ultralytics / yolov5

YOLOv5 🚀 in PyTorch > ONNX > CoreML > TFLite
https://docs.ultralytics.com
GNU Affero General Public License v3.0
50.9k stars 16.39k forks source link

How to Covert CSV Annotation to YOLO Format #7586

Closed abuelgasimsaadeldin closed 2 years ago

abuelgasimsaadeldin commented 2 years ago

Search before asking

Question

Hi everyone,

My apologies as this question may not directly be related to this yolov5 repo, but I've tried searching all over the internet and could not find this answer. I've recently downloaded the "MIO-TCD Localization" Traffic dataset from the official website (https://tcd.miovision.com/challenge/dataset.html) and found the ground truth annotations in the form of a csv file with the following columns as attached below. I would like to convert this to a YOLO txt format so that I can train my yolov5 model but have not been very successful in doing so. Hence, I would highly appreciate anyone's help. Thanks.

gt_train content

best regards, Abu

Additional

No response

MartinPedersenpp commented 2 years ago

I made this to convert SKU110K to Yolo format, it might need some alteration to work on your dataset, but feel free to used it `

import os
import csv
import cv2
def convert_sku_to_yolo():
annotation_file = open("PATH_TO\\annotations_val.csv")
annotation_file = csv.reader(annotation_file, delimiter=" ")
image_paths = os.listdir("PATH_TO\\images")

prev_img_path = ""
counter = 0
for annotation in annotation_file:
    if counter % 12084 == 0:
        print(counter)
    counter += 1
    annotation = annotation[0].split(",")
    img_path = "PATH_TO\\images\\" + annotation[0]
    resize_factor = 640 / max(int(annotation[6]), int(annotation[7]))
    if img_path != prev_img_path:
        img = cv2.imread(img_path)
        img = cv2.resize(img, (int(img.shape[1] * resize_factor), int(img.shape[0] * resize_factor)))
        cv2.imwrite(img_path, img)
        prev_img_path = img_path
    bbox = f"{(int(annotation[1]) * resize_factor) / (int(annotation[6]) * resize_factor)} {(int(annotation[2]) * resize_factor) / (int(annotation[7]) * resize_factor)} {(int(annotation[3]) * resize_factor) / (int(annotation[6]) * resize_factor)} {(int(annotation[4]) * resize_factor) / (int(annotation[7]) * resize_factor)}"
    x1 = (int(annotation[1]) * resize_factor)
    y1 = (int(annotation[2]) * resize_factor)
    x2 = (int(annotation[3]) * resize_factor)
    y2 = (int(annotation[4]) * resize_factor)
    width = (int(annotation[6]) * resize_factor)
    height = (int(annotation[7]) * resize_factor)
    bbox = f"{((x1 + x2) / 2) / width} {((y1 + y2) / 2) / height} {(x2 - x1) / width} {(y2 - y1) / height}"
    label_path = img_path.replace("images", "labelsval").replace("jpg", "txt")
    with open(label_path, "a") as file:
        file.write("1 " + bbox + "\n")
def check_sku_imgs():
image_paths = os.listdir("PATH_TO\\images")
for img in image_paths:
    if img.find("train") != -1:
        image = cv2.imread("PATH_TO\\images\\" + img)
        if image.shape[1] > 640:
            print(img)
convert_sku_to_yolo()`
glenn-jocher commented 2 years ago

@abuelgasimsaadeldin 👋 Hello! Thanks for asking about YOLOv5 🚀 dataset formatting. To train correctly your data must be in YOLOv5 format. Please see our Train Custom Data tutorial for full documentation on dataset setup and all steps required to start training your first model. A few excerpts from the tutorial:

1.1 Create dataset.yaml

COCO128 is an example small tutorial dataset composed of the first 128 images in COCO train2017. These same 128 images are used for both training and validation to verify our training pipeline is capable of overfitting. data/coco128.yaml, shown below, is the dataset config file that defines 1) the dataset root directory path and relative paths to train / val / test image directories (or *.txt files with image paths), 2) the number of classes nc and 3) a list of class names:

# Train/val/test sets as 1) dir: path/to/imgs, 2) file: path/to/imgs.txt, or 3) list: [path/to/imgs1, path/to/imgs2, ..]
path: ../datasets/coco128  # dataset root dir
train: images/train2017  # train images (relative to 'path') 128 images
val: images/train2017  # val images (relative to 'path') 128 images
test:  # test images (optional)

# Classes
nc: 80  # number of classes
names: [ 'person', 'bicycle', 'car', 'motorcycle', 'airplane', 'bus', 'train', 'truck', 'boat', 'traffic light',
         'fire hydrant', 'stop sign', 'parking meter', 'bench', 'bird', 'cat', 'dog', 'horse', 'sheep', 'cow',
         'elephant', 'bear', 'zebra', 'giraffe', 'backpack', 'umbrella', 'handbag', 'tie', 'suitcase', 'frisbee',
         'skis', 'snowboard', 'sports ball', 'kite', 'baseball bat', 'baseball glove', 'skateboard', 'surfboard',
         'tennis racket', 'bottle', 'wine glass', 'cup', 'fork', 'knife', 'spoon', 'bowl', 'banana', 'apple',
         'sandwich', 'orange', 'broccoli', 'carrot', 'hot dog', 'pizza', 'donut', 'cake', 'chair', 'couch',
         'potted plant', 'bed', 'dining table', 'toilet', 'tv', 'laptop', 'mouse', 'remote', 'keyboard', 'cell phone',
         'microwave', 'oven', 'toaster', 'sink', 'refrigerator', 'book', 'clock', 'vase', 'scissors', 'teddy bear',
         'hair drier', 'toothbrush' ]  # class names

1.2 Create Labels

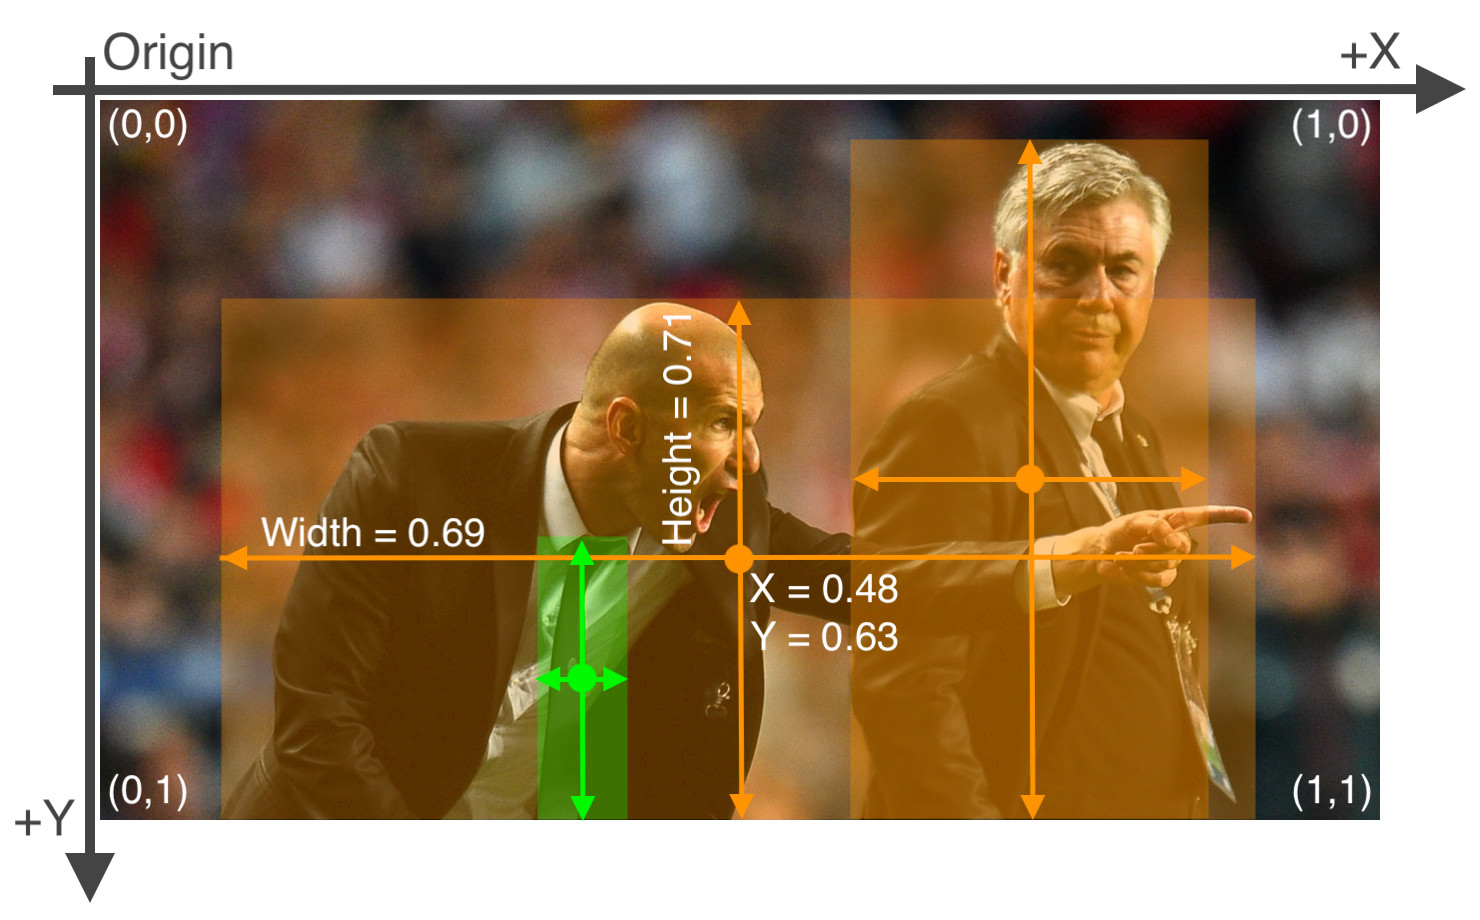
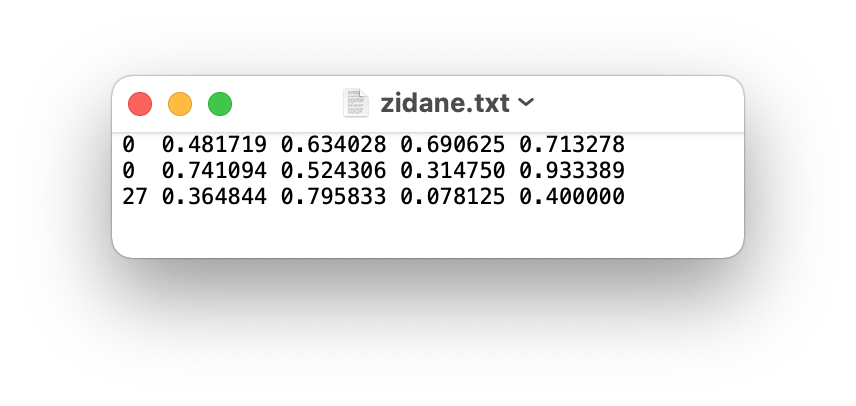
After using a tool like Roboflow Annotate to label your images, export your labels to YOLO format, with one *.txt file per image (if no objects in image, no *.txt file is required). The *.txt file specifications are:

Image Labels

The label file corresponding to the above image contains 2 persons (class 0) and a tie (class 27):

1.3 Organize Directories

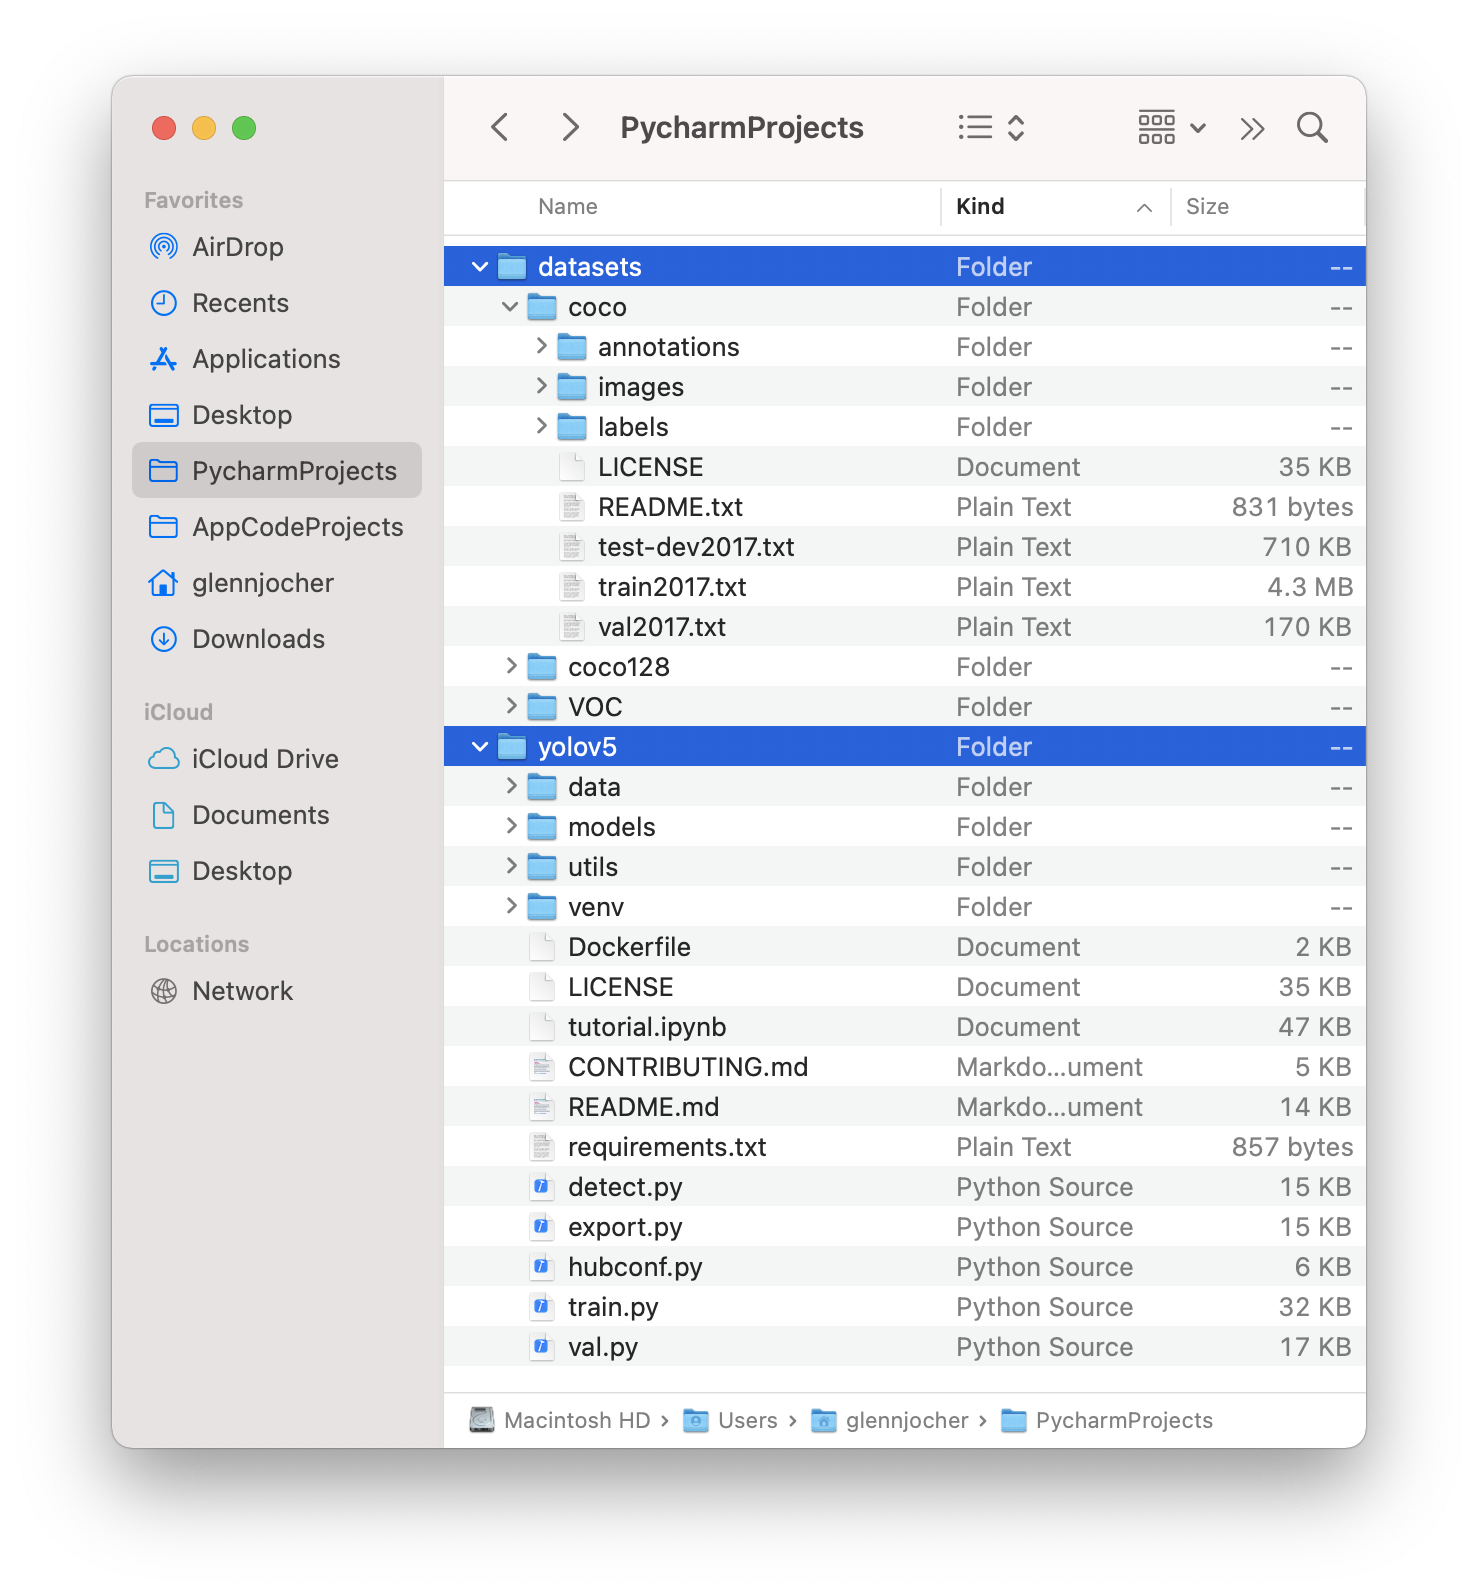
Organize your train and val images and labels according to the example below. YOLOv5 assumes /coco128 is inside a /datasets directory next to the /yolov5 directory. YOLOv5 locates labels automatically for each image by replacing the last instance of /images/ in each image path with /labels/. For example:

../datasets/coco128/images/im0.jpg  # image
../datasets/coco128/labels/im0.txt  # label

Good luck 🍀 and let us know if you have any other questions!

github-actions[bot] commented 2 years ago

👋 Hello, this issue has been automatically marked as stale because it has not had recent activity. Please note it will be closed if no further activity occurs.

Access additional YOLOv5 🚀 resources:

Access additional Ultralytics ⚡ resources:

Feel free to inform us of any other issues you discover or feature requests that come to mind in the future. Pull Requests (PRs) are also always welcomed!

Thank you for your contributions to YOLOv5 🚀 and Vision AI ⭐!

Aziime commented 2 years ago

prev_img_path = "" counter = 0 for annotation in annotation_file: if counter % 12084 == 0: print(counter) counter += 1 annotation = annotation[0].split(",") img_path = "PATH_TO\images\" + annotation[0] resize_factor = 640 / max(int(annotation[6]), int(annotation[7])) if img_path != prev_img_path: img = cv2.imread(img_path) img = cv2.resize(img, (int(img.shape[1] resize_factor), int(img.shape[0] resize_factor))) cv2.imwrite(img_path, img) prev_img_path = img_path bbox = f"{(int(annotation[1]) resize_factor) / (int(annotation[6]) resize_factor)} {(int(annotation[2]) resize_factor) / (int(annotation[7]) resize_factor)} {(int(annotation[3]) resize_factor) / (int(annotation[6]) resize_factor)} {(int(annotation[4]) resize_factor) / (int(annotation[7]) resize_factor)}" x1 = (int(annotation[1]) resize_factor) y1 = (int(annotation[2]) resize_factor) x2 = (int(annotation[3]) resize_factor) y2 = (int(annotation[4]) resize_factor) width = (int(annotation[6]) resize_factor) height = (int(annotation[7]) resize_factor) bbox = f"{((x1 + x2) / 2) / width} {((y1 + y2) / 2) / height} {(x2 - x1) / width} {(y2 - y1) / height}" label_path = img_path.replace("images", "labelsval").replace("jpg", "txt") with open(label_path, "a") as file: file.write("1 " + bbox + "\n") def check_sku_imgs(): image_paths = os.listdir("PATH_TO\images") for img in image_paths: if img.find("train") != -1: image = cv2.imread("PATH_TO\images\" + img) if image.shape[1] > 640: print(img) convert_sku_to_yolo()`
thk

supratim1121992 commented 2 years ago

I used the following code in my case where the tabular annotation data (df_antt) had image_name,x_min,y_min,x_max,y_max and class_id as the column names respectively. The images (JPG) were saved in a folder named images and the annotations were written out to an annotations folder in the current working directory.


  ls_bbox = df_antt.loc[df_antt.image_name == img].drop("image_name",axis = 1).apply(lambda x: x.to_dict(),axis = 1).to_list()
  img_dim = Image.open(os.path.join("images",img)).size
  ls_out = []

  for bbox in ls_bbox:
    bbox_x = (bbox["x_min"] + bbox["x_max"]) / (2 * img_dim[0])
    bbox_y = (bbox["y_min"] + bbox["y_max"]) / (2 * img_dim[1])
    bbox_w = (bbox["x_max"] - bbox["x_min"]) / img_dim[0]
    bbox_h = (bbox["y_max"] - bbox["y_min"]) / img_dim[1]
    class_id = bbox["class_id"]
    ls_out.append("{} {:.3f} {:.3f} {:.3f} {:.3f}".format(class_id,bbox_x,bbox_y,bbox_w,bbox_h))

  fl_nm = os.path.join("annotations",img.replace("JPG","txt"))
  print("\n".join(ls_out),file = open(fl_nm,"w"))```
simrantaneja commented 1 year ago

I used the following code in my case where the tabular annotation data (df_antt) had image_name,x_min,y_min,x_max,y_max and class_id as the column names respectively. The images (JPG) were saved in a folder named images and the annotations were written out to an annotations folder in the current working directory.

  ls_bbox = df_antt.loc[df_antt.image_name == img].drop("image_name",axis = 1).apply(lambda x: x.to_dict(),axis = 1).to_list()
  img_dim = Image.open(os.path.join("images",img)).size
  ls_out = []

  for bbox in ls_bbox:
    bbox_x = (bbox["x_min"] + bbox["x_max"]) / (2 * img_dim[0])
    bbox_y = (bbox["y_min"] + bbox["y_max"]) / (2 * img_dim[1])
    bbox_w = (bbox["x_max"] - bbox["x_min"]) / img_dim[0]
    bbox_h = (bbox["y_max"] - bbox["y_min"]) / img_dim[1]
    class_id = bbox["class_id"]
    ls_out.append("{} {:.3f} {:.3f} {:.3f} {:.3f}".format(class_id,bbox_x,bbox_y,bbox_w,bbox_h))

  fl_nm = os.path.join("annotations",img.replace("JPG","txt"))
  print("\n".join(ls_out),file = open(fl_nm,"w"))```

How to integrate your code with CSV file to covert it to yolo format ?

supratim1121992 commented 1 year ago

You can simply read in your csv file to a pandas dataframe that has a similar structure to the one I described in my comment.

glenn-jocher commented 1 year ago

@supratim1121992 you can integrate the code with a CSV file by reading the CSV into a pandas dataframe and using it to populate the bounding box information for each image. The code you provided iterates through each image, calculates normalized bounding box coordinates, and writes the results to a YOLO format text file in the annotations folder. You can adapt the logic to fit your specific CSV structure and file paths. Let me know if you need further assistance with this integration.