DOT语言学习笔记
介绍
之前上网瞎逛的时候,发现的一个挺好的自动布局绘图工具Graphviz。倒腾了一番,写下一些笔记,方便以后复习。
Graphviz全称Graph Visualization Software,最早出自AT&T实验室,是基于DOT语言脚本的自动绘图软件。是开源且免费的软件。
优点
相对于ms viso需要手动拖动图标,graphviz只需要通过DOT代码表达各节点的逻辑关系,然后自动布局和输出关系图。最小化复杂关系的连线交叉,增强可读性。
尤其在绘制非常复杂的逻辑关系、组织架构、模块组成、数据结构等图时,可以大大减少工作量,理清思路。
缺点
无法绘制需要自定义或者固定布局的图,比如时序图。
安装
官网提供安装包和源码包两种安装方式。安装完成后,最好是将graphviz安装目录下的bin目录设置到环境变量中,以便于随处使用dot命令行。
# windows 设置环境变量
SETX /M PATH "%PATH%;E:\your\graphviz\path\bin"
# 安装和设置完成后,可打开dot命令行帮助提示,验证成功安装
dot -h
应用
扩展名
Graphviz支持两种文件扩展名:
*.gv和*.dot,使用*.gv是为了防止与早期的ms word的扩展名冲突。 后文中的DOT文件即表示输入graphviz处理的文件。输出格式
Graphviz支持的输出文件格式:
- 图片格式:bmp、png、gif、ico、jpg、jpeg、svg
- 文档格式:pdf、ps
编辑
DOT文件可以用任何文本编辑器编辑。但是graphviz自带一个及时输出图像的软件gvedit,软件打开DOT文件,然后按F5及时得到输出图像。这种“所见即所得”的编辑体验非常棒。 在命令行中输入
gvedit可打开这个编辑器。当然,有些Unix/Linux上可以使用的编辑器也支持graphviz及时编辑与输出,比如Emacs的graphviz dot mode和VI/VIM插件
布局器
Graphviz除了DOT语言用于描述图像,还有许多渲染生成工具 —— 布局器:
- dot,默认布局,主要用于有向图
- neato,用于“spring model”布局(Mac OS的版本称为“energy minimised”)
- circo,圆环布局
- twopi,径向布局
- fdp,用于无向图
- sfdp,用于需要放大到很大尺寸的无向图
- osage,紧凑集群布局
命令行
dot -Tv -Kv -O abc.gv这里的
-Tv中的v可用graphviz支持的输出格式代替,如:-Tpng、-Tjpg等等。 而-Kv中的v可用布局器代替,如:-Kfdp、-Kcirco等等。dot是默认布局器,因此可以省略-Kv这部分参数。-O表示自动根据输入文件名来给输出文件命名。abc.gv即使输入的DOT文件可以通过
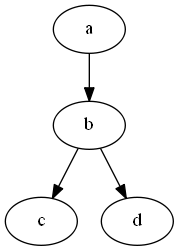
dot -h或dot -?来获得命令行帮助第一个graphviz图
digraph abc {
    a -> b;
    b -> c;
    b -> d;
}
保存为
abc.gvdot -Tpng -O abc.gv利用命令行以dot布局器(默认),输出同名的png格式图像
abc.gv.png
三个示例快速入门
节点示例
digraph node_intro {
    graph [label="节点示例 ", fontname="Microsoft Yahei"];
    node [fontname="Microsoft Yahei"];

    shape1 [shape=box, label="矩形 "];
    shape2 [shape=circle, label="圆形 "];
    shape3 [shape=ellipse, label="椭圆 "];
    shape4 [shape=polygon, sides=4, skew=0.4, label="平行四边形 "];
    shape5 [shape=diamond, label="菱形 "];
    shape6 [shape=record, label="{记录1|记录2|记录3}"];
    shape7 [shape=none, label="无边框 "];
    shape1:s -> shape2 -> shape3 -> shape4 -> shape5 -> shape6 -> shape7;

    color1 [color=blue, label="蓝色边框 "];
    color2 [style=filled, fillcolor=green, label="绿色填充 "];
    color3 [color="#0000ff", style=filled, fillcolor="green:red", label="蓝色边框\n+\n由绿到红渐变色填充 "];
    color1 -> color2 -> color3;

    text1 [shape=box, fontsize=12, label="小字体 "];
    text2 [shape=box, fontsize=24, label="大字体 "];
    text3 [shape=box, fontcolor=blue, label="蓝色字体 "];
    text4 [shape=box, label=<
        <table bgcolor="#aa99ff" align="center">
            <tr>
                <td colspan="3" width="20"><font point-size="24">类HTML标签 </font></td>
            </tr>
            <tr>
                <td color="red"><b>加粗 </b></td>
                <td color="green"><u>下划线 </u></td>
                <td color="blue"><i>斜体 </i></td>
            </tr>
        </table>
    >];
    text1 -> text2 -> text3 -> text4;
}
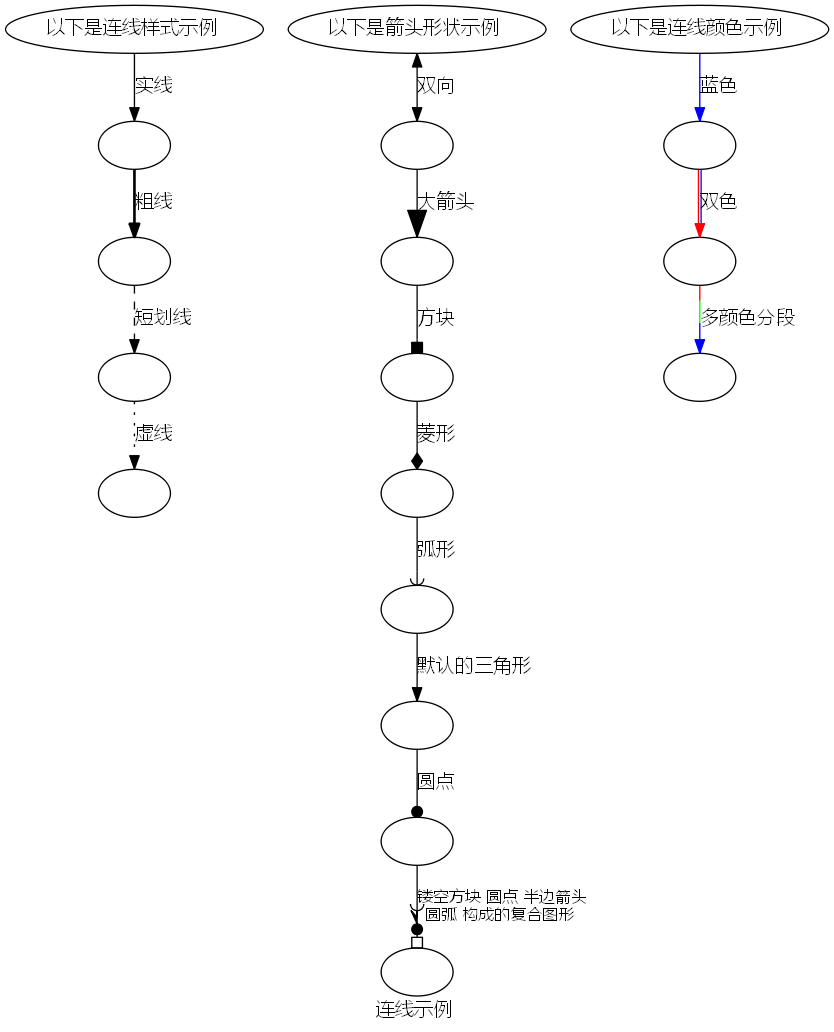
连线示例
digraph edge_intro {
    graph [label="连线示例 ", fontname="Microsoft Yahei"];
    edge [fontname="Microsoft Yahei"];
    node [fontname="Microsoft Yahei"];

    style0 [label="以下是连线样式示例 "];
    style1, style2, style3, style4 [label=""];

    style0 -> style1 [style=solid, label="实线 "];
    style1 -> style2 [style=bold, label="粗线 "];
    style2 -> style3 [style=dashed, label="短划线 "];
    style3 -> style4 [style=dotted, label="虚线 "];

    arrow0 [label="以下是箭头形状示例 "];
    arrow1, arrow2, arrow3, arrow4, arrow5, arrow6, arrow7, arrow8 [label=""];

    arrow0 -> arrow1 [dir=both, label="双向 "];
    arrow1 -> arrow2 [arrowsize=2, label="大箭头 "];
    arrow2 -> arrow3 [arrowhead=box, label="方块 "];
    arrow3 -> arrow4 [arrowhead=diamond, label="菱形 "];
    arrow4 -> arrow5 [arrowhead=curve, label="弧形 "];
    arrow5 -> arrow6 [arrowhead=normal, label="默认的三角形 "];
    arrow6 -> arrow7 [arrowhead=dot, label="圆点 "];
    arrow7 -> arrow8 [arrowhead=oboxdotrveecurve, label="镂空方块 圆点 半边箭头\n圆弧 构成的复合图形 ", fontsize=12];

    color0 [label="以下是连线颜色示例 "];
    color1, color2, color3 [label=""];

    color0 -> color1 [color=blue, label="蓝色 "];
    color1 -> color2 [color="red:blue", label="双色 "];
    color2 -> color3 [color="red:green;0.4:blue", label="多颜色分段 "];
}
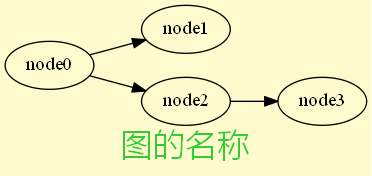
图示例
digraph graph_intro {
    graph [bgcolor=lemonchiffon, fontsize=24, fontcolor=limegreen, rankdir=LR, fontname="Microsoft Yahei", label="图的名称"];

    node0 -> {node1, node2};
    node2 -> node3;
}
【注意】后文中的示例大多需要通过命令行DOT或者gvedit输出图像,不再外加说明。
DOT语法
基础
DOT只有图graph、节点node和连线edge三个主要结构。
graph、node和edge三个关键字还能用于全局属性定义,后面细讲。图分为有向图和无向图。无向图声明的时候使用关键字
graph,有向图使用digraph。关键字
node:定义全局节点属性时使用edge:定义全局连线属性时使用graph:定义全局图属性,或声明一个无向图时使用digraph:声明一个有向图时使用subgraph:声明一个子图时使用,如果父图是有向图则子图是有向图,如果父图是无向图则子图也是无向图strict:用于防止相同的两个节点间使用重复的连线。ID有效字符
ID是编辑者自定义的字符串,相当于C语言中的标识符。
命名规则
- 英文字母
[a-zA-Z\200-\377],下划线_,数字[0-9](但不能数字开头),如:Version_3;- 纯数字
[-]?(.[0-9]+|[0-9]+(.[0-9]*)?),如:-.1或1.414;- 双引号包裹的字符串
"...",字符串中的双引号需要转义\",如:"DOT language";- 尖括号包裹的HTML字符串
<...>,如:<<b>Welcome</b> <u>to</u> <i>China.</i>>;实际上甚至可以插入表格。HTML-Like Labels使用
ID主要是作为图和节点的命名字符串
graph ID{
    label="A empty graph";
}
简单的DOT代码中的图名ID可以省略,这就有了匿名图
graph {
    a_node [label="this is a anonymous graph"]
}
作为子图的图的ID一定要以
cluster开头命名,否则graphviz不识别。因为父图的图ID和子图的图ID,共享相同命名空间,父图和子图、子图与子图间的图的ID命名一定要不同。
digraph abcd{
    subgraph cluster_ab{
        bgcolor=mintcream;
        a b;
    }
    subgraph cluster_cd{
        bgcolor=chartreuse;
        c d;
    }
    a -> b;
    b -> c -> d;
}
【注意】如果ID中间包含空格一定要用双引号包裹。
注释
DOT支持类似C++的注释,单行注释
//,多行或部分注释/*和*/。字符串
分隔符
分号
;和逗号,都不是必须的,可以用空格替代。竖杠
|在节点的属性shape=record时,作为划分分组内部的分隔符。后面有举例字符串处理
长字符串换行,类似C语言,如:
graph {
greeting [label="hello \
everyone, \
welcom \
to China.
"];
}
DOT还支持拼接操作符
+,如:graph { "hello "+"world, "+"welcome"; }【注意】这里描述的字符串都是指以双引号
"包裹的转义与实体符号
字符串中的字符,只有双引号
\"和反斜杠\\需要转义。字符串支持还HTML式的实体符号,如:
&表示&,<表示<,β表示β。当节点的属性
shape=record时,竖杠\|、花括号\{\}、方括号\[\]和尖括号\<\>都需要转义。分组符号
前面介绍了两种包裹字符串的符号,双引号
"..."和<...>; 另外还有两种包裹分组的符号:方括号[...]和花括号{...}。方括号
用于属性定义,给图、节点和连线添加各种样式。如:
digraph {
    graph [label="graph with styles", bgcolor=mintcream, fontsize=24, fontcolor=green];
    a [color=blue, fontsize=12, style=filled, fillcolor=yellow];
}
花括号
用法1,图的声明,,包括有向、无向图以及子图的声明
graph {
    a -- b -- c;
}
用法2,某个节点连接到多个节点时的简写方式
digraph {
    a -> {b c d};
}
用法3,只有在节点的属性
shape=record时,包裹节点内部的分组digraph { node [shape=record]; group1 [label="{a|b|c}"]; group2 [label="{x|{α|β|γ|{L|M|N}}|y|z}"]; }结构声明
图
一个图的声明,需关键字
graphv或digraphv和{...}两部分digraph { // 这里添加节点声明、连线声明以及图、节点和连线的属性设置 }另外,在关键字
graph或digraph前面可以添加一个空格隔开的关键字strict用来防止两节点间重复连线strict graph { a -- b; a -- b [label="repetitive edge", style=bold]; b -- c; a -- b [color=red, style=dashed]; }节点
节点可以不声明直接在连线声明时使用。 一般提前声明节点的情况有两种:
- 给节点定义属性
graph { a, b [color=red]; a -- b; }- 节点被分组到子图中
graph {
    subgraph cluster {
        a, b;
    }
    a -- b;
}
连线
连线的声明需要连接两个节点。
对于有向图,连线使用
->;无向图,连线使用--。digraph { a -> b; } graph { c -- d; }两种连线都可以简写
digraph {
    a -> b -> c -> d;
}
等价于
digraph {
    a -> b;
    b -> c;
    c -> d;
}
属性
属性定义可以给节点、连线和图渲染上不同的样式,使得最终得到的关系图更加美观,提升可读性。 属性均是以名值对
attr=val的方式出现。属性值val,可用双引号或尖括号包裹,但是可选的;不过,如果属性值中间包含DOT无法直接解析的字符,就必须用双引号或尖括号包裹,甚至转义。全局属性
图
直接定义
graph {
    label="A graph directly \ndefined attributes";
    bgcolor=skyblue;
    fontname="Microsoft Yahei";
    fontsize=24;
    rankdir=LR;

    a -- b -- c -- a;
}
使用关键字
graphgraph { graph [label="an undirected graph"]; a -- b -- c -- a; }节点 使用关键字
nodedigraph { graph [label=<<b>styled</b> graph> fontname=Vardana fontsize=20]; node [shape=doublecircle, style=filled, fillcolor=orange]; a -> {b d}; b -> c; }- 连线 使用关键字
edgedigraph { edge [style=bold, color=blue:red]; a -> {b d}; b -> c; }局部属性
局部设置属性,除了可以对一个一个的节点或者连线设置,也可以同时对多个节点或者多个连线进行设置
- 节点
graph { a, b [shape=Mdiamond]; c [shape=doublecircle]; a -- c -- b; }- 连线
digraph {
    a -> {b d} [arrowhead=olnormalol];
    b -> c [style=dashed, color=red, arrowhead=obox];
}
常用属性
label
可用于节点、连线和图的名称设置,如:
graph {
    graph [label=G];
    edge [label=E];
    node [label=N];

    a -- b -- {c, d};
    e[color=red];
}
属性值的形式:
"val"、<val>和val。shape
用于节点的形状修改,如:
graph {
    a [shape=doublecircle];
    b [shape=polygon, skew=0.6];
    c [shape=diamond];
    a -- {b, c};
}
常用属性值:
box矩形、circle圆形、polygon多边形、ellipse默认的椭圆、record记录式、diamond菱形等等。 其中shape=polygon结合倾斜度属性skew=0.4可以将节点设置成平行四边形;shape=record可以将节点设置成记录表的样式。style
用于节点样式和连线样式设置,如:
graph {
    node [style=filled];
    a [fillcolor="green:red"];
    b, c [fillcolor=skyblue];

    a -- b [style=dashed];
    a -- c [style=dotted];
}
常用属性值:
- 节点:
filled填充节点背景色,需要结合填充色属性fillcolor;- 连线:
solid默认的实线、bold粗线、dashed短划线、dotted虚线。color
设置节点边框线颜色和连线颜色,如:
graph {
    a, b [color=blue];
    c [color=red];

    a -- b [color=green];
    a -- c [color=yellow];
}
颜色值有3种形式:
- 颜色名,如:
redgreenblueyelloworangenavywhiteblack等等- 6位16进制颜色值,如:
"#ff0000"等同于red,注意因为DOT不直接识别#,一定要用双引号或尖括号包裹- 渐变色只适用于连线,有两种形式:
"red:blue"和"red:green;0.4:blue",同样因为不直接识别:,需要包裹成字符串bgcolor
用于填充图的背景色,如:
graph {
    bgcolor=yellow;
    subgraph cluster {
        bgcolor="green:red";
        a b;
    }
    a -- b -- c;
}
属性值类似
color,但是渐变色只支持2种色构成的渐变。fillcolor
用于填充节点的背景色,用法同
bgcolorfontname
可设置节点、连线和图的ID的字体,相当于CSS中的
font-family。【注意】使用中文时,
fontname一定要设置系统支持的中文字体,否则graphviz输出图片的中文会乱码。而且,图的名称、连线的名称以及节点的名称只要使用了中文就都应该设置fontname属性,比如:fontname="Microsoft Yahei"。另外,最好是在中文字符后留有一个空格,防止乱码后,英文字符也被修改。fontsize
设置节点、连线和图的字体大小,属性值可以是纯数字或者是数字字符串
fontcolor
设置字体的颜色,用法类似
color,但是不支持渐变色rankdir
设置图的绘制方向,如:
digraph {
    rankdir=LR;
    subgraph cluster {
        b, c;
    }
    a -> b -> c;
    a -> d;
}
属性值: 默认由上至下
TB、由下至上BT、由左至右LR和由右至左RLdir
设置连线的箭头方向,如:
digraph {
    rankdir=LR;
    client [shape=tab];
    server [shape=box3d];

    client:e -> server:w [dir=both, style=bold, color="blue:green", arrowhead=r, arrowtail=r];
}
属性值:向前
forward(有向图默认)、向后back、双向both以及无none(无向图默认)arrowhead
设置无向图或有向图的连线头部箭头形状,如:
digraph {
    a -> b [arrowhead=curve]
}
属性值:箭头形状有很多变种,而且可以同时设置多个形状,基本组合是[是否镂空][左右边][基础形状]。字母
o决定箭头形状是否镂空open,l和r分别表示只出现左边left和右边right,基础形状有box、crow、curve、icurve、diamond、dot、inv、none、normal、tee以及vee。graph { a -- b [dir=both, arrowtail=curve, arrowhead=teeoldiamond]; }解读
teeoldiamond:第一个形状tee紧跟着第二个形状是镂空的o取左边的l钻石形状diamond。arrowtail
设置无向图或有向图的连线尾部箭头形状,与
arrowhead用法相同arrowsize
设置连线箭头大小
digraph { a -> b [arrowsize=2]; }端口
节点上的端口,类似于指针。在节点上确定端口以后,再连接两个节点时可以找到节点上准确的位置。
罗盘端口
罗盘也就是确定八个方位,罗盘端口就是方位端口。
方位端口是每个节点隐藏自带的,可以直接使用。
每个节点都有八个方位:北
n、东北ne、东e、东南se、南s、西南sw、西w和西北nw。利用方位可以指定连线从哪个位置连接节点,如:
digraph {
    node [shape=box];
    subgraph cluster {
        c, d;
    }
    a:e -> b:n;
    a:nw -> c:n;
    c:w -> d:sw;
    b:sw -> d;
}
不同于默认情况下的自动连线,利用方位可以手动指定连线的位置。
命名端口
命名端口需要在节点中手动设置端口,并且位置命名。
一般在节点的属性
shape=record时,对于节点内分组中的单元进行端口设置。digraph { rankdir=LR; fontsize=12; node [shape=record]; struct1 [label="{<head>* int|float|<next>* int}"]; struct2 [label="{<prev>int|* char|<next>* int}"]; struct3 [label="{<prev>int|* char|* int}"]; struct1:next -> struct2:prev; struct2:next -> struct3:prev; struct1:head:s -> int; }
struct1:next中的next和struct2:prev中的prev都是命名端口,通过这两个端口可以将节点struct1的* int单元与节点struct2的int单元连接起来。而struct1:head:s则即使用了命名端口head,又使用了罗盘端口s。以上可以看出,命名端口的设置出现在节点声明时,使用尖括号
<...>包裹,命名端口和罗盘端口都是在节点ID后面加冒号:来引用。属性叠层
继承
主要是指子图会从父图继承图、连线和节点的所有属性定义
digraph abc{
    graph [bgcolor=pink];
    edge [color=blue];
    node [shape=hexagon];

    a -> b;

    subgraph cluster {
        c -> d;
    }

    b -> c;
}
覆盖
DOT中的属性可以多次定义,后面定义的会覆盖前面定义的。 但是要注意如果一个声明在两个属性定义之间,声明的节点或者连线只会获得前一个属性定义。
digraph {
    node [shape=doublecircle, fontcolor=blue];
    edge [style=bold, color=blue];

    a b e;

    a -> b;

    node [shape=box3d];
    edge [style=dotted, color=red];

    a -> c ->d;
    c -> e;
}
节点
a、b和e获得了属性shape=doublecircle,而节点c和d的属性被覆盖为了shape=box3d,但是五个节点有相同的属性fontcolor=blue。可见shape属性被覆盖了。同理,连线a -> c -> d的属性style=bold也被style=dotted覆盖,而a -> b却没有变。当然图的属性定义也能覆盖,不过是父图与子图之间
digraph abc{
    graph [bgcolor=pink];
    edge [color=blue];
    node [shape=box];

    subgraph cluster1 {
        graph [bgcolor=chartreuse];
        edge [color=red];
        node [shape=hexagon];
        a -> b;
    }

    subgraph cluster2 {
        c -> d;
    }

    b -> c;
}
对比
cluster1和cluster2两个子图,前者把父图abc定义的图、连线和节点的属性全部覆盖了;而后者是继承自父图。另外,匿名子图还能够在视觉上不出现子图效果的情况下,覆盖父图定义的属性
digraph {
    graph [bgcolor=pink];
    edge [color=blue];
    node [shape=triangle];

    a;

    subgraph {
        node [shape=tripleoctagon];
        b;
    }

    c;

    node [shape=doublecircle];

    d;

    a -> b -> {c d};
}
很明显,这里的节点
b的shape属性被修改为了tripleoctagon,而节点c却没有被修改。总结
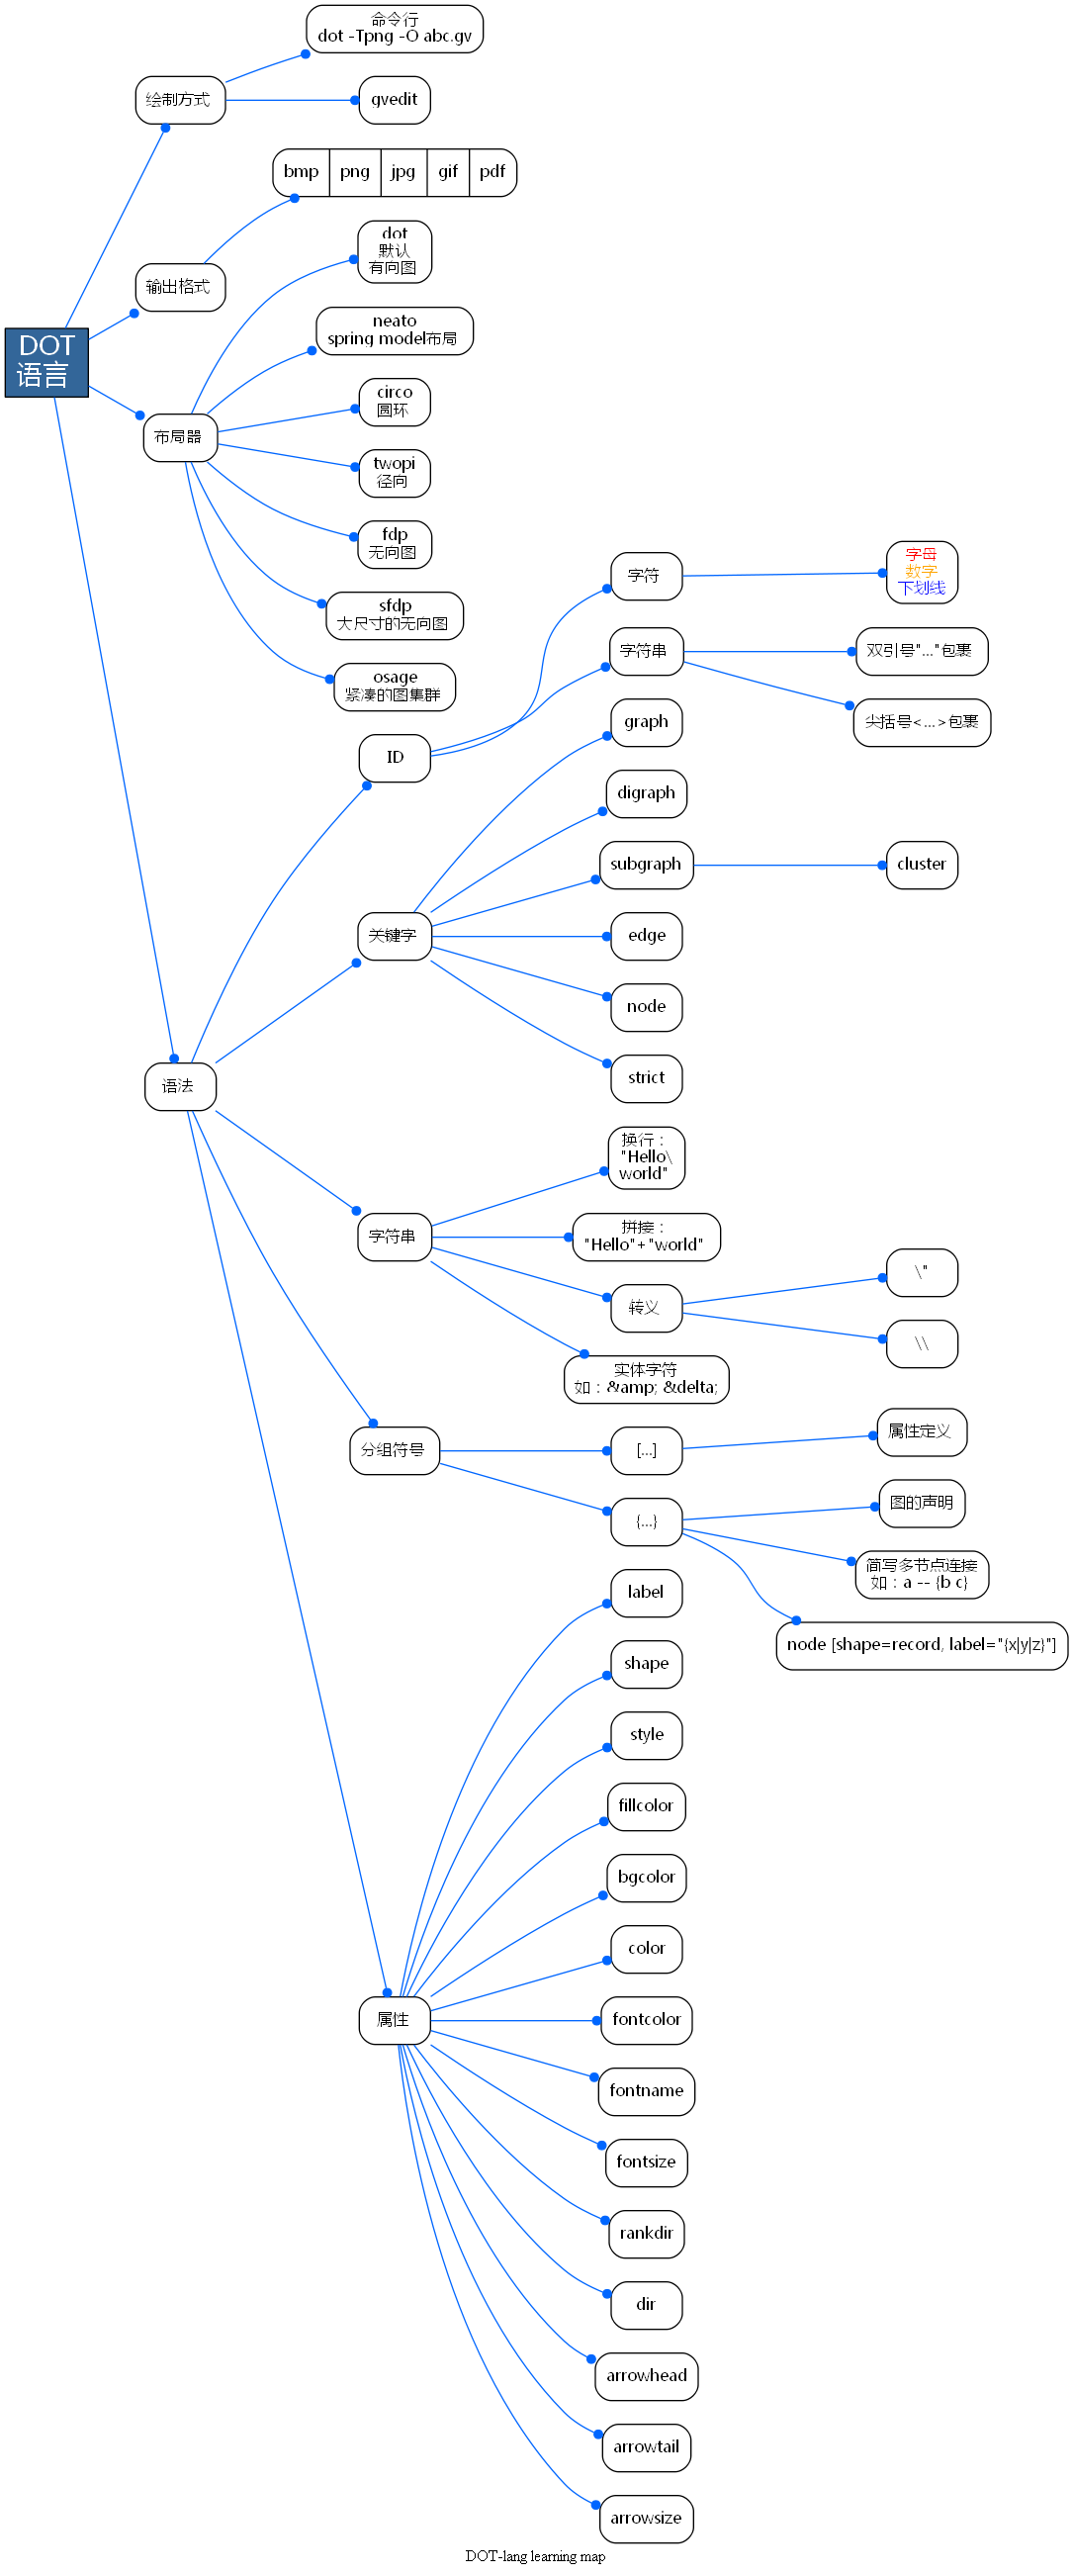
现学现卖,用Graphviz做个思维导图
参考资料


DOT语言学习笔记
介绍
之前上网瞎逛的时候,发现的一个挺好的自动布局绘图工具Graphviz。倒腾了一番,写下一些笔记,方便以后复习。
Graphviz全称Graph Visualization Software,最早出自AT&T实验室,是基于DOT语言脚本的自动绘图软件。是开源且免费的软件。
优点
相对于ms viso需要手动拖动图标,graphviz只需要通过DOT代码表达各节点的逻辑关系,然后自动布局和输出关系图。最小化复杂关系的连线交叉,增强可读性。
尤其在绘制非常复杂的逻辑关系、组织架构、模块组成、数据结构等图时,可以大大减少工作量,理清思路。
缺点
无法绘制需要自定义或者固定布局的图,比如时序图。
安装
Graphviz Download
官网提供安装包和源码包两种安装方式。安装完成后,最好是将graphviz安装目录下的bin目录设置到环境变量中,以便于随处使用dot命令行。
应用
扩展名
Graphviz支持两种文件扩展名:
*.gv和*.dot,使用*.gv是为了防止与早期的ms word的扩展名冲突。 后文中的DOT文件即表示输入graphviz处理的文件。输出格式
Graphviz支持的输出文件格式:
更多格式
编辑
DOT文件可以用任何文本编辑器编辑。但是graphviz自带一个及时输出图像的软件gvedit,软件打开DOT文件,然后按F5及时得到输出图像。这种“所见即所得”的编辑体验非常棒。 在命令行中输入
gvedit可打开这个编辑器。当然,有些Unix/Linux上可以使用的编辑器也支持graphviz及时编辑与输出,比如Emacs的graphviz dot mode和VI/VIM插件
布局器
Graphviz除了DOT语言用于描述图像,还有许多渲染生成工具 —— 布局器:
命令行
这里的
-Tv中的v可用graphviz支持的输出格式代替,如:-Tpng、-Tjpg等等。 而-Kv中的v可用布局器代替,如:-Kfdp、-Kcirco等等。dot是默认布局器,因此可以省略-Kv这部分参数。-O表示自动根据输入文件名来给输出文件命名。abc.gv即使输入的DOT文件可以通过
dot -h或dot -?来获得命令行帮助更多命令行
第一个graphviz图
保存为
abc.gv利用命令行以dot布局器(默认),输出同名的png格式图像
abc.gv.png三个示例快速入门
节点示例
连线示例
图示例
更多示例
【注意】后文中的示例大多需要通过命令行DOT或者gvedit输出图像,不再外加说明。
DOT语法
基础
DOT只有图graph、节点node和连线edge三个主要结构。
graph、node和edge三个关键字还能用于全局属性定义,后面细讲。图分为有向图和无向图。无向图声明的时候使用关键字
graph,有向图使用digraph。关键字
node:定义全局节点属性时使用edge:定义全局连线属性时使用graph:定义全局图属性,或声明一个无向图时使用digraph:声明一个有向图时使用subgraph:声明一个子图时使用,如果父图是有向图则子图是有向图,如果父图是无向图则子图也是无向图strict:用于防止相同的两个节点间使用重复的连线。ID有效字符
ID是编辑者自定义的字符串,相当于C语言中的标识符。
命名规则
[a-zA-Z\200-\377],下划线_,数字[0-9](但不能数字开头),如:Version_3;[-]?(.[0-9]+|[0-9]+(.[0-9]*)?),如:-.1或1.414;"...",字符串中的双引号需要转义\",如:"DOT language";<...>,如:<<b>Welcome</b> <u>to</u> <i>China.</i>>;实际上甚至可以插入表格。HTML-Like Labels使用
ID主要是作为图和节点的命名字符串
简单的DOT代码中的图名ID可以省略,这就有了匿名图
作为子图的图的ID一定要以
cluster开头命名,否则graphviz不识别。因为父图的图ID和子图的图ID,共享相同命名空间,父图和子图、子图与子图间的图的ID命名一定要不同。
【注意】如果ID中间包含空格一定要用双引号包裹。
注释
DOT支持类似C++的注释,单行注释
//,多行或部分注释/*和*/。字符串
分隔符
分号
;和逗号,都不是必须的,可以用空格替代。竖杠
|在节点的属性shape=record时,作为划分分组内部的分隔符。后面有举例字符串处理
长字符串换行,类似C语言,如:
DOT还支持拼接操作符
+,如:【注意】这里描述的字符串都是指以双引号
"包裹的转义与实体符号
字符串中的字符,只有双引号
\"和反斜杠\\需要转义。字符串支持还HTML式的实体符号,如:
&表示&,<表示<,β表示β。当节点的属性
shape=record时,竖杠\|、花括号\{\}、方括号\[\]和尖括号\<\>都需要转义。分组符号
前面介绍了两种包裹字符串的符号,双引号
"..."和<...>; 另外还有两种包裹分组的符号:方括号[...]和花括号{...}。方括号
用于属性定义,给图、节点和连线添加各种样式。如:
花括号
用法1,图的声明,,包括有向、无向图以及子图的声明
用法2,某个节点连接到多个节点时的简写方式
用法3,只有在节点的属性
shape=record时,包裹节点内部的分组结构声明
图
一个图的声明,需关键字
graphv或digraphv和{...}两部分另外,在关键字
graph或digraph前面可以添加一个空格隔开的关键字strict用来防止两节点间重复连线节点
节点可以不声明直接在连线声明时使用。 一般提前声明节点的情况有两种:
给节点定义属性
节点被分组到子图中
连线
连线的声明需要连接两个节点。
对于有向图,连线使用
->;无向图,连线使用--。两种连线都可以简写
等价于
属性
属性定义可以给节点、连线和图渲染上不同的样式,使得最终得到的关系图更加美观,提升可读性。 属性均是以名值对
attr=val的方式出现。属性值val,可用双引号或尖括号包裹,但是可选的;不过,如果属性值中间包含DOT无法直接解析的字符,就必须用双引号或尖括号包裹,甚至转义。全局属性
图
直接定义
使用关键字
graph节点 使用关键字
node连线 使用关键字
edge局部属性
局部设置属性,除了可以对一个一个的节点或者连线设置,也可以同时对多个节点或者多个连线进行设置
节点
连线
常用属性
label
可用于节点、连线和图的名称设置,如:
属性值的形式:
"val"、<val>和val。shape
用于节点的形状修改,如:
常用属性值:
box矩形、circle圆形、polygon多边形、ellipse默认的椭圆、record记录式、diamond菱形等等。 其中shape=polygon结合倾斜度属性skew=0.4可以将节点设置成平行四边形;shape=record可以将节点设置成记录表的样式。更多形状
style
用于节点样式和连线样式设置,如:
常用属性值:
filled填充节点背景色,需要结合填充色属性fillcolor;solid默认的实线、bold粗线、dashed短划线、dotted虚线。color
设置节点边框线颜色和连线颜色,如:
颜色值有3种形式:
redgreenblueyelloworangenavywhiteblack等等"#ff0000"等同于red,注意因为DOT不直接识别#,一定要用双引号或尖括号包裹"red:blue"和"red:green;0.4:blue",同样因为不直接识别:,需要包裹成字符串bgcolor
用于填充图的背景色,如:
属性值类似
color,但是渐变色只支持2种色构成的渐变。fillcolor
用于填充节点的背景色,用法同
bgcolorfontname
可设置节点、连线和图的ID的字体,相当于CSS中的
font-family。【注意】使用中文时,
fontname一定要设置系统支持的中文字体,否则graphviz输出图片的中文会乱码。而且,图的名称、连线的名称以及节点的名称只要使用了中文就都应该设置fontname属性,比如:fontname="Microsoft Yahei"。另外,最好是在中文字符后留有一个空格,防止乱码后,英文字符也被修改。fontsize
设置节点、连线和图的字体大小,属性值可以是纯数字或者是数字字符串
fontcolor
设置字体的颜色,用法类似
color,但是不支持渐变色rankdir
设置图的绘制方向,如:
属性值: 默认由上至下
TB、由下至上BT、由左至右LR和由右至左RLdir
设置连线的箭头方向,如:
属性值:向前
forward(有向图默认)、向后back、双向both以及无none(无向图默认)arrowhead
设置无向图或有向图的连线头部箭头形状,如:
属性值:箭头形状有很多变种,而且可以同时设置多个形状,基本组合是[是否镂空][左右边][基础形状]。字母
o决定箭头形状是否镂空open,l和r分别表示只出现左边left和右边right,基础形状有box、crow、curve、icurve、diamond、dot、inv、none、normal、tee以及vee。解读
teeoldiamond:第一个形状tee紧跟着第二个形状是镂空的o取左边的l钻石形状diamond。更多箭头形状
arrowtail
设置无向图或有向图的连线尾部箭头形状,与
arrowhead用法相同arrowsize
设置连线箭头大小
更多属性
端口
节点上的端口,类似于指针。在节点上确定端口以后,再连接两个节点时可以找到节点上准确的位置。
罗盘端口
罗盘也就是确定八个方位,罗盘端口就是方位端口。
方位端口是每个节点隐藏自带的,可以直接使用。
每个节点都有八个方位:北
n、东北ne、东e、东南se、南s、西南sw、西w和西北nw。利用方位可以指定连线从哪个位置连接节点,如:
不同于默认情况下的自动连线,利用方位可以手动指定连线的位置。
命名端口
命名端口需要在节点中手动设置端口,并且位置命名。
一般在节点的属性
shape=record时,对于节点内分组中的单元进行端口设置。struct1:next中的next和struct2:prev中的prev都是命名端口,通过这两个端口可以将节点struct1的* int单元与节点struct2的int单元连接起来。而struct1:head:s则即使用了命名端口head,又使用了罗盘端口s。以上可以看出,命名端口的设置出现在节点声明时,使用尖括号
<...>包裹,命名端口和罗盘端口都是在节点ID后面加冒号:来引用。属性叠层
继承
主要是指子图会从父图继承图、连线和节点的所有属性定义
覆盖
DOT中的属性可以多次定义,后面定义的会覆盖前面定义的。 但是要注意如果一个声明在两个属性定义之间,声明的节点或者连线只会获得前一个属性定义。
节点
a、b和e获得了属性shape=doublecircle,而节点c和d的属性被覆盖为了shape=box3d,但是五个节点有相同的属性fontcolor=blue。可见shape属性被覆盖了。同理,连线a -> c -> d的属性style=bold也被style=dotted覆盖,而a -> b却没有变。当然图的属性定义也能覆盖,不过是父图与子图之间
对比
cluster1和cluster2两个子图,前者把父图abc定义的图、连线和节点的属性全部覆盖了;而后者是继承自父图。另外,匿名子图还能够在视觉上不出现子图效果的情况下,覆盖父图定义的属性
很明显,这里的节点
b的shape属性被修改为了tripleoctagon,而节点c却没有被修改。总结
现学现卖,用Graphviz做个思维导图
参考资料