 gilbertohasnofb
commented
7 years ago
gilbertohasnofb
commented
7 years ago This is ready to be reviewed and merged
Closed gilbertohasnofb closed 7 years ago
gilbertohasnofb
commented
7 years ago This is ready to be reviewed and merged
 ghost
commented
7 years ago
ghost
commented
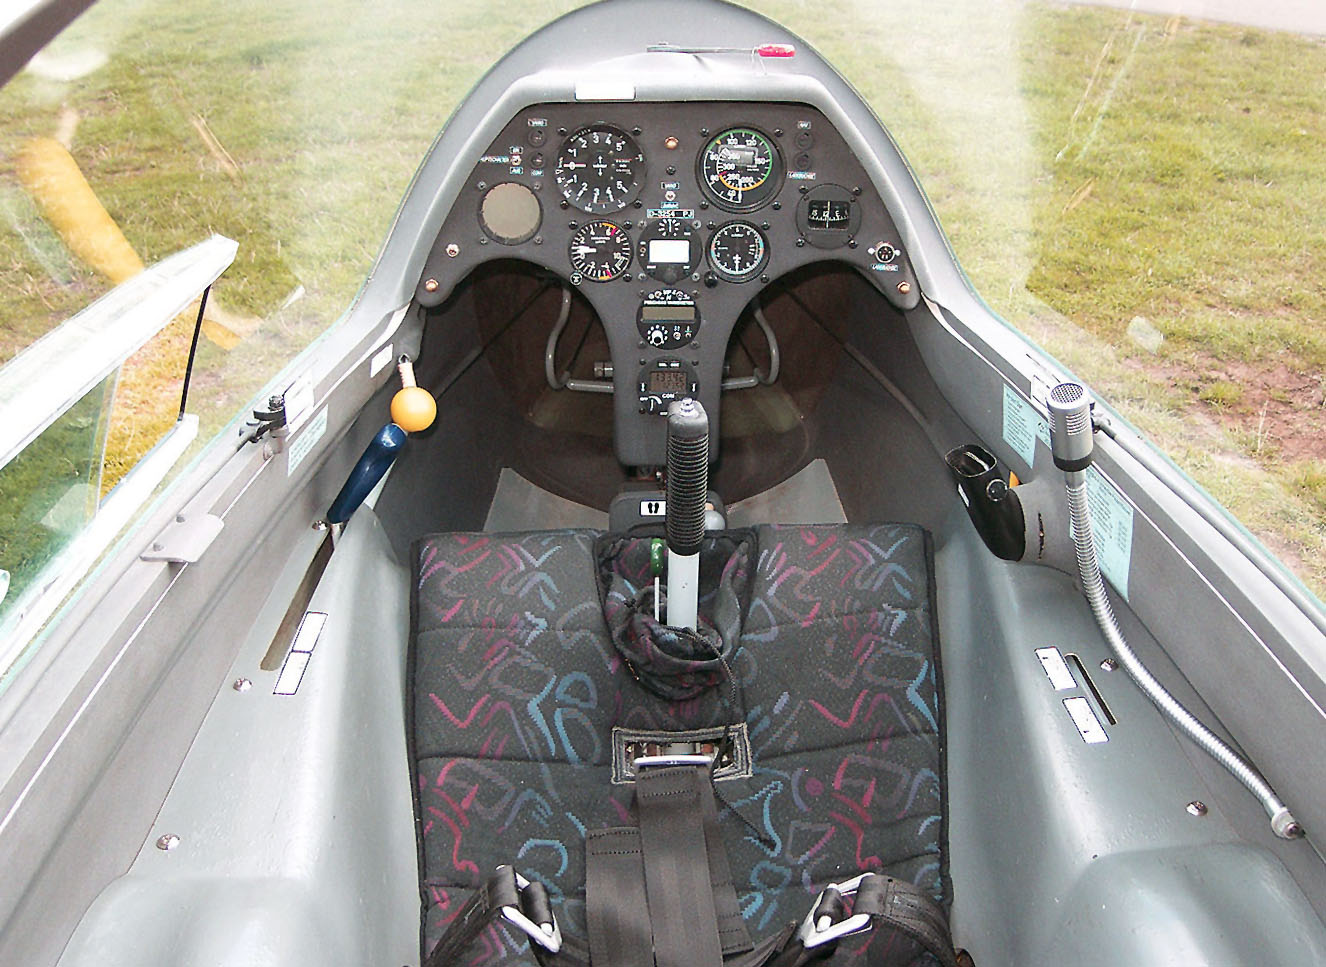
7 years ago Please leave the fake holes and signs there, they are a good orientation for modelling and a good solution while we don't have real ones
gilbertohasnofb
commented
7 years ago The signs are in too low resolution and look ugly IMO. We need to find some high resolution pictures of the cockpit so I can re-create those. As for the hole, there is no rush, but that black stroke in GIMP is also looking ugly, and I would say not to use it as reference as I just put it without much care, the photograph should be much better for orientation :smile:
gilbertohasnofb
commented
7 years ago On a second thought, if it helps you I will add that layer back and we can solve it in the 3D model later.
gilbertohasnofb
commented
7 years ago @D-ECHO done
 viktorradnai
commented
7 years ago
viktorradnai
commented
7 years ago @gilbertohasnofb @D-ECHO The user manual has a copy of all the labels :D
https://www.capmembers.com/media/cms/ASK21__Schleicher__Flight_Manual_0F12AEE54A4A2.pdf on page 20 :)
gilbertohasnofb
commented
7 years ago @viktorradnai thanks a lot! But let's merge this PR and work on this later, as it will also involve some 3D modelling (as I will need to ask @D-ECHO to add those stickers as one sided rectangles to the fuselage in order to have them in high enough resolution). I will open an issue for that
viktorradnai
commented
7 years ago @gilbertohasnofb I have merged this but there are a couple of things that occurred to me about these changes.
gilbertohasnofb
commented
7 years ago @viktorradnai
But on the other hand, some other cockpits such as the one in the next image below do not show this yellow colour (the picture below is the one I used as reference when making the textures)
gilbertohasnofb
commented
7 years ago @viktorradnai I made some experiments with the interior, what do you think about these images below? I have 1) added the rubber carpet for both pilot and instructor, 2) changed the front of the plane to use a woven yellow texture, 3) changed the colour of the seats back to blue (as to better differentiate between the carpet and seat) and remade the texture and its overlay. What do you think about it? If you think it's better (I do) then I will push a PR


All based on:
And by the way, this aircraft is really looking better each day, let me share some nice screenies with your two :smile:


viktorradnai
commented
7 years ago @gilbertohasnofb I think the cockpit will need @D-ECHO to do another pass to refine some features that are somewhat inaccurate (curved seat pan, sticks embedded into seat pan, curved floor at the front, rudder cable ducts, etc). I think you did as much as that can be done with textures in the cockpit.
BTW, have you seen my (somewhat poor) photos of the interior of our gliders here? They might be helpful for figuring things out: https://drive.google.com/drive/folders/0BxVWkln4EgdVODV5SXJjRDh5STg
I actually have a couple of minor texturing suggestions:
Make the rubber floor continue just 1-2cm short of the raw fibreglass. It's difficult to compare because the floor on the model is flat, not curved but I think it would look more credible and also our gliders may actually have it that way.
Give the sides and maybe the top of the seat cushion (the blue material) about 1cm of stitching rather than continuing the striped material right to the edge of the of the seatpan. The cushion is actually removable and it's only held in place by the insert around the stick. The way it's textured at the moment makes it look like it's built in.
The shadow on the fuselage texture where the wing meets the fuselage is way too dark. That has annoyed me a bit and it's showing very clearly on your last screenshot (which is amazing btw, on first glance I thought it was a photo) and even more on the screenshot above it.
BTW, the glider is really starting to look pretty impressive but it's also turning out to be a whole lot of work (lots of man-hours put in by the three of us). The issue tracker is starting to resemble the one we have at work, and that's just the ones that are open :D
viktorradnai
commented
7 years ago @gilbertohasnofb I've found the lost comment I referenced in #104 (I've accidentally hit the back key on this tab but Firefox still had it).
gilbertohasnofb
commented
7 years ago :+1: Please see my reply in #104 as it addresses these issues. Just give me a green light and I will try to push the fixes still tonight
Improving
parts.png: