Start from QuickCapture 1.11, the QuickCapture app supports taking multiple photos for a captured record. This long-awaited new feature allows field workers to capture a feature and also have the option to capture more than one photo - making the field observation process as efficient as possible.
In this exercise, we are going to build a webhook scenario that enables capturing multiple photos and sending them as an email attachment.
Create a new scenario > Continue > Click on the question mark, search and select QuickCapture > Watch Project
Specify the name of your webhook > Add your ArcGIS Online connection > Specify the QuickCapture project and the target point layer > Save.
The Integromat will automatically generate a webhook URL and integrate it with the selected QuickCapture project. When a new record is submitted to the point layer, the QuickCapture app will also send webhook payload (event data) to this URL. The event data sent by QuickCapture app will be used by other app modules to process in the webhook scenario.
As the event data contains all the captured information, but we only need photos information in this scenario, we are going to use several other tools in Integromat to extract and photo information we need and pass them to the Email module in the end.
Add an Iterator module to grab the Attachment info: Photo[ ] array. This module will go through the attachment info from the payload and grab information of each photo.
An iterator converts each collection of items into individual separate bundles, and in doing so, you can process each element in the collection separately and exactly as you need.
Add a HTTP > Get a file module to get the URL of each photo from the Iterator output.
Add an Array aggregator module to aggregate multiple photo urls and filenames into a single array. Set the Iterator as the source module. Set the Target structure type to the module property that will receive the output of the Array aggregator. In our case, we want to use the aggregated array to populate the ·Attachments’ property of the Microsoft 365 Email module.
When configuring how the target structure will be populated, make sure you use the Map option, so you can get the Data property from the HTTP Get a file operation and the File Name from the name property of the QuickCapture module.
Array Aggregators, in short, do the exact opposite of iterators. They convert multiple bundles of data into a single array containing collections of specified items.
Add a Microsoft Outlook module > Create and send an email. Add your email connection (which account do you want to send the email from), add email content, and the email recipients. At the Attachment section, enable Map, and select Array[ ] output by the Aggregator module.
Run the scenario and test
Save the scenario on Integromat, and click Run to test the webhook workflow.
On the QuickCapture mobile app, download the project. (Or if you already download the QuickCapture, you should see an update message on the project card. Go ahead and update the project).
Click the button to take several photos, and Send your record.
If everything works well, you should now get an email from your account with multiple photos in the email attachment.
If error happens, the related module will be highlighted with detailed error information, so you can take another look at where went wrong.
Finally, the beauty of Integromat is that there are tons of useful modules available that allow you to customize and build your own scenario. If you have other good ideas to achieve the same goal or to simplify this scenario, don't hesitate to let me know!
Description
Start from QuickCapture 1.11, the QuickCapture app supports taking multiple photos for a captured record. This long-awaited new feature allows field workers to capture a feature and also have the option to capture more than one photo - making the field observation process as efficient as possible.
In this exercise, we are going to build a webhook scenario that enables capturing multiple photos and sending them as an email attachment.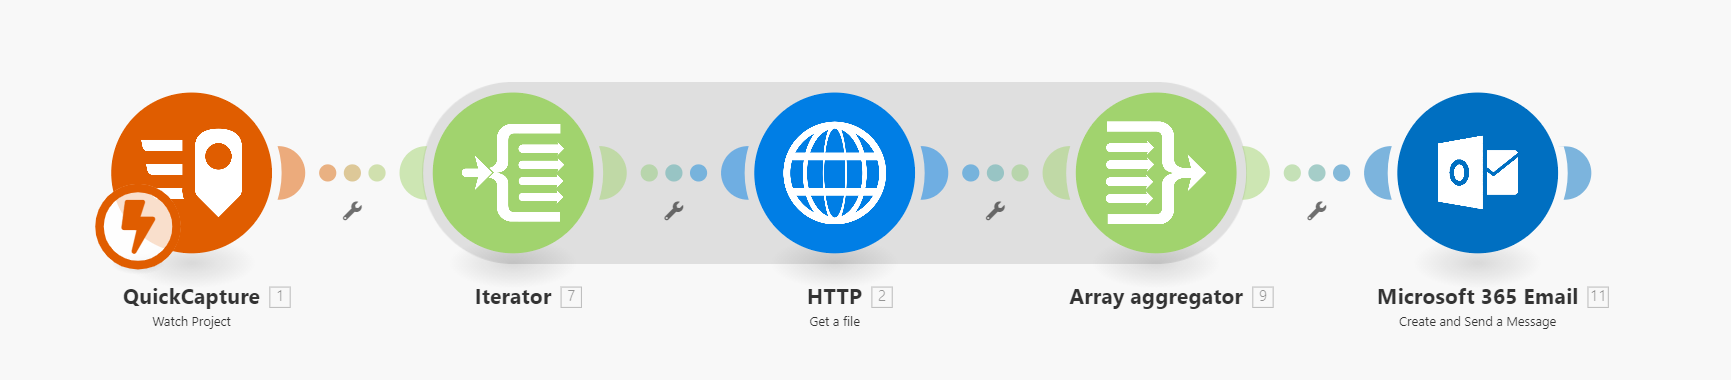
Steps
Build a QuickCapture project
Set up a webhook for the QuickCapture project.
Sign up for a free account in Integromat https://www.integromat.com/en/login and sign in to Integromat with your account
Create a new scenario > Continue > Click on the question mark, search and select QuickCapture > Watch Project
Specify the name of your webhook > Add your ArcGIS Online connection > Specify the QuickCapture project and the target point layer > Save. The Integromat will automatically generate a webhook URL and integrate it with the selected QuickCapture project. When a new record is submitted to the point layer, the QuickCapture app will also send webhook payload (event data) to this URL. The event data sent by QuickCapture app will be used by other app modules to process in the webhook scenario.
As the event data contains all the captured information, but we only need photos information in this scenario, we are going to use several other tools in Integromat to extract and photo information we need and pass them to the Email module in the end.
Add an Iterator module to grab the An iterator converts each collection of items into individual separate bundles, and in doing so, you can process each element in the collection separately and exactly as you need.
Attachment info: Photo[ ]array. This module will go through the attachment info from the payload and grab information of each photo.Add a HTTP > Get a file module to get the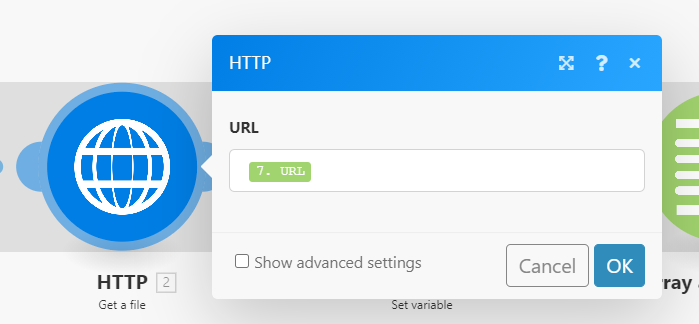
URLof each photo from the Iterator output.Add an Array aggregator module to aggregate multiple photo urls and filenames into a single array. Set the Iterator as the source module. Set the Target structure type to the module property that will receive the output of the Array aggregator. In our case, we want to use the aggregated array to populate the ·Attachments’ property of the Microsoft 365 Email module. When configuring how the target structure will be populated, make sure you use the Map option, so you can get the Data property from the HTTP Get a file operation and the File Name from the name property of the QuickCapture module. Array Aggregators, in short, do the exact opposite of iterators. They convert multiple bundles of data into a single array containing collections of specified items.
Add a Microsoft Outlook module > Create and send an email. Add your email connection (which account do you want to send the email from), add email content, and the email recipients. At the Attachment section, enable Map, and select
Array[ ]output by the Aggregator module.Run the scenario and test
Finally, the beauty of Integromat is that there are tons of useful modules available that allow you to customize and build your own scenario. If you have other good ideas to achieve the same goal or to simplify this scenario, don't hesitate to let me know!