Open xiwenAndlejian opened 5 years ago
本文内容:承接 #15 ,补全 EchoClient (回声客户端)的代码。 主要实现:
public class EchoClientDemo {

    private static final String EXIT_COMMAND = "exit()";

    public static void main(String[] args) throws InterruptedException {
        NioEventLoopGroup group = new NioEventLoopGroup();
        try {
            Bootstrap bootstrap = new Bootstrap();
            bootstrap.group(group)
                    .channel(NioSocketChannel.class)// 注意此处使用的类与 EchoServer 中的不同
                    .handler(new ChannelInitializer<Channel>() {
                        @Override
                        protected void initChannel(Channel ch) throws Exception {
                            ch.pipeline().addLast(new SimpleChannelInboundHandler<ByteBuf>() {
                                @Override
                                protected void channelRead0(ChannelHandlerContext ctx, ByteBuf msg) throws Exception {
                                    System.out.println("接收到来自服务端的消息:" + msg.toString(CharsetUtil.UTF_8));
                                }
                            });
                        }
                    });
            ChannelFuture channelFuture = bootstrap.connect("127.0.0.1", 8000);
            channelFuture.addListener(future -> {
                if (future.isSuccess()) {
                    System.out.println("连接服务端成功!");

                    startConsoleCommand(channelFuture.channel());
                } else {
                    System.err.println("连接服务端失败!");
                    future.cause().printStackTrace();
                }
            });
            channelFuture.channel().closeFuture().sync();
        } finally {
            group.shutdownGracefully();
        }

    }

    private static void startConsoleCommand(Channel channel) {
        new Thread(() -> {
            Scanner scanner = new Scanner(System.in);
            while (true) {
                String msg = scanner.nextLine();
                // 输入退出命令,关闭 channel
                if (EXIT_COMMAND.equals(msg)) {
                    System.out.println("接受退出指令,断开与服务端的连接。");
                    channel.close();
                    break;
                }
                ByteBuf byteBuf = channel.alloc().buffer();
                byteBuf.writeBytes(msg.getBytes(CharsetUtil.UTF_8));
                channel.writeAndFlush(byteBuf);
            }
        }).start();
    }
}
步骤:
同 #15 ,此处略
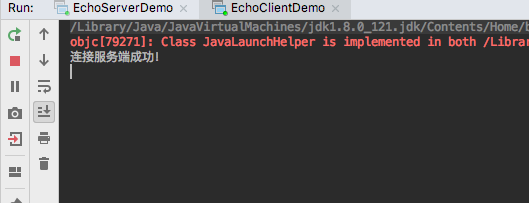
启动结果如下图:
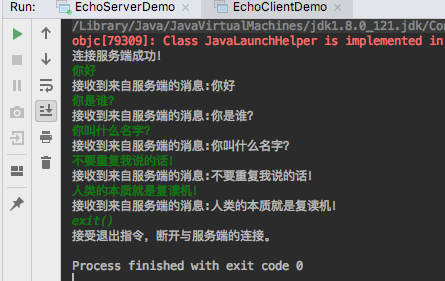
如下图:
注:图中绿色的字是 Client 的输入。
EchoClient 中有许多与 EchoServer 相同的源码,这里不再重复解析。 这里主要分析一下不同的代码:
由于 Netty 中的 I/O 操作是异步的,即源码中的 connect()、writeAndFlush() 均是异步的。 查看源码可以发现,执行这两个操作都会返回一个相同的类型 ChannelFuture。实际的操作是不会立即执行的。只能通过返回的 ChannelFuture 来获取操作执行的状态,或者通过注册监听函数执行完成后的操作。 例如下方代码:
ChannelFuture channelFuture = bootstrap.connect("127.0.0.1", 8000);
channelFuture.addListener(future -> {
    if (future.isSuccess()) {
        System.out.println("连接服务端成功!");

        startConsoleCommand(channelFuture.channel());
    } else {
        System.err.println("连接服务端失败!");
        future.cause().printStackTrace();
    }
});
private static void startConsoleCommand(Channel channel) {
    new Thread(() -> {
        Scanner scanner = new Scanner(System.in);
        while (true) {
            String msg = scanner.nextLine();
            // 输入退出命令,关闭 channel
            if (EXIT_COMMAND.equals(msg)) {
                System.out.println("接受退出指令,断开与服务端的连接。");
                channel.close();
                break;
            }
            ByteBuf byteBuf = channel.alloc().buffer();
            byteBuf.writeBytes(msg.getBytes(CharsetUtil.UTF_8));
            channel.writeAndFlush(byteBuf);
        }
    }).start();
}
在连接服务端成功后,启动此线程,接受控制台的输入,并发送给服务端。 这里需要注意的是,此处不能直接将控制台输入的 String 直接发送给服务端。即: channel.writeAndFlush(msg); 我们可以稍加修改代码,查看一下原因:
channel.writeAndFlush(msg);
// 给 writeAndFlush() 操作增加监听函数
channel.writeAndFlush(msg).addListener(future -> {
    if (future.isSuccess()) {
        System.out.println("发送成功");
    } else {
        // 关键日志: java.lang.UnsupportedOperationException: unsupported message type: String (expected: ByteBuf, FileRegion)
        future.cause().printStackTrace();
    }
});
从错误信息可以看出,String 是不支持的消息类型,期望的是 ByteBuf/FileRegion。
本文补全了上一篇文章 EchoServer 的 EchoClient,替换了 telnet 作为新的客户端。主要展示了如何通过代码创建 Client、连接 Server、接受&发送消息、Client 主动断开连接。 下一篇文章中,将详细解释 ByteBuf 以及它的用法。
Netty 学习笔记(二)EchoClient
本文内容:承接 #15 ,补全 EchoClient (回声客户端)的代码。 主要实现:
源码
进行测试
步骤:
1. 启动 EchoServer
同 #15 ,此处略
2. 启动 EchoClient
启动结果如下图:
3. 输入字符串(回车发送消息)& 4. 客户端主动断开连接
如下图:
注:图中绿色的字是 Client 的输入。
源码解析
EchoClient 中有许多与 EchoServer 相同的源码,这里不再重复解析。 这里主要分析一下不同的代码:
ChannelFuture.addListener
由于 Netty 中的 I/O 操作是异步的,即源码中的 connect()、writeAndFlush() 均是异步的。 查看源码可以发现,执行这两个操作都会返回一个相同的类型 ChannelFuture。实际的操作是不会立即执行的。只能通过返回的 ChannelFuture 来获取操作执行的状态,或者通过注册监听函数执行完成后的操作。 例如下方代码:
startConsoleCommand
在连接服务端成功后,启动此线程,接受控制台的输入,并发送给服务端。 这里需要注意的是,此处不能直接将控制台输入的 String 直接发送给服务端。即:
channel.writeAndFlush(msg);我们可以稍加修改代码,查看一下原因:从错误信息可以看出,String 是不支持的消息类型,期望的是 ByteBuf/FileRegion。
总结
本文补全了上一篇文章 EchoServer 的 EchoClient,替换了 telnet 作为新的客户端。主要展示了如何通过代码创建 Client、连接 Server、接受&发送消息、Client 主动断开连接。 下一篇文章中,将详细解释 ByteBuf 以及它的用法。