xopto / pyxopto

PyXOpto is a collection of python tools for performing Monte Carlo simulations of light propagation in turbid media.
GNU General Public License v3.0
30 stars 8 forks source link

Issues with Rectangular Light Source (mcml.mcsource.*Rectangular) #10

Open ImanKafian opened 1 year ago

ImanKafian commented 1 year ago

Hi,

I am trying to perform a simple Monte Carlo simulation with rectangular light source and detector. I built the MC object as follows: `from xopto.mcml import mc from xopto.cl import clinfo

cl_device = clinfo.gpu() layers = mc.mclayer.Layers([mc.mclayer.Layer(d=0.0, n=1.0, mua=0.0, mus=0.0, pf=mc.mcpf.Hg(1)), # Surrounding medium mc.mclayer.Layer(d=2.0e-3, n=1.34, mua=0.2e+3, mus=(3/(1-0.9))*1e+3, pf=mc.mcpf.Hg(0.9)), # tissue mc.mclayer.Layer(d=0.0, n=1.0, mua=0.0, mus=0.0, pf=mc.mcpf.Hg(1))]) # Surrounding medium filter = mc.mctrace.Trace(maxlen=250, options=mc.mctrace.Trace.TRACE_ALL, plon=True) fluence = mc.mcfluence.Fluence(xaxis=mc.mcfluence.Axis(-5e-3, 5e-3, 500), yaxis=mc.mcfluence.Axis(-5e-3, 5e-3, 500), zaxis=mc.mcfluence.Axis(0, 2e-3, int(2.0e-3/2e-5))) detector = mc.mcdetector.Detectors(top=mc.mcdetector.Cartesian(xaxis=mc.mcdetector.Axis(-4.5e-3, -4e-3, 1), yaxis=mc.mcdetector.Axis(-3.5e-3, -3e-3, 1), direction=(0.0, 0.0, 1.0))) light_source = mc.mcsource.LambertianRectangular(position=(-0.5e-3,-0.2e-3, 0), width=0.3e-3, height=0.3e-3, n=1.5, na=0.9) mc_obj = mc.Mc(layers=layers, trace=filter, fluence=fluence, source=light_source, detectors=detector, cl_devices=cl_device)

output = mc_obj.run(nphotons=100000, verbose=True)`

When I try to run the simulation, I receive the following error: Pyxopto-RectangularLight-Error

I traced the error and realized there was a typo! Instead of "Structure", "Stucture" was used. I fixed the typo in the code and tried to re-perform the simulation. I received another error as follows: Pyxopto-RectangularLight-Error2

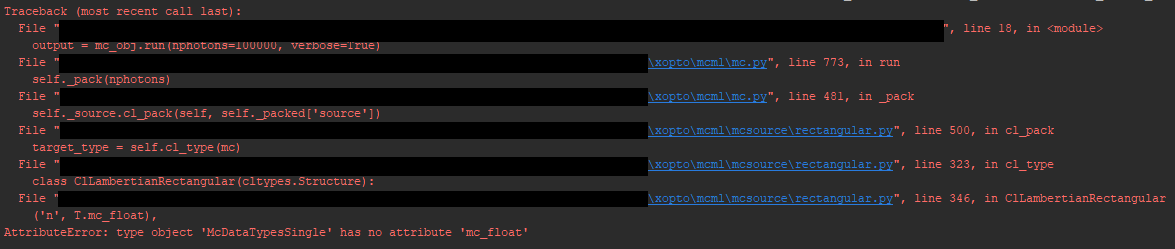
When I traced the source of error again, I came to this part of the LambertianRectangular class definition code: `class LambertianRectangular(UniformRectangular): @staticmethod def cl_type(mc: mcobject.McObject) -> cltypes.Structure: T = mc.types class ClLambertianRectangular(cltypes.Structure): ''' Structure that is passed to the Monte carlo simulator kernel.

        Fields
        ------
        position: mc_point3f_t
            Source position (center of the source),
        size: mc_point2f_t
            Source size along the x and y axis.
        n: mc_fp_t
            Refractive index of the source.
        cos_critical: mc_fp_t
            Cosine of the total internal reflection angle for the
            source -> sample boundary transition.
        na: mc_fp_t
            Numerical aperture of the source in air. 
        layer_index: mc_int_t
            Layer index in which the source is located.
        '''
        _fields_ = [
            ('position', T.mc_point3f_t),
            ('size', T.mc_point2f_t),
            ('n', T.mc_float),
            ('cos_critical', T.mc_float),
            ('na', T.mc_fp_t),
            ('layer_index', T.mc_int),
        ]
    return  ClLambertianRectangular

@staticmethod
def cl_declaration(mc: mcobject.McObject) -> str:
    '''
    Structure that defines the source in the Monte Carlo simulator.
    '''
    return '\n'.join((
        'struct MC_STRUCT_ATTRIBUTES McSource{',
        '   mc_point3f_t position;',
        '   mc_point2f_t size;',
        '   mc_fp_t n;',
        '   mc_fp_t cos_critical;',
        '   mc_fp_t na;',
        '   mc_int_t layer_index;',
        '};'
    ))`

When I compared it with the Fiber class code, I realized in the cl_type function, the input types are different. The same can be observed if you compare the input types declared in the cl_type function with those in the cl_declaration function -> "join" segment. So I tried to adjust the input types of cl_type function according to those specified in the cl_declaration function. I performed the simulation and received the following error. Pyxopto-RectangularLight-Error3

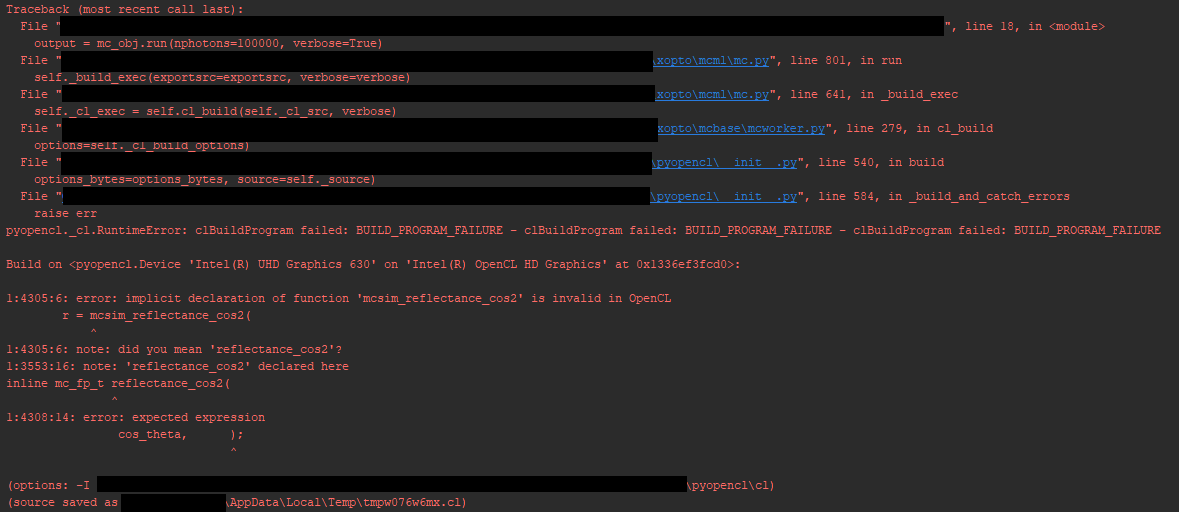
I would say similar thing must happen for other classes of rectangular sources; however, I didn't check all of them except the UniformRectangular class. I would appreciate it if you could please let me know how I can fix this issue.

xopto commented 1 year ago

Seems that the code of the rectangular source was not updated to reflect the common type definitions. There were also a couple of typos in the OpenCL & Python source. I am attaching a modified source file of the rectangular source along with an example. Let me know if there are further issues with the source. The bug will be fixed with the next commit.

rectangular.zip

rectangular_test.zip

ImanKafian commented 1 year ago

Yes, it worked just fine! Many thanks for your prompt assistance. Additionally, I wanted to point out here for other potential users that when the reflectance is read from the MC object, for the case of Cartesian detector, the reflectance is divided by the area of the detector and since the dimensions are physically in either um2 or mm2 - converted in m2, would result in a very large value for reflectance which, at the first glance, is very difficult to make sense of! But once, you know you have to multiplied by the area of the detector (in [m2]), the reflectance value will be in [0, 1] range again. However, I would like to ask you how we can have a series of Cartesian detectors for transmission and reflection geometries in our simulation. For instance, we have the fiber array detection capabilities but I have no idea how we can create a Cartesian detector array! It would be great if you could please shed some light on this issue too! :)

Many thanks for your great work.

xopto commented 1 year ago

As explained in the documentation, the simulator assumes SI units (m) and normalizes the reflectance by the detector surface area. All detectors come with a raw property that yields the accumulated weight of the photon packets. This raw property can be used for custom normalization.

I am attaching an example that uses an optical fiber probe as the source and two Cartesian detectors to collect the reflectance and transmittance of a 0.5 mm thick slab. Note that the photon packets that exit the top or bottom surface of the slab outside of the detectors are accumulated into the nearest outer pixel of the detector (similar to the radial detector).

reflectance_cartesian.zip

shiroiruka333 commented 1 year ago

The problem noted in the question above is also happening with UniformRectangularLut, which could not be used. I used the rectangular light source correction file above. I ran this file. I encountered the AttributeError after correcting a spelling error in Structure. I would appreciate it if you could also correct the UniformRectangularLut. Thank you in advance.

xopto commented 1 year ago

In addition to the typos in the OpenCL code and related Python structures the size of the source was not correctly passed to the OpenCL kernel. A fix will be included with the next commit. In the meantime, you can replace the original file with the attached one. rectangular.zip

shiroiruka333 commented 1 year ago

I was able to confirm that UniformRectangularLut works with the rectanglar modification file you provided. Thanks.

I wrote the following code to create a rectangular light source that emits light only in the 0~60° direction using this UniformRectangularLut, but it does not work as expected and the light seems to be emitted over the entire circumference.

code

from xopto.mcml import mc from xopto.cl import clinfo import numpy as np from xopto.mcbase.mcutil.lut import CollectionLut

cl_device = clinfo.gpu()

layers = mc.mclayer.Layers([ mc.mclayer.Layer(d=0.0, n=1.0, mua=0.0, mus=0.0, pf=mc.mcpf.Hg(1)), # Surrounding medium mc.mclayer.Layer(d=1.9e-3, n=1.0, mua=0.0, mus=0.0, pf=mc.mcpf.Hg(1)) , # Air mc.mclayer.Layer(d=2.0e-2, n=1.34, mua=0.2e+3, mus=(3/(1-0.9))*1e+3, pf=mc.mcpf.Hg(0.9)), # tissue mc.mclayer.Layer(d=2.1e-3, n=1.0, mua=0.0, mus=0.0, pf=mc.mcpf.Hg(1)) ,# Air mc.mclayer.Layer(d=0.0, n=1.0, mua=0.0, mus=0.0, pf=mc.mcpf.Hg(1)) # Surrounding medium ])

filter = mc.mctrace.Trace( maxlen=250, options=mc.mctrace.Trace.TRACE_ALL, plon=True)

fluence = mc.mcfluence.Fluence( xaxis=mc.mcfluence.Axis(-5e-2, 5e-2, 500), yaxis=mc.mcfluence.Axis(-5e-2, 5e-2, 500), zaxis=mc.mcfluence.Axis(0, 2e-2, int(2.0e-2/2e-4)) ) detector = mc.mcdetector.Detectors( top=mc.mcdetector.Cartesian( xaxis=mc.mcdetector.Axis(-4.5e-3, -4e-3, 1), yaxis=mc.mcdetector.Axis(-3.5e-3, -3e-3, 1), direction=(0.0, 0.0, 1.0) ) )

Define the angles in radians

theta = np.linspace(0, np.pi/3, 1000)

Define the sensitivity as a function of the angle

sensitivity = np.sin(theta)**2

Create a new lookup table with the sensitivity values limited to 0~60 degrees

costheta_limited = np.cos(np.linspace(0, np.pi/3, 601)) sensitivity_limited = np.sin(np.arccos(costheta_limited))**2 lut_limited = CollectionLut(sensitivity_limited, costheta_limited)

Print the lookup table

print(costheta_limited) print(sensitivity_limited)

light_source = mc.mcsource.UniformRectangularLut( lut = lut_limited, width= 2.0e-2 , height= 0.3e-3 , n=1.0, position=(-0.5e-2,-0.2e-3, 1.0e-2) )

mc_obj = mc.Mc( layers=layers, trace=filter, fluence=fluence, source=light_source, detectors=detector, cl_devices=cl_device)

trace_res, fluence_res, detector_res = mc_obj.run(nphotons=100000, verbose=True)

plot

fluence_res.plot(axis='z') fluence_res.plot(axis='y') fluence_res.plot(axis='x') trace_res.plot(view='3d')

code end

I would appreciate your advice on how to make a rectangular light source that emits light only in the direction of 0~60°. Thank you in advance.

xopto commented 1 year ago

EmissionLut needs to be used instead of CollectionLut. The documentation is suggesting the wrong class (CollectionLut) and in some cases, the wrong class was also used in the code. The latest commit fixed the issue.

Pull the master branch and do the following modifications:

First, import the EmissionLut: from xopto.mcml.mcutil.lut import EmissionLut

Then replace CollectionLut with EmissionLut: ut_limited = EmissionLut(sensitivity_limited, costheta_limited)

shiroiruka333 commented 1 year ago

Thanks for your advice on my code. However, I tried to change the code according to your advice, but I still get light all around. I'm attaching a TRACE image.

I need your advice if there is anything else I should change. Thanks in advance. Trace_view

xopto commented 1 year ago

As an observation, the source from your example is located inside the sample (10 mm under the sample top surface). It is very difficult if not impossible to assess the initial propagation directions of the packets from the trace plot. The initial direction should be extracted directly from the trace results as: trace_res.data[:, 0]['pz']

I am attaching a minimal example that does a trace and shows the distribution of the initial/launch propagation directions (with respect to the z-axis) of 1000 packets. The source is using angular intensity distribution from your code. Do not forget to update the pyxopto code from the master branch before running the example. mcml_rectlut.zip

The histogram produced by the example should look similar to: rectlut_60deg