 zxsby
commented
3 years ago
zxsby
commented
3 years ago npm私有库---verdaccio
✨verdaccion官方网址
verdaccion安装
✨verdaccio安装方式有几种,文档资料:https://verdaccio.org/docs/zh-CN/installation,在这里我使用的是npm下载verdaccio的方式。
//在cmd输入
npm install -g verdaccio  //npm下载

yarn global add verdaccio  //yarn下载  用yarn下载的时候 verdaccio运行不起来的时候请换成npm下载

//或者nrm切换下源地址  要是报权限错误的话,请选择cmd<以管理员身份运行>在输入一次
//或者在cmd输入下面的命令:
npm install -g verdaccio --unsafe-perm
//--unsafe-perm添加上是为了防止报 gyp ERR! permission denied 的权限问题

//下载完成后会有红色字体表示:表示没有python的环境,这个时候不需要理会。

//在cmd输入:verdaccio 执行效果如下: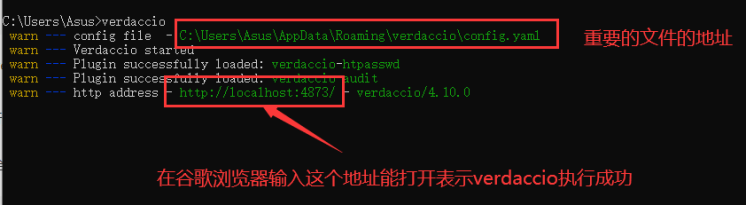
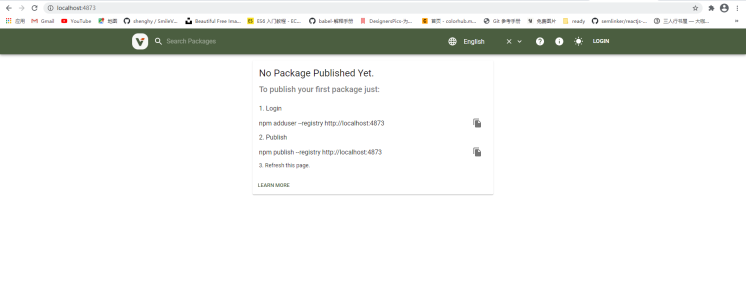
默认端口号是4873,在谷歌浏览器显示页面是:
配置信息
在上面的图片可以得到verdaccio文件的配置文件地址:C:\Users\账户\AppData\Roaming\verdaccio,可以看到文件如图所示:

默认启动服务需要占用4873端口,若启动verdaccio服务失败请检查该端口是否被占用,或者手动修改对应的配置文件。配置文件在上图能找出,修改其端口号。
config.yaml文件配置信息:https://verdaccio.org/docs/en/configuration
  #
  # 这是默认的配置文件. 它会允许我们做任何事情,
  # 所以不要在生产环境(系统)使用它.
  #
  # 在这里可以看见更多的配置示例:
  # https://github.com/verdaccio/verdaccio/tree/master/conf
  #

  # 包含所有包的目录路径,npm私服包的存放目录以及缓存地址
  storage: ./storage
  # 包含plugins的目录路径,默认插件的文件位置,一般只对docker部署有关系
  plugins: ./plugins

  web:  #verdaccio的界面
    title: Verdaccio
    # comment out to disable gravatar support 注释掉gravatar禁止使用
    # gravatar: false
    # by default packages are ordercer ascendant (asc|desc)  默认的packages是准备好的两个选择
    # sort_packages: asc
    # convert your UI to the dark side  用户界面是黑夜模式
    # darkMode: true

  # translate your registry, api i18n not available yet  看看下你的注册表,i18n api还不能使用
  # i18n:
  # list of the available translations 查看可以使用的注册列表的地址:https://github.com/verdaccio/ui/tree/master/i18n/translations
  #   web: en-US

  auth:
    htpasswd:
      file: ./htpasswd  #保存用户的账号信息比如用户名,密码等,还没有注册或者登录的话暂时看不到
      # Maximum amount of users allowed to register, defaults to "+inf".允许注册的最大用户数量,可以是无穷大
      # You can set this to -1 to disable registration. 你可以设置-1去禁止用户通过 npm adduser 去注册
      # max_users: 1000  #默认注册人数最大数量是1000

  # a list of other known repositories we can talk to  我们需要了解其他相关有名的存储库
  uplinks: #配置上游的npm服务器,主要用于请求的库不存在时可以去到上游服务器去获取,可以多配置下上游链路的链接
    npmjs:
      url: https://registry.npmjs.org/
      agent_options:  #代理的配置项
        keepAlive: true
        maxSockets: 40
        maxFreeSockets: 10

  packages: # 配置模块,access访问下载权限,pushlish包的发布权限
    '@*/*': # 一种是@/表示某下面所属的某项目,关键字匹配
      # scoped packages   配置权限管理
      access: $all # 表示哪一类用户可以对匹配的项目进行安装(install)和查看包的信息
      publish: $authenticated # 表示哪一类用户可以对匹配的项目进行发布(publish)
      unpublish: $authenticated # 表示哪一类用户可以对匹配的项目进行卸载(publish)
      proxy: npmjs # 这里的值是对应于 uplinks 的名称,如果本地不存在,允许去对应的uplinks去拉取

    '**': # 另一种是*匹配项目名称(名称在package.json中有定义)
      # allow all users (including non-authenticated users) to read and
      # publish all packages
      # 允许所有用户(包括未经身份验证的用户)读取和发布所有包
      # you can specify usernames/groupnames (depending on your auth plugin) 您可以指定用户名/组织名称(取决于验证身份的插件)
      # and three keywords: "$all", "$anonymous", "$authenticated" 三个关键字:所有的,匿名的,验证过的  也可以使用具体的用户名或者组织名称(公司私有的名字)和配置的用户表 htpasswd 有关
      access: $all

      # allow all known users to publish/publish packages 允许所有用户去发布包
      # (anyone can register by default, remember?)  任何人都可以默认注册
      publish: $authenticated
      unpublish: $authenticated

      # if package is not available locally, proxy requests to 'npmjs' registry 如果包不允许在本机使用,可以用proxy请求npmjs注册表的代理
      proxy: npmjs

  # You can specify HTTP/1.1 server keep alive timeout in seconds for incoming connections. 传入的指定连接的HTTP/1.1服务器保持活跃状态直到超时,以秒为单位
  # A value of 0 makes the http server behave similarly to Node.js versions prior to 8.0.0, which did not have a keep-alive timeout.  值为0的时候的服务表现行为和8.0.0之前版本的nodejs链接的时候没有保持活跃状态导致超时
  # WORKAROUND: Through given configuration you can workaround following issue  解决办法:通过已知的配置,你可以解决这些问题: https://github.com/verdaccio/verdaccio/issues/301. Set to 0 in case 60 is not enough.  如果60不够的话可以设置为0
  server:
    keepAliveTimeout: 60

  middlewares:
    audit:
      enabled: true

  # log settings  设置日志
  logs:
    - { type: stdout, format: pretty, level: http }
    #- {type: file, path: verdaccio.log, level: info}
  #experiments: 实验性的
  #  # support for npm token command  支持npm的token令牌
  #  token: false
  #  # support for the new v1 search endpoint, functional by incomplete read more on ticket 1732
  #  search: false
  #  # disable writing body size to logs, read more on ticket 1912
  #  bytesin_off: false

  # This affect the web and api (not developed yet) 这些会影响web和api(尚未开发的功能)
  #i18n:
  #web: en-US

  #默认是没有的,只能在本机访问,添加后可以通过外网访问
  listen:0.0.0.0:4873
通过pm2启动verdaccio
✨pm2 是一款著名的nodejs进程守护和管理工具
npm install -g pm2 //安装pm2
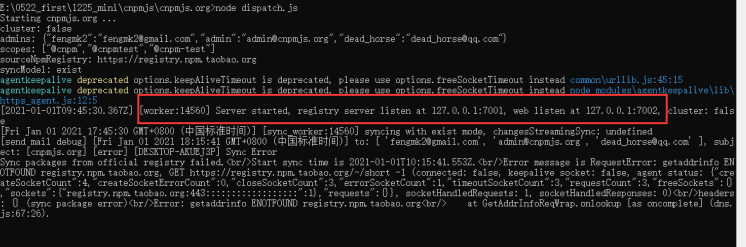
pm2 start verdaccio //启动verdaccio status为online即为成功 如下图所示:
pm2 常见的执行命令:
  npm install pm2 -g     // 命令行安装 pm2
  pm2 start app.js       // 启动app.js应用程序
  pm2 start app.js -i 4  // 后台运行pm2,启动4个app.js
                          // 也可以把'max' 参数传递给 star
                          // 正确的进程数目依赖于Cpu的核心数目
  pm2 start app.js  --watch      // 当文件变化时自动重启应用
  pm2 list                       // 列表 PM2 启动的所有的应用程序
  pm2 monit                      // 显示每个应用程序的CPU和内存占用情况
  pm2 logs                       // 显示所有进程日志
  pm2 start app.js --name="api"  // 启动应用程序并命名为 "api"
  pm2 start script.sh            // 启动 bash 脚本
  pm2 show [app-name]            // 显示应用程序的所有信息
  pm2 logs [app-name]            // 显示指定应用程序的日志
  pm2 stop all                   // 停止所有的应用程序
  pm2 stop 0                     // 停止 id为 0的指定应用程序
  pm2 restart all                // 重启所有应用
  pm2 restart 0                  // 重启指定的进程
  pm2 delete all                 // 关闭并删除所有应用
  pm2 delete 0                   // 删除指定应用程序id为0的
npm包的流程
新建一个文件夹名称为npm-test ,在cmd控制台上输入
  cd npm-test

  npm init        //初始化   默认指向index.js文件,所以新建一个index.js文件
//index.js文件
module.exports.Say = function(name){
return ("Hello " + name);
}简单写完之后可以发布包啦!前提是cmd启动verdaccio才可以的。
npm adduser --registry http://localhost:4873      //添加功能,无账号的添加完毕直接包

npm login --registry=http://localhost:4873        //登录功能,有账号的话可以直接使用这个

npm publish --registry http://localhost:4873      //发布包
输入自己的用户名,密码,邮箱地址,成功结果如上图所示。
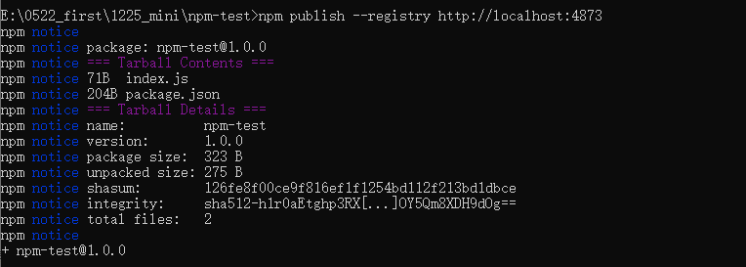
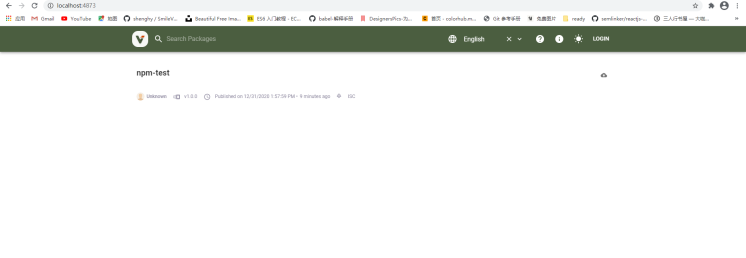
发布成功如上图所示。小小提示下可以使用nrm进行管理npm源,来避免手动输入registry
nrm add company http://localhost:4873  //company可以换任意名称  url地址  添加功能
nrm use company       //使用company的源地址

//这样的话简单了结,不用手动输入registry
npm addUser
npm login
npm publish

//注意:registry要切换到公司私有服务器地址,如果不是用nrm管理切换,则需要带上私有registry(重复啦!)此时在http://localhost:4873/ 页面上进行更新,就会发现你发布的包(包的名称就是文件的名称)。
我们来下载刚刚发布的包
//注意:registry要切换到公司私有服务器地址,如果不是用nrm管理切换,则需要带上私有registry(再来一遍)
//新建一个文件夹名为  app
cd app
npm install npm-test  //要是没有切换的话,请手动添加 --registry=http://localhost:4873
//成功如图所示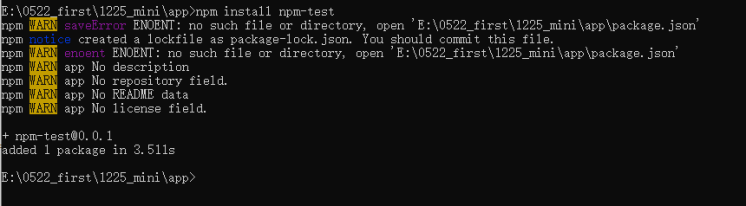
删除发布的包
npm unpublish npm-test --force //清除发布的包
其他知识点
npm私有库的权限管理
因为verdaccio默认是人人都可以注册的,所以需要先将注册窗口关闭
auth:
  htpasswd:
    file: ./htpasswd
    // 此配置项可以关闭注册功能
    max_users: -1
verdaccio 的认证是基于verdaccio-htpasswd, 可以通过官方提供的工具来生成
http://www.htaccesstools.com/htpasswd-generator/,将生成的段字符串添加到htpasswd中即可,这样的话就可以登录npm私有库
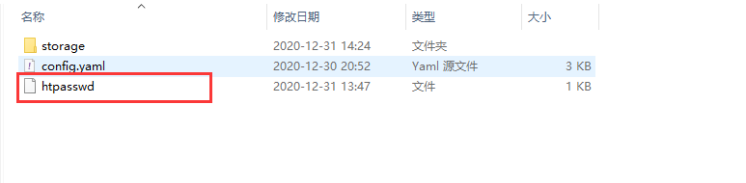
之后就需要修改verdaccio文件下的config.yaml的配置:针对不同的包来设置access,publish,unpublish对应的权限组,因为htpasswd是默认的鉴权插件,所以只能写入相应的用户名,all,authenticated,$anonymous
//小小实例下:
auth:
  htpasswd:
    file: ./htpasswd
    // 此配置项可以关闭注册功能
    max_users: -1
    duGroup:
    // 这里可以自定义用户组
    demoPublish: [xiaoming, xiaohong, xiaoli]
    demoUnpublish: [xiaojun, xiaoming]
    testPublish: [xiaoming,xiaojun]

 packages:
        '@demo/*':
            access: $all
        // 针对不同的包,可以指定不同的用户组来满足权限控制
            publish: demoPublish
            unpublish: demoUnpublish
            proxy: npmjs
     'test':
            access: $all
            publish: testPublish
            unpublish: demoUnpublish
            proxy: npmjs
或者通过安装htpasswd-for-sinopia工具来添加账号
 npm install htpasswd-for-sinopia -g

 sinopia-adduser   // 在 htpasswd 目录执行
为其他登录的用户生成用户名和密码,之后将用户名和密码写入verdaccio文件夹下的htpasswd文件中,然后就跟上文是一样的步骤。

nrm
nrm是一个npm源管理器,允许你快速在npm源之间进行切换。