Add Print Identifier
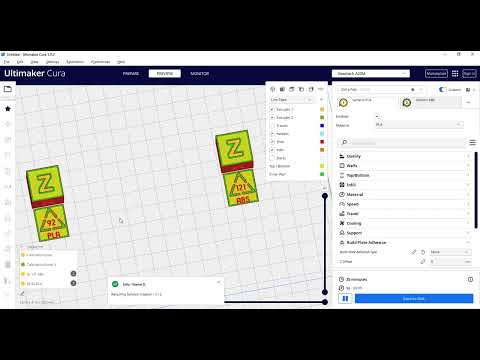
This plugin adds an identifier in front of each part present on the builtplate. This identifier can be either a number or the name of the part defined in Cura.

The identifier is linked to the model, if you move the part manually, the identifier will also be moved.

This plugin is using the Trimesh library to load STL files and for mesh manipulations.
Due to licence issue, the initial Fonts based on the Gill Sans MT:style=Bold font style and Arial Rounded MT have been removed and replace by Noto Sans:style=Bold font style and Odin Rounded
A special font called NameIt Rounded have been created for this plugin. The objective of this TrueType font is to be more easily printable with a 3D FDM printing process.
Add Number
Function to add a number in front of each part to identify every part. This function can be used by selecting the elements or a global identification without selection.
Note ! If you use to select the elements, the selecting order will also give the number used to identify each models.

Add Number From part
Function to add a number in front of each part to identify every part. This function can be used by selecting the elements or a global identification without selection. If the name of the part in the Cura Project contains an integer number between two parentheses; this number will be used to identify the part. Ie Ultimaker_wheel_pulley.stl (2) -> 2.

Add Name
Function to add the name of the element in front of each part to identify every part. This function can be used by selecting the elements or a global identification without selection.

Add Recycling Symbol
Function to add the Recycling Symbol associated to the Filament material used to print the part.

Rename Models
You can use the integrated function Rename Models to change the name of the element present on the builtplate before to use the function Add Name.
You can rename several model in the same times
In case of several modifications the first Item will start from (0) -> can be usefull for the function Add Number From Part Ie : 4#issuecomment

Capitalization of the text
The name of the part is systematically converted into capital letters. This is a normal and desired feature. Capital letters are often easier to print (for example no dot on the i or j; I J)
Remove Identifier
The function allows to delete all the meshes generated by the plugin. At first all the meshes created in the session will be deleted. If meshes have been created previously and saved with the project by activating this menu a second time, these meshes will be deleted.
Note : the generated meshes are identified by a specific attribute "Identification Mesh"

Define Text Parameters
The function Define Text Parameters gives you the possibility to change the text definition size and some additional parameter like Prefix and Suffix you can add to the number identifiers.


You can also specify a specific Initial Layer Speed used to print these marks.

Text location option
Front
Basic text creation in the Front of the part.

Front + Base
Basic text creation in the Front of the part. A base is added to the text . This base can be customized by modyfing the base.stl model.

Front + Base + Link
Basic text creation in the Front of the part. A base attached to the model is added to the text . This base can be customized by modyfing the base_link.stl model.

See initial request on this Github
Center & Center (not filled)
By using this option the text will be add not on the border of the part but mirrored in the center of the print. In this way only the line pattern of the first layer is modified, without adding to much print time.

If you want to use this mode, you must fix the Mesh Fixes Union Overlaping Volumes to false. (Parameter automaticaly fixed as Per Model Settings on the text by the Plugin)
It could be also possible according to the Cura release to modify the parameters Remove Mesh Intersection and Alternate Mesh Removal to True.

The Location type Center (not filled) generate a model without infil/Wall and Top/bottom layer. The result if these settings is normaly a text engraved in the bottom of the part.


Installation
Marketplace (recommended):
This plugin is now avalaible in the Cura marketplace. So you can install it automaticaly from this place:

Name It on Ultimaker Market place
Manually:
First, make sure your Cura version is 4.4 or newer.
Download or clone the repository into [Cura configuration folder]/plugins/NameIt.
The configuration folder can be found via Help -> Show Configuration Folder inside Cura.
This menu opens the following folder:
- Windows:
%APPDATA%\cura\<Cura version>\, (usuallyC:\Users\<your username>\AppData\Roaming\cura\<Cura version>\) - Mac OS:
$HOME/Library/Application Support/cura/<Cura version>/ - Linux:
$HOME/.local/share/cura/<Cura version>/
Help
This function will redirect you on the Wiki of this repositery.
Youtube Video