Contrast-DiffAE
This repository contains the code required to train a Contrastive Diffusion Autoencoder. It is an adaptation of the original Diffusion Autoencoder repo found at:
Which was introduced in the paper:
Diffusion Autoencoders: Toward a Meaningful and Decodable Representation \ K. Preechakul, N. Chatthee, S. Wizadwongsa, S. Suwajanakorn 2022 IEEE/CVF Conference on Computer Vision and Pattern Recognition (CVPR).
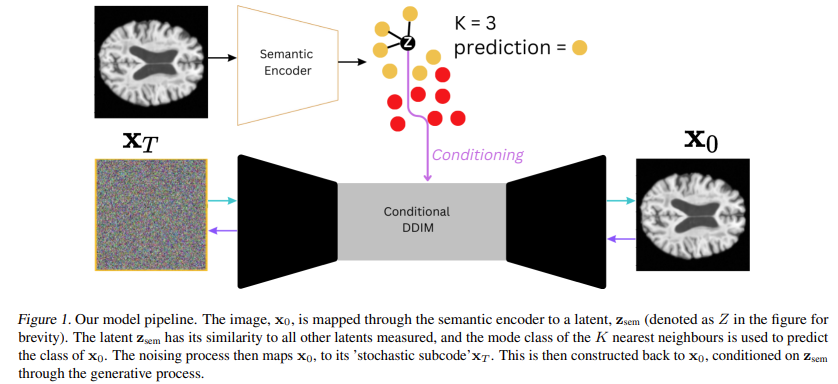
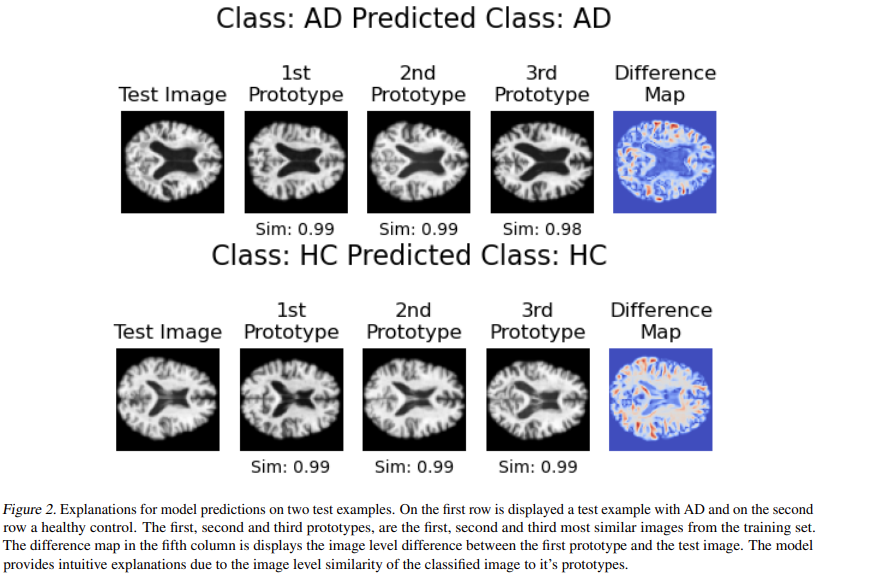
This model produces interpretable explanations for binary classification of images. Images are classified based on their nearest neighbours (prototypes) within the latent space. As such, each prediction comes with an explanation for why the image was classified, namely the prototypes which bares both latent and whole image level similarity to the classified image.
The model architecture can be seen below:
And here are examples of what explanations look like:
This model was introduced in the paper:
Interpretable Alzheimer's Disease Classification Via a Contrastive Diffusion Autoencoder \ A. Ijishakin, A. Abdulaal, A. Hadjivasiliou, S. Martin, J. Cole\ 2023 International Conference of Machine Learning (ICML), 3rd Workshop on Interpretable Machine Learning in Healthcare. \ [paper |bibtex]
For details on accessing the datasets used in the paper as well as access to model weights please get in contact with: ayodeji.ijishakin.21@ucl.ac.uk.
Training a model
-
Clone the repo by running:
git clone https://github.com/A-Ijishakin/Contrast-DiffAE.git -
Make a virtual environment either natively in python by running:
pip install virtualenvvirtualenv cDiffae_envOr in conda by running:
conda create -n cDiffae_env -
Activate that environment Native Python:
source ./cDiffae_env/bin/activateConda:
conda activate cDiffae_env -
Install all of the neccessary dependencies by running:
pip install -r requirement.txt -
Next ammend the file dataset.py such that it loads in your data accordingly. An example dataloader can be found in the file.
-
Then config.py must should be ammended such that the hyperparameters used meet your specifications. These arguments exist on the TrainConfig dataclass which starts on line 25. Arguments which are particularly of note are:
- load_in : This specifies how long training should happen before the contrastive loss kicks in.
- K : This specifies how many neighbours (prototypes) should be used when making a classification prediction.
- alpha : This specifies the weighting on the contrastive loss.
- beta : This specifies the weighting on the predictive loss. The make_dataset method on the TrainConfig class should also be ammended to load your dataset accordingly. Again examples have been left here as a guide.
-
Following this templates.py needs to be modified according to your model, and data specificiation. Changes to the conf.net_ch_mult, will make your model smaller of bigger for example. You can also change the batch size by editing the conf.batch_size argument on line 34.
-
Then train.py needs to be ammended such that it calls on the configuration for your dataset/particular model. An example has been left there as well.
After following the above steps, the model will be ready to train with your specifications and dataset. It is advised that you also inspect the expeiriment.py file as this is the location of the pytorch_lightning class, LitModel, which further defines the training specifications. Methods on this class which should particularly be inspected are:
- training_step : (line 438) modifications should be made to ensure that the data is loaded in each step appropriately.
- training_epoch_end : (line 237) modifications should be made to log metrics at the end of each epoch.
- ModelCheckpoint : (line 1078) modifications should be made to configure checkpointing according to your needs.
The trainer also includes logging of images and the MSE loss as well, so use of the tensorboard is advised. This can be done by running the following command in a terminal with the aformentioned environment active:
tensorboard --logdir=checkpointsThis should open up the tensorboard in a localhost.