ZeroSeg
A code library for the ZeroSeg Raspberry Pi Zero add-on board from ThePiHut.com.
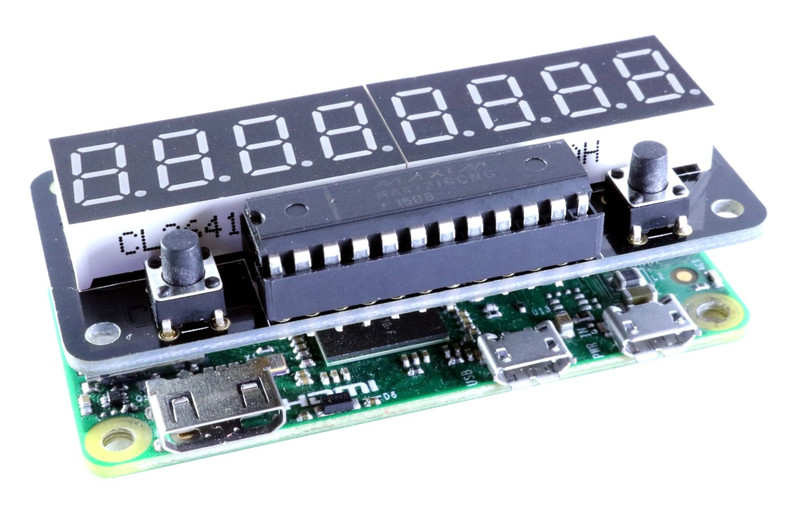
The ZeroSeg contains two (4-character) 7-segment displays, giving you the ability to display 8-digit data on a tiny Pi Zero sized add-on board. It also holds 2 tactile buttons for controlling data, brightness or any other element of your project.
The ZeroSeg works with any 40 GPIO pin Raspberry Pi – not just the Pi Zero - and is controlled by a MAX7219CNG integrated circuit, which manages the display of each LED segment, requiring very few GPIO pins to run the board.

This board’s circuit is wired in the exact same way as generic 7-segment modules, allowing the use of existing code and libraries to easily create Pi Zero projects with 8-character displays.
This code library was originally cloned from Richard Hull's original open source MAX7219 library right here on GitHub. This has since been replaced with the luma.led_matrix library.
This library makes it easy to scroll numbers and text along the ZeroSeg's twin 7-segment displays, running via the MAX7219 IC with just a few simple lines of code.
 Raspberry Pi Setup & Installation
I recommend using a fresh Raspbian image to avoid any conflicts.
-
Download and install the latest copy of Raspbian from here: https://www.raspberrypi.org/downloads/raspbian/
-
Boot (power on) your Raspberry Pi. The displays may light up, this is perfectly normal.
-
In a terminal window, update Raspbian using
sudo apt-get updateand thensudo apt-get upgrade. -
Next run
sudo raspi-configand enable SPI. Select option 5Interfacing Optionsand then option 4SPI. Select Yes to enable the SPI interface and hit enter. -
Exit the config tool by selecting Finish
-
Reboot your Raspberry Pi by entering 'sudo reboot' and hit enter
-
Once rebooted, run
sudo apt-get install git build-essential python-dev python-pip. Enter 'Y' when prompted, and hit enter. Let the install run. -
Enter
cdin the terminal and hit enter, to ensure you're in the home directory -
Next run
git clone https://github.com/AverageMaker/ZeroSeg.gitto download the ZeroSeg code library to your Pi. -
Enter
cd ZeroSegto enter your new ZeroSeg directory -
Next run
sudo python setup.py install -
With the files now downloaded, complete the SPI setup. Whilst still in the ZeroSeg directory, run the following command and hit enter
sudo pip install spidev -
Optional: To delete the files you probably won't need, and reduce clutter, whilst in the ZeroSeg directory run
rm LICENSE.md,rm README.mdandrm setup.py.
Run the Code Example
To make sure everything's working as it should, run the main test script:
-
Enter
cdin the terminal to make sure we're starting from the same place (the home directory) -
Now enter
cd ZeroSeg- this will take you to the main ZeroSeg directory -
Next enter
cd examplesto go to the example script directory -
To run the test script, run
sudo python zeroseg_example.py -
The displays should show the date, then the brightness should fade in and out. The date will then scroll left, followed by the time being displayed. Next the display will count up from a negative number, followed by hex numbers and finally random number count.
Other Example Scripts
More example scripts can be found in the examples directory, which are discussed in more detail in the following sections.
button_example.py - Gives basic button control code. Press the buttons to see printed text in your terminal window.
time_example.py - Constantly shows the time on the display until the script is manually closed.
scrolling_example.py - Scrolls the number '1234' on to the display, then scrolls away to the left, and repeats until the script is manually closed.
date_example.py - Shows the date on the display, and updates every 15 minutes until the script is manually closed.
date_time_example.py - Shows the date for 5 seconds, then the time for 5 seconds, and repeats until the script is manually closed.
text_example.py - Displays a static message up to 8 characters for 3 seconds until the script is manually closed.
rotating_example.py - Scrolls text until the script is manually closed.
Additional examples created by the Raspberry Pi community will be added when shared.
Coding Basics
Whilst this library is based on the original MAX7219 work of Richard Hull (since replaced with the luma.led_matrix repo) here are a few pointers to help get you started.
Extracting code from the main example script (zeroseg_example.py) is a great way to learn how to use the library and expand on it further for your own projects:
Imports & Basic Data Display
Start your file by importing and initialising the sevensegment class:
import ZeroSeg.led as led
device = led.sevensegment()
You can now start with something simple like displaying a number for 5 seconds on one of the displays.
import ZeroSeg.led as led
import time
device = led.sevensegment()

device.write_number(deviceId=0, value=1234)
time.sleep(5)
Show the Date A common project feature for displays this size is to show the date.
Using code found in the example script, we can extract what we need to create a simple date display that updates every 15 minutes:
import ZeroSeg.led as led
import time
from datetime import datetime

def date(device, deviceId):

    now = datetime.now()
    day = now.day
    month = now.month
    year = now.year - 2000

    # Set day
    device.letter(deviceId, 8, int(day / 10))     # Tens
    device.letter(deviceId, 7, day % 10)          # Ones
    device.letter(deviceId, 6, '-')               # dash
    # Set day
    device.letter(deviceId, 5, int(month / 10))     # Tens
    device.letter(deviceId, 4, month % 10)     # Ones
    device.letter(deviceId, 3, '-')               # dash
    # Set day
    device.letter(deviceId, 2, int(year / 10))     # Tens
    device.letter(deviceId, 1, year % 10)     # Ones

device = led.sevensegment(cascaded=2)

while True:
    date(device, 1)
    time.sleep(900) #Update every 15 minutes
    device.clear()
Show the Time Again using parts of the example script, we can simply show the time with a blinking 'dot' LED between the hour and minute digits:
import ZeroSeg.led as led
import time
from datetime import datetime

def clock(device, deviceId, seconds):

    for _ in xrange(seconds):
        now = datetime.now()
        hour = now.hour
        minute = now.minute
        second = now.second
        dot = second % 2 == 0                # calculate blinking dot
        # Set hours
        device.letter(deviceId, 4, int(hour / 10))     # Tens
        device.letter(deviceId, 3, hour % 10, dot)     # Ones
        # Set minutes
        device.letter(deviceId, 2, int(minute / 10))   # Tens
        device.letter(deviceId, 1, minute % 10)        # Ones
        time.sleep(1)

device = led.sevensegment(cascaded=2)

while True:
    clock(device, 1, seconds=10)
Scroll Numbers Scrolling numbers is another fun element to add to your project's display.
Once again, we're using code from the example script to simply scroll some fixed numbers ("1234"). Chop, change and add to this for your own project needs:
import ZeroSeg.led as led
import time

device = led.sevensegment(cascaded=2)

while True:
    device.write_number(deviceId=0, value=1234)
    for x in xrange(2):
        for _ in xrange(8):
            device.scroll_right()
            time.sleep(0.1)
        time.sleep(1)
    device.clear()
Displaying Static Text You can display static text on the ZeroSeg, however as with all 7-segment displays, not every character will work (think about 'W' for example).
Where a letter isn't able to be displayed, an underscore will take its place. Tip: you can mix letters and numbers with this function:
import ZeroSeg.led as led
import time

device = led.sevensegment(cascaded=2)

device.write_text(1,"HELLO")

time.sleep(3)
device.clear()
Scrolling Anything! Scrolling a mix of text and numbers is very easy too. With just a single line of code you can scroll a set message across the display:
import ZeroSeg.led as led

device = led.sevensegment(cascaded=2)

device.show_message("HELLO EVERYONE")
If you want to speed it up or slow it down, just add the optional delay parameter and have a play with the numbers:
import ZeroSeg.led as led

device = led.sevensegment(cascaded=2)

device.show_message("HELLO EVERYONE", delay=0.1)
Button Control We added a button each side of the display, because we figured they would come in handy for a lot of projects using these displays. Everyone likes buttons!
The buttons are hard-wired to GPIO 17 (left button) and GPIO 26 (right button). To use them is just a case of using the RPi.GPIO library which is a very common method.
Within the examples directory is a script called button_example.pywhich shows some basic control by printing on screen when each button is pressed:
import time
import RPi.GPIO as GPIO

switch1 = 17
switch2 = 26

GPIO.setmode(GPIO.BCM) # Use BCM GPIO numbers

GPIO.setup(switch1, GPIO.IN)
GPIO.setup(switch2, GPIO.IN)

print "start"

while True:
    if not GPIO.input(switch1):
        print "Button 1 pressed"
        time.sleep(0.5)

    elif not GPIO.input(switch2):
        print "Button 2 pressed"
        time.sleep(0.5)

    else:
        pass
Change the Brightness A great feature of the MAX7219CNG is the ability to change the display brightness using software rather than a physical control. Even better, we added a couple of buttons to the board so that you can use them for controlling things like display brightness (or anything you want!).
Brightness can be set from 1 to 15 (low to high), and we've incorporated this in the code below to avoid going above or below this range and breaking the library script.
We're using generic GPIO code to control the switches, examples of which can be found in the button_example.py script in the examples directory (see the button code section above as well):
import ZeroSeg.led as led
import RPi.GPIO as GPIO
import time

device = led.sevensegment()

switch1 = 17
switch2 = 26

GPIO.setmode(GPIO.BCM) # Use BCM GPIO numbers

GPIO.setup(switch1, GPIO.IN)
GPIO.setup(switch2, GPIO.IN)

level = 10

while True:
    print "run - level is at ", level
    device.write_number(deviceId=0, value=12345678)
    device.brightness(level)

    if not GPIO.input(switch1):
        if level == 1:
            print "minimum brightness reached"
            time.sleep(0.5)
        if level >= 2:
            level = level -1
            print "Button 1 pressed - brightness down to ", level
            time.sleep(0.5)

    elif not GPIO.input(switch2):
        if level == 15:
            print "Max brightness reached"
            time.sleep(0.5)
        if level <= 14:
            level = level +1
            print "Button 2 pressed - brightness up to ", level
            time.sleep(0.5)

    time.sleep(0.2)
GPIO pin-outs
The following GPIO pins have been used in the ZeroSeg board. Power and GND lines have not been documented, however it's worth mentioning that the MAX7219CNG chip uses the 5V line, whilst the switches use 3.3V.
All other remaining GPIO pins are available for use (if breaking out separately).
| Name | Description | Physical Pin | RPi Function |
|---|---|---|---|
| DIN | Data In | 19 | GPIO 10 (MOSI) |
| CS | Chip Select | 24 | GPIO 8 (SPI CE0) |
| CLK | Clock | 23 | GPIO 11 (SPI CLK) |
| SW1 | Left Switch/Button | 11 | GPIO 17 |
| SW2 | Right Switch/Button | 37 | GPIO 26 |
References
See original GitHub Repository (https://github.com/rm-hull/max7219)
License
This code library is a modified version of Richard Hull's MAX7219 library, therefore the license details, as requested, are being included here:
The MIT License (MIT)
Copyright (c) 2016 Richard Hull
Permission is hereby granted, free of charge, to any person obtaining a copy of this software and associated documentation files (the "Software"), to deal in the Software without restriction, including without limitation the rights to use, copy, modify, merge, publish, distribute, sublicense, and/or sell copies of the Software, and to permit persons to whom the Software is furnished to do so, subject to the following conditions:
The above copyright notice and this permission notice shall be included in all copies or substantial portions of the Software.
THE SOFTWARE IS PROVIDED "AS IS", WITHOUT WARRANTY OF ANY KIND, EXPRESS OR IMPLIED, INCLUDING BUT NOT LIMITED TO THE WARRANTIES OF MERCHANTABILITY, FITNESS FOR A PARTICULAR PURPOSE AND NONINFRINGEMENT. IN NO EVENT SHALL THE AUTHORS OR COPYRIGHT HOLDERS BE LIABLE FOR ANY CLAIM, DAMAGES OR OTHER LIABILITY, WHETHER IN AN ACTION OF CONTRACT, TORT OR OTHERWISE, ARISING FROM, OUT OF OR IN CONNECTION WITH THE SOFTWARE OR THE USE OR OTHER DEALINGS IN THE SOFTWARE.