![]()
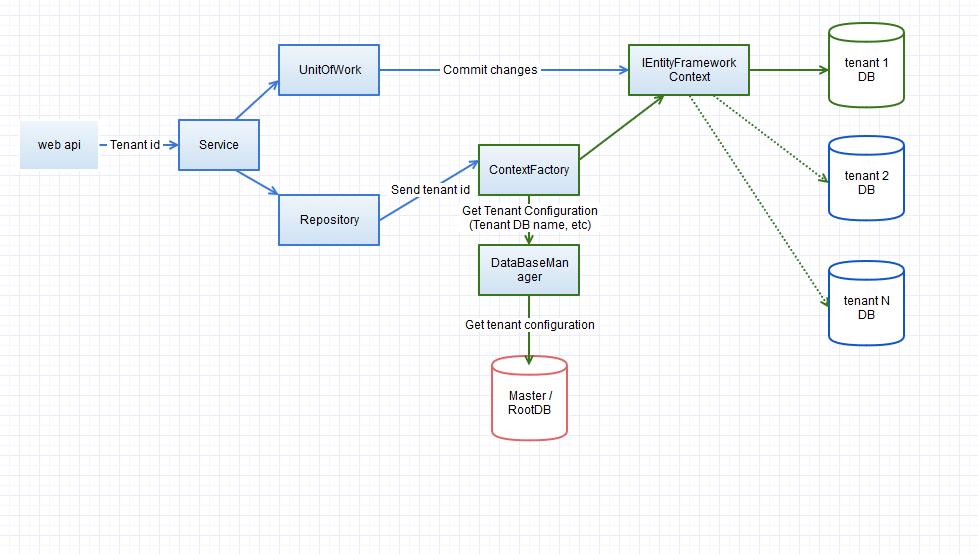
Web API Solution demonstrates mutliteantcy architecture, using Entity Framework, UnitOfWork,Repository patterns


Project
Todo list, accomplished tasks, can be found Here.
Installation
- Clone repository
- Apply Entity Framework migration. Run:
Update-DataBase.- (For Multitenancy testing) Change
DefaultConnectionto;Database=DeviceDb-ten2;inappsettings.json. Run EF migrationUpdate-DataBase. It will create another database. - Tenants Database configuration stored in DataBaseManager (
tenantConfigurationDictionary).
- (For Multitenancy testing) Change
- Fill up valid database connection string configuration option in
appsettings.json. - Run UnitTests.
- (Optional) Run API integration tests
- Build / Run.
Database Connection
DatabaseType field is used to specify the database type the application should connect.
Currently, the framework contains connection information for:
- MsSql (MS SQLServer, Sql Express)
- Postgres NoSql (Information how to setup Postgres can be found here)
The value of DatabaseType should come from DatabaseType enum in Settings folder and should match the class name inside DatabaseTypes folder and implement IDatabaseType interface.
To add a new database type, just add a class implementing IDatabaseType and add the same name inside DatabaseType and change connection string in the DefaultConnection property and DatabaseType to new database type.
Localization Support
Application supports localization support though resource files. Currently, shared resource file is used to support support for English and German languages.
According to (Microsoft docs), to use a UI culture pass it as a query parameter (ui-culture=de-DE).
All the resource values for each UI culture should be added to a resource file under Resources folder. The file name should include culture code.
Text values from resource files based on the UI culture is obtained from using the instance of IStringLocalizer<SharedResource> sharedLocalizer which is injected via constructor. Then use this object to get resource values using sharedLocalizer["ResourceKey"].Value.
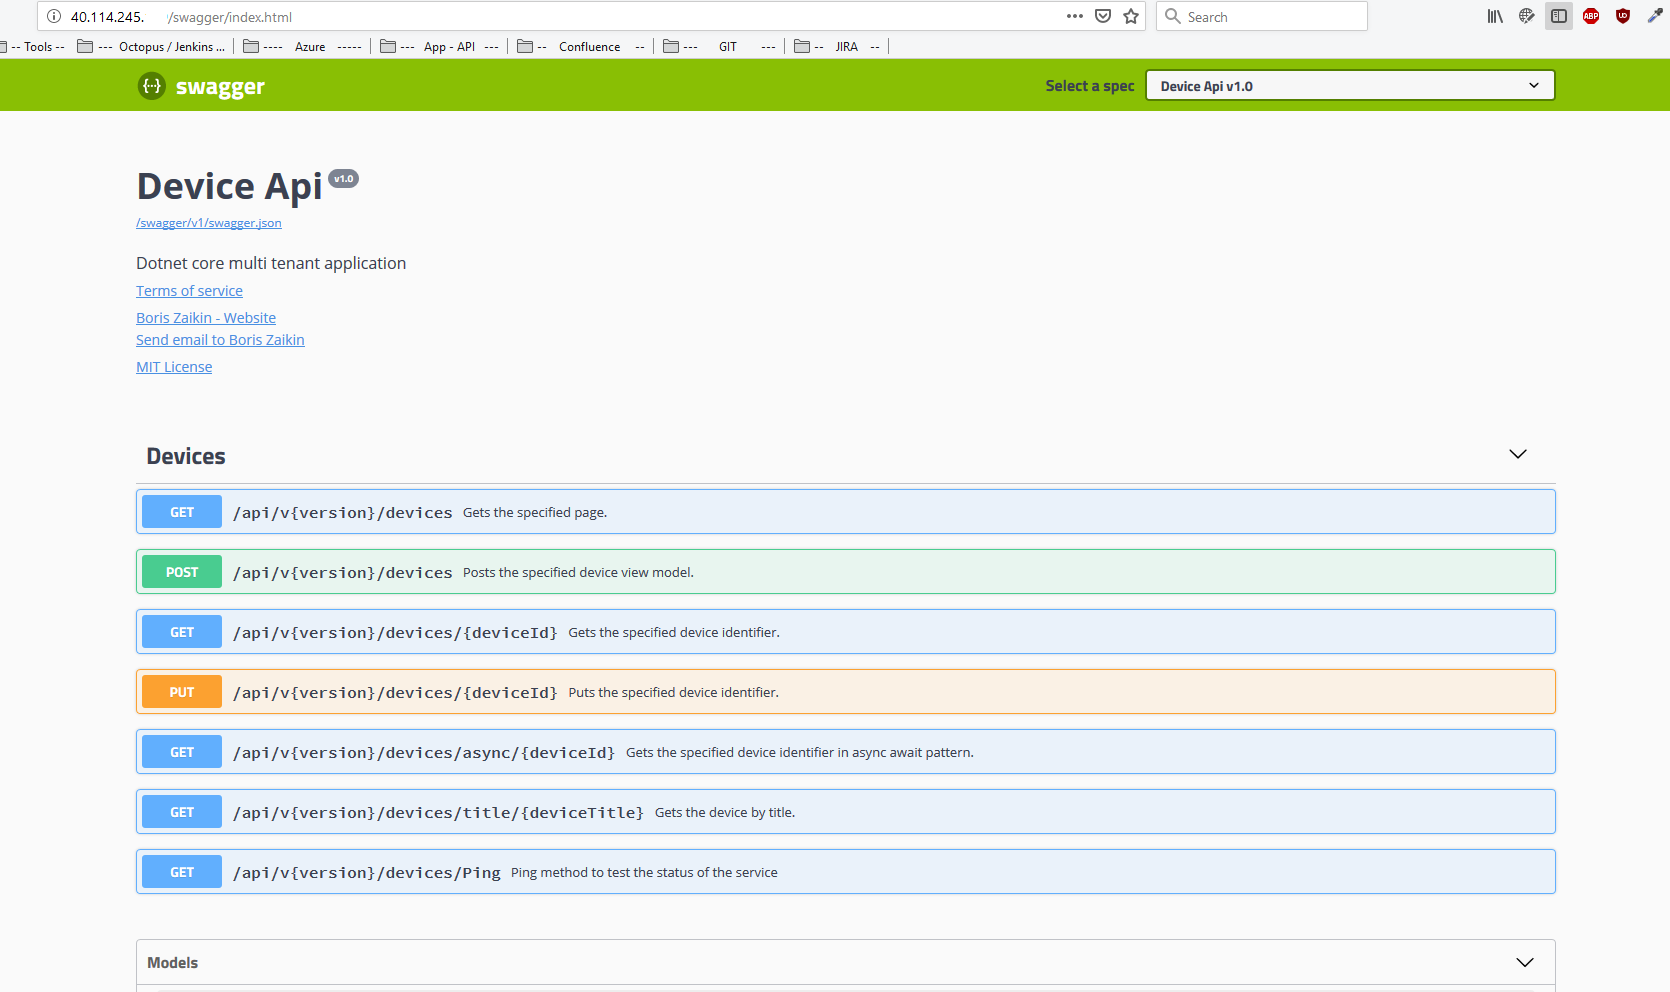
Check Ping action in BaseController.
Note: If only one of culture or ui-culture is sent in the query parameter then dotnetcore uses same value for the other one.
Data Seeding
To seed database with initial data update SeedData method in DataSeederclass.
There can be multiple data seeding classes. To create a new data seeding class:
- Create a new data seeding class in the same folder inheriting from IDataSeeder interface.
- Register new class in the IocContainerConfiguration class by replacing
DataSeederwith new class name.
Dapper support
Dapper is incorporated into the application. DapperUnitOfWork handles all the begin and commit transaction. The instance of Dapper Unit of work can be obtained by requesting instance of IDapperUnitOfWork.
DeviceService is using DapperUnitOfWork to fetch and create records in the database through DapperRepository. DapperRepository is a generic repository with built in methods for fetching and adding records into the database based on DapperInsert and DapperUpdate attributes defined on the Model. In the future update and delete will be implemented.
The DapperRepository builds generic insert and fetch using QueryBuilderHelper class based on the attributes defined on the model. For example Device model defines DapperInsert on few properties. Only these property names will be considered while building insert query.
The Dapper region in the DeviceController uses Dapper to fetch and create records in the database.
Docker support
App images available in Docker Hub Registry: https://hub.docker.com/r/boriszn/devicemanagerapi/ (LINUX and Windows images are available)
You can pull image:
- Linux:
docker pull boriszn/devicemanagerapi:1.0.4 - Windows
docker pull boriszn/devicemanagerapi:latest
The solution was migrated to the docker container and support docker compose orchestration.
You can run docker using following options:
- Visual Studio 2017 Debug mode. Run VS (
F5) will run docker container. - Docker CLI. Run in PS
docker run -p 8080:80 --rm -d boriszn/devicemanagerapi:latestwill run docker container in background (ordocker run -p 8080:80 boriszn/devicemanagerapi:latest)
You can access the the Web API locally via URL: http://localhost:8080
You can also Build container from solution. To do so run docker build -t boriszn/devicemanagerapi:1.0.4 . or run it in VS.
IMPORTANT. To debug solution in Visual Studio replace file Dockerfile with Dockerfile-VsDebug file (or replace content of Dockerfile from Dockerfile-VsDebug) This is temporary work around to be able to run containers in command line and in Visual Studio. It will fixed (consolidated in one docker file) in upcoming PRs
To run/build project without docker, switch from Docker to DeviceManagerApi (specified in launchSettings.json)
Authentication and Authorization using IdentityServer4
Bearer Authentication using IdentityServer4 is added to the application. The feature is enabled by default and can be turned off by removing the compiler switch UseAuthentication under Build tab in the project properties of bother DeviceManager.Api and DeviceManager.Api.UnitTests.
To use the authentication following two lines must be added to your hosts file situated under c:\Windows\System32\Drivers\etc\ folder.
127.0.0.1 devicemanager.api
127.0.0.1 devicemanager.identityserver
IMPORTANT: Reason for adding the names to the hosts file is to use IdentityServer authentication with or without docker-compose
Currently, a basic IdentityServer with pre defined Clients, Users, ApiResourses is added.
Config file defines two clients
Swagger Ui Client - Used to access the API resources using Swagger Ui

Test Client - Used to test the API end point by setting up Test Client.
TestUsers file contains two test users with predefined roles and tenants in claims.
User Roles and Tenant Authorization
The claims defined in the TestUsers file are used in the AuthenticationConfiguration file to grant access to the Api Resource.
services.AddAuthentication handles the authentication and logic inside options.AddPolicy handles the authorization part. There are 3 policies currently defined.
-
DefaultPolicy
This policy is executed when the
controlleroractioncontains[Authorize]attribute like BaseController.If the requesting user is having
adminrole or the client isTest Clientfrom unit test then access to any resources beloging to any tenant is allowed.But, if the user is neither of the above then access to only the
Tenantdefined in the TenantClaim property is allowed.
-
Admin
This policy is executed when the
controlleroractionis decorated with[Authorize(PolicyConstants.Admin)]. SoGetDataaction in (AdminController)[src/DeviceManager.Api/Controllers/AdminController.cs] is accessed by users havingadminormanagerdefined in theirroleclaims. In our predfined users onlyalicecan access theGetDataresource. -
Manager
This policy is excuted when the
controlleroractionis decorated with[Authorize(PolicyConstants.Manager)]. Users withmanagerin theirroleclaims.
Kubernates (minikube cluster) setup
- Setup minikube (tested on
v0.34.1) (This article should help) - Start minikube (for example:
minikube start --vm-driver=hyperv --hyperv-virtual-switch=testCluster. My setup used Windows 10 Pro + Hyper-V Hypervisor) - To create deployments run
kubectl create -f ks-deployment.yaml - Check if deployments created successfully, run
kubectl get deployments - Create service to expose app, run
kubectl expose deployment devicemanagerapi --type=NodePort(as minikube doesn't contain ingress/load balancer) - To receive URL run
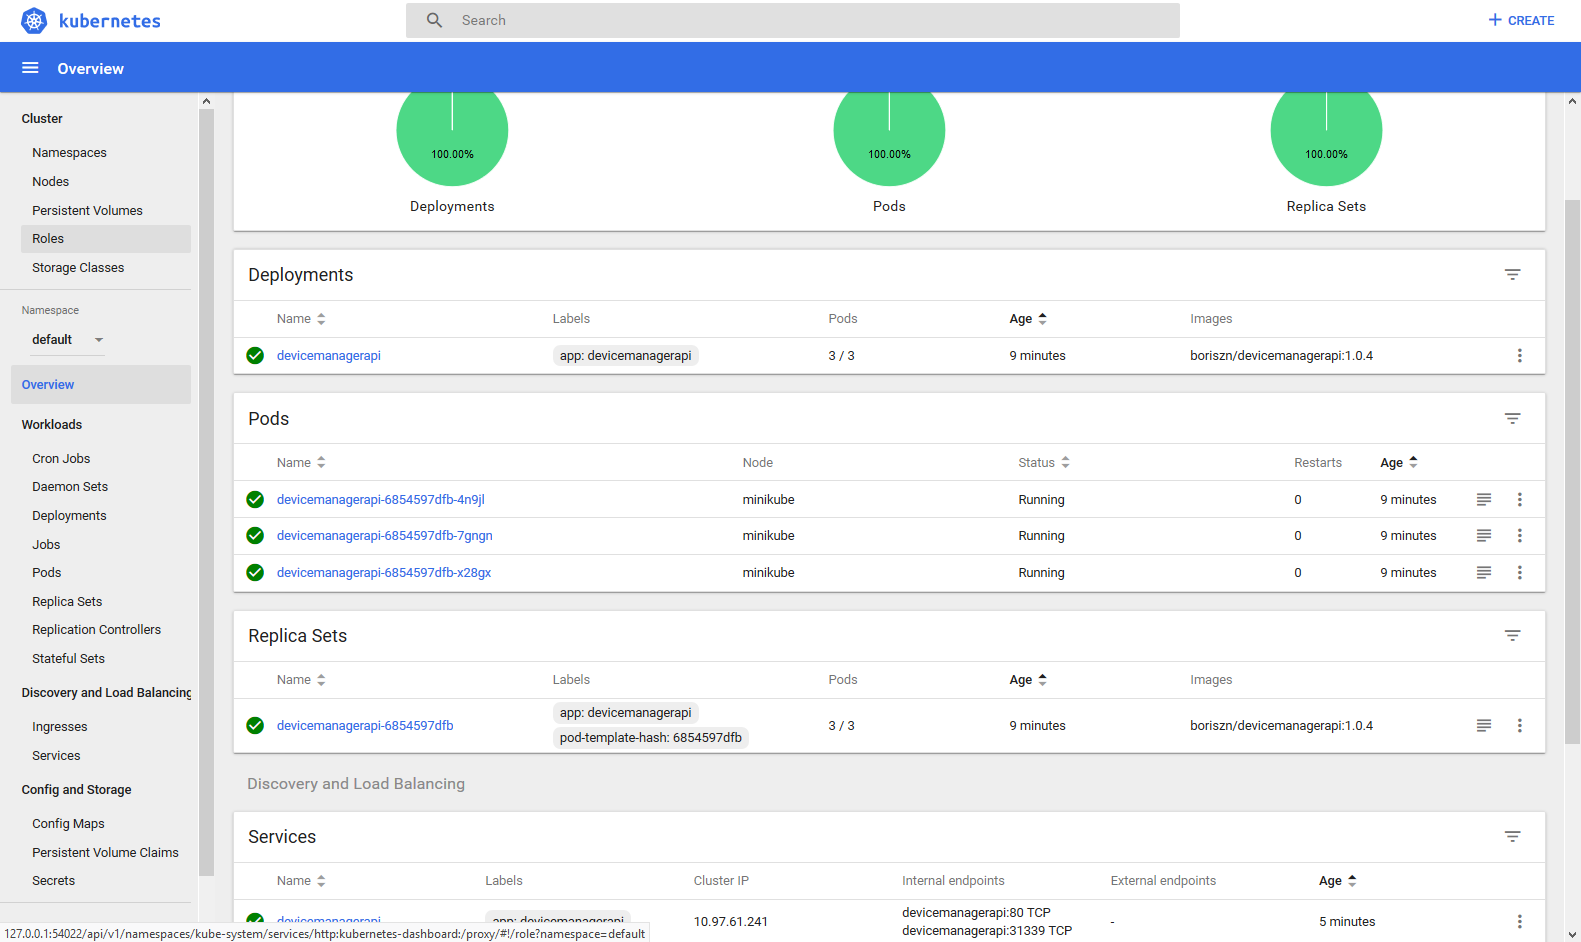
minikube service devicemanagerapi --url - Finally you can test all setup, run minikube dashboard
minikube dashboard. Dashboard is displayed on image below.
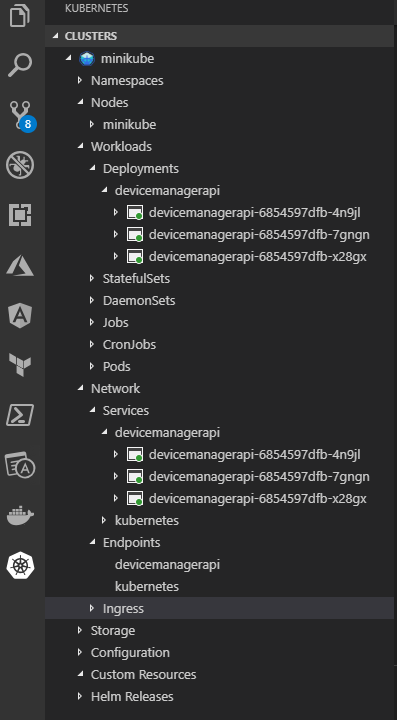
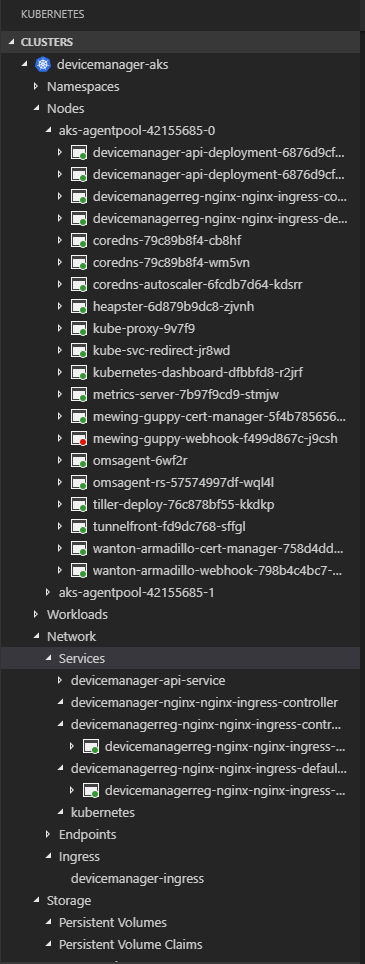
Or you can use This plugin for VS Code to manage/monitor minikube cluster
IMPORTANT: Ensure that you are switched to LINUX docker container. Because minikube support only LINUX based containers (at least v0.34.1. In future it can be changed)
Azure Kubernetes Services setup
You can Setup Azure Container Registry or use docker hub.
Azure Container Registry (ACR) setup (optional)
- Create ACR registry. I used this registry name
devicemanagerreg - Tag your image, in case of moving to ACR. Example:
docker tag [image-id] devicemanagerreg.azurecr.io/boriszn/devicemanagerapi:1.0.4 - Push your image to ACR, example:
docker push devicemanagerreg.azurecr.io/boriszn/devicemanagerapi:1.0.4
Create AKS Cluster via Azure Portal
Set up connection between ACR and AKS
- Create Secret in the Kubernetes, to access Docker Images from Azure Container Registries. (For ACR you can obtain secretes from Azure Portal simply open Acess keys in the ACR blade).
Run
kubectl create secret docker-registry devicemanagerreg-connection --docker-server=devicemanagerreg.azurecr.io --docker-username=devicemanagerreg --docker-password=[ACR-Registry-Password] --docker-email=email@gmail.com - Obtain
ServiceAccount.yamlfrom Kubernetes. Run:kubectl get serviceaccounts default -o yaml > ./serviceaccount.yaml. Than addimagePullSecretsline to the end of service account file:
....
imagePullSecrets:
- name: devicemanagerreg-connection
....- Replace service account, Run:
kubectl replace serviceaccount default -f ./serviceaccount.yaml
Setup NGINX Ingress load balancer
- Install Helm package manager
- Sign-in with azure CLI. (User command from azure portal:
az aks get-credentials –resource-group [your-resource-group] –name [your-cluster-name]). - Run:
helm init - Install NGINX-Ingress. Runs
helm install stable/nginx-ingress –name devicemanagerreg-nginx –set rbac.create=false - Receive ingress config, public IP etc. Run:
kubectl get service -l app=nginx-ingress --namespace default
Setup Configuration for Ingress, Ingress-Service, Service, Deployment
- Setup Ingress
kubectl apply -f aks-deployment/ingress.yaml. - Setup Ingress Service:
kubectl apply -f aks-deployment/ingress-service.yaml - Setup Service
kubectl apply -f aks-deployment/devicemanager-api-service.yaml - Setup Deployment
kubectl apply -f aks-deployment/aks-deployment.yaml - Done. ;) You can obtain statistic using Kubernetes Dashboard or using VS code plugin.
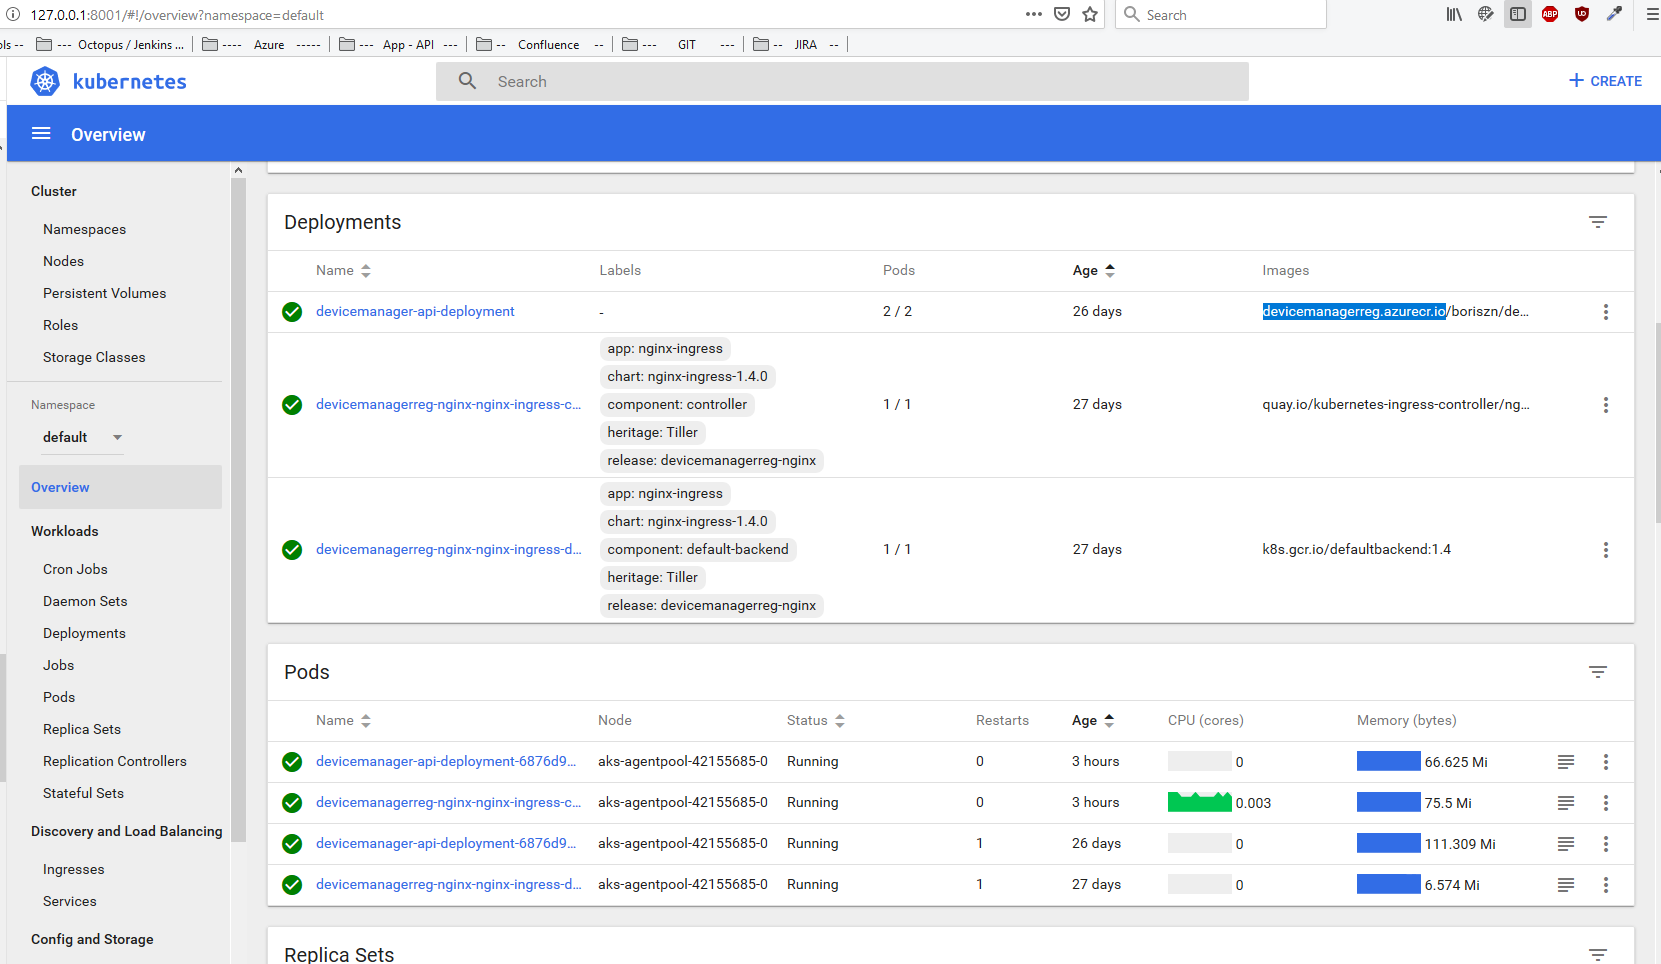
DeviceManager API should be accessible via public IP or with DNS name (FQDN).
Run AKS through HTTPS
Known issues
- In case of running from Docker Connection string should be changed to use IP addresses or real server domain names for
Serverparameter. AlsoUser IdandPasswordshould be added. For example:Server=192.168.1.36,1433;Database=DeviceDb;User Id=MyUser;Password=MySuperStringPassword;Trusted_Connection=True;MultipleActiveResultSets=true
Please be aware connection string like: Server=(localdb)\\mssqllocaldb;Database=DeviceDb;Trusted_Connection=True;MultipleActiveResultSets=true will NOT work if app running from Docker container
Contributing
- Fork it!
- Create your feature branch:
git checkout -b my-new-feature - Commit your changes:
git commit -am 'Add some feature' - Push to the branch:
git push origin my-new-feature - Submit a pull request
History
All changes can be easily found in RELEASENOTES
License
This project is licensed under the MIT License