Data Rivers
Apache Airflow + Beam ETL scripts for the City of Pittsburgh's data pipelines, orchestrated with Google Cloud Composer (Google's hosted version of the open-source Airflow project) and Dataflow (Google's hosted version of the open-source Apache Beam project).
Requirements: Python 3.7.x, access to city GCP account, JSON file with Data Rivers service account key (stored in the project root as data_rivers_key.json but excluded from version control for security reasons via .gitignore)
- Google Cloud Composer documentation
- Apache Airflow documentation
- Google Dataflow documentation
- Apache Beam documentation
Architecture
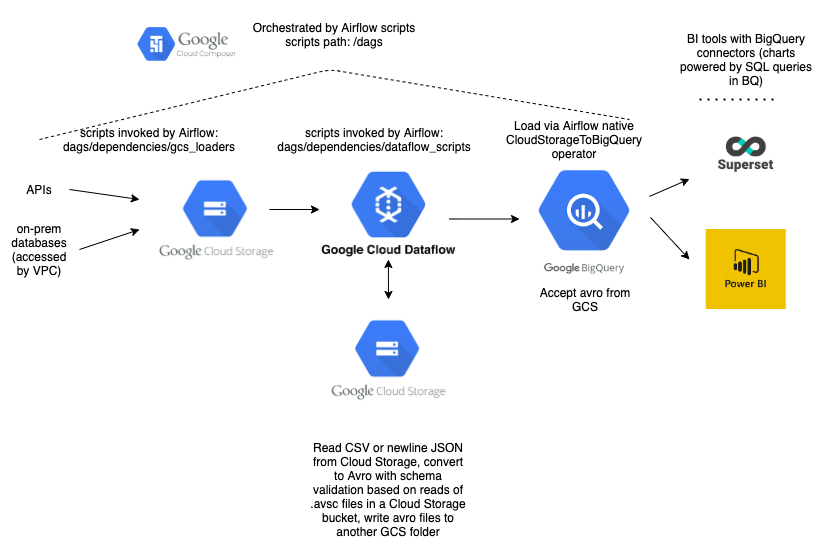
The DAGs in this project share a common structure. First, they load data (either via queries to third-party APIs or on-prem JDBC databases) to Google Cloud Storage, in JSON or CSV format. For many data sources (particularly those on-prem), there exist R scripts from our legacy system to do the data extraction. To avoid duplicating this work, we've packaged a number of these scripts in Docker images stored privately on Google Container Registry. We use Airflow's DockerOperator to invoke those scripts, which in some cases return CSV and in others newline-delimited JSON (Beam requires newline-delimited).
Where legacy loading scripts don't exist, we load data via Python scripts stored in this project. Whenever possible, we load data as newline-delimited JSON, which is easier to work with downstream. We use Airflow's template variables for DAG execution date to bucket these files by time (e.g. gs://pghpa_computronix/businesses/2020/02/2020-02-07_business_licenses.json). That values are stored retroactively, so if we need to rerun a job from the previous week, the files will still get routed to the appropriate time buckets.
Once files are loaded to Cloud Storage, we run Apache Beam scripts via Dataflow, Google's hosted Beam offering. These scripts transform the data where necessary (e.g. changing data types, normalizing addresses) and convert it to avro. Avro has several advantages: its fast and compact binary format; its self-describing schemas, which provide type safety; and its status as the preferred format for loading to BigQuery. Avro schemas are defined as JSON, and can include an arbitrary number of additional fields beyond data types, so they're useful for storing human-readable metadata (e.g. data steward, publish frequency) along with schema information.
The Dataflow scripts validate datums against avro schemas, which we push to this repository and copy to a Google Cloud Storage bucket. When creating a DAG for a new data source, you'll first need to create the avro schema, push it to the data-rivers-schemas repo, and copy it to the pghpa_avro_schemas bucket. Note that geocoding/reverse geocoding attributes, or other enrichments added via BigQuery joins, aren't part of these schemas, as they aren't added until later in the pipeline. Where applicable, we add metadata in the avro schemas (e.g. "reverse_geocoded": "True" or "downstream_enrichments": "["foo", "bar"]) to flag additional fields that appear in the final BigQuery table.
The Dataflow scripts read the schemas from that bucket. Once any necessary transforms are completed and the data has been converted to avro, we upload it to a separate folder (avro_output) in the same bucket that houses the source JSON or CSV. Again, these filenames are time-bucketed using Airflow template variables.
Once the avro files are in Cloud Storage, we move to the next step in the Airflow DAG: using Airflow's GoogleCloudStoragetoBigQuery operator to (you guessed it) insert the data into BigQuery. In cases where the data needs to be reverse-geocoded, we then use a function from airflow_utils to do so using SQL GEOGRAPHY operators and create a new table. (Note: We could simplify the DAGS by creating BigQuery views for the geo-joining portion, but Google BI Engine doesn't support GEOGRAPHY operators, and is very useful for reducing latency in dashboarding)
Environment variables
You'll need a file called data_rivers_key.json in your root folder in order to interact with GCP (this file is excluded
from version control via .gitignore). Consult a team member to get a copy of this file as well the most up-to-date
version of the .env file. It's EXTREMELY IMPORTANT that these values never be shared publicly or inadvertnetly
committed to this repository. You can share them securely using privnote.com, which allows you to
generate one-time, expiring URLs.
If you're working on a branch and you're adding a new environment variable, make sure to update env.example with the
name of that variable, and add the value to the environment variables used by our production cluster by navigating
here.
Dependencies/running locally
As a start, you'll need to install and configure Apache Airflow. Create your
virtual environment by running pip install -r requirements.txt and pip install -r requirements-gcp.txt. Then,
navigate to /dags/dependences/dataflow_scripts and run python setup.py install to install the local dataflow_utils
module. We recommend using pyenv and pyenv-virtualenv to manage your virtual environments.
We have separate requirements files (requirements.txt and requirements-gcp.txt) because the Cloud Composer machines
come with a standard set of Python libraries, which are listed in requirements.txt. It's important to keep this file
in sync with the package versions for the particular Airflow version we're running (as of November 2020, that's 1.10.10)
in order to avoid version conflicts between your local development environment and production. The package versions can
be found on this page (find the current
project version in the table and click "Package list for Python 3"). Apart from those standard packages, we have the
additional packages specific to this project listed in requirements-gcp.txt. When you need to add a new package,
specify it in requirements-gcp.txt and install it on the production cluster from this page.
Once you've created your virtual environment and installed Airflow, you can trigger tasks or entire DAGs locally via airflow run my_dag my_task YYYY-MM-DD or airflow trigger_dag my_dag. To view progress/logging in the Airflow web UI, you'll need to run the processes airflow webserver (which shows on port 8080) and airflow scheduler in two separate terminal windows. Make sure you have the proper .env values available in the shell sessions from which you run those commands, and that you've activated this project's virtualenv in those sessions.
Note that when running DAGs locally that use a DockerOperator or GKEPodOperator (the GCP flavor of Docker), the jobs will fail if you haven't pulled the relevant images from Google Container Registry to your machine. Example pull command: docker pull gcr.io/data-rivers/pgh-trash-can-api
A lot of these images are pretty bulky, so if you're working on a machine with limited disk space, it may make sense to delete them (via the docker rmi command) once you've completed your work, then re-pull as needed.
Consult env.example for the necessary environment variables (talk to your teammates to get these). We recommend installing autoenv via homebrew so that your system sources environment variables automatically when you enter the directory.
You'll see that we use the variables GCLOUD_PROJECT and GCS_PREFIX throughout the scripts. In your local environment, these should be set to data-rivers-testing and pghpa_test, respectively (this is extremely important). In the production environment (hosted via Cloud Composer), the variables are set to data-rivers and pghpa. This gives us a testing sandbox for local development while walling off the production environment from code that hasn't yet been merged and deployed from master.
Updating the project Airflow version
As mentioned above, it's critical to keep the package verisons in requirements.txt in sync with those of the Composer
image for the particular version of Airflow we're using. You can update the Airflow version by changing
this line in requirements.txt.
When you do so, be sure to review the package list at the link above and make sure everything listed in
requirements.txt is in sync with the package versions listed there.
We'll most likely want to do the next update when Airflow 2.0 is released in a Composer image. You can keep track of that by consulting this page and looking for the latest version.
It may be possible to get around this problem in the future by deploying this project within a Docker container pointing to the image we want; I (James) will leave that to future developers on this project to determine.
Tests/Deployment
Write tests for every new Dataflow script. You can execute the entire test suite by running pytest from the project root
(please do so before making any new pull requests).
We have Google Cloud Build linked to this repository, which will run the test suite on any new pull request. Don't merge a PR before you get a green dot to the left of the blue Cloud Build icon. If there's a failure, click "Details", then on the next page, scroll down and click "View more details on Google Cloud Build" to examine the logs and see what went wrong.
Cloud Build automatically copies the repository to Cloud Storage when changes are merged to the master branch. The configuration
for this is stored in cloudbuild.yaml; this file then runs the deploy command defined in the Makefile. Note that
the Makefile only copies .py and .jar files, in order to avoid copying logs and other junk into the GCS bucket. If
you end up adding an additional file type to the project that's necessary in production, add a step in the Makefile
to copy files with that extension.
You can check out our Cloud Build setup here (you must be logged in with your GCP Google account). There you'll see the configuration of our triggers, as well as a build history with helpfully verbose logging.
Cloud Build uses Docker images to load a container and run its tests. At present, the container that runs the first step
of the build uses Airflow 1.10 (our version as of November 2020). When the time comes to upgrade to Airflow 2.0, delete
the image gcr.io/data-rivers/airflow from [our Google Container Registry]
(https://console.cloud.google.com/gcr/images/data-rivers?project=data-rivers) and recreate one of the same name by
following the instructions here.
Networking/Kubernetes configuration
Our production environment runs on a Google Kubernetes Engine cluster, as is standard for Cloud Composer projects. You can view the GKE cluster configuration here, and the Composer configuration here.
This project pulls data from a number of sources within the city's internal network (e.g. Public Safety and Finance databases).
Consequently, it has to utilize a Virtual Private Connection that allows it access behind our firewall. The configuration
for that network (pgh-on-prem-vpn) can be viewed here.
The cluster machines don't have individual public IP addresses; instead, we utilize IP address masquerading so that they appear to communicate from a single IP address (instructions for determining that IP address are below). This is useful because when we need to gain access to a new, protected data source (e.g. non-public vendor API such as the QScend's 311 feed), only that single cluster IP needs to be whitelisted. We've configured IP masquerading based on the workflows outlined here and here. The scripts we utilized in that process can be found here. If you need to adjust this setup (which you hopefully shouldn't need to), consult AJ and the network team.
As of November 2020, the network team has a plan in place to set up an interconnect between our network and Google Cloud that would obviate the need for the current VPC (consult AJ and team on the timing for that). It would likely be more straightforward to go that route if possible, however it may necessitate spinning up a new Cloud Composer environment, re-adding the environment variables and PyPi packages, and getting the new cluster IP whitelisted with whatever third-party/vendor sources necessitate that.
To test whether the production cluster can access a particular data source, navigate to the data-rivers
VM instances dashboard. Find an
instance that includes the text data-rivers-default-pool in the same and click the "SSH" button on the righthand side.
That will open up a terminal for the VM in a new window. Test whether you can hit a particular endpoint or database
by typing curl -i someurl.com and seeing whether it successfully returns data and a 200 status response. If yes,
the relevant DAG should work in production; if not, work with the vendor, our network team, or whomever else manages the
data source you're trying to access. If it's an internal source behind the city firewall, consult AJ and the network team
to see whether the VPN or firewall need to be adjusted. If it's a vendor API, have them whitelist the cluster IP address,
which can be found by entering curl icanhazip.com in that same terminal window for the VM.
Backfilling data
When you write and deploy a new DAG, there will often be historical data that you'll want to load to BigQuery. The best way I
(James, Nov. 2020) have found to do this is to run a one-off script to download the historical data into a directory named
/backfill in a Google Cloud Storage bucket. Then, on your local machine, adjust the relevant DAG file to comment out the
GCS load step from the beginning and hard-code the path to the /backfill folder into the arguments passed to the Dataflow step.
From there, run the DAG from your terminal with airflow trigger_dag your_dag. That will load the historical data to BigQuery.
Once you've confirmed it's there, you can uncomment the initial GCS step in the DAG.
The backfills will typically be either SELECT * statements hitting on-prem databases, or API calls (possibly fired off in a loop
if rate limits pose a challenge for high-volume historical datasets). These backfill scripts will typically be one-offs,
so they don't need to be committed to this repo; if you want to store them for the team for reference, you can put them
here.
Schema migrations
You'll occasionally want to update the schema for a dataset (adding or subtracting fields). The best way to do this is as follows:
- Update the .avsc file in data-rivers-schemas with the additional column(s) or redactions
- If necessary, edit the relevant table schemas via the BigQuery console (do this first in
data-rivers-testing) - Refactor the relevant Dataflow file if needed (e.g. change field names, change data types)
- Profit
Monitoring/Error alerting
Our Airflow UI—from which you can monitor the progress of our DAGs, view error logs, and rerun them if necessary—can be found here. Join the "Airflow errors" channel on Microsoft Teams to get alerts when production DAGs fail, including links to the relevant error logs.