hexo-theme-reimu


❤ Hakurei Reimu ❤
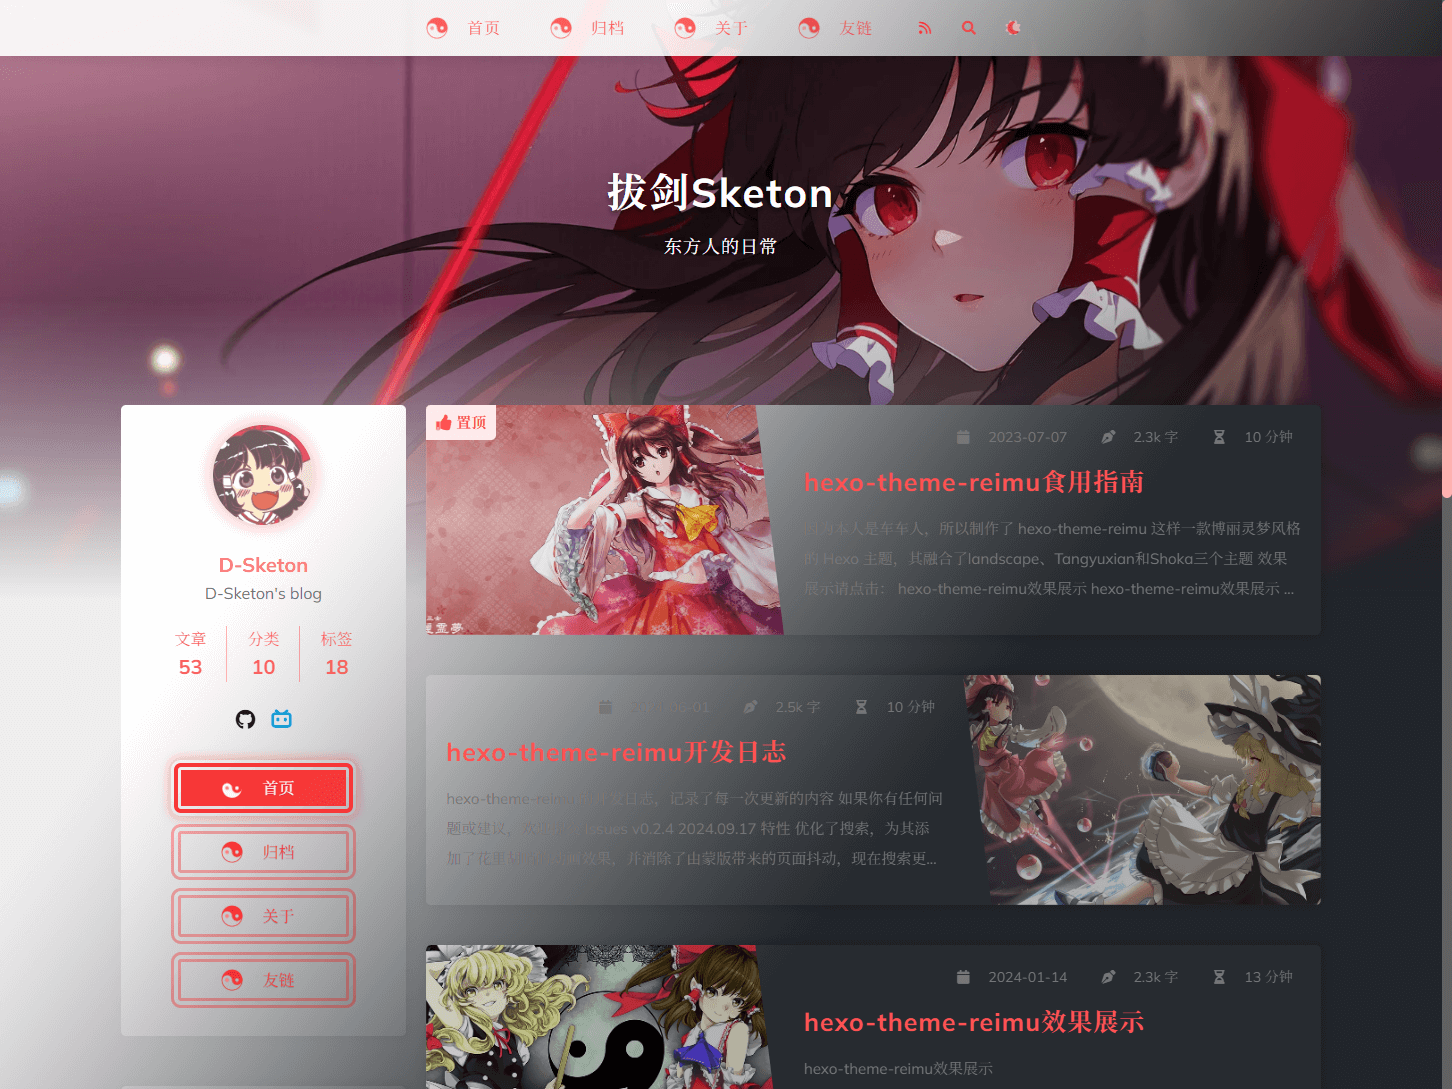
[演示网站](https://d-sketon.github.io) | [开发日志](https://d-sketon.github.io/20240601/hexo-theme-reimu-log/) 简体中文 | [English](https://github.com/D-Sketon/hexo-theme-reimu/blob/main/README.en.md)本人是车车人,所以制作了这样一款博丽灵梦风格的 Hexo 主题,融合了 landscape、Tangyuxian 和 Shoka 三个主题
Astro 主题请参见 astro-theme-reimu
欢迎提交 ISSUE 和 PR!
特性
- 所有的博客常规功能
- 兼容 Hexo v6+
- 响应式布局
- 代码高亮,代码粘贴
- 支持 KaTeX 展示数学公式
- 支持 Mermaid 展示流程图
- Algolia / hexo-generator-search 搜索支持
- valine / waline / twikoo / gitalk / giscus 评论系统
- valine / waline 文章阅读统计
- 不蒜子访客统计
- 支持 RSS
- 同时支持 iconfont 和 fontawesome
- 黑夜模式
- 图片懒加载
- 加载动画
- TOC
- 回到顶部
- 鼠标动画
- pjax
- ServiceWorker
- live2d
- reimu 鼠标指针
- 内部提供内链/外链/友链卡片的标签插件
- 支持文章底部版权声明
- 支持配置自定义 CDN 源
结构
.
├── _screenshot 截图
├── _example    示例source文件夹内结构
├── _config.yml 主题配置
├── languages
├── layout
├── scripts
└── source
安装
使用 npm
npm install hexo-theme-reimu --save或直接克隆本仓库至 /themes 文件夹下并重命名为 reimu
git clone https://github.com/D-Sketon/hexo-theme-reimu.git并修改 _config.yml 中的 theme
# Extensions
## Plugins: https://hexo.io/plugins/
## Themes: https://hexo.io/themes/
theme: reimu
使用
基本结构
### 基本结构 为了保证显示正确,请参考 `_example` 在 `source` 中分别建立 `_data`、`about` 和 `friend` 文件夹 #### \_data - `avatar` 文件夹中存储作者头像,默认命名 `avatar.webp`,可在 内层 `_config.yml` 中做如下配置 ```yaml avatar: "avatar.webp" # 默认就是在avatar文件夹内寻找,请不要包含路径,否则会404 ``` - `covers` 文件夹中存储文章封面 - `covers.yml` 中存储文章封面 url #### about `index.md` 作为**关于**页面 #### friend `index.md` 作为**友链**页面,在 `_data.yml` 中填入友链信息即可在页面上显示对应好友卡片封面、头图和图标
### 封面、头图和图标 #### 封面 封面显示逻辑如下 - 如果文章的 Front matter 中包含 cover 的 url,则该文章头图和首页缩略图均显示该 url ```yaml --- title: Hello World cover: https://example.com --- ``` - 如果文章的 Front matter 中包含 cover 为 `false`,则该文章不显示头图(首页上仍然是随机图片) ```yaml --- title: Hello World cover: false --- ``` - 如果文章的 Front matter 中包含 cover 为 `rgb(xxx,xxx,xxx)`,则该文章头图为对应的渐变纯色(首页上仍然是随机图片) ```yaml --- title: Hello World cover: rgb(255,117,117) --- ``` - 否则查找 `covers` 文件夹和 `covers.yml`,并从中随机挑选图片 - 若上述文件均不存在,则显示头图 #### 头图 头图保存于 `themes/reimu/source/images/banner.webp`,可在内层 `_config.yml` 中修改 ```yaml banner: "/images/banner.webp" ``` #### 图标 图标保存于 `themes/reimu/source/images/favicon.ico`,可在内层 `_config.yml` 中修改 ```yaml favicon: "/images/favicon.ico" ``` #### 置顶 在文章的 Front-matter 中添加 `sticky: true` ```yaml --- title: Hello World sticky: true --- ```代码高亮
### 代码高亮 为保证代码块的正确显示,请保证外层 `_config.yml` 中为如下配置 (<7.0.0) ```yaml highlight: enable: true wrap: true hljs: false prismjs: enable: false ``` (>=7.0.0) ```yaml syntax_highlighter: highlight.js highlight: wrap: true hljs: false ``` 代码块同时提供了代码粘贴功能,点击代码块右上角的复制按钮即可复制代码。在内层 `_config.yml` 中可以对复制功能进行配置。 `success` 为复制成功时的提示,`fail` 为复制失败时的提示。此外,可以配置版权声明,当复制的字符数大于 `count` 时会在复制的内容后面添加 `content` 版权声明。 ```yaml clipboard: success: 复制成功(*^▽^*) fail: 复制失败 (゚⊿゚)ツ copyright: enable: false count: 50 # 大于多少字符添加版权声明 content: 本文版权:本博客所有文章除特别声明外,均采用 BY-NC-SA 许可协议。转载请注明出处! ```站内评论
### 站内评论 > 站内评论可以使用 Front matter 中的 `comments` 独立控制每篇文章是否显示评论。 > 当 `comments` 为 `false` 时不显示评论,`true` 或不填时根据 `_config_yml` 的配置决定是否显示。 若基于 [Valine](https://valine.js.org/) 请参考其官方文档完成 `LeanCloud` 的配置,并在内层 `_config_yml` 中将 `valine.enable` 改为 `true`,并填入自己的 `appId` 和 `appKey` ```yaml valine: enable: true appId: "your appId" appKey: "your appKey" ``` 若基于 [Waline](https://waline.js.org/) 请参考其[官方文档](https://waline.js.org/guide/get-started/)完成 `LeanCloud` 的配置,并在内层 `_config_yml` 中将 `waline.enable` 改为 `true`,并填入自己的 `serverURL` ```yaml waline: enable: true serverURL: "your server url" lang: zh-CN locale: {} # https://waline.js.org/guide/features/i18n.html#%E8%87%AA%E5%AE%9A%E4%B9%89%E8%AF%AD%E8%A8%80 emoji: - https://unpkg.com/@waline/emojis@1.2.0/weibo - https://unpkg.com/@waline/emojis@1.2.0/alus - https://unpkg.com/@waline/emojis@1.2.0/bilibili - https://unpkg.com/@waline/emojis@1.2.0/qq - https://unpkg.com/@waline/emojis@1.2.0/tieba - https://unpkg.com/@waline/emojis@1.2.0/tw-emoji meta: - nick - mail - link requiredMeta: - nick - mail wordLimit: 0 pageSize: 10 pageview: true ``` 若基于 [twikoo](https://twikoo.js.org) 请参考其[官方文档](https://twikoo.js.org/quick-start.html)完成 腾讯云 或 Vercel 部署,并在内层 `_config_yml` 中将 `twikoo.enable` 改为 `true`,并填入自己的 `envId` ```yml twikoo: enable: true envId: # 腾讯云环境填 envId;Vercel 环境填地址(https://xxx.vercel.app) region: ``` 若基于 [giscus](https://giscus.app/zh-CN),请参考文档完成仓库的配置,并在内层 `_config_yml` 中将 `giscus.enable` 改为 `true`,并填入对应的数据 ```yml giscus: enable: true repo: "your repo" repoId: "your repoId" category: "your category" categoryId: "your categoryId" mapping: mapping strict: 0 reactionsEnabled: 1 emitMetadata: 0 inputPosition: bottom commentTheme: preferred_color_scheme lang: zh-CN ``` 若基于 [gitalk](https://gitalk.github.io/) 请参考其[官方文档](https://github.com/gitalk/gitalk?tab=readme-ov-file#usage)完成仓库的配置,并在内层 `_config_yml` 中将 `gitalk.enable` 改为 `true`,并填入对应的数据 ```yml gitalk: enable: true clientID: "your application client ID" clientSecret: "your application client secret" repo: "your repo" owner: "repo owner" admin: "repo owner and collaborators" md5: false # 是否使用 md5 加密路径 ```站内搜索
### 站内搜索 若选择 [Algolia](https://www.algolia.com/),请安装 [hexo-algoliasearch](https://github.com/LouisBarranqueiro/hexo-algoliasearch) ```bash npm install hexo-algoliasearch --save ``` 并参考其 [README](https://github.com/LouisBarranqueiro/hexo-algoliasearch#readme) 完成对 `Algolia` 账号的配置,并在外层 `_confg.yml` 中添加如下配置 ```yml algolia: appId: "your applicationID" apiKey: "your apiKey" adminApiKey: "your adminApiKey" indexName: "your indexName" chunkSize: 5000 fields: - content:strip:truncate,0,500 - excerpt:strip - gallery - permalink - photos - slug - tags - title ``` 在内层 `_config_yml` 中将 `algolia_search.enable` 改为 `true` ```yaml algolia_search: enable: true ``` 注意:搜索跳转链接为永久链接,所以请保证外层 `_config.yml` 中的 `url` 填写正确 若选择 [hexo-generator-search](https://github.com/wzpan/hexo-generator-search),请安装[hexo-generator-search](https://github.com/wzpan/hexo-generator-search) 并参考其 [README](https://github.com/wzpan/hexo-generator-search#readme)在外层 `_config.yml` 中添加如下配置 ```yml search: path: search.json # 文件名必须为search.json field: post content: true ``` 在内层 `_config_yml` 中将 `generator_search.enable` 改为 `true` ```yaml generator_search: enable: true ```数学公式
### 数学公式 数学公式基于 [Katex](https://github.com/KaTeX/KaTeX),请安装 [hexo-renderer-markdown-it-plus](https://github.com/CHENXCHEN/hexo-renderer-markdown-it-plus) ```bash npm uninstall hexo-renderer-marked --save npm install hexo-renderer-markdown-it-plus --save ``` 在内层 `_config_yml` 中将 `math.enable` 改为 `true` ```yaml math: enable: true ```Mermaid
### Mermaid 请安装 [hexo-filter-mermaid-diagrams](https://github.com/webappdevelp/hexo-filter-mermaid-diagrams) ```bash npm install hexo-filter-mermaid-diagrams --save ``` 在内层 `_config_yml` 中将 `mermaid.enable` 改为 `true` ```yaml mermaid: enable: true ``` 并在需要使用 mermaid 的文章的 front-matter 中添加 `mermaid: true` ```yaml --- title: Hello World mermaid: true --- ```RSS
### RSS 请安装 [hexo-generator-feed](https://github.com/hexojs/hexo-generator-feed) ```bash npm install hexo-generator-feed --save ``` 并参考其 [README](https://github.com/hexojs/hexo-generator-feed#readme) 在外层 `_config.yml` 完成对 `feed` 的配置 在内层 `_config.yml` 中填入生成的 `xml` ```yaml rss: atom.xml ```Icon
### Icon Icon 默认使用本项目提供的 iconfont(v0.1.3+) ```yml icon_font: 4552607_y484ez0be3f ``` 如果想要继续使用 fontawesome 图标,请将 `icon_font` 设置为 `false`,此时会使用 `vendor` 中对应的 fontawesome ```yml fontawesome: high_priority: - webcache|@fortawesome/fontawesome-free@6.5.1/css/regular.min.css - webcache|@fortawesome/fontawesome-free@6.5.1/css/solid.min.css low_priority: - webcache|@fortawesome/fontawesome-free@6.5.1/css/brands.min.css - webcache|@fortawesome/fontawesome-free@6.5.1/css/v5-font-face.min.css - webcache|@fortawesome/fontawesome-free@6.5.1/css/v4-font-face.min.css ```高级功能
### 高级功能 #### firework 默认开启 ```yaml firework: enable: true ``` 具体配置请查看 [mouse-firework](https://github.com/D-Sketon/mouse-firework) #### pjax 默认关闭 ```yaml pjax: enable: false ``` > pjax 在 v0.0.10 中被引入,用于那些需要添加音乐播放器等需要 SPA 的用户。但其仍然属于实验性质,引入后可能会出现诸如**脚本无法执行**、**脚本重复执行**、**页面渲染混乱**等 BUG。请慎重考虑! #### ServiceWorker 默认关闭 ```yaml service_worker: enable: false ``` #### live2d 默认关闭 ```yaml live2d: enable: false ``` #### reimu 鼠标指针 默认开启 ```yml reimu_cursor: true ``` #### 头图响应式(v0.2.0+) 默认关闭,打开后并提供对应尺寸的图片和媒体查询可以在一定程度上提高移动端的 LCP ```yml banner_srcset: enable: false srcset: - src: "/images/banner-600w.webp" media: "(max-width: 479px)" - src: "/images/banner-800w.webp" media: "(max-width: 799px)" - src: "/images/banner.webp" media: "(min-width: 800px)" ``` #### quicklink(v0.2.3+) 默认开启,打开后可以在用户停留在页面时预加载链接,提高用户体验 ```yml quicklink: enable: true timeout: 3000 # 预加载超时时间 priority: true # 是否优先加载 ignores: [] # 忽略的链接,仅支持字符串 ``` #### 文章版权声明(v0.2.0+) 默认关闭 ```yml article_copyright: enable: false # 是否展示版权卡片? content: author: # true | false 版权卡片展示作者? link: # true | false 版权卡片展示链接? title: # true | false 版权卡片展示标题? date: # true | false 版权卡片展示创建日期? updated: # true | false 版权卡片展示更新日期? license: # true | false 版权卡片展示协议? ``` #### 过期提醒(v0.2.4+) 默认关闭 ```yml outdate: enable: false daysAgo: 180 # 多少天前的文章算过期 message: 本文最后更新于 {time},请注意文中内容可能已经发生变化。 ```Vendor
### Vendor v0.1.0 对 `vendor` 进行了较大程度的重构,目前 `vendor` 路径的组成方式为:`:cdn|:package@:version/:file`,`:cdn`可在 `vendor` 中自行配置。目前自带以下 CDN 源: ```yaml cdn_jsdelivr_gh: https://cdn.jsdelivr.net/gh/ # 仅针对github加速 cdn_jsdelivr_npm: https://cdn.jsdelivr.net/npm/ # 仅针对npm加速 fastly_jsdelivr_gh: https://fastly.jsdelivr.net/gh/ # 仅针对github加速 fastly_jsdelivr_npm: https://fastly.jsdelivr.net/npm/ # 仅针对npm加速 unpkg: https://unpkg.com/ # 仅针对npm加速 webcache: https://npm.webcache.cn/ # 仅针对npm加速 ``` 用户可根据网络状况自行切换 CDN 源。贡献者
许可
