OpenSourceLogger
This software creates a web application with Spring Boot and with this web application you can control and measure analog inputs and outputs and store them into a MySQL database.
Features
- 4 Analog inputs of 12-bit
- 2 Analog inputs of 16-bit
- 3 Analog inputs of 16-bit differential
- 9 PWM control outputs
- 6 Digital inputs
- 3 Analog outputs of 12-bit
- Circuit protection from high voltage
- Spring Security Login
- MySQL database
- USB Camera view (Does not work with Raspberry Pi)
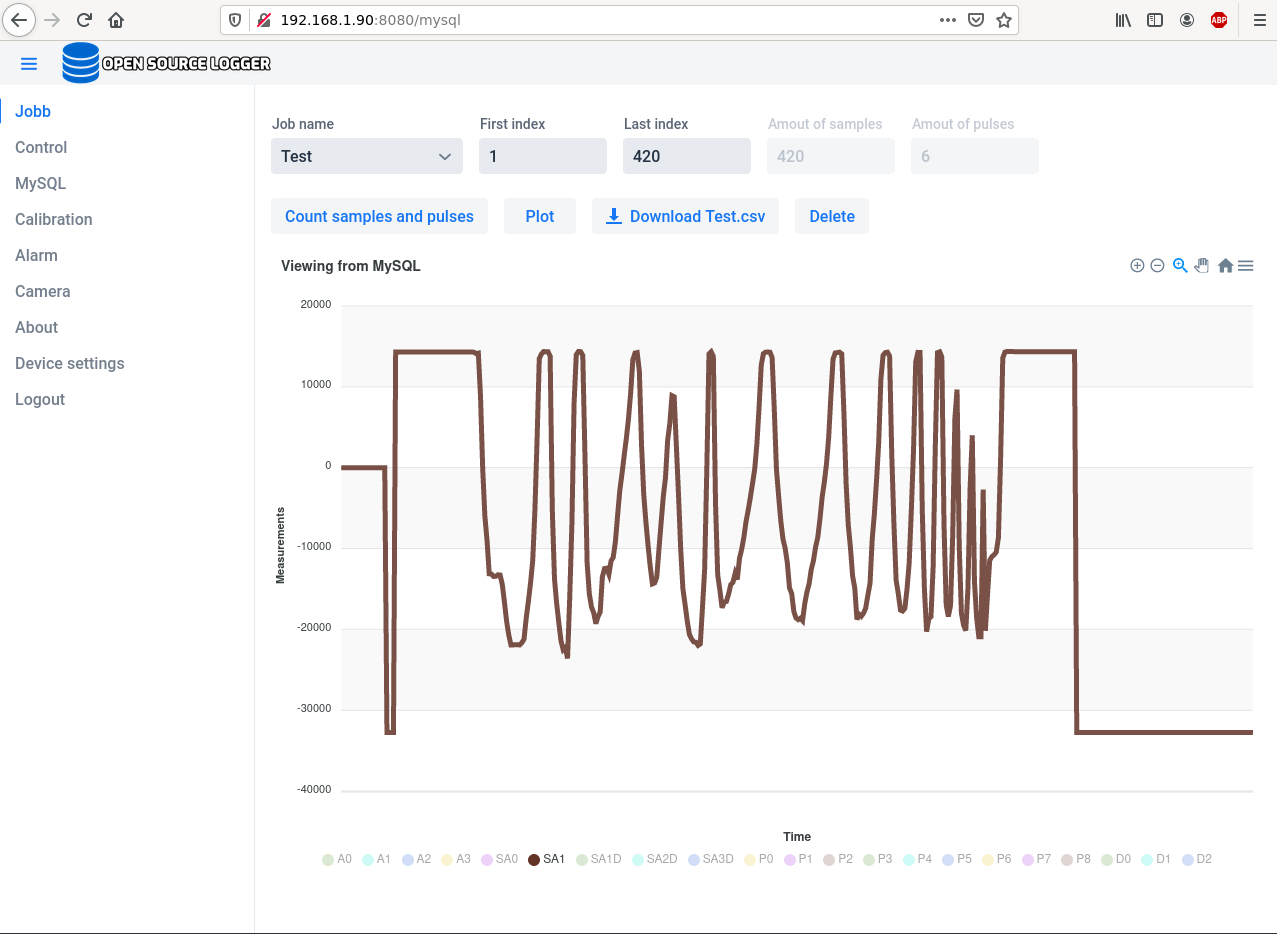
- Plotting functionality
- SMTP alarm functionality
- CSV generation of measurements
- Connect with RX and TX from Raspberry Pi pins
- Save unsaved database measurement for later if database might be slow for a moment
- Close down PWM and analog outputs when stop logging or alarm goes of
With this user view, you can control PWM, DAC, read ADC and logging digital inputs online over the web. Set an alarm and calibration of a special sensor you want to use. Store all data inside the database. Then later you can bring the measurement back to a plot. Notice that you can close down the web browser while you logging. It will continue to sample in a separate thread.
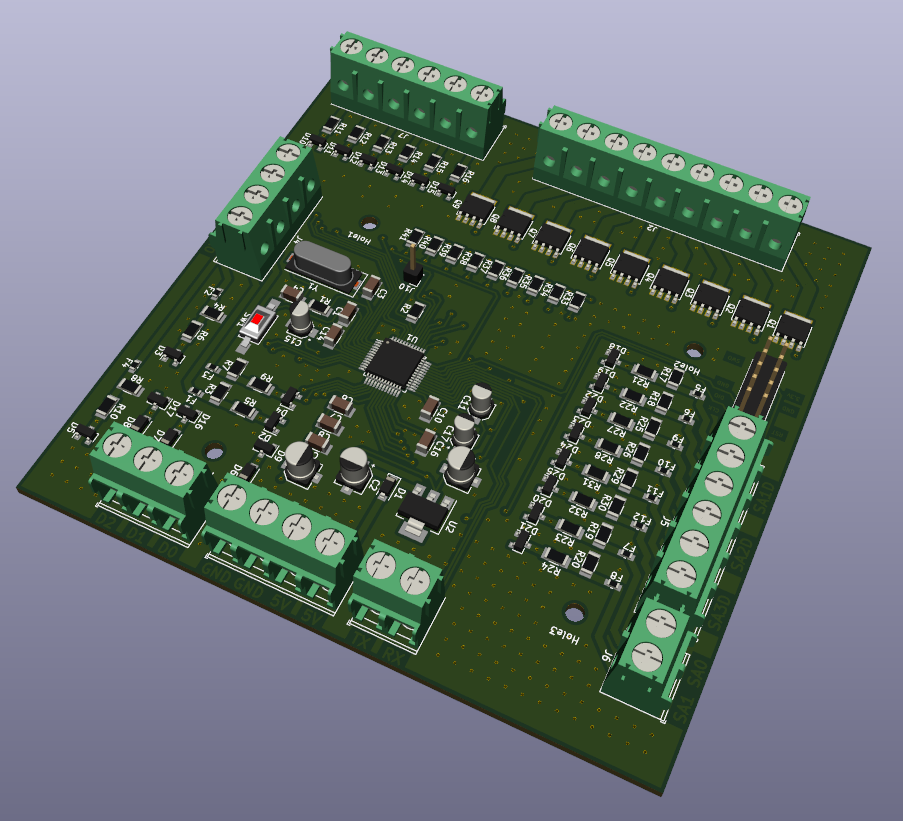
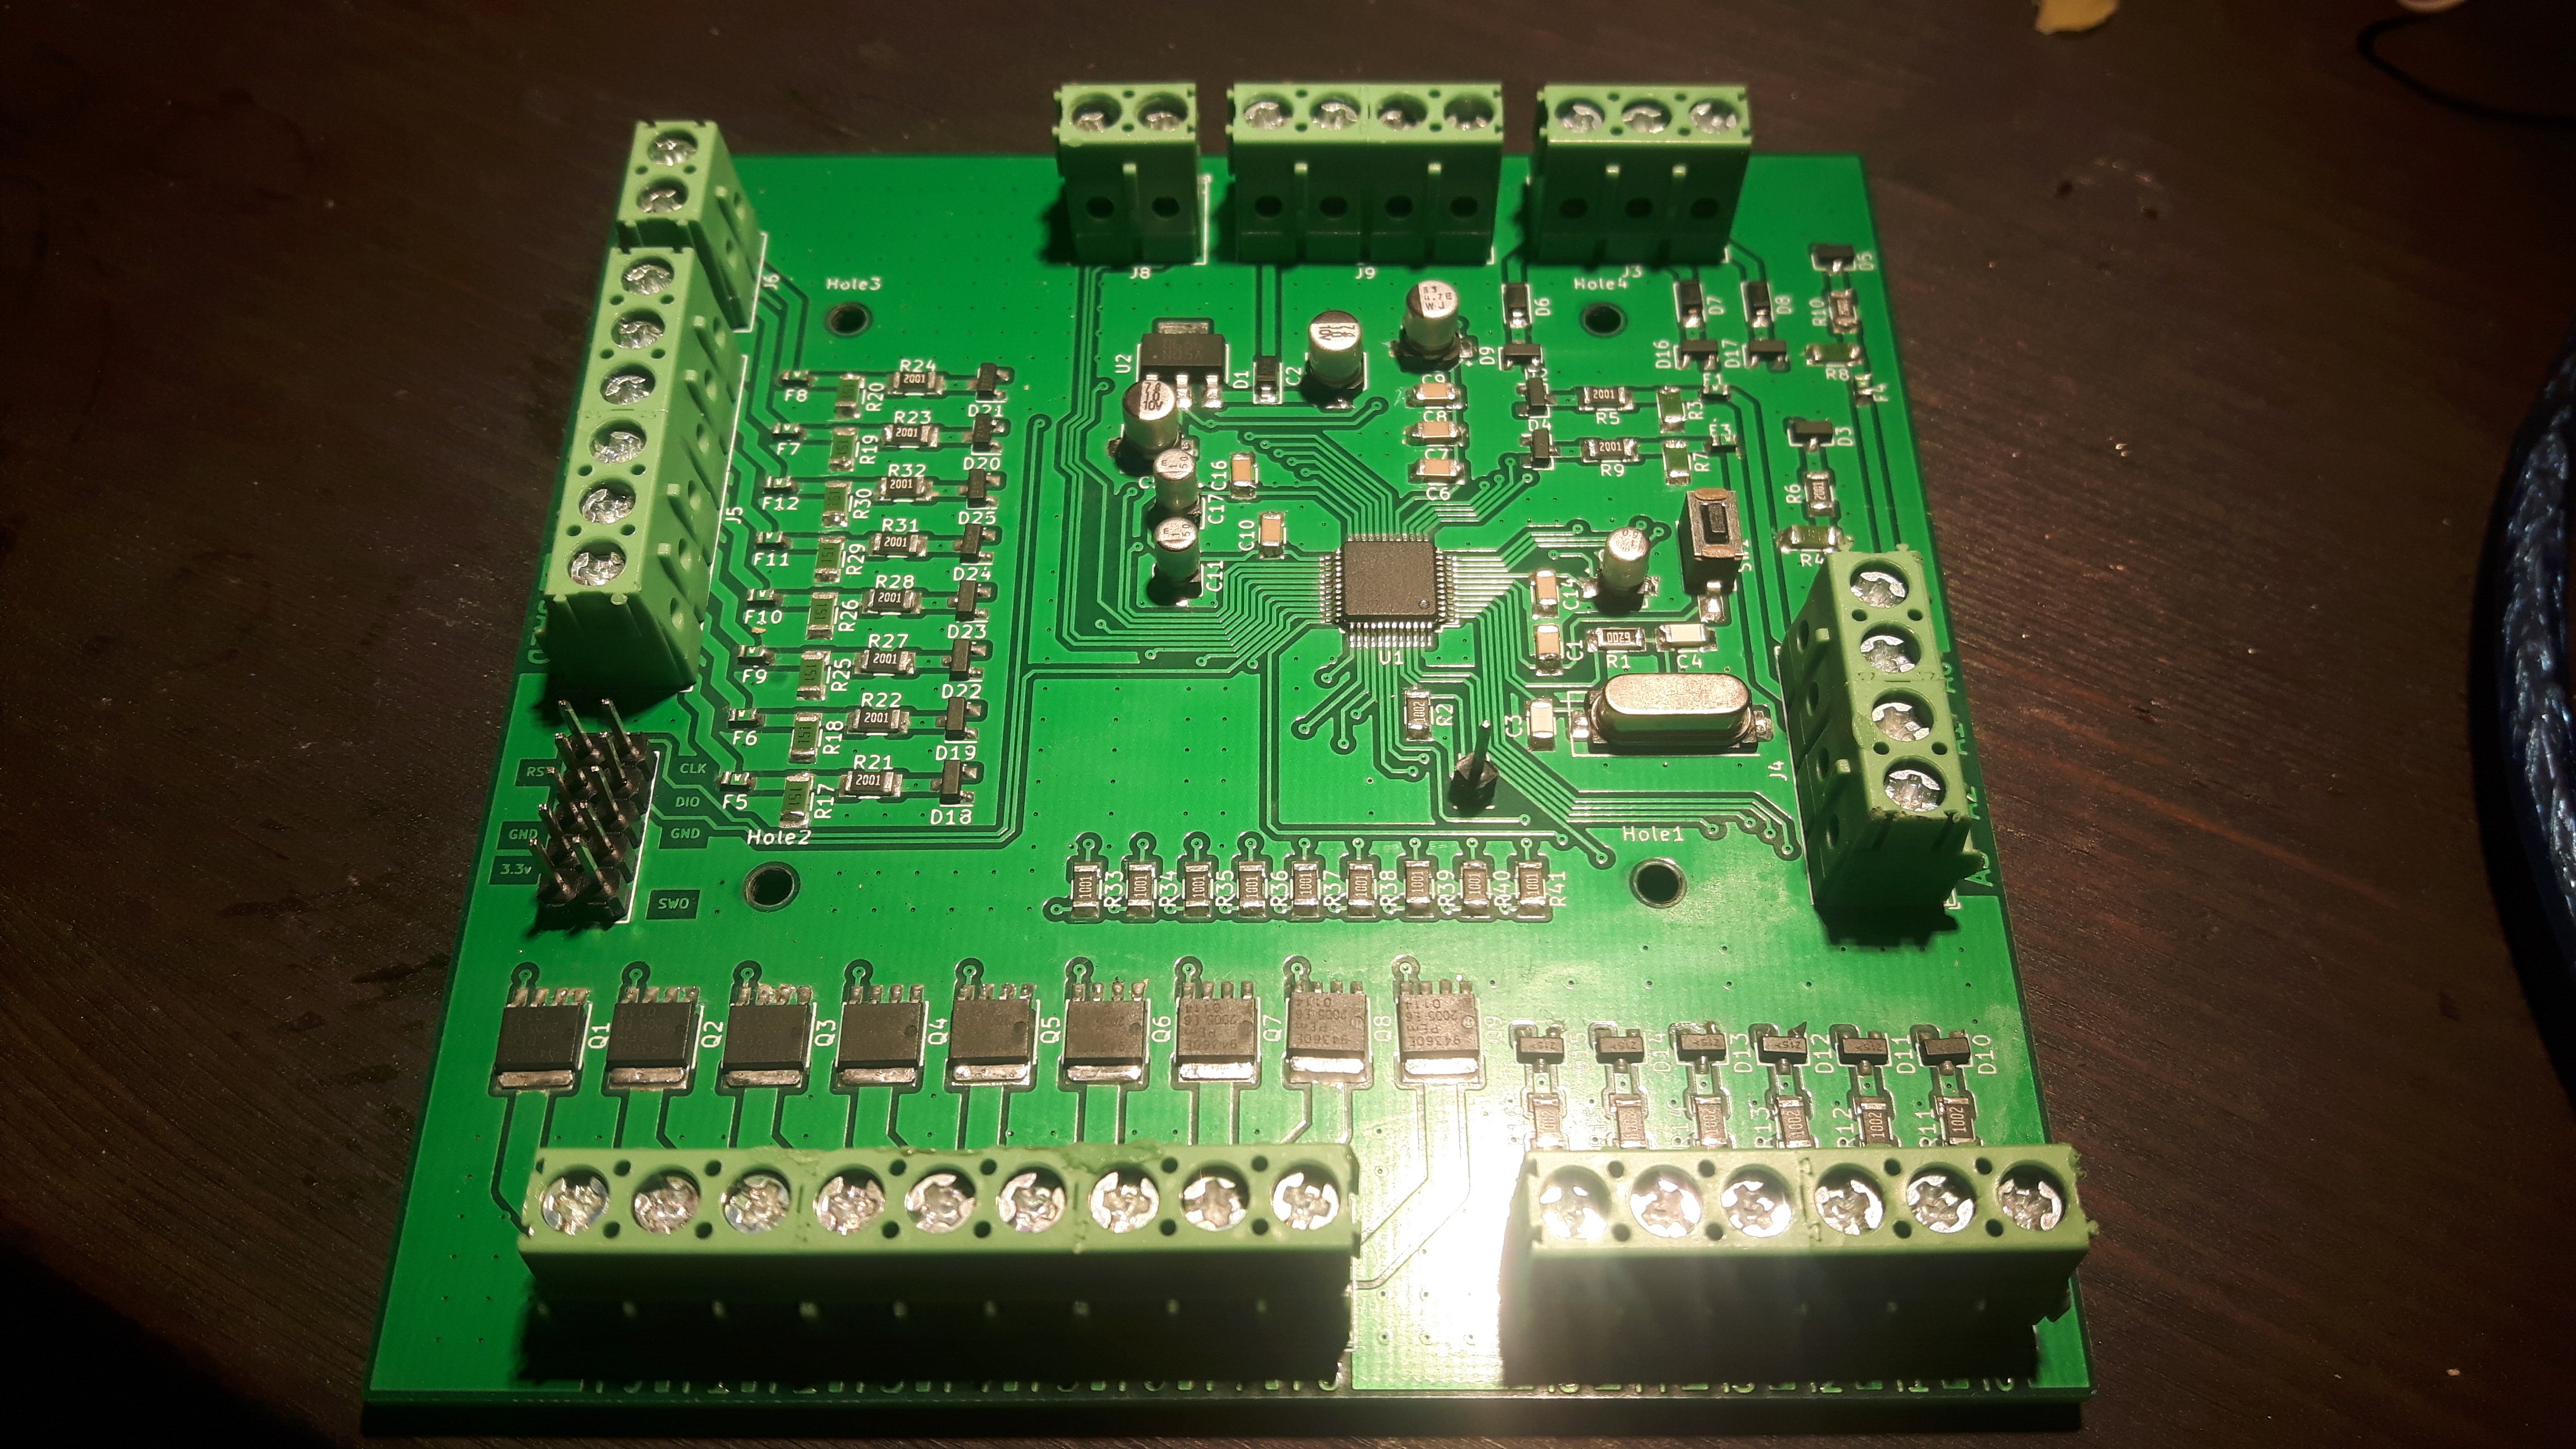
This is made in KiCad. I have drag all the tracks on the board by my self. No auto-routing here.
I have solder all components by my self.
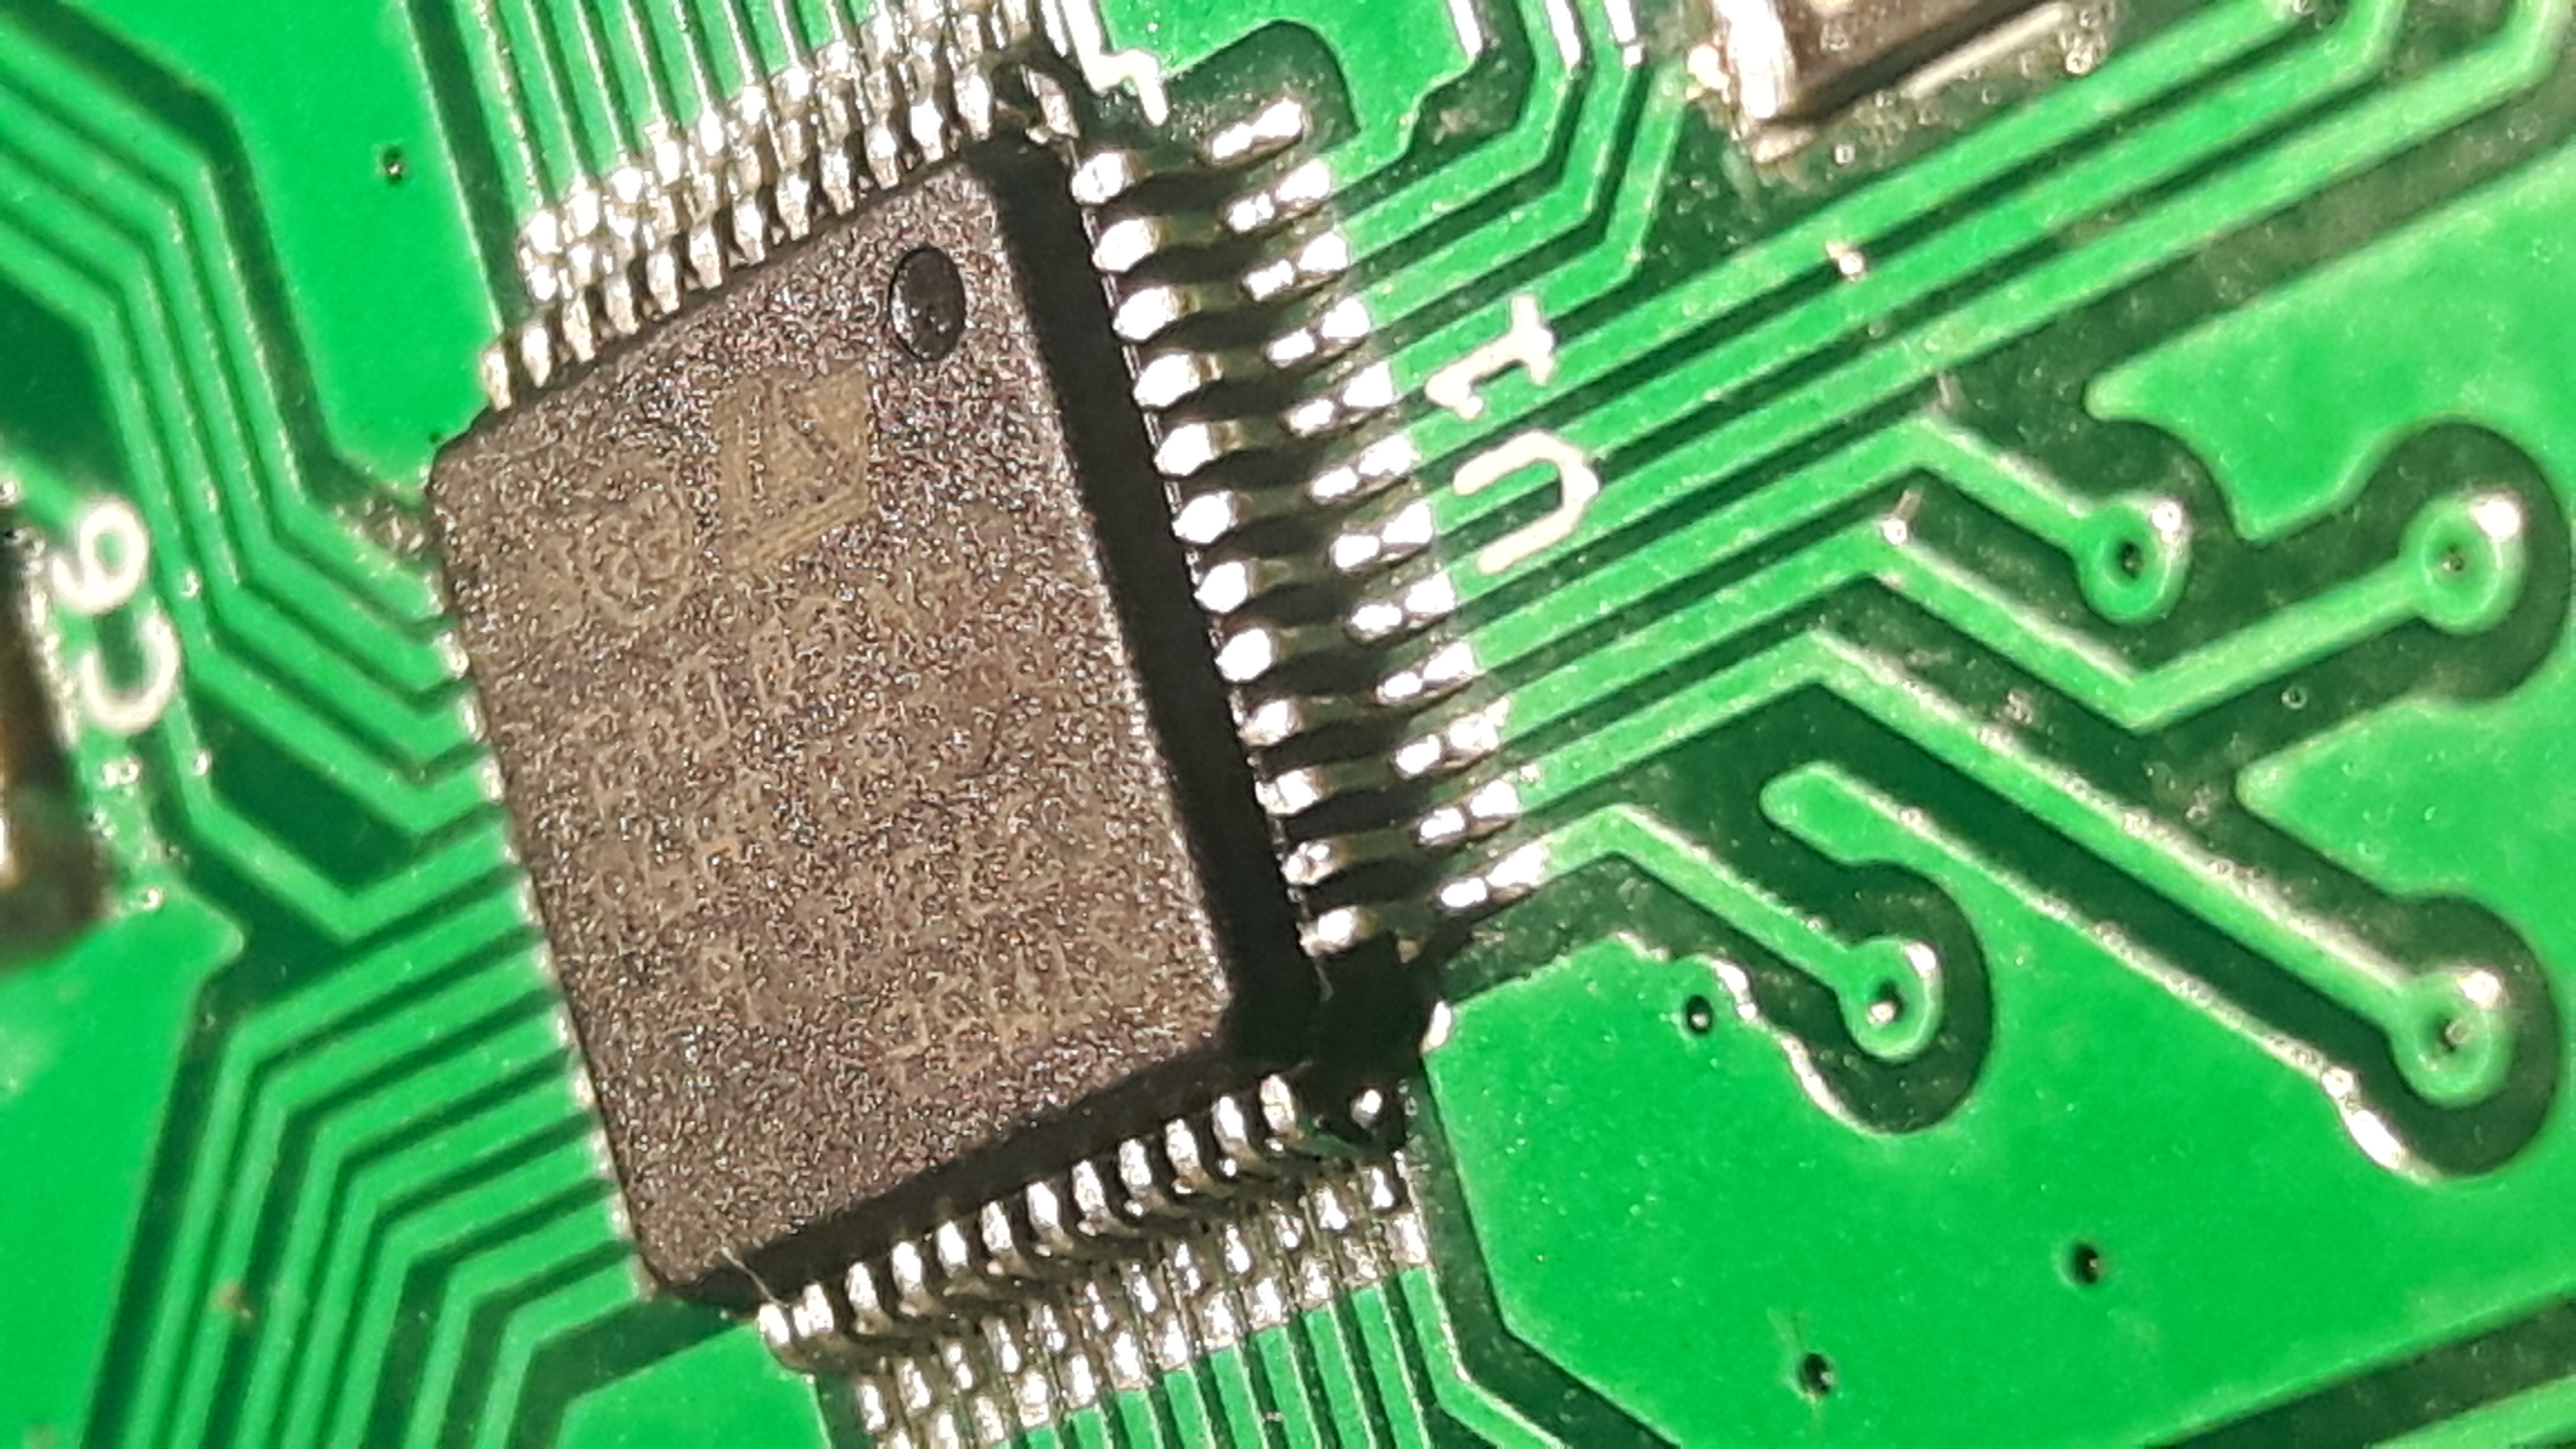
I have solder this microcontroller by hand.
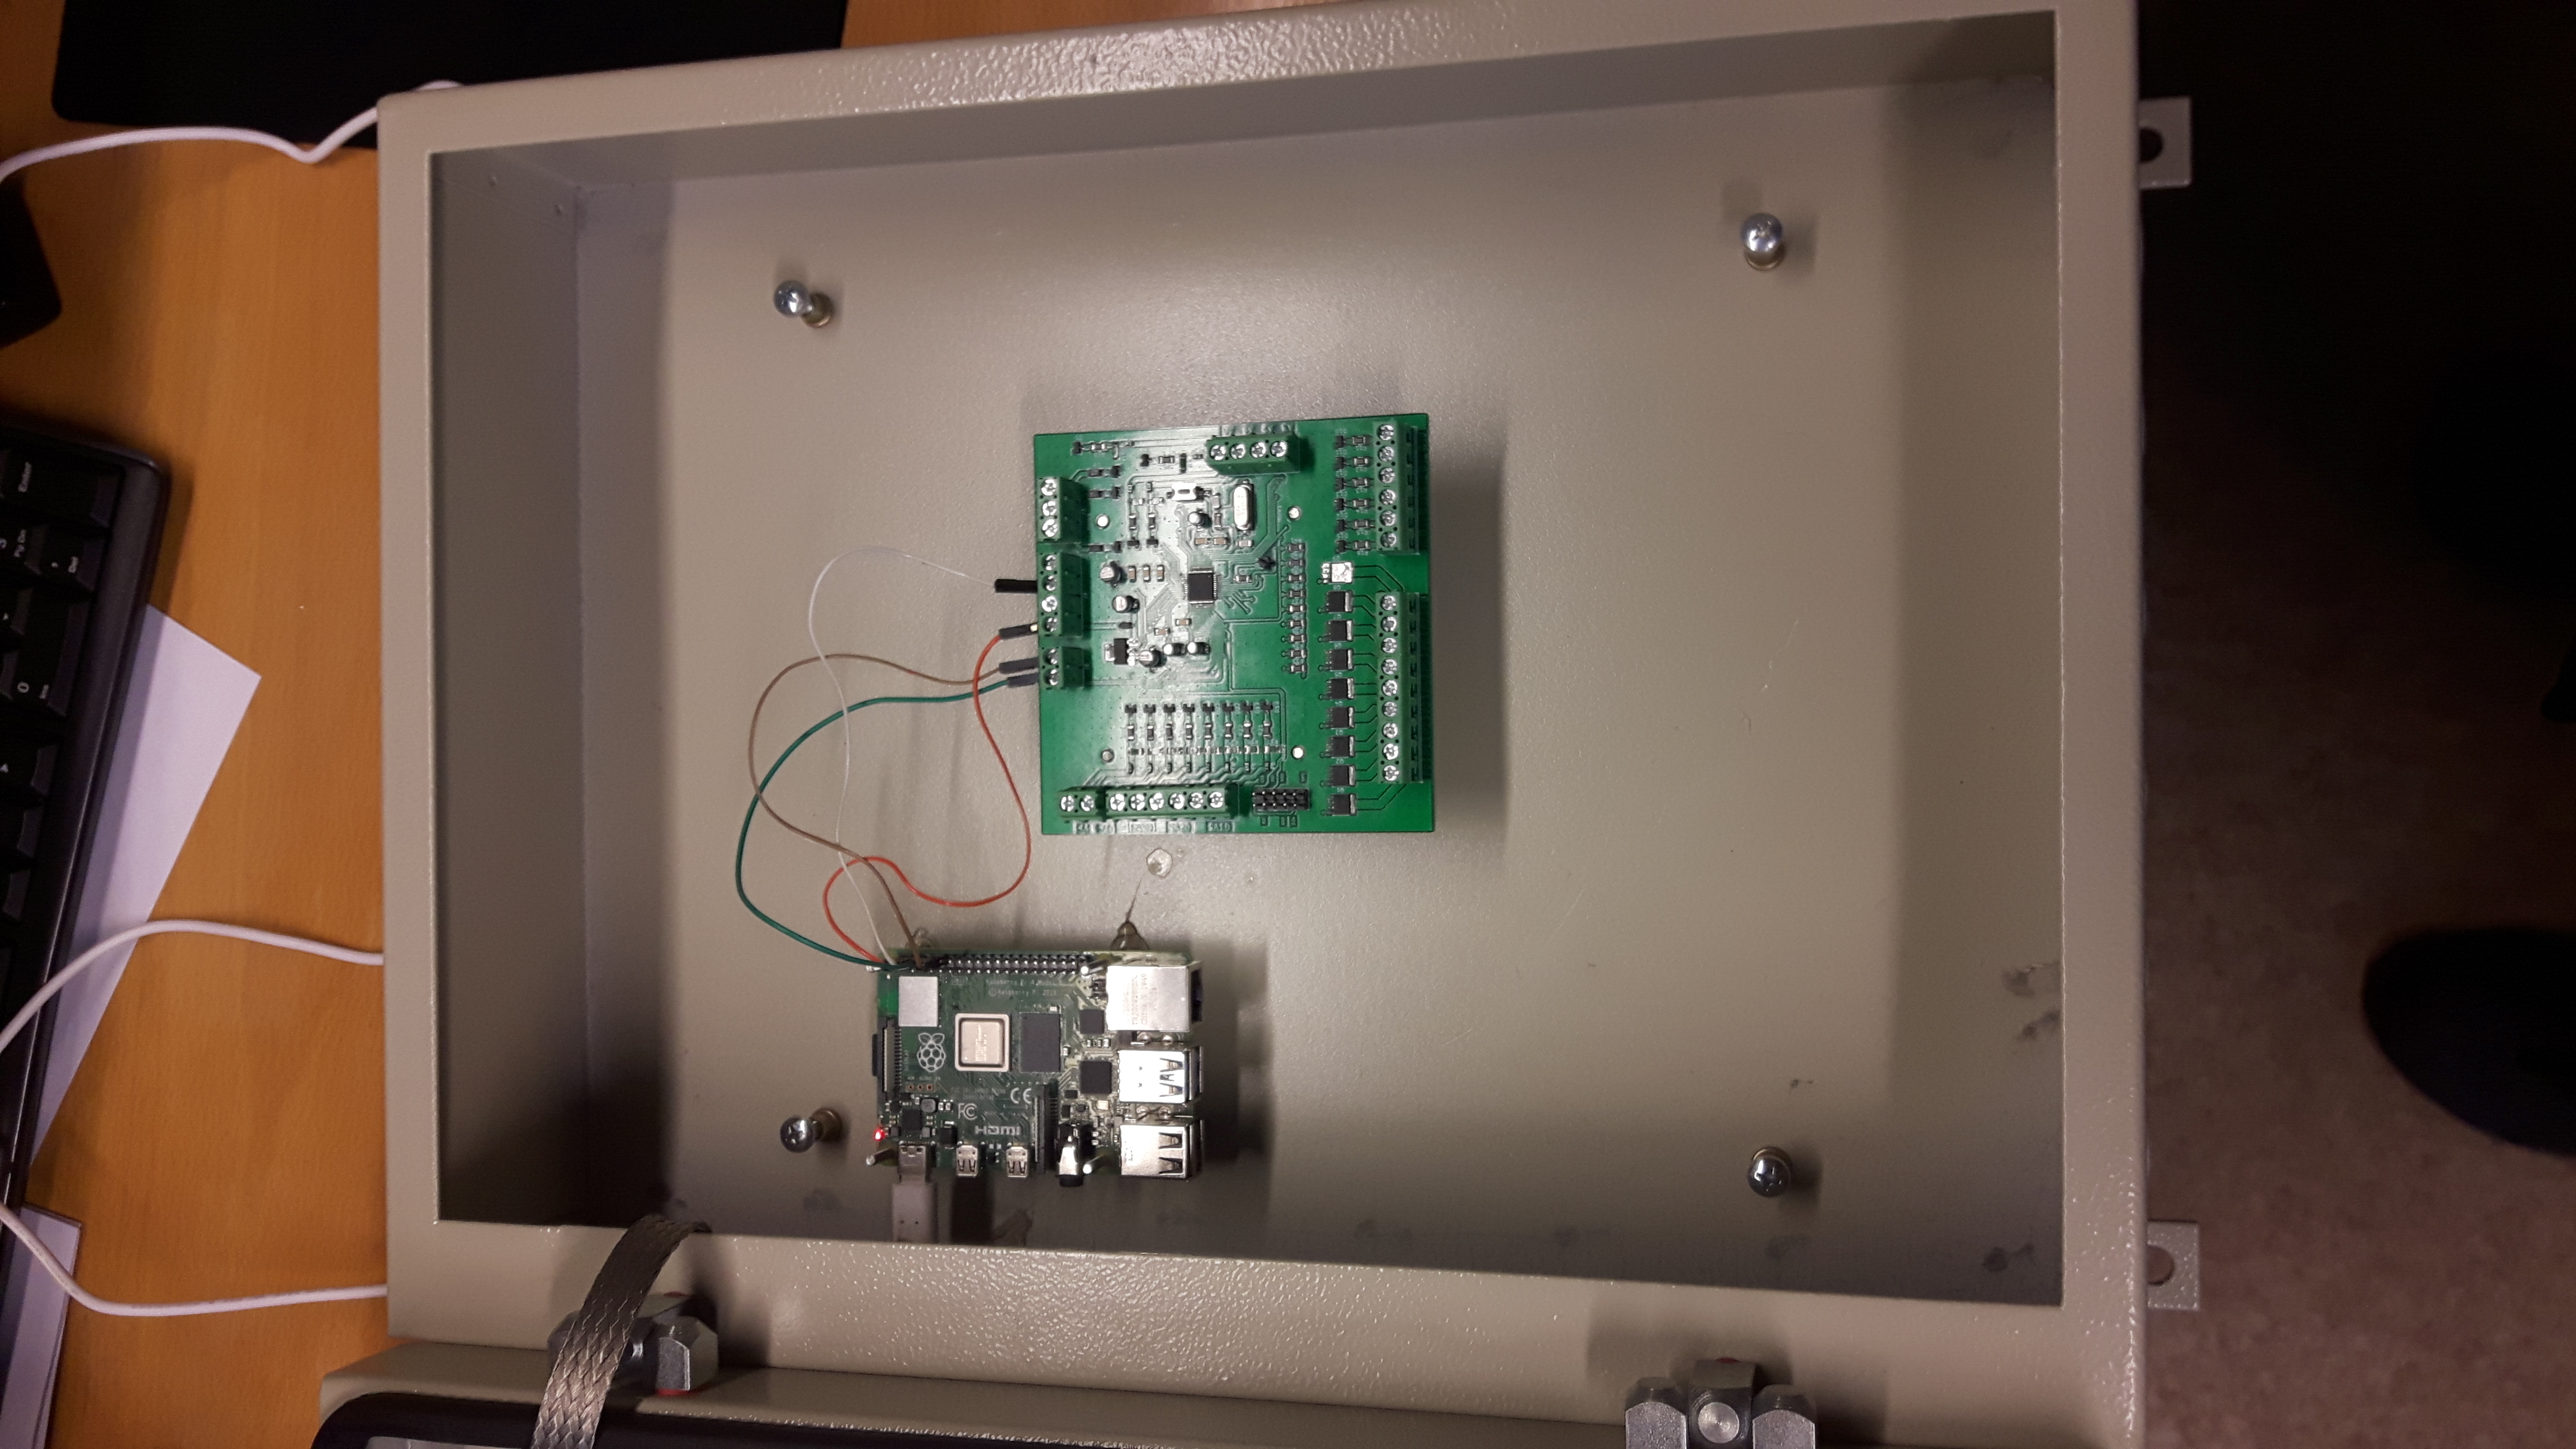
Applied inside a metallic box. Here I'm using Raspberry Pi to communicate with the board.
You can use a regular computer as well, as long you have a USB to serial converter, e.g USB/UART converter FTDI FT232 where you connect RXD -> TX and TXD -> RX on the board.
How to install - Ubuntu user
- Install Java 11, Maven, NodeJS
Java 11
sudo apt-get install openjdk-11-jdkMaven
sudo apt-get install mavenNodeJS
curl -sL https://deb.nodesource.com/setup_lts.x | sudo -E bash -
sudo apt-get install -y nodejs- Begin first to install MySQL Community Server
sudo apt-get install mysql-server- Then create a user e.g
myUserwith the password e.gmyPassword
Login and enter your sudo password or mysql root password
sudo mysql -u root -pCreate user with the host % <-- That's important if you want to access your server from other computers.
CREATE USER 'myUser'@'%' IDENTIFIED BY 'myPassword';Set the privileges to that user
GRANT ALL PRIVILEGES ON *.* TO 'myUser'@'%';- Change your MySQL server so you listening to your LAN address
Open this file
/etc/mysql/mysql.conf.d/mysqld.confAnd change this
bind-address = 127.0.0.1To your LAN address where the server is installed on e.g
bind-address = 192.168.1.34Then restart your MySQL server
sudo /etc/init.d/mysql restartIf you don't know your LAN address, you can type in this command in linux ifconfig in the terminal
- Download
OpenSourceLogger
Download the OpenSourceLogger and change the application.properties in the /src/main/resources folder.
Here you can set the configuration for your database IP address, user and password. Here set the address of your Outlook account.
The service.MailService.from must be the same as configuration.MailConfiguration.username.
# Database
spring.jpa.show-sql=true
spring.jpa.hibernate.ddl-auto=update
spring.jpa.properties.hibernate.dialect=org.hibernate.dialect.MySQL5Dialect
spring.datasource.url=jdbc:mysql://yourIPAddressOfTheServerWhereMySQLIsInstalled:3306/OpenSourceLogger?createDatabaseIfNotExist=true&serverTimezone=CET
spring.datasource.username=myUser
spring.datasource.password=myPassword

# Mail - Transmitter
configuration.MailConfiguration.host=smtp.office365.com
configuration.MailConfiguration.port=587
configuration.MailConfiguration.username=yourOutlookAccount@outlook.com
configuration.MailConfiguration.password=yourOutlookPassword

# Mail - Receiver
service.MailService.subject=Alarm Message Subject Title
service.MailService.from=yourOutlookAccount@outlook.com

# Login
spring.security.user.name=myUser
spring.security.user.password=myPassword- Pack this project and run
First stand inside of the folder OpenSourceLogger and write inside your terminal
mvn package -Pproduction- Starting the application
Now a JAR file is created inside the OpenSourceLogger/target folder.
You can start opensourcelogger-1.0-SNAPSHOT.jar. First plugin your Serial UART into your USB port first, then write.
sudo java -jar opensourcelogger-1.0-SNAPSHOT.jarOnce the application is started. You can then enter the web application e.g.
http://192.168.1.35:8080Notice that there is no https, only http.
Deploy onto Raspberry Pi
Notice that camera won't work on Raspberry Pi due to the latest library from Sarox cannot support Raspberry Pi 4B. But you can
do everything else. If you want to work with this camera stuff inside OpenSourceLogger, please go to CameraThread.java class and begin to explore how to solve that problem.
Anyway! Once you got opensourcelogger-1.0-SNAPSHOT.jar ready, you can send it to your Raspberry Pi.
sudo scp opensourcelogger-1.0-SNAPSHOT.jar pi@RaspberryPiIPAddress:/The/Place/You/Want/The/Jar/File/To/Be/SavedExample:
sudo scp opensourcelogger-1.0-SNAPSHOT.jar pi@192.168.1.35:/home/piThen open rc.local
sudo nano /etc/rc.localAnd place these line above exit 0
cd /The/Path/To/Where/The/Jar/File/Is/Placed
sudo java -jar opensourcelogger-1.0-SNAPSHOT.jar &
Or if you want to specify the Java Heap Space for e.g 1024 Megabyte. Can be good if you want to download .csv data from the database.
cd /The/Path/To/Where/The/Jar/File/Is/Placed
sudo java -Xmx1024m -jar opensourcelogger-1.0-SNAPSHOT.jar &
Important with &, else Raspberry Pi is going to get stuck there with the Spring Boot terminal at the startup.
Then you need to enable Serial in Raspberry Pi.
sudo raspi-configThen enable Serial. It's at the same page where you enable SSH, VNC, I2C etc.
Once you found Serial option, answer NO to the question about login shell.
Then answer YES to the question about serial hardware port.
Then when you exit the raspi-config, it will ask you if you want to reboot, press YES
Now your OpenSourceLogger will starts automatically. Select the port ttyS0 in Device settings at OpenSourceLogger and save the configuration
inside the database. ttyS0 is the RX and TX pins of the Raspberry Pi. Done!
Build an own board
Download DAC ADC PWM IO - Board Schematic and DAC ADC PWM IO - STM32 Code folder.
Inside the DAC ADC PWM IO - Board Schematic folder, there is a .csv Bill Of Materials list with article numbers from Mouser Electronics.
I have been using KiCad to create these files and I used https://jlcpcb.com to give them the gerber files from the DAC ADC PWM IO - Board Schematic folder.
To program the board, use a ST-LINK-V2 programmer to program the board with STM32CubeIDE 1.5.0.