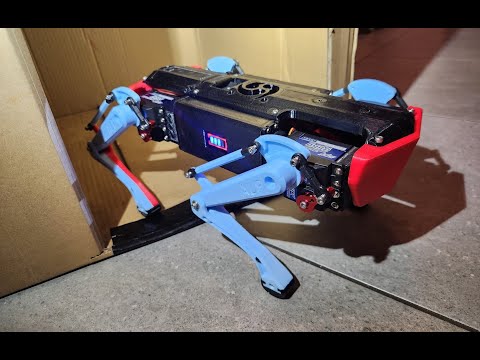
robodog - the noob friendly quadruped robot
Click thumbnail to play video (YouTube):
Credits:
Some design and code based on work by these guys:
- "Baris ALP" - https://grabcad.com/library/diy-quadruped-robot-1
- "Jack Demeter" https://grabcad.com/library/quadruped-robot-w-code-1
Overview
I attempted to learn ROS starting from zero experience with robotic development and found it to be way more complicated than I was prepared to deal with learning at the time. If you wish to operate a robot like this properly, you should really a) build a robot with closed-loop motor control, ie. not using R/C servos, and b) learn to create a physic simulation (for ROS, that would be in Gazebo, as far I could tell) and have ROS operate your robot's motors based on actual physical simulation and accelerometer data.
In layman's terms, the code in this repo lets you control the robot and walk it around, but it's really just playing a fixed animation of the legs rather than 'knowing' how to walk.
I wrote my code in NodeJS. I had extreme difficulty and ultimately failed getting other projects to run on the OrangePi Zero LTS due to python dependencies and differences between the distros which can be a nightmare at the best of times. Not having a real Rpi handy, nor being prepared to buy one for the sake of Python, nor wanting to change the robot design to accommodate it, I went with NodeJS. As a front-end dev this was natural to me. Use of Node reduces the only real compatibility challenges for other people using this repo to surfacing an i2c interface to talk to the PWM controller.
Assembly
This is the easy part! I'll add physical build instructions soon.
Electronics Required
- OrangePi Zero LTS, or other Rpi / OrangePi board (untested)
- PCA9685 16-channel 12-bit PWM driver (Adafruit)
- 10x Servos
- I used
SPT5535LV-210Servos from Aliexpress. They're digital metal-gear units with 200° rotation and a pulse width of 500µs - 2500µs. - There were many options to choose from; I selected both the 35kg rating (higher torque gearing reduces rotation speed) and included the optional red anodized aluminium arm, which I used.
- Be aware if you stall these servos and have a powerful enough supply of current, they will burn very quickly. Make sure your robot is assembled and the servos properly positioned before you attach the legs.
- I used
Instead of using a regulator, I opted to power my servos directly from the battery, which is 2x 18650 cells in series for a nominal 7.4V. The servos I used are fine with this voltage and I imagine most will be as it's standard practice to power servos from a 2S LiPo in R/C cars. The robot runs for at least an hour on a single charge, so they seem to be plenty.
Bill of Materials
Will update with complete list once the project is mature.
Installation
Check that i2c is enabled for your board. For OrangePi and possibly other Armbian boards, run sudo armbian-config, select System (System and security settings) then Hardware (Toggle hardware configuration), and mark i2c0 to enable it. Select save and you'll be prompted to reboot your OrangePi.
- Clone the repo
- run
npm install - edit
config.js- set the pin assignments for your Servos to the PCA9685 PWM controller
- set
calibrate: trueso your servos are in centre position to attach the legs - under pca9685, the
i2cDevicevalue corresponds to your device in linux, eg. for/dev/i2c0or/dev/i2c-0you would set this to0. (usels -l /dev/i2c*to check. If not found, you need to enable i2c for your board)
- run
node robot.jsor usenpm run start - access the page at
http://<device IP>:3000and use the buttons or WASD to control the robot
Note about hardware dependencies:
Hardware-specific dependencies are set as optional in package.json:
{ "optionalDependencies": {
    "i2c-bus": "^5.2.3",
    "pca9685": "^5.0.0"
}}
You can therefore do the install on a desktop OS and run the software, but i2c and the PCA9685 will be simulated and do nothing - you will see a message in console to confirm whether or not the hardware dependencies are OK or being simulated. All of the kinematic calculations are still executed so this was handy for development.
Gait Visualisation
run node visualise.js to see the gait visualised on a 3D plot
Edit visualise.js to modify which gait file is visualised (default gaits/basic.js)
Development Status
Overall status
See related Git project for planned and in-progress features: https://github.com/users/Energiz3r/projects/2
I'm absolutely useless when it comes to 3D modelling. The parts I've modified were done so in 123D Design, a discontinued piece of very basic software from Autodesk. If you want proper design files you'll need to make / convert them yourself. Contributions of all kind are welcome, but conversion of the 3D files to proper CAD format especially so.