FHIRType
The FHIRType API serves consistently formatted healthcare provider data from numerous FHIR Standard endpoints.
Quickstart Guide
The script thankyou.sh will build and run a Docker composition of the project locally, then it will open webpages for each of the services so you can see them work together!
It also includes some troubleshooting tips if you run into network problems.
bash ./thankyou.shTable of Contents
Introduction
This README is meant mostly for the development team's reference while under initial development, it will need to be re-written for production.
FHIRType is the name of this project as well as the name of the group of students developing it under Oregon State University's Computer Science Bachelor's Capstone Project.
Q: Is there a chance this repo might go public? : A: There is almost no chance this repo will ever go public, it would need to undergo some extensive commit revisions.
Q: How should I name my branches/commits? : A: Refer to the current SDP.
This repo must never see the light of day. The code may move to production, but this repo will never go public!
How-To Guides
These guides are written for the development team and very few if any actually describe how to use the API.
Set up guides
HUGE SUGGESTION:
Do these things in this order, I had a whale of a time jumping around between them, they're best done in order to reduce unnecessary finagling
Using the Python virtual environment
Reference: https://docs.python.org/3/tutorial/venv.html
This process first initializes a Python virtual environment in a directory specially titled for it, then activates that environment in your shell. Once you're "in" the venv, you will install all the dependencies that are outlined in the requirements.txt file.
Going forward, you may want to remember step 2, or define a run configuration that uses it. That will be the "version" of python that the project will be required to work with.
WHEN RUNNING SCRIPTS OR OTHERWISE USING PYTHON, to ensure you're actually using the version in the .venv, you must call
the python.exe that is within the .venv directory (e.g. .venv/Scripts/python)
Process (Windows):
- (cd to workshop)
python -m venv .venv - (should have created /.venv)
.venv/Scripts/activate - (you are now using the venv)
.venv/Scripts/python -m pip install -r requirements.txt
Process (Unix):
- (cd to workshop)
-m venv .venv - (should have created /.venv)
source .venv/bin/activate - (you are now using the venv)
.venv/Scripts/python -m pip install -r requirements.txt
Using Doxygen and doxypypy
Link to documentation rending
Installing Doxygen
Doxygen is not a Python module and must be installed by a package manager or directly from their site. See https://www.doxygen.nl/manual/install.html for their tutorials on installation. I would HIGHLY recommend using a package manager as I will be guiding through in the following section, it is far more portable and easy.
Installing Doxygen with scoop (Windows)
This section assumes that you have the scoop package manager installed, see https://scoop.sh/ if you do not have scoop installed yet. Big ups, very easy to use.
Process (Windows):
scoop install doxygen
yes, it is seriously that easy
Installing Doxygen with homebrew (Unix)
This section assumes that you have the homebrew package manager installed, see https://brew.sh/ if you do not have homebrew installed yet. Big ups, very easy to use.
Process (Unix):
brew install doxygen
yes, it is seriously that easy
Using doxypypy with Doxygen
Doxypypy is a python module, and it was included in the venv installation, so you don't need to install it. What you do need to do is put a script that connects the two tools onto your PATH so that Doxygen knows where to find it.
Doxypypy will "filter" our Python docstrings into Java docstrings so that Doxygen can make effective use of it. This is done via the scripts in the /docs folder (py_filter and py_filter.bat), so we need Doxygen to be able to find them.
On Windows...
this is a little annoying, but this should get you through it pain-free. WARNING: When editing your system variables, be pretty careful as it can introduce some annoying issues. For this reason, there is a step in this walkthrough that backs up your PATH to a file, you can skip this if you are confident.
This next step refers to the "/docs" directory, this is in your local workshop repo (something like "~/workshop/docs")
Process (Windows):
- (back up your path before starting)
echo $Env:PATH > path_backup.txt - (copy the path to the /docs directory)
$Env:PATH = "$($Env:PATH);<docs directory>"
If anything is broken or you just want that undone, use this script to restore your backup
Process (Windows):
$Env:PATH = Get-Content -Path <path_to_backup> -Raw
On Unix systems...
this feels far less annoying, maybe just because Unix just feels nicer in the terminal? It's essentially the same process as on Windows, so I'll include the steps for backup.
Process (Unix):
- (back up your path before starting)
printf $PATH > path_backup.txt - (copy the path to the /docs directory)
export PATH=$PATH:"<docs directory>"
If anything is broken or you just want that undone, use this script to restore your backup
Process (Unix):
export PATH=$(cat <path_to_backup>)
Generating documentation with Doxygen + doxypypy
Now that the stage is set, you should be able to call the following script which will generate documentation at this location: docs/output/html/index.html (hint: open in browser to see it displayed). This process is identical on Windows or Unix.
You'll need to call this function any time you want the documentation to update, it does NOT do so dynamically.
Process (Windows/Unix):
Doxygen docs/Doxyfile
Linting with BLACK
BLACK will already be installed via the virtual environment, so this is a super simple step
BLACK will reformat code to follow a common format standard, this may change the appearance of your code significantly. This is a feature, not a bug! You can feel free to code however you like, use what ever format you want, and then BLACK will magically make it look like code written by some of the leading developers (Django, SQLAlchemy, Facebook, Mozilla, the list goes on https://github.com/psf/black).
Process (Windows/Unix):
black FhirCapstoneProject
NOTE: You can replace the argument FhirCapstoneProject with any directory/file if you'd like to change the target.
Testing with pytest
pytest will already be installed via the virtual environment, so this is a super simple step
Pytest discovers tests in the specified directory, these files MUST
be titled like test_very_descriptive_name_of_the_tests_within.py with the test_ part being most vital for
discovery, and the rest of the long ass name being vital for knowing what tests are failing, because the name of the
file is what is first reflected when running the tests.
Process (Windows/Unix):
pytest
NOTE: This will run all the discoverable tests.
Using ConfigMaker.py
This is the standard method of configuring your local settings, this way we are all on the same page
This script will generate all the necessary .ini files for FHIRType to work, you can make changes to these files as you need/wish, and they will not affect any other contributor's environment. Make sure you navigate to ~/workshop.
The file config/default_endpoints.txt is the source of the most recent and tested configurations for the project, this is where the following command will get its info for generating your config files.
Process (Windows/Unix):
- From the directory
./workshop... .venv\Scripts\python.exe .\FhirCapstoneProject\configMaker.py endpoint ServerEndpoints --src ".\FhirCapstoneProject\fhirtypepkg\config\default_endpoints.txt".venv\Scripts\python.exe .\FhirCapstoneProject\configMaker.py logging ServerLogging
Setting up gcloud
This step is a prerequisite to SSH (virtual console) into the remote virtual machine
Process (Windows):
scoop bucket add extrasscoop install gcloudgcloud init- Enter
yto authenticate your gmail account, MAKE SURE YOU USE THE ONE ATTACHED TO THE PROJECT - Select the cloud project
fhirtype-osu-cs - Enter
yto set a default region and zone - Set a default region and zone to
us-central1-a
Process (OSX):
brew install --cask google-cloud-sdkgcloud init- Enter
yto authenticate your gmail account, MAKE SURE YOU USE THE ONE ATTACHED TO THE PROJECT - Select the cloud project
fhirtype-osu-cs - Enter
yto set a default region and zone - Set a default region and zone to
us-central1-a
Usage Guides [DEPRECATED]
Accessing the Virtual Machine
You can do this a couple of ways, included are two options tested on Trenton's PC.
NOTE
If you can't connect, it could be that the VM has stopped due to a number of problems (overuse, time out, etc. because we use the free tier). Log into the Google Cloud Services dashboard and start the VM with the three-dot menu.
[!NOTE]
You need to pair an SSH key with GitHub to your user in the virtual machine in order to use GitHub on the VM
SSH From Google Cloud Webapp
- Go to: https://console.cloud.google.com/compute/instances?hl=en&project=fhirtype-osu-cs
- Under VM instances, on the far right, click
SSH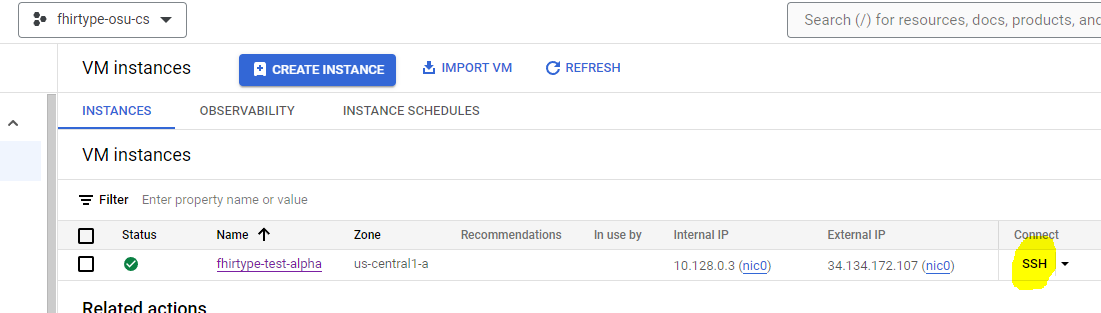
- This will prompt you to authorize SSH, then open a remote terminal in a browser window.
SSH From PuTTY (With PyCharm run configuration)
This option allows you to open a terminal from PyCharm with one click
- Edit the run configuration associated with
/scripts/ssh-fhirtype-osu-cs.sh> More Run/Debug > Modify Run Configuration... - Enter
-u [your ONID username] -s fhirtype-test-betainto the Script Options- Double check with Trenton that
fhirtype-test-betais the correct machine, this may change
- Double check with Trenton that
- Uncheck "Execute in Terminal" if you're on Windows
- Trenton has set up a user for you manually, there's no integration with OSU (refer to Discord for your password).
- In the Interpreter Path field, navigate to and select the git-bash.exe from your local Git installation
If this all succeeds, when you run that configuration a git-bash terminal will open, which MAY then open a PuTTY terminal, weirdly you have to keep them both open.
Accessing the shared directory
The directory
/home/publicis accessible by all users, there is a clone of the workshop in there
Running the Flask API Locally
If you aren't using PyCharm yet, do so; then running the API is as simple as clicking a button (and you can use an industry-leading debugger on it). If you're holding out still because you've been so hurt, then use this process to run the API. Before using the run command, you need to export the app's location to your PATH.
Process (Windows):
$Env:FLASK_APP = "./FhirCapstoneProject/swaggerUI.app"flask run
Process (OSX):
export FLASK_APP="./FhirCapstoneProject/swaggerUI.app"flask run
Running Docker Image on the VM
The project is configured to be composed from the top-level directory (~/workshop) and a helper script was written
to facilitate this. The script will build the image, then deploy it. This build does not cache because our tiny baby VMs
can't handle that, so it takes about a minute or more each time.
sudo ./scripts/dockerup.shsudo docker ps- to test if the build and deploy worked, you should wait a couple seconds- If any of the containers have a status of "Resetting" then something has gone wrong.
sudo docker logs CONTAINER-NAMEwill print out the logs of that container, the name is the last column in the abovepscommand