
Introduction
Scottish Gem is a site created as a place people can share their recommendations of places around Scotland which are not common knowledge. Places that brought happiness and amazement to those who shared.
The users this site is aimed at are as follows:
- People who are local to an area and have a day off.
- People who are visiting Scotland on holiday.
- The Local population who are looking to explore their own country more.
Table of contents
Please Click the arrow to see full table of contents
- [Project Goals](#Project-Goals) - [Agile Development](#Agile-Development) - [User Stories](#User-Stories) - [User Experience](#user-experience-ux-design) - [Wireframes](#Wireframes) - [Navigation](#Navigation) - [Data Schema](#Data-Schema) - [Color Scheme](#Color-Scheme) - [Google API](#Sharing-Gem-With-aid-from-google-API) - [Color Scheme](#Color-Scheme) - [Typography](#Typography) - [Features](#Features) - [Homepage](#Home-Page) - [Navigation Bar](#Navigation-Bar) - [Login](#Login) - [Signup](#Signup) - [Logout](#Logout) - [User Messages](#User-Messages) - [Share Your Gem](#Share-Your-Gem) - [Favorites](#Favorites) - [Select by Region](#Select-by-Region) - [Known Bugs](#Known-Bugs) - [500 error during user signout](#500-error-during-user-signout) - [500 error during user attempting to add a "Gem"](#500-error-during-user-attempting-to-add-a-"Gem") - [## Images displayed on the base.html page](#Images-displayed-on-the-base.html-page) - [Future Features](#Futrue-Development.) - [Technologies Used](#Technologies-Used) - [APIs Used](#APIs-Used) - [Testing](#Testing) - [Code Valitdation](#Code-Valitdation) - [HTML](#HTML) - [CSS](#CSS) - [Python](#Python) - [Python Unit Testing](#Python-Unit-Testing) - [Testing with Pep8](Testing-with-Pep8) - [JavaScript](#JavaScript) -[Testing with JsHint](#Testing-with-JsHint) - [Manual Testing](Manual-Testing) - [Deployment](#Deployment)Project Goals
The goals that I have set out for the site's functionality are:
- User authentication: Users would have the ability to create an account, sign in to their account.
- Adding places: Once a user had an account then permission would be granted for them to add in "Scottish Gems" that they have discovered.
- Commenting: Once a user had an account, then permission would be granted for them too add or remove comments to other "Gems" listed by other users.
- Favoriting: Once a user had an account, then permissions would be granted for them to add gems to their "favorites list".
Agile Development
User Stories
A kanban board in Github Projects was used for the Agile development process - see the board here. 'user Stories' were used and these were broken down into 'Tasks'.
User Experience (UX Design)
Wireframes
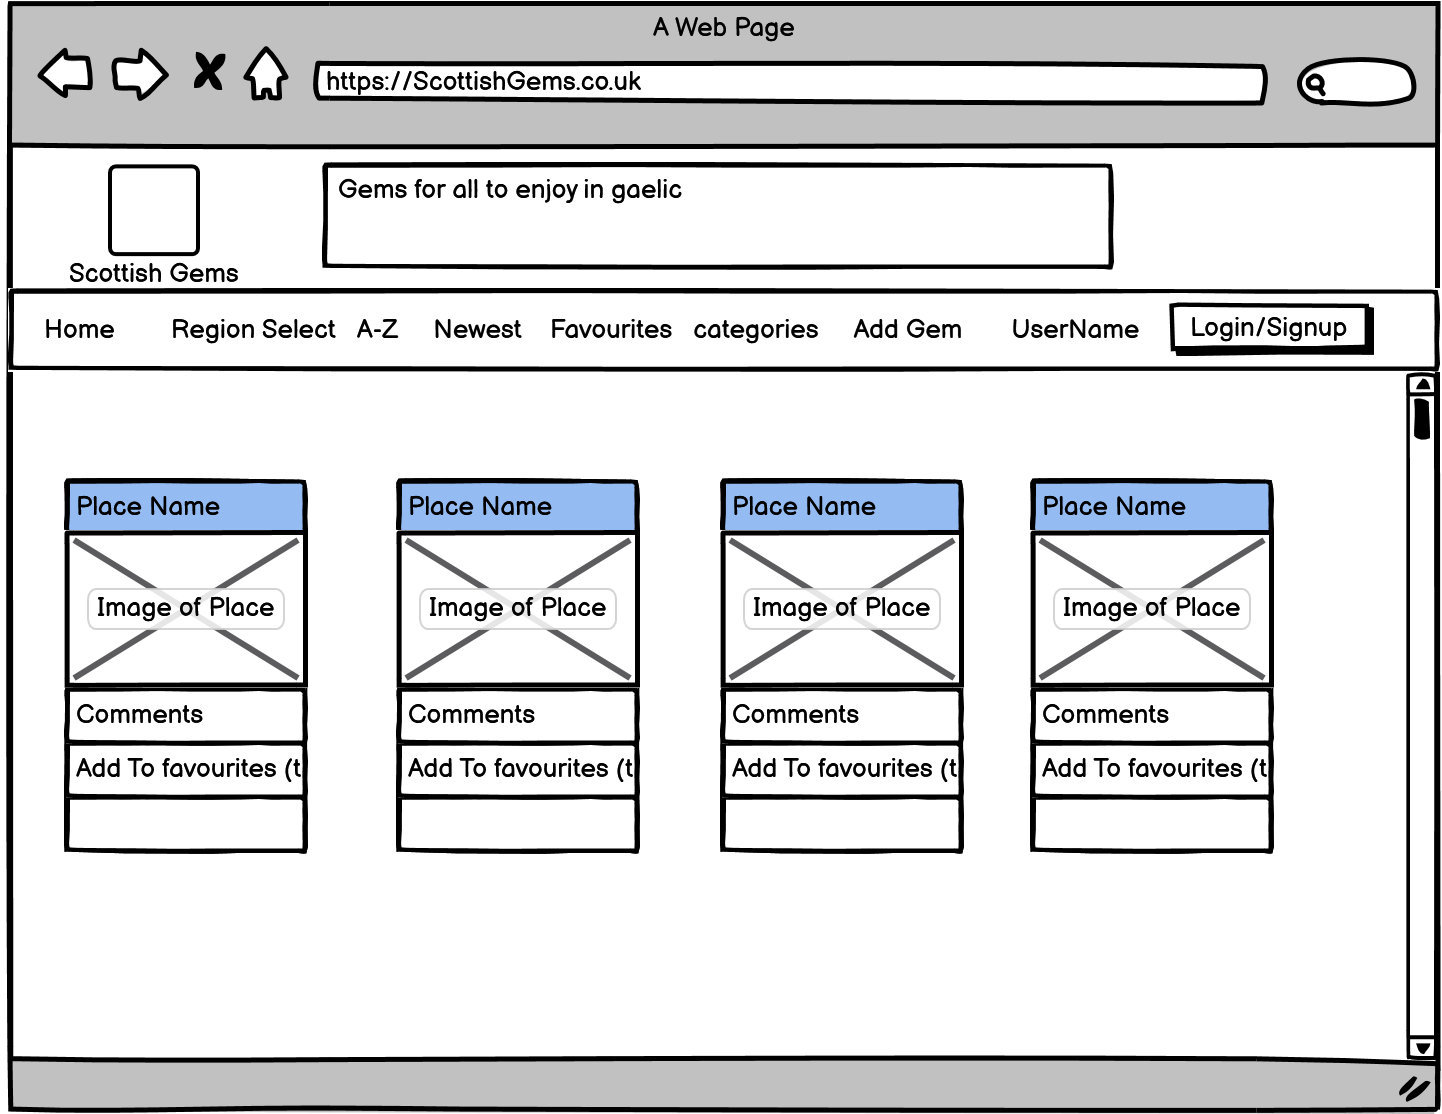
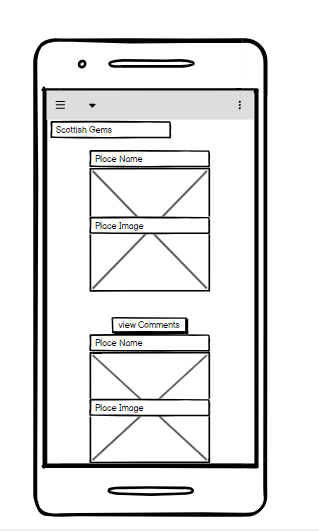
Balsamiq Wireframes were used to map out the design of the application.
Desktop
Desktop Wireframe
Mobile
Navigation
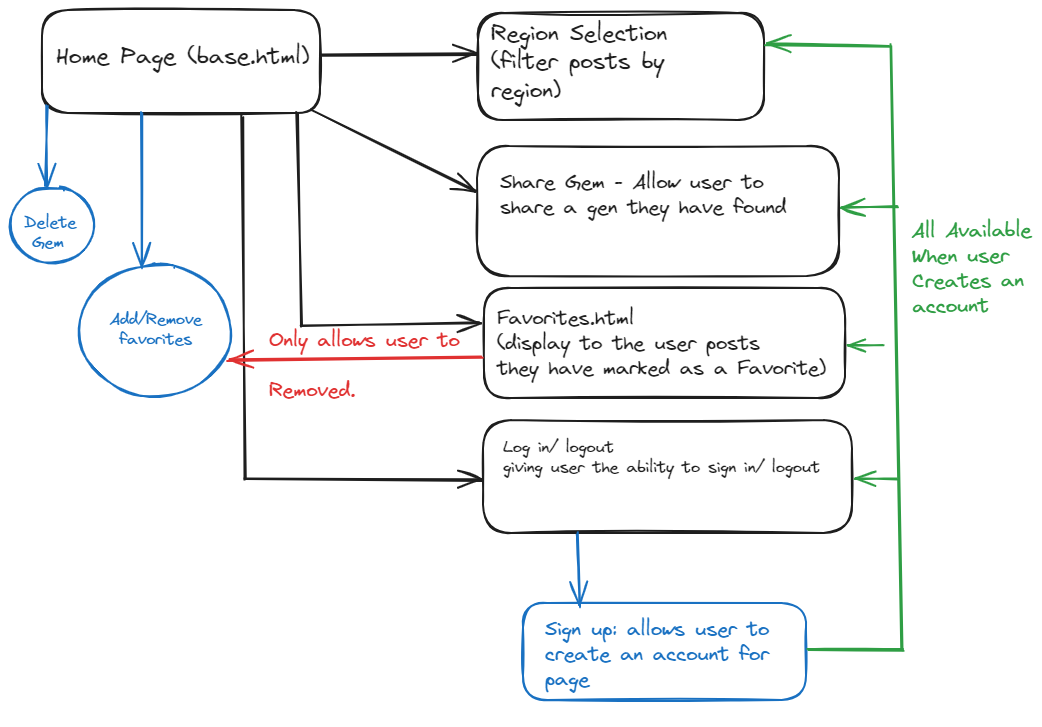
Plaese see below a Navigational Flow Chart showing what was aimed for when creating the website.
Flow Chart Diagram
ERD
ERD
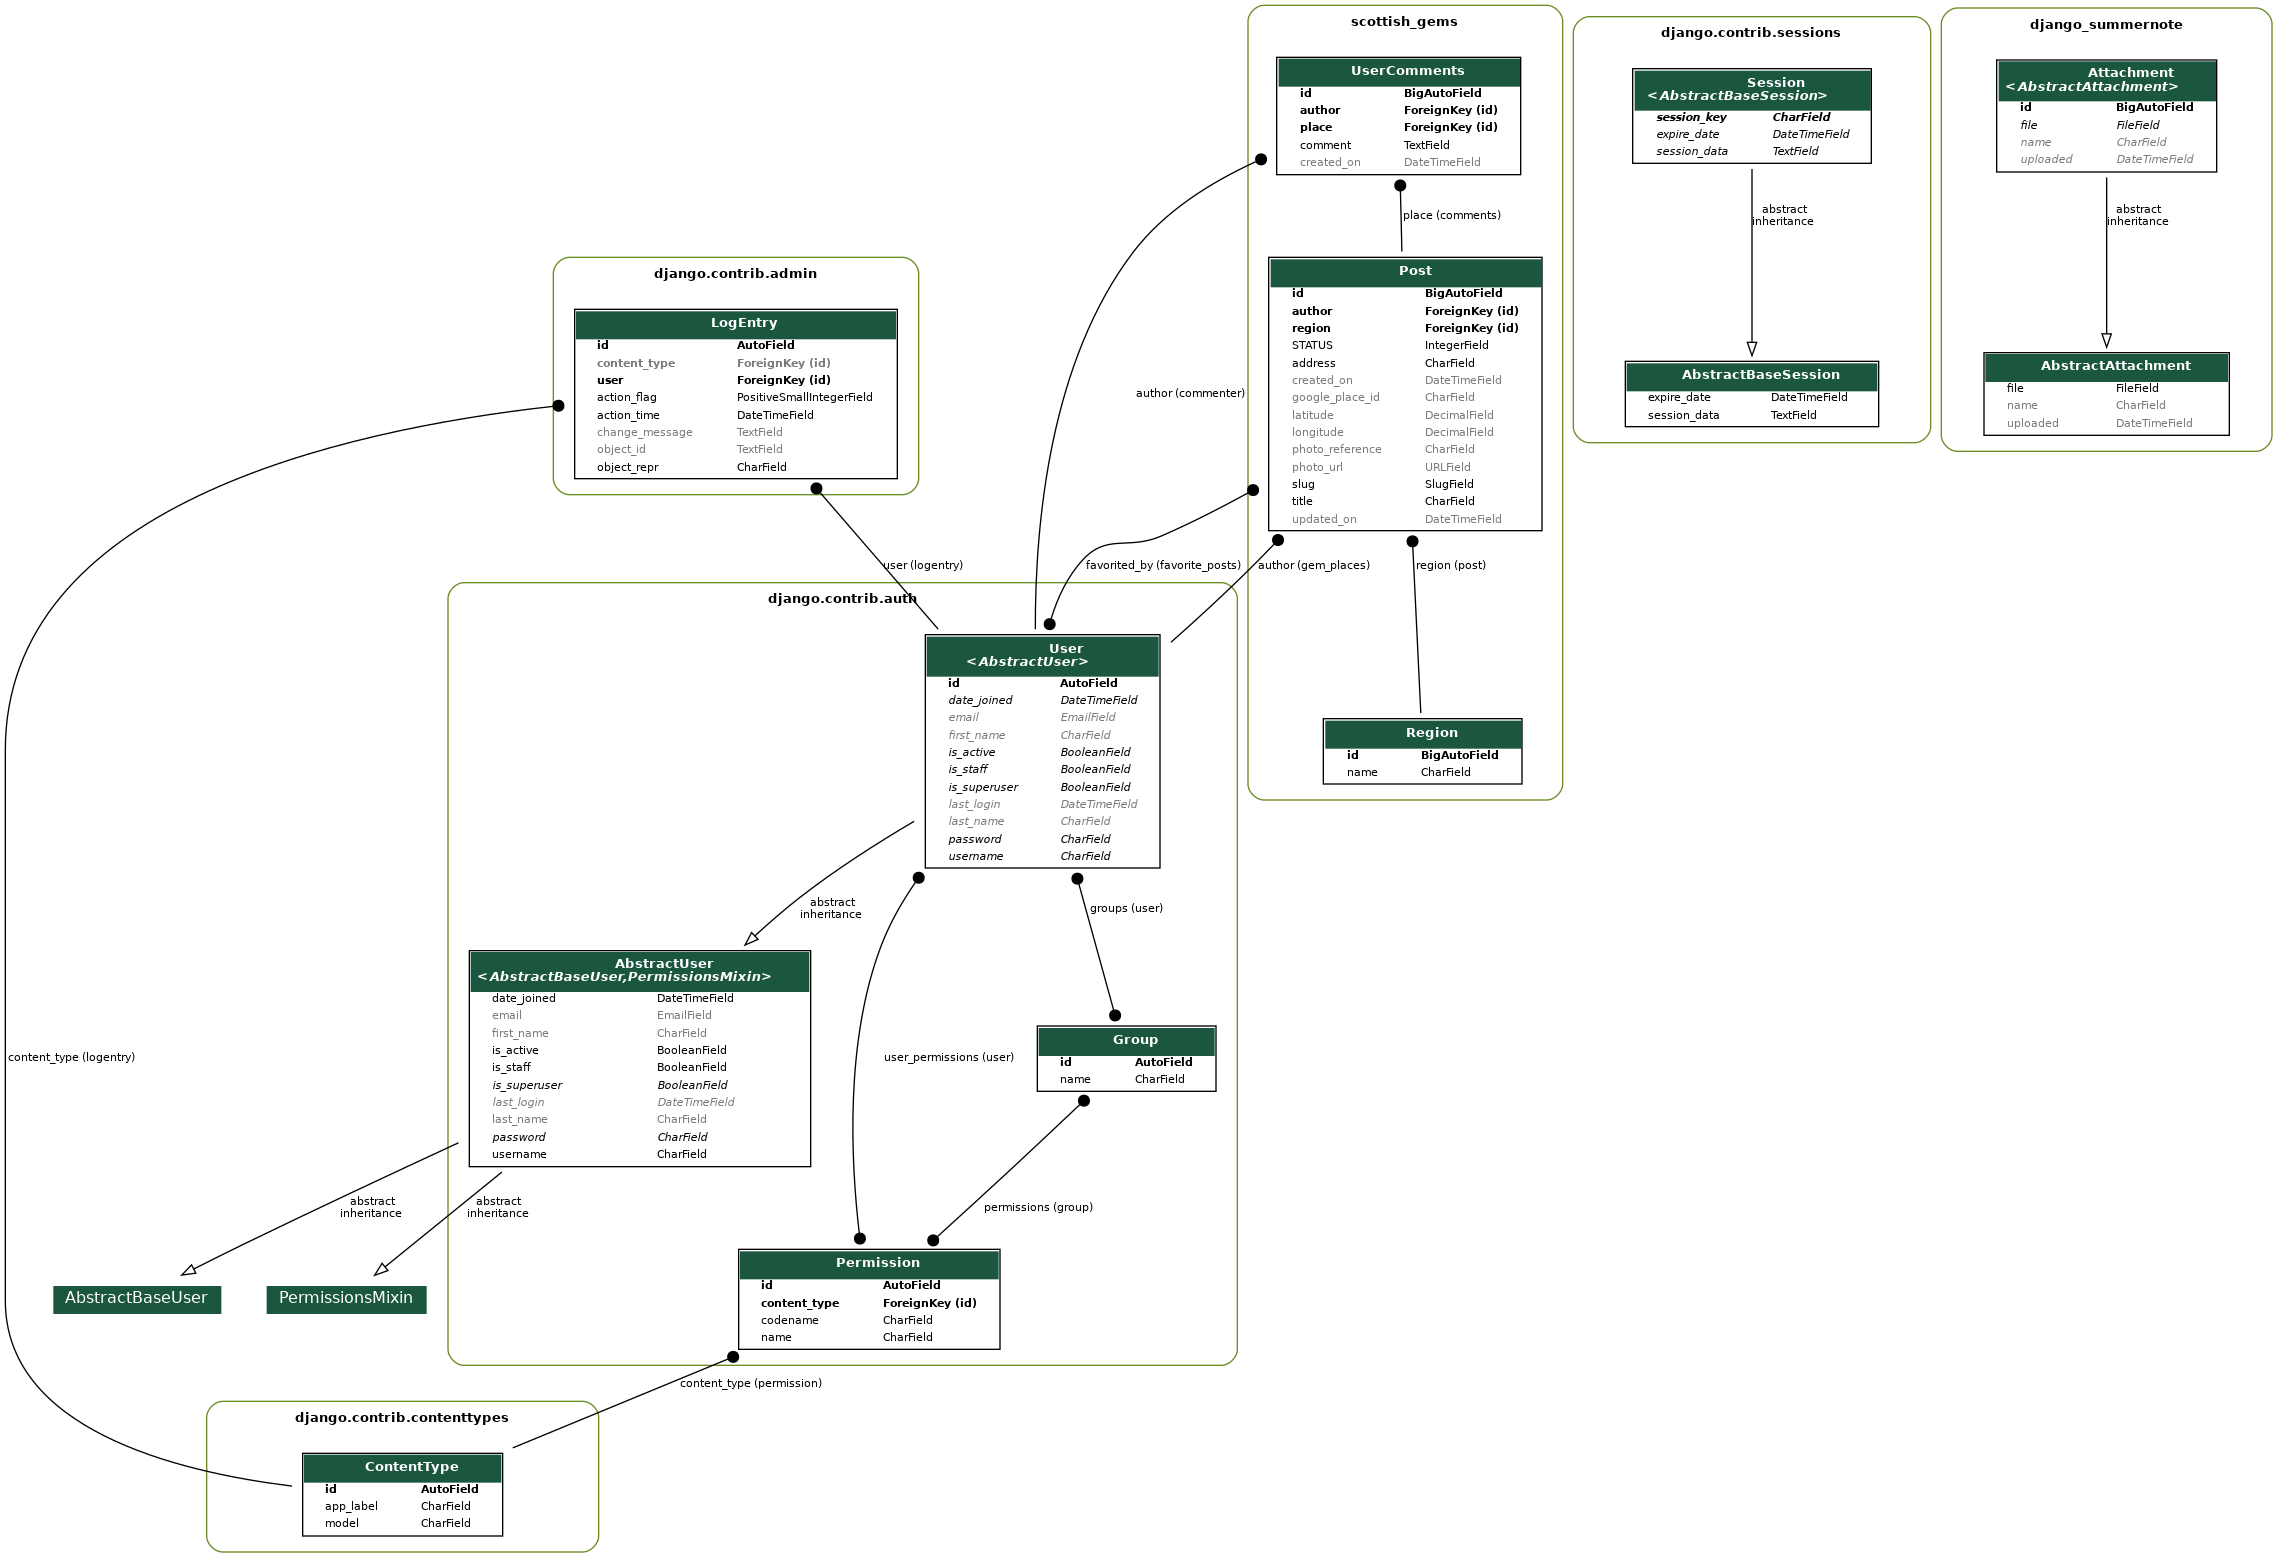 This can be generated within the terminal by using the following commands: 1. Enter the following command: "pip install pip install django-extensions" 2. Within the 'INSTALLED_APPS' section of the settings.py ensure 'django_extensions', is present. 3. Enter the following command: "pip install pygraphviz" 4. Enter the following command: "./manage.py graph_models -a -g -o my_project_visualized.png" Now a .png image will be generated from python showing you ERD.Sharing Gem With aid from google API
When a user is looking to share a "Gem" that they have discovered they can do so with the aid of Google's Plcae API and autocomplete features. When a use begins to input a place that they have discovered google will begin to display suggestions to the user and when the user clicks on the place that they have discovered. Then with the aid of google autocomplete feature the full address and post/zip code is automatically filled in leaving with the user to upload their own images and which region they were in when they discovered the gem.
Color Scheme
The color palette below was generated with the help of Coolors
Color Palette
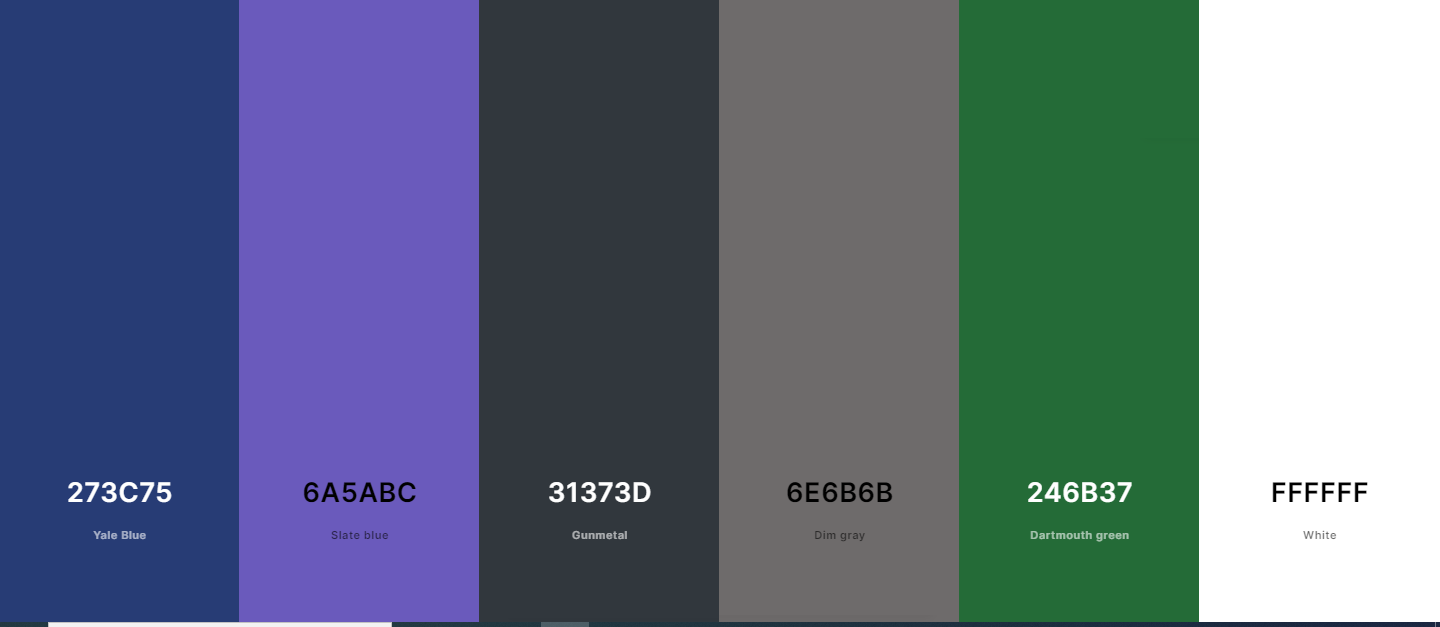 The color scheme was chosen to give the user a more authentic Scottish experience as these colors are generally associated with Scotland.Typography
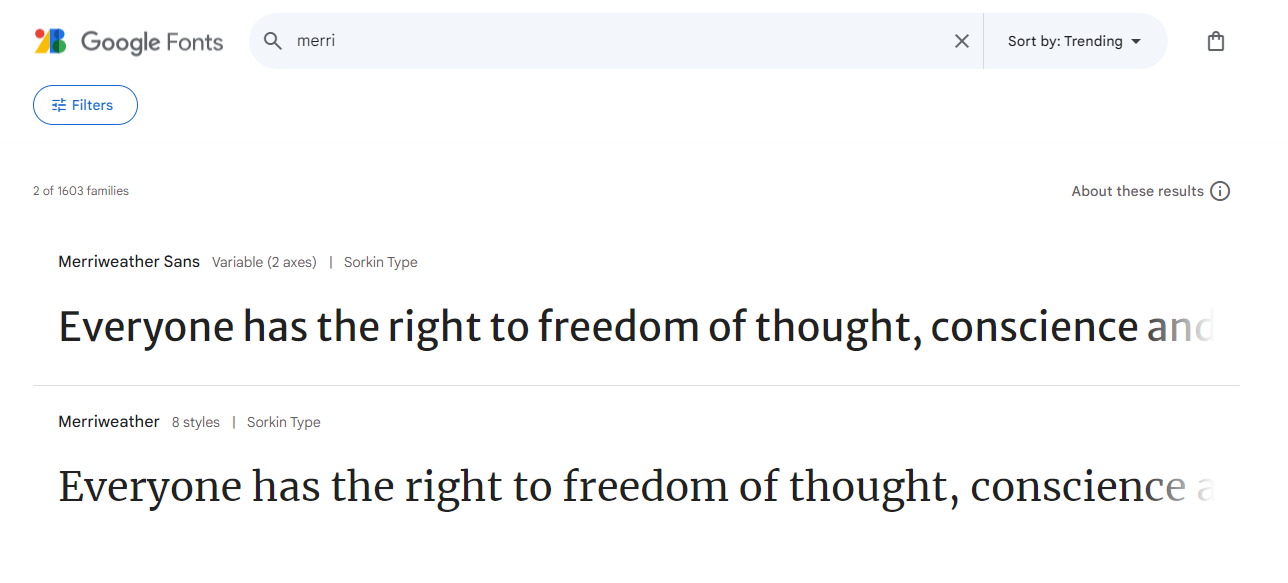
The typography used for the project was produced from google fonts and the chosen text was "Merriweather". Again this was used to give that more authentic Scottish look and feel to the user.
Google Fonts Used
Features
Home Page
The home page is presented to the user with posts already shown by other users and user can click on these posts to view it in more detail. If a user has not got a sign in then the only items available to them on the navbar are "home" "select by region" and the sign in button.
Navigation Bar
The navigation bar is comprised of two views. One view is displayed to a user who is either no to the site or has not yet signed in. The second view is for the users who have signed onto the page and is then presented with two options.
Navigation bar when user is not signed in:

Navigation bar when a user is signed in.

Login
When a user decides to log in they are presented with the following screen.
Login Display
Signup
If a user does not already have an account they can create one by clicking the link shown in the previous image which will bring them to the following page.
SignUp Display
Log Out
When a user decides to Log Out they can click the "signout" button on the navigation bar and is then presented with the following screen
Log Out Display
 - Please note that the Log Out display has has slight style changes since this photo was uploaded.User Messages
When ever a user completes a task they are met with a brief message. These Messages can be seen down below:
Successful Login / Signup
Successful Log Out
Successful Share Gem
Successful Delete Gem
Successful add to favorites
Successful remove from favorites
Successful add comment
Successful edit comment
Successful delete comment
Share Your Gem
The original concept for this page was that a user could input their information into a form. However after a lot of trial and error it was decided that this would not be user friendly. And as previously mentioned inspiration came form another students similar project (Magical Places) and the can now add a place by simply searching for their gem in the search field which by powered by Google Places Autocomplete to suggest existing gems. Once the user clicks on a suggested place, the hidden form is automatically filled in by JavaScript, from the data provided by the Google Places API.
notes:
- The ability for a user to edit a Place that they have added wasn't implemented:
- As the form data is not user-generated, and rather supplied by the Google Places API, there is a low chance or user error that would justify ‘edit’ functionality.
- If the user were to delete places that were already commented on, other users would lose their comments and lose access to the place if it was in their favorites list.
Favorites
The ability for a user has been split into two main parts. Users can see which posts they have selected as their favorites from the main landing page. Or the user can select the "favorites" tab within the navigation tab and they will be brought to a page where they are able to view posts that they have marked as their favorites. The user can decided to set a favorite post from the home page and unfavorite from either the home page or within their favorites page.
- Note: If a post is marked as a favorite and that posts creator decides to delete the post. Then unfortunately it will be removed from the users favorite list.
- This could be something to look at in future development so that the user can still access deleted posts within their favorites directory.
Posts on main home page is user has not selected it as a favorite.
Favorites section within navbar
If post is not a favorite shown on homepage
If a post is a favorite shown on hompage
Users favorites shown on the "favorites.html page"
Select by Region
The select by region function was put in place as this app was intended to cover the whole of Scotland. This would make it easier for the user to filter the Gem Posts in the home page to the region that they were interested in. This feature remains on the navigation bar for users who are and are not signed into the site.
Region selection from dropdown menu
Known Bugs
500 error during user signout.
One of the bug found during development was that when a user was attempting to logout of their account, a 500 error was flagged. This meant that there was an issue internally with the server. - To fix this trouble shooting and debugging of both the Python and JavaScript codes were done to ensure that they were not the main cause of the user recieving this error. There was nothing found within these. - After a bit of advice from a friend I decided to look at the Signout.html code. I commented out the entire code and left a single message that read "this is the signout page". When the page was refreshed the message displayed to the user. I then began to uncomment each section of my html code and refreshed the server until the 500 error was flagged. It was indead the case that the way my HTML code was written was the reason that my app was recieving the internal 500 error. I altered the code to fix the issue and this fixed the error that was being recieved.500 error during user attempting to add a "Gem"
Another bug found during the development of the project was that when a user clicked on the "Share your Gem" on the nav bar, a 500 error was flagged. Again this meant that there was an internal issue with the server. - To fix this I performed the same stages as mentioned earlier and again it was my HTML code that was causing this issue and as mentioned before the HTML code was altered and this fixed the issue with the user being able to share a "Gem".Images displayed on the base.html page
A really big issue/bug that was discovered was to do with the images displayed to users on the base.html page. - These images were automatically produced during the "Share you Gem" functionallity and then would be displayed for all users to see. - However it seems that there was a limit on how many times an API request could be made to Google to have these images constantly displayed to users and after around 4-5 days the image would expire leaving the posts with the image shown below. - There was many different approaches to attempt to fix this issue before submission with each unfotunitaly yeilding in the same results. - Some of which were: - Creating a function with JavaScript to use the Google_Place_ID as a reference to make an image request everytime the page was loaded. (Unsuccessful) - Creating a function using the backend (Python) to capture the image and create a custom URL which then would be displayed to the user (Unsuccessful) After multiple attempts a function is now in place using the backend database and python to use the google_place_id to make a request to the API to generate/renew the photo_reference if the google_place_id is older that 12 hours old. **Please note that although this was working during the time of submission there is still a possibility that the photo_reference could still expire**Bugs Still to Address
Select by region options only present on home page and favorites page
Another bug that was found was when a user was either in their "favorites" page or the "share your gem" page then the dropdown for the "Region Selection" did not display the regions to the user. This is a bit inconveniant especially with the favorites page as the user should also be able to filter their favorites by region, if they were looking for a specific place. - This has yet to be fixed and was sadly unable to be accomplished prior to project submission.After all the above was fixed to the best of my abilities, to my knowledge there are currently no other bugs within the project
Futrue Development.
Any future develop of the page may include the following.
-
Sort Gems by date
- Give the user the option of filtering the posts by date as well as filtering by region.
-
Set the boundries for Scotland more to Scotland.
- At the moment there are boundries set however this is limited to North, South, East and West co-ordinates which is generating more of a square boundry rather than just Scotland. As a result of this the user can select locations in parts of Northern England and Northern Ireland.
- There is a boudries section within Google's APi framework which my aid in achieving this.
-
Linking user email addresses to accounts for password reset/recovery.
Technologies Used
- Languages:
- Python
- JavaScript
- HTML5
- CSS3
- Framework:
- Django
- Database:
- PostgreSQL
- GitPod - as the code editor.
- Git - for version control, using the Gitpod IDE.
- GitHub - for storing the project.
- [CodeInstituteSQL]() - PostgreSQL as a service. (Note: This Replaced ElephantSQL)
- Heroku - to deploy the application.
- Chrome Developer Tools - to test responsiveness, edit CSS code, debug JavaScript and generate Lighthouse reports.
- Google Fonts - to import the site font, ‘Oswald’.
- Balsamiq - to create the wireframes.
- Font Awesome - for all the site icons.
- Coolers - for an overview of the chosen colour palette.
- Am I Responsive - to create the responsive demo image at the top of the Readme.
- Excalidraw - to create the navigation diagram.
- Eightshapes Contrast Grid - to visualise the contrast accessibility of the whole site colour palette.
- Code Institute’s Python Linter - for automated testing of the Python code.
- JSHint - to test the JavaScript code.
- W3C Markup Validator - to test the HTML code.
- W3C CSS Validator - to test the CSS code.
APIs Used
- Google Places API - to get details and photos from place searches.
Python Packages Used
- django-allauth - for user authentication.
- gunicorn - as the HTTP server that allows Django to run on Heroku.
- psycopg2 - as the PostgreSQL database adapter for Python.
- dj_database_url - to allow the use of the
DATABASE_URLenvironment variable inside Django. - Coverage.py - to measure test coverage of the Python code.
Testing
Code Valitdation
HTML
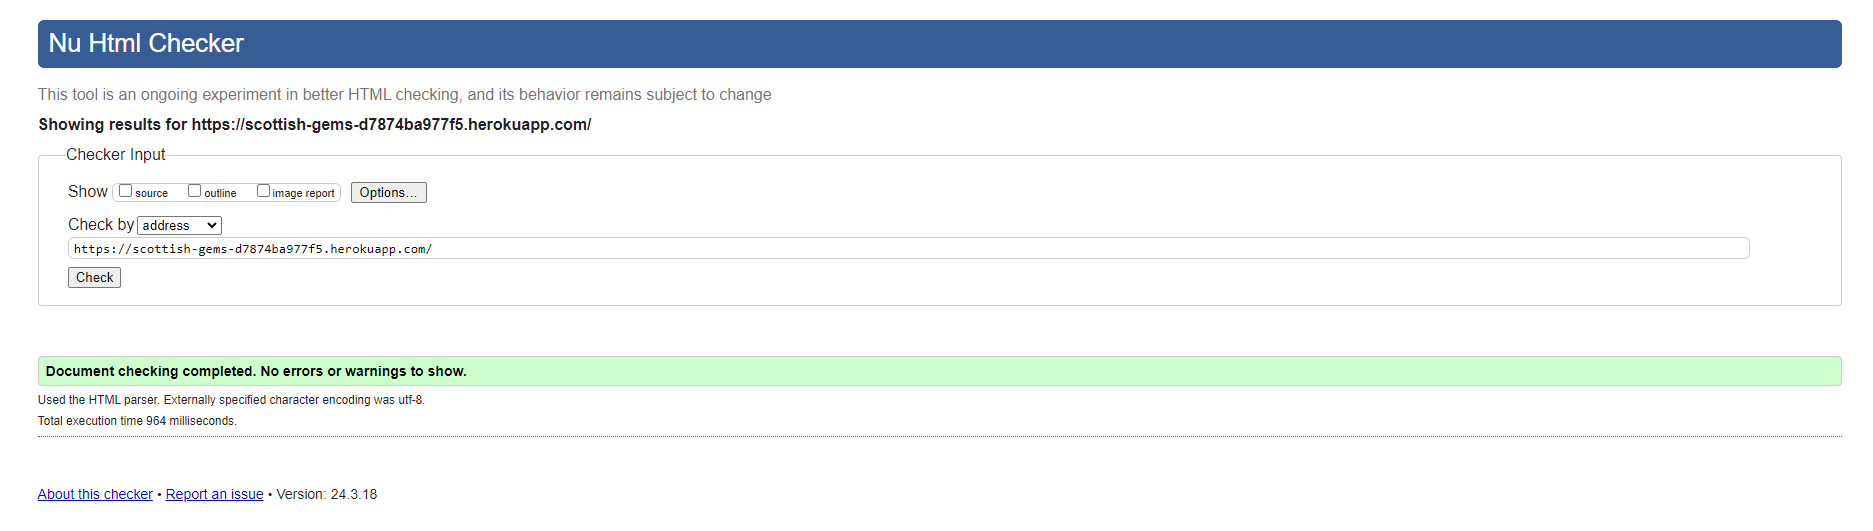
The HTML for the HTTML files Scottish Gems Project was put through the W3C Markup Validation Servie and the results can be seen below.
W3C Validator Results
CSS
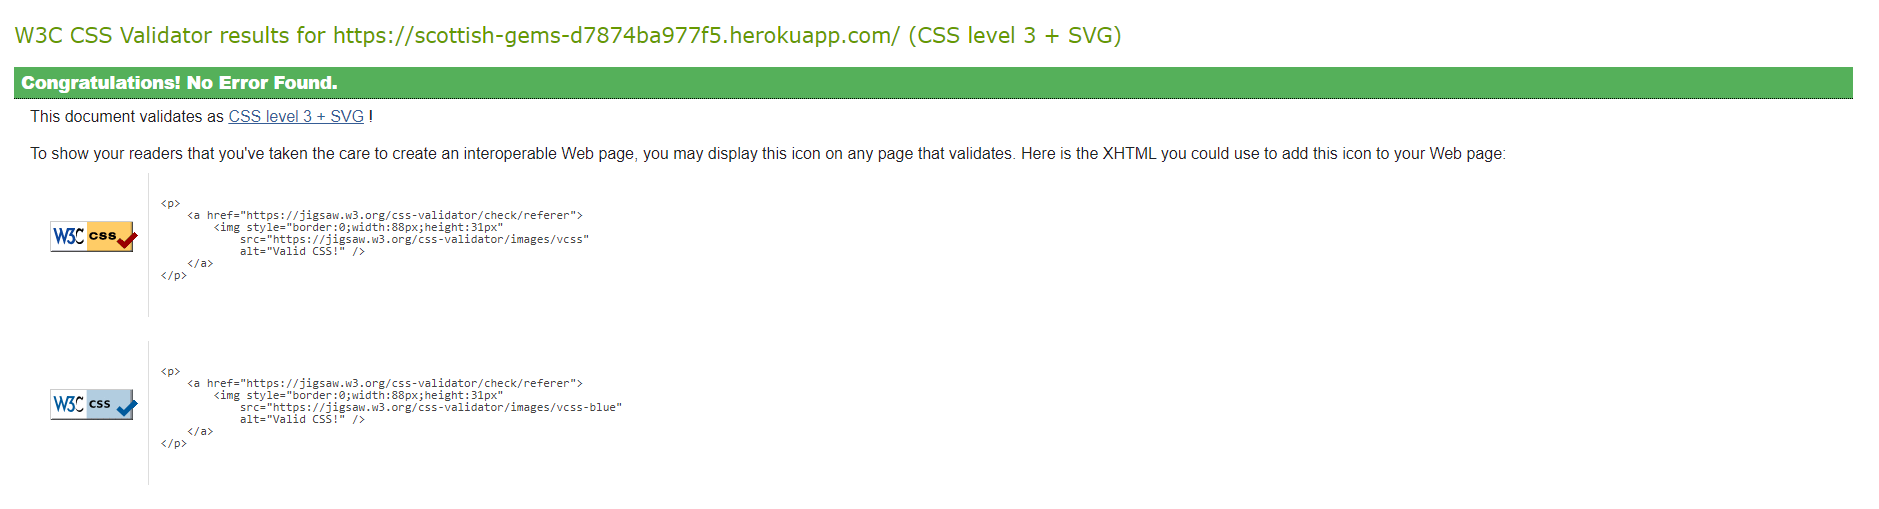
The CSS for the Scottish Gems Project was put through the []() and the results can be seen below.
W3C CSS Validator Results
Python
 Unit testing
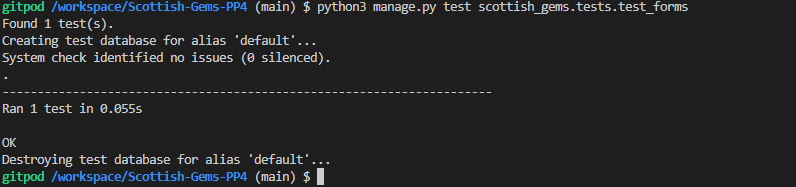
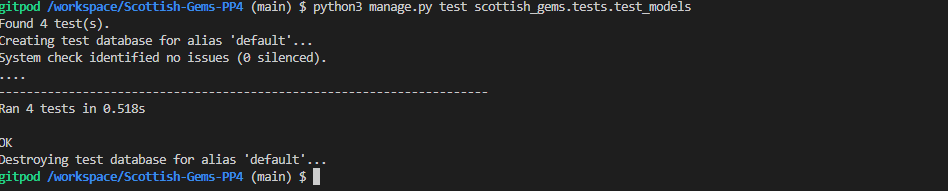
Unit testing was created and carried out based on the following: forms.py, models.py and views.py. Each test is stored within a directory within this scottish_gems app entitled "tests" and imageas of these results can be seen below.
terminal command to run test: python3 manage.py test scottish_gems.tests.test_forms
terminal command to run test: python3 manage.py test scottish_gems.tests.test_models
terminal command to run test: python3 manage.py test scottish_gems.tests.test_views
Testing with Pep8
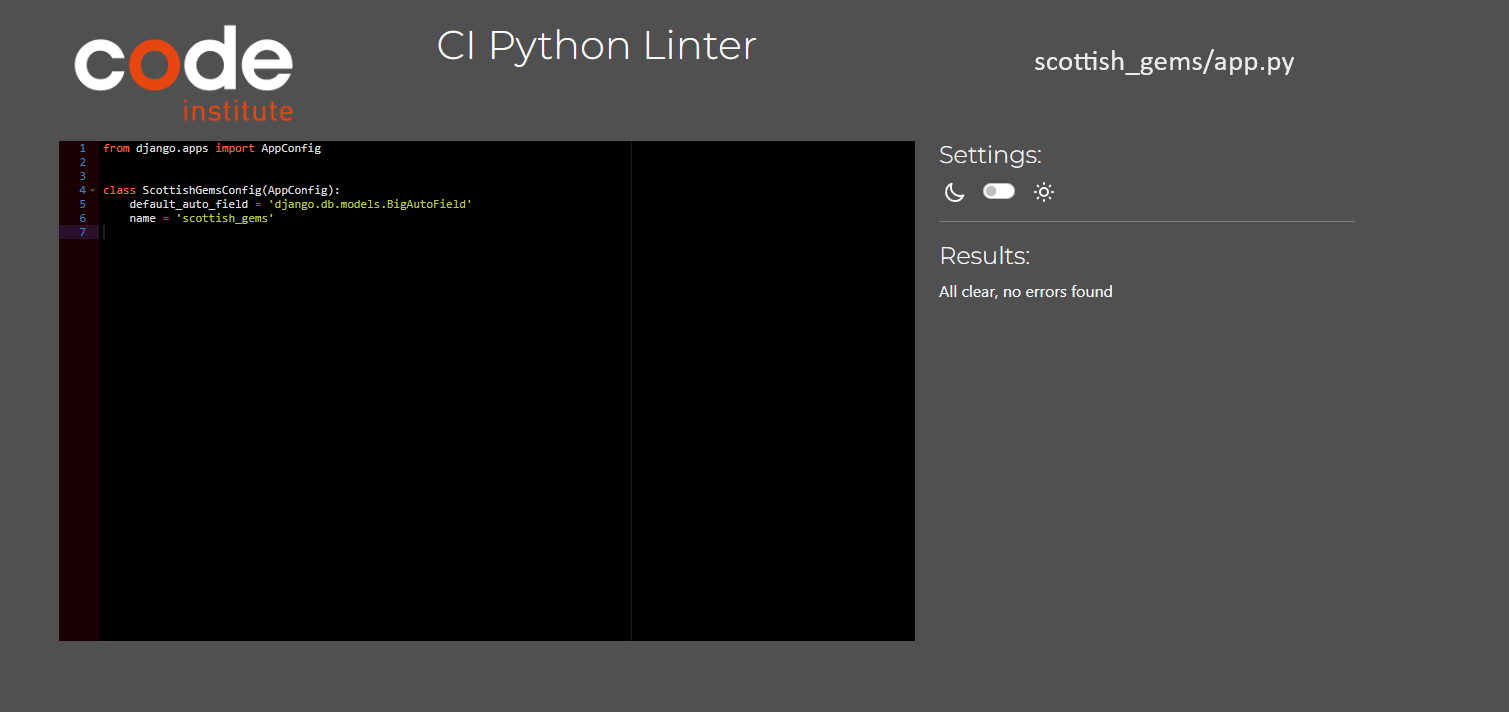
All python code was tested using Code Institutes Python Linter Tester. You can see images of the results below
admin.py Pep8 results
app.py Pep8 results
asgi.py Pep8 results
forms.py Pep8 results
gem_place Pep8 results
models.py Pep8 results
settings.py Pep8 results
urls.py Pep8 results
views.py Pep8 results
JavaScript
Testing with JsHint
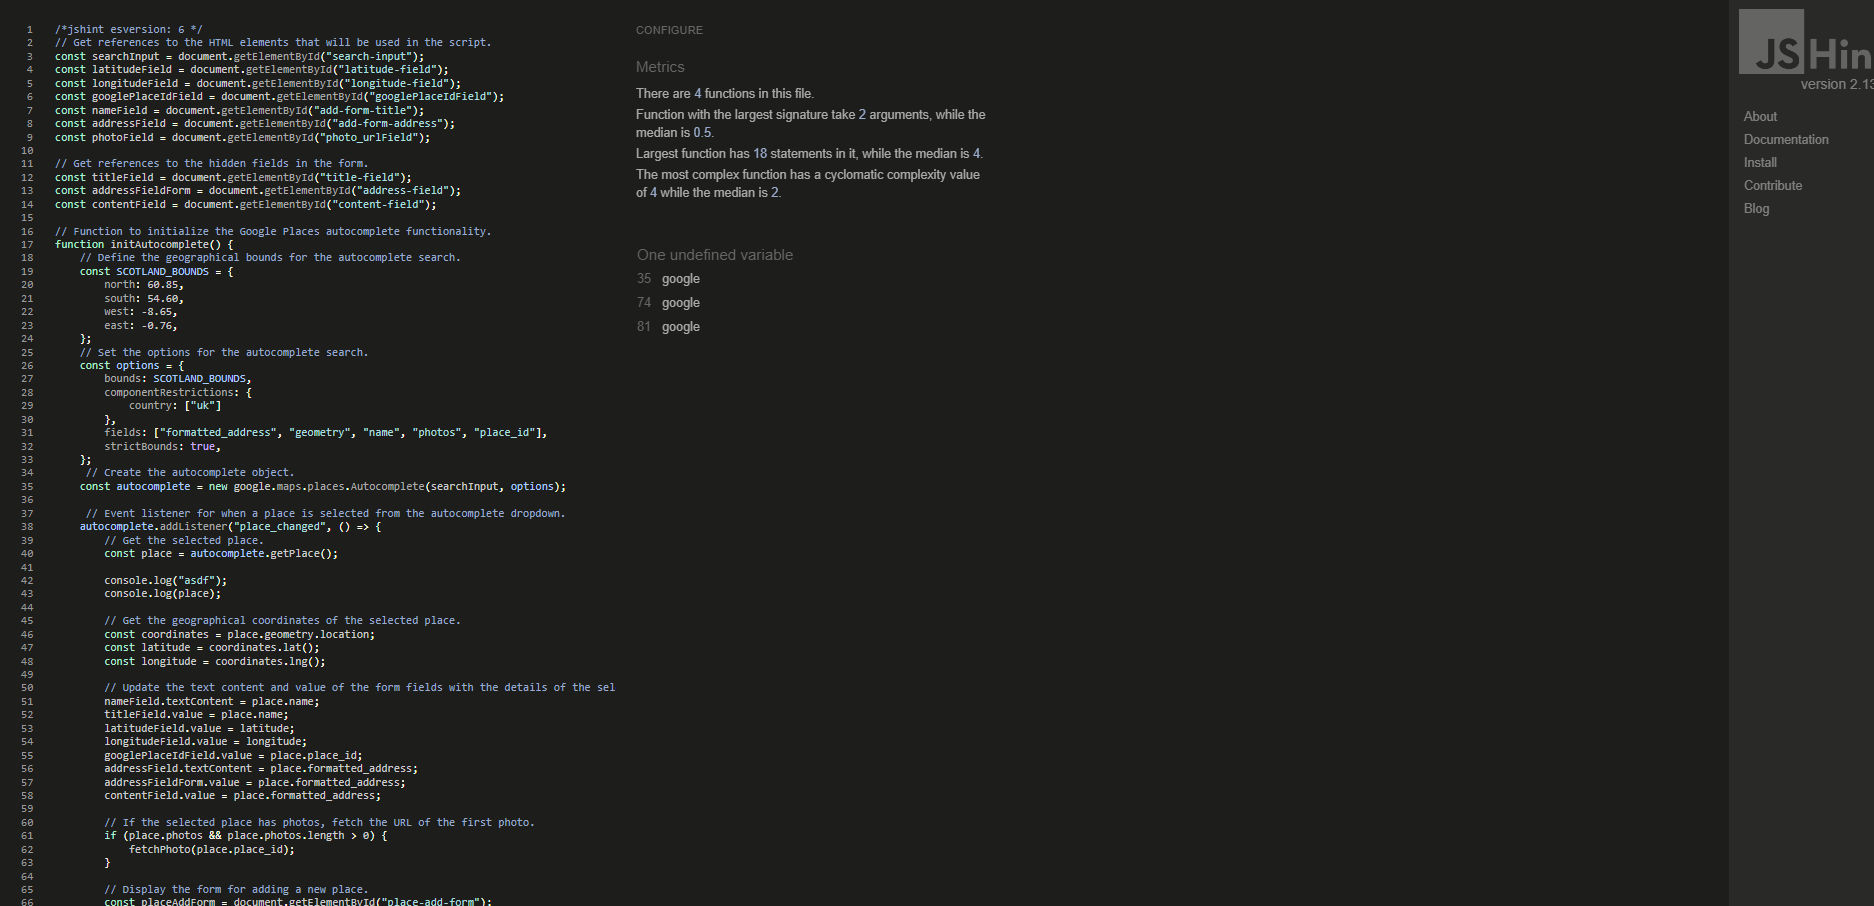
All JavaScript files were ran through JSHint. The results can be seen below.
add-gem-form.js JSHint results
back-btn.js JSHint results
comments.js JSHint results
messages.js JSHint results
script.js JSHint results
Please note that the errors shown on the above JS tests were beacauseof the following
- The undefined variables were defined in other areas.
Manual Testing
Manual Testing was done to test that each feature/function worked as it should and also to ensure that only the user who was the 'Author' of either a gem being shared or a comment who could either have the ability to delete or edit what they have shared. The results of this can be seen below.
Nav Bar Testing
Manual Testing of Nav Bar Features
| Feature |Desired Outcome |Actual Outcome | Test Done to achieve Actual Outcome |--|--|--|--| | Nav Bar (when user not signed in) | Only The home button, select a region button and log in button are displayed. | The Actual outcome is the same as the Desired Outcome. | Ensured no users were signed in and checked nav bar for display. |Nav Bar (when User is singed in)| New options are presented to user to view posts they have marked as their favorites and also to share their own gems they have discovered.|The Actual outcome for this is the same as the desired outcome. |Signed in as a user and checked the nav bar display to ensure additional options were visible. |Log In Button on navbar| When clicked the user is the redirected to the desired "login" html page. | When the user click this button they are redirected to the "login html page.| Ensured no user was logged in and clicked the login button on navbar.Login/ Logout Testing
Manual Testing of Login/Logout Features
| Feature |Desired Outcome |Actual Outcome | Test Done to achieve Actual Outcome |--|--|--|--| Login Page | When the user is at this page they can use their credentials to sign into page.| when the user inputs their credentials they are successfully signed into their account. | For this inital test was conduced with the "super-user" account and then several accounts were created to test all tests worked as expected. |Sign in Page | When a user does not have an account they can click on the sign up option within the "login" page and will be redirected to the sign in page. | When clicked the sign up button successfully re directs the user to the sign up page. | Click the desired button on different occasions and the user was successfully redirected to signup page. |Creating a user account. |when the user is within the sign up page, they input their desired username and password and click sign up. |User inputs desired username and password and their user account is created. | Several different accounts names and passwords were used to test this feature. Duplicated usernames were also tried and an error message presented to the user to inform that the desired username already exists. | Log out button on nav bar | Once a user had either signed in or created and account the login button that was on the nav bar has changed to a logout button for the user. | Once the user has signed in/ created an account then the login button does change into the logout button. | This was tested by signing into the several accounts that were created for the testing purposes and each one was successful for the desired outcome. | logout function | when the user clicks on the logout button within the navbar they are then redirected to the sign out confirmation page. | when the user does click the log out button they are redirected to the logout confirmation page. | This was tested using the several different user accounts created and each one was a success in redirecting the user to the logout confirmation page. |Logout confirmation page | when on this page the user is then prompted to confirm that they wish to log out and once the user confirms a message will pop up confirming successful log out and then redirected back to the home page. | The user clicks the confirmation button ant they are presented with the successful message and is redirected to the home page. | This was tested using the several test account created and each time the user was successfully logged out of their account.Adding/Removing Favorites Tests
Manual Testing of Favourites Features
| Feature |Desired Outcome |Actual Outcome | Test Done to achieve Actual Outcome |--|--|--|--| |Adding post to favorites | when a user has successfully logged in they are then displayed with icons on each post which if clicked will ad that post to the users list of favorited posts. | When the user clicks this button a message does appear confirming desired post is in fact added to their favorites and the icon has now filled with a solid color to the user. | This was tested using the several test accounts created and each one was successful in adding posts to their favorites. |Filtering favorites posts | Once a user has several posts marked as their favorites they can click the favorites tab within the nav bar and they are then presented with only the posts that they have marked as their favorites. | When the user clicks on the favorites tab within the nav bar they are presented with only the posts that they have marked as their favorites. | This was tested using the different test accounts created and each one was successful in filtering and displaying to the user their selected favorite gems. |Removing posts form favorites | Either through the home page or the favorites page the user would have the ability to remove posts from their list of favorites. |when either the icon on the home page or the icon within the favorites page was clicked by the user a message pop up would show confirming successful removal from favorites. | This was tested using the several test accounts created and each one was successful in removing posts from their list of favorite gems.Creating/Deleting Gem Test
Maunal Testing of Adding/Deleting Gem
| Feature | Desired Outcome | Actual Outcome | Test Done to achieve Actual Outcome | | ------------------------------------------ | ----------------------------------------------------------------------------------------------------------------------------------------------------------------------------------------------------------------------------------------------------------------------------------------------------------------------------------------------------------- | ------------------------------------------------------------------------------------------------------ | -------------------------------------------------------------------------------------------------------------------------------------------------------------------------------------------------------------------------------------------------------------------------------------------------------------------------------------------------------------------------------------------------------------------------------------------------------------------------------------------------------------------------------------------- | | Creating a gem | still to be fixed and tested | still to be fixed and tested | still to be fixed and tested | | Deleting a gem post (when correct user). | If a user no longer wishes to share there gem there is an icon present on the posts that they have shared and once clicked they are brought to a confirmation page for deletion of their post | When the user clicks on the icon within the post then the are redirected to the the confirmation page | This was tested using the several test accounts and when the user clicks on their post for deletion then they were successfully redirected to the confirmation page for deletion. | | Deletion confirmation page | When the user is redirected they are asked if the wish to confirm deletion or return to the home page. If the confirm button is clicked a successful message will appear and the post will be deleted from the database and no longer displayed on the home page. If the cancel button is clicked then the user is simply redirected back to the home page. | When either button is clicked then the desired outcome is achieved. | This test was carried out using the several test accounts created and each time depending on which button was clicked the desired outcome was achieved. | | Deleting a gem post(when not correct user) | When a user is signed in the delete icon is only shown for the posts that they have created, the do not have the ability to deleted any other user posts. | When a user is logged in they are only presented with the option to delete a post for their own posts. | This was tested using the created test accounts and users were unable to access the confirmation page to delete other users posts. A deeper test was carried out by having 2 windows open and signed in as two different users, user "A" and user "B". When User "A" tried to copy and paste the confirmation URL link belonging to user "B" then user A was met with and 400 error with the option to return to the home page. and the same outcome was achieved when user "B" tried the same method with user "A's" confirmation URL link. |Adding/Edit/Delete Comments
Manual testing of comments feature
| Feature | Desired Outcome | Actual Outcome | Test Done to achieve Actual Outcome | | ----------------------------- | ------------------------------------------------------------------------------------------------------------------------------- | ------------------------------------------------------------------------------------------------------------------------- | ------------------------------------------------------------------------------------------------------------------------------------------------------------------------------------------------------------------- | | Adding user comments to posts | when a user clicks on a post they would be able to add their comments on that particular post | When a user is signed in they are able to leave a comment on a post and then it will be displayed for other users to see. | This was tested using the different test account created and each account was successful in leaving comments on posts | | Editing Comments | Once a user had already posted a comment on a post, if the wished they could go back later and edit the comment created | The user can edit their comments and resubmit to the comments section. | This was tested using the different test accounts created and each user was able to edit their own comments. | | Editing other user comments | Users will not be able to edit the comments that other users have made on a post | Users can only edit the comments that they, themselves have created | This was tested using the different test accounts and a help with a friend, when logged in i could not edit their comments and when sent the hyperlink they had when on the edit page i was met with a 400 error. | | Deleting comments | A user should have the abilitiy to delete a comment that they have made, if they no longer wish to display a particular comment | Users can delete their comments if they no longer wish to display them | This was tested using the multiple test accounts created and each account was successful in deleting their comments if needed. | | Deleting other user comments | Users will not be able to delete the comments that other users have made on a post | Users can only delete the comments that they, themselves have created | This was tested using the different test accounts and a help with a friend, when logged in i could not delete their comments and when sent the hyperlink they had when on the edit page i was met with a 400 error. |Lighhouse Testing
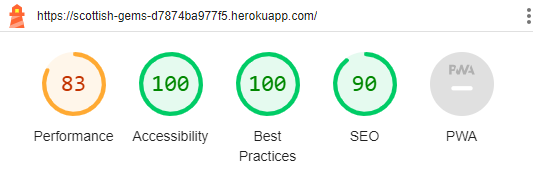
Each page of the project was tested through lighthouse please find the results below.
Base.html
login.html
signup.html
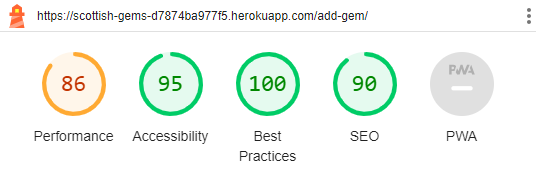
share_gem.html
gem_details.html
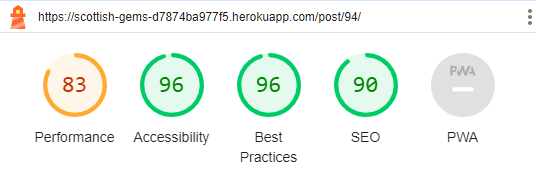Please note that all these tests were done within incogneto mode as there were chrome extensions installed that were effecting the performance of the site
User Stories Testing
All user stories were tested to confirm that they meet their Acceptance Criteria. The following have all PASSED.
(View the User Stories, Acceptance Criteria and Tasks on the GitHub Kanban Board)
USER ACCOUNT
As a user I can sign up and log in to the site to leave comments and add Gems.
- Acceptance Criteria - PASSED:
- Users can create an account with a Sign Up page
- Users can log in with a Log In page
- Users can log out with a Log Out Page
As a user I can view a list of the Gems to see titles, pictures.
- Acceptance Criteria - PASSED:
- List view page
- Photo is displayed
- Title is displayed
COMMENTS
As a user I can leave a comment on a Gem, to share my experience with other users.
- Acceptance Criteria - PASSED:
- Once signed in, a user can leave a comment on a Gem.
- User receives successful feedback message
- Comment form is in the detail view
As a user I can read my and other people's comments, to be inspired to visit a place.
- Acceptance Criteria - PASSED:
- Comments are displayed in the detail page
- Comment form submission redirects to detail page, so it can be read
As a user I can edit my comments, to correct or add information.
- Acceptance Criteria - PASSED:
- User can edit their own comments (not others)
As a user I can delete my comments, to allow me to change my mind.
- Acceptance Criteria - PASSED:
- User can delete ONLY their own comments
FAVOURITES
As a user I can favourite and unfavourite a Gem, to keep a record of places to visit in the future.
- Acceptance Criteria - PASSED:
- User can click an icon to toggle the 'favourite' status of a Gem.
- 'Favourite' status is shown in the icon display.
As a user I can view a list of my favourite Gems, to easily see which places I plan to visit.
- Acceptance Criteria - PASSED:
- User can select 'Favourites' in the list page to view all of their favourites
ADD A PLACE
As a user I can easily add a Gem by typing its name, to share my recommendation with other users.
- Acceptance Criteria - PASSED:
- Search bar with autocomplete
- Selected place is shown with name, address and photo
- User has the option to Save or Cancel
ADMIN
As a site developer I can view a list of all data: places, comments and favourites, so I can moderate content.
- Acceptance Criteria - PASSED:
- Django admin panel with Places, Comments and Favourites
As a developer I can create, read, update and delete (CRUD) Gems, to create the initial content for the site, and moderate the Gems added by users.
- Acceptance Criteria - PASSED:
- Places can be updated & deleted in Django Admin panel
DEPLOYMENT
As a developer I can deploy to a hosting service, so that the site is available to the public.
- Acceptance Criteria - PASSED:
- Functioning deployment to Heroku
Deployment
Creating The Repository
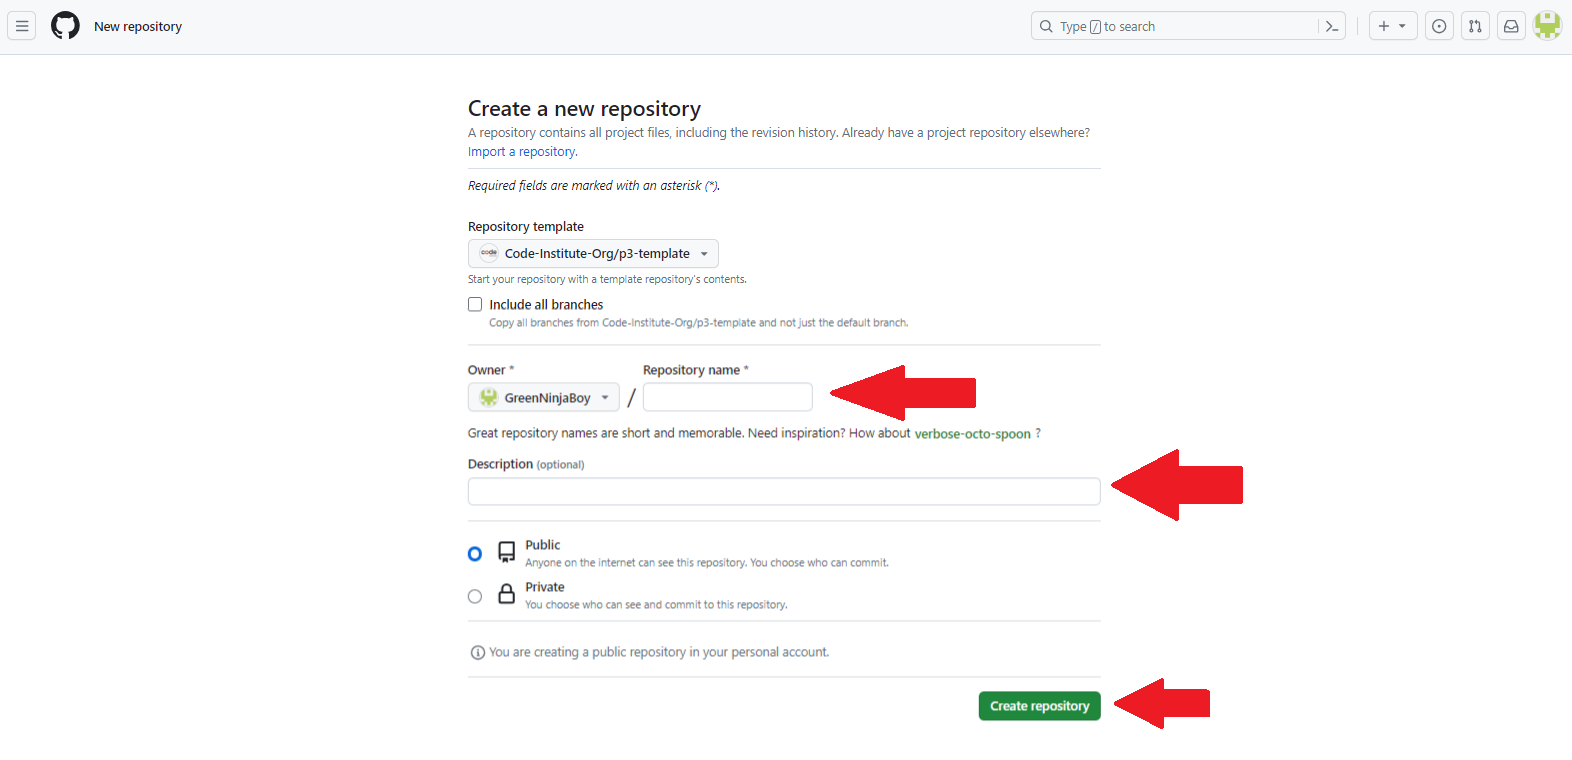
The repository was created using Github. as a student this was done using a template provided by Code Institute. To do this the following steps were taken:
- On the browser head over to the Code Institute Template.
- Click on the green "Use this template button".
- Click on "create a new repository".
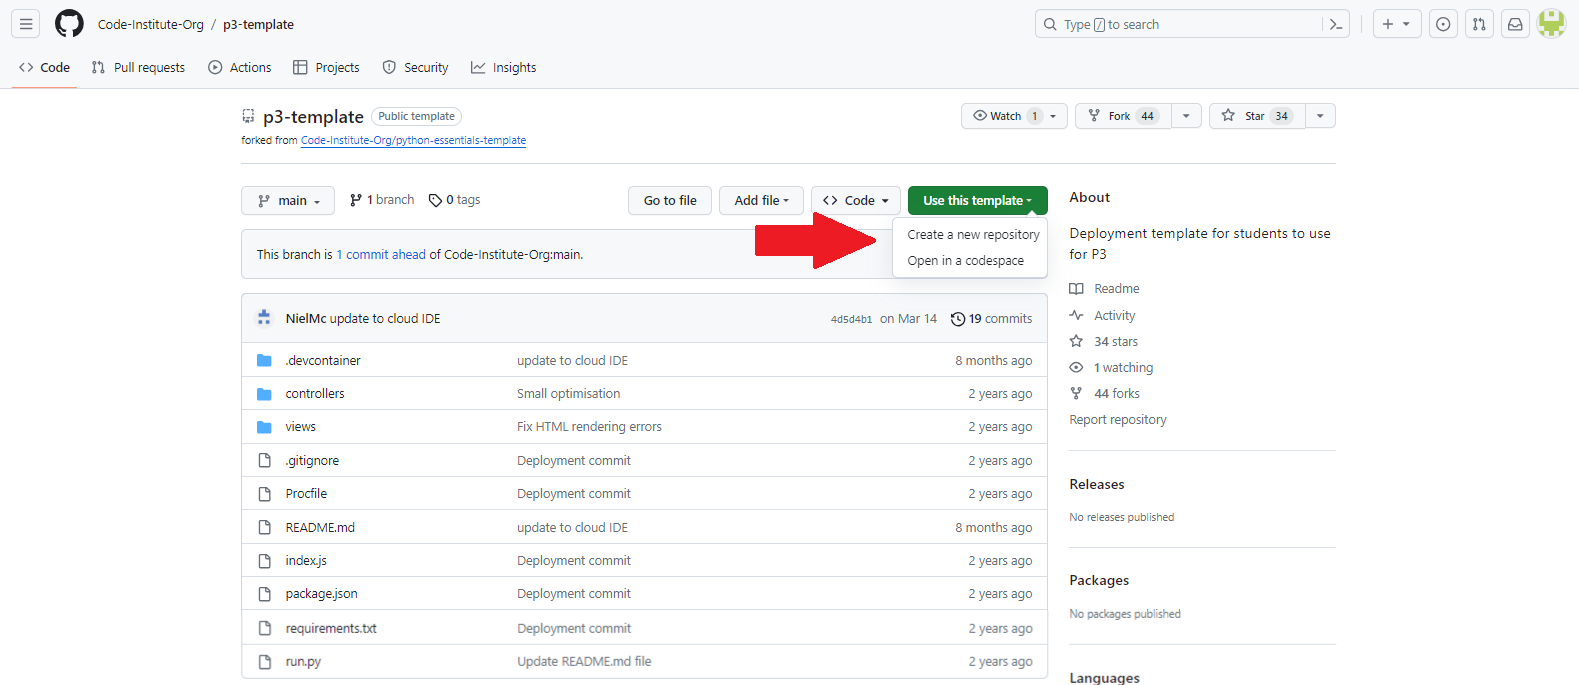
- The user will be taken to a new page to create the repository.
- In the box titled "repository name" enter an appropriate name (for this project Scottish-gems-PP4 was used).
- There is an optional description box if you wish to give a bit more detail to your repository.
- Then Click on the green "create repository" and Github will create the new repository.
Cloning the Repository
- Github can also be used to clone a repository so that the code can be altered and pushed back to the main repository using a different IDE.
- This can be done by using the following steps.
- In the " Scottig-Gems-PP4" repository, select the green "code" tab.
- Select HTTPS in the dropdown menu.
- Copy the URL under HTTPS.
- There are 2 main virtual IDE's that CodeInstitiue reccomend and those are CodeAnyWhere and GitPod.
- Please Note that the images used for CodeAnywhere were images used in a previous project entitled Story-time-Adventures-PP3 the process however remains the same.
Cloning Repository Using CodeAnywhere
 1. Open the [CodeAnywhere](https://app.codeanywhere.com/). 2. Sign in using your Github details.  3. Click on the create new workspace button.  7. Paste copied HTTPS and click create (Codeanywhere will now generate the virtual IDE).  4. Once IDE has Loaded create inital index.html page and add test text. 5. Once test text is added press `Ctrl + S` to save. 6. Click terminal tab at top of screen and click new terminal. 7. Once new terminal has opened test that content is being pushed back to github. 8. In the terminal type `git add .` and press enter (this will add all new content). 9. Then type `git commit -m "add test text"` and press enter (this lets anyone seeing your commits know what you have done). 10. Once you have done that type `git push` and press enter (this will push all changes made to the github repository). 11. Navigate to github. 12. Choose the repository you were working on. 13. Check the changes have been successfully pushed.Cloning Repository Usining Gitpod
1. Open [GitPod](Gitpod.io) 2. Click the signin/ Login button at the top right hand corner of the page. 3. Sign/Login using your GitHub credentials. 4. Click on New Workspace 5. Gitpod works slightly different from Codeanywhere, you can either begin typing the name of your repository and you will see it appear in the dropdown menu or you can simply paste the copied HTTPS in to the field. 6. Click Continue and you Gitpod virtual workspace will be created. 7. Once IDE has Loaded create inital index.html page and add test text. 8. Once test text is added press `Ctrl + S` to save. 9. Click terminal tab at top of screen and click new terminal. 10. Once new terminal has opened test that content is being pushed back to github. 11. In the terminal type `git add .` and press enter (this will add all new content). 12. Then type `git commit -m "add test text"` and press enter (this lets anyone seeing your commits know what you have done). 13. Once you have done that type `git push` and press enter (this will push all changes made to the github repository). 14. Navigate to github. 15. Choose the repository you were working on. 16. Check the changes have been successfully pushed.-
Please Note
- If for what ever reason you find yourself switching between CodeAnywhere or Gitpod please make sure that the first command in your terminal is "git pull" as this will pull any changes that you have made using other IDE's.
Forking The Repository
- Github can also be used to fork a repository. - This can create a copy of the repository which can be edited without effecting the main repository branch. - The steps to fork the repository can be done as follows: - When in the " Scottish-Gems_PP4" repository click on the "Fork" tab located at the top right hand corner. - Click on "create a new fork" - You will be sent to another page to name your forked repository. - Once Named click create fork and you will have a copy of the repository that you can now access and change without affecting the original main repository.
Fork Image 1
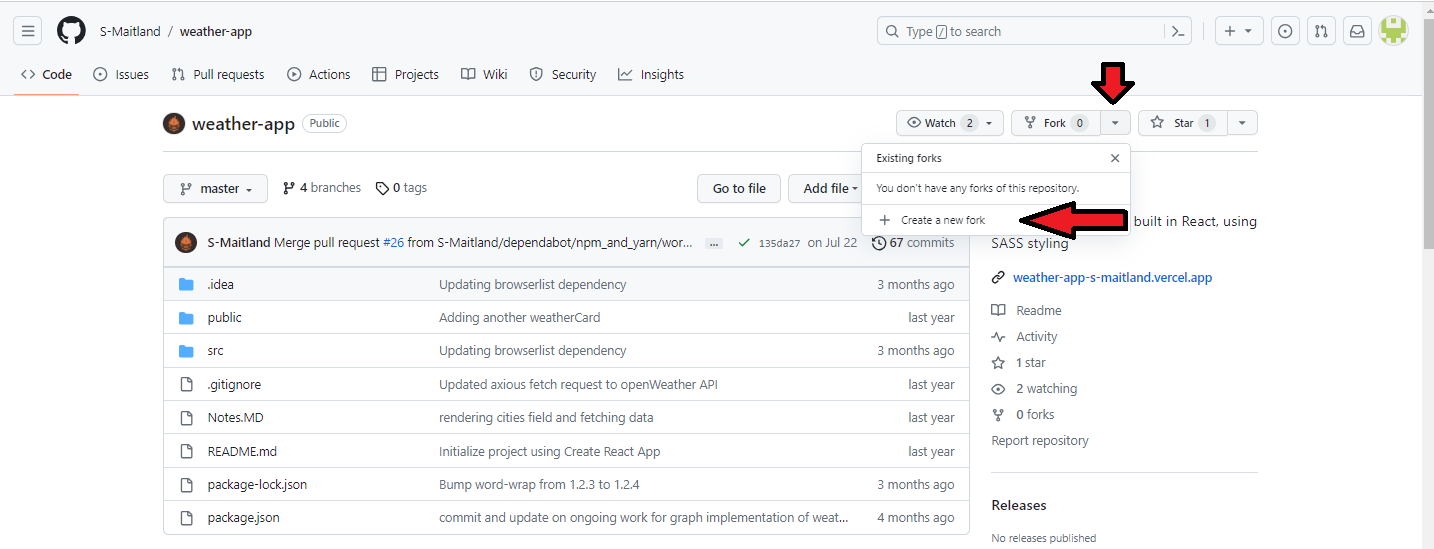
Fork Image 2
 \*Please note that the images taken were from a friends Github repository who consented to the use of these images for educational purposes.Setup Google Maps/Places API
To set up the Google Maps API follow the steps outlined in the Google documentation, to:
- Create a Google Cloud account
- Create a project
- Get a Google Maps API key
- Enable the Maps API and Places API
CodeInstituteSQL
- Use the following [link]() to access code institutes SQL page.
- Enter you email addrexx.
- You will then be emailed a link which when opened will give you all your details to set up your database
Deploying Using Heroku
The Scottish-Gems-PP4 repository was deployed using Heroku.
The following steps were used:
- Login or create an account with Heroku
- On the dashboard click on the "Create new app."
- Write a name for the app being deployed and choose your region and click "Create App".
- Add build pack scripts, the one used for this project was:
- Python
- Connect your Heroku with your GitHub account and select the repository you are working on.
- In the ‘Settings’ tab, click on 'Reveal Config Vars’.
- Enter the details for these Variables (for this particular projectneed these variables in the ‘env.py’ file for local use):
- CLOUDINARY_URL
- DATABASE_URL (from [Code Institute]())
- GOOGLE_MAPS_API_KEY (to ensure the add gem funtionallity works correctly)
- SECRET_KEY (from Django)
- Then at the bottom of the deployed tab, you can either choose to deploy your repository manually or have the system do it for you automatically.
Creating The Django Project & App
The following steps were taken to create the django Project and App:
Django Project
- Within the terminal install django using the following command "pip3 install django". - Once installed run the following command to create your project: **django-admin startproject web_project .** - *Note: replace "web_project" with your chosen app name, for this project "gem_places" was used. - *Note: the command used with the use of the "." assumes that this is your created project and automatically creates the following files: - Settings.py - __init__.py - asgi.py - urls.py - wsgi.py - When this is done then imput the following command into the terminal python manage.py migrate. - When you run the server the first time, it will create a default SQLite database in the file db.sqlite2 that is intended for development purposes. This is the first stage when creating a project using django.Django App
To create the basic temnplate for the django app the following steps were taken. - Within the termianl the follwing command was used "**python manage.py startapp appname** - Note* insert what ever you would like to call you app instead of "appname". For this app scottish_gems was used. - When the command is running you app directory is created with some of the followign files inside. - views.py - urls.py - models.py - forms.py - admin.py This is now the basic structure installed and ready for you to begin work within your application/project.Creating Procfile
Heroku web applications requires a Procfile for the application to run successfully and is done so usuing the following steps. 1. Run the following command within your terminal "pip install gunicorn" 2. create Procfile within your directiory. 3. Withing the procfile insert the following "web: gunicorn project_name.wsgi" 4. Push your changes to github. Once you have re-deployed your app on heroku the Procfile will be updated within the reasourses section.requirements.txt
To create the requirements.txt file the following command is inputted into the terminal "pip freeze > requirements.txt" This will create your requirements.txt file with a list of the dependences required.Credits
Content
The original idea for this site was inspired by Magical Gems who created a similar project around the main London Area.
All photos come from the Google Places API.
Code
The following docs and tutorials were consulted.
Django
General Django tutorials:
Django ‘favoriting’ functionality:
Django messages:
Getting data from a Django model into javascript:
Google Maps API/JavaScript
(Official Google)
Acknowledgements
This is my Fourth project that was created and developed for portfolio as a student of Code Institute currently undertaking their course in Full Stack Software Development.
I would like to thank the following for all of the support throughout the development phase.
- The Code Institute community, including fellow students and staff.
- My family, My friends and peers who have helped during the testing phase and provided valuable feedback.
- My Mentor lauren-nicole Popich for her continuing advice and support during the development process. I can honestly say without her knowledge and guidence I would not be at the stage I am at now
Jamie Connell Code Institute Student 2024