
Using IBM Watson to enrich audio and visual files.
WARNING: This repository is no longer maintained.
This repository will not be updated. The repository will be kept available in read-only mode.
In this developer journey we will use Watson services to showcase how media (both audio and video) can be enriched on a timeline basis. Credit goes to Scott Graham for providing the initial application.

Flow
- Media file is passed into the
Media Processorenrichment process. - The Watson Speech to Text Service translates audio to text. The text is broken up into scenes, based on a timer, a change in speaker, or a significant pause in speech.
- The Watson Natural Language Understanding Service pulls out keywords, entities, concepts, and taxonomy for each scene.
- The Watson Tone Analyzer Service extracts top emotions, social and writing tones for each scene.
- The Watson Visual Recognition Service takes a screen capture every 10 seconds and creats a 'moment'. Classifications, faces and words are extracted from each screen shot.
- All scenes and 'moments' are stored in the Watson Cloudant NoSQL DB.
- The app UI displays stored scenes and 'moments'.
Watson Accelerators
Visit the Watson Accelerators portal to see more live patterns in action.
Included components
- Watson Natural Language Understanding: A IBM Cloud service that can analyze text to extract meta-data from content such as concepts, entities, keywords, categories, sentiment, emotion, relations, semantic roles, using natural language understanding.
- Watson Speech-to-Text: A service that converts human voice into written text.
- Watson Tone Analyzer: Uses linguistic analysis to detect communication tones in written text.
- Watson Visual Recognition: Visual Recognition understands the contents of images - visual concepts tag the image, find human faces, approximate age and gender, and find similar images in a collection.
- Cloudant NoSQL DB: A fully managed data layer designed for modern web and mobile applications that leverages a flexible JSON schema.
Featured Technologies
- Node.js: An asynchronous event driven JavaScript runtime, designed to build scalable applications.
- AngularJS
Watch the Video
Steps
This journey contains multiple apps - the app server which communicates with the Watson services and renders the UI, and the process media app which enriches multimedia files. Both of these need to be run locally to enrich media files. Once media files are enriched, the app server can be deployed to IBM Cloud so that the UI can be run remotely.
NOTE: To enrich multimedia files, both the app server and enrichment process must be run locally.
For convenience, we recommend that you use the Deploy to IBM Cloud button to initially create the Watson services and deploy the Watson Multimedia Analyzer application. Using this feature will provide the following benefits:
- All Watson services are automatically created and associated with the deployed app.
- Watson service credentials will be centrally located and easily accessible.
- Once you have completed this journey, all of the Watson services can be automatically deleted along with deployed app.
Deploy to IBM Cloud

-
Press the above
Deploy to IBM Cloudbutton and then click onDeploy. -
In Toolchains, click on
Delivery Pipelineto watch while the app is deployed. Once deployed, the app can be viewed by clicking 'View app'.

- To see the app and services created and configured for this journey, use the IBM Cloud dashboard. The app is named
watson-multimedia-analyzerwith a unique suffix. The following services are created and easily identified by thewma-prefix:- wma-natural-language-understanding
- wma-speech-to-text
- wma-tone-analyzer
- wma-visual-recognition
- wma-cloudant
Note: Even though the
watson-mulitmedia-analyzerhas been deployed to IBM Cloud and can be accessed remotely, it will not display correctly until the following steps are completed.
- Clone the repo
- Configure the Watson Multimedia Analzer application
- Configure credentials
- Run application
- Enrich multimedia files
- View results in UI
1. Clone the repo
Clone the watson-multimedia-analyzer locally. In a terminal, run:
$ git clone https://github.com/ibm/watson-multimedia-analyzer
2. Configure the Watson Multimedia Analzer application
Install package managers
Use this link to download and install node.js and npm to your local system.
Install the Bower package manager:
npm install -g bowerInstall dependencies
cd watson-multimedia-analyzer
npm install
bower install
3. Configure credentials
The credentials for IBM Cloud services (Visual Recognition, Speech to Text, Tone Analyzer, Natural Language Understanding, and Cloudant NoSQL DB), can be found in the Services menu in Bluemix,
by selecting the Service Credentials option for each service.
Or, all of the credentials can be conveniently accessed by visiting the Connections IBM Cloud panel for the deployed app.

Copy the env.sample to .env.
$ cp env.sample .envEdit the .env file with the necessary settings.
env.sample:
# Replace the credentials here with your own.
# Rename this file to .env before starting the app.

# Cloudant Credentials
# The name of your database (Created upon startup of APP) You can leave this alone and use default below
DB_NAME=video_metadata_db

# Cloudant NoSQL DB Credentials and Config options (Required)
DB_USERNAME=<add_db_username>
DB_PASSWORD=<add_db_password>
DB_HOST=<add_db_host_name>
DB_PORT=<add_db_port_num>
DB_URL=<add_db_url>

# Tone Analyzer Credentials
TONE_ANALYZER_USERNAME=<add_tone_username>
TONE_ANALYZER_PASSWORD=<add_tone_password>

# SpeechToText Credentials
SPEECH_TO_TEXT_USERNAME=<add_stt_username>
SPEECH_TO_TEXT_PASSWORD=<add_stt_username>

# Visual Recognition Key
VR_KEY=<add_vr_recognition_key>

# Natural Language Understanding Credentials
NATURAL_LANGUAGE_UNDERSTANDING_USERNAME=<add_nlu_username>
NATURAL_LANGUAGE_UNDERSTANDING_PASSWORD=<add_nlu_password>
4. Run application
npm start- Take note of the successful creation and deployment of the Cloudant NoSQL DB
watson-multimedia-analyzer $ npm start
WatsonMulitMediaPipeline@0.0.5 start /test/watson-multimedia-analyzer node app.js | node_modules/.bin/pino
[2017-06-13T21:17:14.333Z] INFO (50150 on TEST-MBP.attlocal.net): AppEnv is: {"app":{},"services":{},"isLocal":true,"name":"test-multimedia-enrichment","port":6007,"bind":"localhost","urls":["http://localhost:6007"],"url":"http://localhost:6007"} [2017-06-13T21:17:14.335Z] INFO (50150 on TEST-MBP.attlocal.net): cloudant_credentials null [2017-06-13T21:17:14.336Z] INFO (50150 on TEST-MBP.attlocal.net): dbConfig {"url":"https://65e02d54-e2d1-4ccb-a5db-72064d16f76d-bluemix:19f3a0601a8992be63e4a6cb449172a6ef3f1533e52669e96de93eb31e0115f2@65e02d54-e2d1-4ccb-a5db-72064d16f76d-bluemix.cloudant.com","host":"65e02d54-e2d1-4ccb-a5db-72064d16f76d-bluemix.cloudant.com","port":"443","username":"xxx","password":"xxx"} [2017-06-13T21:17:14.368Z] INFO (50150 on TEST-MBP.attlocal.net): AppEnv is: {"app":{},"services":{},"isLocal":true,"name":"test-multimedia-enrichment","port":6007,"bind":"localhost","urls":["http://localhost:6007"],"url":"http://localhost:6007"} [2017-06-13T21:17:14.368Z] INFO (50150 on TEST-MBP.attlocal.net): cloudant_credentials null server starting on http://localhost:6007 [2017-06-13T21:17:15.053Z] INFO (50150 on TEST-MBP.attlocal.net): video_metadata_db_status Database already created! [2017-06-13T21:17:15.058Z] INFO (50150 on TEST-MBP.attlocal.net): video_metadata_db Database already created! [2017-06-13T21:17:15.058Z] INFO (50150 on TEST-MBP.attlocal.net): Successfully created database: video_metadata_db [2017-06-13T21:17:15.136Z] INFO (50150 on TEST-MBP.attlocal.net): Successfully Created views in database [2017-06-13T21:17:15.136Z] INFO (50150 on TEST-MBP.attlocal.net): Views already exist.
*  UI will be available where indicated (in this example: http://localhost:6007/)

## 5. Enrich multimedia files

To enrich media files, they need to be processed by the `processMedia` function.

For encoding Speech-to-Text (STT) and Visual Recognition (VR) from the command
line, you need to install [`ffmpeg` and `ffprobe`](https://ffmpeg.org/download.html).
Install ffmpeg with the libopus audio codex enabled
On OSX
brew install ffmpeg --with-opus npm install node-ffprobe
On Ubuntu
sudo apt-get install ffmpeg --with-opus npm install node-ffprobe
Enrichment is initiated via the command line using `bin/processMedia`. The usage for the command is as follows:
bin/processMedia --help
Usage: processMedia [options]
Options:
-h, --help output usage information -d, --save-to-db save to db -o, --save-to-file save to file -S, --use-stt use STT -V, --use-vr Use Visual Recognition -r, --vr-rate Visual Recognition Rate (default 10 seconds) -m, --enrichment-model GAP|TIMED Enrichment Model -g, --time-gap Time Gap for GAP model -f, --media-file filename Media File -x, --xml-file filename XML URI or filename
*Note:* Using Visual Recognition will take significantly longer. It is worth testing your setup without using the ``-V`` option. Once the ``-S`` option or the subtitles are correctly determined, add the ``-V`` option. There is a limitation on your VR account (250 images/day), so proceed with caution.

### Enrich a local MP4/WAV file (Using STT)

If you just have an MP4 or Wav file locally on your machine, you can just enrich it. We will copy this file to `public/media_files` automatically so you can use the UI to browse the results.

For convenience, use the supplied sample mp4 file:
STT Only
bin/processMedia -S -f public/media_files/grid-breakers.mp4
STT & VR (Will take a lot longer)
bin/processMedia -S -V -f public/media_files/grid-breakers.mp4
### Enrich from a URL pointing to a MP4/WAV file (Using STT)

If you have a MP4 or Wav at a URL or on YouTube you can enrich it as follows:
STT & VR (Will take a lot longer)
bin/processMedia -S -f http://someurl.com/somefilename.mp4
(Youtube) STT & VR (Will take a lot longer)
bin/processMedia -S -V -r 10000 -f https://www.youtube.com/watch?v=_aGCpUeIVZ4
*Note:* Remember the VR Rate can QUICKLY eat up your 250 images. So choose Wisely!!!

### Enrich from a URL Feed:

If you have a remote URL that references an XML file in the 'schema/media' or 'mrss' format
then you can enrich by pointing to that URL
bin/processMedia -V -x http://some.url.com/some_mrss.xml
### Enrich a Media+Transcript file via an XML

Open the XML Template file (samples/episode_template.xml) and fill it out as noted.
You MUST give it a GUID/Title/media:content and media:subTitle to make this work.

Save this file as a new name somewhere (like `feeds`):
bin/processMedia -V -x feeds/new_feed.xml
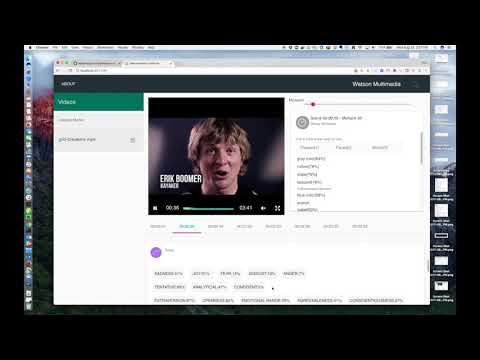
## 6. View results in UI

Point your browser to the URL specified when the server was started. For example:

`http://localhost:6007/`

Username and password are defined by the object `users` in [`app.js`](app.js). The default username/password credentials are `enrich`/`enrichit`.

Note that the default credentials must NOT be removed. You can, however, add additional credentials.

### Deploy the Application to IBM Cloud
After you have enriched your media files, you can deploy the application to IBM Cloud so that you can view the UI remotely.

> Note: If you already have the application deployed, you will either need to delete it (take care not to also delete any assoicated services at the same time), or modify the `manifest.yml` to change the name of the application. The default name is `watson-multimedia-analyzer`.

* Download and install the [Cloud Foundry CLI](https://cloud.ibm.com/docs/cli/index.html#cli) tool.
* Login to the Cloud Foundry service.
* From the root directory of this project run the following command:
cf push
* You should see a lot of activity as the application is deployed to IBM Cloud. At the end of the activity, the application should be 'Running'.
* Access the application using the following url:
http:\{BLUEMIX_APPLICATION_NAME}.mybluemix.net
* When prompted for a username and password, use the credentials stored in [`app.js`](app.js). The default username/password credentials are `enrich`/`enrichit`.
> Note: If you enrich additional media files with Visual Recognition, you will need to re-deploy the application to IBM Cloud to view the new content.
# Sample Output

# Troubleshooting
* `ffmpeg` reports error that "audio codec libopus is not available"
> Ensure that the audio codec `libopus` is included in the version of `ffmpeg` that you install. To check this, make sure it is listed using this command:
ffmpeg -encoders | grep opus
* `ffprobe` reports error

  > Ensure you are on at least version 3.3.1

* Enrichment does not complete or reports errors

  > Note that there are several IBM Cloud trial version limitations that you may run into if you attempt to enrich multiple OR large mp4 files.

  > Watson Tone Analyzer - max of 2500 API calls.<br>
Solution - delete and create new service instance

  > Watson Visual Recognition - max of 250 API calls per day.<br>
Solution - wait 24 hours to run again.

# Links
* [Demo on Youtube](https://www.youtube.com/watch?v=nTzrA56zLTE)
* [Watson Natural Language Understanding](https://www.ibm.com/watson/services/natural-language-understanding/)
* [Watson Speech-to-Text](https://www.ibm.com/watson/services/speech-to-text/)
* [Watson Tone Analyzer](https://www.ibm.com/watson/services/tone-analyzer/)
* [Watson Visual Recognition](https://www.ibm.com/watson/services/visual-recognition/)
* [IBM Cloudant db](https://www.ibm.com/cloud/cloudant)

# Learn more
* **Artificial Intelligence Code Patterns**: Enjoyed this Code Pattern? Check out our other [AI Code Patterns](https://developer.ibm.com/technologies/artificial-intelligence/).
* **AI and Data Code Pattern Playlist**: Bookmark our [playlist](https://www.youtube.com/playlist?list=PLzUbsvIyrNfknNewObx5N7uGZ5FKH0Fde) with all of our Code Pattern videos
* **With Watson**: Want to take your Watson app to the next level? Looking to utilize Watson Brand assets? [Join the With Watson program](https://www.ibm.com/watson/with-watson/) to leverage exclusive brand, marketing, and tech resources to amplify and accelerate your Watson embedded commercial solution.

# License
This code pattern is licensed under the Apache Software License, Version 2.  Separate third party code objects invoked within this code pattern are licensed by their respective providers pursuant to their own separate licenses. Contributions are subject to the [Developer Certificate of Origin, Version 1.1 (DCO)](https://developercertificate.org/) and the [Apache Software License, Version 2](https://www.apache.org/licenses/LICENSE-2.0.txt).

[Apache Software License (ASL) FAQ](https://www.apache.org/foundation/license-faq.html#WhatDoesItMEAN)