WARNING: This repository is no longer maintained :warning:
This repository will not be updated. The repository will be kept available in read-only mode.
Create an iOS app that uses built-in and custom Watson Visual Recognition classifiers
**Note: This pattern has now been deprecated because it uses Watson Visual Recognition which is discontinued. Existing instances are supported until 1 December 2021, but as of 7 January 2021, you can't create instances. Any instance that is provisioned on 1 December 2021 will be deleted. Please view the Maximo Visual Inspection as a way to get started with image classification. Another alternative to train computer vision models is Cloud Annotations.
This is an iOS application that showcases various out of the box classifier available with the Watson Visual Recognition service on IBM Cloud.
This app has support for the following features of Watson Visual Recognition:
- General: Watson Visual Recognition's default classification, it will return the confidence of an image from thousands of classes.
- Explicit: Returns percent confidence of whether an image is inappropriate for general use.
- Food: A classifier intended for images of food items.
- Custom classifier(s): Gives the user the ability to create their own classifier.
| General | Food | Explicit | Custom |
|---|---|---|---|
 |
 |
:upside_down_face: :no_entry_sign: |  |
Architecture

Flow
- User opens up the app in iOS based mobile phone and chooses the different classifiers (faces, explicit, food etc.) they want to use, including custom classifiers.
- The Visual Recognition service on IBM Cloud classifies and provides the app with the classification results.
Prerequisites
-
Carthage: Can be installed with Homebrew.
brew install carthage -
Xcode: Required to develop for iOS, can be found on the Mac App Store.
-
IBM Cloud account.
Note: :bulb: You can use the free/lite tier of IBM Cloud to use this code!
(Optional) If you want to build your own custom classifier, you can follow along this pattern, this video, or this tutorial.
Steps
- Clone the repo
- Install dependencies with Carthage
- Setup Visual Recognition credentials
- Run the app with Xcode
1. Clone the repo
git clone the repo and cd into it by running the following command:
git clone github.com/IBM/watson-visual-recognition-ios.git &&
cd watson-visual-recognition-ios
2. Install dependencies with Carthage
Then run the following command to build the dependencies and frameworks:
carthage update --platform iOSTip: :bulb: This step could take some time, please be patient.
3. Create IBM Cloud services
Create the following services:
Copy the API Key from the credentials and add it to Credentials.plist

Credentials.plist
<key>apiKey</key>
<string>YOUR_API_KEY</string>
4. Run the app with Xcode
Launch Xcode using the terminal:
open "Watson Vision.xcodeproj"Test the application in the simulator
To run in the simulator, select an iOS device from the dropdown and click the ► button.

You should now be able to drag and drop pictures into the photo gallery and select these photos from the app.
Tip: :bulb: Custom classifiers will appear in the slider based on the classifier name.
Run the app on an iOS device
Since the simulator does not have access to a camera, and the app relies on the camera to test the classifier, we should run it on a real device.
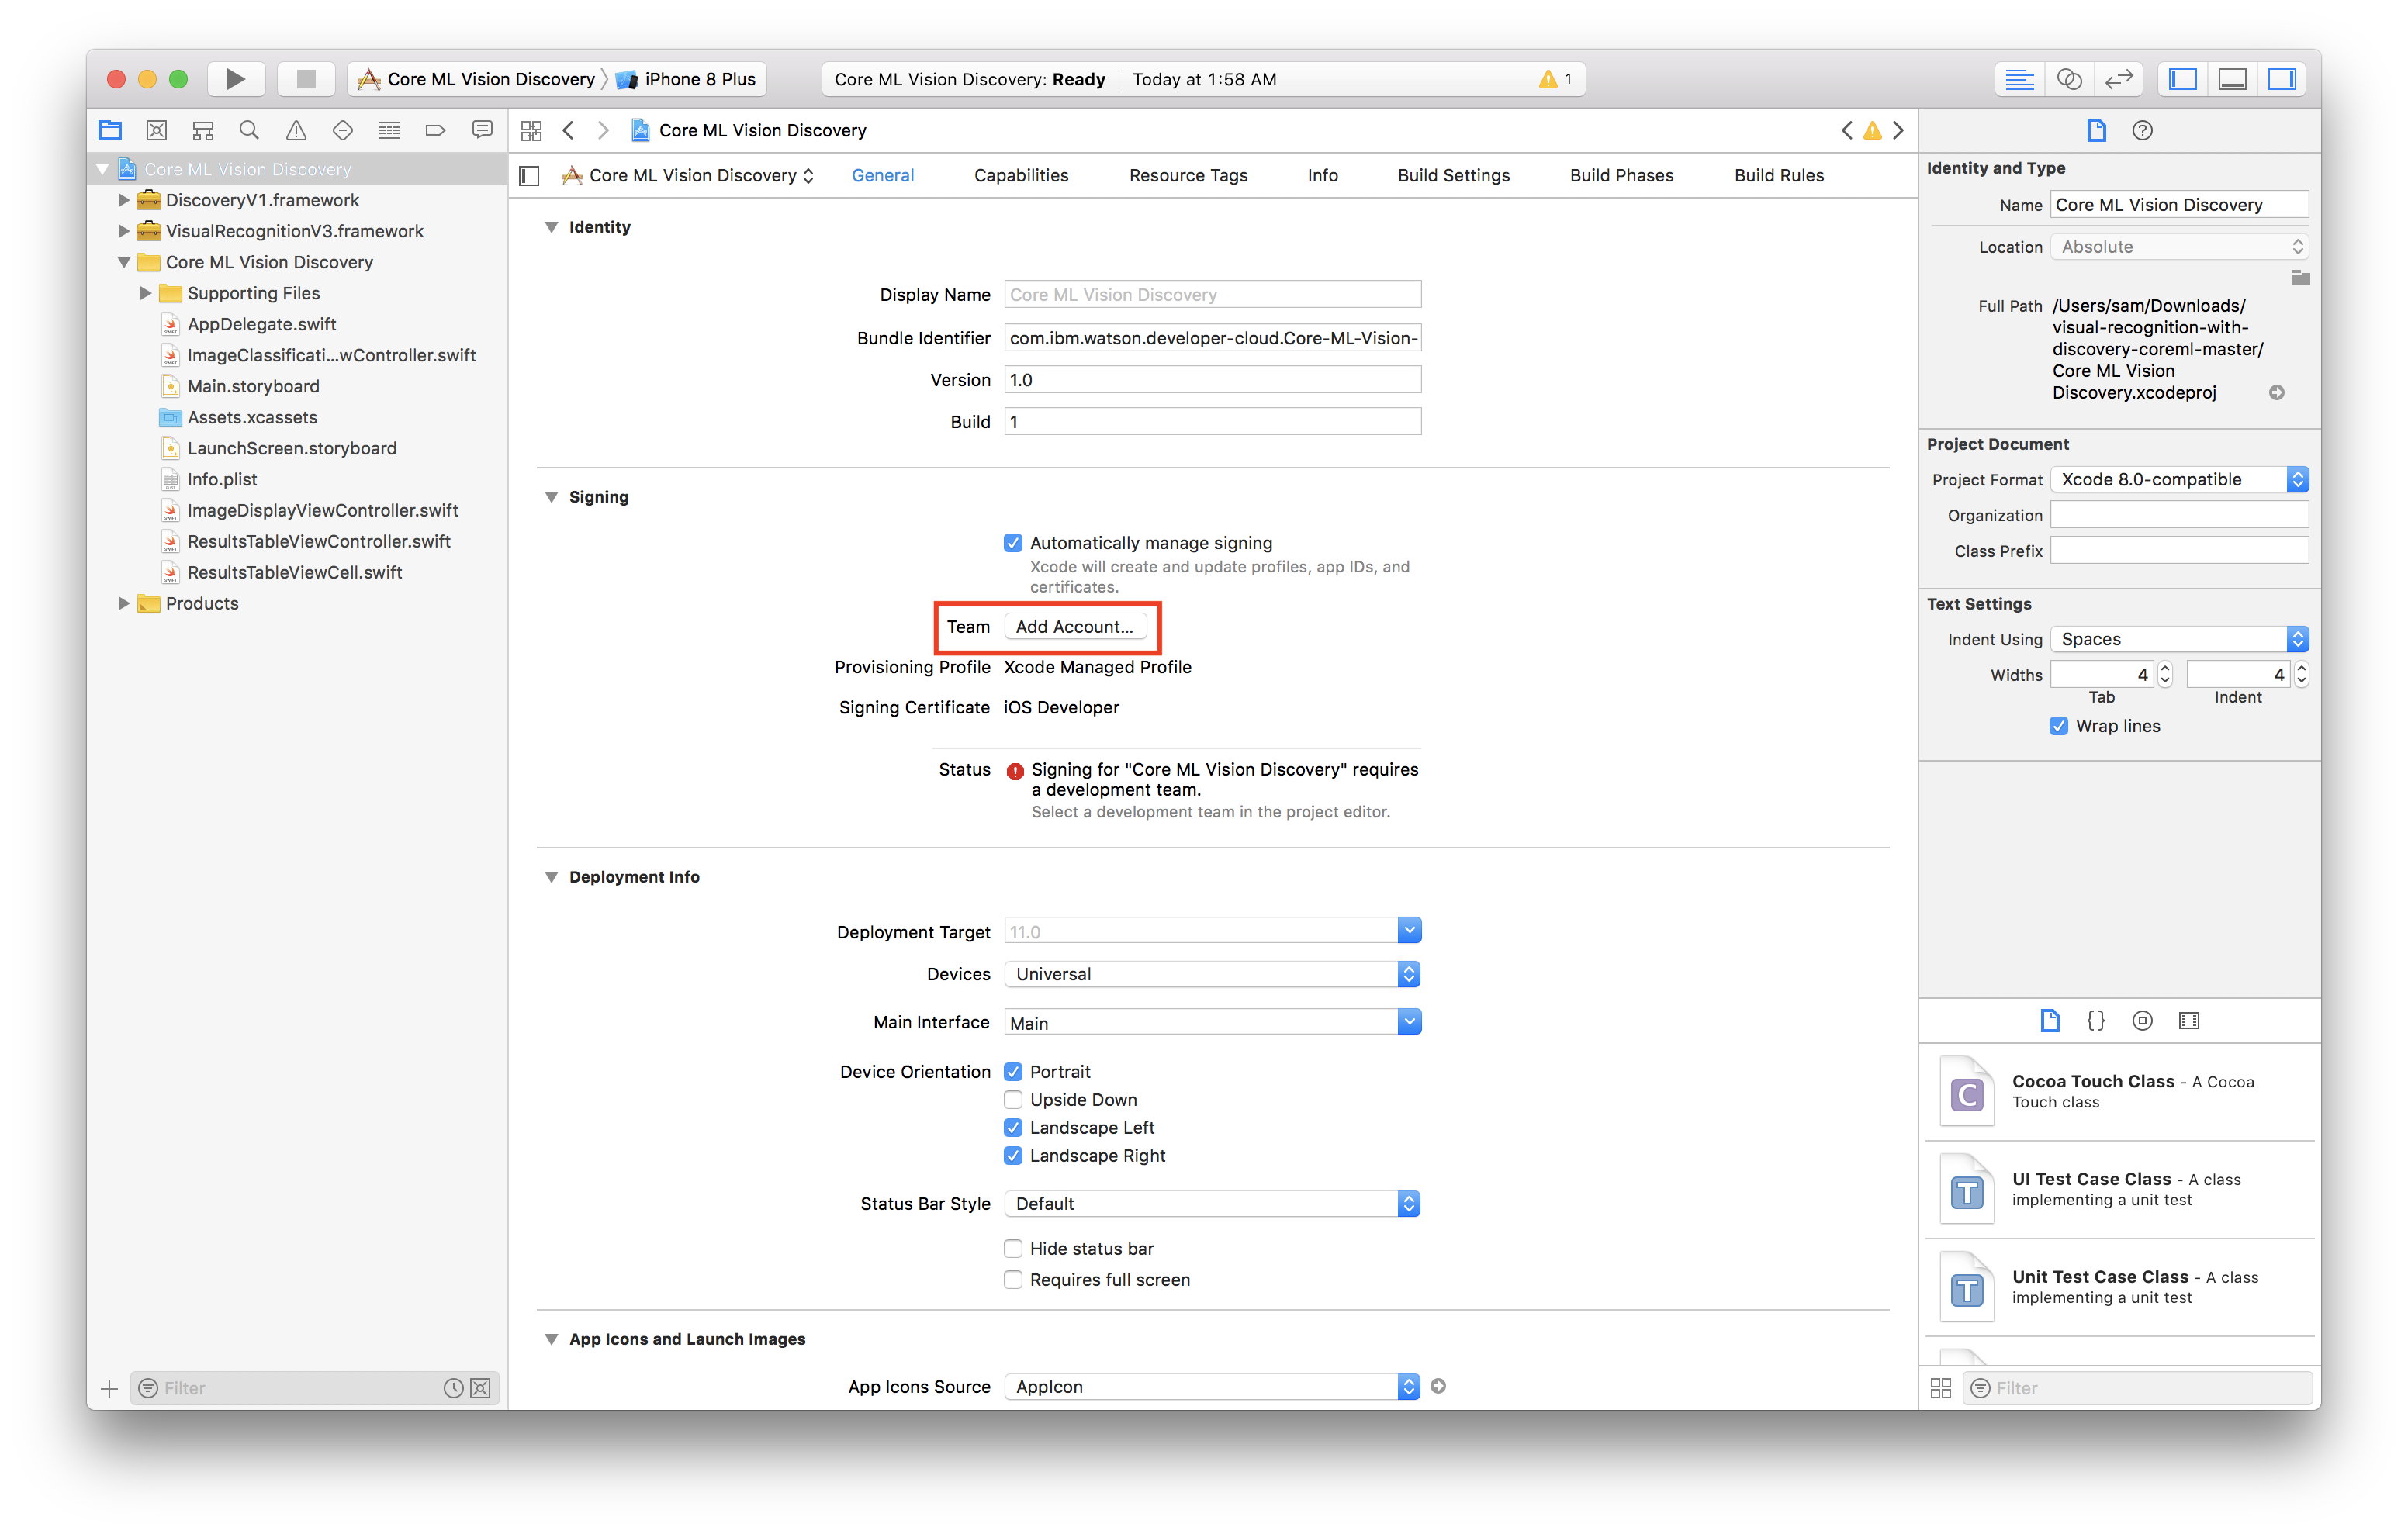
To do this, we need to sign the application, the first step here is to authenticate with your Apple ID, to do so:
-
Switch to the General tab in the project editor (The blue icon on the top left).
-
Under the Signing section, click Add Account.

-
Login with your Apple ID and password.
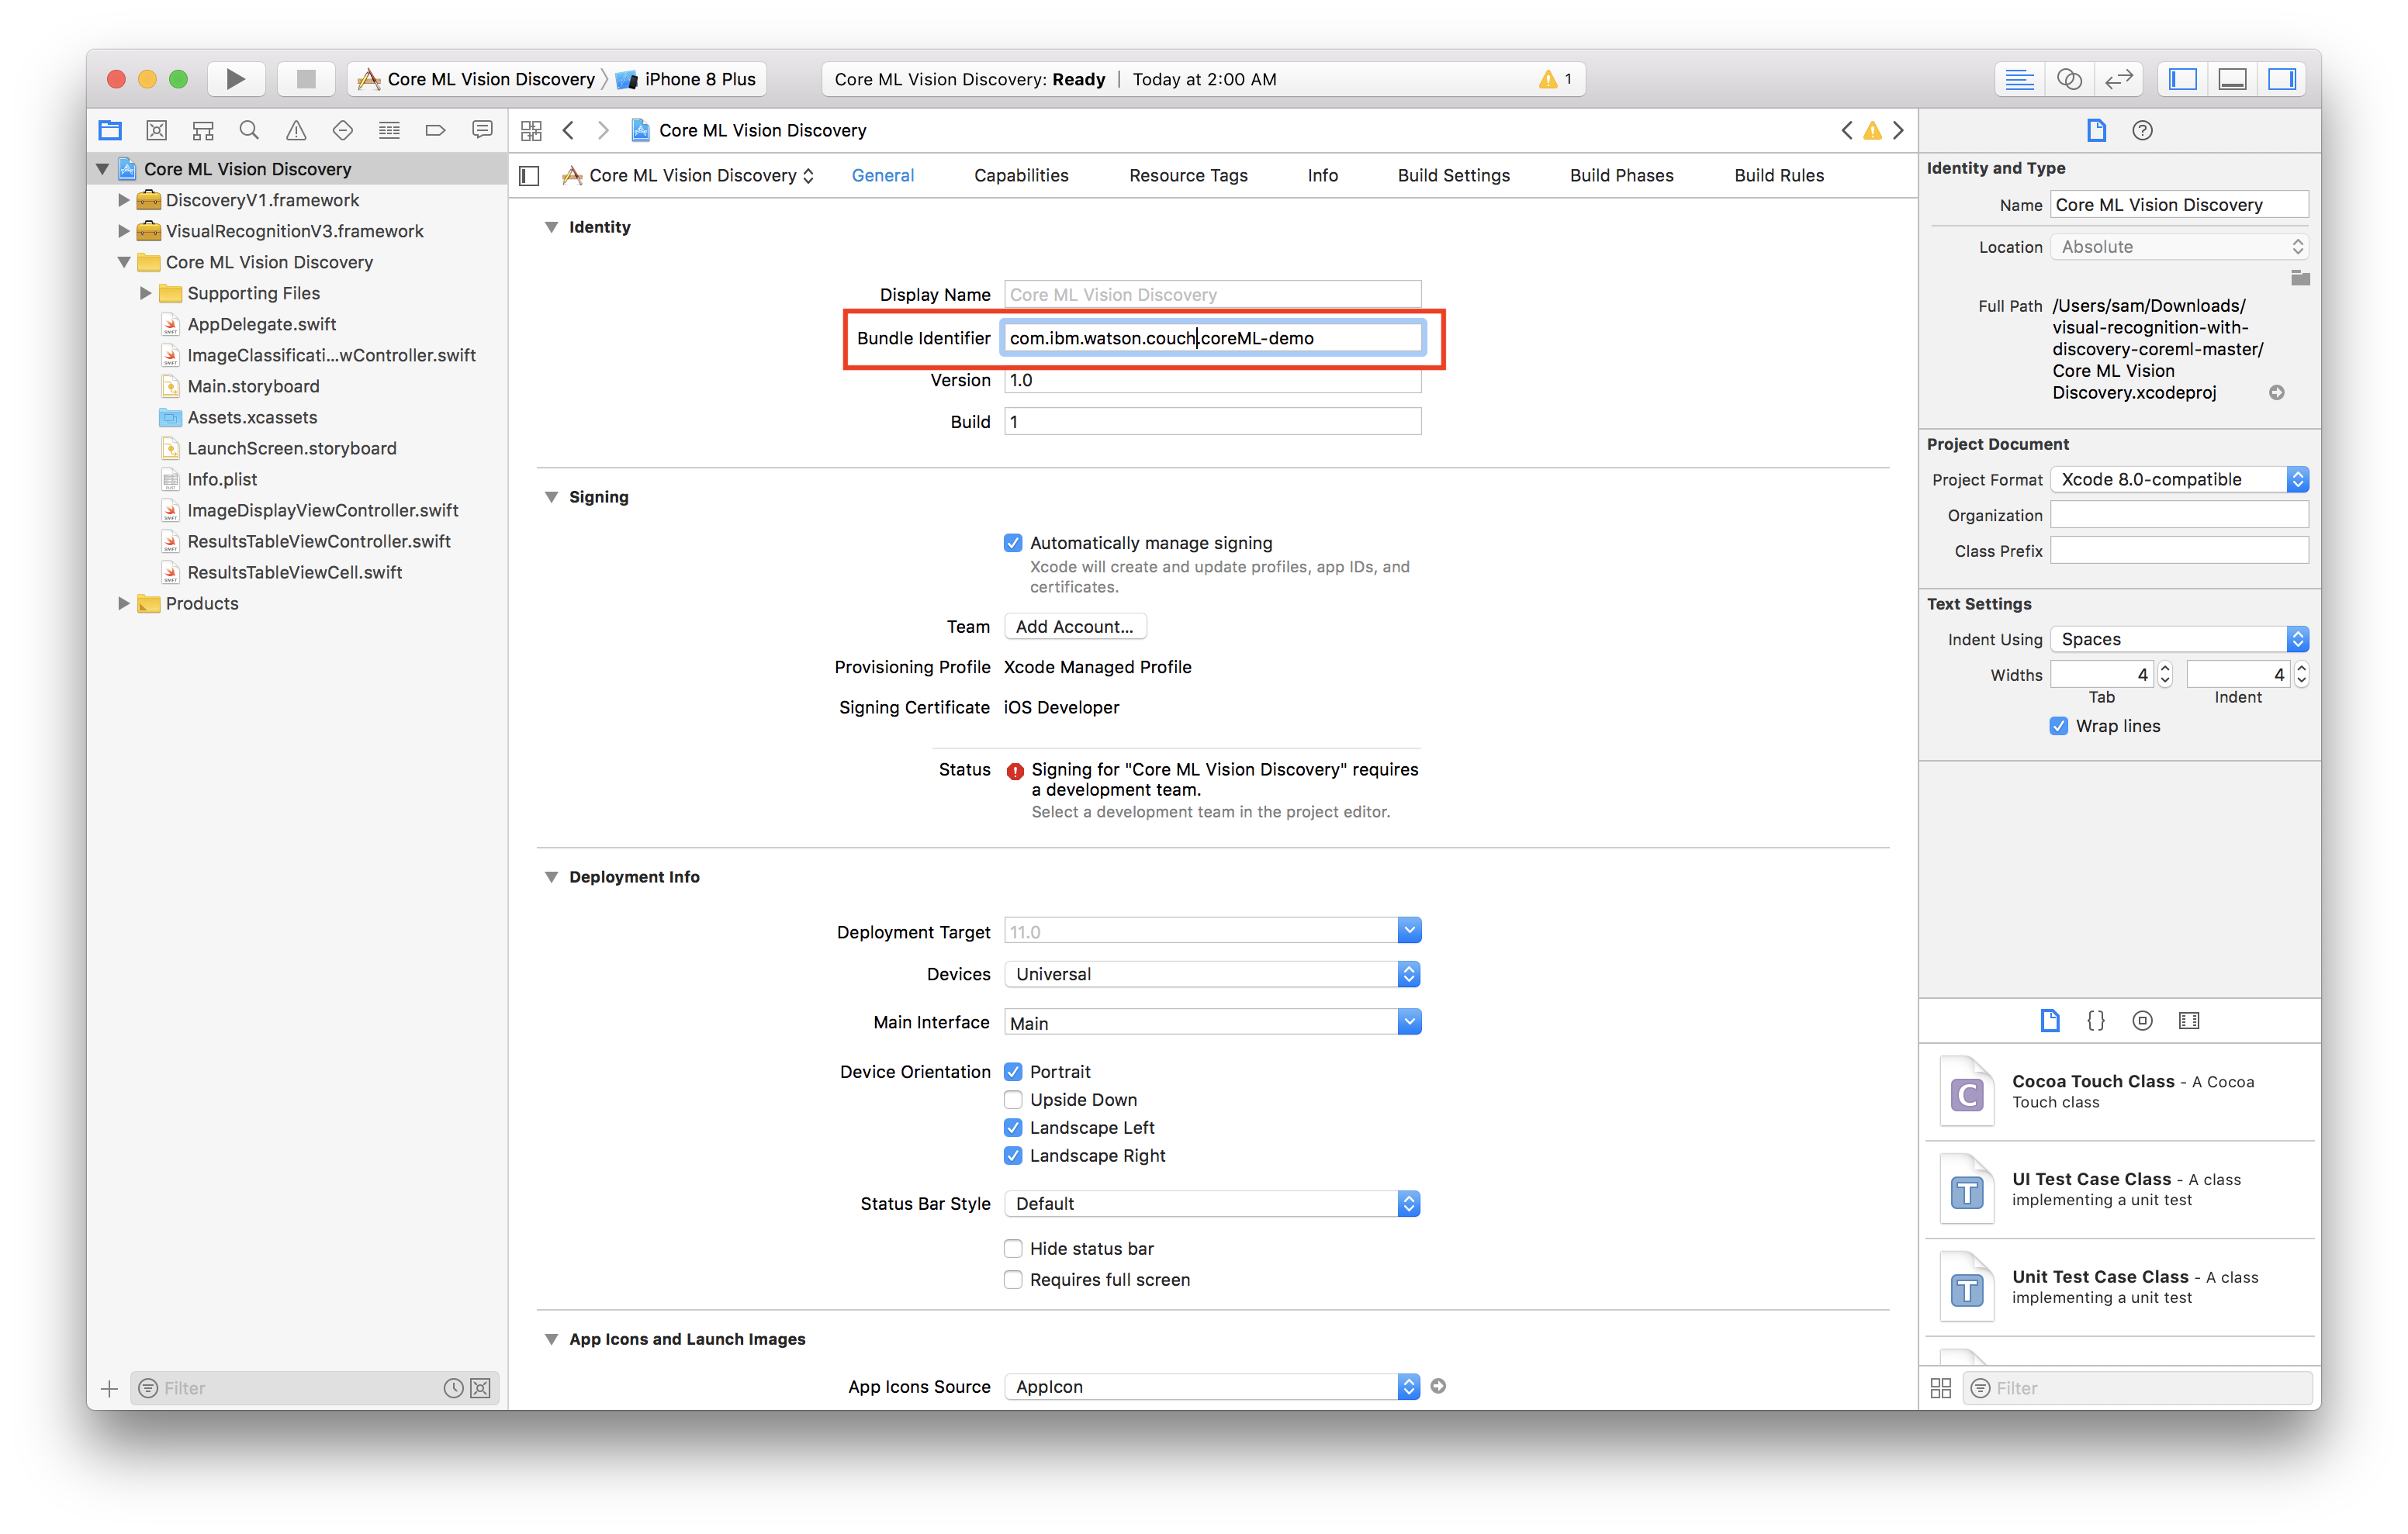
Now we have to create a certificate to sign our app, in the same General tab do the following:
-
Still in the General tab of the project editor, change the bundle identifier to
com.<YOUR_LAST_NAME>.Core-ML-Vision.
-
Select the personal team that was just created from the Team dropdown.
-
Plug in your iOS device.
-
Select your device from the device menu to the right of the build and run icon.
-
Click build and run.
-
On your device, you should see the app appear as an installed appear.
-
When you try to run the app the first time, it will prompt you to approve the developer.
-
In your iOS settings navigate to General > Device Management.
-
Tap your email, tap trust.
-
Now you're ready to use the app!
Demo
| Using the simulator | Using the camera |
|---|---|
 |
 |
License
This code pattern is licensed under the Apache License, Version 2. Separate third-party code objects invoked within this code pattern are licensed by their respective providers pursuant to their own separate licenses. Contributions are subject to the Developer Certificate of Origin, Version 1.1 and the Apache License, Version 2.