Tax Calculator
The aim of this project was to create a tax calculator for IT contractors to compare take home pay across different jurisdictions.
Tax law is complex and time consuming to research. This project aims to democratise tax knowledge so that the average IT contractor can see with a quick calculation how they will be affected by taxes in different jurisdictions.
This calculator is of use to any IT contractor considering moving countries. It is also useful to those in the UK, since certain tax matters are devolved which means that tax rates can be different in England, Wales, Scotland and Northern Ireland. As a result, for some residents who live near the borders, a simple move to the next village can result in a drastically different tax bill.
The goal of this calculator is to allow them to see an indicative calculation of how a move would affect their take home pay, without them having to spend weeks investigating complex legal issues or spending thousands on tax advisers. In the event that they are seriously considering a move to another jurisdiction after seeing the indicative calculation, then they will be advised to seek personalised, specialist advice.
The tax calculator could be expanded in the future to be of use to a wider demographic than just IT contractors. The software architecture of this project has been designed with scalability/xxxx? in mind, to ensure that additional jurisdictions and demographics can be added easily.
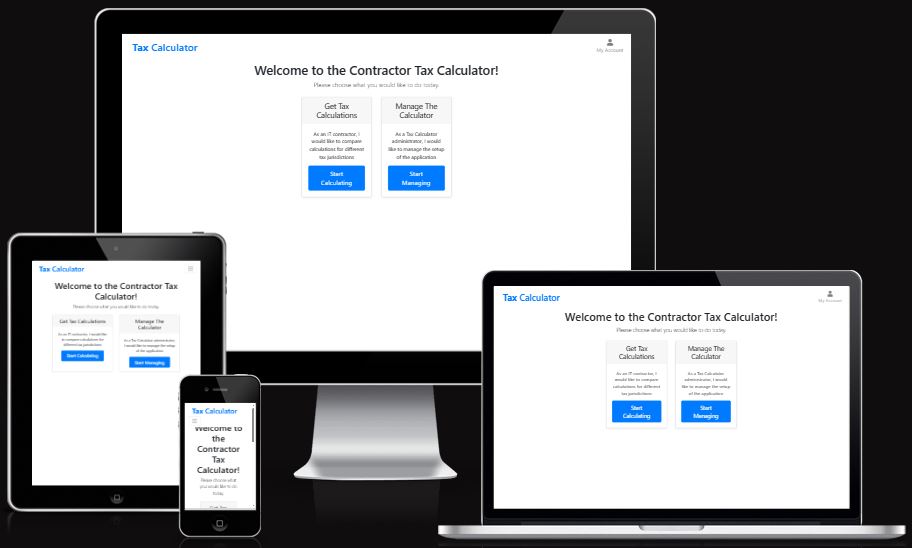
Table of Contents
- Tax Calculator
Notes to Assessors
The admin user site has been designed for a sophisticated professional tax adviser who has commissioned the project. As a result, and to keep the user experience streamlined, it does not explain tax concepts, rules, or basic instructions as the user would have in-depth knowledge of these.
Users
The users of this site will be any IT contractor working outside IR35 and considering moving to another tax jurisdiction. The site may also be suitable for any other type of contractor working through a limited company in the same way.
Finding accurate demographics for this group was not easy, and as this is a new application I have no existing business data to draw on. The most accurate data I found related to the IT contractor market in the USA, so it was not ideal, but it does give a clear view of the typical demographic:
- 86.3% male, 13.7% female
- Average age is 42 years old
- 11% identified as LGBT
Since most IT contractors work through limited companies and submit tax returns each year I would expect the users to be reasonably sophisticated, possibly with multiple sources of income, and a reasonable understanding of tax language. I therefore did not define terms like ‘corporation tax’ as the average user of this site would more likely than not already be familiar with them. I do not have any data to test this assumption, as this is a new site. As it is used, data will be collected and if my assumptions are incorrect the user experience can be modified. For example the terms could be clarified in some additional notes. For the sake of a clean user experience those notes have not been included at this stage.
Additionally, there will also be one admin user who will be able to log in, add new jurisdictions and update tax rates for existing jurisdictions. It is critical to note that the admin user is a sophisticated professional tax adviser who has commissioned the project. As a result, and to keep the user experience streamlined, the admin user section does not explain tax concepts, rules, or basic instructions as the user would have in-depth knowledge of these.
User stories
All user stories were documented, and progress towards delivering them, was tracked in Github.
As an IT contractor I want to…..
- Select the jurisdictions to compare tax calculations for, so that I only see jurisdictions I am interested in
- Easily enter my income details, so that my tax can be calculated for each jurisdiction I have selected
- See how much progress I am making while using the application, so that I can easily see where I am in the process
- See a clear tax calculation for each jurisdiction I have selected that is easy to understand, so that I can easily decide which jurisdiction is most favourable
- Have my data be protected by login and appropriate security measures, so that I have confidence only I can access the data
- Purchase subscriptions for the tax calculator, so that I can begin comparing my tax calculations right away
As the Contractor Tax Calculator team, I want...
As an admin user I want to….
- Add new jurisdictions, so that I can continuously improve the product
- Delete jurisdictions, so that I can continuously improve the product
- Define the questions that IT contractors should be asked for a given jurisdiction - and the format of the corresponding answer fields - so that the tax calculator will display only relevant questions to users
- Edit the questions and answer formats associated with a given jurisdiction at any time, so that I can keep the tax calculator up to date with changes in tax regimes
- Questions and answer formats that are associated with a jurisdiction to be deleted if the jurisdiction itself is deleted, so that I do not store redundant data in the database
- Create the tax rates for a jurisdiction, so that I can add new jurisdictions to improve the product
- Update tax rates for a jurisdiction, so that I can keep the product up to date with changing tax regimes
- Tax rates for a jurisdiction to be deleted if the jurisdiction is deleted, so that I do not store unnecessary data in the database
- View subscriptions, so that I can assist users with any subscription-related queries
- View payments, so that I can assist users with any payment-related queries
- Admin functionality to be protected by an admin user account, so that only authorised users can modify jurisdiction, form, and tax rate data
- View field names for question and rule fields in the config app, so that I can easily understand which data elements relate to which fields
Challenges Faced
Tax law is highly complex. Different systems have different types of rules and caluclations. In order to limit the scope of the project, personal allowances have not been included yet. The project is dependent upon the calculations being accurate. Therefore research was a critical aspect. The sophisticated admin user will need to keep the information up to date for the calculator to continue to be accurate over time.
Tax ranges and limits are specified in the currency of the jurisdiction. This site is currently aimed at UK residents so will only take income in GBP for the time being.
The architecture of the project was critical to ensuring that the project is scalable and can be amended and kept up to date.
UX
Colour Scheme
The aim of this site was to appear professional, accurate and trustworthy with good levels of contrast to satisfy optimal UX design.
As this is an entirely new site, I do not have any demographic data about the expected users. Once the site is in use data will be collected and demographic assumptions will be revised. The colour scheme can then be changed if it is felt necessary.
Typography
Since the site is conveing complex informaiton, a simple, clear text was desired.
Imagery
The site is free from images to ensure a clean, simple interface.
Font awesome was used to provide simple, clear graphics.
Wireframes
IT Contractor Wireframes
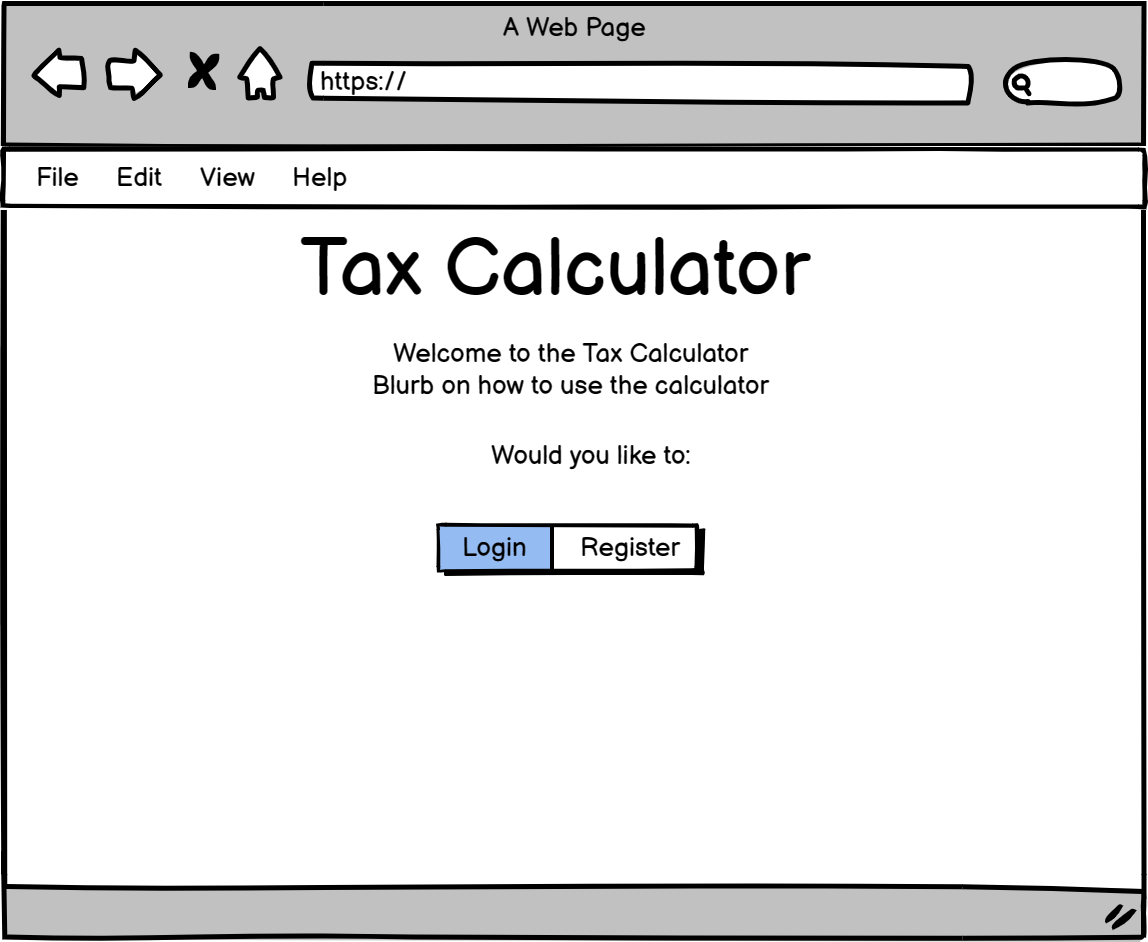
As an IT contractor, I am first asked to choose whether I need to register or login:
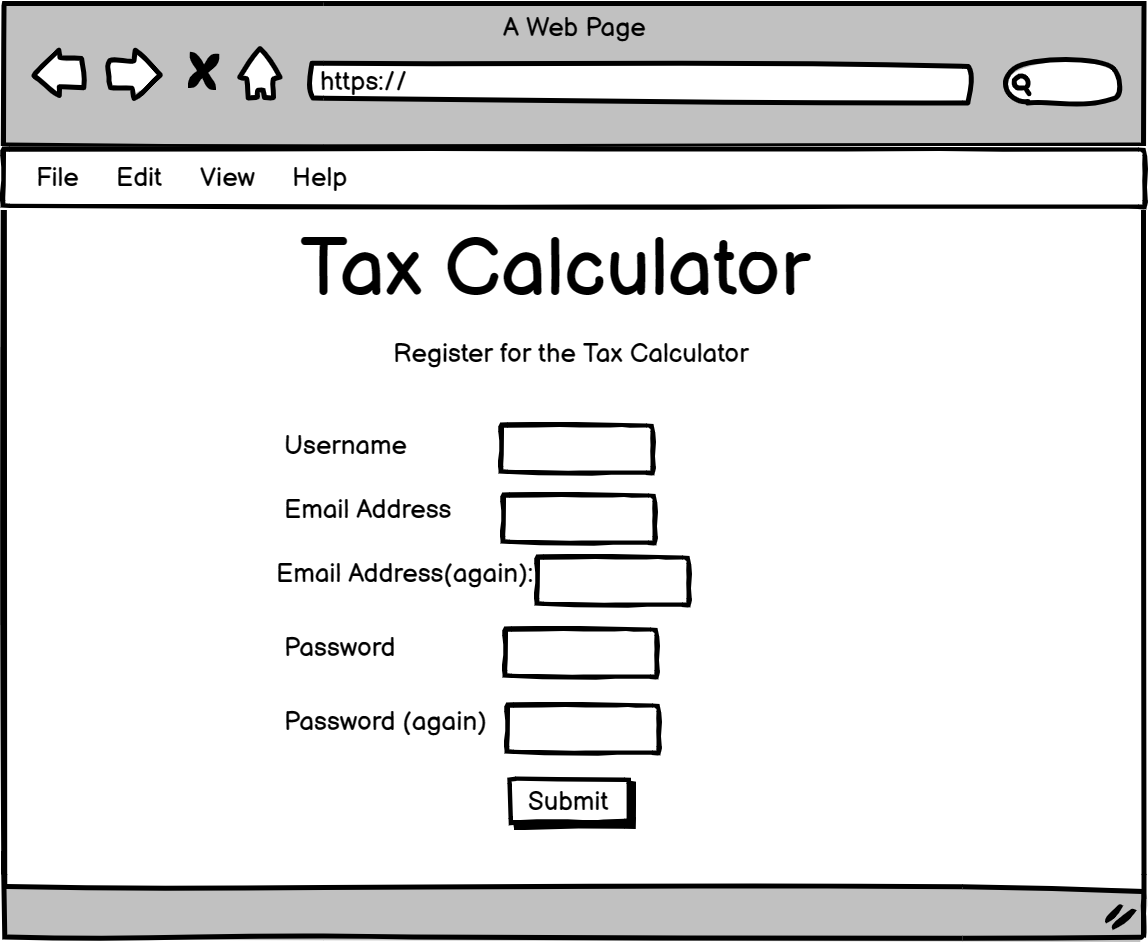
If I choose to register, I am presented with a registration form:
If I choose to login, I am presented with a login form to access the Tax Calculator using my existing username and password:

When I login, I can see a summary of my past tax calculations, and my subscription status:

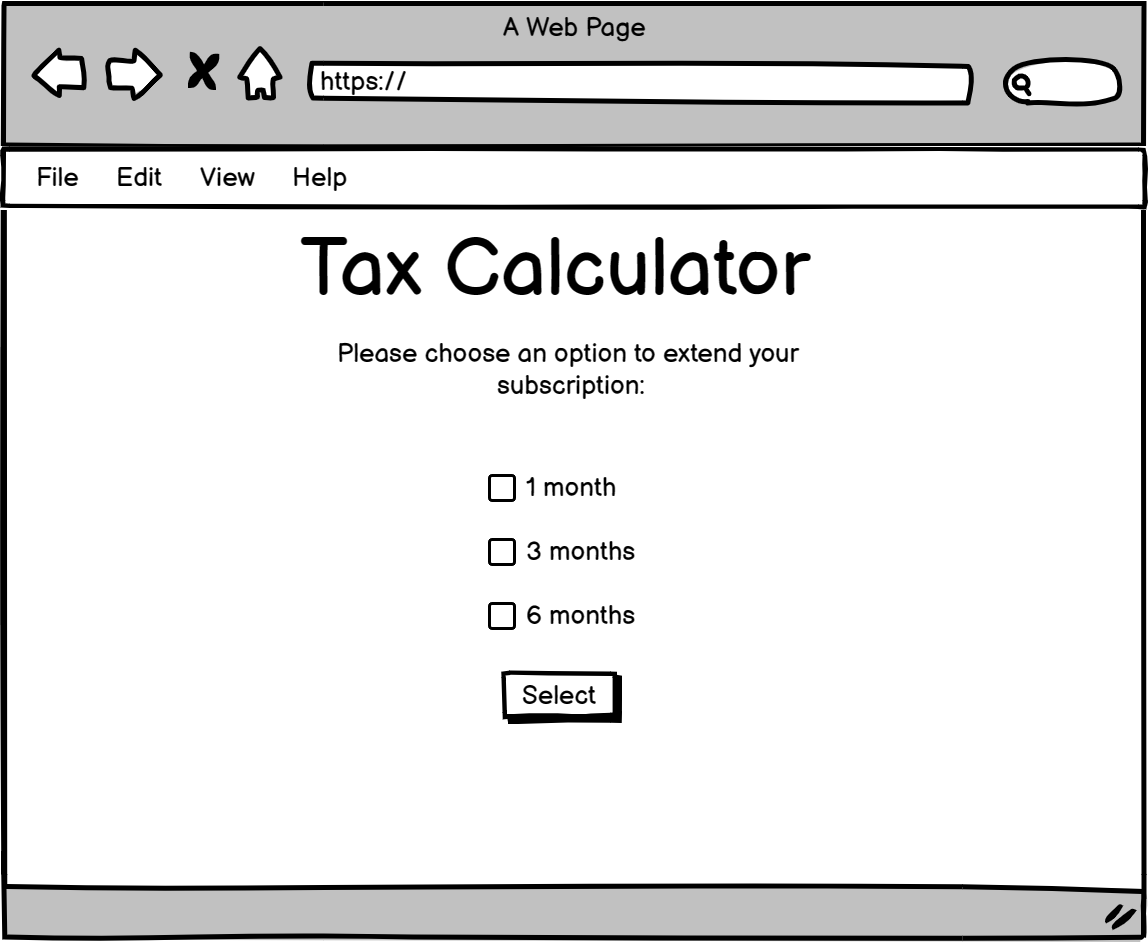
If my subscription has expired, or I have not subscribed yet, then I can choose to extend my subscription:
Once I have chosen my new subscription plan, I see a checkout page for my subscription:
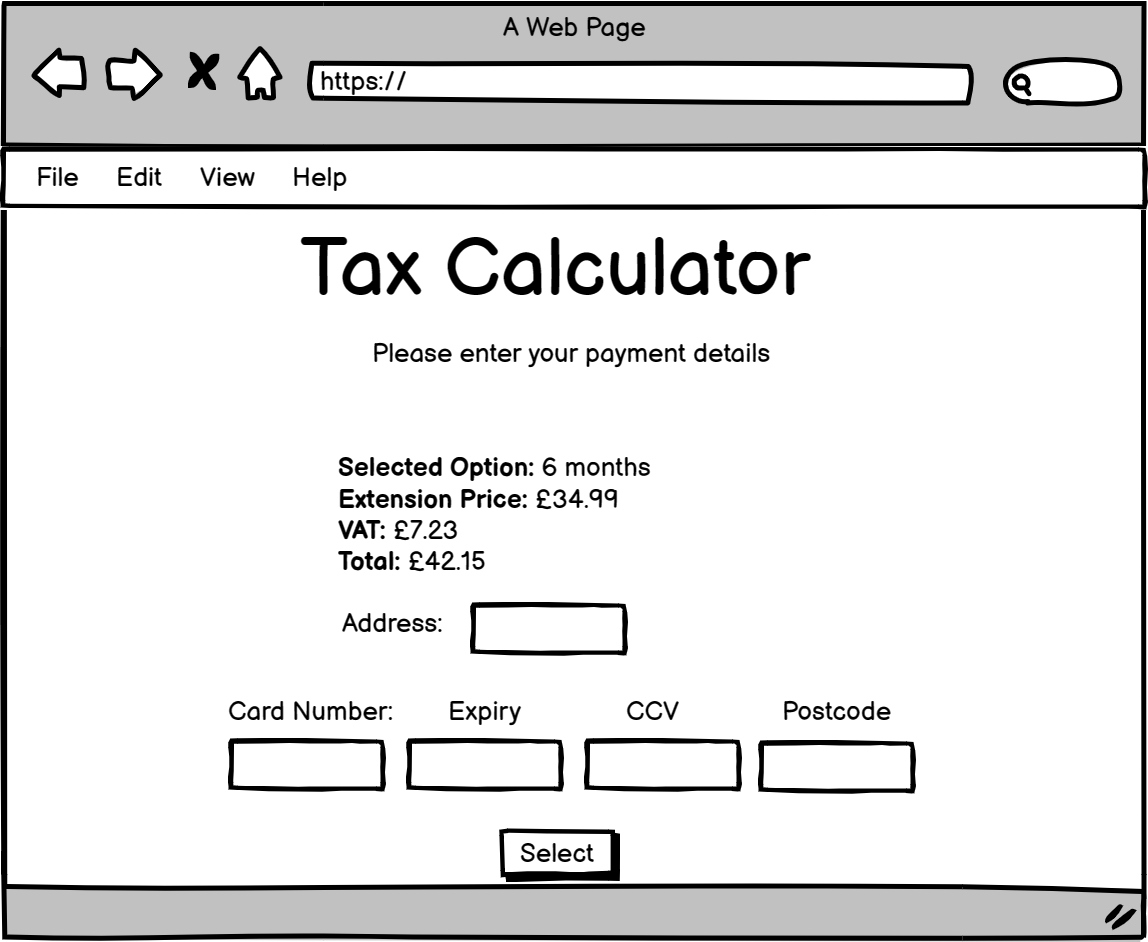
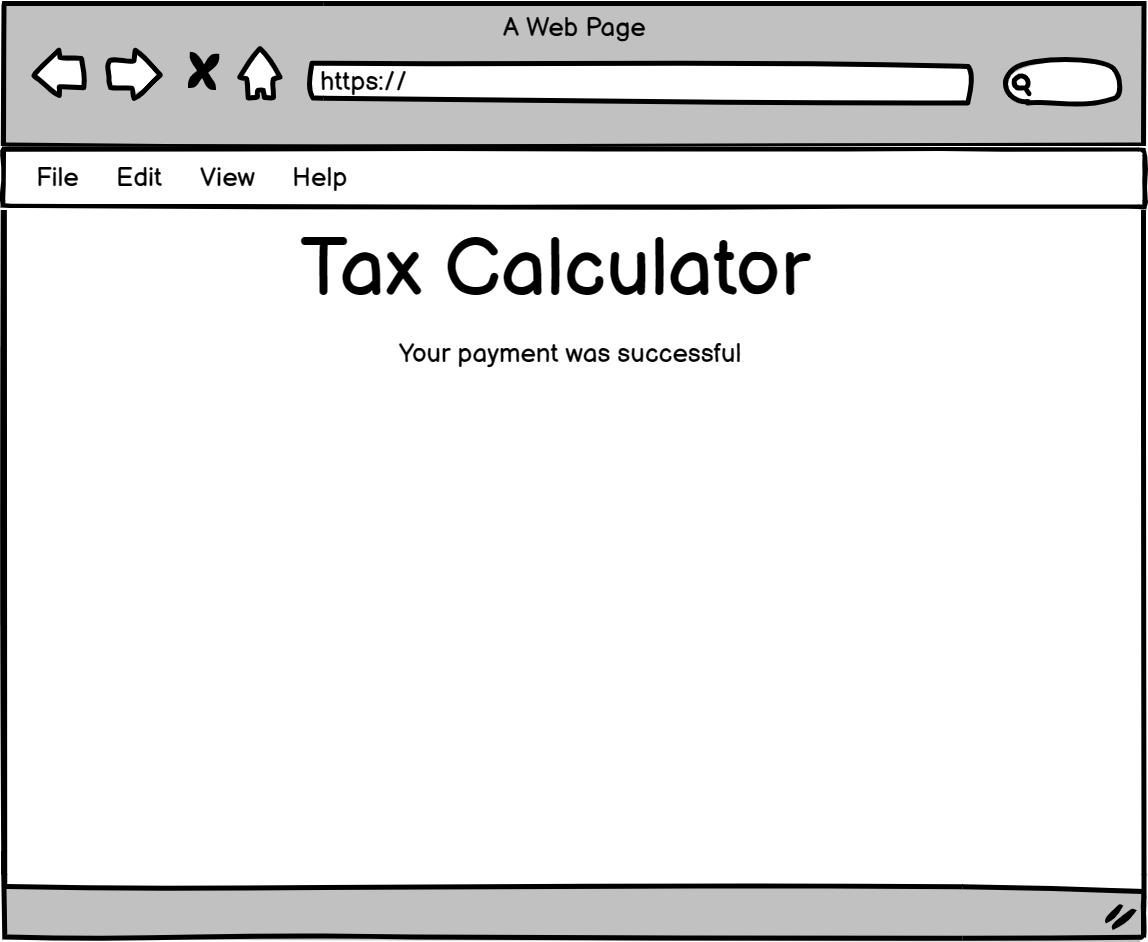
When I have entered my payment details, payment is taken and I am shown a page confirming the status of the payment:
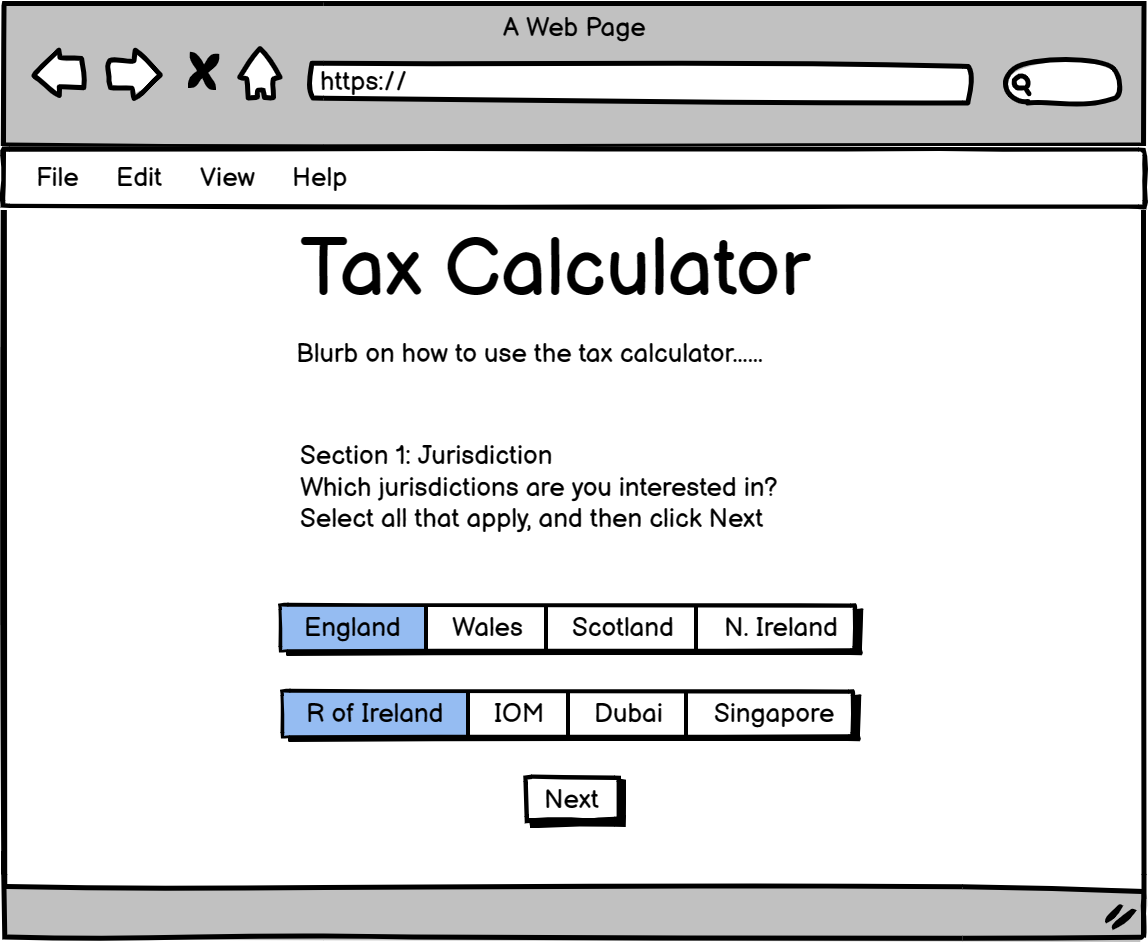
Once my payment has been completed, and my subscription updated, then I can start creating a tax calculation. The first step is to choose the countries that I want to compare:
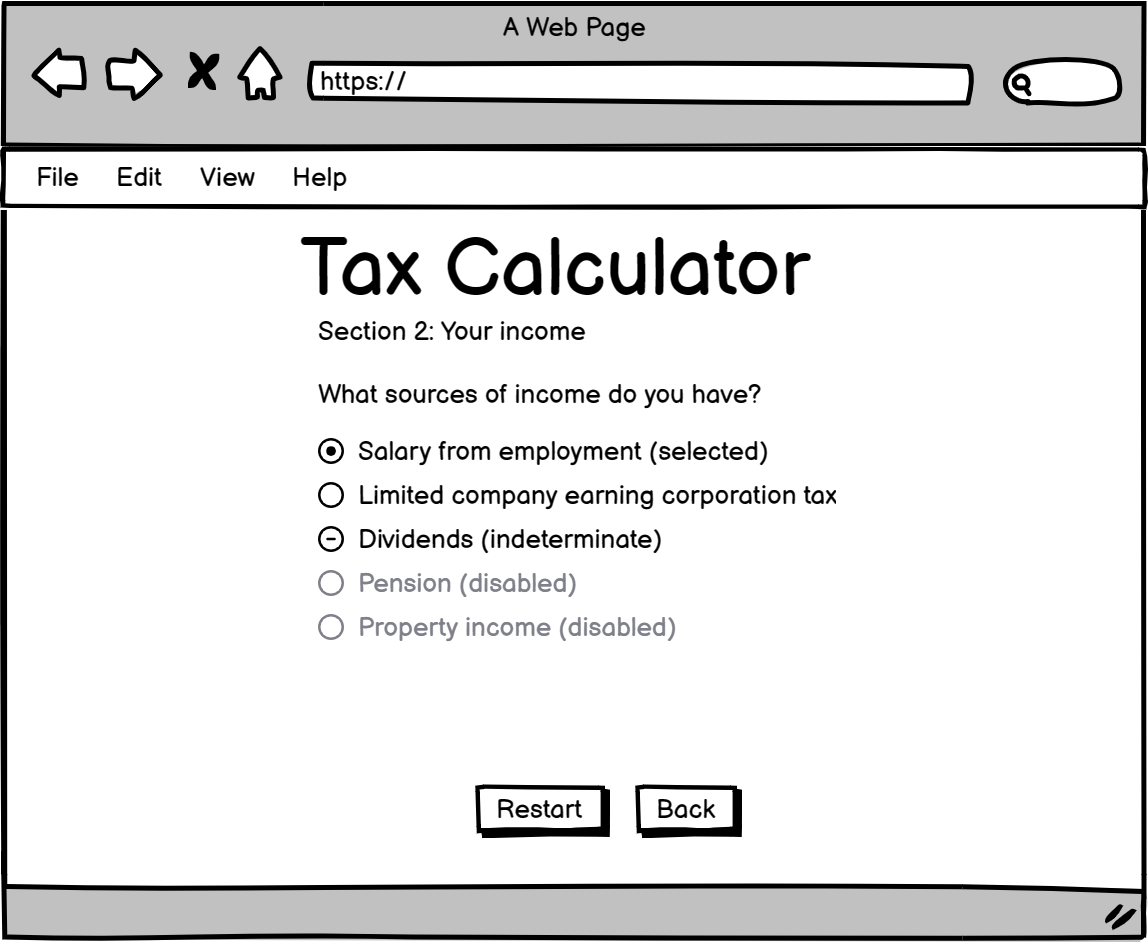
Next, I enter my financial information following the on-screen instructions. Firstly, I select my income sources:
Then I enter my income details:
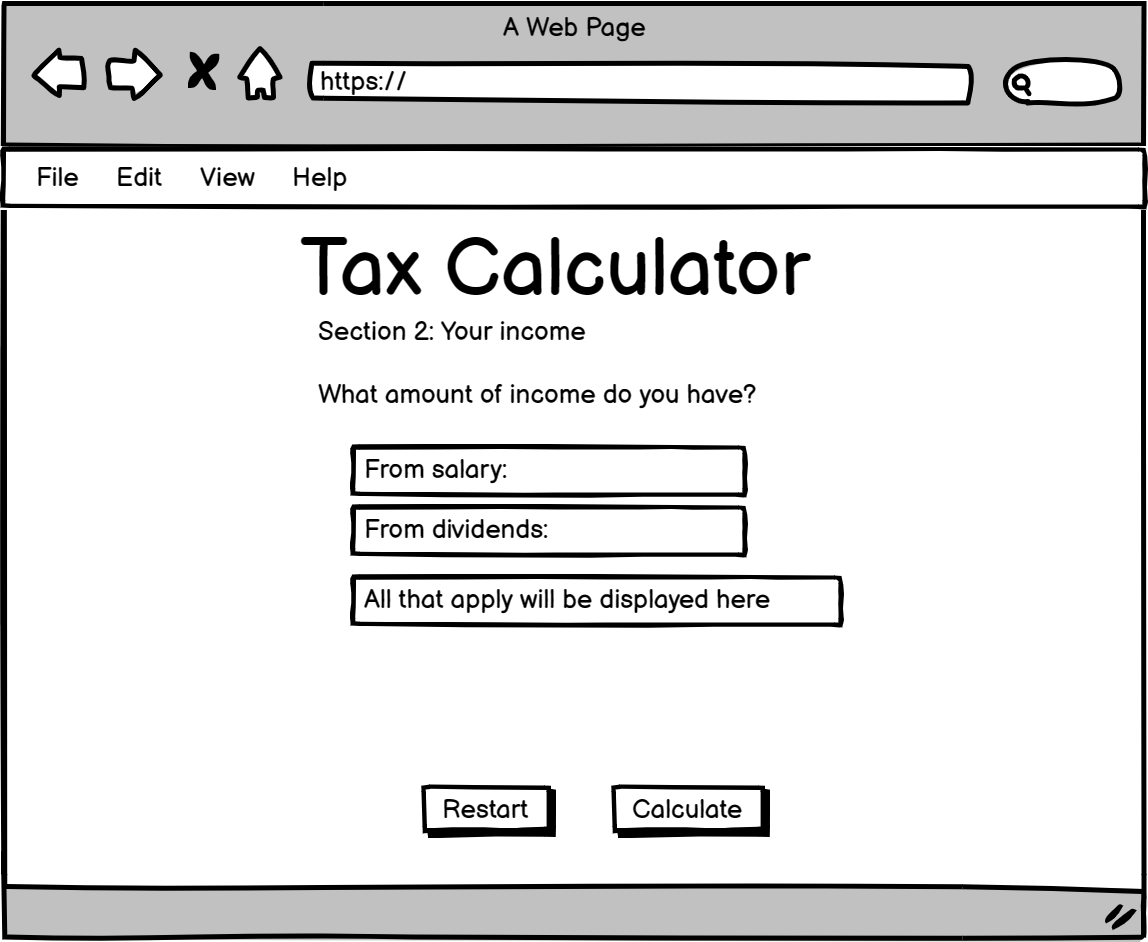
Finally, once I have provided all required data, my tax calculation is displayed:
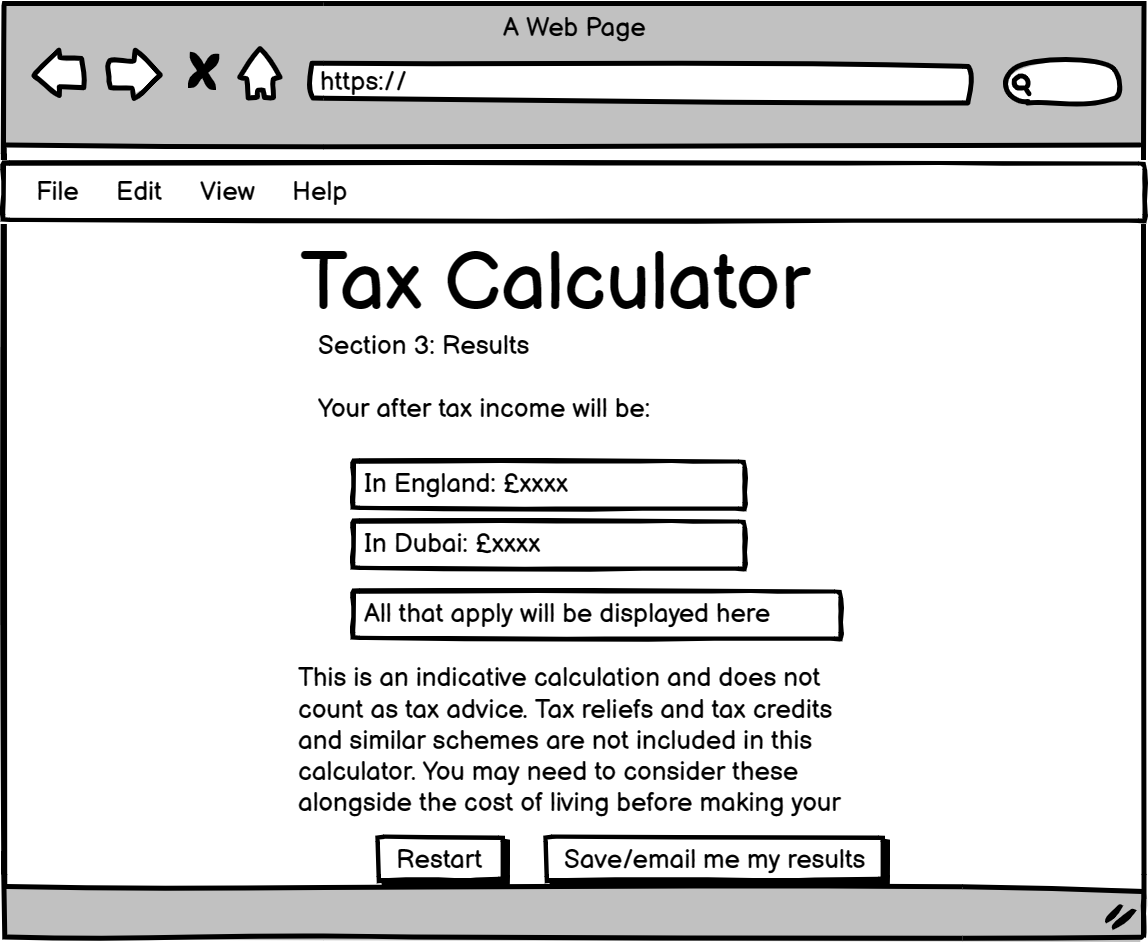
Admin Wireframes
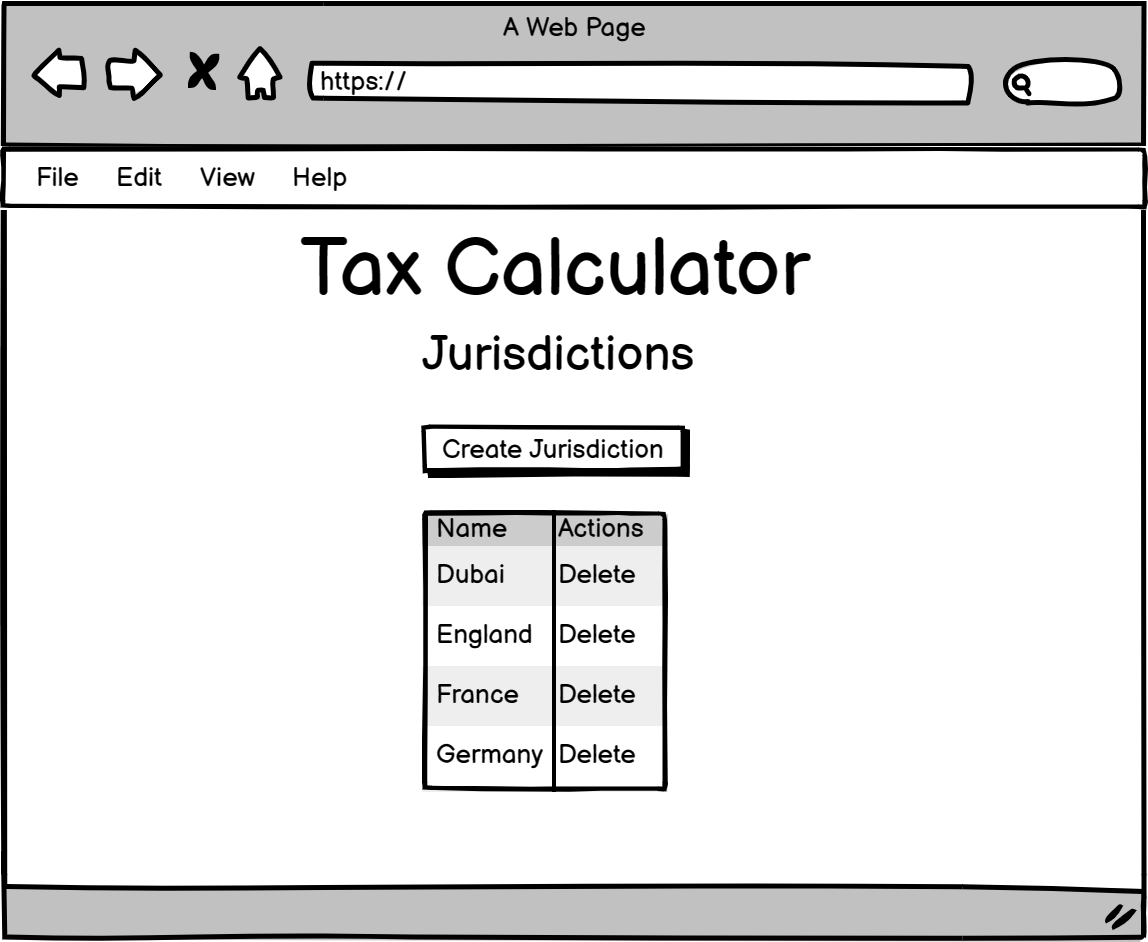
As an admin, I can see a list of jurisdictions. I can choose to delete a jurisdiction, or add a new one:
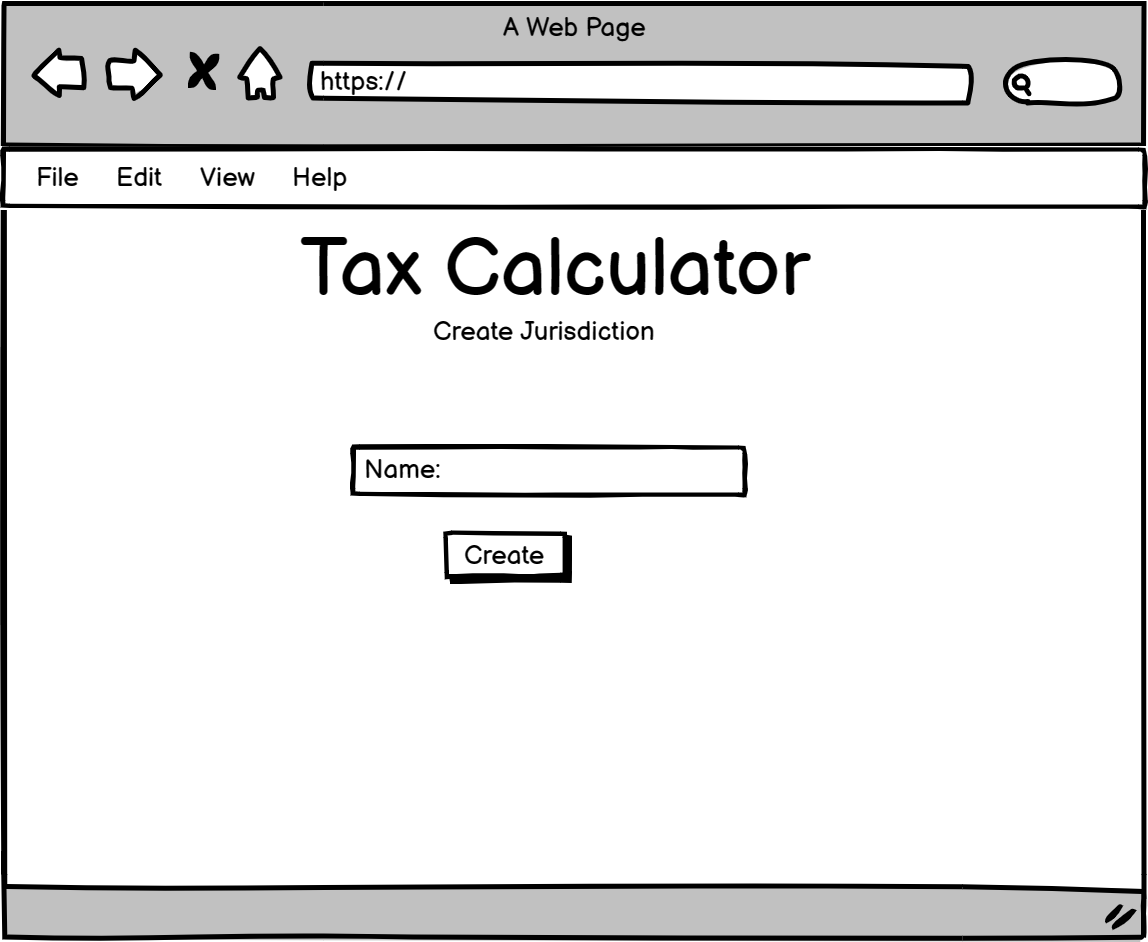
If I choose to add a jurisdiction, then I am shown a form to enter jurisdiction details:
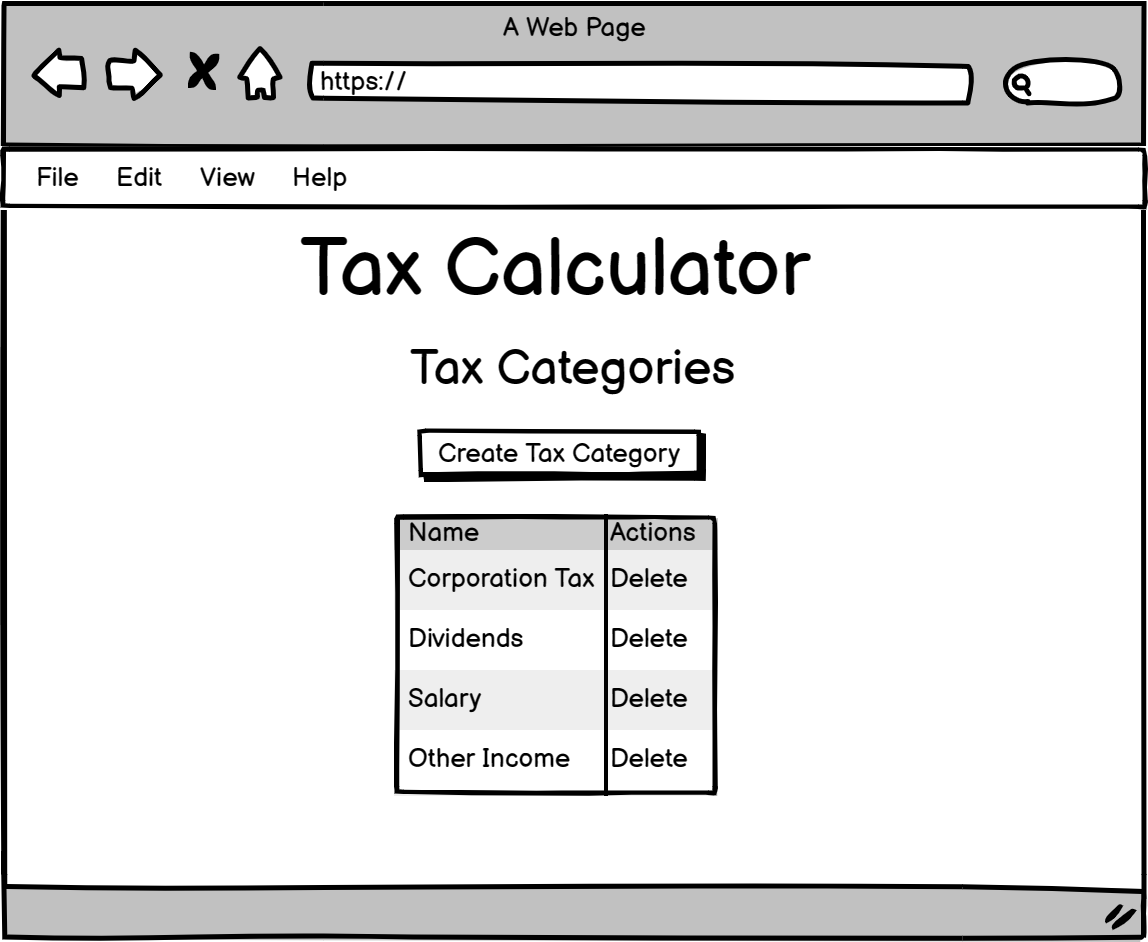
As an admin, I can see a list of tax categories. I can choose to add a new tax category, or delete one:
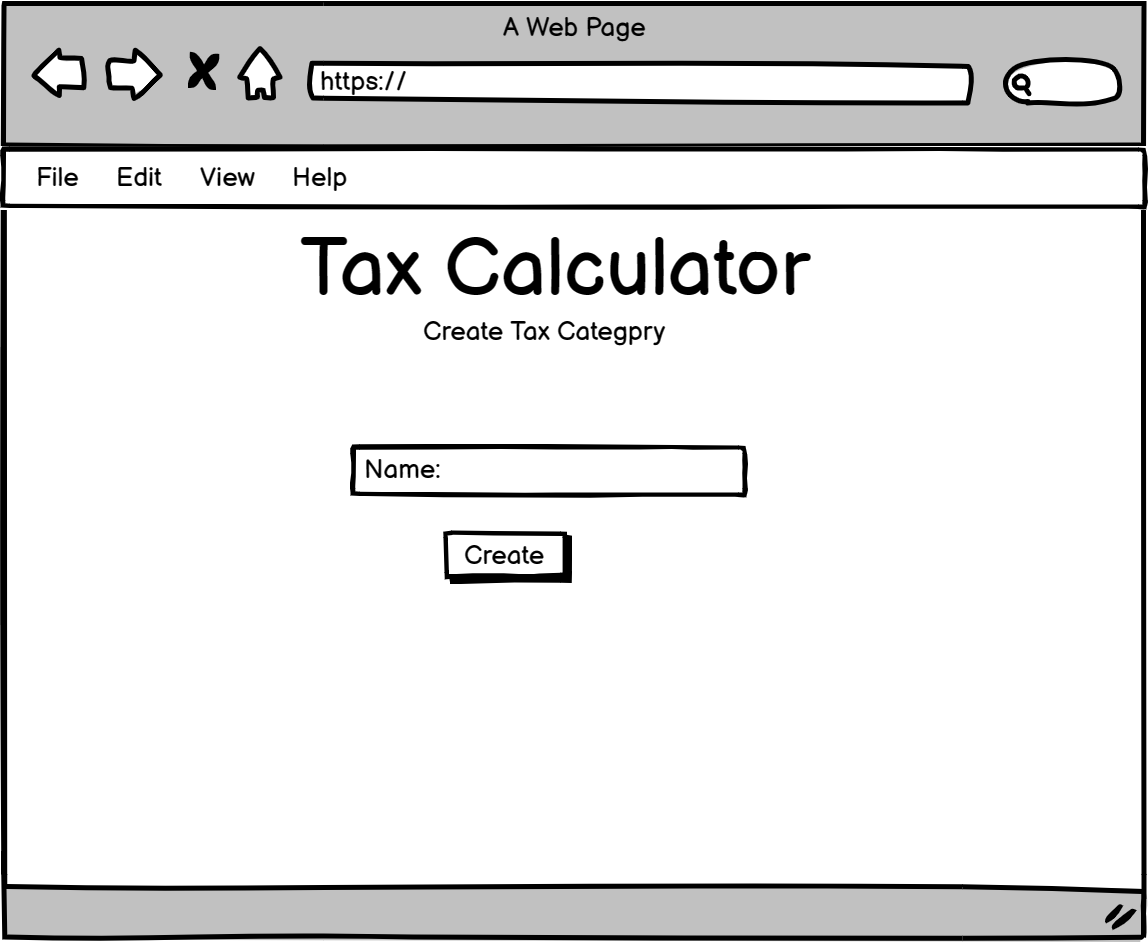
If I choose to add a tax category, then I am shown a form to enter tax category details:
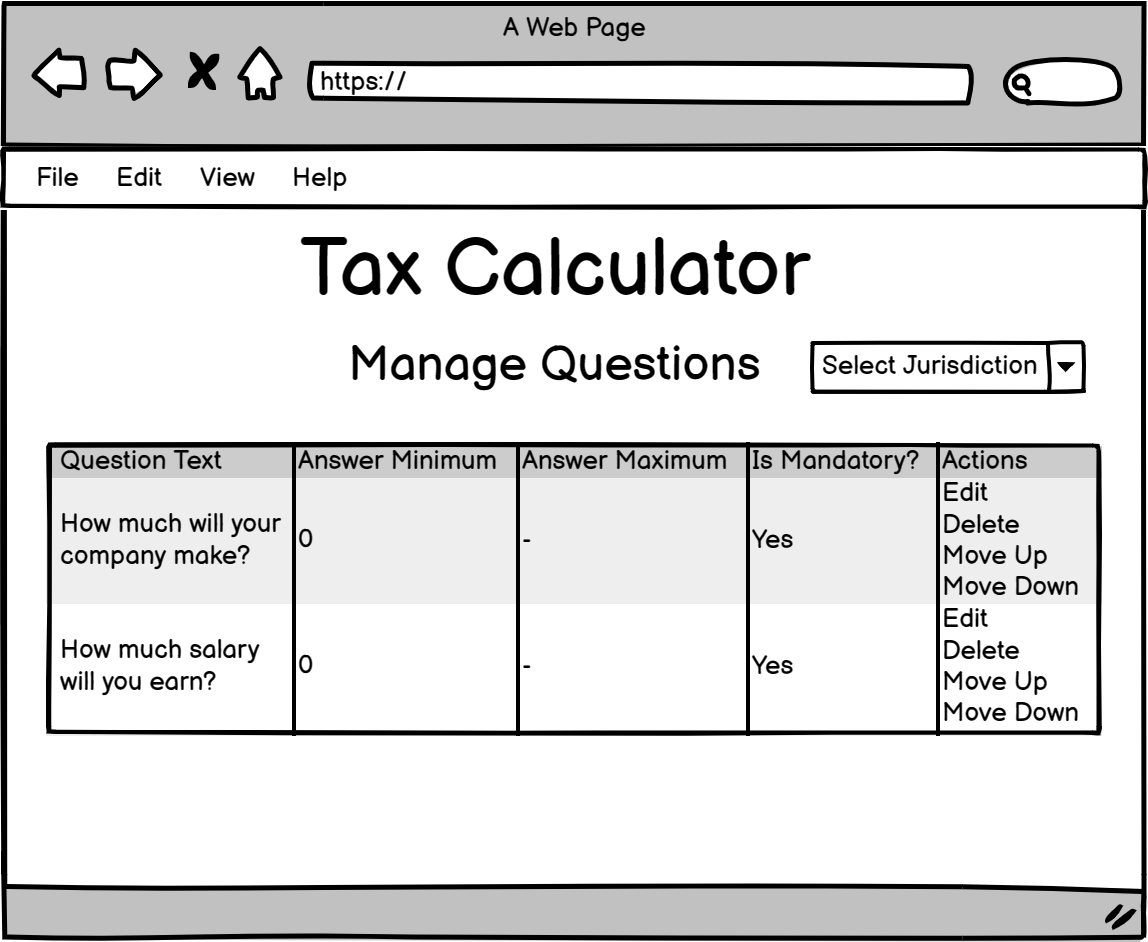
As an admin, I can see a list of questions for a selected jurisdiction. I can choose to edit or delete existing questions, or add a new one:
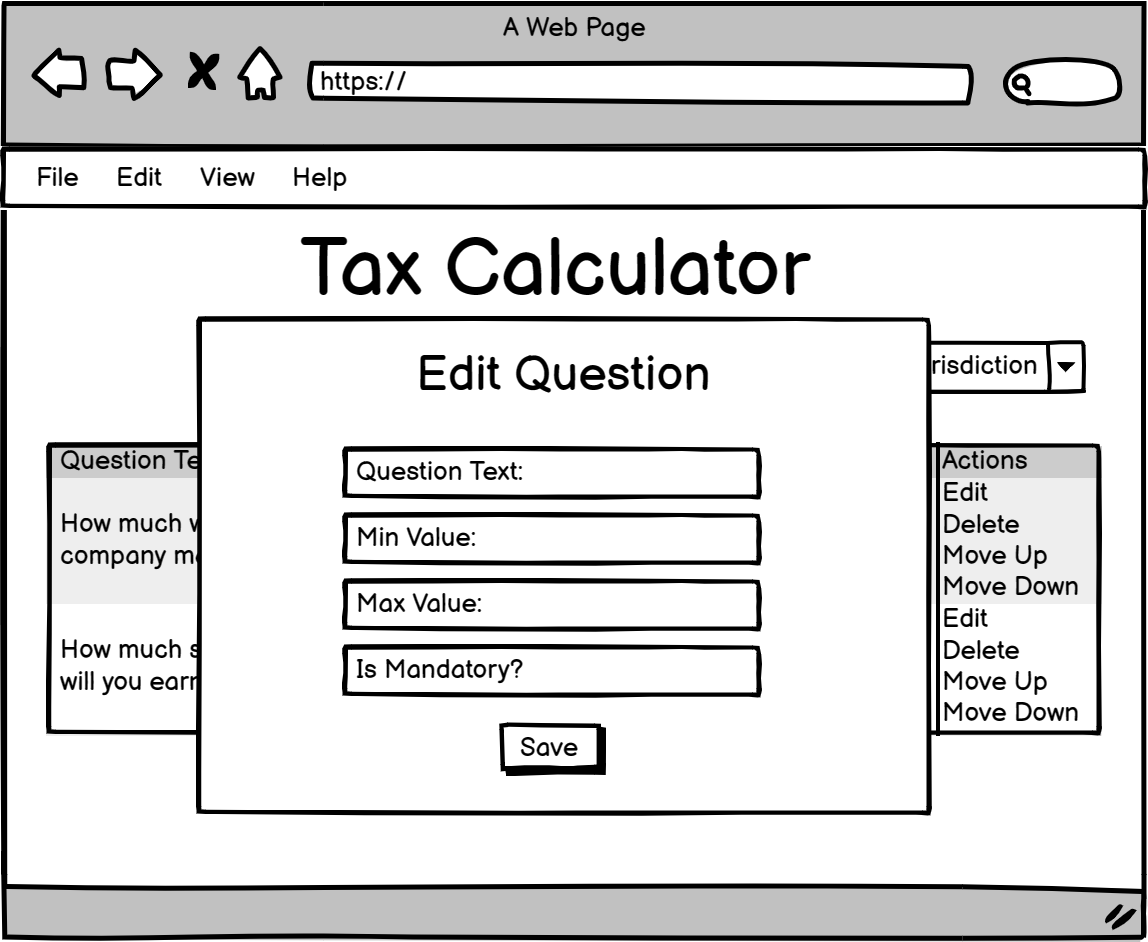
When I choose to add or edit a question, I am shown a form to enter the details for the question. If I am editing an existing question, then the details of the current question are displayed:
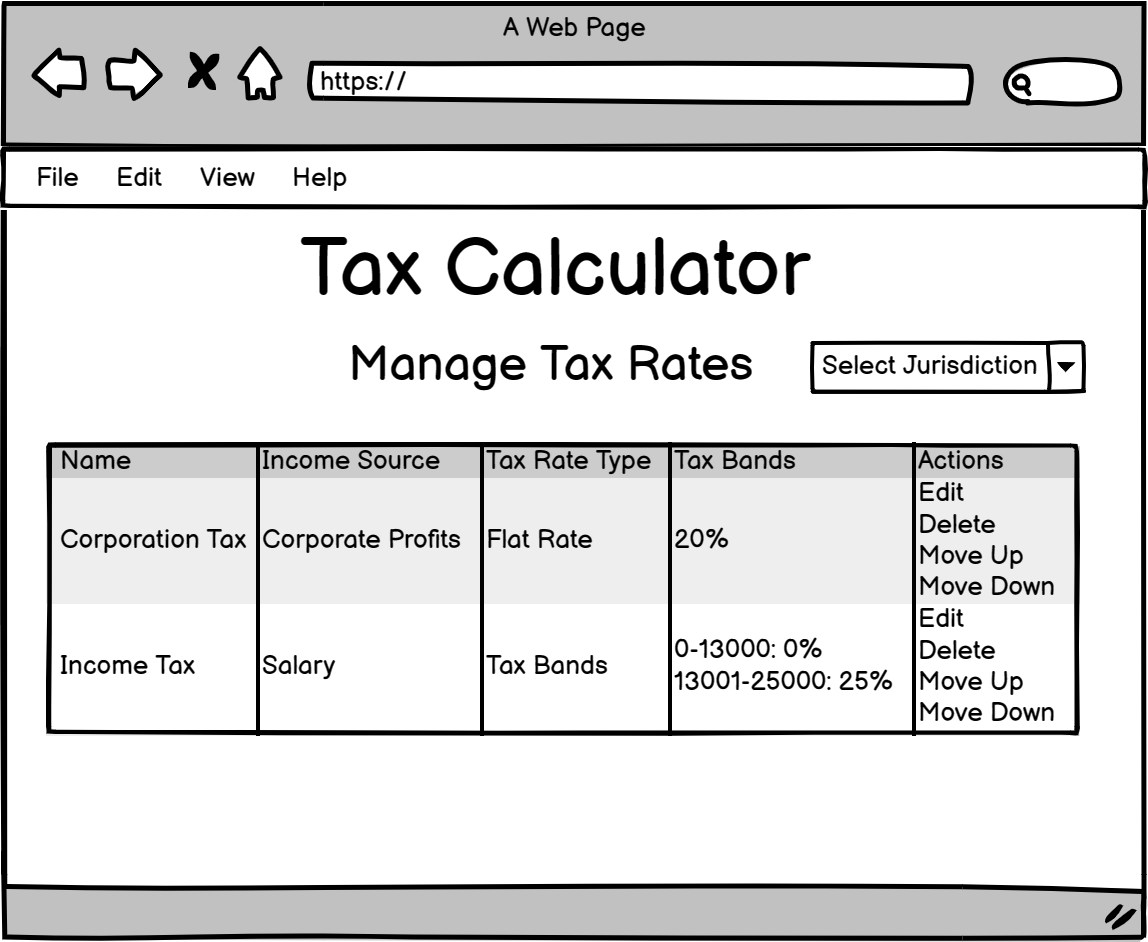
As an admin, I can see a list of tax rates for a selected jurisdiction. I can choose to edit or delete existing tax rates, or add a new one:
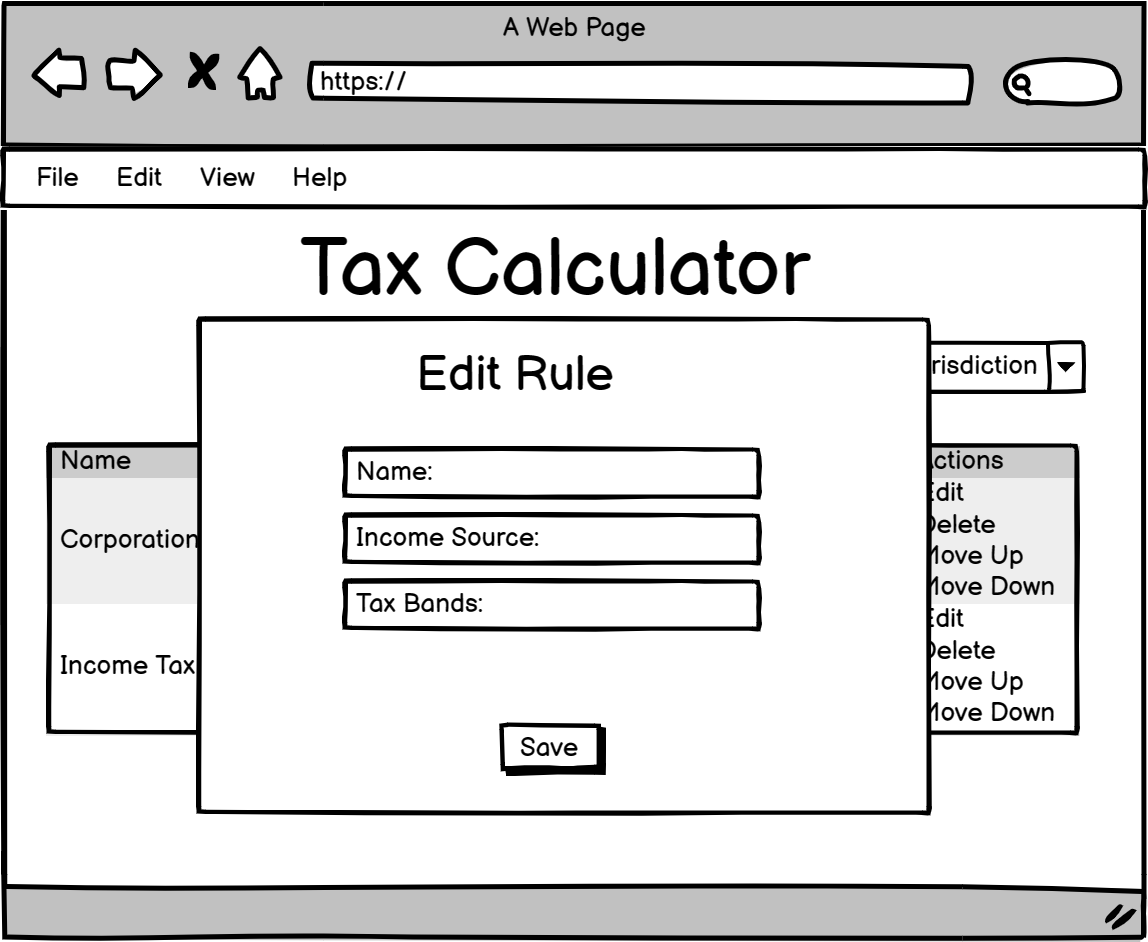
When I choose to add or edit a tax rate, I am shown a form to enter the details for the tax rate. If I am editing an existing tax rate, then the details of the current tax rate are displayed:
Features
Existing Features
-
A single landing page for Contractors and Admins
- The application provides a welcome message when visitng the home URL, and provides clear links to guide the user towards the most relevant actions for them.

- The application provides a welcome message when visitng the home URL, and provides clear links to guide the user towards the most relevant actions for them.
-
An instructions page for Contractors
- The application provides an instructions page for Contractors to help them understand the purpose of the Tax Calculator and the steps to use it.
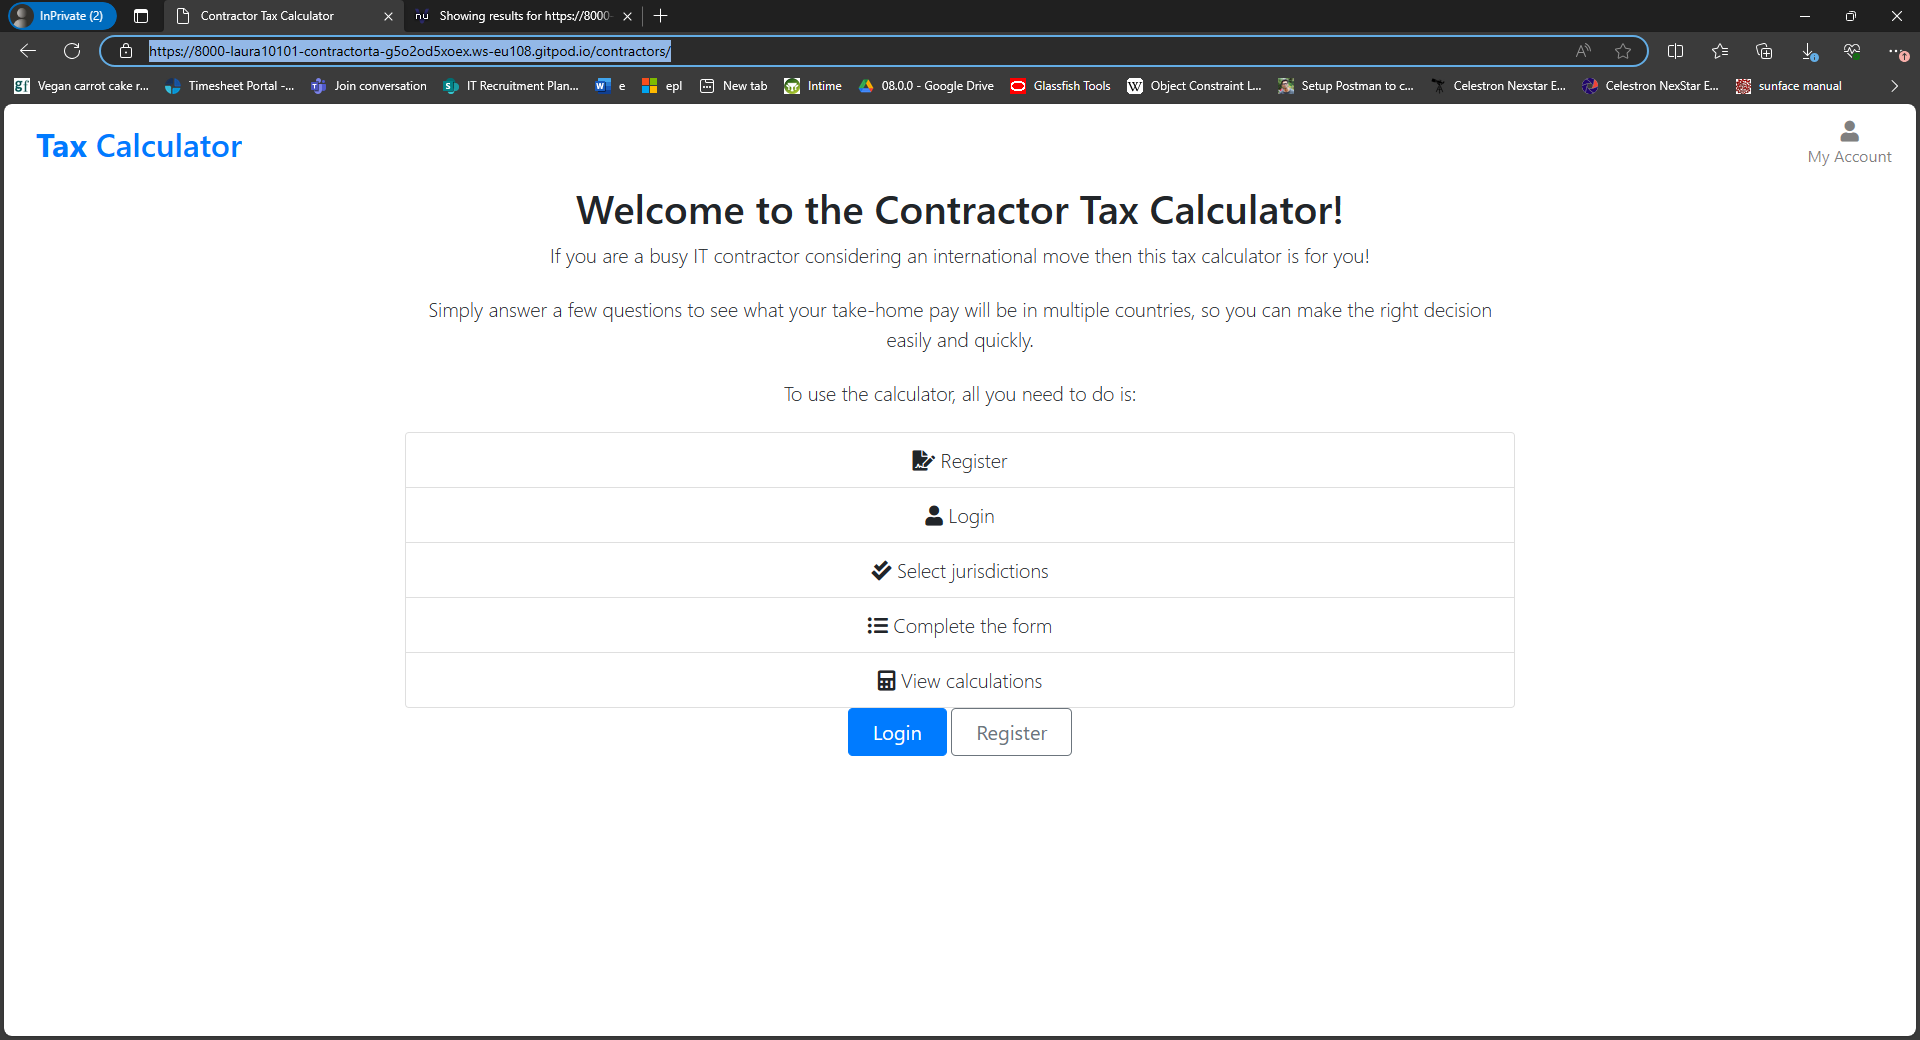
- The application provides an instructions page for Contractors to help them understand the purpose of the Tax Calculator and the steps to use it.
-
A login form
- The application provides a login form to allow both Contractors and Admins to sign in.

- The application provides a login form to allow both Contractors and Admins to sign in.
-
A registration form
- The application provides a registration form to allow new Contractors to sign up.

- The application provides a registration form to allow new Contractors to sign up.
-
Toasts to display important Djanog messages to the user
- The application will display Django-generated messages as toasts, allowing the user to view and then dismiss them.
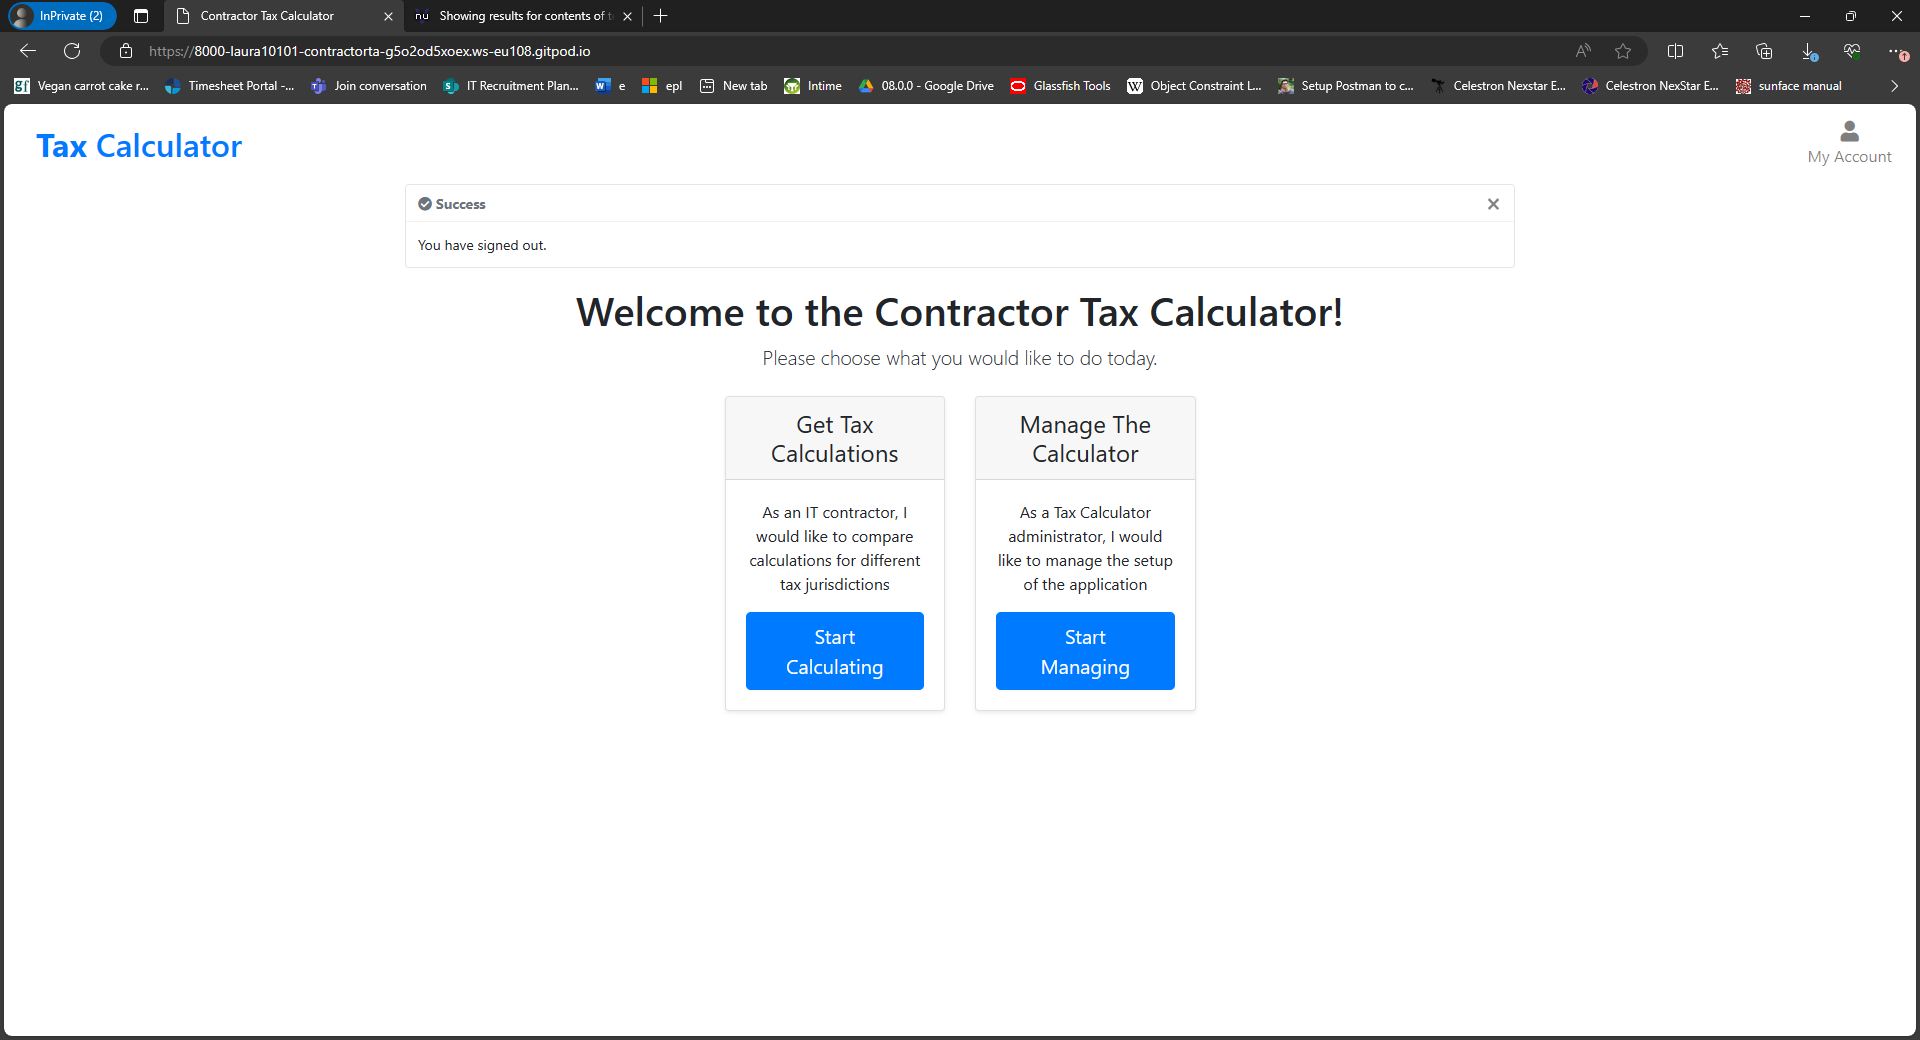
- The application will display Django-generated messages as toasts, allowing the user to view and then dismiss them.
-
A dashboard for Contractors
- The application provides a Contractor dashboard displaying their subscription status, recent payments, and their past tax calculations.
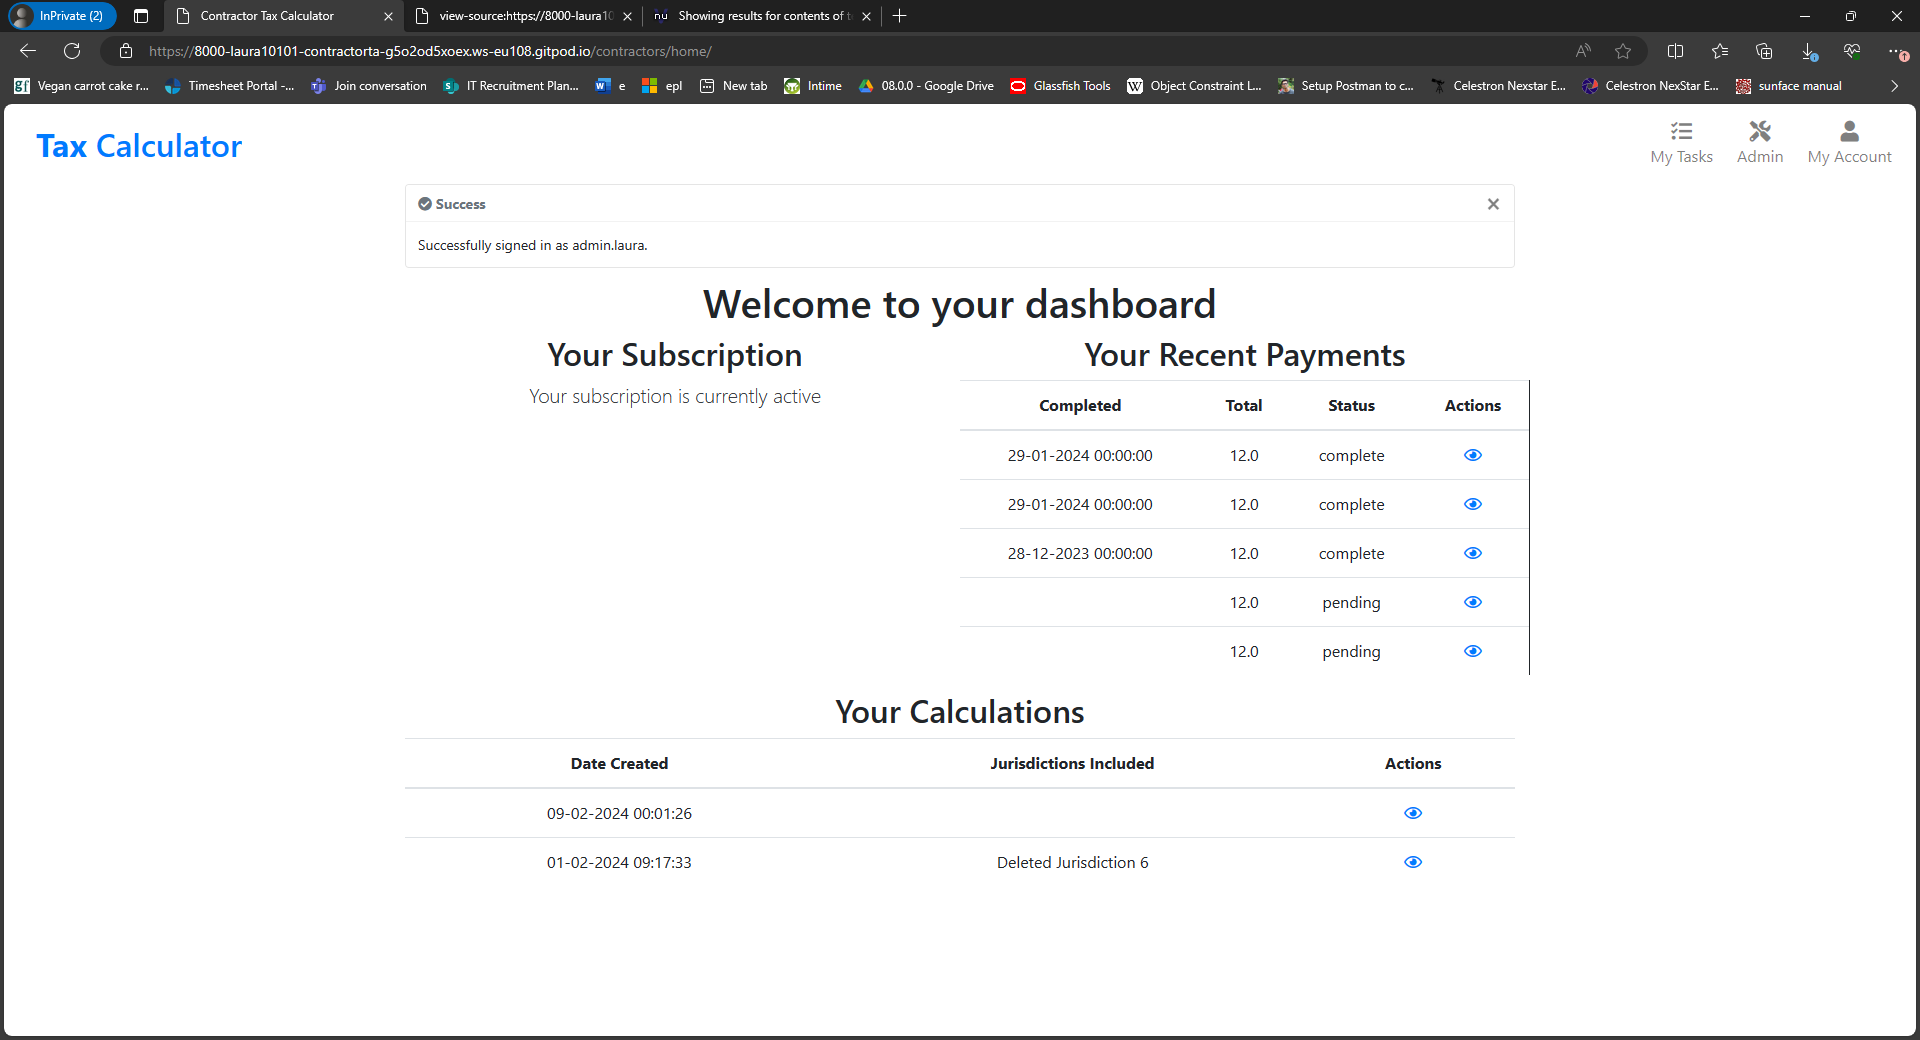
- The application provides a Contractor dashboard displaying their subscription status, recent payments, and their past tax calculations.
-
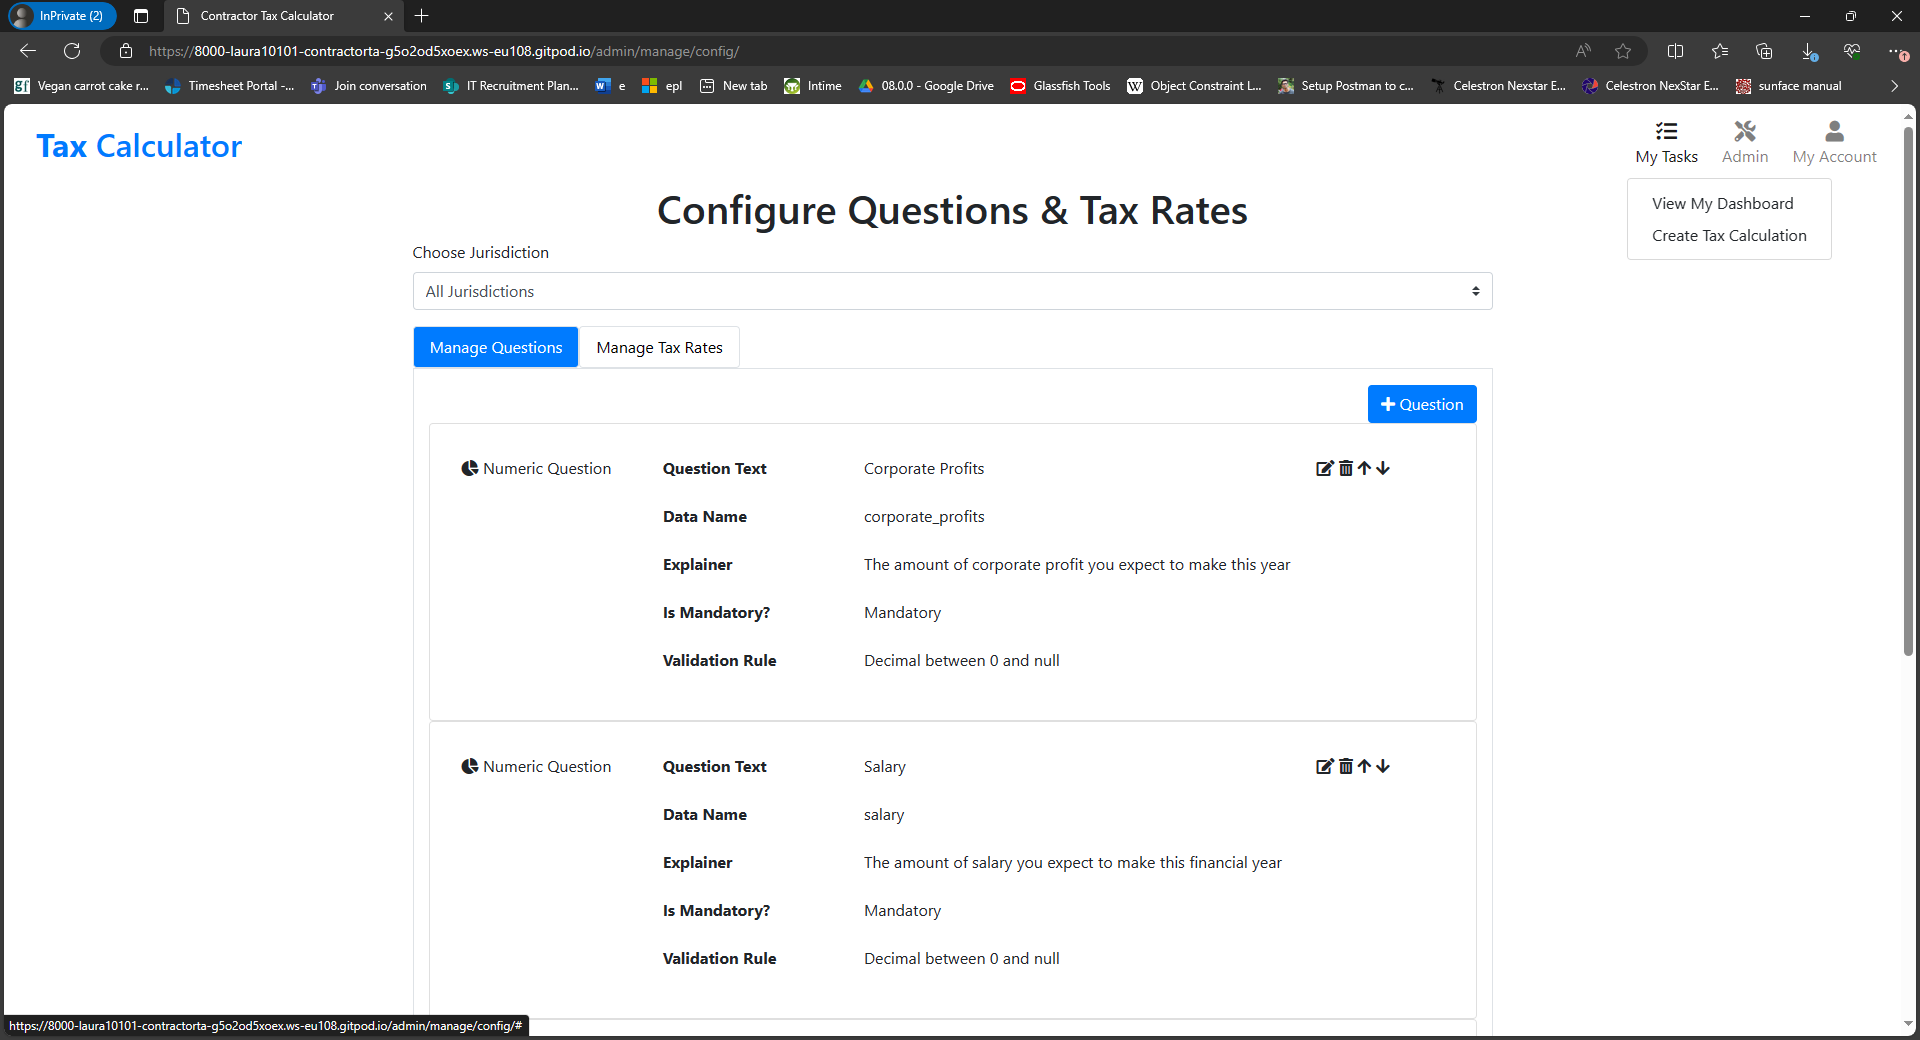
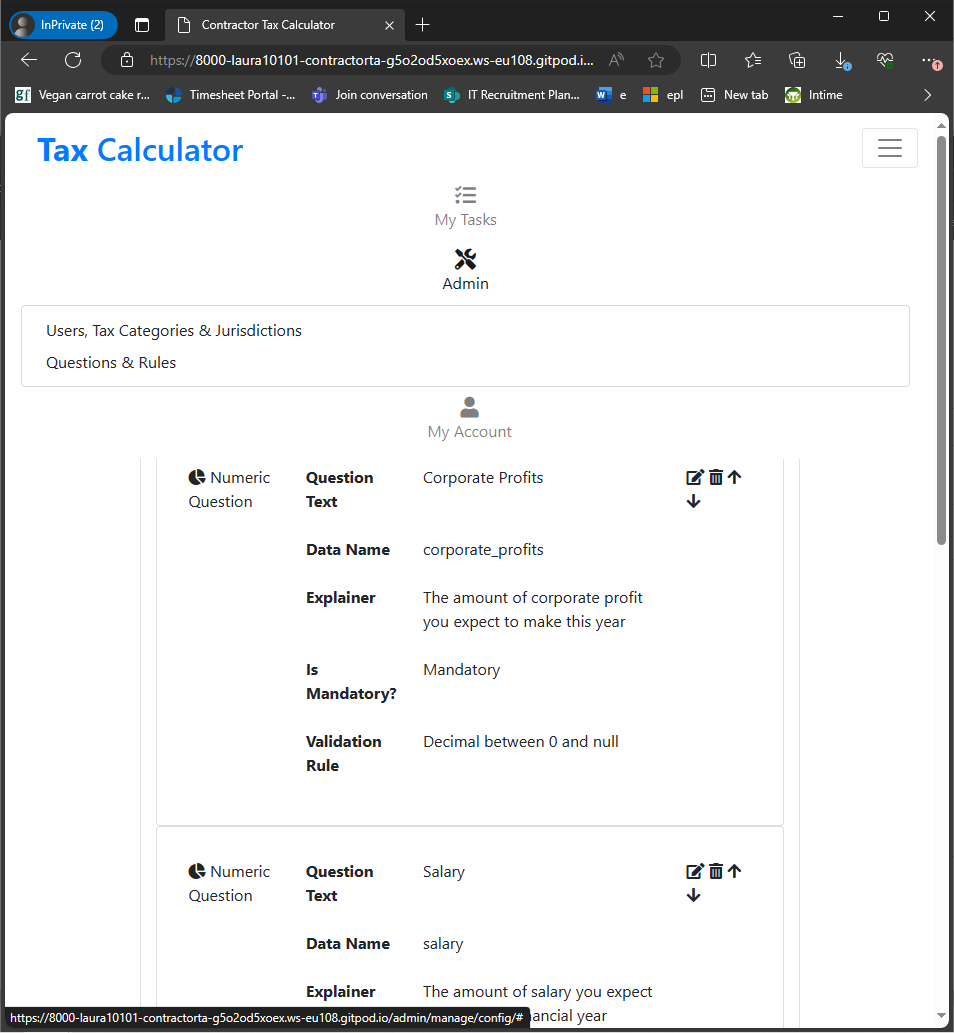
Responsive navbar with relevant Contractor, Admin, and Account links clearly displayed
- The application proivdes a navbar with separate drop-down menus for Contractor links, Admin links, and Account links.
- This allows all types of users to navigate around the site easily and access all features from any page.
- The navbar is responsive to accomodate small screens.
-
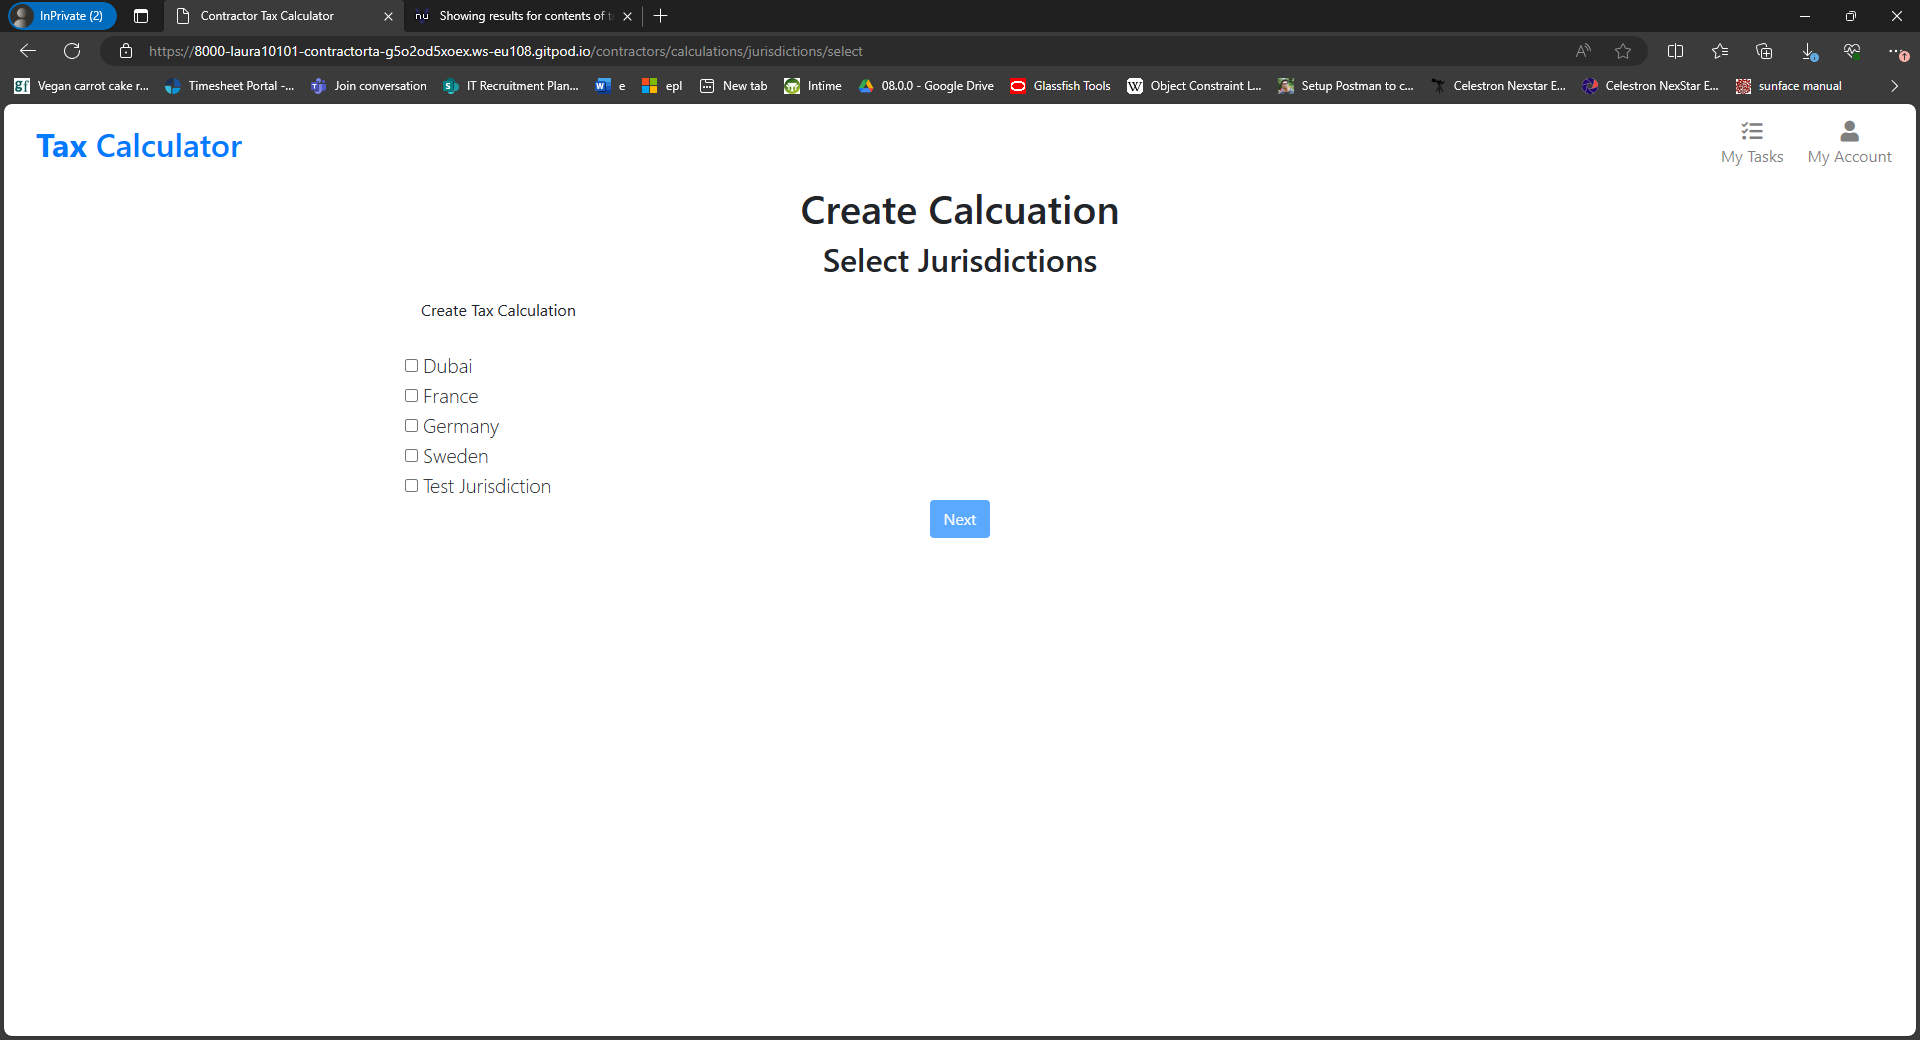
The Jurisdictions Selection form
- The application provides a form allowing Contractors to select the jurisdictions they would like to include in tax calculations.
- The
Nextbutton is disabled until at least one jurisdiction has been selected.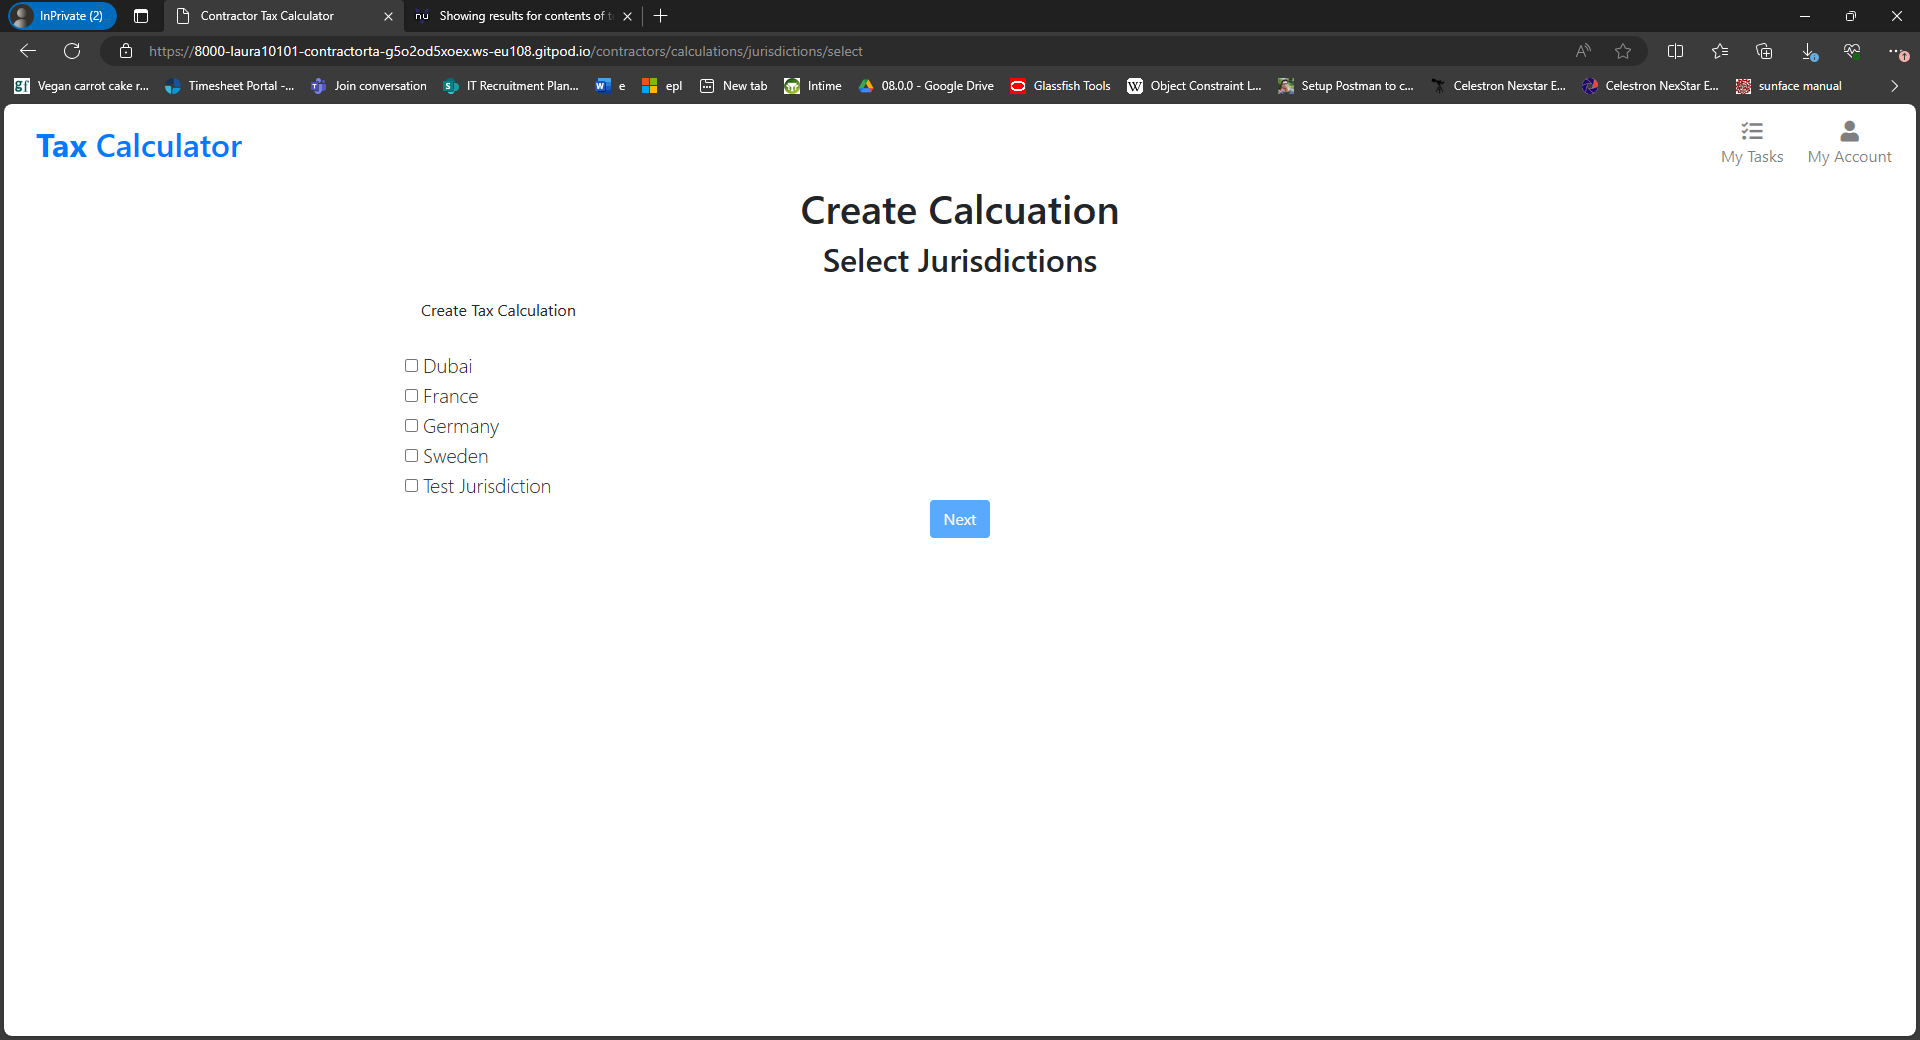
- Once a selection has been made, the form can be submitted.
-
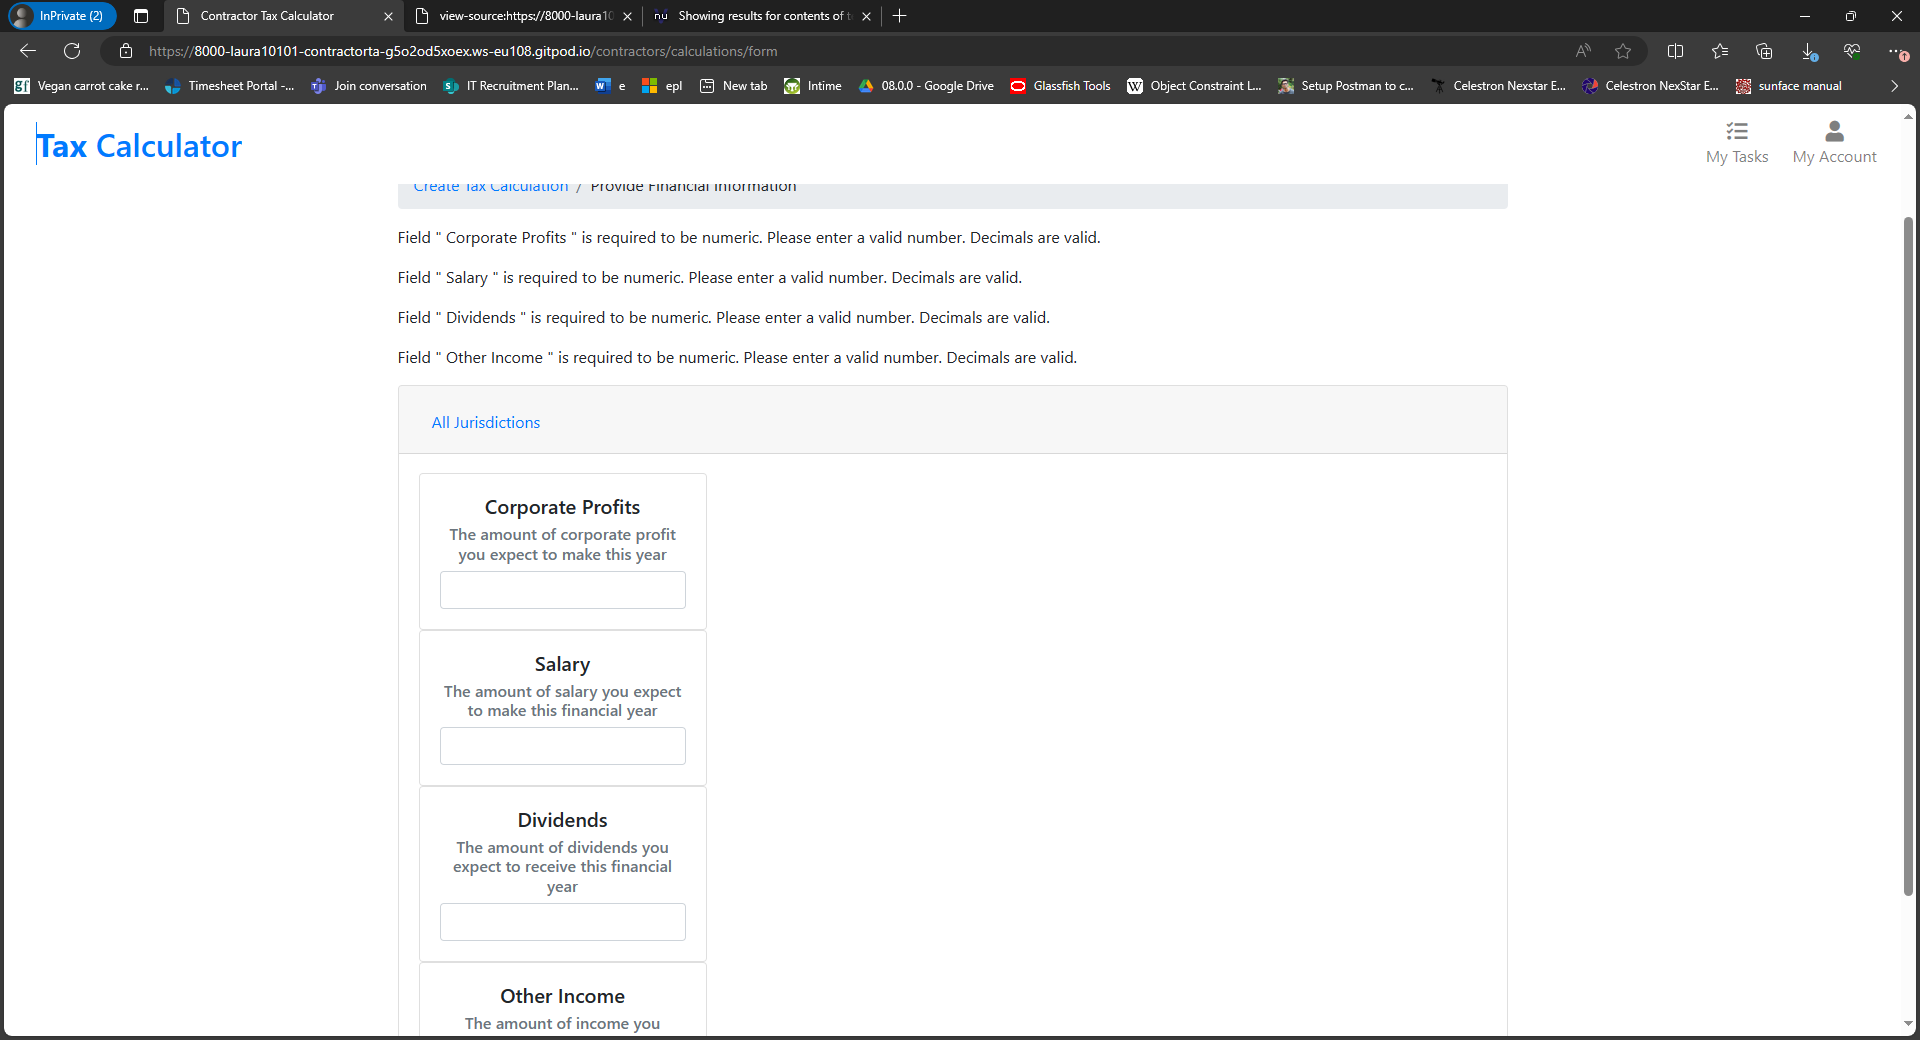
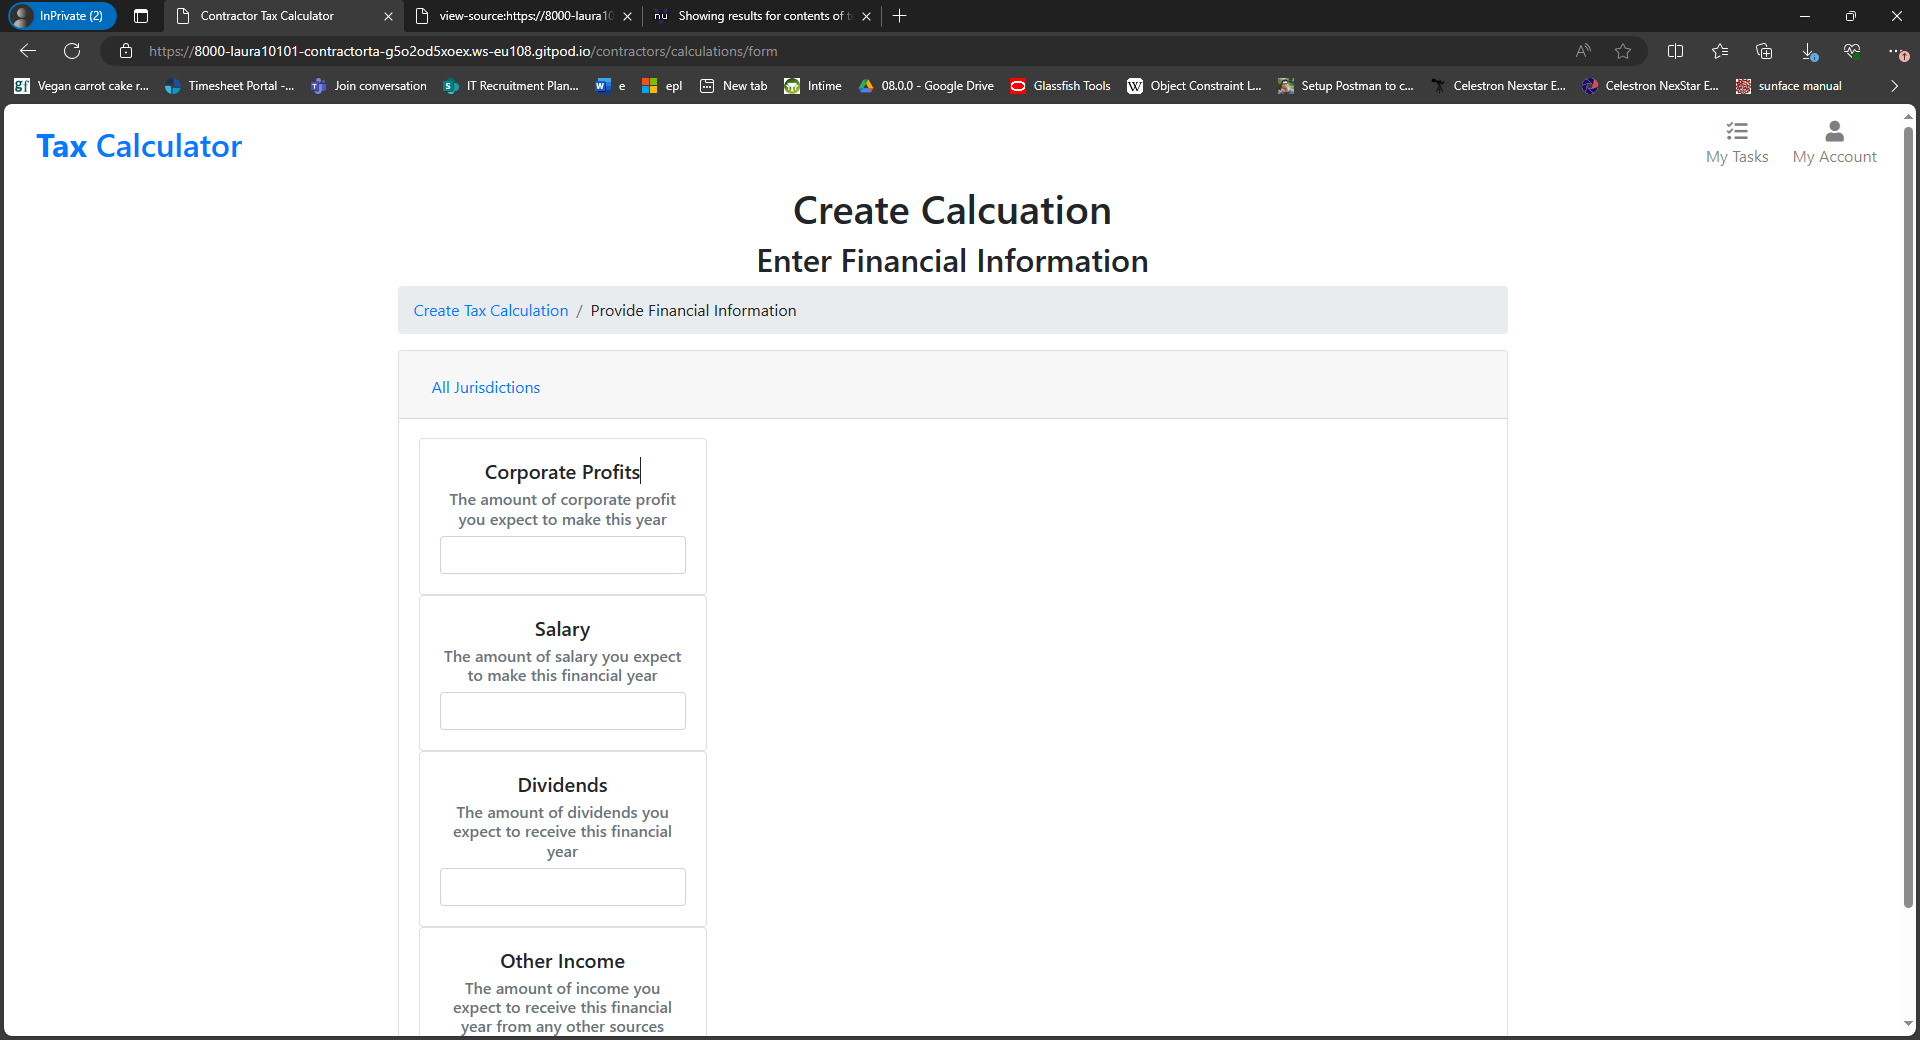
The Financial Information form
- The application will display all questions associated with the selected Jurisdictions to the user.
- The form guides the user through the process of responding to these questions.
- The form displays validation errors clearly to the user and the form will not be submitted if validation errors are displayed.
- Once all errors are cleared, the form can be submitted.
-
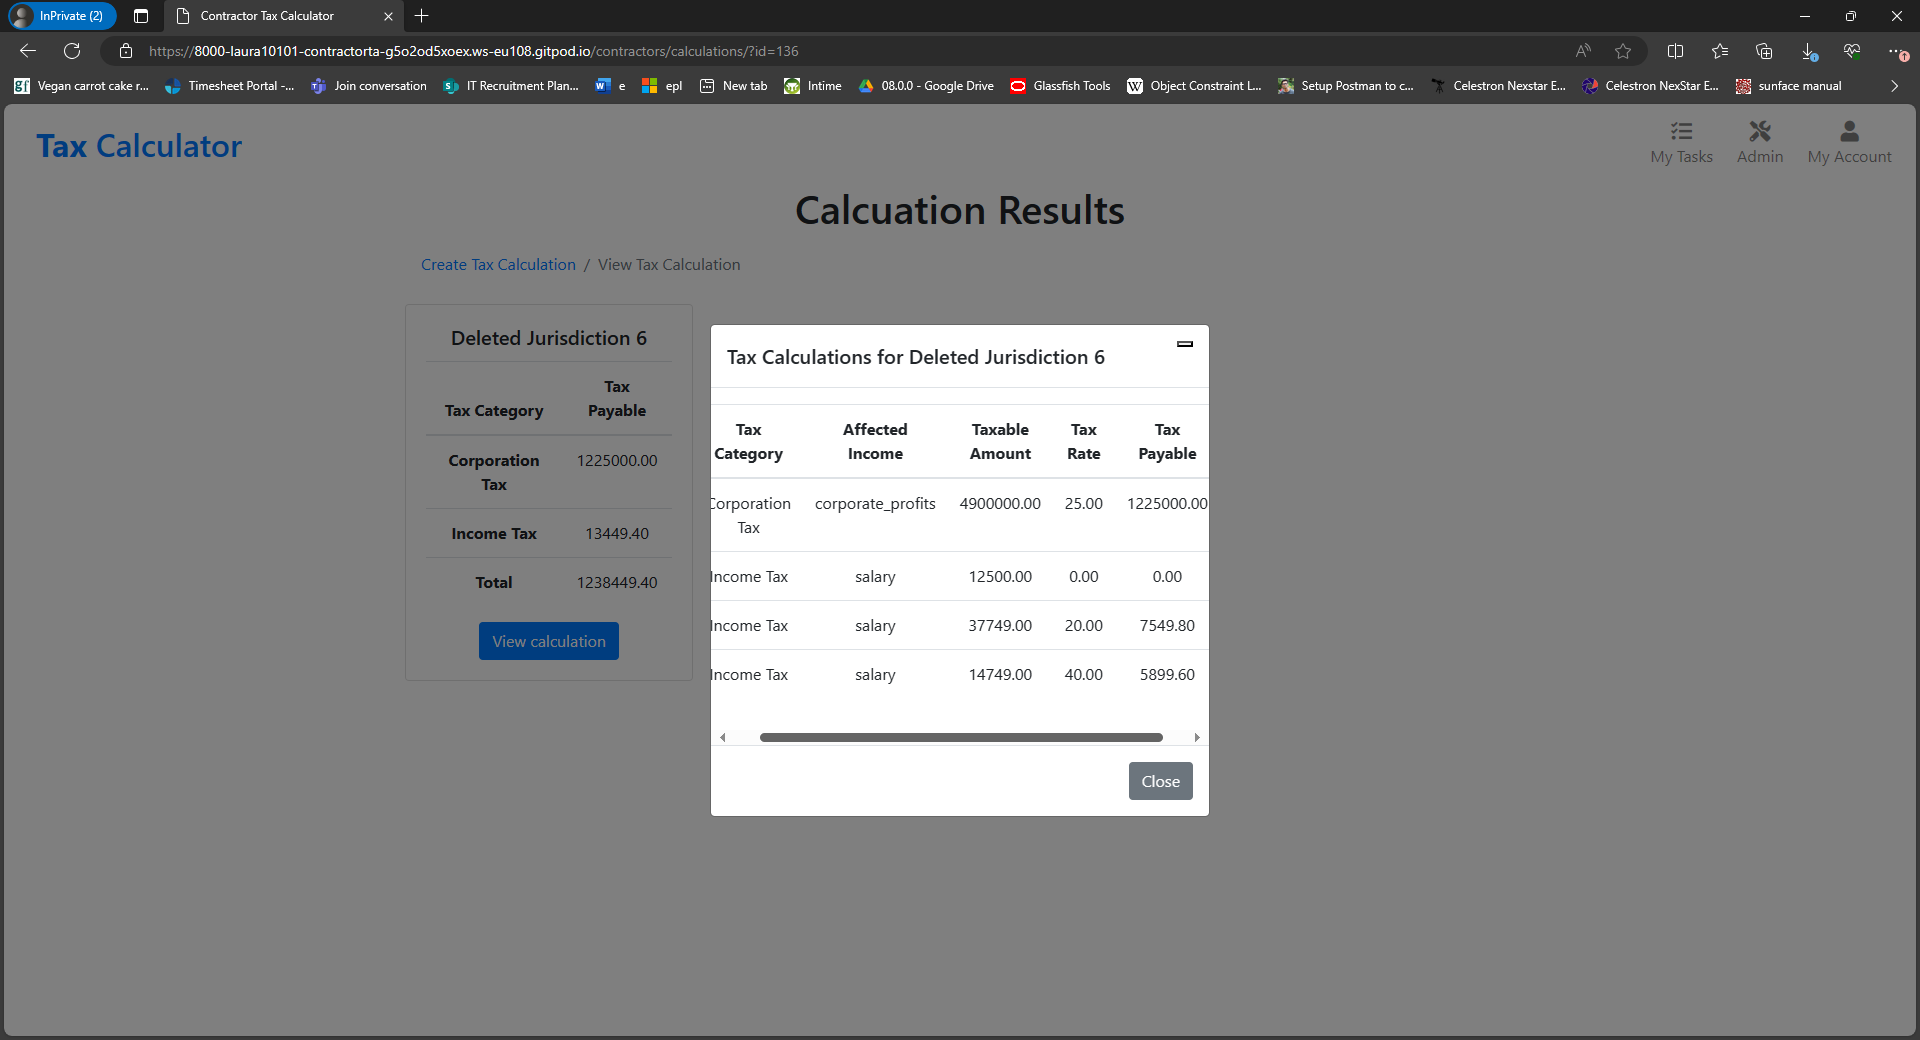
The Calculation Results page
- The application displays a summary of the calculation results to the user.
- For each jurisdiction that was included in the calculation, a card is displayed providing a summary of the tax to be paid.

- The user can click the View Details button in order to see the detailed steps taken to calculate tax due for that Jurisdiction.
-
The Calculation process breadcrumb
- The application provides a breadcrumb to indicate to the user where they are in the process of producing a tax calculation.
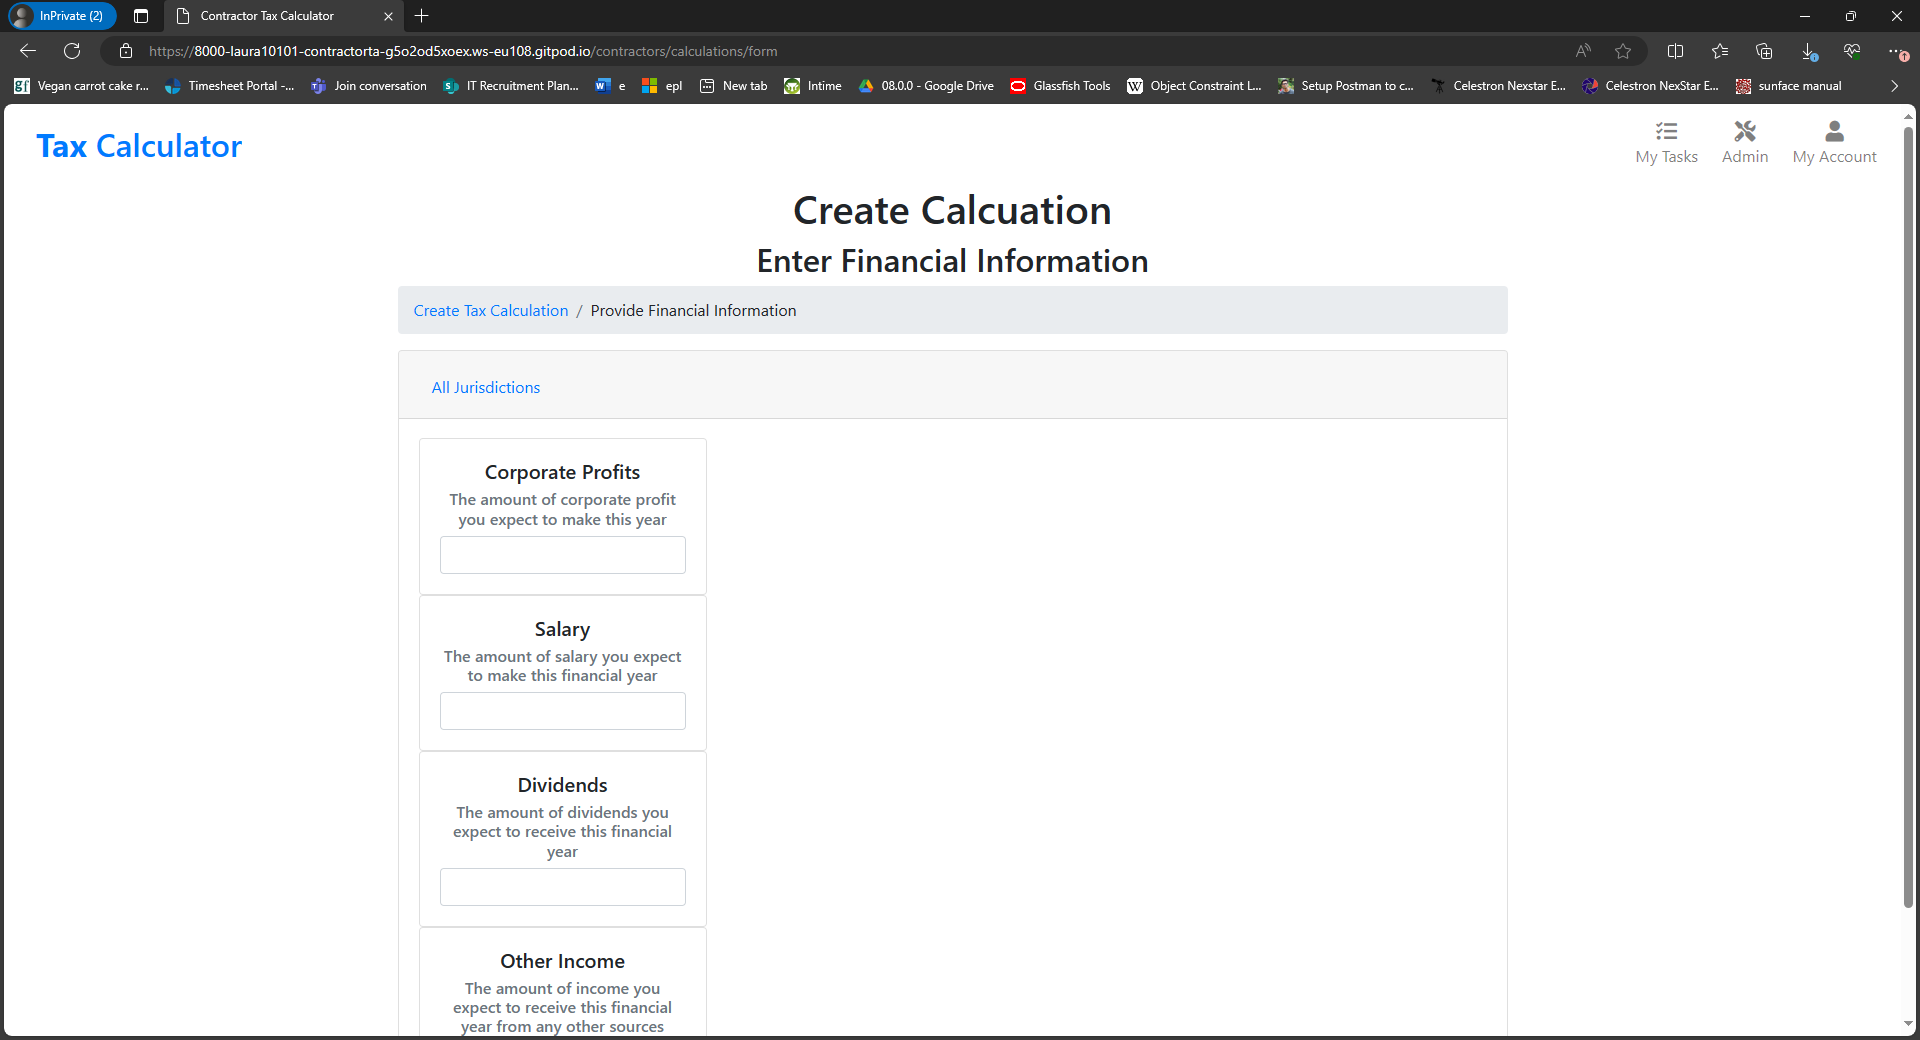
- The application provides a breadcrumb to indicate to the user where they are in the process of producing a tax calculation.
-
The Subscription Options form
- The application provides a clear form that allows users to choose a subscription option.
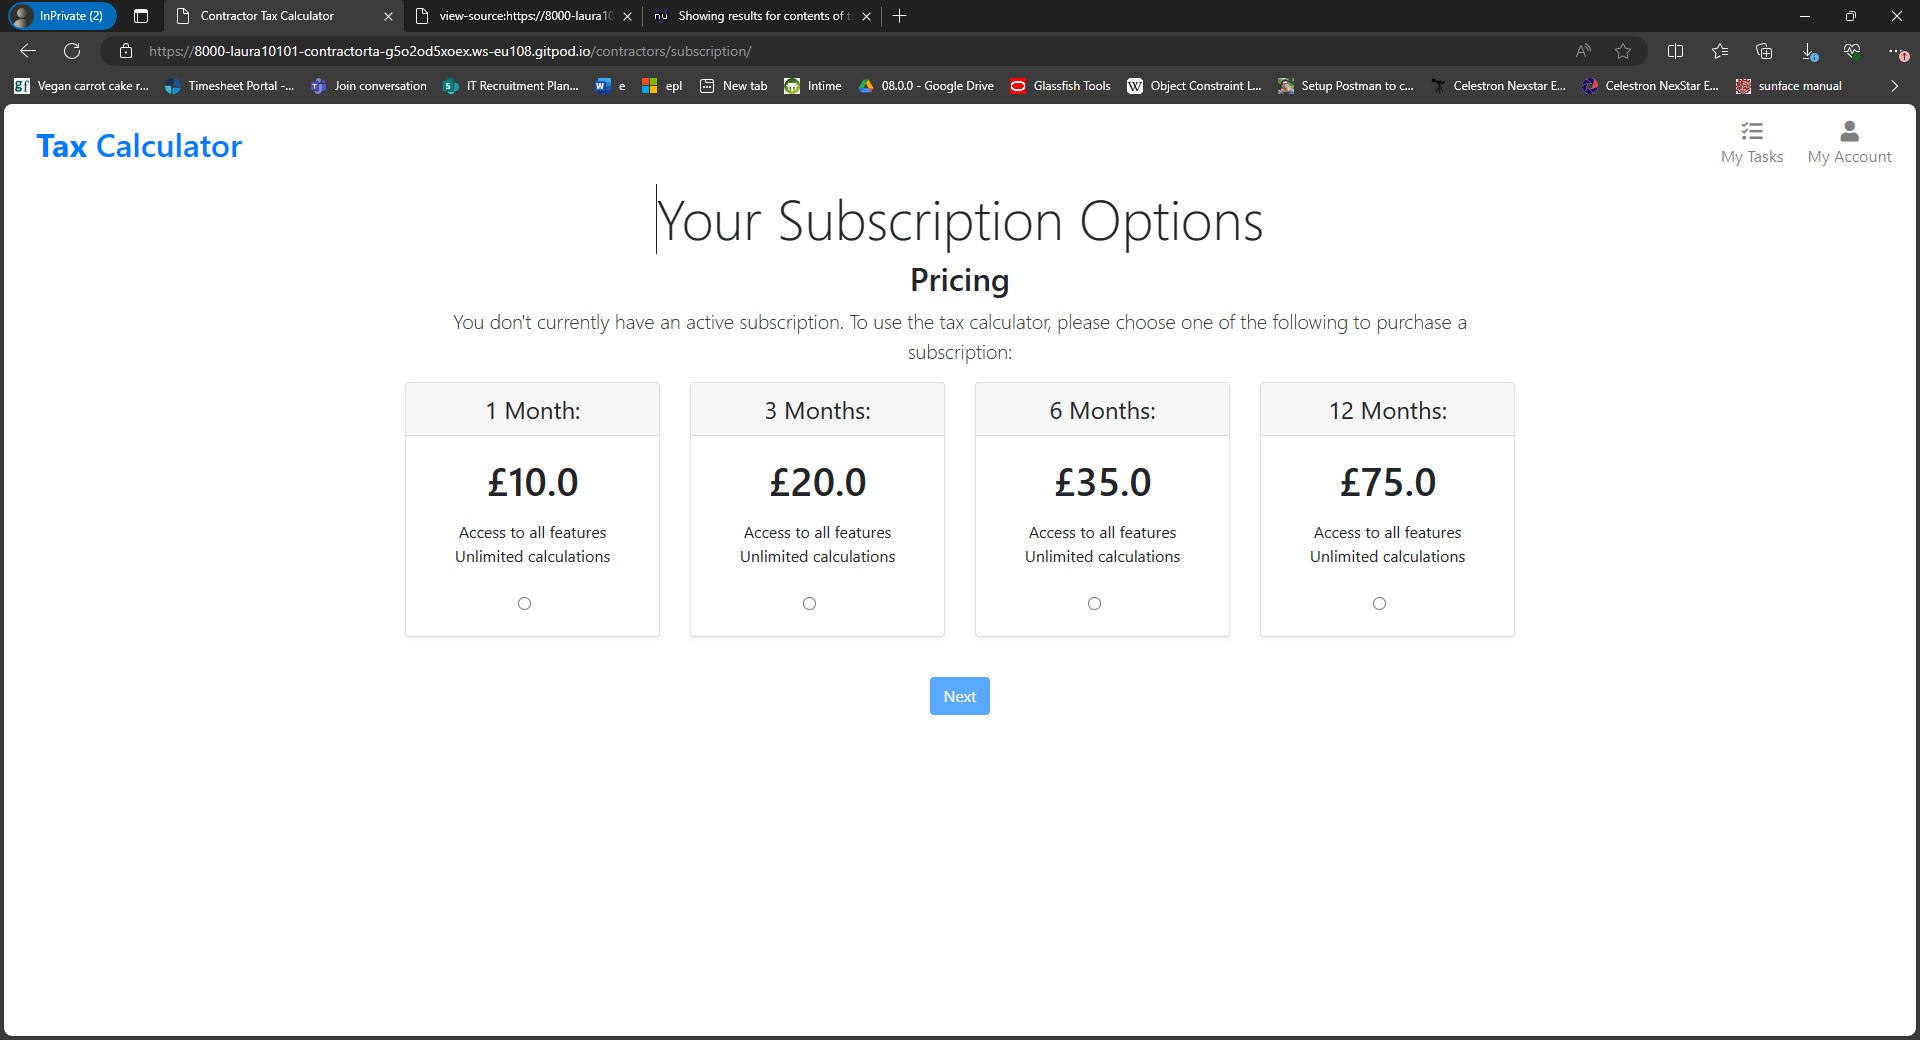
- The application provides a clear form that allows users to choose a subscription option.
-
The Checkout form
- The checkout form allows users to pay for their subscription via Stripe.

- The checkout form allows users to pay for their subscription via Stripe.
-
The Admin landing page
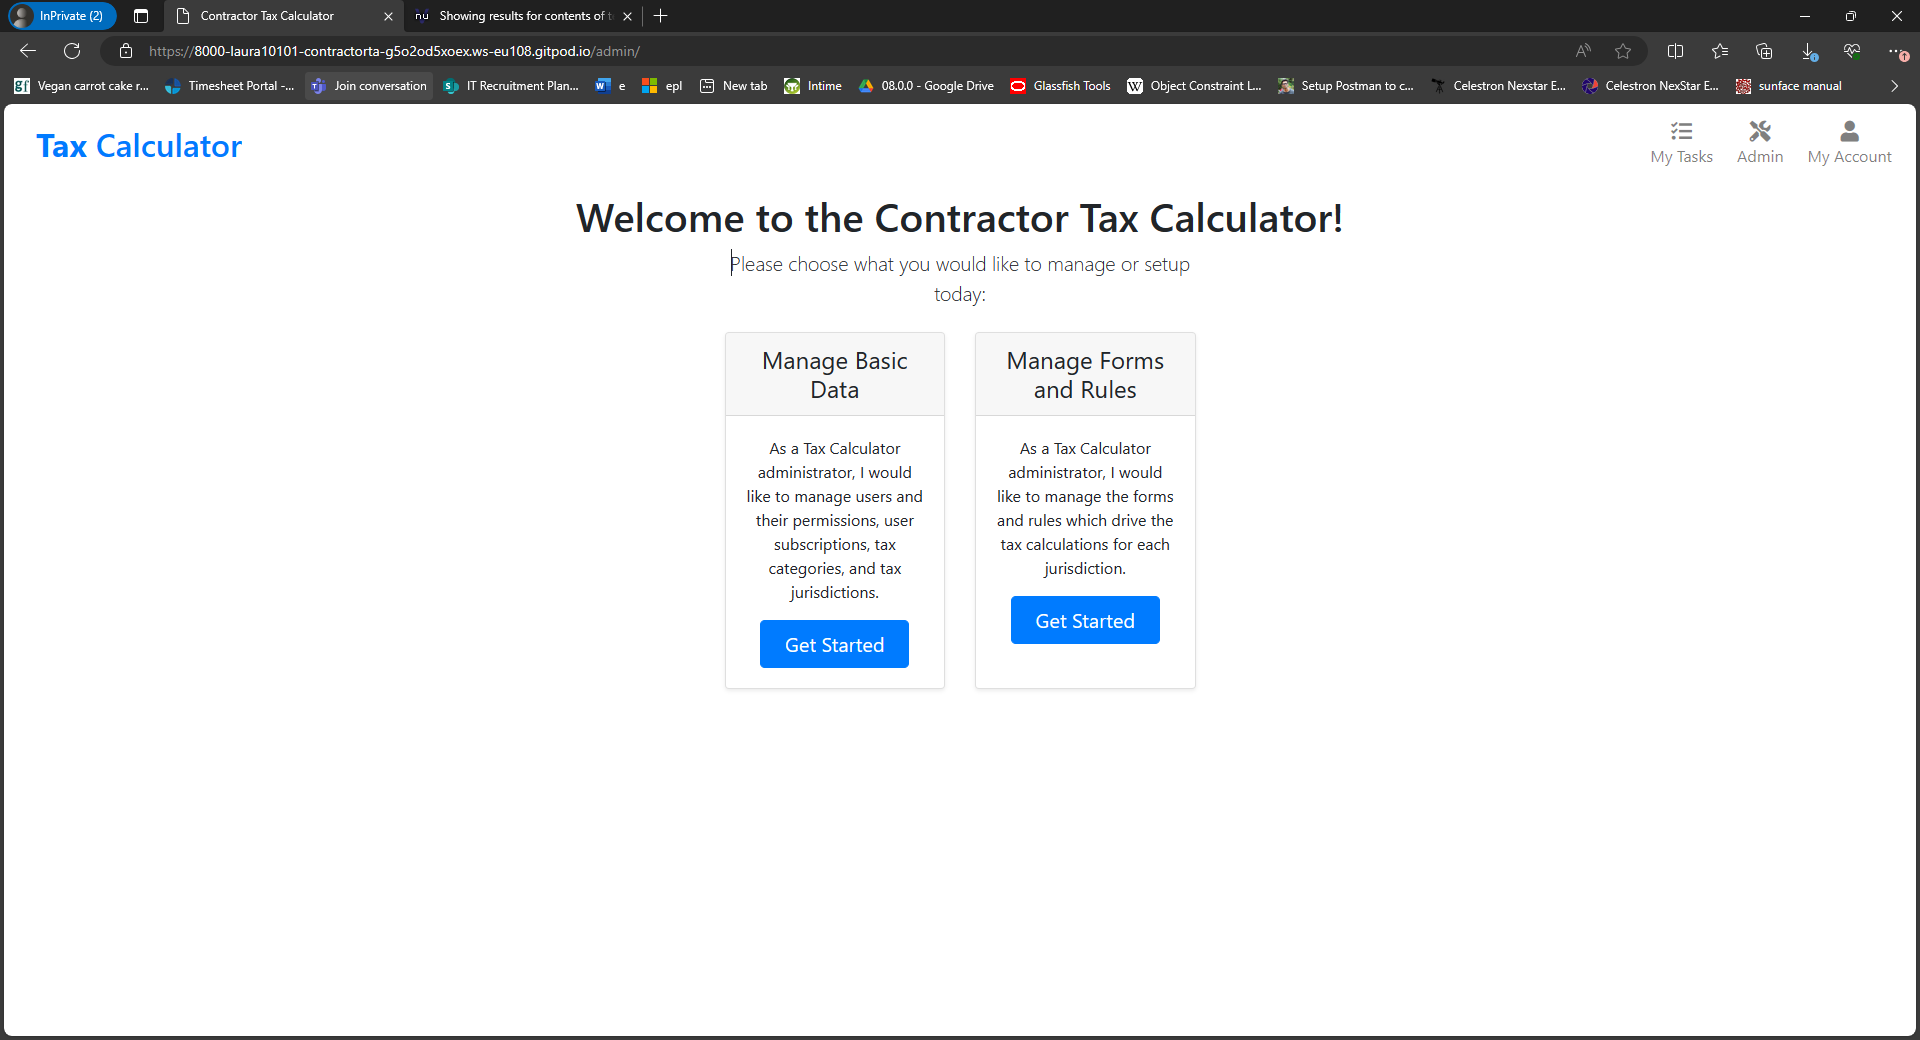
- The app provides an app for admins to choose between the basic admin app and the config app.
- This is required because I was unable to modify the default Django admin app to include a link to the config app, even with the support of a Code Institute tutor.
-
The Basic admin app
- The basic admin app is configured to allow admins to manage jurisdictions, tax categories, payments and subscriptions.
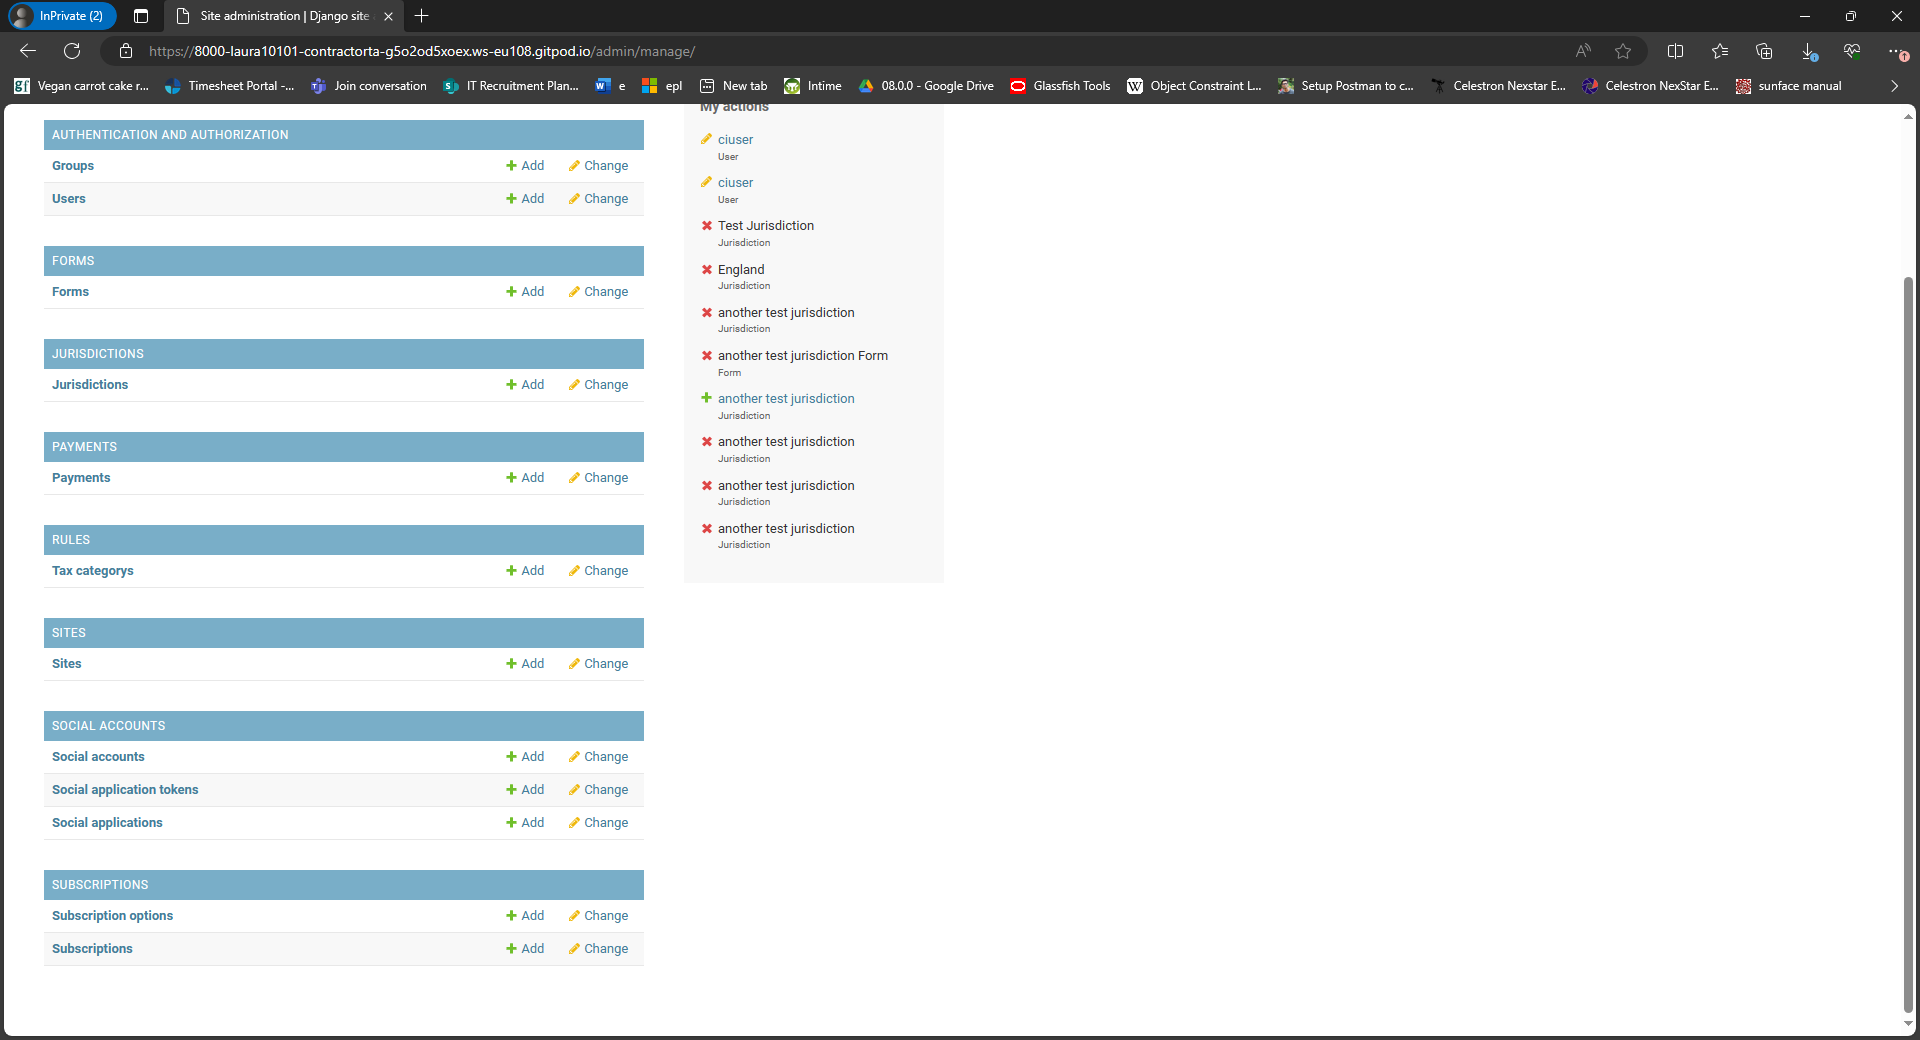
- The basic admin app is configured to allow admins to manage jurisdictions, tax categories, payments and subscriptions.
-
Managing Jurisdictions
- From the basic admin app, the user can choose the "Jurisdictions" link on the left hand side. From here they can create, edit, and delete Jurisdictions.
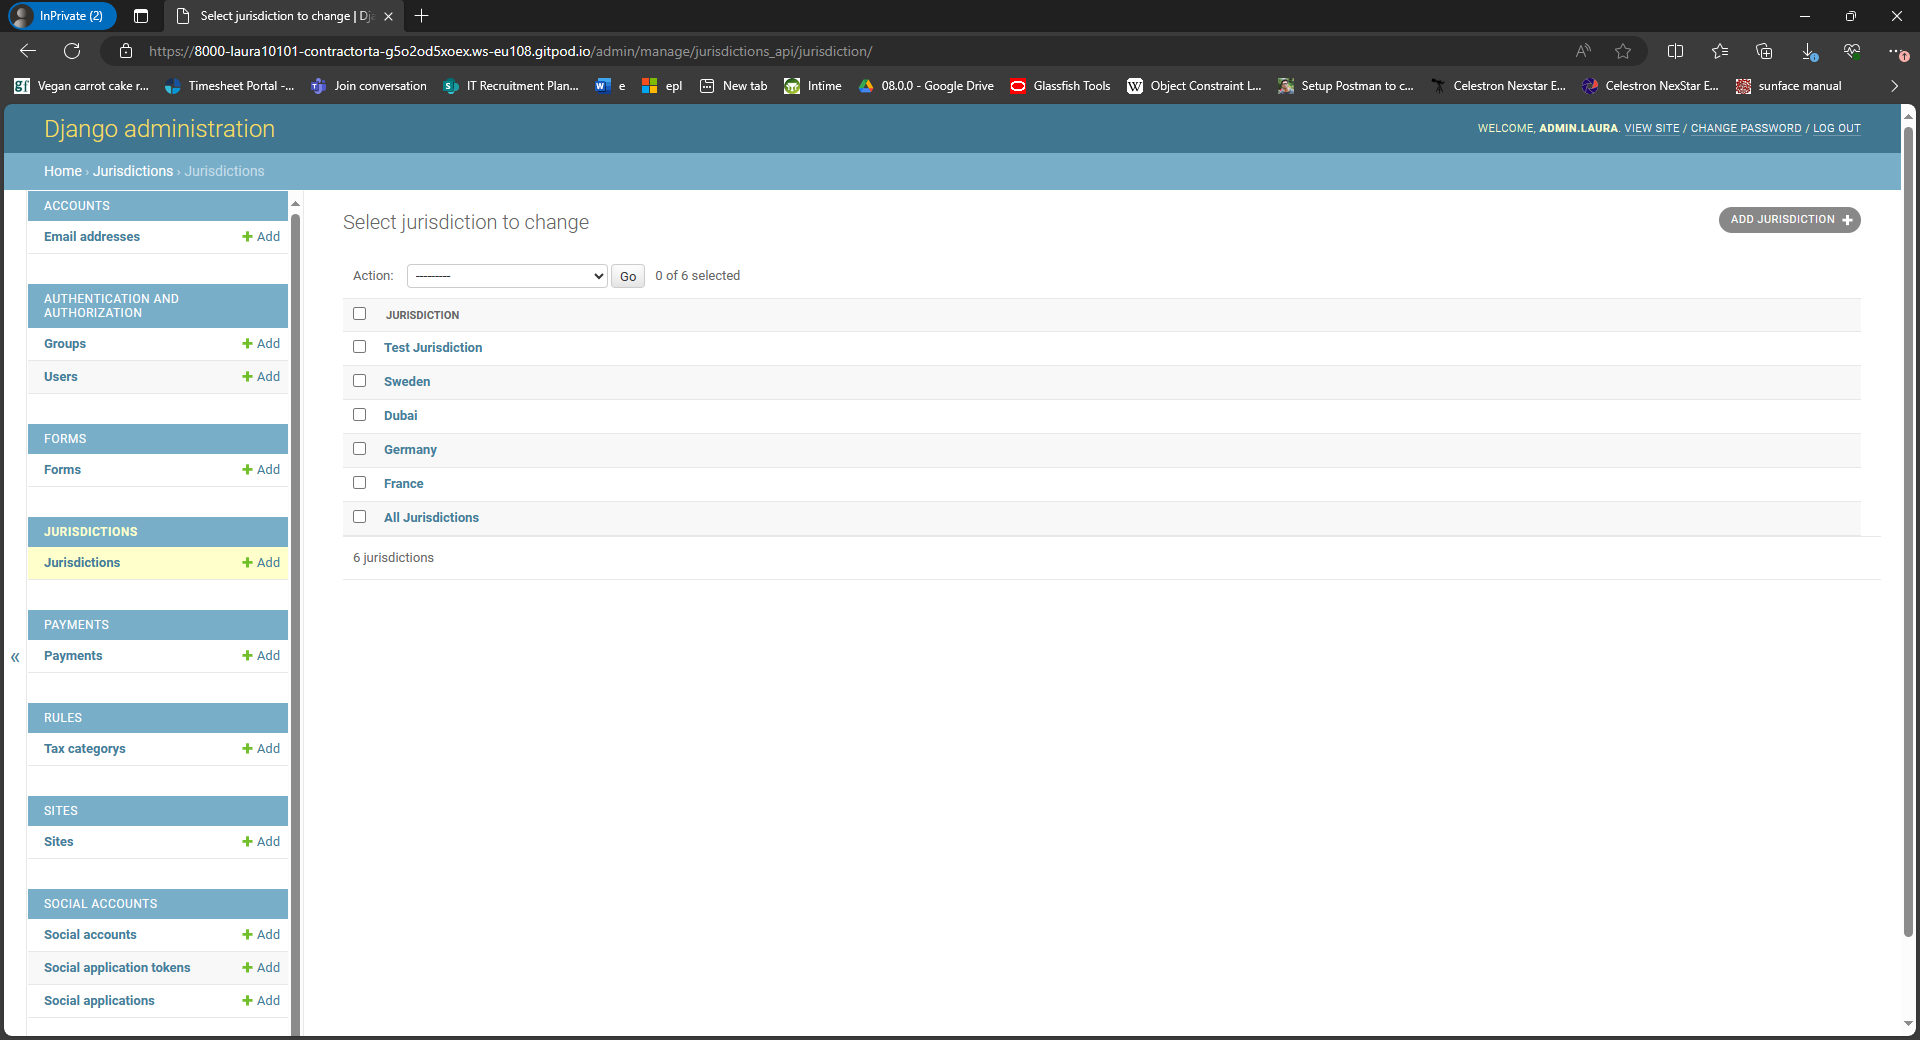
- From the basic admin app, the user can choose the "Jurisdictions" link on the left hand side. From here they can create, edit, and delete Jurisdictions.
-
Managing Tax Categories
- From the basic admin app, the user can choose the "Tax Categories" link on the left hand side. From here they can create, edit, and delete Tax Categories.
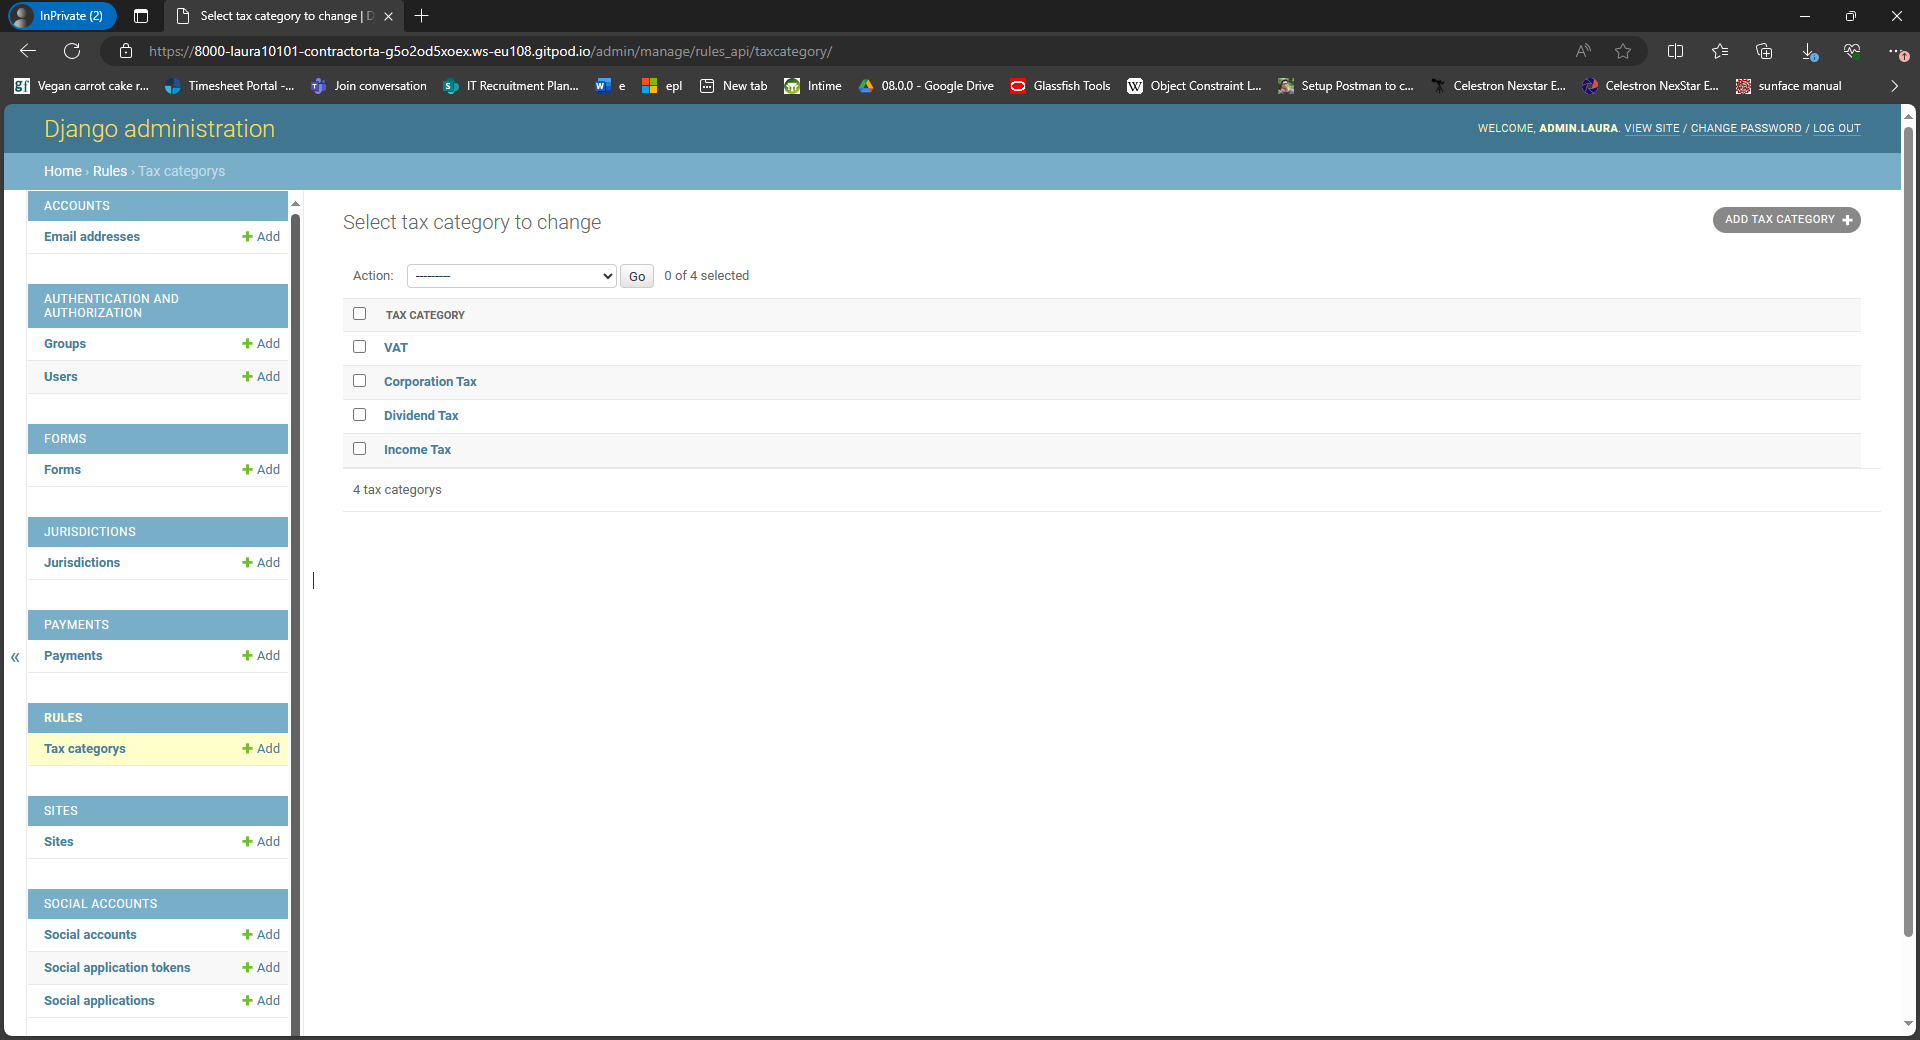
- From the basic admin app, the user can choose the "Tax Categories" link on the left hand side. From here they can create, edit, and delete Tax Categories.
-
Managing Subscriptions
- From the basic admin app, the user can choose the "Subscriptions" link on the left hand side. From here they can create, edit, and delete Subscriptions.
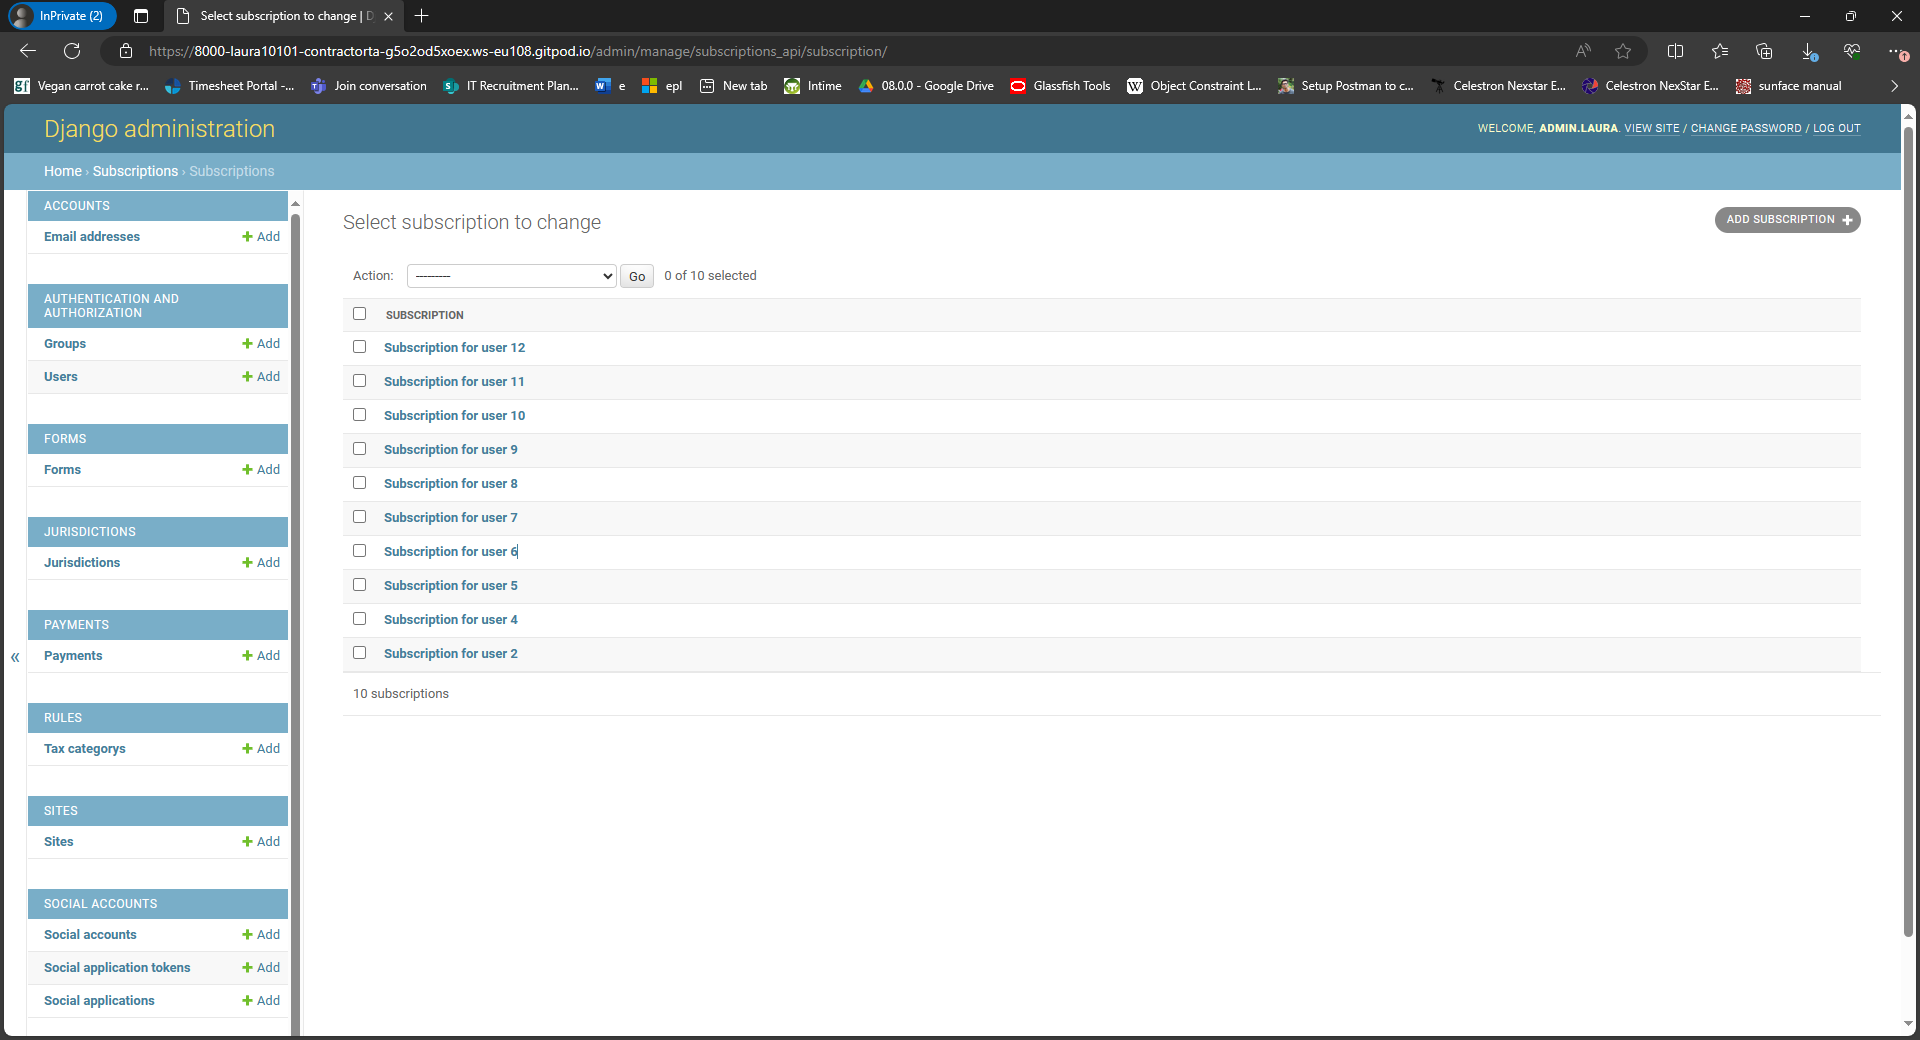
- From the basic admin app, the user can choose the "Subscriptions" link on the left hand side. From here they can create, edit, and delete Subscriptions.
-
Managing Payments
- From the basic admin app, the user can choose the "Payments" link on the left hand side. From here they can create, edit, and delete Payments.
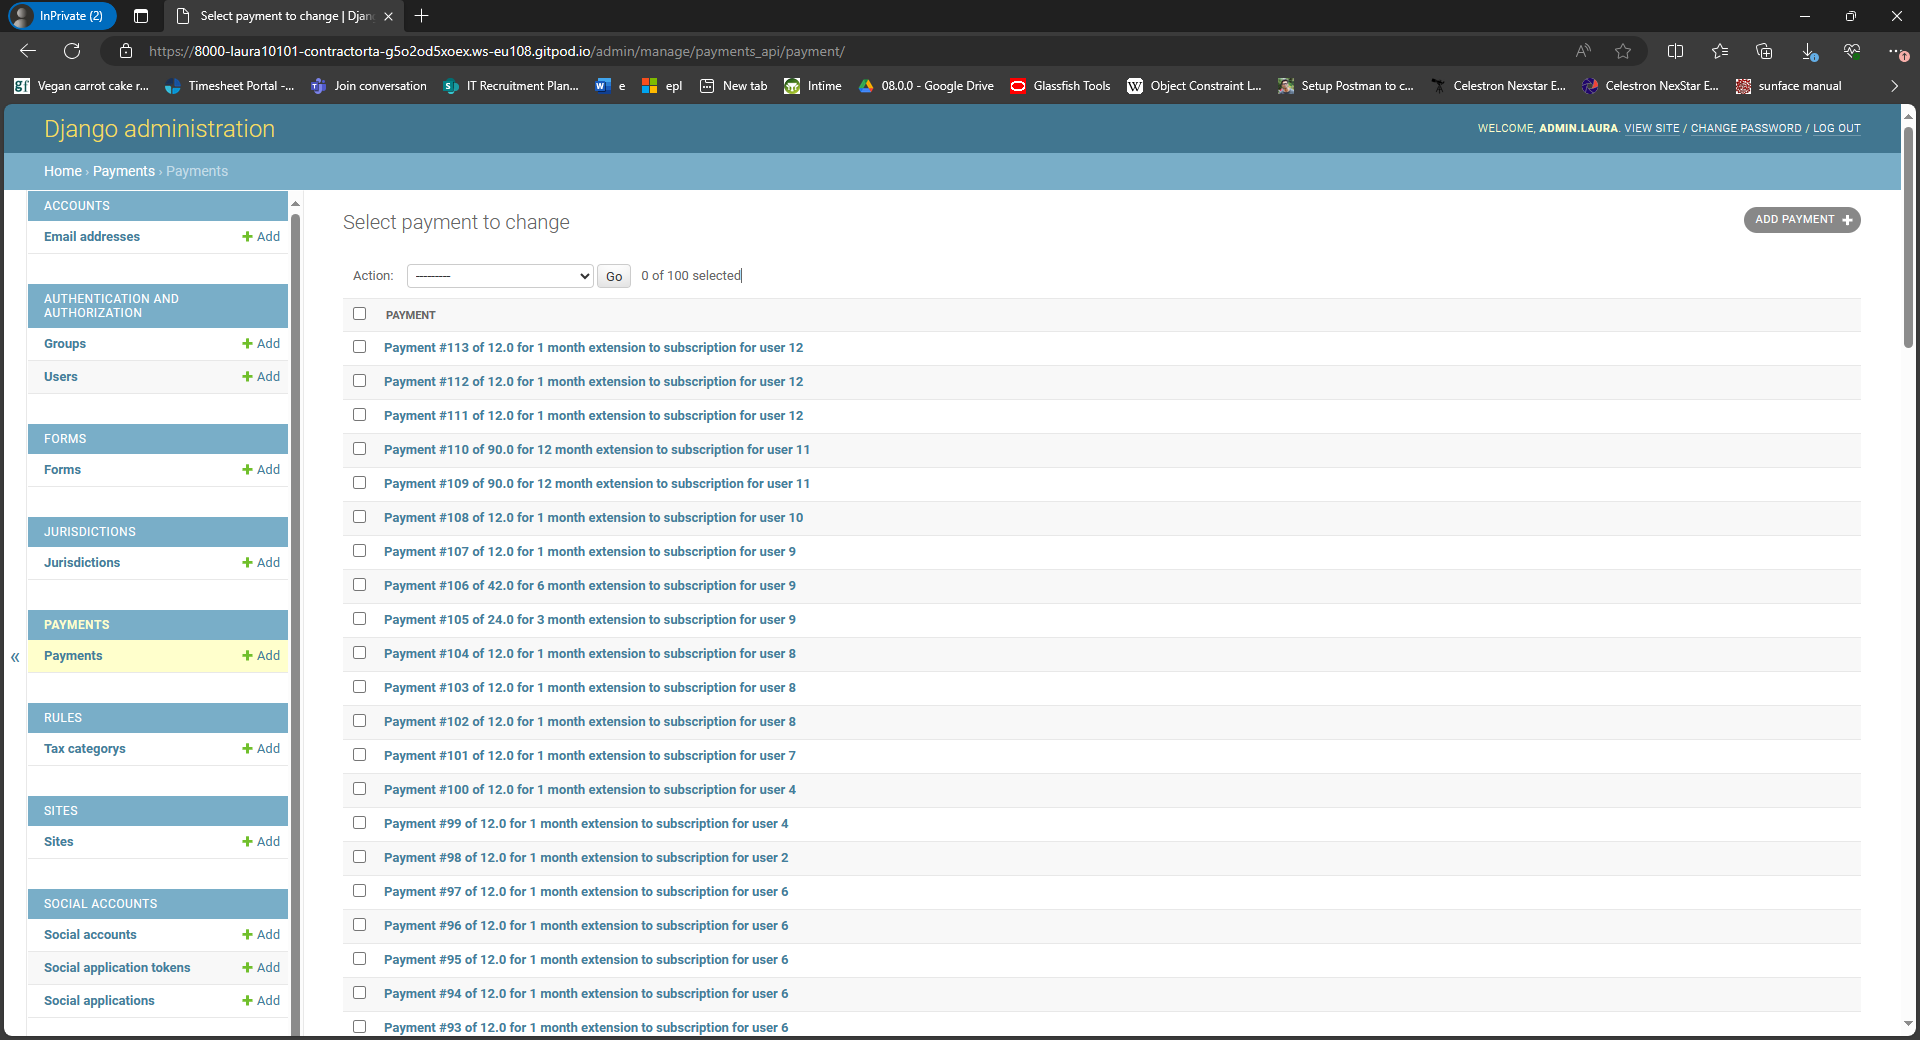
- From the basic admin app, the user can choose the "Payments" link on the left hand side. From here they can create, edit, and delete Payments.
-
Selecting Jurisdictions in the Config App
- The select box at the top of the Config app allows the user to choose the jurisdiction for which they wish to manage rules and questions.
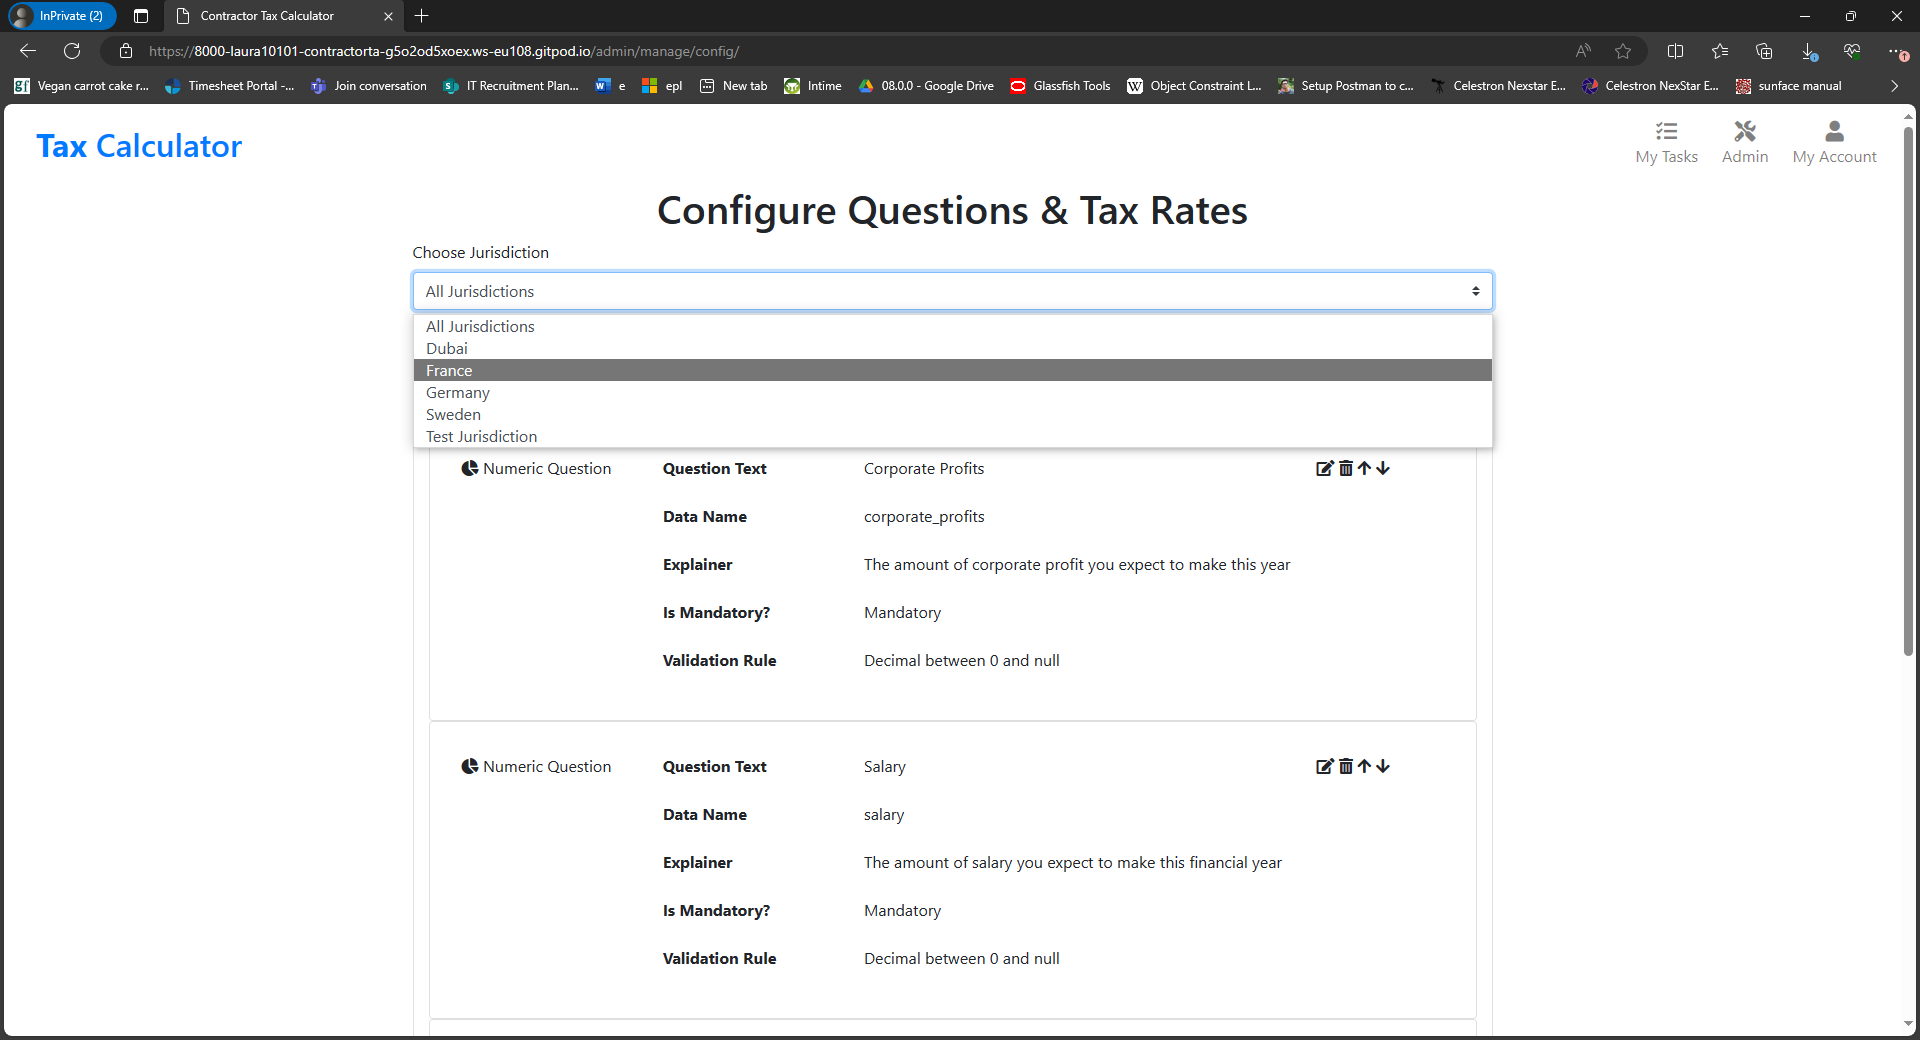
- The select box at the top of the Config app allows the user to choose the jurisdiction for which they wish to manage rules and questions.
-
The Question Display
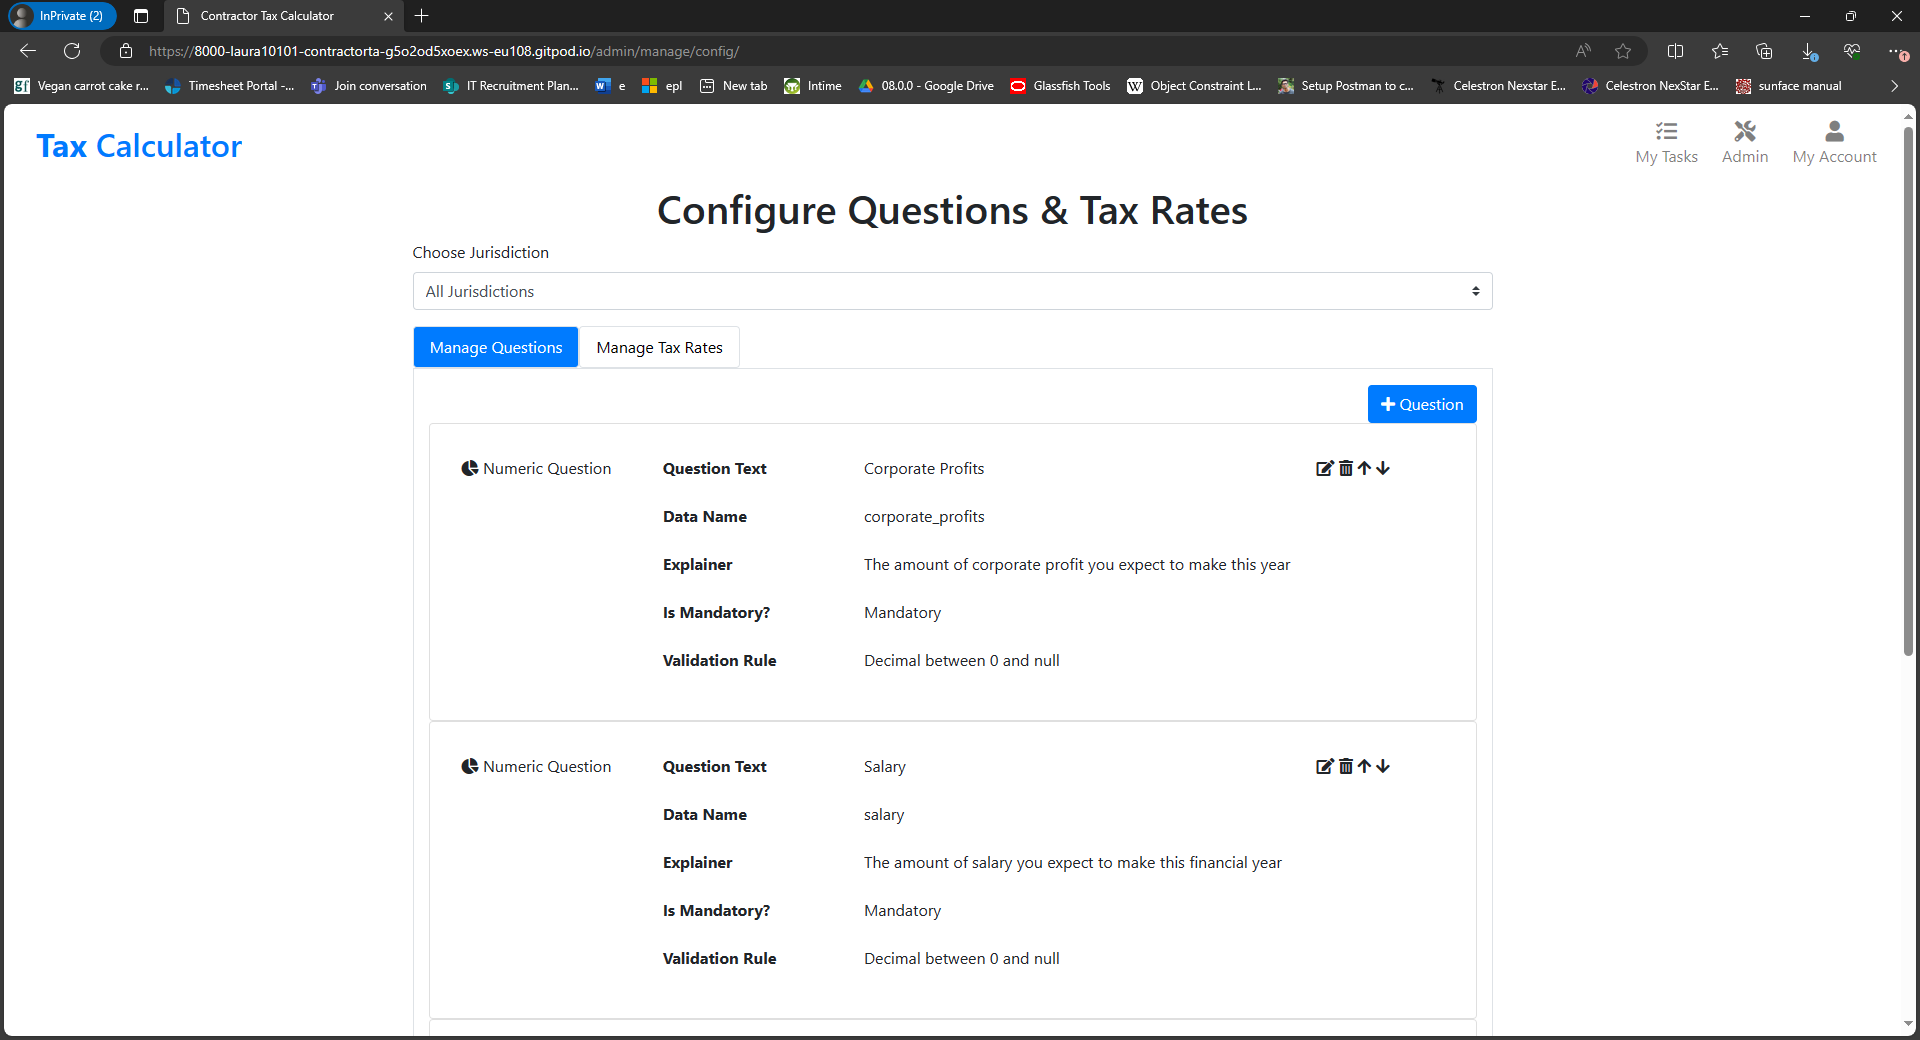
- The config app clearly displays a list of all questions for the selected jurisdiction to the user.
- For each question, a summary of the question is displayed.
-
The Create Question journey
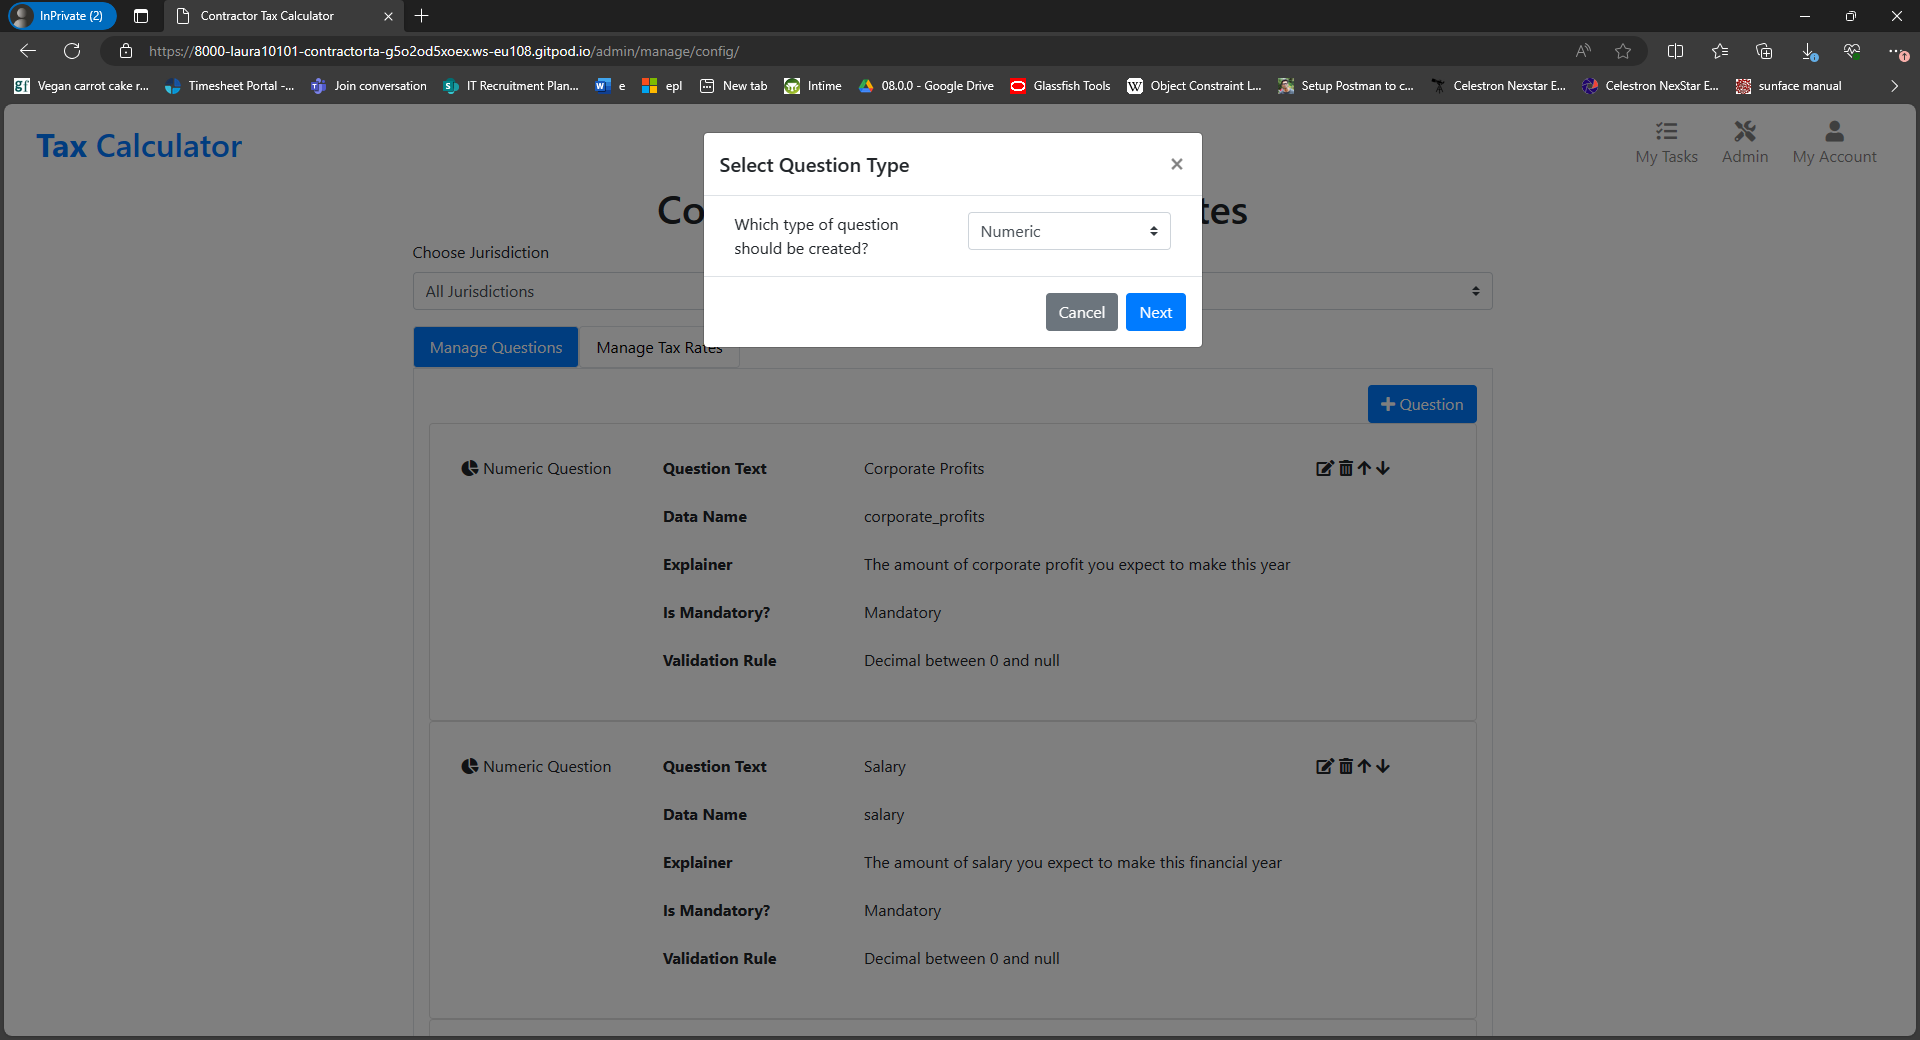
- To create a new question for the selected jurisdiction, the users first choose the type of question they wish to create.
- The user then fills out the Create Question form as instructed on screen and clicks "Save Changes".
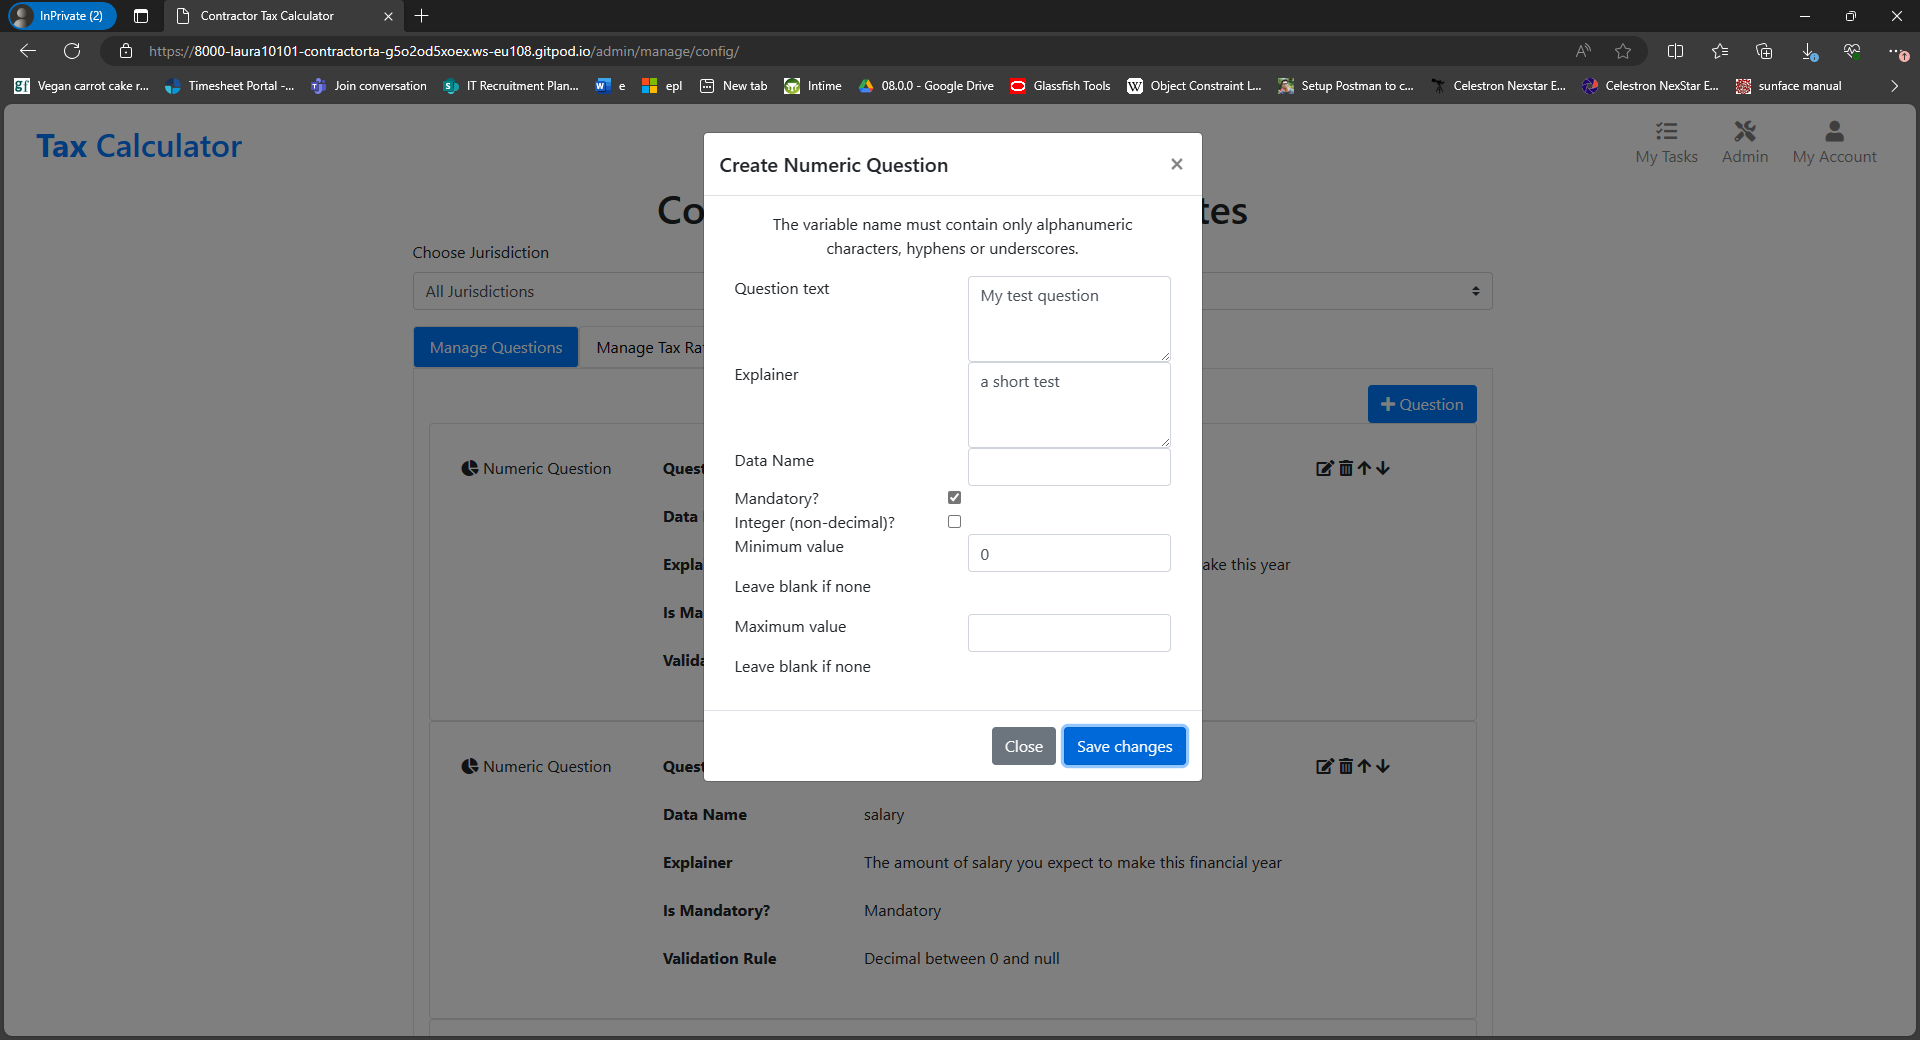
- A success message is displayed.
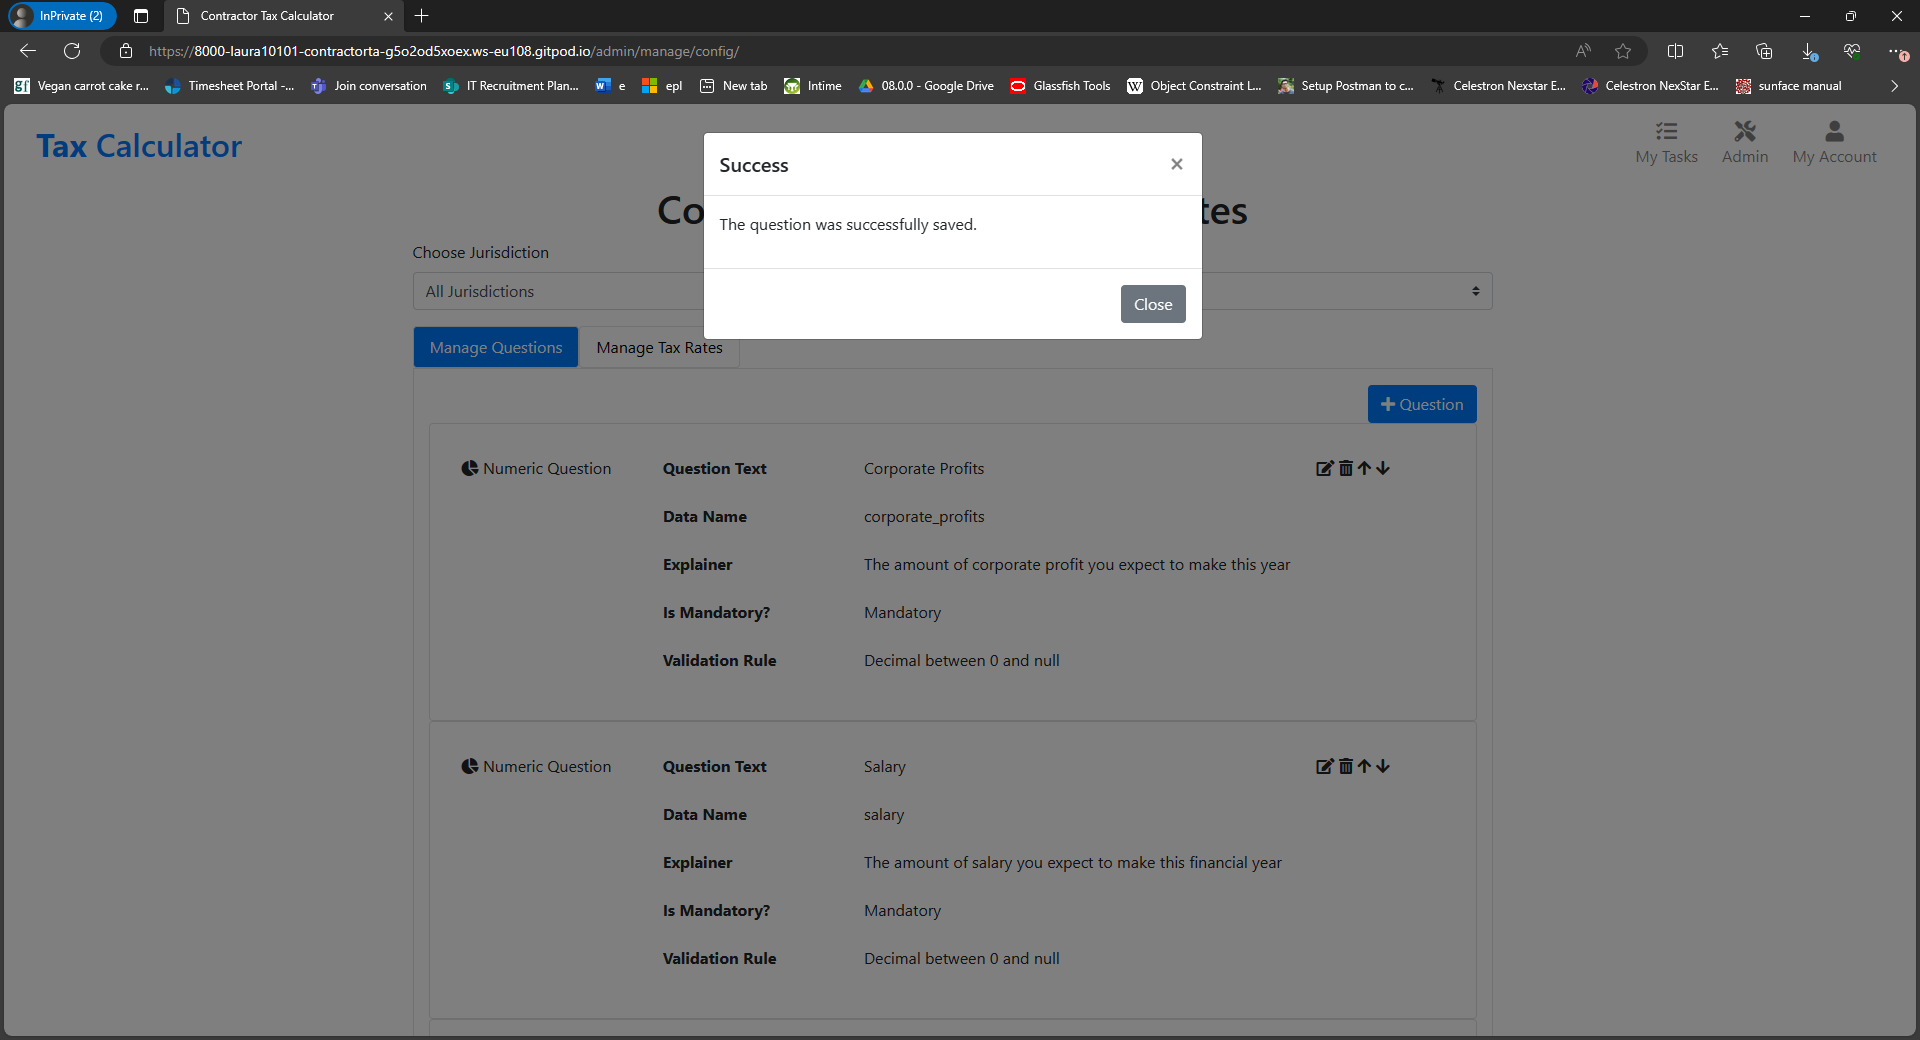
- The question is then displayed.
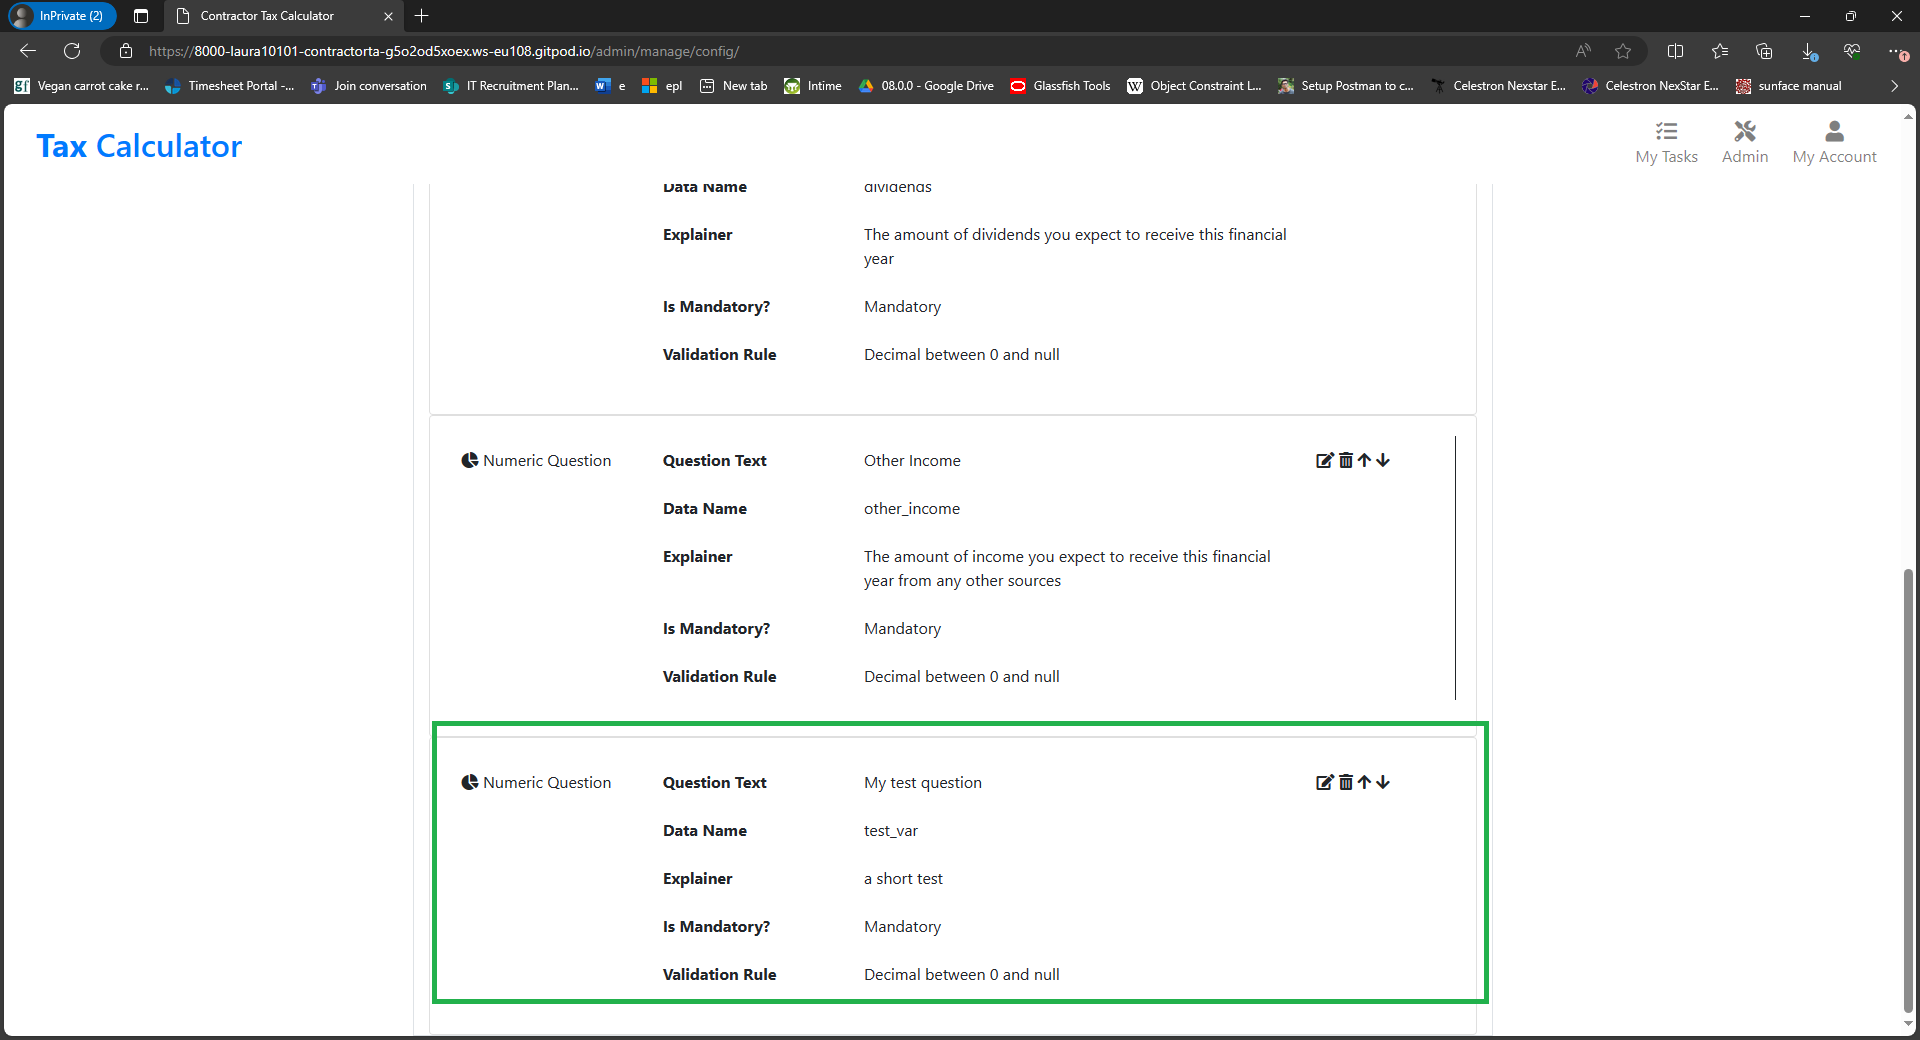
- To create a new question for the selected jurisdiction, the users first choose the type of question they wish to create.
-
The Edit Question journey
- To edit an existing question, the user selects the Edit button next to a question and then completes the form that is displayed.
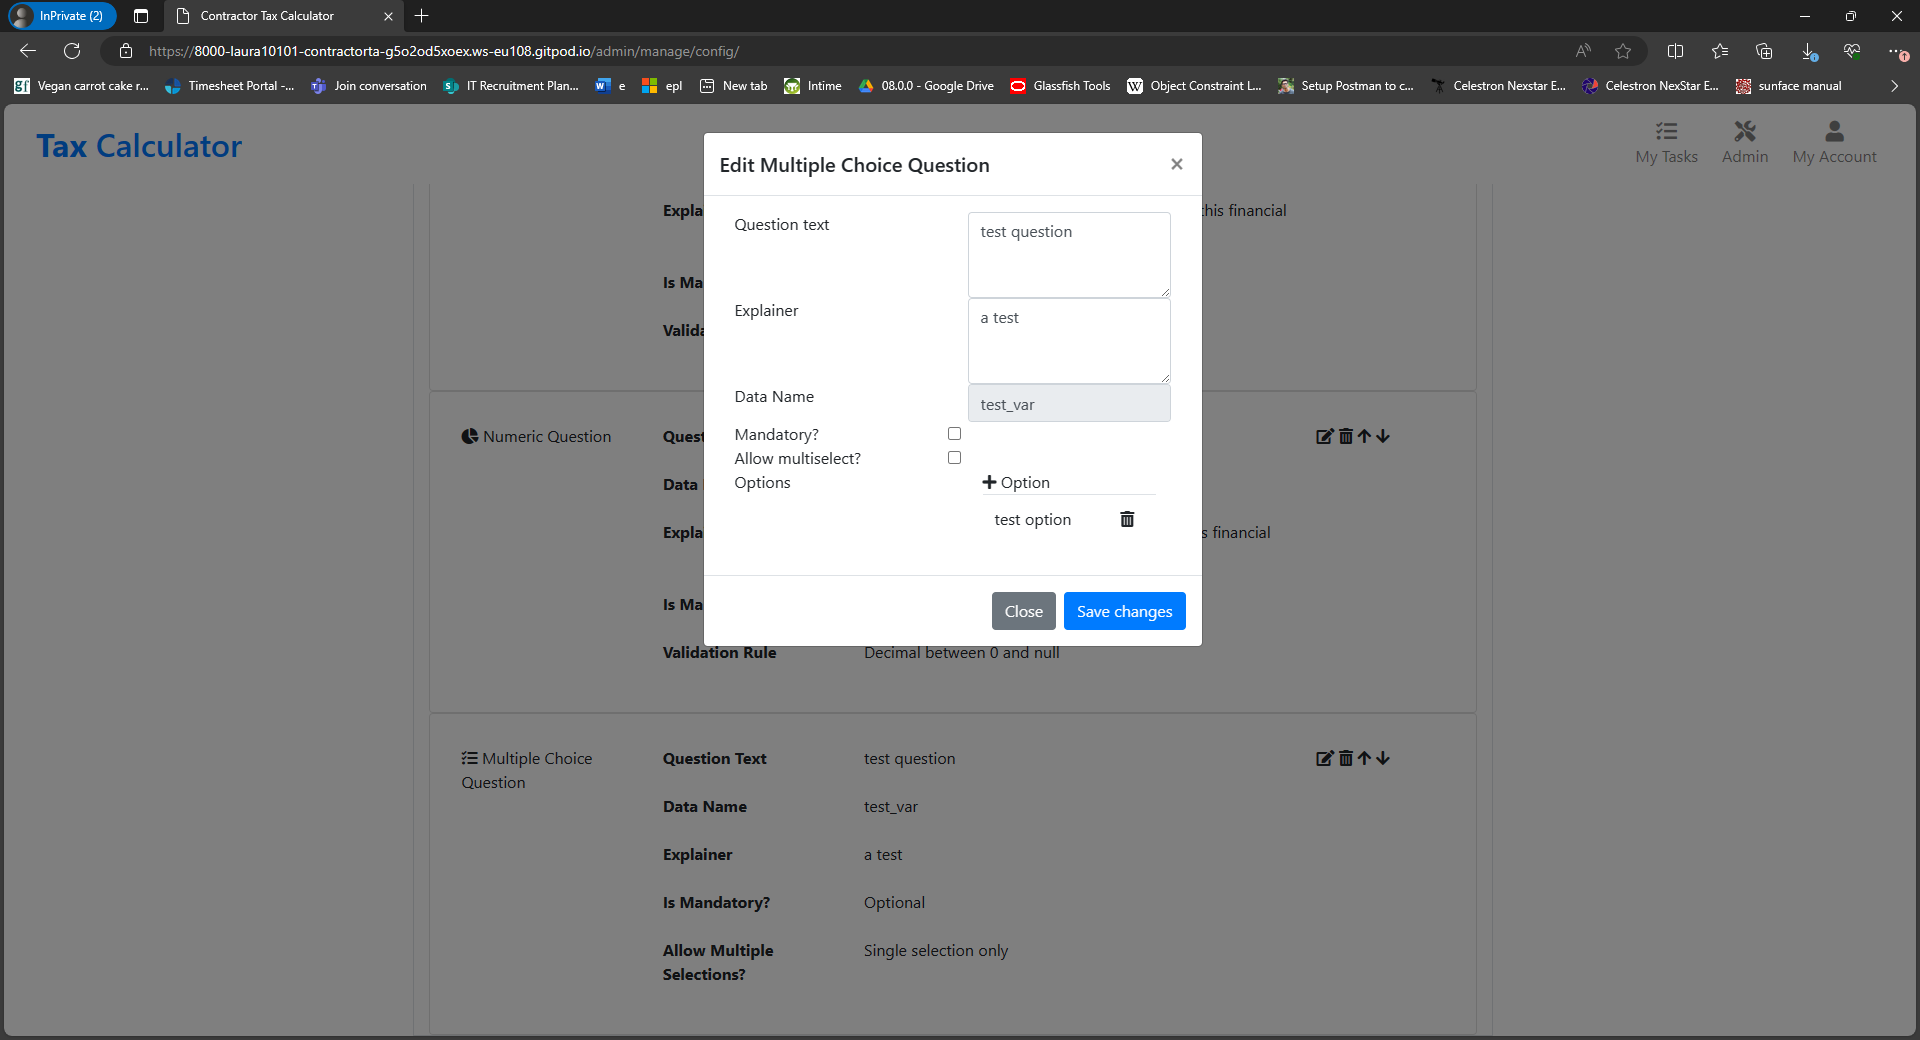
- A success message is then displayed.
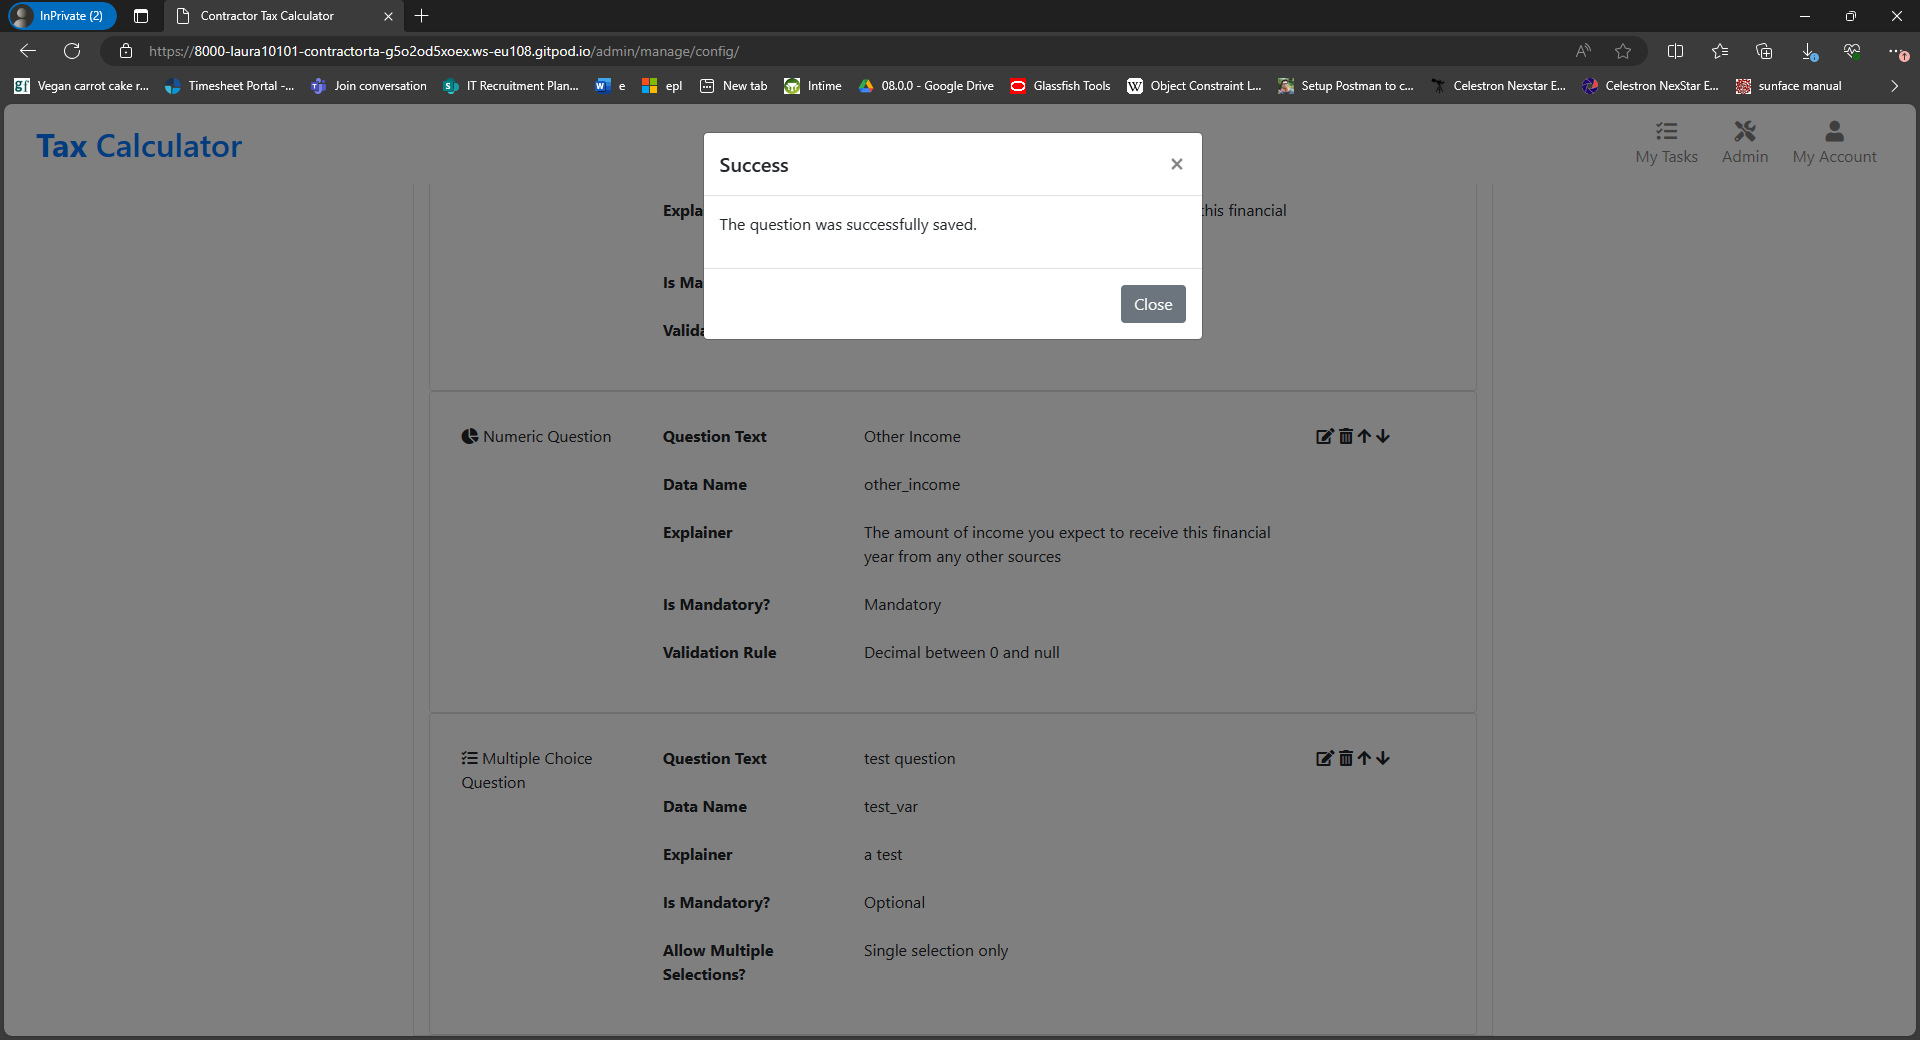
- The updated question is displayed.
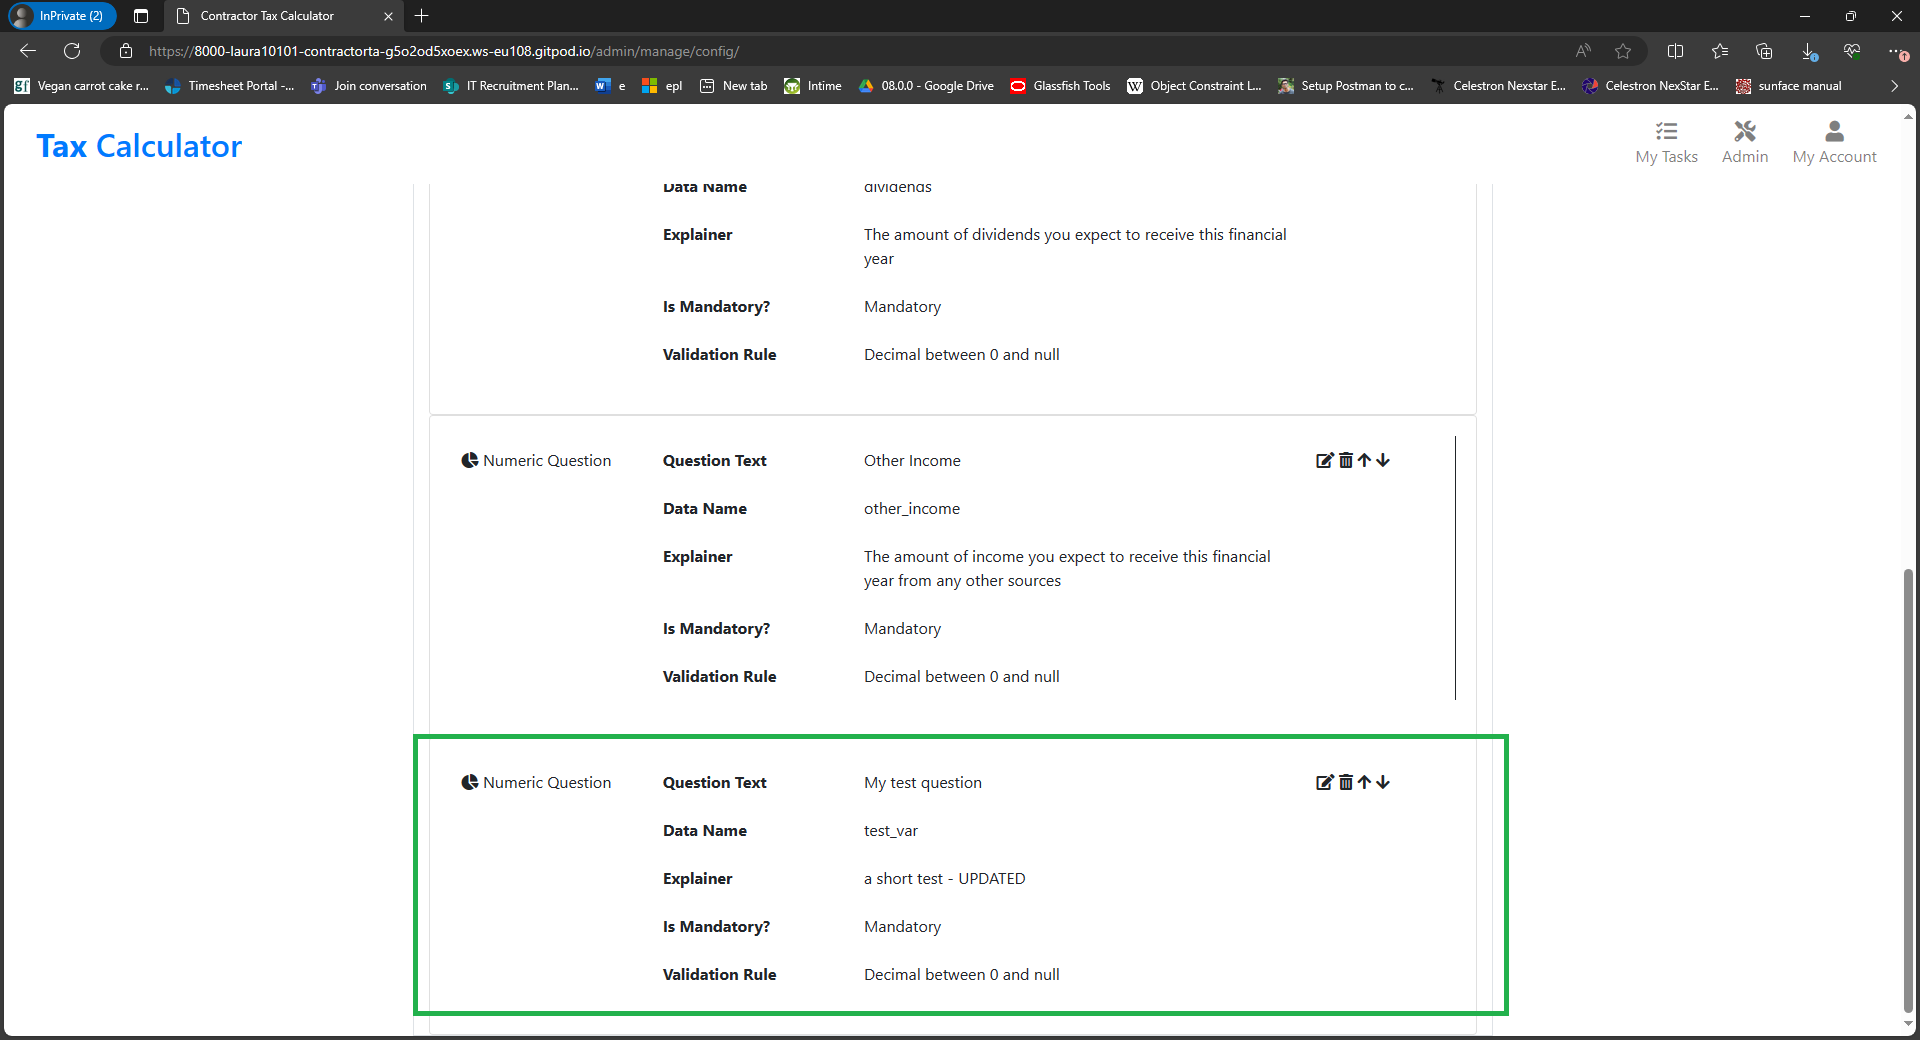
- To edit an existing question, the user selects the Edit button next to a question and then completes the form that is displayed.
-
Adding Multiple Choice Options
- To add a multiple choice option, the user must first select to edit a multiple choice question from the Questions display, as described above.
- Multiple choice options can only be added when the question is being edited (not created).
- Click the Add Option button at the bottom of the
Multiple Choice Questionform.
- Complete the form that is displayed and click Save Changes.
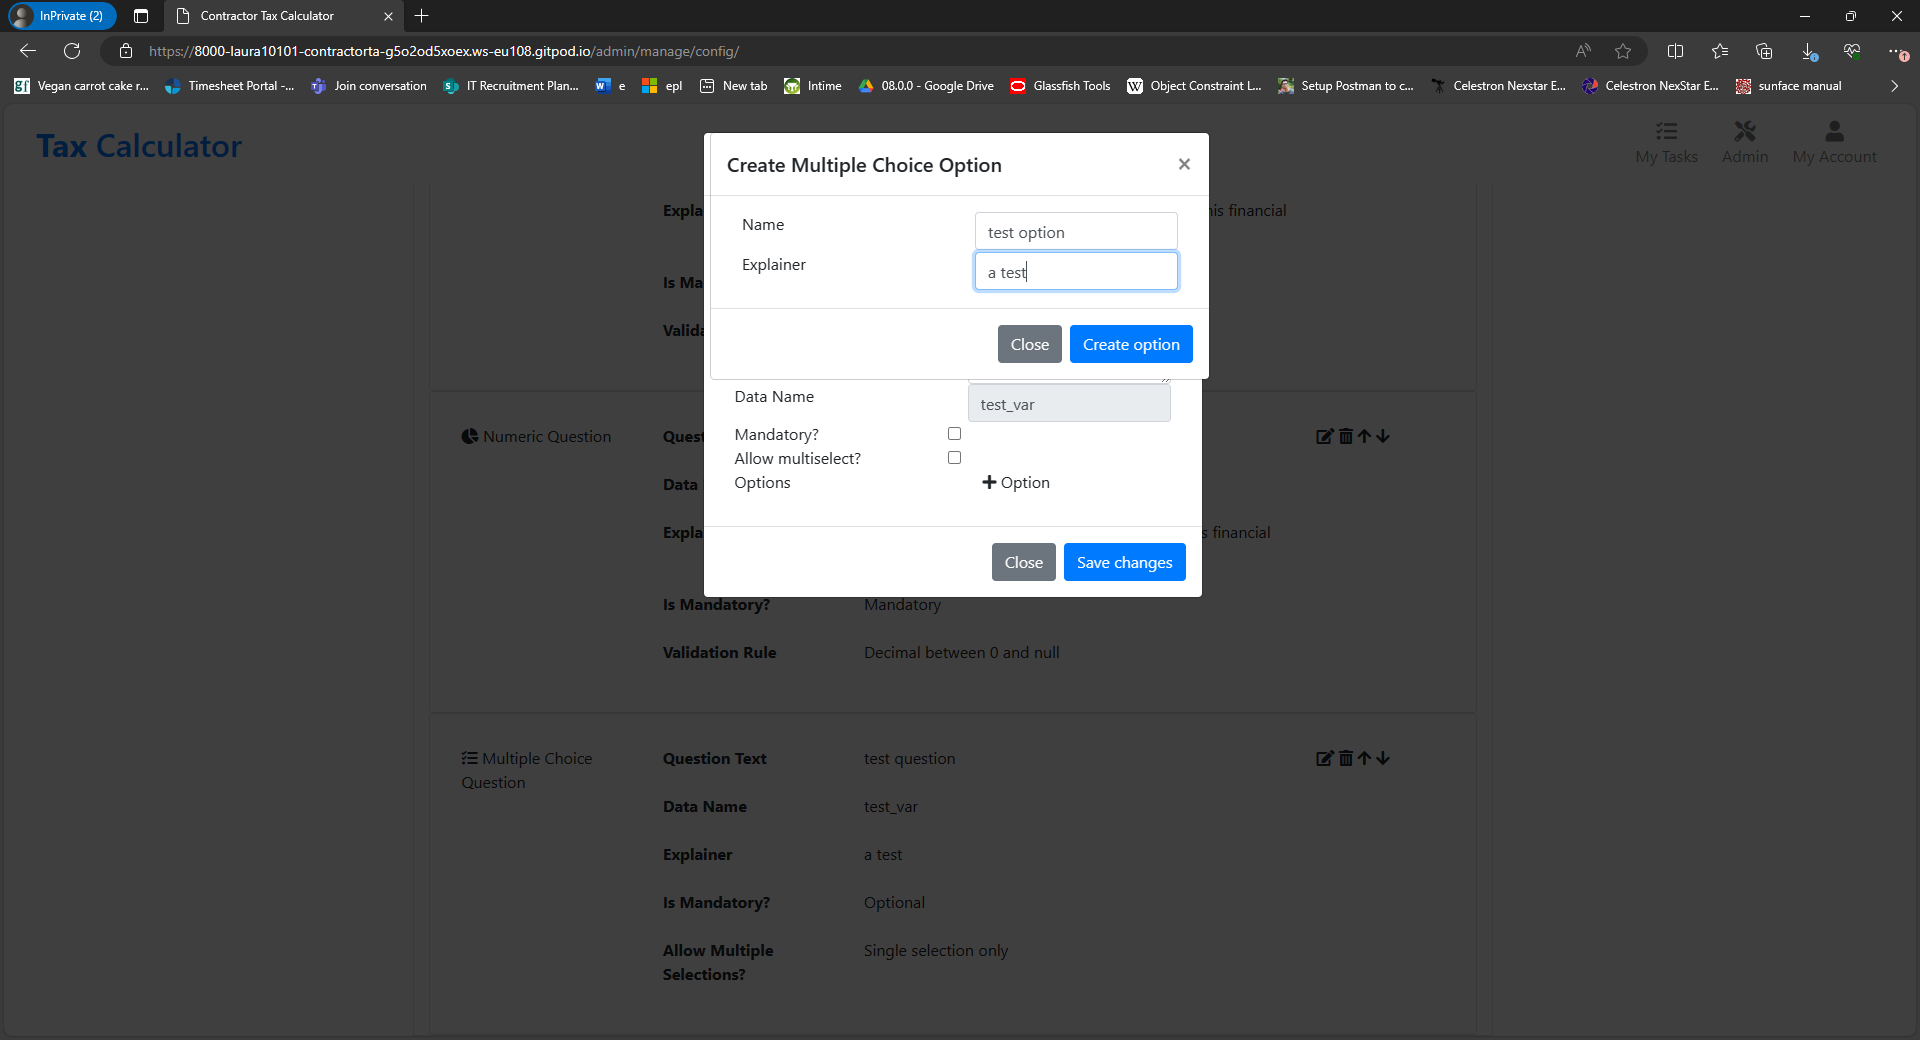
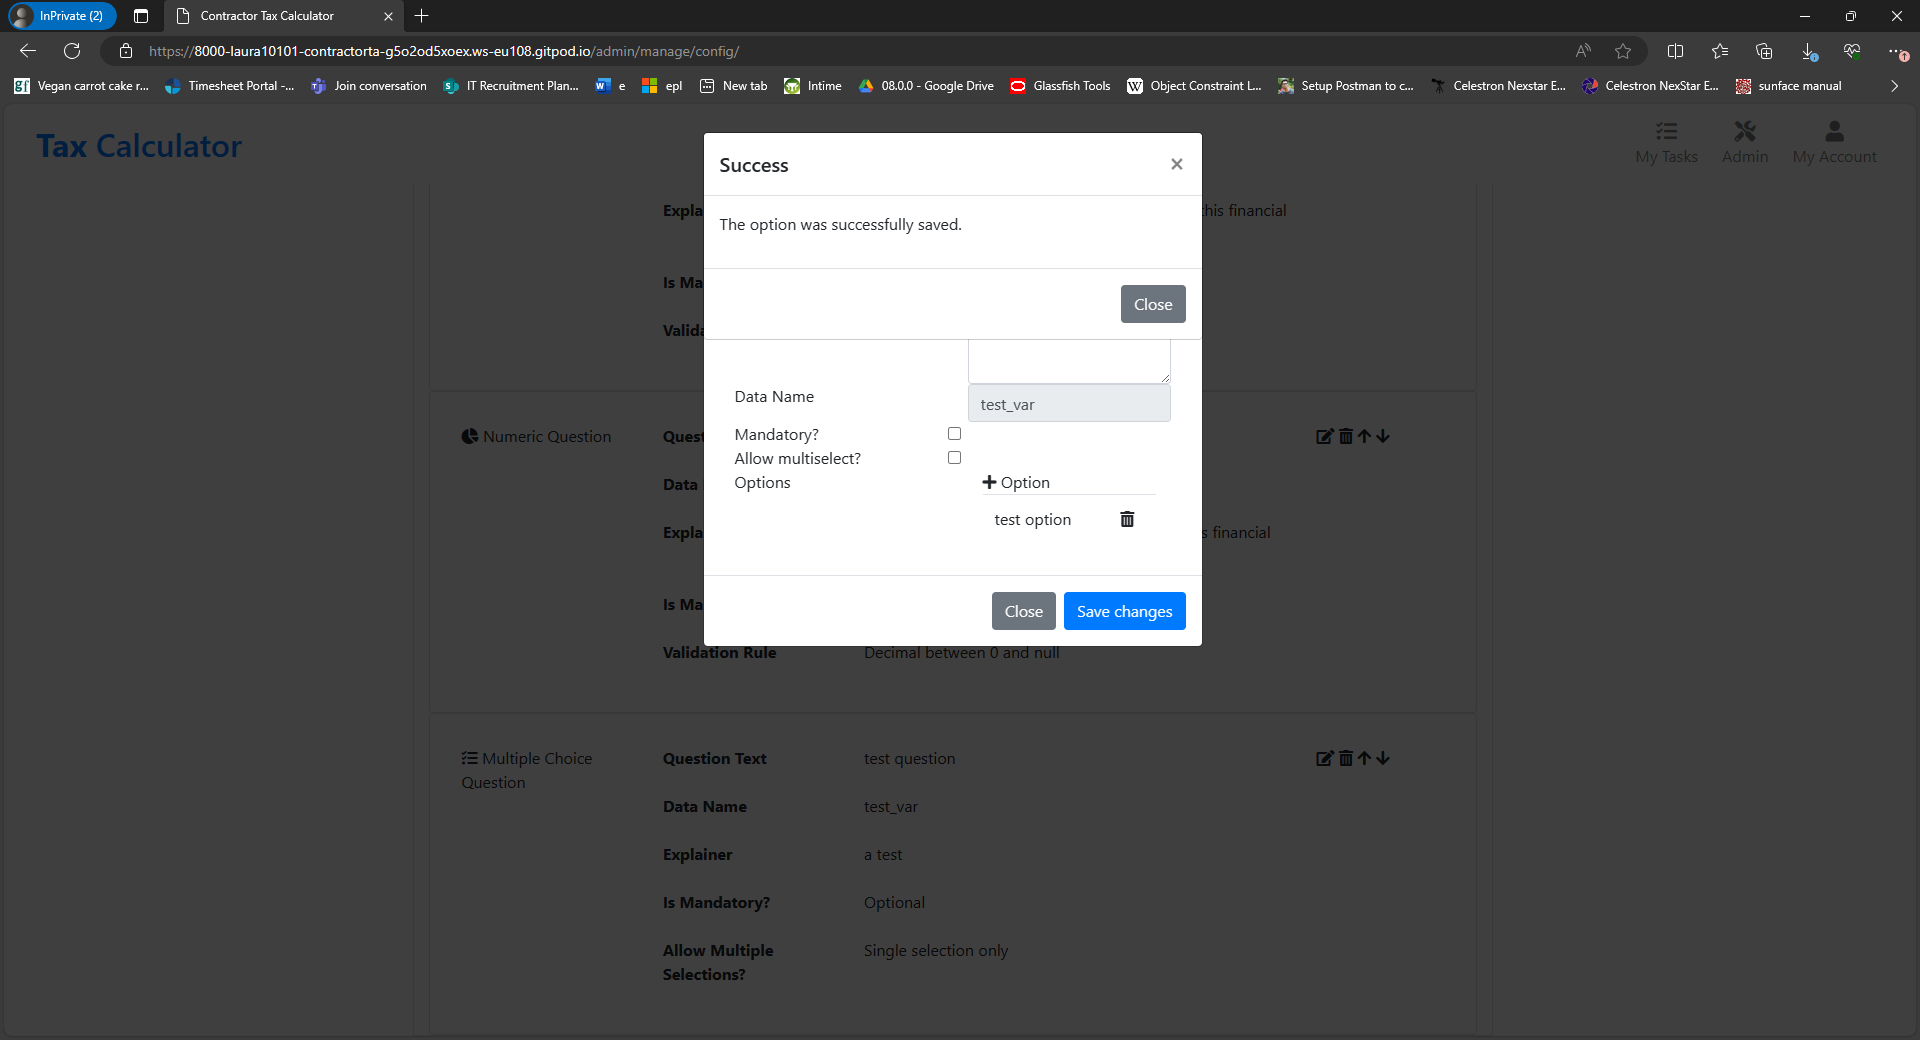
- A success message is displayed:
- The new option is displayed in the table on the
Edit Questionpage.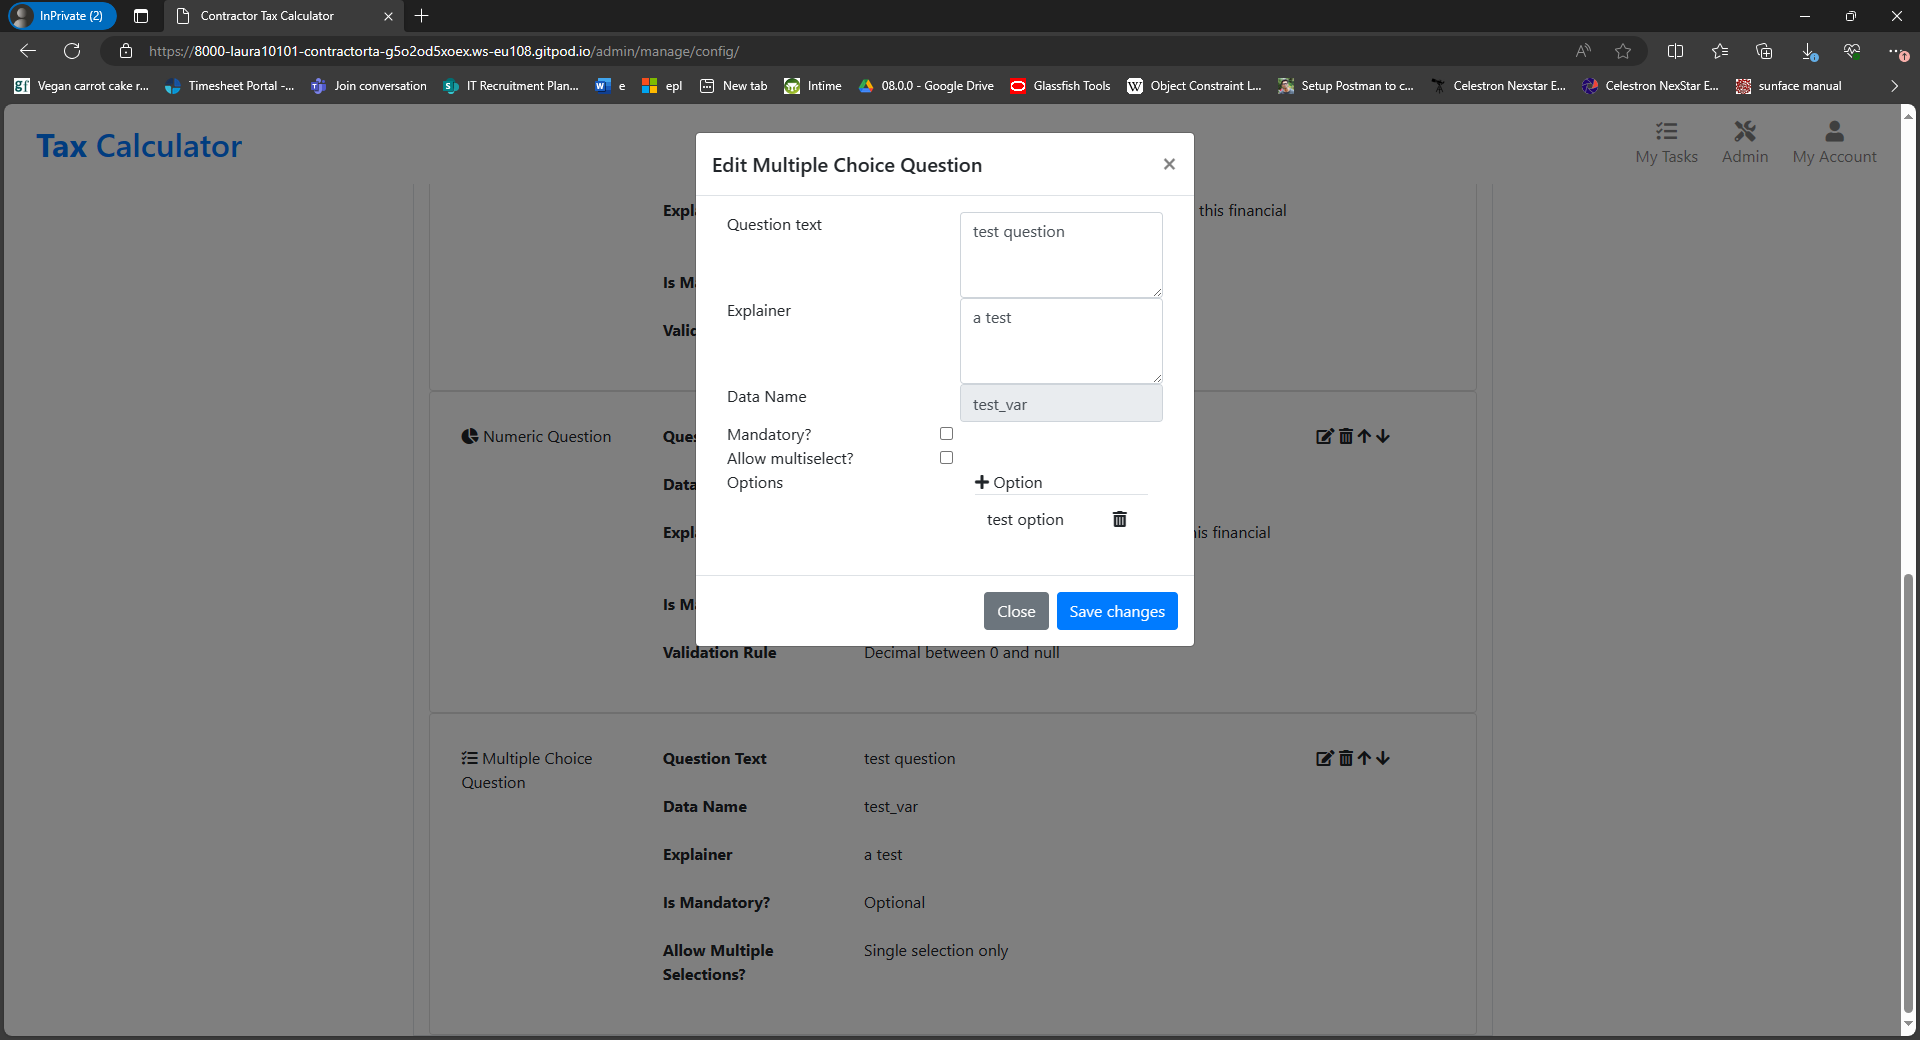
-
Reordering Questions
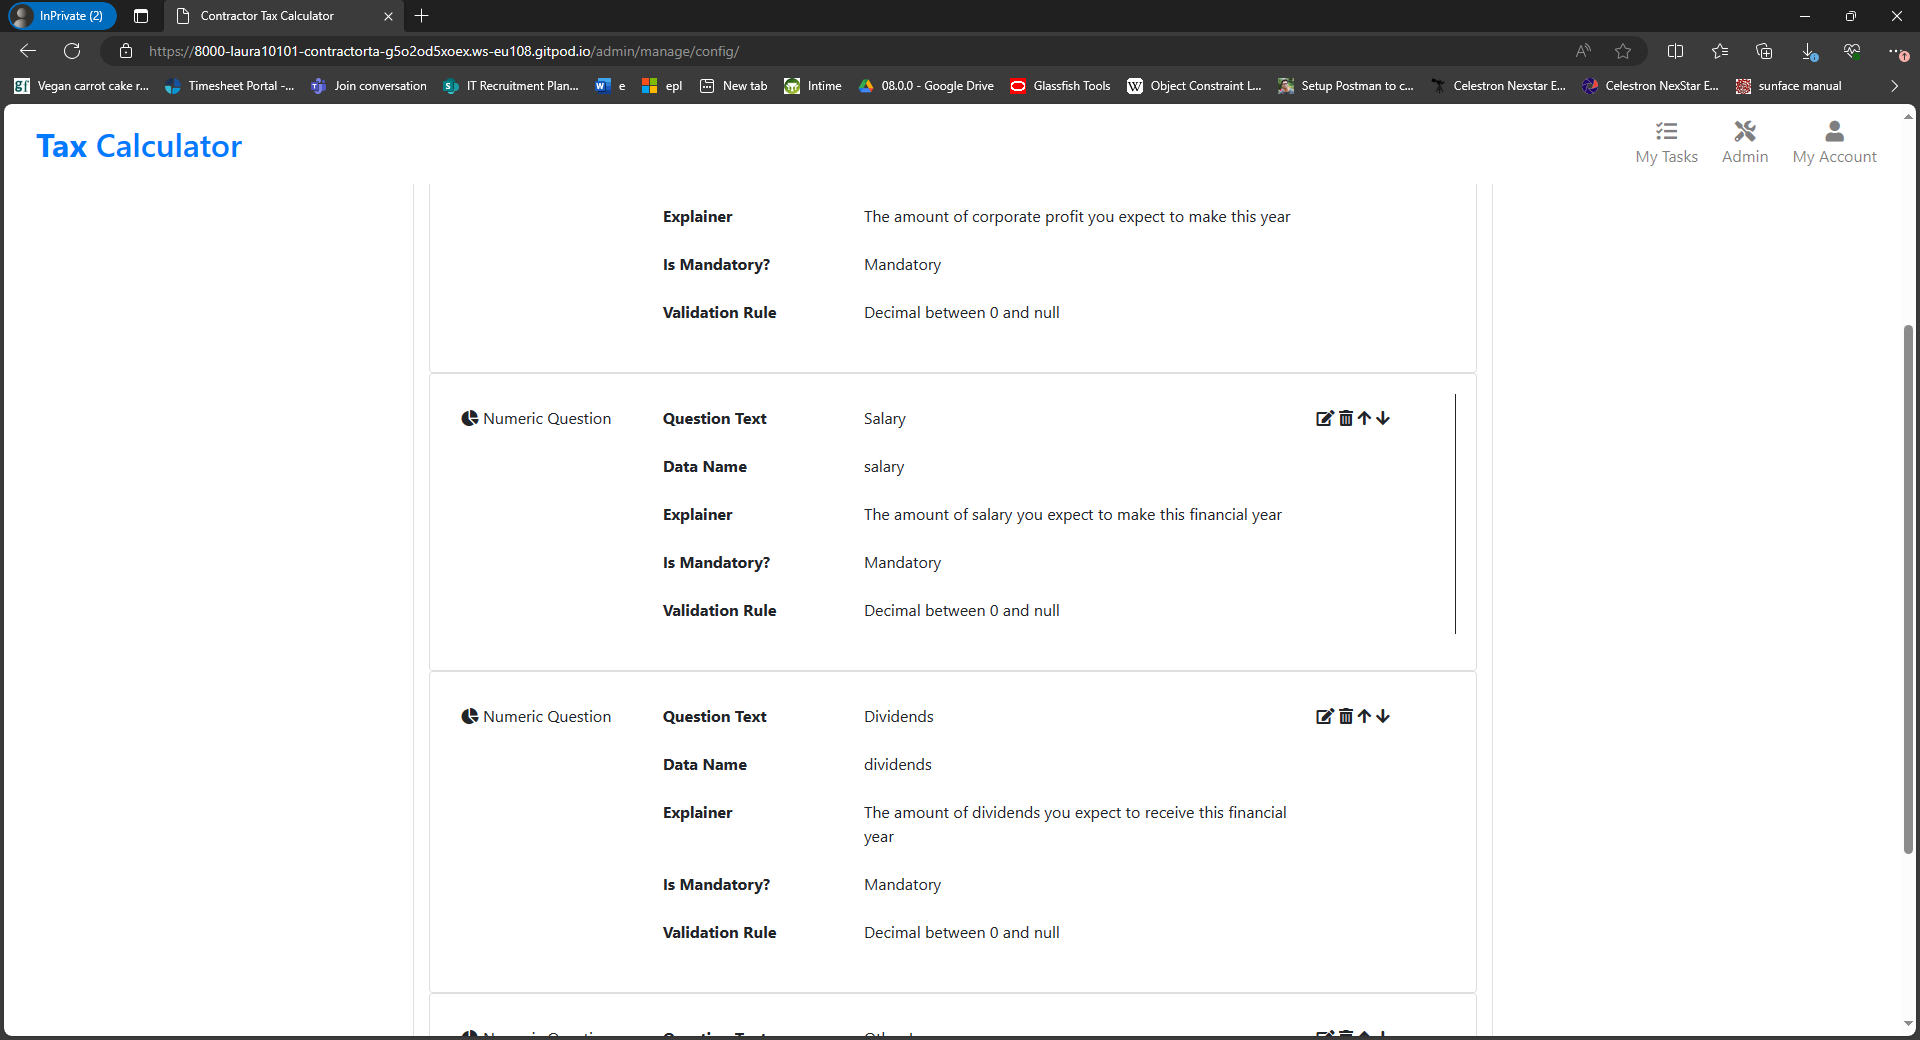
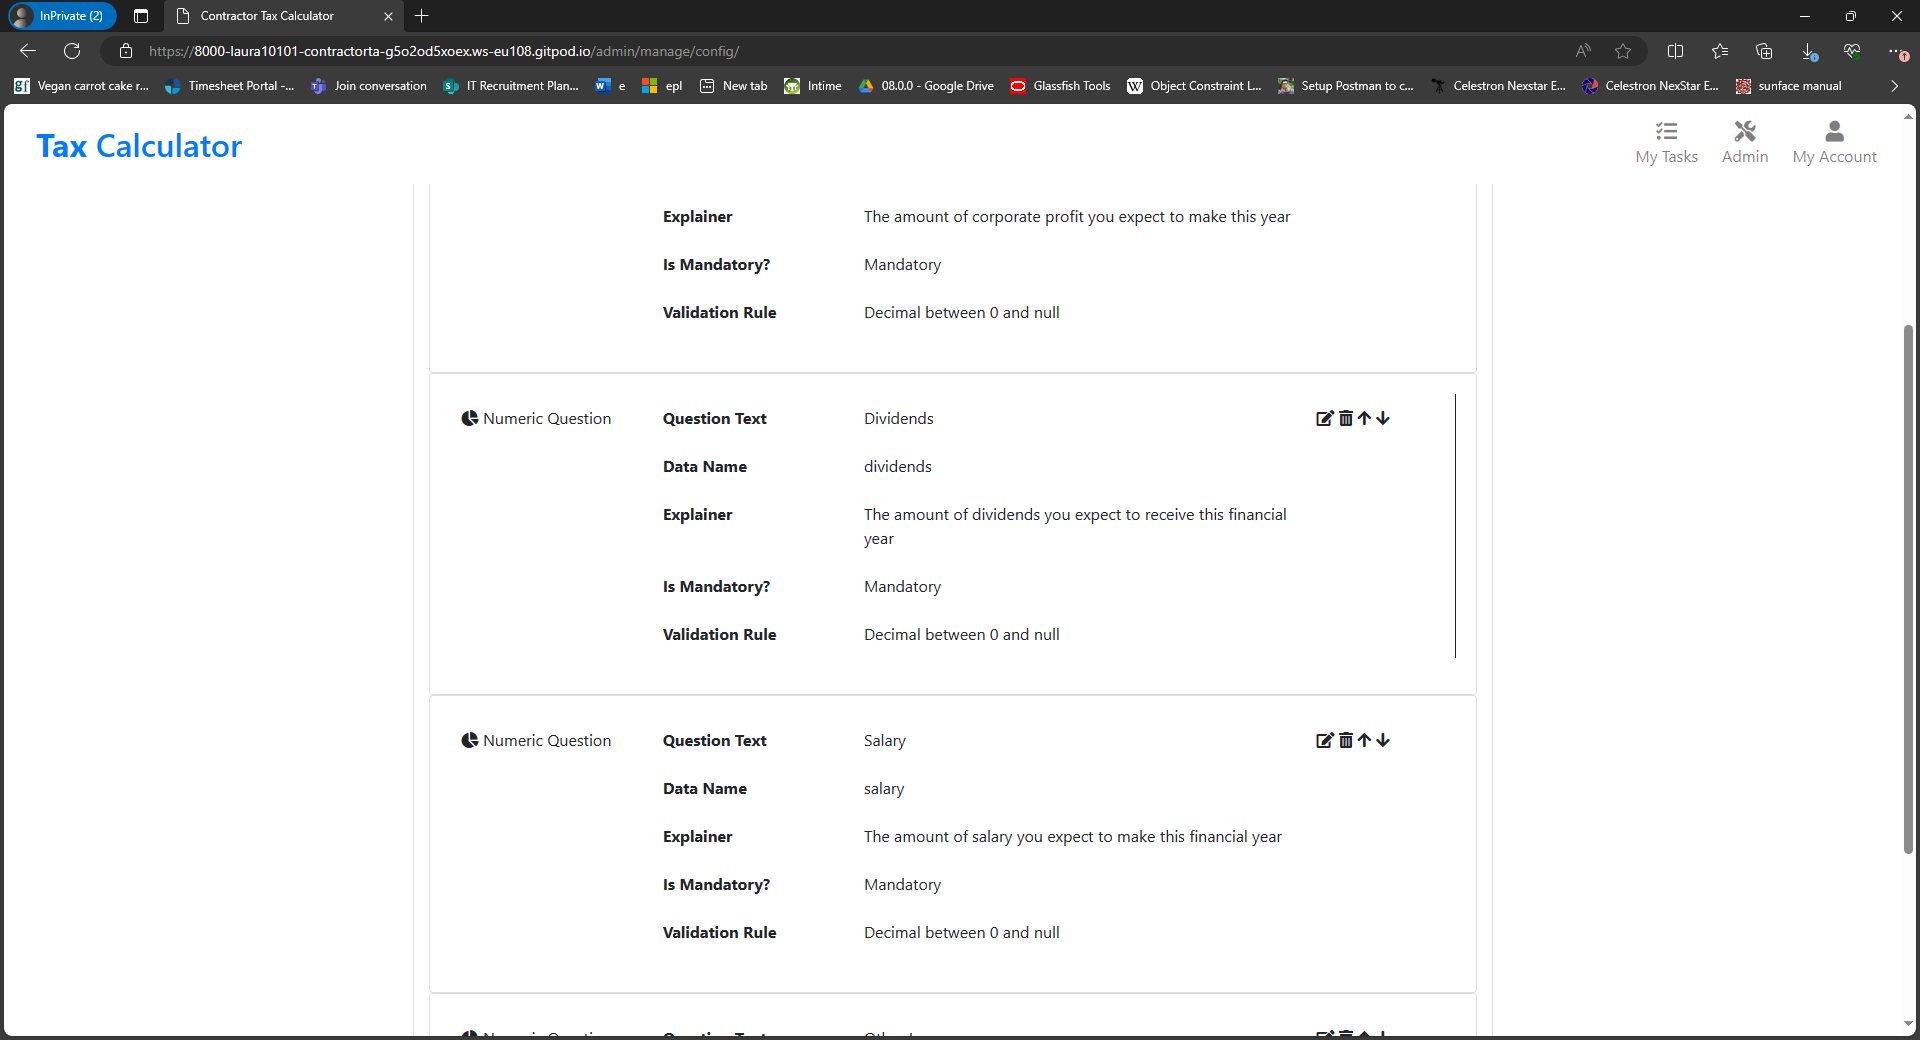
- To move questions up or down, the user clicks the Move Up or Move Down button next to a question.
- In the screenshot below, the Salary question preceeds the Dividends question.
- After clicking the Move Up button on Dividends, that question now comes first.
-
The Rulesets display
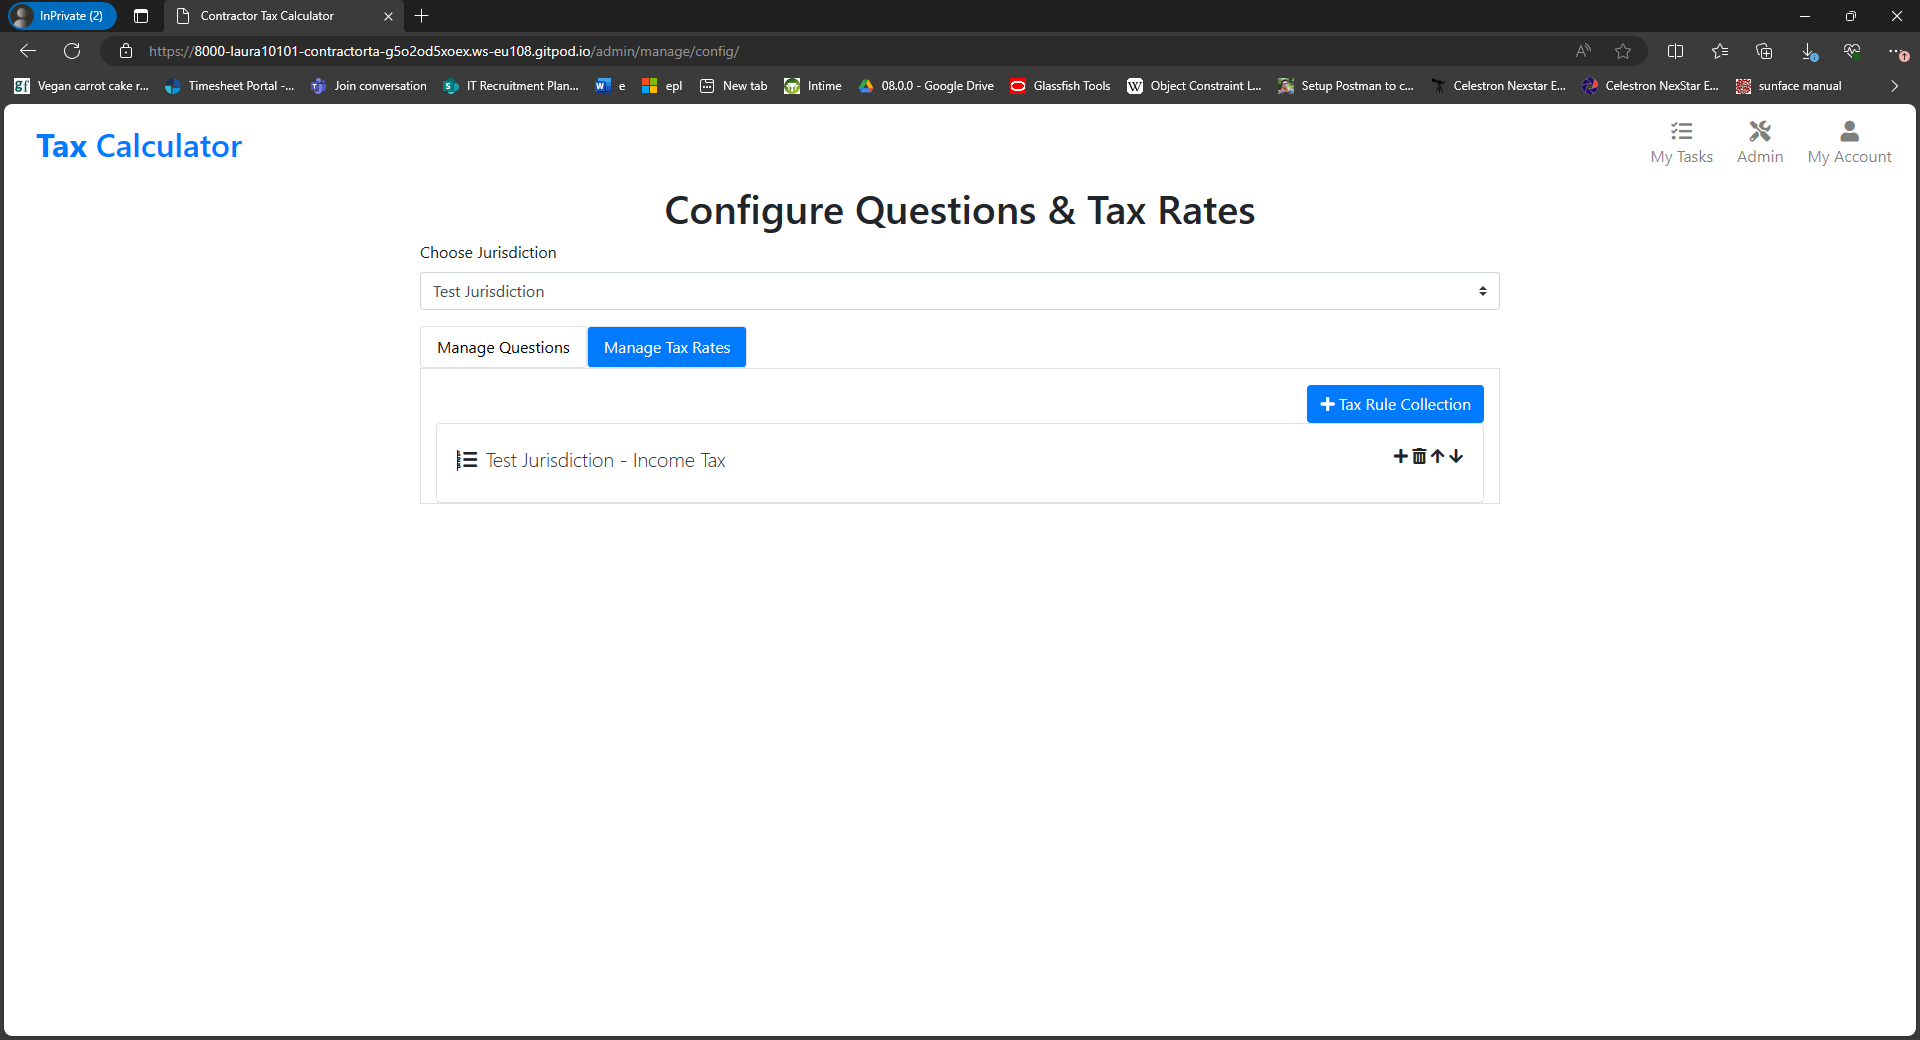
- The config app clearly displays all rulesets for the selected jurisdiction to the user.
- For each ruleset, the rules defined under that ruleset are also displayed.
-
The Create Ruleset journey
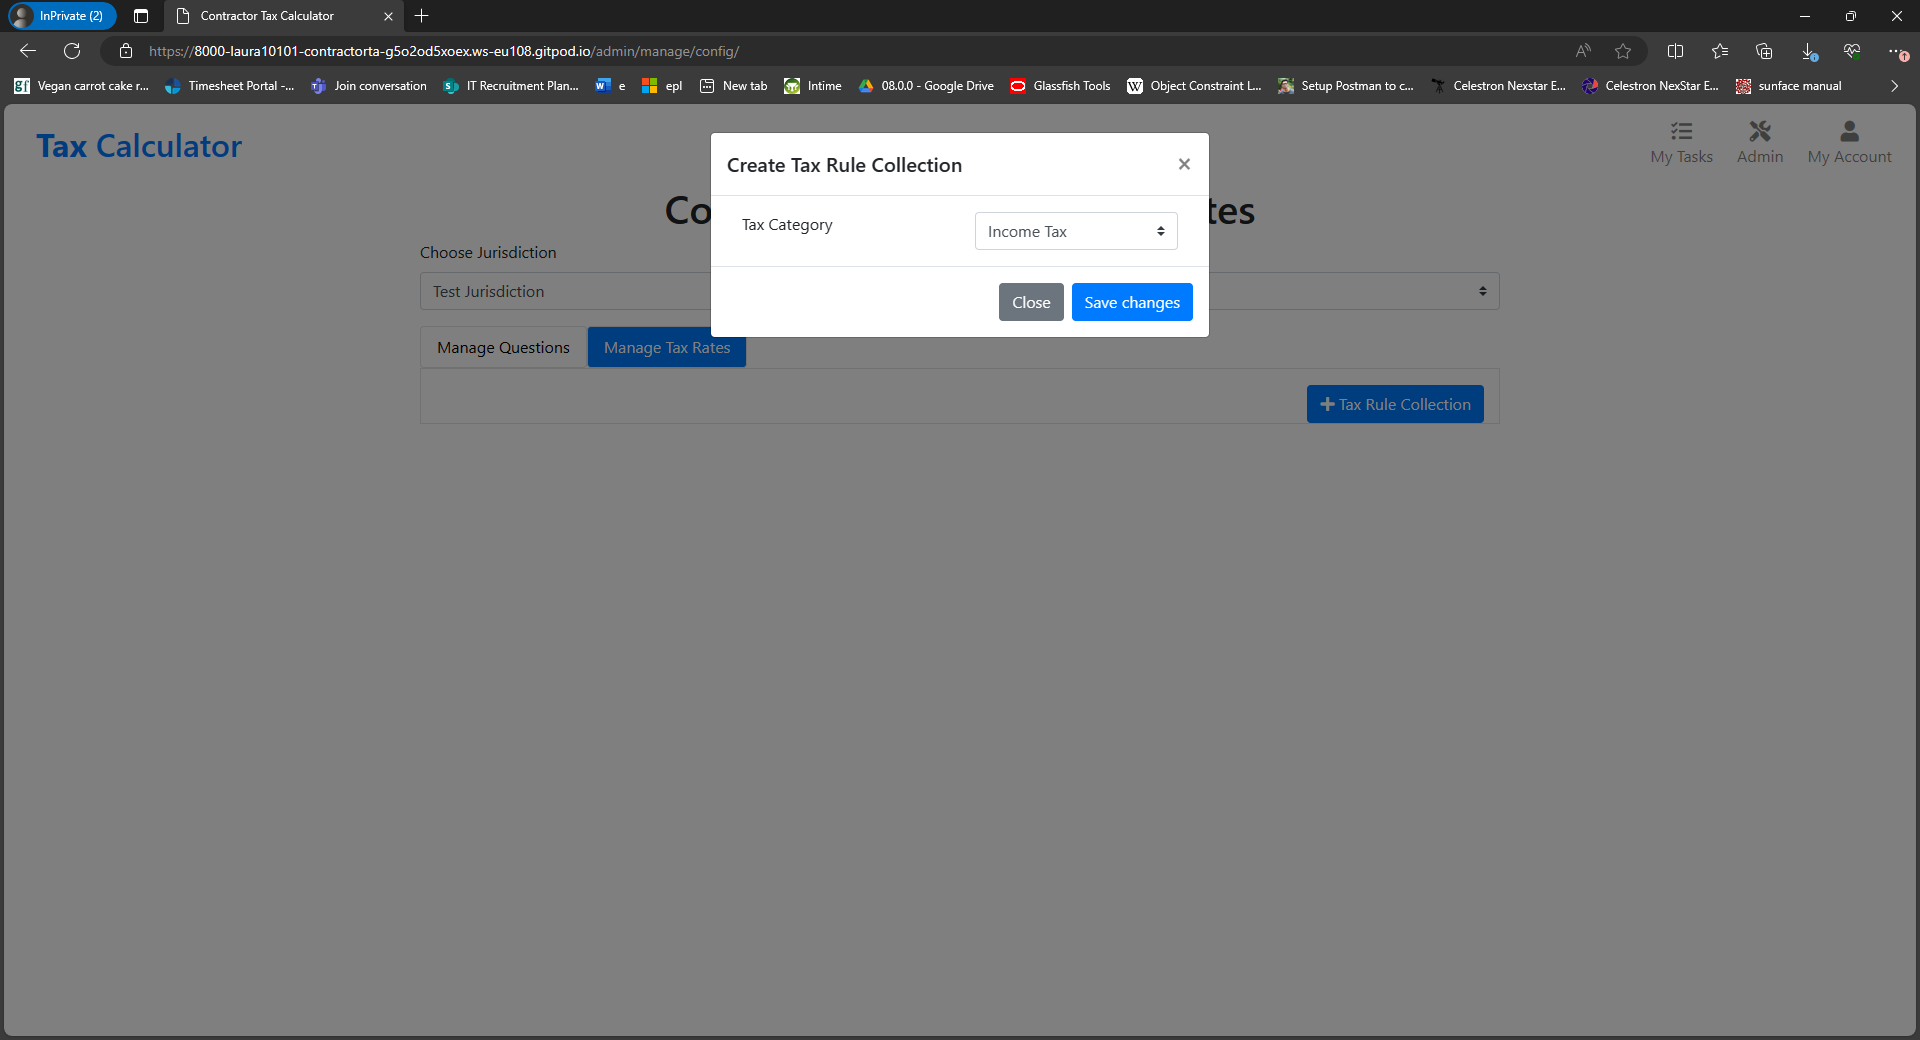
- To create a new ruleset, the user clicks the + Ruleset button at the top of the config app.
- The user then selects a tax category to create the ruleset for.
- A success message is then displayed.
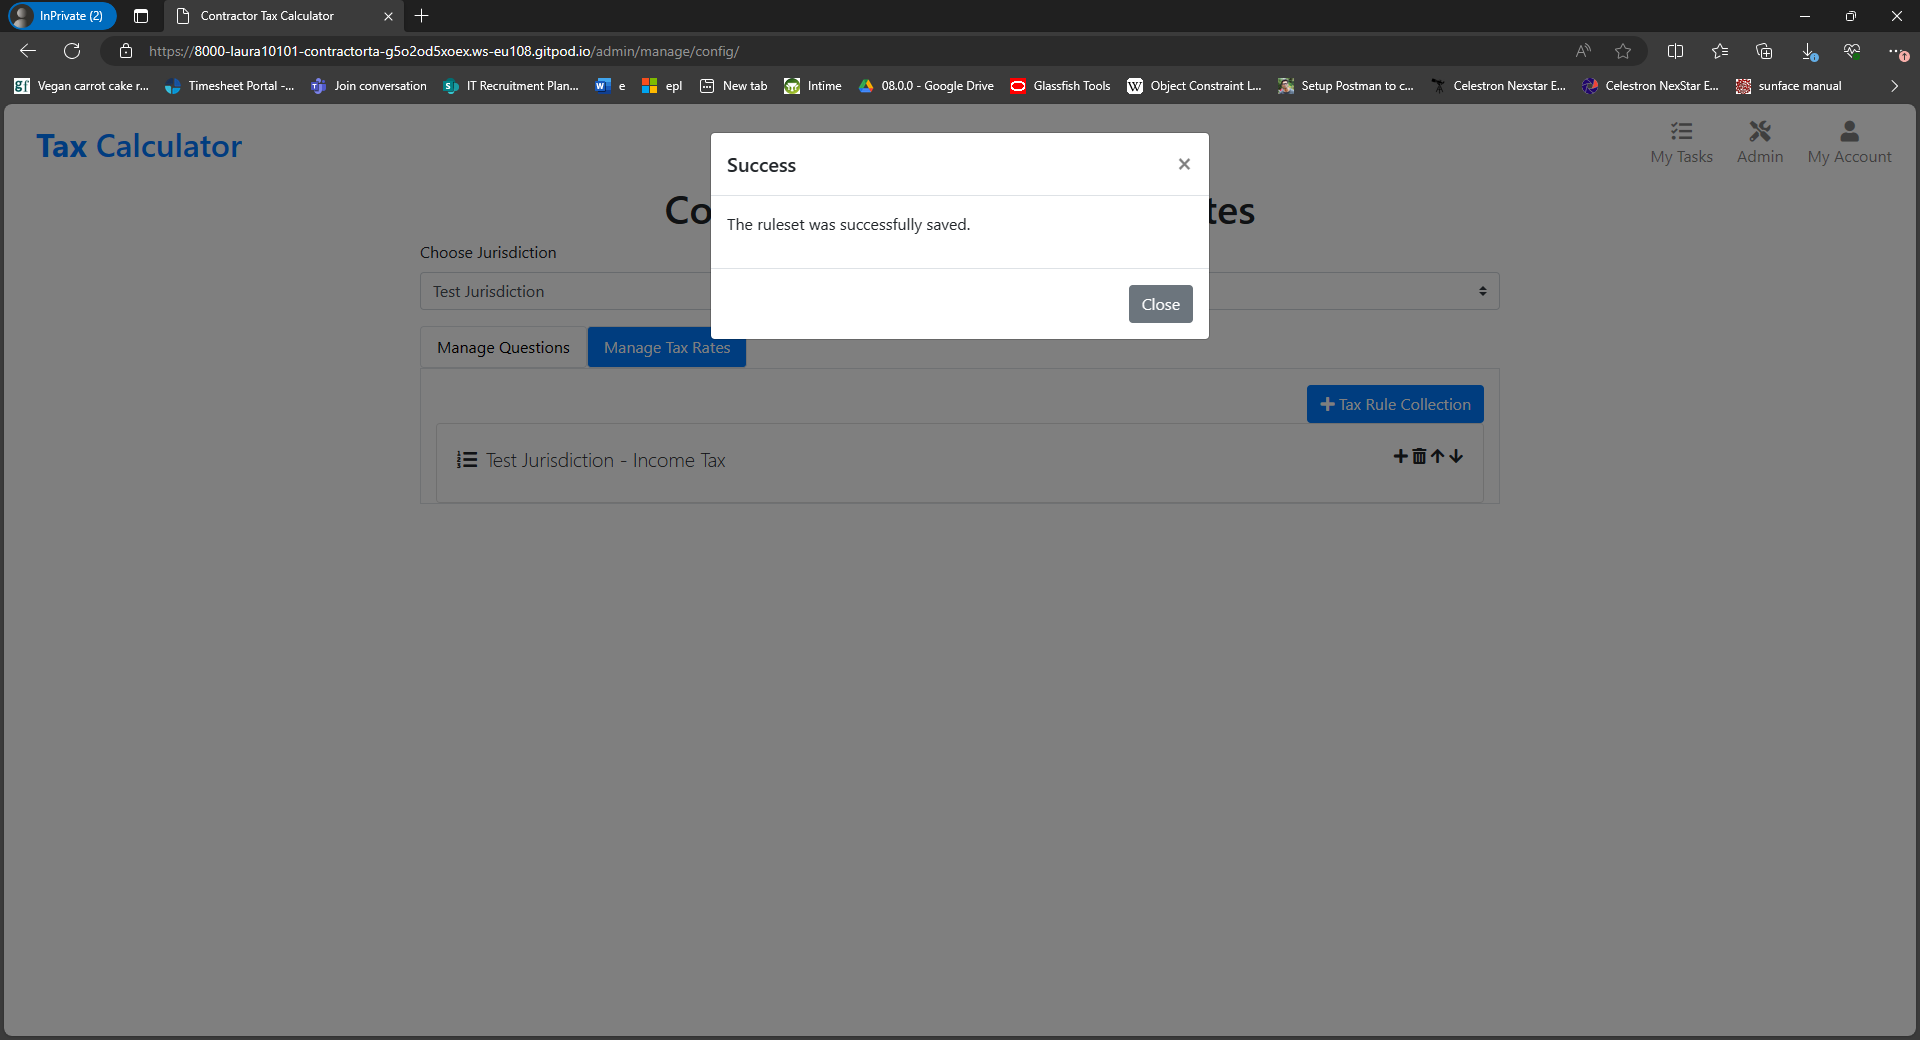
- And the ruleset is displayed within the rulesets display.

-
Reordering Rulesets
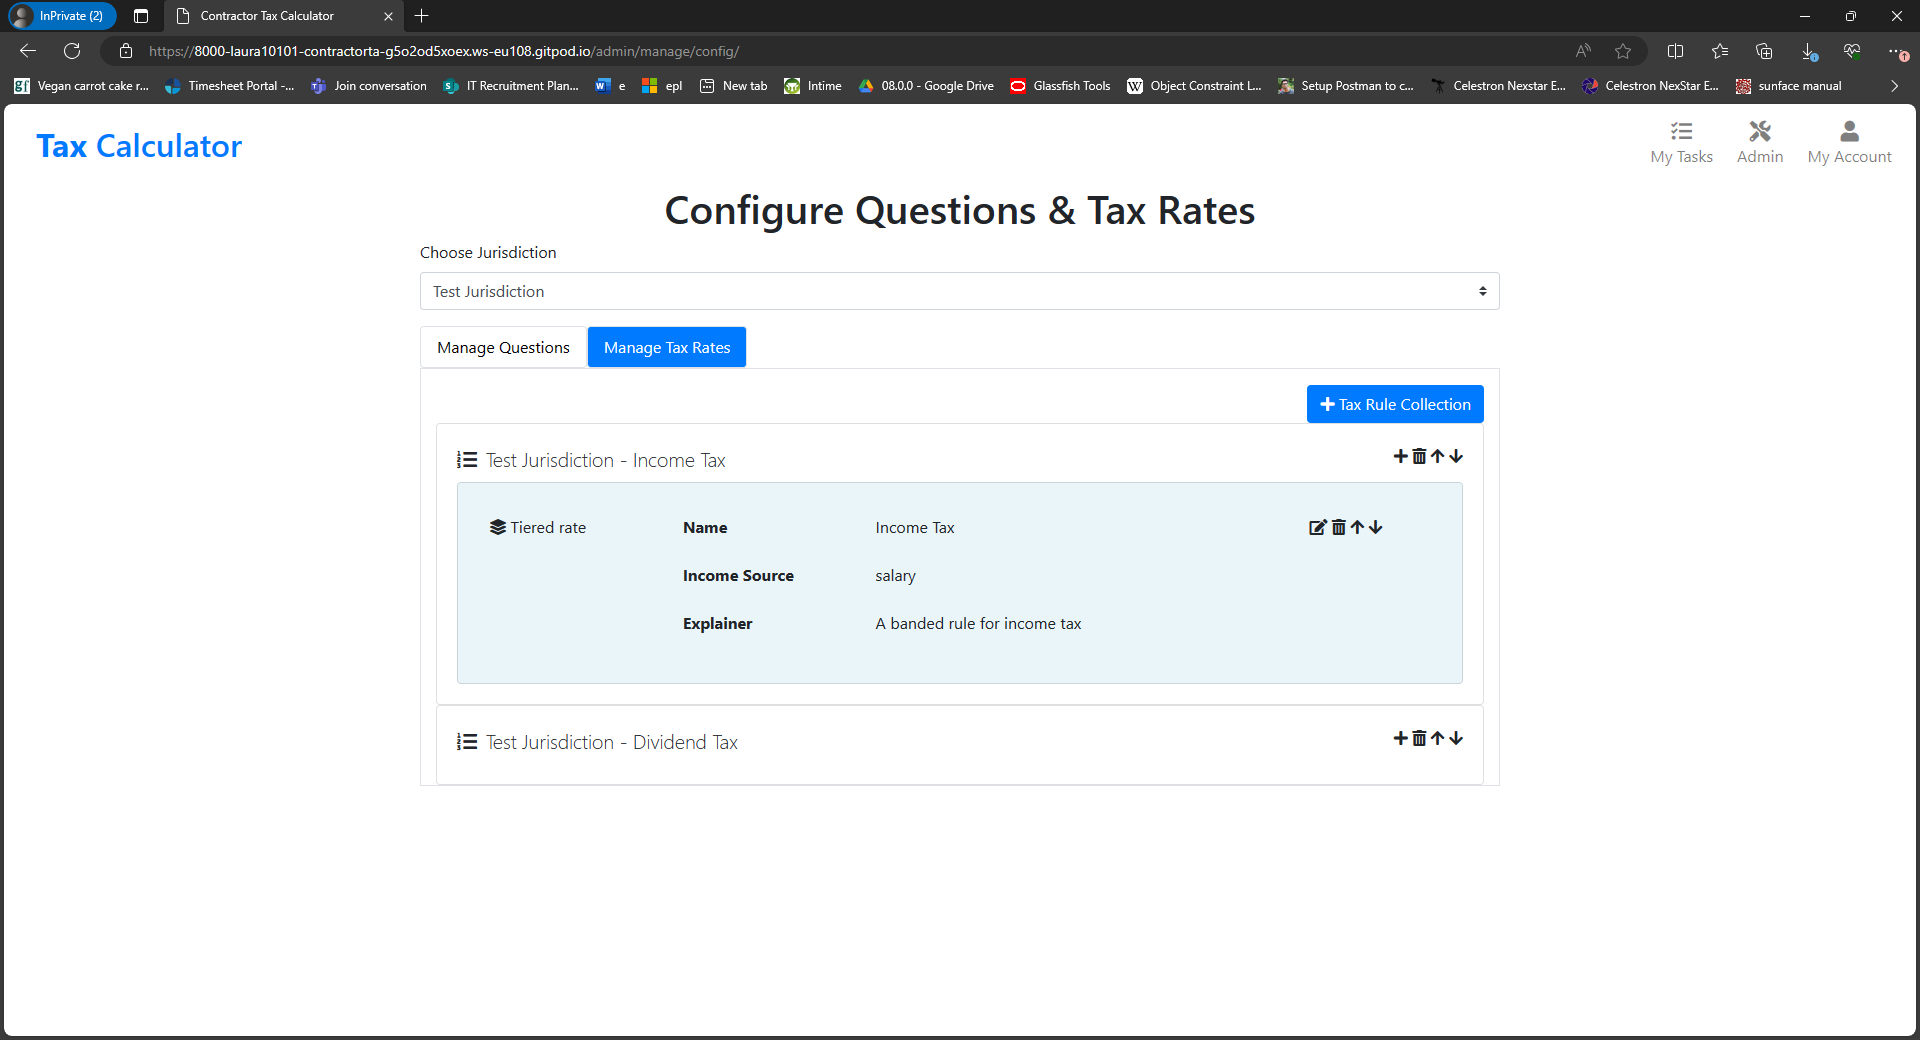
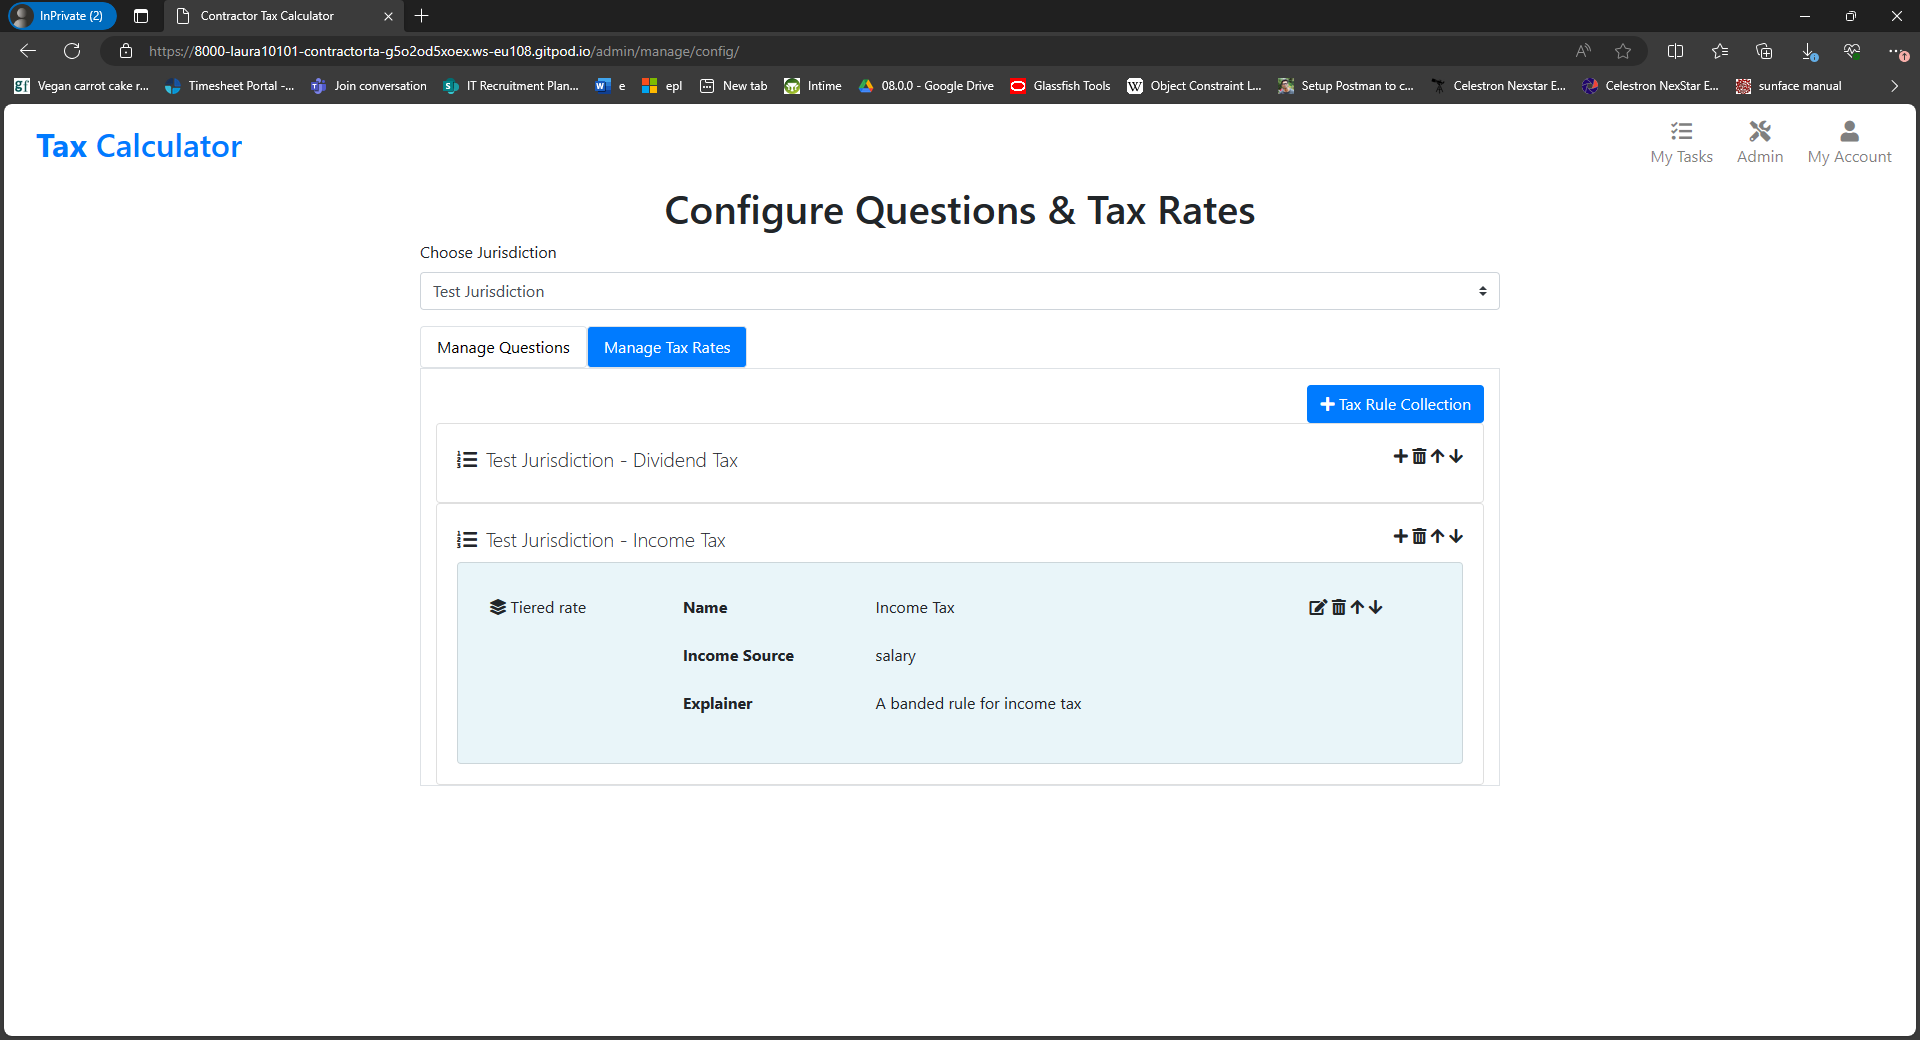
- To reorder rulesets, the user clicks the Move Up or Move Down button at the top of the Ruleset display.
- In the image below, the Income Tax ruleset preceeds the Dividend Tax ruleset.
- After moving the Dividend Tax ruleset up, this is displayed first.
-
The Add Rule journey
- To add a rule, the user clicks the + button in the title bar for the Ruleset to which the rule should be added.
- The user then chooses a Rule Type.
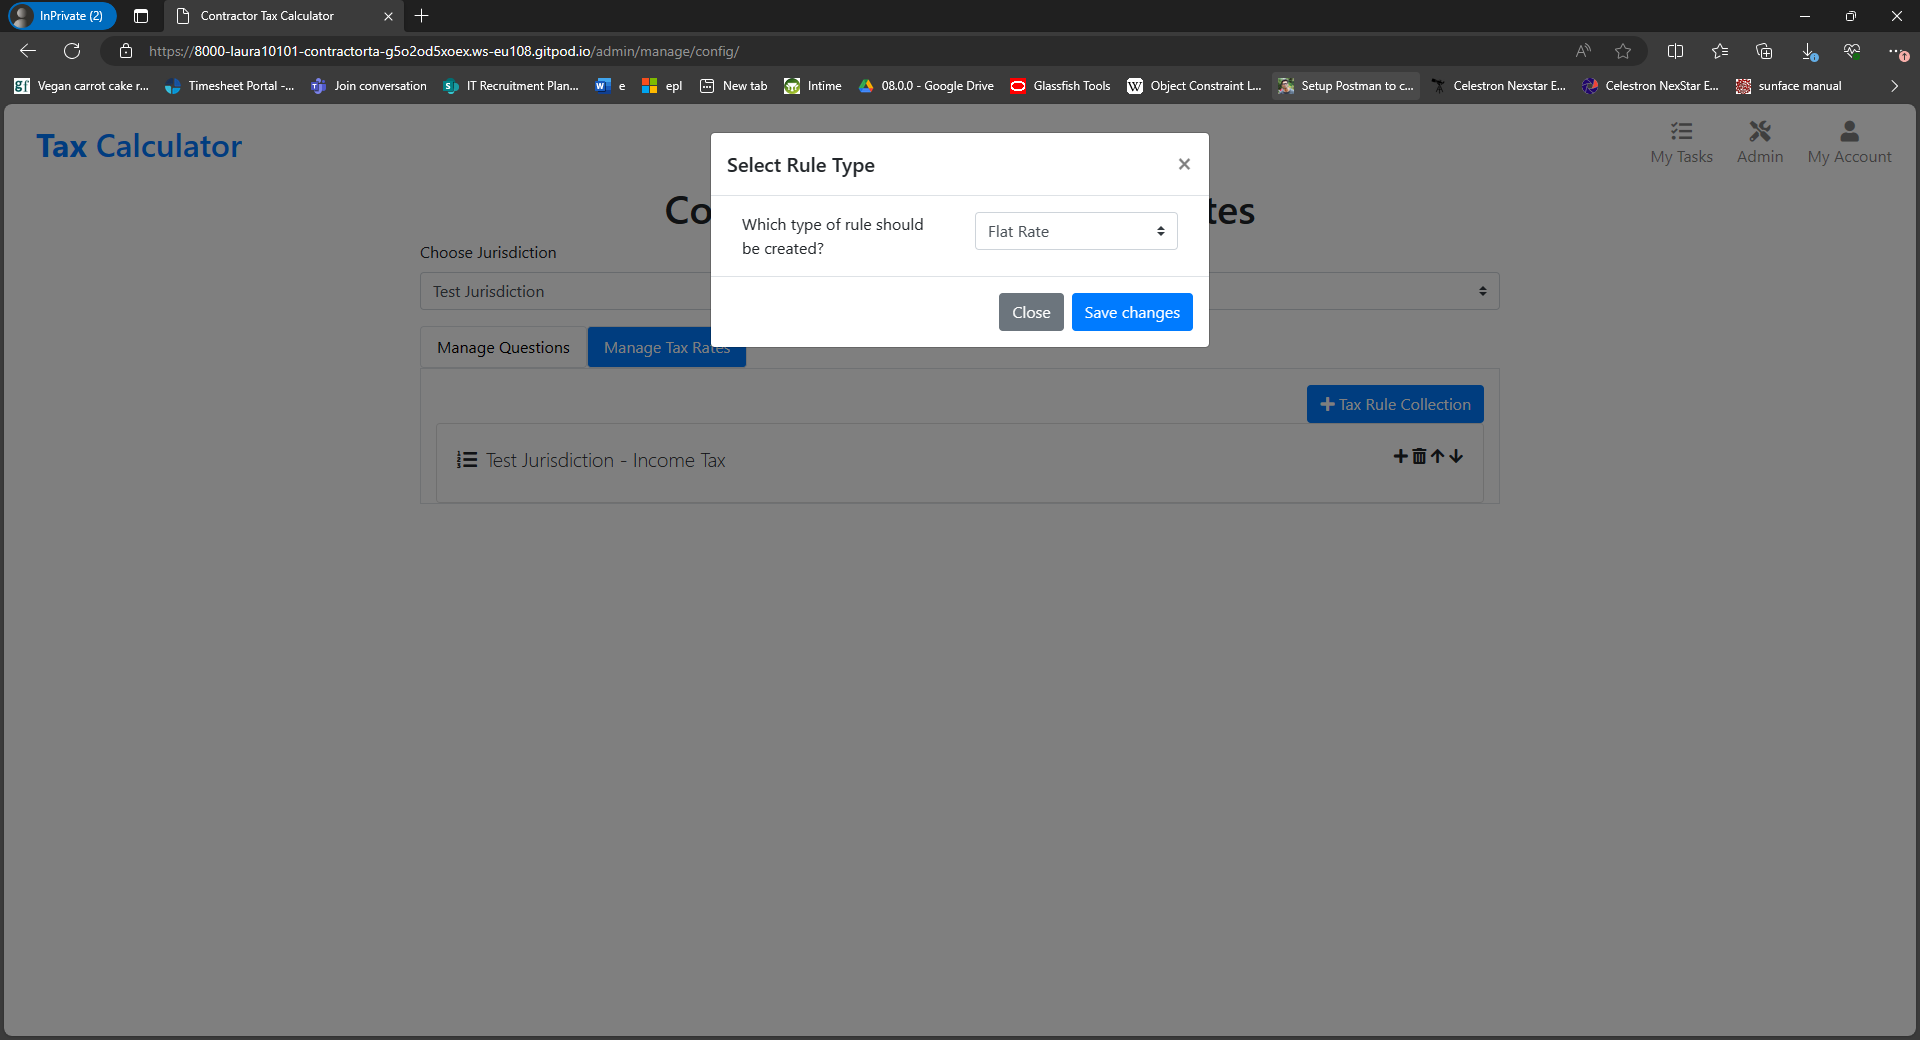
- The user then fills out the
Create Ruleform that is displayed and then clicks Save Changes.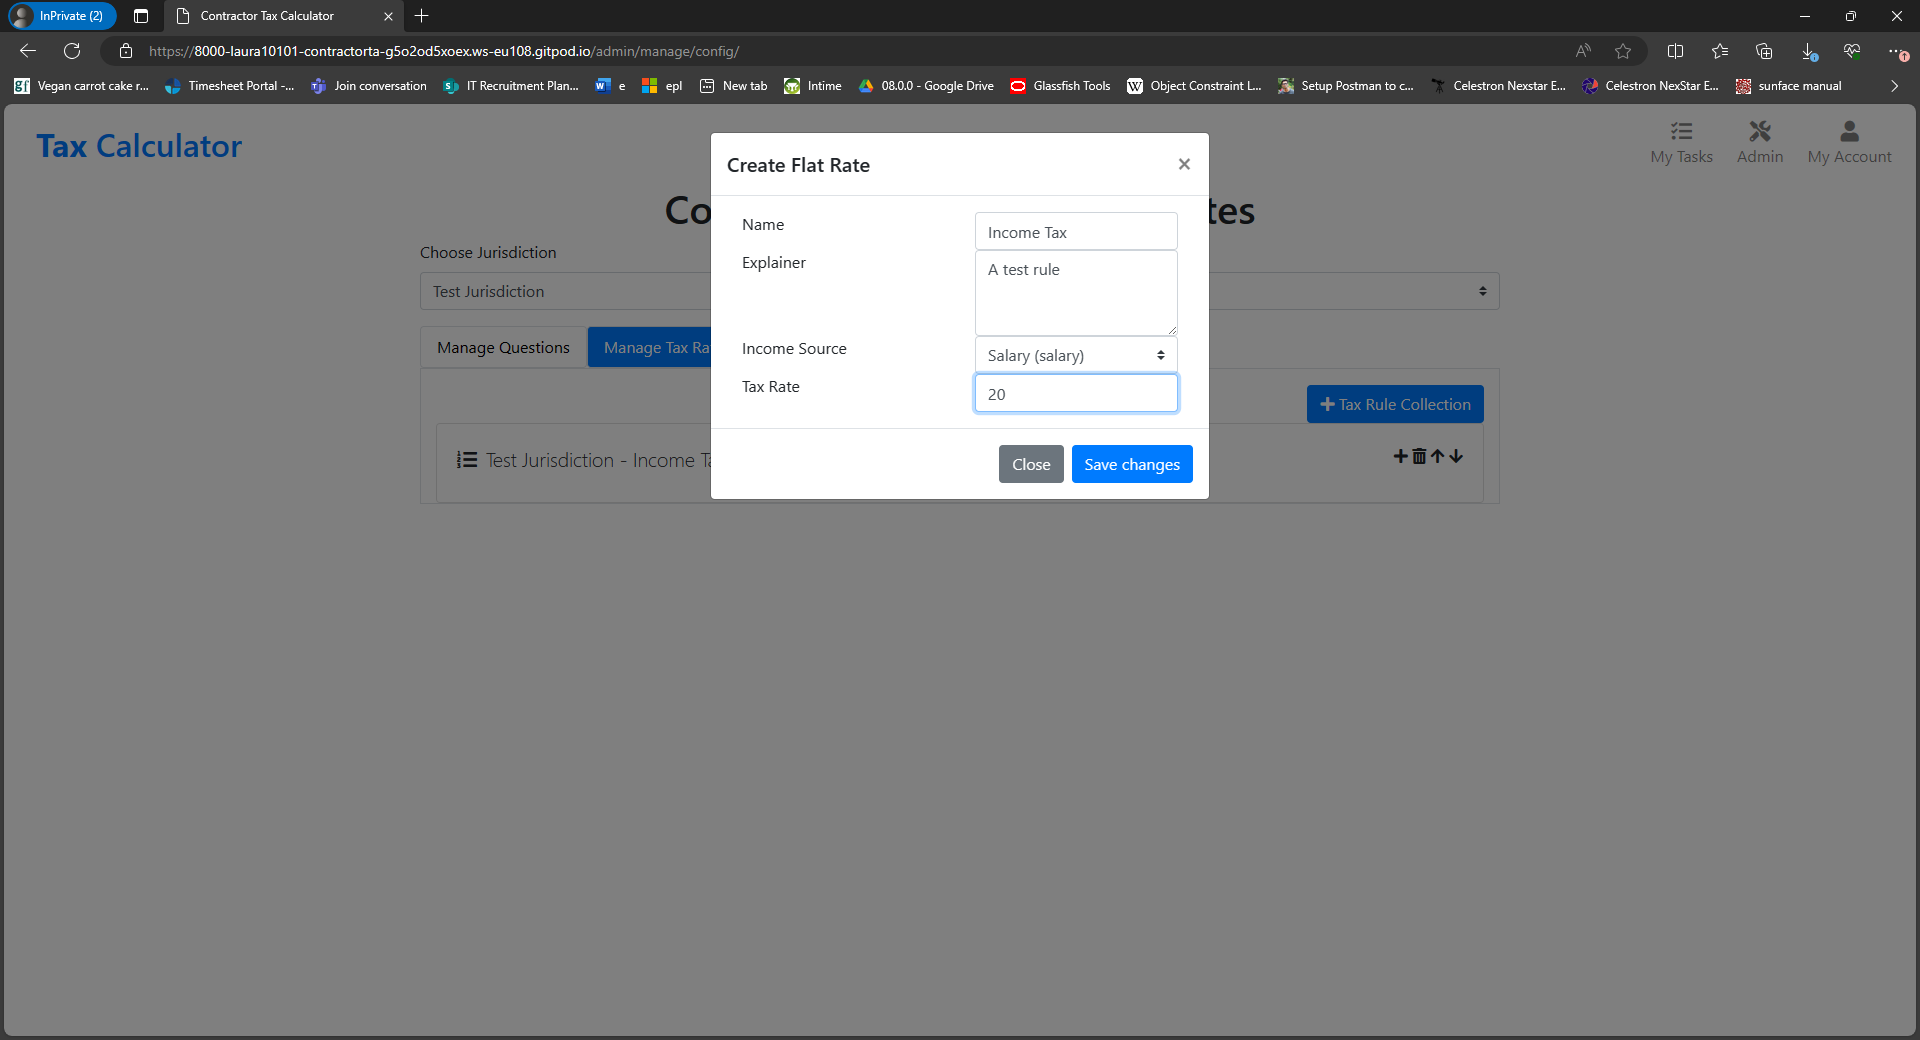
- A success message is then displayed.
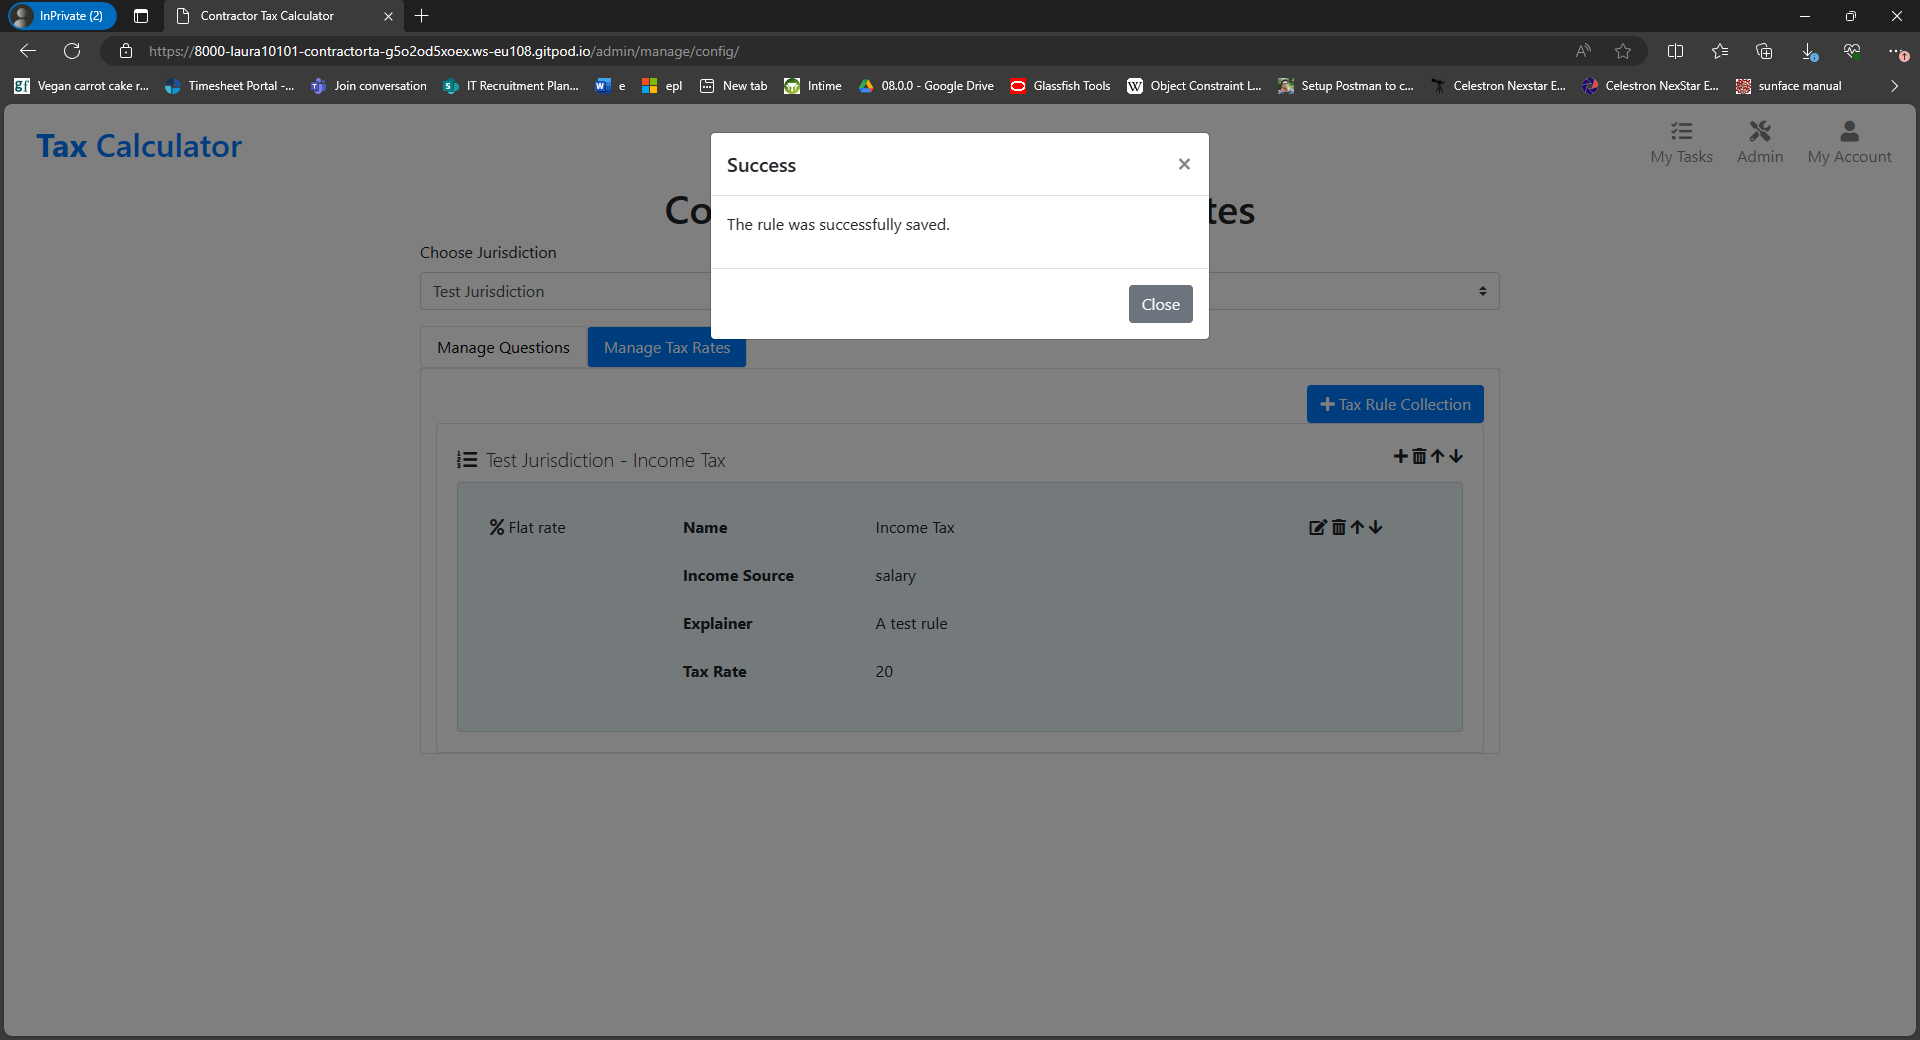
- And the rule is displayed in the rulesets display.
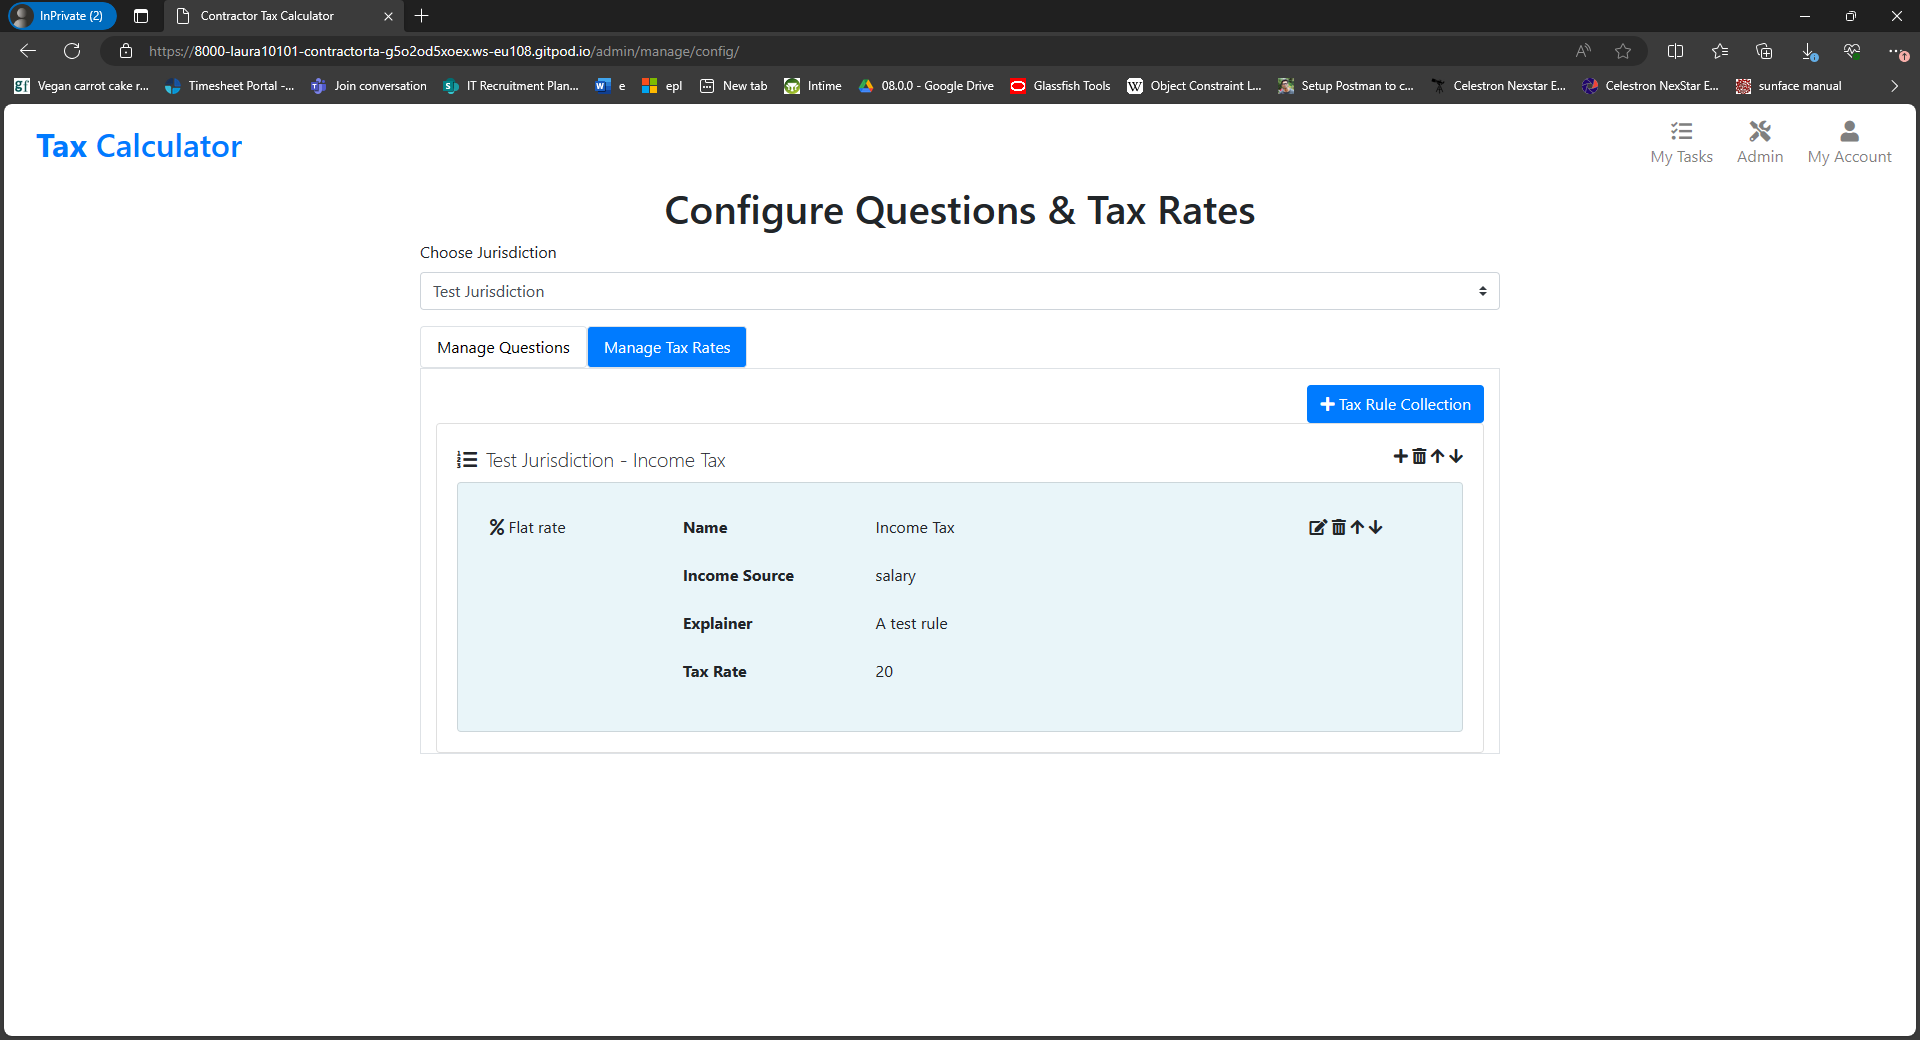
-
Editing Rules
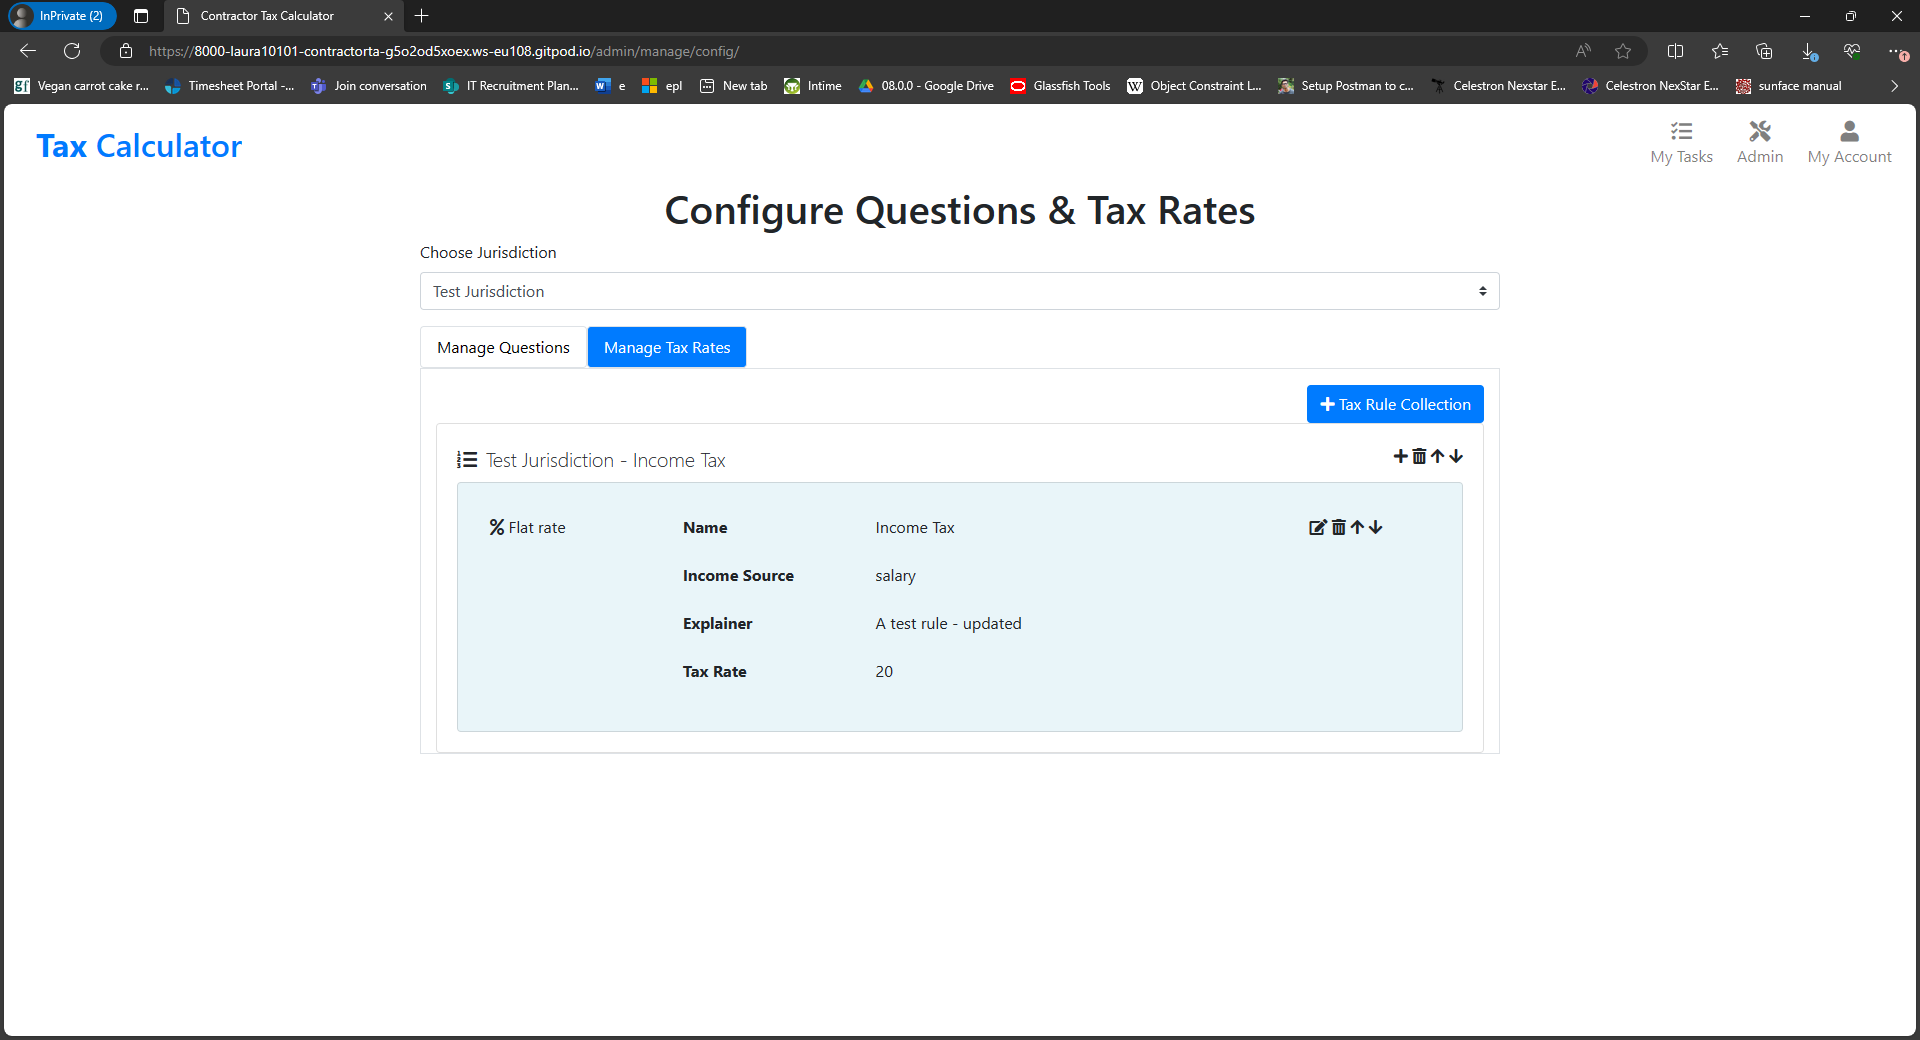
- To edit a rule, the user clicks the Edit Rule button next to any rule in the Rulesets display.
- From here, they complete the form that is displayed and click Save Changes
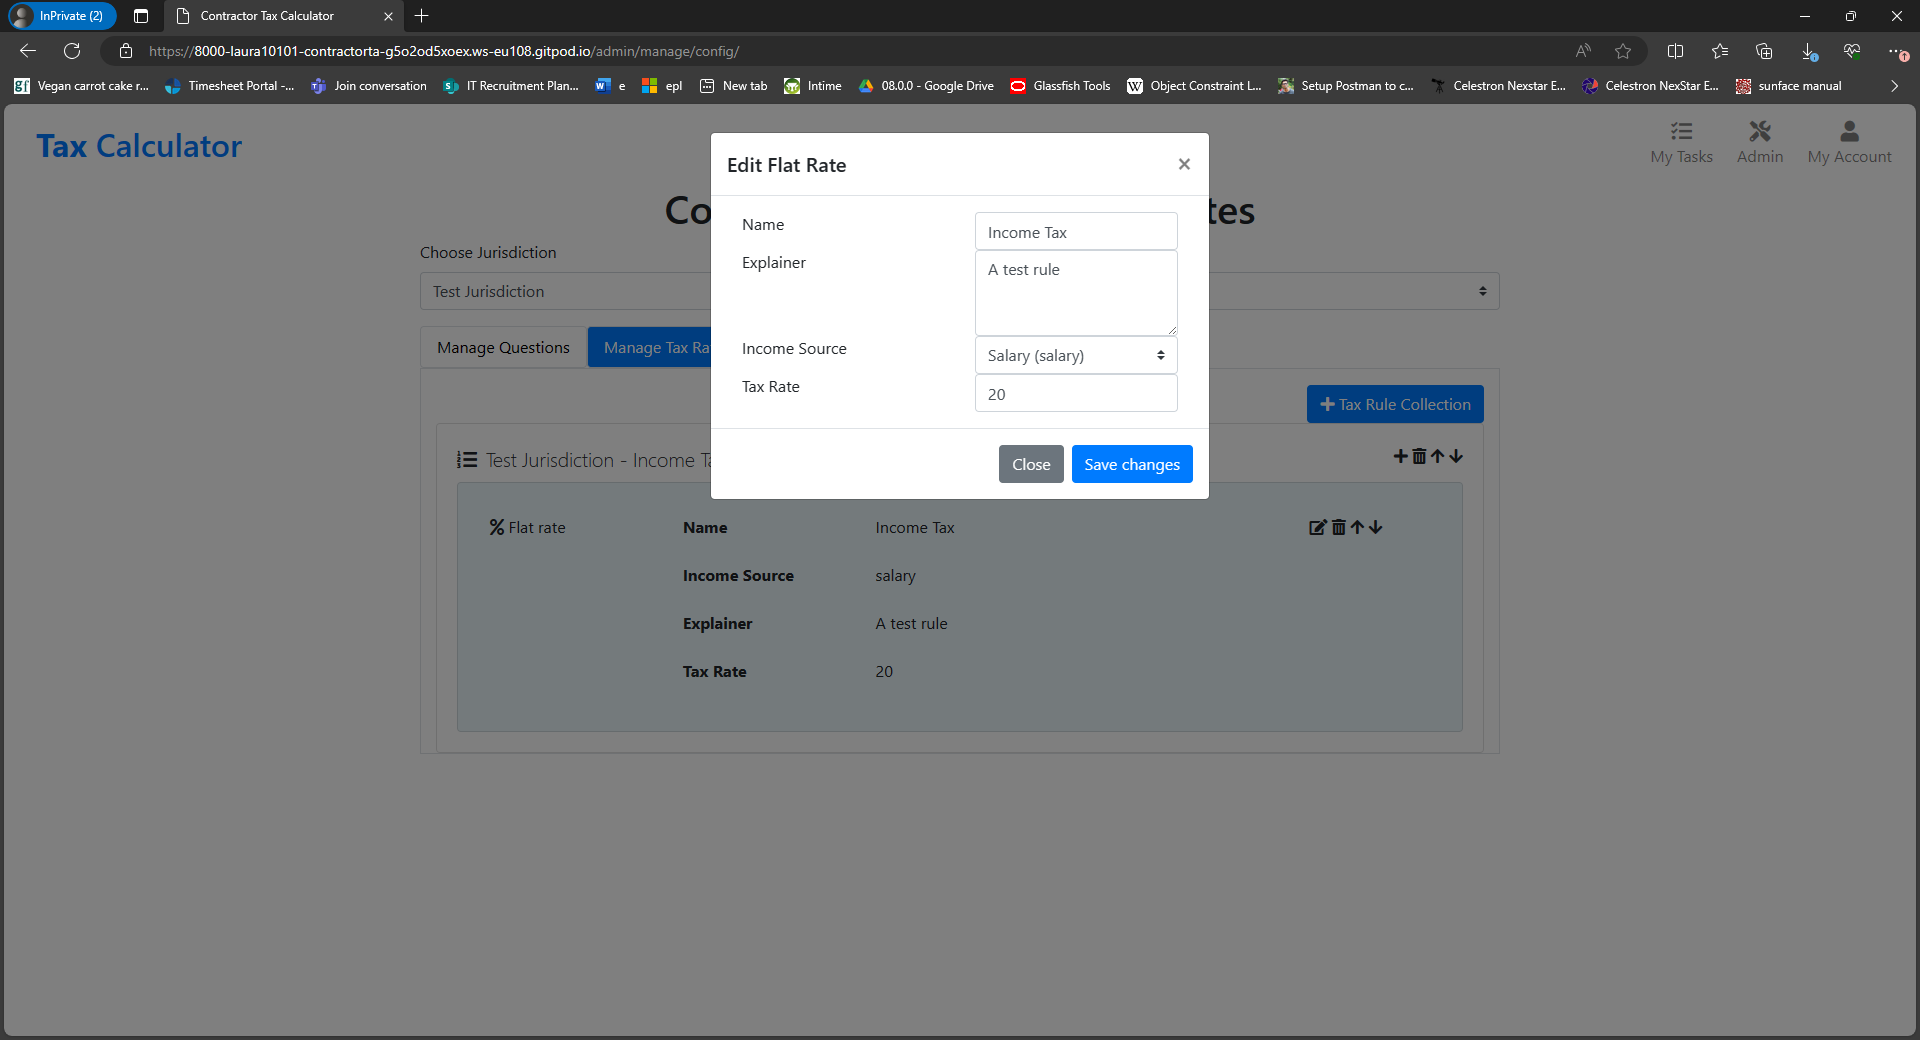
- A success message is then displayed.
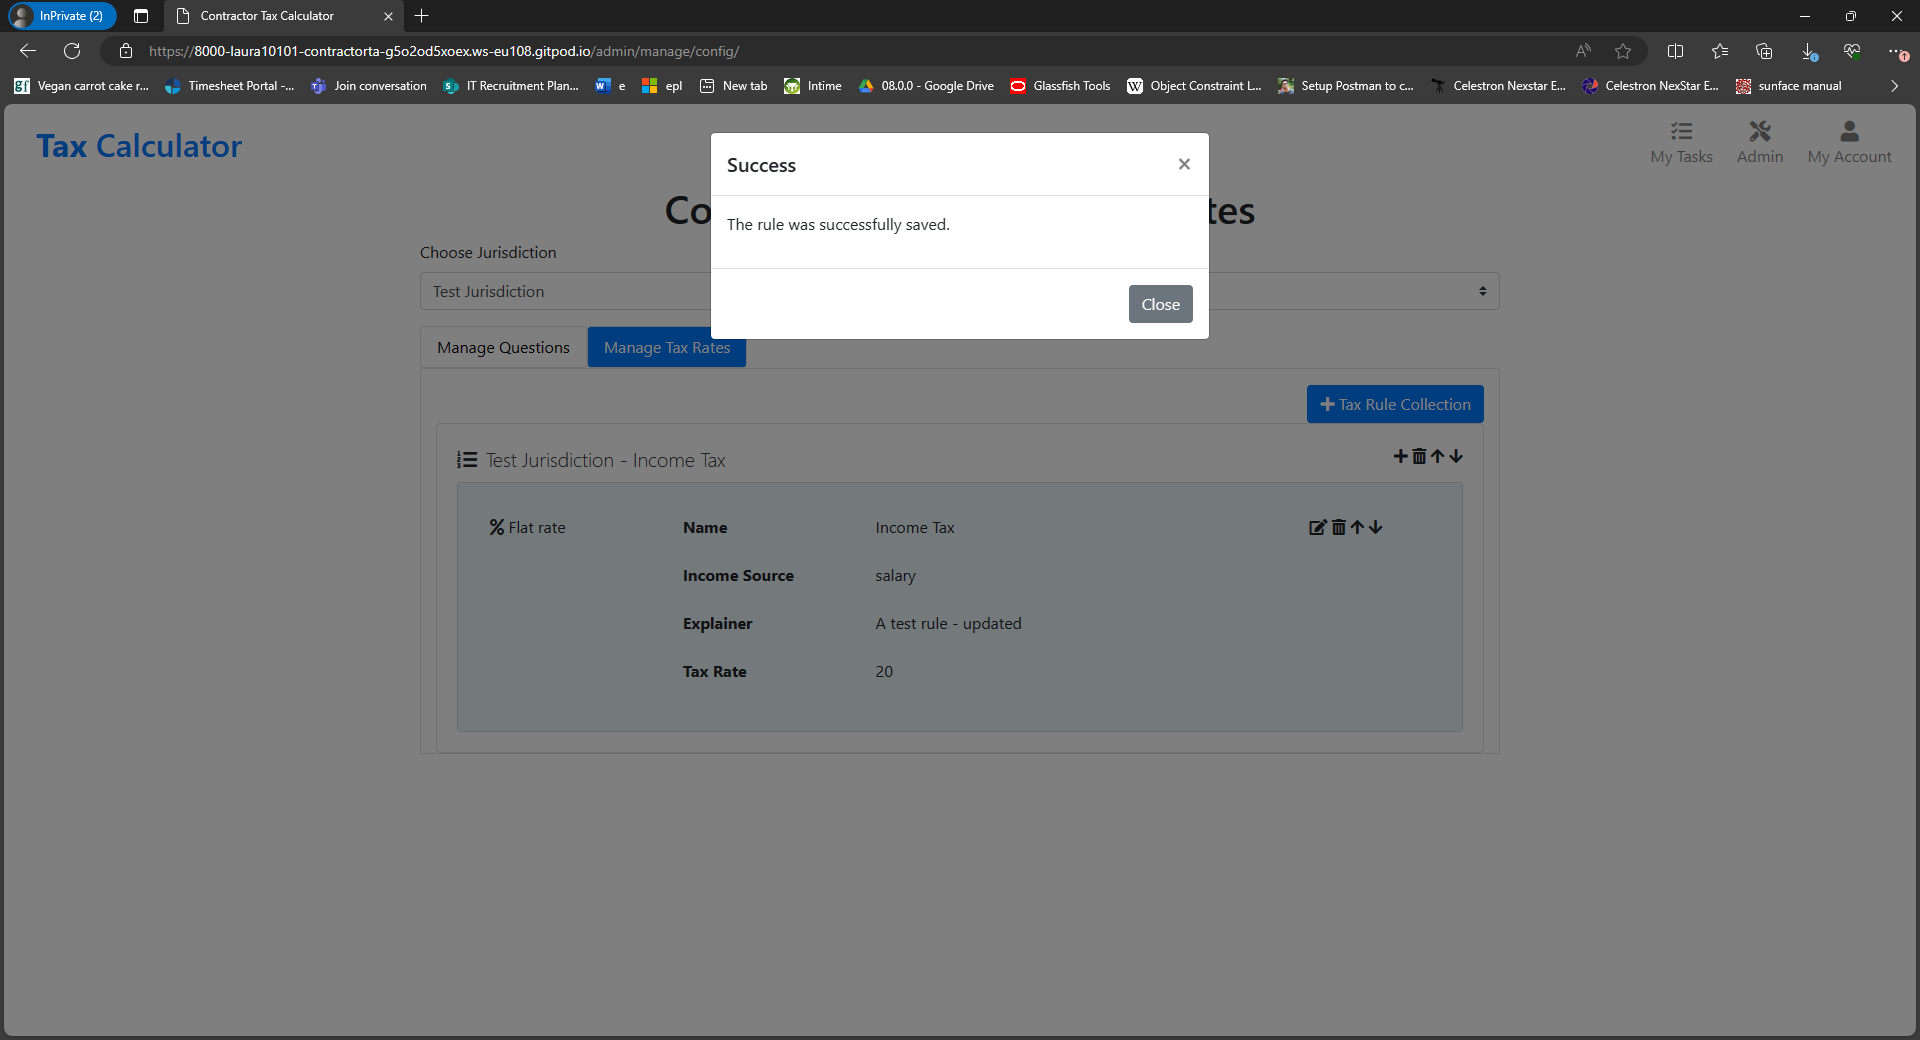
- And the rule is updated in the rulesets display.
-
Adding Rule Tiers
- To add a primary or secondary rule tier, the user first selects Edit next to either a Tiered Rate rule or a Tiered Rate rule with progression.
- The user can then choose to add a tier by clicking the + Tiers button at the bottomn of the form.
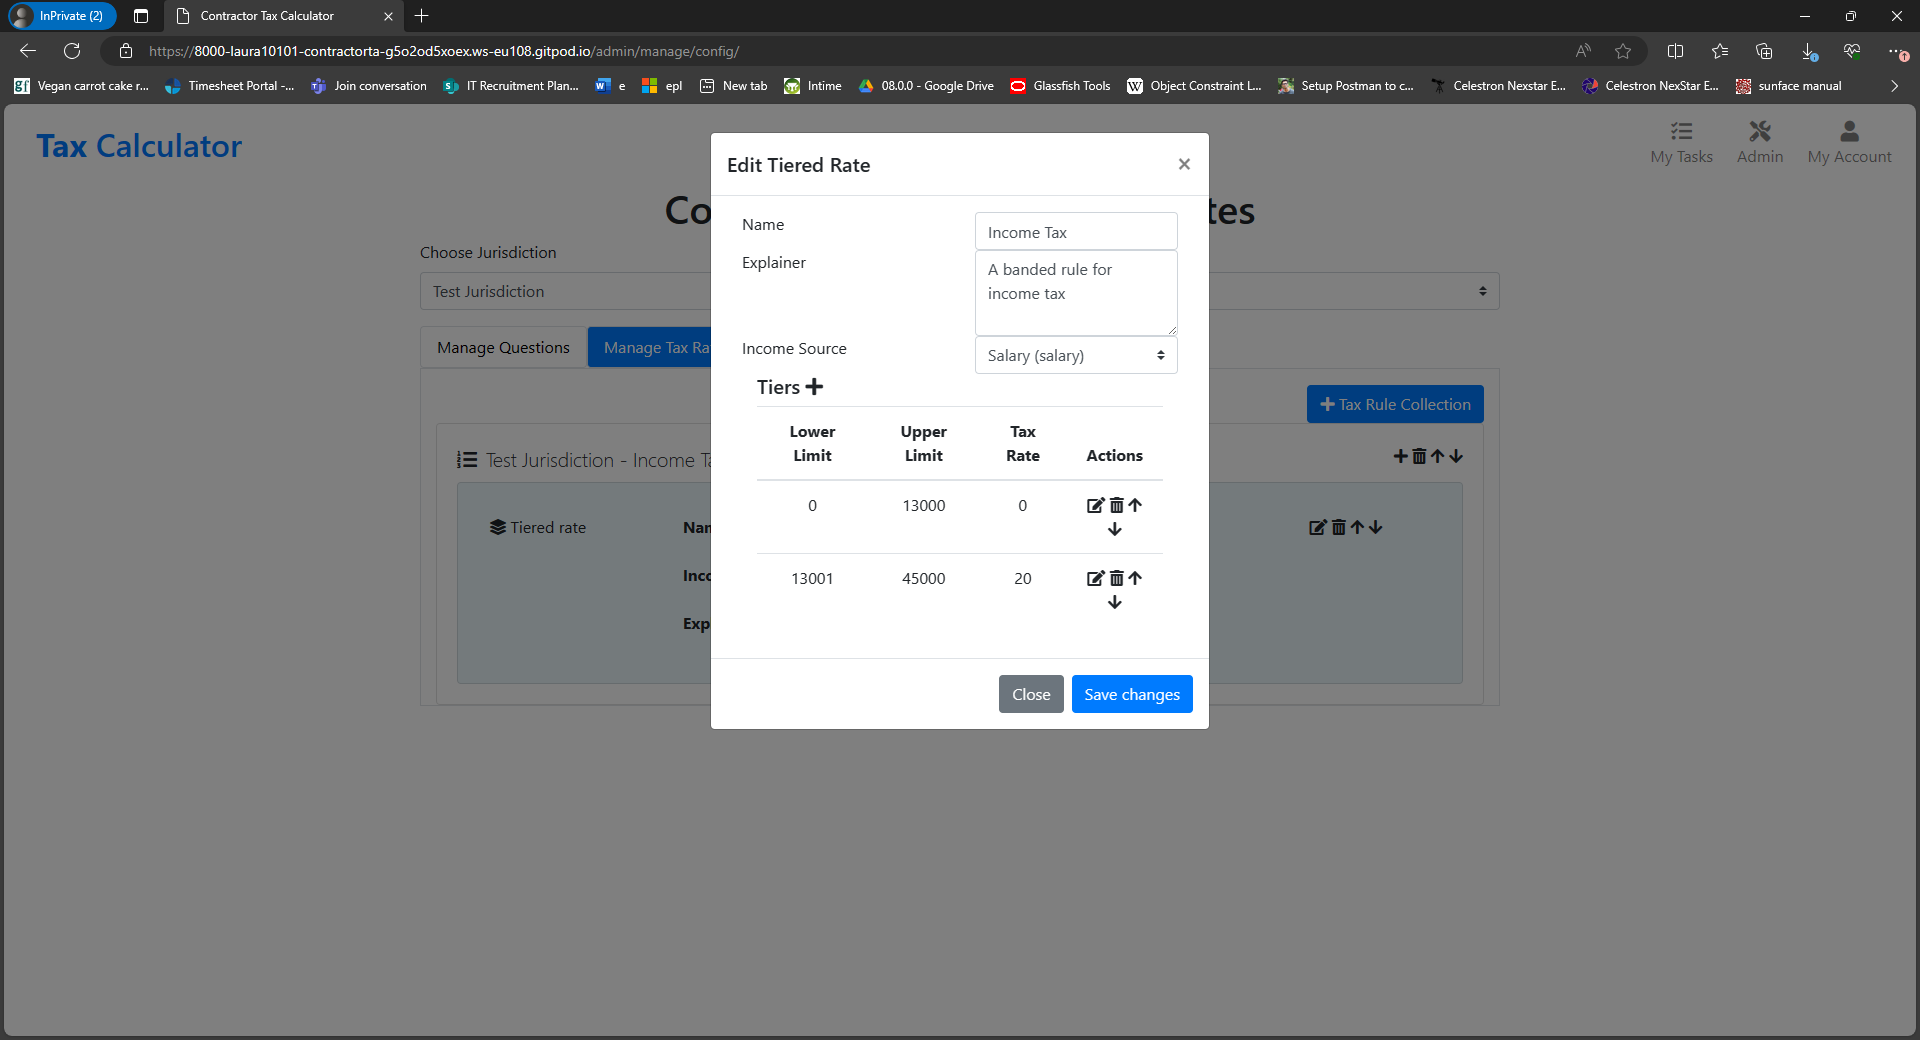
- The user then completes the form that is displayed and clicks Save Changes.
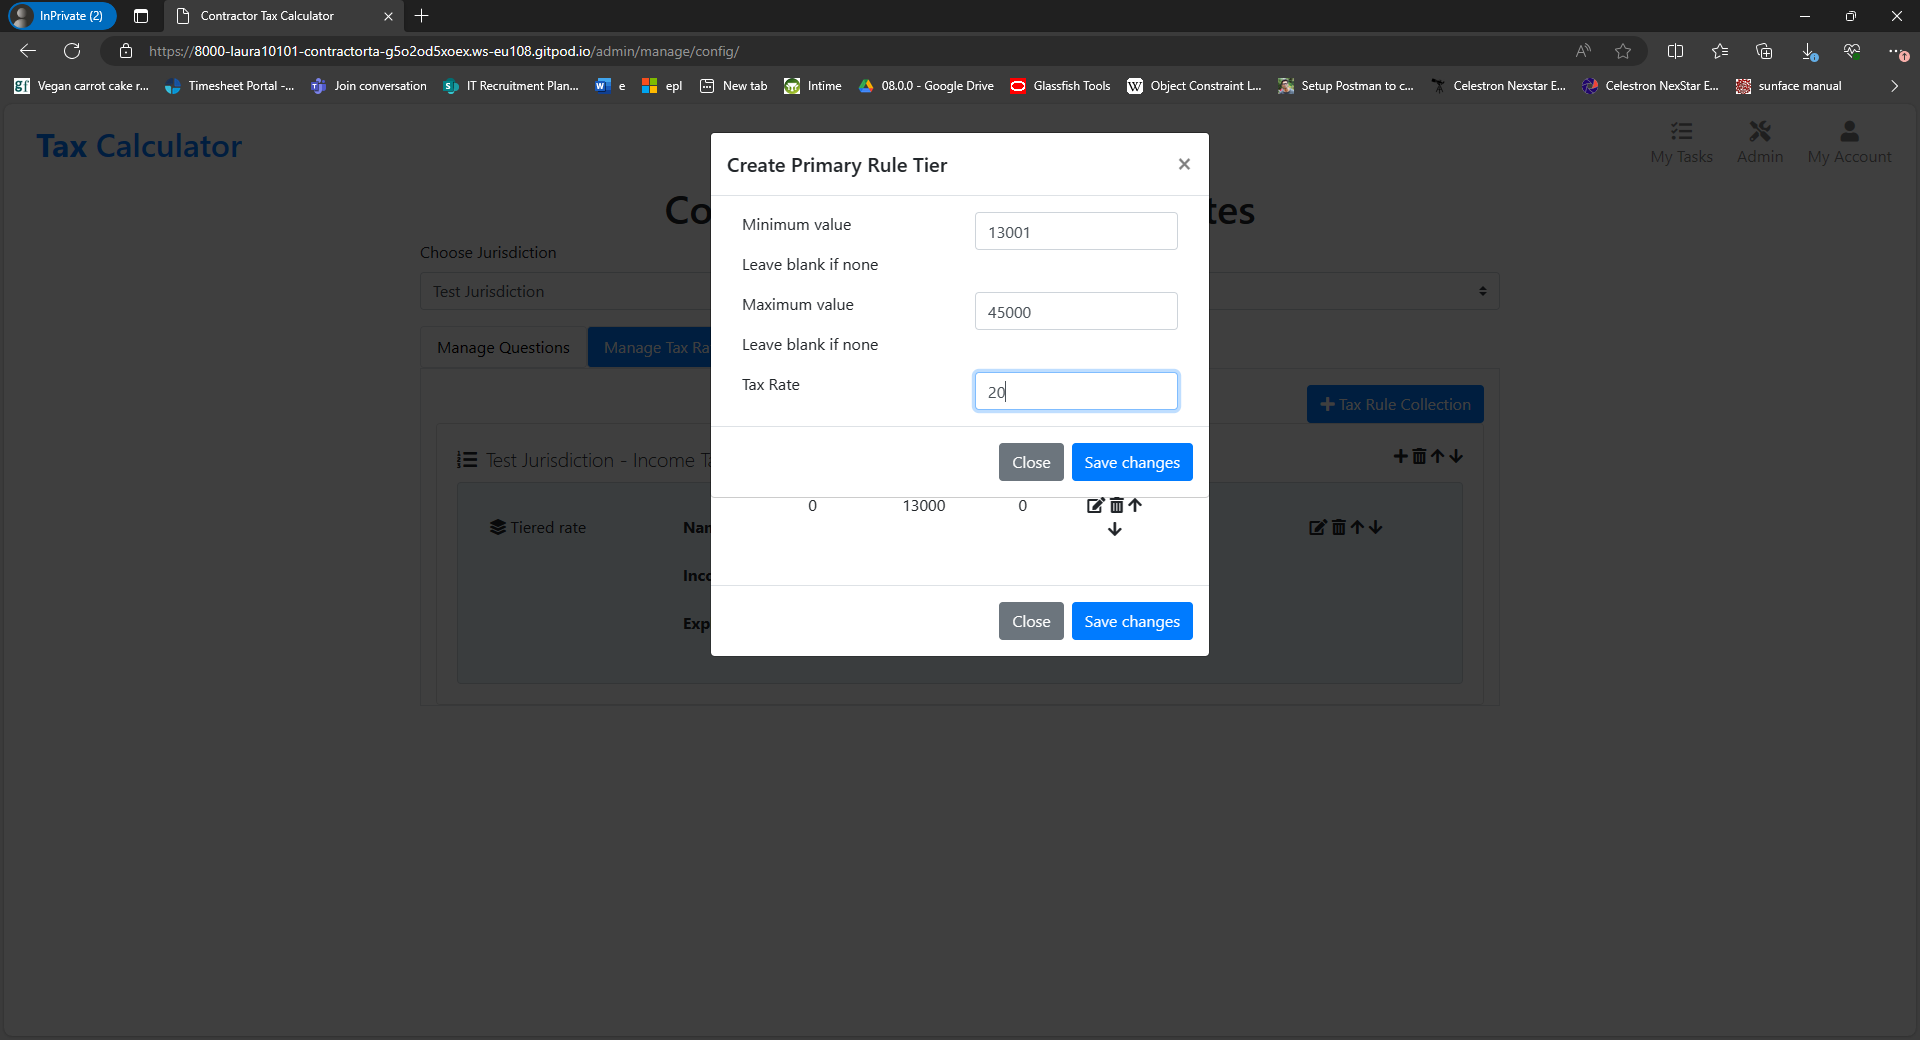
- A success message is displayed.
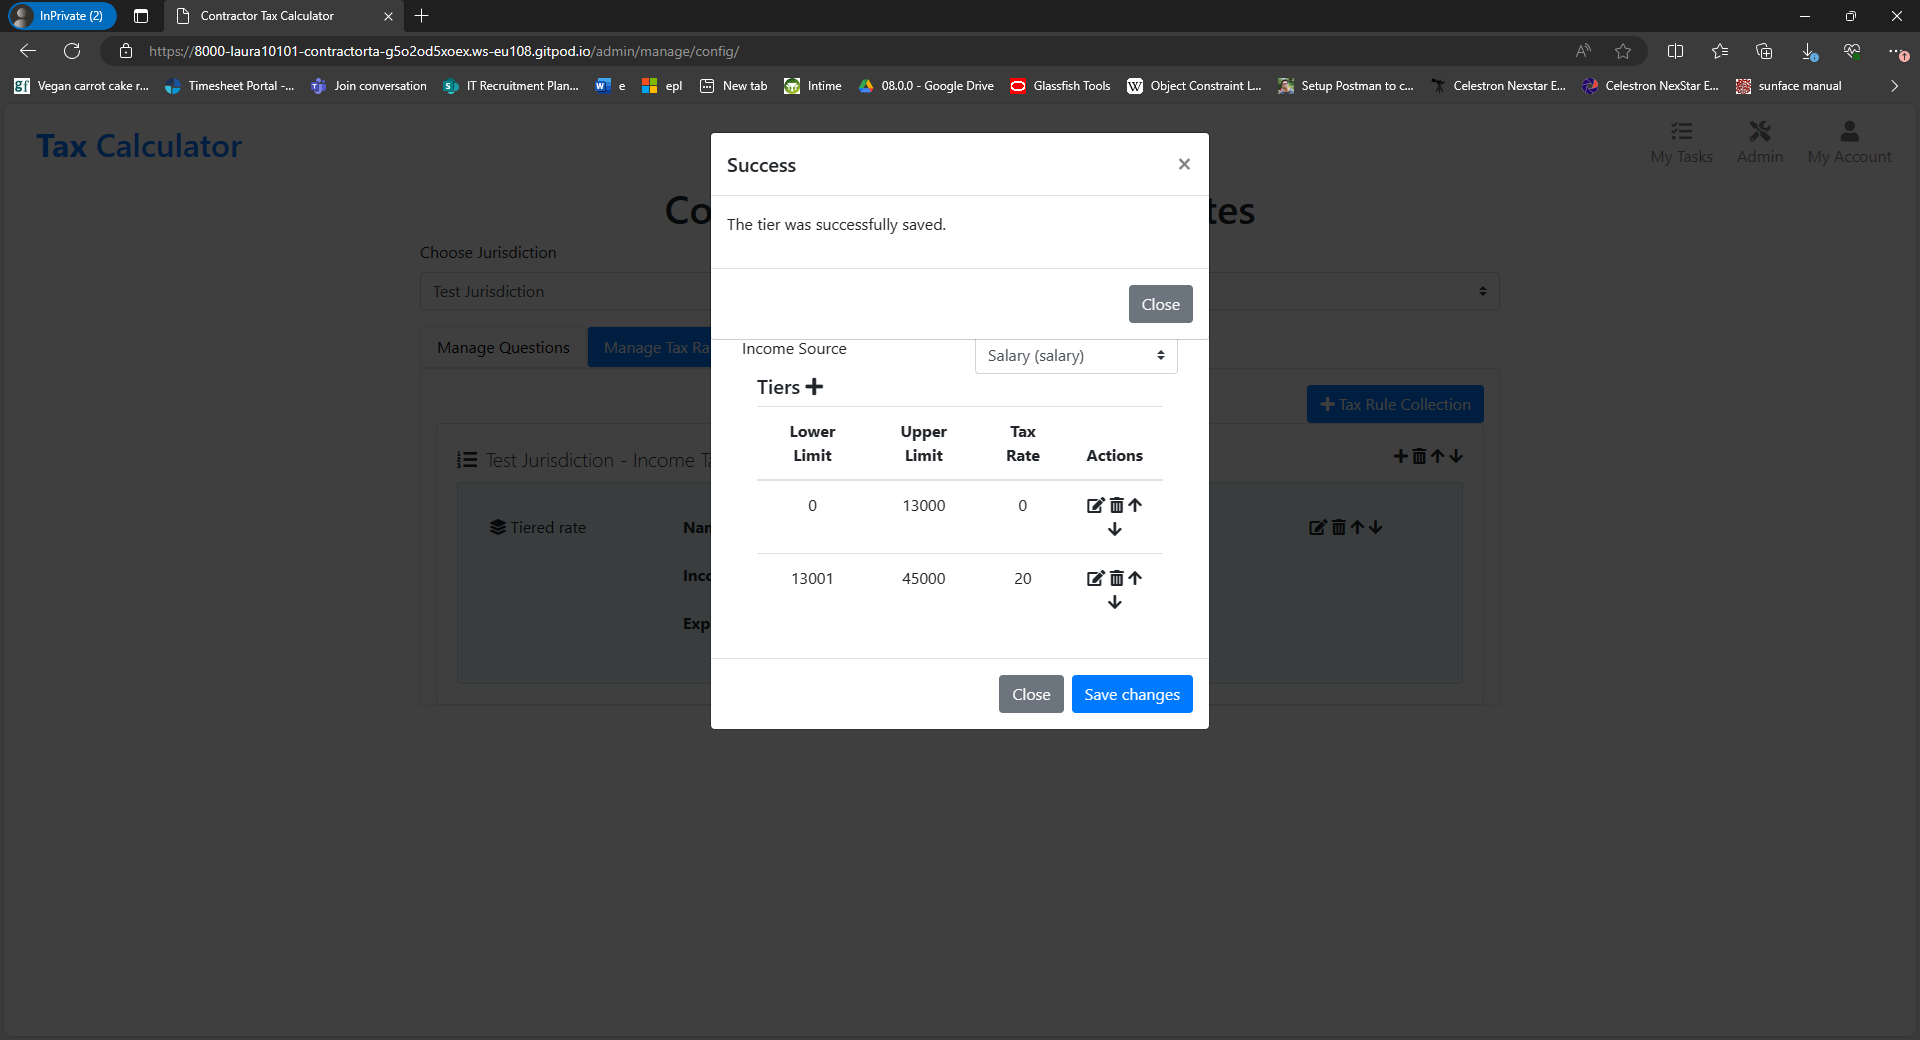
- The new tier is then displayed.

Features Left to Implement
For this project I had to be very careful to keep the scope as tight as possible since there was a large amount of legal research, algorithms and architecture to carry out. With the limited time available, I had to prioritise. I architected the project in an agile way, to ensure that I could come back to it at a later date and add functionality as easily as possible. With more time, I would consider adding the following functionality:
- More jurisdictions with a view to including every jurisdiction across the globe. This would take a significant amount of research which would need to be kept up to date each year as tax regimes change.
- A feature to allow elements to be ‘mixed and matched’: for example for a user to enter their company as being based in one country whilst they are based in another. This adds an additional layer of complexity as it involves the interplay of international, cross-jurisdictional tax laws.
- Collect data on users to ensure that my assumptions about them are correct and change the UX is needed. For example, if users are less knowledgeable than expected then additional explanatory notes/pages can be added to explain the basic terms.
- A feature along the lines of ‘Where will I be best off’. This feature would allow a user to enter their details - their income and its sources, and then tell them the top 3 jurisdictions where they would benefit from the maximum level of take home pay.
- Include pension information, including pension tax relief. This has not been included yet because it requires an in-depth knowledge of pension tax law in each jurisdiction, and there simply wasn’t time to research and include these additional complex algorithms and calculations.
- Accuracy is a critical part of this project. Fortunately, I have a legal background so am accustomed to researching and deciphering complex legal problems. In an ideal world, this would be double checked by a specialist international tax lawyer from each jurisdiction. That has not been done yet, #######so a disclaimer has been included on each page#######. This could be included at a later date.
- Allow the site to be used in multiple currencies.
- The ability to edit an existing calculation to add additional jurisdictions, rather than to have to start all over again if adding a new jurisdiction.
- A function that says your total tax percentage of income is x%.
- A function where you can enter your income and it will return the most tax efficient place to live, or order them from best to worst
- Broaden it out beyond just IT contractors by including additional types of tax
- Include tax reliefs and allowances
Technical Design
The Technical Challenges
The fundamental problem for the Tax Calculator is to gather financial information from the user and then apply a series of calculations to work out, based on that info, how the user will be taxed. The problem is that the structure of the calculations, and the calculations themselves, and the info on which they are based, varies from country to country.
The forms will be different for each country - different questions for each country, and the calculations are going to be different for each country. Given this, I needed to come up with a piece of software that can gather the right info from the user for all of the countries, and then apply the right calculation for all of the countries.
The problem is this: how do I get info from users when the info needed is dependent on the particular country and the calculation needed is also dependent on the particular country?
I wanted to architect this in a way that means other countries can be added in the future without needing to change the software itself. This will make the project more extensible and future-proof, and is in line with the principles of Uncle Bob’s ‘Clean Code’ - reducing the time and expense needed to update the project in the future.
There were three options:
-
To use lots of if statement, with hard coded calculations for each country, and then the algorithm selects the calculations based on the country. But with this design, software engineers would have to change it every time a new country is added, requiring a release of code every time. This is because all of the logic is hard coded. Additionally, Uncle Bob doesn’t like if statements!
-
Enable additional countries to be added by extension. Create a software module for each country and each will have hard coded questions and answers. A plug-in would effectively be created for each country. This doesn’t require a redeployment of the whole application code if changes are made, but you need a software engineer to create a new plugin and maintain the logic for each country.
-
Enable administrators to configure each country. This approach would come up with a generic algorithm that is data driven and store all of the knowledge in a database. The algorithm uses the knowledge in the database to work out what questions to ask and what calculations to apply. This would enable an admin user to update the database with a new country, and no software engineering is needed. This makes the project much more accessible, usable and updateable.
I selected the third option to make it as easy as possible for tax experts to rapidly expand the range of countries supported by the Tax Calculator. The issue with this option is that if a new country has totally different tax rules than those in the existing database, then a software engineer would need to update the system to provide new types of tax rate but this is much less common than having to change the tax rates themselves. This option can lead a developer down a rabbit hole, trying to anticipate every single tax rule set that might possibly come up. But all tax systems I have studied so far have had similar rules, so this still remains the best option. In the event that a new country was added with drastically different rules, software engineering would be required to ensure the overall logic still worked.
This project is about striking a balance between ensuring the application is useful to the end user (IT contractors) whilst also being easily updatable by an admin user as far as that is reasonably practicable. There may be outlying cases where a software engineer would be required to add a new country, but I am limiting the scope where possible to minimise this risk.
Monolith versus Microservices
Given the user stories and analysis of the Tax Calculator problem above, it is clear that the backend of the Tax Calculator will be very complicated with a need to support several different areas of functionality:
- User-related functionality including login, logout and registration
- Subscription-related functionality including checking for subscriptions, extending subscriptions, and defining subscription options
- Taking payments from the user for a subscription
- Adding and editing jurisdictions
- Adding and editing categories of tax
- Gathering the financial information for users and defining the questions required to do this for each jurisdiction and tax category
- Calculating the tax payable for a set of jurisdictions based on a user's financial information
- Defining the tax rates in order to allow the application to do this
Given these different types of functionality that the backend of the Tax Calculator will need to support, I had to decide how best to architect the solution. One option would be to adopt a monolithic style similar to that used on the Boutique ADO project. In this approach, the code for the user interface (templates and views) lives in the same module (in our case, Django app) as the models and data access logic which that user interface relates to. This works well for small scale applications. However, as the application grows it becomes harder to maintain clean separation of concerns between modules.
The Tax Calculator has already reached this point. For example, there will be need to be two different applications at least - one for admins and one for IT contractors. Both applications, however, will need access to both the question and rules data. The admin will need to be able to view lists of questions and rules so they can edit that data. The IT contractor will need to access the same data to generate the financial information form and their tax calculation. Similarly, administrators need to be able to view subscriptions and create subscription options. Users need to choose subscription options and update subscriptions.
This raises the problem as to which Django app should own each piece of data. Using the conventional monolithic approach, there are many scenarios where one app would need to access the data provided by another app. Furthermore, this is likely to lead to duplicated code in many places.
To avoid this problem, an alternative architectural style is the microservices architecture. Using this style involves hiding data and functionality microservices which are accessed via RESTful APIs. Each API manages the data and provides the functionality for a specific, closely-related set of data models. This allows the functions that process data to be decoupled from the user interfaces which allow users to view and input data. Because the functionality provided by each microservice is accessed via a RESTful API, this means that many Django apps could access the same functionality and data without replicating too much code. This also allows for consistent validation of data where multiple apps can edit the same data.
I therefore decided to opt for the microservices style.
Domain-Driven Design
Having decided to adopt a microservice approach, the next question I had to answer is what are the microservices that I need?
Microservices are closely related to the concept of domain-driven design. Each microservice should manage the data for exactly one domain. Domain-driven design involves designing data models in the software that closely resembles the terminology used by real users of the application. An important aspect of domain design is:
How to organize large domains into a network of Bounded Contexts.
This involves separating complex data models into separate bounded contexts. The guidance is that the context changes when the language changes, and that different contexts have unrelated concepts - but also some overlapping concepts.
Using this approach I was able to identify five bounded contexts. To do this, I worked out from the list of all of the data that the Tax Calculator would need, which bits of data belonged together.
The five contexts are:
- The Jurisdictions context which holds and manages the list of tax jurisdictions.
- The Forms context which holds and manages all of the data needed to generate the forms required to capture the correct financial information from IT contractors.
- The Rules context which holds and manages all of the data needed to generate the tax calculations for a user based on the provided financial information.
- The Subscription context which holds and manages data relating to user subscriptions and options.
- The Payments context which takes payments from users and stores a record of these.
Originally, I had intended to separate out a sixth context - the Calculations context - from the Rules context. However, it became clear that this was not sensible or feasible since the Calculations context would need all of the data contained within the Rules context to do its job. The calculation algorithms are in fact just the functionality associated with the Rules context.
I also considered holding Forms and Rules data as part of the Jurisdiction context. However, Forms and Rules data are not very closely related and this would have felt like too much data and functionality in a single microservice.
High-Level Architecture
Having identified the bounded contexts for the Tax Calculator, I was able to design my high-level architecture as shown below:
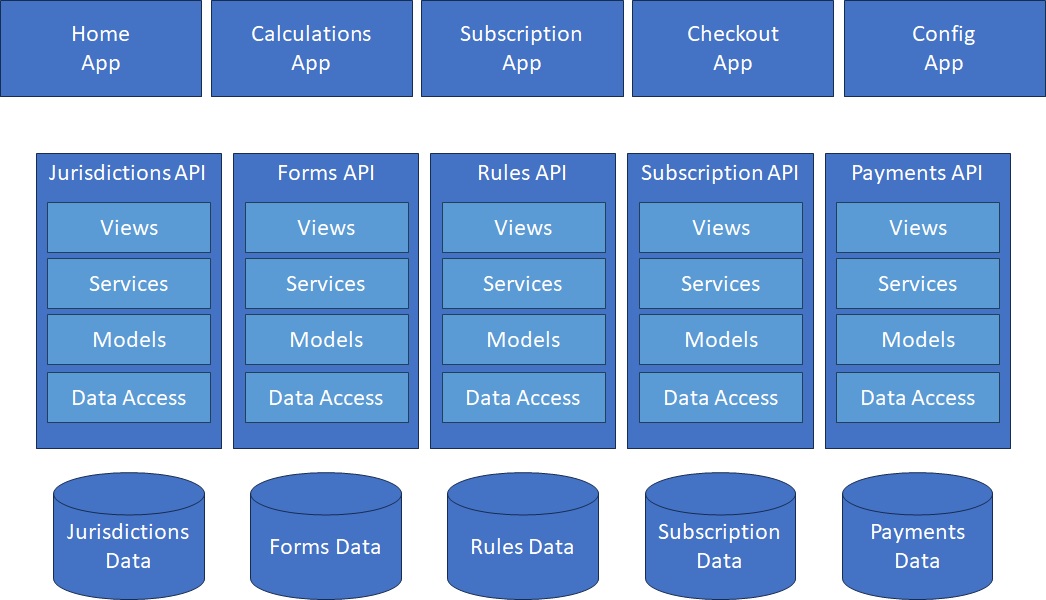
In this diagram, there is an API for each bounded context identified above. Each API is intended to fully own and manage the data and functionality associated with that bounded context.
Additionally, there are a number of Django applications. Each application is intended to contain a complete set of end-to-end user journeys as follows:
- The Home app will contain the index pages and home page for admins and IT contractors, including the contractor dashboard.
- The Calculations app will provide the end-to-end user journey for generating tax calculations, from selecting jurisdictions to viewing calculations.
- The Subscription app will provide the end-to-end user journey for viewing and selecting a subscription option.
- The Checkout app will provide the end-to-end journey for paying for a subscription.
- The Config app provides the end-to-end journey for managing forms and rules data.
API Code Design
An API needs to do a number of things:
- Receive and return HTTP requests and responses and serialise/deserialise these to and from Django models.
- Validate HTTP requests to ensure they contain all of the required data.
- Read and/or write data from and/or to the database.
- Any data processing that may be required.
Following the single-responsibility principle, and loosely based on the Model-View-Controller pattern, I decided to separate out my API code into several layers as shown in the diagram below:
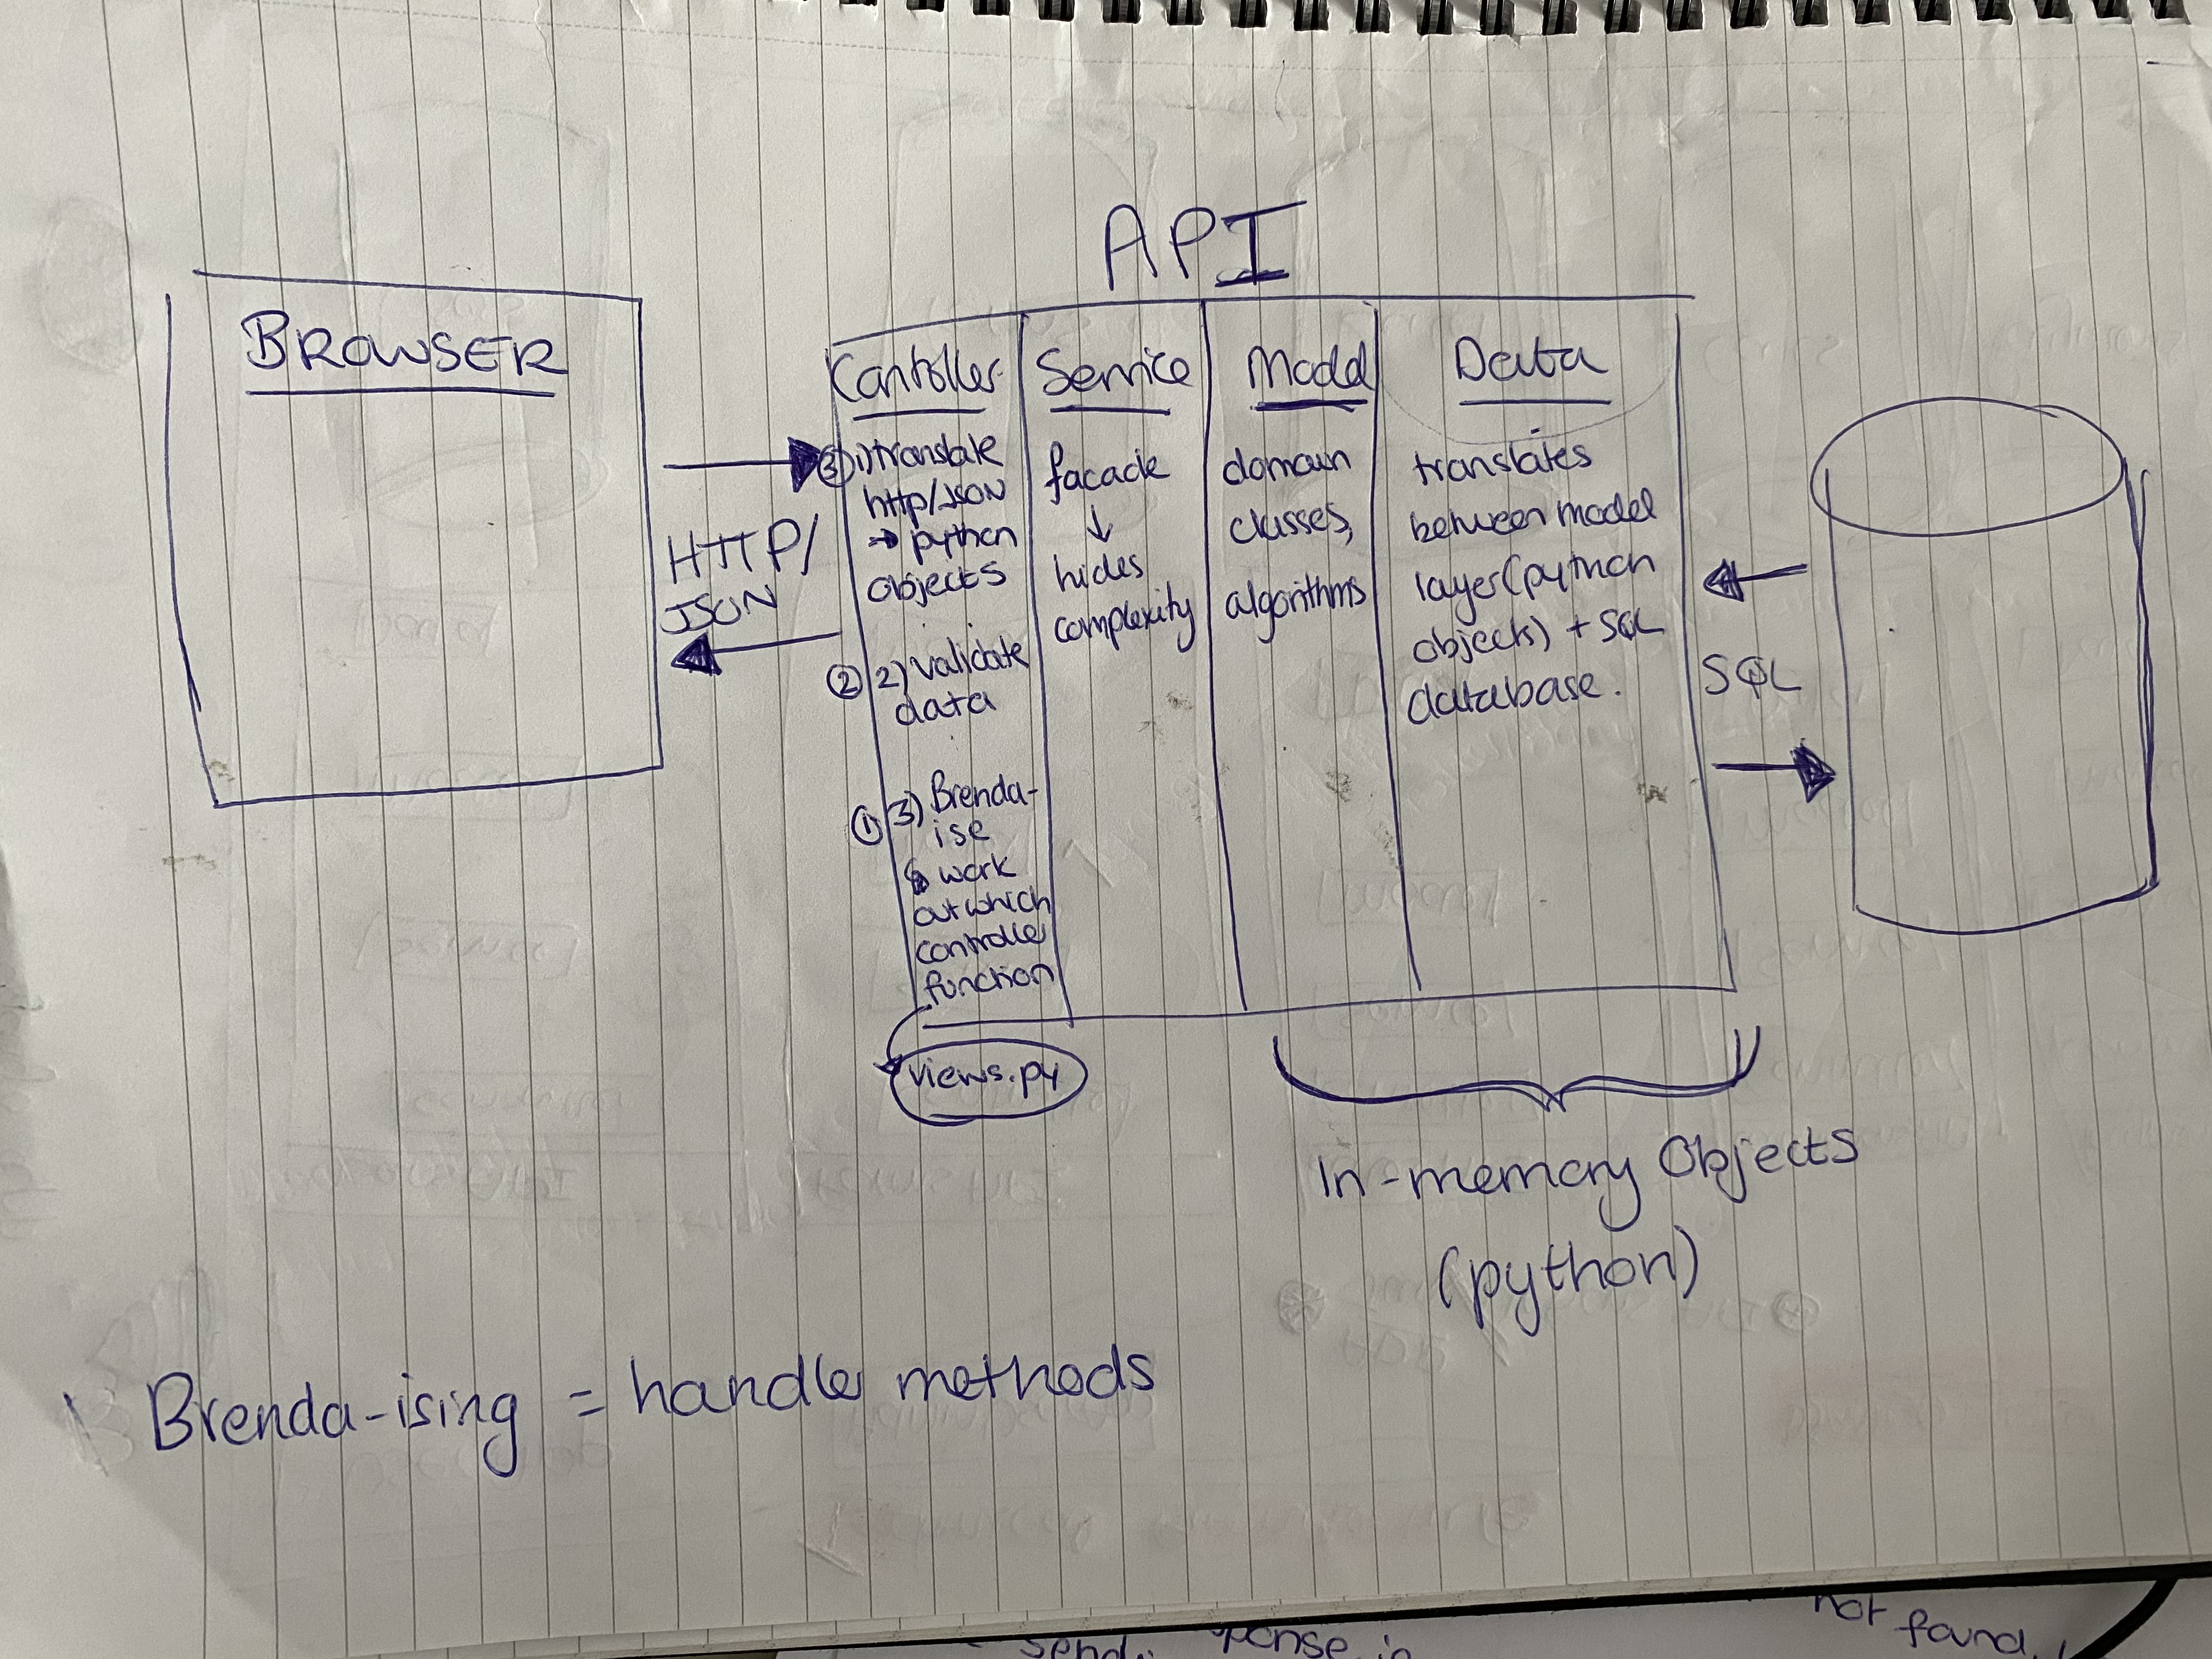
The layers are:
- Views which receive HTTP requests, deserialise them into in-memory data, validate the data, and serialise and return responses.
- Services which encapsulate the individual business functions required to deliver the user stories.
- Models which define the data models for the bounded context, provide data access, and provide atomic methods that operate on the models.
High Level System Flow
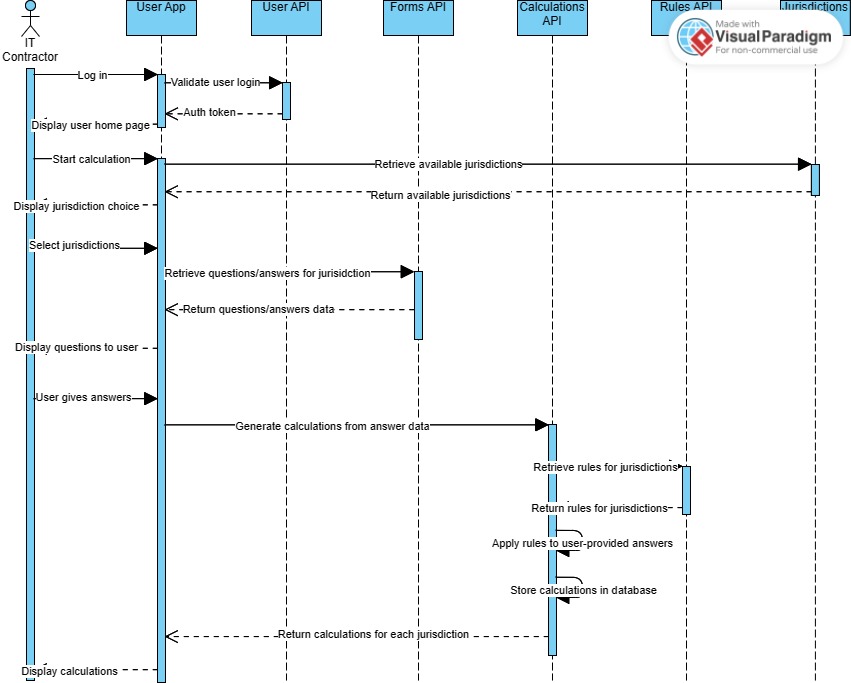
The following diagram provides an early high-level design for how these different components will collaborate to provide the end-to-end calculation journey:
Data Model
The Jurisdictions Domain The data model for the Jurisdiction domain is shown below:
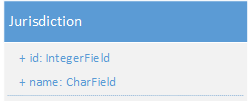
Arguably, this data model is too small to be considered a context in its own right. However, as noted above this data model is referenced by both the Forms and Rules context. Given that the Jurisdiction data model is shared in this way, it was not logical to place the Jurisdiction data model in either the Forms or Rules.
The alternative would have been to place Jurisdiction, Forms and Rules data in a single bounded context but I felt the resulting domain would have been too large with lots of unrelated functionality living behind a single API. This would have broken the single responsibility principle. I therefore felt splitting the Jurisdictions data out was the best option.
The Forms Domain The data model for the Forms domain is shown below:
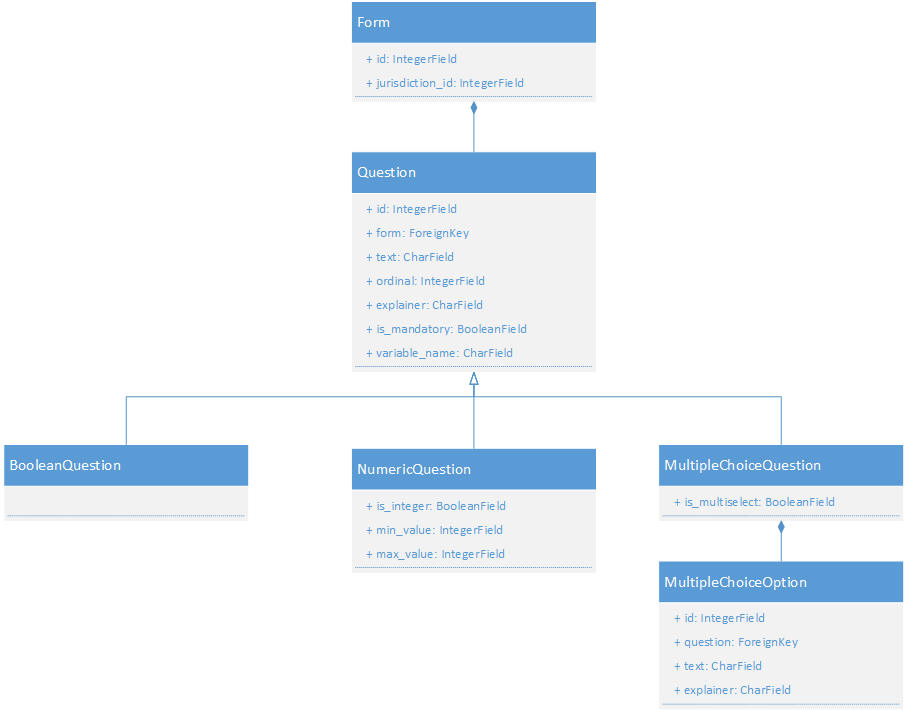
In this data model, Questions for a single jurisdiction are grouped together into a Form. Given that the Form lives in a separate API, it holds the integer ID of the corresponding Jurisdiction rather than a Django foreign key. Holding the Foreign Key would have broken the microservices principle by allowing a model in one service to access the data inside another without going via the API.
The model allows the admin to configure three types of question:
- BooleanQuestions allow Yes or No as a response.
- NumericQuestions allow numeric values to be provided as a response. These responses must fall within the range specified by the min_value and max_value attributes. The responses must also be an integer or a float depending on whether the is_integer field is true or false.
- MultipleChoiceQuestions are composed of MultipleChoiceOptions. The response to a MultipleChoiceQuestion must be one of the options which is defined for that question.
The Rules Domain The data model for the Rules domain is shown below:
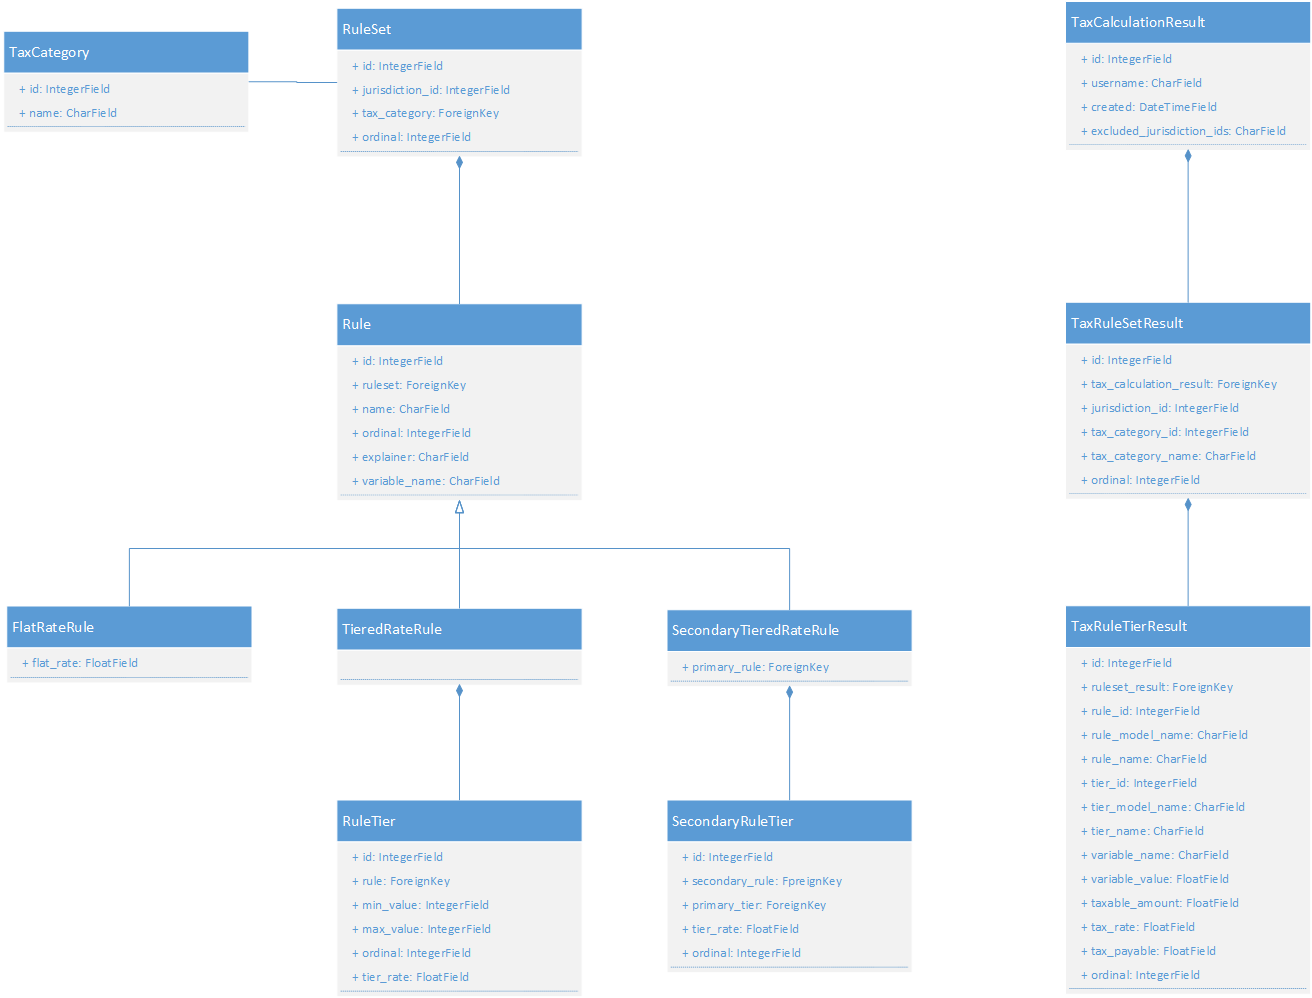
The Rules data model follows a similar pattern to the Questions data model. This is an implementation of the Strategy Pattern which allows multiple implementations of the same function to be used interchangeably. In this case, the functions are the Validate and Calculate functions. This allows multiple rules of varying types to be defined for a jurisdiction and processed without complex conditional logic. Uncle Bob would like this!
TaxCategory objects correspond to different types of tax (e.g., income, corporation, VAT, dividend, inheritance).
RuleSets are used to group all of the tax Rules for a specific Jurisdiction and TaxCategory combination. For example, one RuleSet instance would be defined to hold Corporation Tax rules for France. Another would hold Corporation Tax rules for Germany, and so on.
Three types of rule are supported:
- FlatRateRules apply a single percentage to the full amount for a given income stream.
- TieredRateRules apply tax in bands. Each band defined for the rule specifies a tax rate and the portion of the income stream to which that rate will be applied. For example, UK income tax may charge a rate of 0% on income up to £12,500, 20% on the portion of income between £12,500 to £45,000 and so on.
- SecondaryTieredRateRules (also known as Tiered Rules with Progression) follow the same bands as a specified TieredRateRule (known as the primary rule). However, the secondary income stream starts to be taxed where the primary income ends. As an example, in the UK, dividend tax rates are set based on the total amount of income so if a person's salary falls half way through the higher rate (40%) tax band, the dividend income will start at that same point in the tax band.
The Rules context also contains three models that hold the results of a tax calculation. Rather than just displaying the final amount of tax payable for each jurisdiction, I wanted to be able to display each step of the calculation to the IT Contractors so they can understand how the calculation was reached if they wish to. This data model allows the steps to be grouped and ordered.
- TaxCalculationResults hold all of the steps for the entire calculation across all jurisdictions.
- TaxRuleSetResults group the specific steps for a given RuleSet (tax category/jurisdiction combination).
- TaxRuleTierResults hold the details and result of a specific calculation step.
It's worth noting that these models do not hold foreign keys to any of the RuleSet or Rule data models but instead hold integer IDs referencing the RuleSet or Rule models, as well as the summary data for the associated rules and rulesets. The reason for this is to minimise the complexity of SQL queries when retrieving TaxCalculationResults. Instead of having to join the TaxRuleTierResults to the associated Rules in order to get the details of the step, all of the data needed to explain the step to the user is held within the TaxRuleTierResults.
The Subscriptions Domain The data model for the Subscriptions domain is shown below:

The Payments Domain The data model for the Payments domain is shown below:
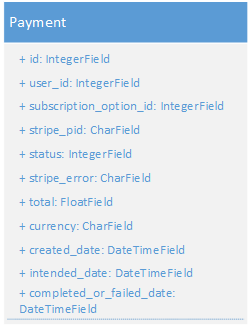
One important factor to note is that the Payment model holds the payment ID that is returned by Stripe for the payment. This is required to properly handle webhooks that are returned by Stripe. By storing the stripe_pid on the Payment model, the API can correctly identify the Payment entity to which a given webhook coming in from Stripe corresponds. This is needed since Stripe cannot hold the API's Payment.id value and a common identifier is needed between the two systems to allow the matching to take place.
It is debatable whether the Payments context should really have been separated out from the Subscriptions context. Initially this decision was taken since the Payment functionality is very different to, and separate from, the functionality required to update Subscriptions. However, an alternative point of view is that the Pamyent process is simply part of the subscription user journey.
One consequence of separating out the Payment and Subscription contexts was that it became harder to update a Subscription once Payment was completed. In a future version of the Tax Calculator, therefore, I would merge these two contexts together.
Testing
For all testing, please refer to the TESTING.md file.
Deployment
The live deployed application can be found at Tax Calculator.
Heroku
This project uses Heroku, a platform as a service (PaaS) that enables developers to build, run, and operate applications entirely in the cloud.
Deployment steps are as follows, after account setup:
- Select New in the top-right corner of your Heroku Dashboard, and select Create new app from the dropdown menu.
- Your app name must be unique, and then choose a region closest to you (EU or USA), and finally, select Create App.
- From the new app Settings, click Reveal Config Vars, and set the following key/value pairs:
AWS_ACCESS_KEY_IDYour AWS access keyAWS_SECRET_ACCESS_KEYYour secret AWS access keyDATABASE_URLYour database URLDEVELOPMENTFalseSECRET_KEYA randomly generated secret keySTRIPE_PUBLIC_KEYYour Stripe public keySTRIPE_SECRET_KEYYour Stripe secret keySTRIPE_WH_SECRETYour Stripe webhook keyUSE_AWSTrueUSE_TEST_DBFalse
Heroku needs two additional files in order to deploy properly.
- requirements.txt
- Procfile
You can install this project's requirements (where applicable) using: pip3 install -r requirements.txt. If you have your own packages that have been installed, then the requirements file needs updated using: pip3 freeze --local > requirements.txt
The Procfile can be created with the following command: echo -e web: python app.py\nworker: celery -A worker.celery worker > Procfile
For Heroku deployment, follow these steps to connect your GitHub repository to the newly created app:
Either:
- Connect Heroku and GitHub.
- Then select "Automatic Deployment" from the Heroku app.
- Click the Deploy Branch button.
Or:
- In the Terminal/CLI, connect to Heroku using this command:
heroku login -i - Set the remote for Heroku:
heroku git:remote -a contractor-tax-calculator - After performing the standard Git
add,commit, andpushto GitHub, you can now type:git push heroku main
The frontend terminal should now be connected and deployed to Heroku.
ElephantSQL DB
This project uses ElephantSQL DB as the relational database for the application's data warehouse.
Deployment steps to create the database in ElephantSQL, after account setup, are as follows:
- From your ElephantSQL
Instancesdashboard, select theCreate New Instancebutton. - In the
Namefield, entercontractor-tax-calculator. - Set the
Planfield toTiny Turtle (Free). - Click the
Select Regionbutton. - In the
Data Centerfield, chooseEU-West-1 (Ireland)and clickReview. - On the next page, choose
Create Instance. - This will send you back to the
Instancesdashboard. Now choose thecontractor-tax-calculatorinstance. - On the
Detailspage, select the eye icon next to theURLfield. Choose theCopyicon next to the URL field. - Now return to the Heroku Settings page.
- Click Reveal Config Vars, and paste the copied database URL as the value for the
DATABASE_URLvar.
Stripe
This project uses Stripe as the payment provider to receive payments for subscriptions from the user.
Deployment steps to set up Stripe integration, after account setup, are as follows:
- From the
Homepage after signing in to Stripe, click the Developers link in the top right hand corner. - Select the API Keys tab
- Copy the
Publishable Keyand paste this into theValuefield for theSTRIPE_PUBLIC_KEYvar in the HerokuSettingspage. - Click the Reveal test key button that is hiding the
Secret keyfield in the Stripe API keys tab. Copy the revealed value. - Copy the
Secret Keyand paste this into theValuefield for theSTRIPE_SECRET_KEYvar in the HerokuSettingspage. - Select the Webhooks tab in the Stripe
Developerspage. Choose Add Endpoint - In the
Endpoint URLfield, enter the URL of your deployed Heroku app, followed by:/api/payments/webhooks/ - Click the Select Events link and in the search box, enter
payment_intent. - Selected the
payment_intent.canceled,payment_intent.payment_failed,payment_intent.requires_actionandpayment_intent.succeededevents. Click Add events. - Choose Add Endpoint.
- From the Webhooks tab in the Stripe
Developerspage, choose the newly-created endpoint. - At the top of the page, under
Signing Secret, click Reveal. Copy the revealed webhook key. - Paste this key as the value of the
STRIPE_WH_SECRETvar in the HerokuSettingspage.
Local Deployment
Gitpod IDE was used to write the code for this project.
To make a local copy of this repository, you can clone the project by typing the follow into your IDE terminal:
git clone https://github.com/Laura10101/cat-identifier.git
You can install this project's requirements (where applicable) using: pip3 install -r requirements.txt.
Create an env.py file, and add the following environment variables:
import os

os.environ['SECRET_KEY'] = "11)7m!ubta%^*^e68=^03k)ht^yyh@724#&%eyn6ihng9i+uim"
os.environ['STRIPE_PUBLIC_KEY'] = 'pk_test_51NDoGHFkVBiDxSnkTY8frrULeHhmIUMQUtoAJPyqnRCV3xM7kgd1PNX4AkWOx7lWDuRdzXTXQCcvIqMvpGLJvUZR00gMGZRSEG'
os.environ['STRIPE_SECRET_KEY'] = 'sk_test_51NDoGHFkVBiDxSnkgbUnGaJO53YUKEj8snA7eqrRYmgRzmzjV0JyOUv1dHF9VUAmgg9lfGOoORrnYT126SpgFk7m00HsjjFcmm'
os.environ['STRIPE_WH_SECRET'] = 'whsec_PBvl6xDiaj1yrqG8dQ3mQLLyslnheCj0'
os.environ['DATABASE_URL'] = 'postgres://mqrlkcwy:aAuiwNbWU-9KjIL1Vsrrxn8ju8ZZuSXl@tyke.db.elephantsql.com/mqrlkcwy'
os.environ['DEVELOPMENT'] = 'True'
os.environ['USE_TEST_DB'] = 'False'
Alternatively, if using Gitpod, you can click below to create your own workspace using this repository.
Credits
Thanks
I would like to thank the Code Institute for all of the support through all four of my projects. Special thanks goes to Tim Nelson who was my personal tutor. He is a remarkable software professional and has a natural ability to teach and inspire.
Educational Resources
- Uncle Bob’s Clean Code
- Fowler on domain-driven design
- Fowler on microservices
- Monolithic architecture
- Fowler on RESTful APIs
- Fowler on bounded contexts
- Government tax websites/legal resources
- Canva pallet picker (with colours amended by me)
- Gang of Four Design Patterns
- Django Best Practices: Projects vs Apps | LearnDjango.com
- Django Stripe Subscriptions | TestDriven.io
- Strategy (refactoring.guru)
- Serializing Django objects | Django documentation | Django (djangoproject.com)
- Convert Queryset To Json In Django (letscodemore.com)
- URL dispatcher | Django documentation | Django (djangoproject.com)
- How to read JSON data in an HTTP POST request in Django | by Sampath Surineni | Medium
- python - How to disable Django's CSRF validation? - Stack Overflow
- REST/HTTP - Should you use a body for your DELETE requests? (peterdaugaardrasmussen.com)
- (2) How to delete multiple objects in django? : djangolearning (reddit.com)
- Getting query params from request in Django - https://pythoncircle.com
- Python String split() Method (w3schools.com)
- Making queries | Django documentation | Django (djangoproject.com)
- Model Inheritance In Python Django (buildatscale.tech)
- Modeling Polymorphism in Django With Python – Real Python
- Quickstart — django-polymorphic 3.1 documentation
- Getting query params from request in Django - https://pythoncircle.com
- python 2.7 - How to return HTTP 400 response in Django? - Stack Overflow
- Http Delete request to django returns a 301(Moved permenantly)_django_Mangs-DevPress官方社区 (csdn.net)
- Add Months to datetime Object in Python - GeeksforGeeks
- python - how to get request object in django unit testing? - Stack Overflow
- Advanced testing topics | Django documentation | Django (djangoproject.com)
- How to write and report assertions in tests — pytest documentation
- Django helpers — pytest-django documentation
- Python: Fastest — Convert list of integers to comma separated string | by Akshay Chavan | Medium
- Use incoming webhooks to get real-time updates | Stripe Documentation
- Stripe API Reference - The event object
- How intents work | Stripe Documentation
- Stripe API Reference - The PaymentIntent object
- Stripe Documentation - Create Payment Method
- How to create Django admin with readonly permissions for all users
- How to add an attribute to Django request
- Helper function to remove all child nodes of a DOM element
- Django Polymorphic issues with cascading delete
- Django - Reduce no. of DB connections
- Jest - testing asynchronous code
- Jest - configure test URL
- W3Schools - Remove file if it exists
- Django - running Django in standalone mode
- Deep clone technique
- Load relative file paths using Node.js
- Restricting Django views to logged in users
- Stripe address element documentation
- Stripe address element example
- Order specific value first when retrieving Django objects
- Deduplicating a Javascript array
- Waiting for multiple JQuery AJAX requests to complete
- Extracting protocol and hostname from URL in JavaScript
- Reading Jest config in test code