![]()
RVT-2: Learning Precise Manipulation from Few Examples
Ankit Goyal, Valts Blukis, Jie Xu, Yijie Guo, Yu-Wei Chao, Dieter Fox
RSS 2024
RVT: Robotic View Transformer for 3D Object Manipulation
Ankit Goyal, Jie Xu, Yijie Guo, Valts Blukis, Yu-Wei Chao, Dieter Fox
CoRL 2023 (Oral)
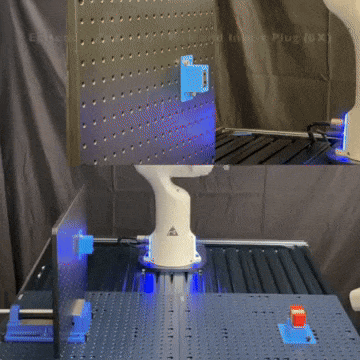
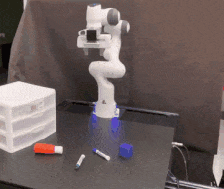
RVT-2 solving high precision tasks Single RVT solving multiple tasks
This is the official repository that reproduces the results for RVT-2 and RVT. The repository is backward compatible. So you just need to pull the latest commit and can switch from RVT to RVT-2!
If you find our work useful, please consider citing our:
@article{goyal2024rvt2,
  title={RVT2: Learning Precise Manipulation from Few Demonstrations},
  author={Goyal, Ankit and Blukis, Valts and Xu, Jie and Guo, Yijie and Chao, Yu-Wei and Fox, Dieter},
  journal={RSS},
  year={2024},
}
@article{goyal2023rvt,
  title={RVT: Robotic View Transformer for 3D Object Manipulation},
  author={Goyal, Ankit and Xu, Jie and Guo, Yijie and Blukis, Valts and Chao, Yu-Wei and Fox, Dieter},
  journal={CoRL},
  year={2023}
}
Getting Started
Install
-
Tested (Recommended) Versions: Python 3.8. We used CUDA 11.1.
-
Step 1 (Optional): We recommend using conda and creating a virtual environment.
conda create --name rvt python=3.8 conda activate rvt -
Step 2: Install PyTorch. Make sure the PyTorch version is compatible with the CUDA version. One recommended version compatible with CUDA 11.1 and PyTorch3D can be installed with the following command. More instructions to install PyTorch can be found here.
conda install pytorch==1.12.1 torchvision==0.13.1 torchaudio==0.12.1 cudatoolkit=11.3 -c pytorch
Recently, we noticed an issue while using conda to install PyTorch. More details can be found here. If you face the same issue, you can use the following command to install PyTorch using pip.
pip install torch==1.12.1 torchvision==0.13.1 torchaudio==0.12.1 --index-url https://download.pytorch.org/whl/cu113- Step 3: Install PyTorch3D.
You can skip this step if you only want to use RVT-2 as it uses our custom Point-Renderer for rendering. PyTorch3D is required for RVT.
One recommended version that is compatible with the rest of the library can be installed as follows. Note that this might take some time. For more instructions visit here.
curl -LO https://github.com/NVIDIA/cub/archive/1.10.0.tar.gz
tar xzf 1.10.0.tar.gz
export CUB_HOME=$(pwd)/cub-1.10.0
pip install 'git+https://github.com/facebookresearch/pytorch3d.git@stable'- Step 4: Install CoppeliaSim. PyRep requires version 4.1 of CoppeliaSim. Download and unzip CoppeliaSim:
- Ubuntu 16.04
- Ubuntu 18.04
- Ubuntu 20.04
Once you have downloaded CoppeliaSim, add the following to your ~/.bashrc file. (NOTE: the 'EDIT ME' in the first line)
export COPPELIASIM_ROOT=<EDIT ME>/PATH/TO/COPPELIASIM/INSTALL/DIR
export LD_LIBRARY_PATH=$LD_LIBRARY_PATH:$COPPELIASIM_ROOT
export QT_QPA_PLATFORM_PLUGIN_PATH=$COPPELIASIM_ROOT
export DISPLAY=:1.0
Remember to source your .bashrc (source ~/.bashrc) or .zshrc (source ~/.zshrc) after this.
- Step 5: Clone the repository with the submodules using the following command.
git clone --recurse-submodules git@github.com:NVlabs/RVT.git && cd RVT && git submodule update --initNow, locally install the repository. You can either pip install -e '.[xformers]' to install the library with xformers or pip install -e . to install without it. We recommend using the former as improves speed. However, sometimes the installation might fail due to the xformers dependency. In that case, you can install the library without xformers. The performance difference between the two is minimal but speed could be slower without xformers.
pip install -e '.[xformers]' Install, required libraries for PyRep, RLBench, YARR, PerAct Colab, and Point Renderer.
pip install -e rvt/libs/PyRep
pip install -e rvt/libs/RLBench
pip install -e rvt/libs/YARR
pip install -e rvt/libs/peract_colab
pip install -e rvt/libs/point-renderer-
Step 6: Download dataset.
-
For experiments on RLBench, we use pre-generated dataset provided by PerAct. Please download and place them under
RVT/rvt/data/xxxwherexxxis eithertrain,test, orval. -
Additionally, we use the same dataloader as PerAct, which is based on YARR. YARR creates a replay buffer on the fly which can increase the startup time. We provide an option to directly load the replay buffer from the disk. We recommend using the pre-generated replay buffer (98 GB) as it reduces the startup time. You can either download replay.tar.xz which contains the replay buffer for all tasks or replay buffer for indidual tasks. After downloading, uncompress the replay buffer(s) (for example using the command
tar -xf replay.tar.xz) and place it underRVT/rvt/replay/replay_xxxwherexxxis eithertrainorval. Note that is useful only if you want to train RVT from scratch and not needed if you want to evaluate the pre-trained model.
-
Using the library
Training
Training RVT-2
To train RVT-2 on all RLBench tasks, use the following command (from folder RVT/rvt):
python train.py --exp_cfg_path configs/rvt2.yaml --mvt_cfg_path mvt/configs/rvt2.yaml --device 0,1,2,3,4,5,6,7 Training RVT
To train RVT, use the following command (from folder RVT/rvt):
python train.py --exp_cfg_path configs/rvt.yaml --device 0,1,2,3,4,5,6,7We use 8 V100 GPUs. Change the device flag depending on available compute.
More details about train.py
- default parameters for an
experimentare defined here. - default parameters for
rvtare defined here. - the parameters in for
experimentandrvtcan be overwritten by two ways:- specifying the path of a yaml file
- manually overwriting using a
optsstring of format<param1> <val1> <param2> <val2> ..
- Manual overwriting has higher precedence over the yaml file.
python train.py --exp_cfg_opts <> --mvt_cfg_opts <> --exp_cfg_path <> --mvt_cfg_path <>The following command overwrites the parameters for the experiment with the configs/all.yaml file. It also overwrites the bs parameters through the command line.
python train.py --exp_cfg_opts "bs 4" --exp_cfg_path configs/rvt.yaml --device 0Evaluate on RLBench
Evaluate RVT-2 on RLBench
Download the pretrained RVT-2 model. Place the model (model_99.pth trained for 99 epochs or ~80K steps with batch size 192) and the config files under the folder RVT/rvt/runs/rvt2/. Run evaluation using (from folder RVT/rvt):
python eval.py --model-folder runs/rvt2 --eval-datafolder ./data/test --tasks all --eval-episodes 25 --log-name test/1 --device 0 --headless --model-name model_99.pthEvaluate RVT on RLBench
Download the pretrained RVT model. Place the model (model_14.pth trained for 15 epochs or 100K steps) and the config files under the folder runs/rvt/. Run evaluation using (from folder RVT/rvt):
python eval.py --model-folder runs/rvt --eval-datafolder ./data/test --tasks all --eval-episodes 25 --log-name test/1 --device 0 --headless --model-name model_14.pthEvaluate the official PerAct model on RLBench
Download the officially released PerAct model.
Put the downloaded policy under the runs folder with the recommended folder layout: runs/peract_official/seed0.
Run the evaluation using:
python eval.py --eval-episodes 25 --peract_official --peract_model_dir runs/peract_official/seed0/weights/600000 --model-name QAttentionAgent_layer0.pt --headless --task all --eval-datafolder ./data/test --device 0 Gotchas
-
If you face issues installing
xformersand PyTorch3D, information in this issue might be useful https://github.com/NVlabs/RVT/issues/45. -
If you get qt plugin error like
qt.qpa.plugin: Could not load the Qt platform plugin "xcb" <somepath>/cv2/qt/plugins" even though it was found, try uninstalling opencv-python and installing opencv-python-headless
pip uninstall opencv-python
pip install opencv-python-headless-
If you have CUDA 11.7, an alternate installation strategy could be to use the following command for Step 2 and Step 3. Note that this is not heavily tested.
# Step 2: pip install pytorch torchvision torchaudio # Step 3: pip install 'git+https://github.com/facebookresearch/pytorch3d.git@stable' -
If you are having issues running evaluation on a headless server, please refer to https://github.com/NVlabs/RVT/issues/2#issuecomment-1620704943.
-
If you want to generate visualization videos, please refer to https://github.com/NVlabs/RVT/issues/5.
FAQ's
Q. What is the advantag of RVT-2 and RVT over PerAct?
RVT's are both faster to train and performs better than PerAct.
Q. What resources are required to train RVT?
For training on 18 RLBench tasks, with 100 demos per task, we use 8 V100 GPUs (16 GB memory each). The model trains in ~1 day.
Note that for fair comparison with PerAct, we used the same dataset, which means duplicate keyframes are loaded into the replay buffer. For other datasets, one could consider not doing so, which might further speed up training.
Q. Why do you use pe_fix=True in the rvt config?
For fair comparison with offical PerAct model, we use this setting. More detials about this can be found in PerAct code. For future, we recommend using pe_fix=False for language input.
Q. Why are the results for PerAct different from the PerAct paper?
In the PerAct paper, for each task, the best checkpoint is chosen based on the validation set performance. Hence, the model weights can be different for different tasks. We evaluate PerAct and RVT only on the final checkpoint, so that all tasks are strictly evaluated on the same model weights. Note that only the final model for PerAct has been released officially.
Q. Why is there a variance in performance on RLBench even when evaluting the same checkpoint?
We hypothesize that it is because of the sampling based planner used in RLBench, which could be the source of the randomization. Hence, we evaluate each checkpoint 5 times and report mean and variance.
Q. Why did you use a cosine decay learning rate scheduler instead of a fixed learning rate schedule as done in PerAct?
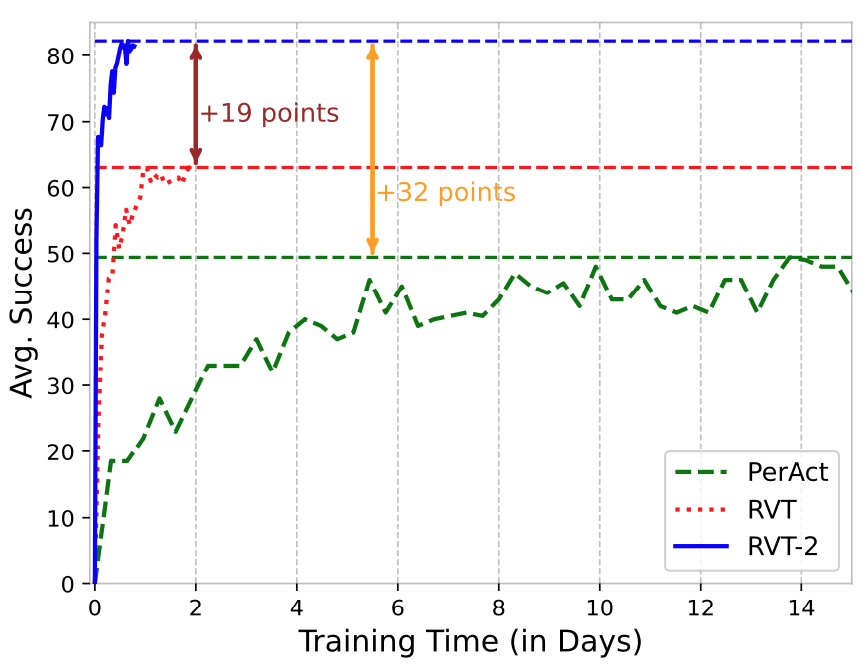
We found the cosine learning rate scheduler led to faster convergence for RVT. Training PerAct with our training hyper-parameters (cosine learning rate scheduler and same number of iterations) led to worse performance (in ~4 days of training time). Hence for Fig. 1, we used the official hyper-parameters for PerAct.
Q. For my use case, I want to render images at real camera locations (input camera poses) with PyTorch3D. Is it possible to do so and how can I do that?
Yes, it is possible to do so. A self-sufficient example is present here. Depending on your use case, the code may need be modified. Also note that 3D augmentation cannot be used while rendering images at real camera locations as it would change the pose of the camera with respect to the point cloud.
For questions and comments, please contact Ankit Goyal.
Acknowledgement
We sincerely thank the authors of the following repositories for sharing their code.
License
License Copyright © 2023, NVIDIA Corporation & affiliates. All rights reserved.
This work is made available under the Nvidia Source Code License. The pretrained RVT models are released under the CC-BY-NC-SA-4.0 license.