The author of this plugin will continue to support it in a separate repo exclusively as part of ProPlugins. This repo will remain supported by the NativeScript community.
Contribution - help wanted
This plugin is supported by the NativeScript community. All PRs are welcome but make sure that the demo applications work correctly before creating a new PR. If you do not have an issue you are facing but want to contribute to this plugin you can find a list of the on going issues here.
Creating a PR checklist:
- Fork the repo
- Add new functionality or fix an issue and push it to your fork
- Start both demo and demo-ng apps and make sure they work correctly (make sure that no console errors are thrown on both iOS and Android)
- From your fork create a PR targeting the 'master' branch of this repository
Thank you for your contribution.
NativeScript DropDown widget


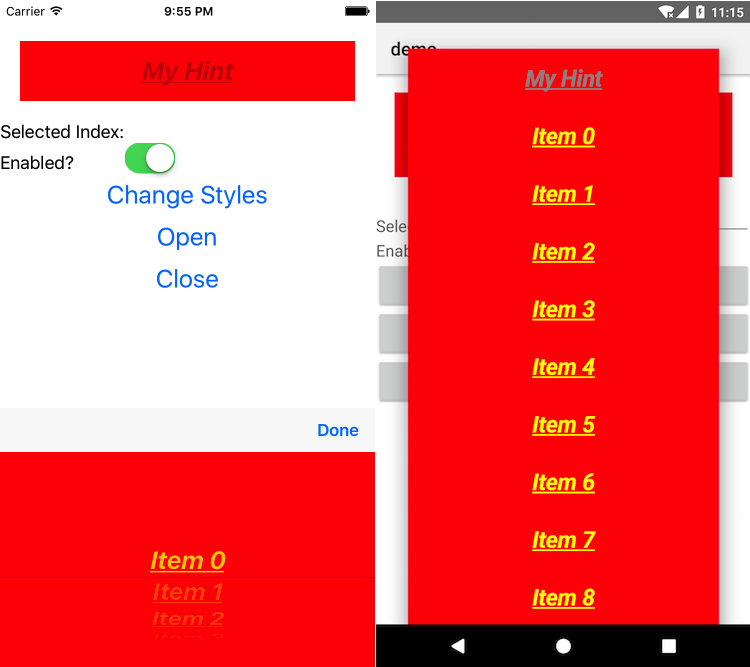
A NativeScript DropDown widget. The DropDown displays items from which the user can select one. For iOS it wraps up a UILabel with an inputView set to an UIPickerView which displays the items. For Android it wraps up the Spinner widget.
Screenshot
Installation
Run the following command from the root of your project:
tns plugin add nativescript-drop-down
This command automatically installs the necessary files, as well as stores nativescript-drop-down as a dependency in your project's package.json file.
Configuration
There is no additional configuration needed!
API
Events
-
opened
Triggered when the DropDown is opened. -
closed
Triggered when the DropDown is closed. -
selectedIndexChanged
Triggered when the user changes the selection in the DropDown
Static Properties
-
openedEvent - String
String value used when hooking to opened event. -
closedEvent - String
String value used when hooking to closed event. -
selectedIndexChangedEvent - String
String value used when hooking to selectedIndexChanged event.
Instance Properties
-
ios - UILabel
Gets the native iOS view that represents the user interface for this component. Valid only when running on iOS. -
android - android.widget.Spinner
Gets the native android widget that represents the user interface for this component. Valid only when running on Android OS. -
items - Array | ItemsSource
Gets or sets the items collection of the DropDown. The items property can be set to an array or an object defining length and getItem(index) method. -
selectedIndex - Number
Gets or sets the selected index of the DropDown. -
hint - String
Gets or sets the hint for the DropDown. -
isEnabled - boolean
Gets or sets whether the drop down is enabled. If you want to apply a specific style you can use the:disabledpseudo css selector. -
accessoryViewVisible - boolean (Default: true)
Gets/sets whether there will be an accessory view (toolbar with Done button) under iOS. Valid only when running on iOS. -
itemsTextAlignment - String Gets or sets the alignment for items in the DropDown.
-
itemsPadding - String Gets or sets the padding for items in the DropDown.
Methods
-
open(): void
Opens the drop down. -
close(): void
Closes the drop down.
Usage
You need to add xmlns:dd="nativescript-drop-down" to your page tag, and then simply use <dd:DropDown/> in order to add the widget to your page.
<!-- test-page.xml -->
<Page xmlns="http://schemas.nativescript.org/tns.xsd" loaded="pageLoaded" xmlns:dd="nativescript-drop-down">
  <GridLayout rows="auto, auto, *" columns="auto, *">
    <dd:DropDown items="{{ items }}" selectedIndex="{{ selectedIndex }}"
                 opened="dropDownOpened" closed="dropDownClosed"
                 selectedIndexChanged="dropDownSelectedIndexChanged"
                 row="0" colSpan="2" />
    <Label text="Selected Index:" row="1" col="0" fontSize="18" verticalAlignment="bottom"/>
    <TextField text="{{ selectedIndex }}" row="1" col="1" />
  </GridLayout>
</Page>
// test-page.ts
import observable = require("data/observable");
import observableArray = require("data/observable-array");
import pages = require("ui/page");
import { SelectedIndexChangedEventData } from "nativescript-drop-down";
var viewModel: observable.Observable;
export function pageLoaded(args: observable.EventData) {
var page = <pages.Page>args.object;
var items = new observableArray.ObservableArray();
viewModel = new observable.Observable();
for (var loop = 0; loop < 20; loop++) {
items.push("Item " + loop.toString());
}
viewModel.set("items", items);
viewModel.set("selectedIndex", 15);
page.bindingContext = viewModel;
}
export function dropDownOpened(args: EventData) {
console.log("Drop Down opened");
}
export function dropDownClosed(args: EventData) {
console.log("Drop Down closed");
}
export function dropDownSelectedIndexChanged(args: SelectedIndexChangedEventData) {
console.log(`Drop Down selected index changed from ${args.oldIndex} to ${args.newIndex}`);
}Usage in Angular
Migration to 3.0+
- Remove:
registerElement("DropDown", () => require("nativescript-drop-down/drop-down").DropDown);` - Import
DropDownModuleinNgModule:import { DropDownModule } from "nativescript-drop-down/angular"; //...... @NgModule({ //...... imports: [ //...... DropDownModule, //...... ], //...... })
Example Usage
// main.ts
import { NgModule } from "@angular/core";
import { NativeScriptModule } from "nativescript-angular/nativescript.module";
import { platformNativeScriptDynamic } from "nativescript-angular/platform";
import { DropDownModule } from "nativescript-drop-down/angular";
import { AppComponent } from "./app.component";

@NgModule({
    declarations: [ AppComponent ],
    bootstrap:    [ AppComponent ],
    imports:      [
        NativeScriptModule,
        DropDownModule,
    ],
})
class AppComponentModule {
}

platformNativeScriptDynamic().bootstrapModule(AppComponentModule);
<!-- app.component.html -->
<StackLayout>
<GridLayout rows="auto, auto, *"
columns="auto, *">
<DropDown #dd
backroundColor="red"
itemsTextAlignment="center"
[items]="items"
[(ngModel)]="selectedIndex"
(selectedIndexChanged)="onchange($event)"
(opened)="onopen()"
(closed)="onclose()"
row="0"
colSpan="2"></DropDown>
<Label text="Selected Index:"
row="1"
col="0"
fontSize="18"
verticalAlignment="bottom"></Label>
<TextField [text]="selectedIndex"
row="1"
col="1"></TextField>
</GridLayout>
</StackLayout>// app.component.ts
import { Component } from "@angular/core";
import { SelectedIndexChangedEventData } from "nativescript-drop-down";
@Component({
selector: "my-app",
templateUrl:"app.component.html",
})
export class AppComponent {
public selectedIndex = 1;
public items: Array<string>;
constructor() {
this.items = [];
for (var i = 0; i < 5; i++) {
this.items.push("data item " + i);
}
}
public onchange(args: SelectedIndexChangedEventData) {
console.log(`Drop Down selected index changed from ${args.oldIndex} to ${args.newIndex}`);
}
public onopen() {
console.log("Drop Down opened.");
}
public onclose() {
console.log("Drop Down closed.");
}
}Set the selectedIndex value in Angular
Get an instance of the child drop down component like this:
@ViewChild('dd') dropDown: ElementRef;
// set the index programatically from the parent component
this.dropDown.nativeElement.selectedIndex = <some number from code>
Working with value and display members
It is a common case that you want to have one thing displayed in the drop down and then get some backend value
tied to the tex. For example drop down with states you might want tos how the full state name (i.e. Florida)
and then when working with your backend you want to use the state code (i.e. FL). The Drop Down items property can be
set to either Array of objects or a custom object that implements getItem(index: number): any function and length proerty. With versionn 3.0 of the plugin it has a built in class that helps you with this scenario:
import { ValueList } from "nativescript-drop-down";Then you can set the items property of the DropDown to an instance of ValueList:
let dd = page.getViewById<DropDown>("dd");
let itemSource = new ValueList<string>([
    { value: "FL", display: "Florida" },
    { value: "MI", display: "Michigan" }
]);
dd.items = itemSource;
This enables you to do things like:
1.If you want to select an item in the DropDown by its backend value (for example FL), you can do this with:
dd.selectedIndex = itemSource.getIndex("FL");2.You can get the backend value of what the user selected using:
let selectedValue = itemSource.getValue(dd.selectedIndex);Demos
This repository includes both Angular and plain NativeScript demos. In order to run those execute the following in your shell:
$ git clone https://github.com/peterstaev/nativescript-drop-down
$ cd nativescript-drop-down
$ npm install
$ npm run demo-ios
This will run the plain NativeScript demo project on iOS. If you want to run it on Android simply use the -android instead of the -ios sufix.
If you want to run the Angular demo simply use the demo-ng- prefix instead of demo-.
Donate
![]()
bitcoin:14fjysmpwLvSsAskvLASw6ek5XfhTzskHC
