ChipView
ChipView enables you to easily create Chip list with optional click listener on each Chip.
ChipView is highly customizable to the point you can control every Chip layout and background colors (normal and selected) individually.
How to use
Default mode
Just add ChipView to your layout (or programmatically) :
<com.plumillonforge.android.chipview.ChipView
        android:id="@+id/chipview"
        android:layout_width="match_parent"
        android:layout_height="wrap_content" />
Then prepare your data, each item on the ChipView must implements the Chip interface, just to know what String to display (via the getText() method) :
public class Tag implements Chip {
    private String mName;
    private int mType = 0;

    public Tag(String name, int type) {
        this(name);
        mType = type;
    }

    public Tag(String name) {
        mName = name;
    }

    @Override
    public String getText() {
        return mName;
    }

    public int getType() {
        return mType;
    }
}
Now you're free to go by adding Chip to your ChipView :
List<Chip> chipList = new ArrayList<>();
chipList.add(new Tag("Lorem"));
chipList.add(new Tag("Ipsum dolor"));
chipList.add(new Tag("Sit amet"));
chipList.add(new Tag("Consectetur"));
chipList.add(new Tag("adipiscing elit"));
ChipView chipDefault = (ChipView) findViewById(R.id.chipview);
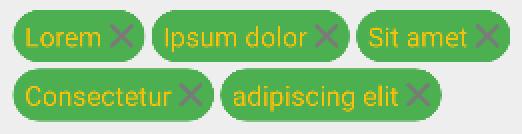
chipDefault.setChipList(chipList);ChipView will be displayed with default settings :

ChipView adapter
The ChipView library uses an adapter to display his data, he creates a default one if you don't specify yours.
The ChipView class is also a wrapper to his current adapter to simplify adapter methods call.
If you want to provide your own implementation of adapter, just extend ChipViewAdapter :
public class MainChipViewAdapter extends ChipViewAdapter {
    public MainChipViewAdapter(Context context) {
        super(context);
    }

    @Override
    public int getLayoutRes(int position) {
        Tag tag = (Tag) getChip(position);

        switch (tag.getType()) {
            default:
            case 2:
            case 4:
                return 0;

            case 1:
            case 5:
                return R.layout.chip_double_close;

            case 3:
                return R.layout.chip_close;
        }
    }

    @Override
    public int getBackgroundColor(int position) {
        Tag tag = (Tag) getChip(position);

        switch (tag.getType()) {
            default:
                return 0;

            case 1:
            case 4:
                return getColor(R.color.blue);

            case 2:
            case 5:
                return getColor(R.color.purple);

            case 3:
                return getColor(R.color.teal);
        }
    }

    @Override
    public int getBackgroundColorSelected(int position) {
        return 0;
    }

    @Override
    public int getBackgroundRes(int position) {
        return 0;
    }

    @Override
    public void onLayout(View view, int position) {
        Tag tag = (Tag) getChip(position);

        if (tag.getType() == 2)
            ((TextView) view.findViewById(android.R.id.text1)).setTextColor(getColor(R.color.blue));
    }
And set the ChipView adapter :
ChipViewAdapter adapter = new MainChipViewAdapter(this);
chipView.setAdapter(adapter)
Since ChipView is creating his own default adapter, don't forget to set your adapter before anything else to avoid manipulating the wrong adapter
Click listener
If you want to register a listener when a Chip is clicked, implement OnChipClickListener :
chipDefault.setOnChipClickListener(new OnChipClickListener() {
            @Override
            public void onChipClick(Chip chip) {
                // Action here !
            }
        });
More layout control
If the default layout and backgroud color doesn't match your needs, you can override it in different ways.
XML attributes (without custom adapter)
Here is an example of all possible XML attributes :
<com.plumillonforge.android.chipview.ChipView
    android:id="@+id/text_chip_attrs"
    android:layout_width="match_parent"
    android:layout_height="wrap_content"
    chip:chip_background="@color/deep_orange"
    chip:chip_background_selected="@color/blue_grey"
    chip:chip_corner_radius="6dp"
    chip:chip_line_spacing="20dp"
    chip:chip_padding="10dp"
    chip:chip_side_padding="10dp"
    chip:chip_spacing="16dp"
    chip:chip_background_res="@drawable/chip_selector" />
chip_background and chip_background_selected will be overrided by chip_background_res if provided
Changing the background colors
You can change all the Chip background in one line :
chipView.setBackgroundColor(getResources().getColor(R.color.light_green));If you got a click listener and want another color when clicked :
chipView.setChipBackgroundColorSelected(getResources().getColor(R.color.green));Or if you prefer to control the click color feedback with your own selector :
chipView.setChipBackgroundRes(R.drawable.chipview_selector);Or remove the background completely with setHasBackground
Changing the Chip spacing, line spacing, Chip padding and corner radius
- You can control the space between
ChipwithsetChipSpacing(default is 4dp) - You can control the space between each line of
ChipwithsetChipLineSpacing(default is 4dp) - You can control the top and bottom
Chippadding withsetChipPadding(default is 2dp) - You can control the left and right
Chippadding withsetChipSidePadding(default is 6dp) - You can control the
Chipbackground corner radiussetChipCornerRadius(default is 16dp)
Changing all the Chip layout
If you want your own layout for all Chip, you can specify it in your adapter (or via the ChipView proxy method) :
chipView.setChipLayoutRes(R.layout.chip_close);A TextView with android:id="@android:id/text1" is mandatory in the layout
The background is set on the layout root View by default, if you need to place the background on a specific View on the layout, please provide a android:id="@android:id/content".
Chip spacing and line spacing rules
- If the layout doesn't got a right margin, we fall back to
ChipViewChip spacing - If the layout doesn't got a bottom margin, we fall back to
ChipViewChip line spacing
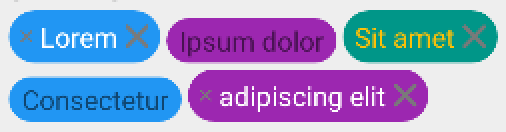
Controlling layout and background colors individually
If you need to customize your Chip individually, you can do so by overriding your ChipViewAdapter getLayoutRes(int position), getBackgroundColor(int position) and getBackgroundColorSelected(int position) methods.
For example :
    @Override
    public int getLayoutRes(int position) {
        Tag tag = (Tag) getChip(position);

        switch (tag.getType()) {
            default:
            case 2:
            case 4:
                return 0;

            case 1:
            case 5:
                return R.layout.chip_double_close;

            case 3:
                return R.layout.chip_close;
        }
    }

    @Override
    public int getBackgroundColor(int position) {
        Tag tag = (Tag) getChip(position);

        switch (tag.getType()) {
            default:
                return 0;

            case 1:
            case 4:
                return getColor(R.color.blue);

            case 2:
            case 5:
                return getColor(R.color.purple);

            case 3:
                return getColor(R.color.teal);
        }
    }
The Chip falls back to ChipView overall behaviour if you return 0.
Last chance to modify your layout
The adapter got a onLayout method where you can manipulate each Chip View, this is the last place where you will be able to add logic to change the View itself :
    @Override
    public void onLayout(View view, int position) {
        Tag tag = (Tag) getChip(position);

        if (tag.getType() == 2)
            ((TextView) view.findViewById(android.R.id.text1)).setTextColor(getColor(R.color.blue));
    }
How to use
Gradle
You can include ChipView in your Gradle dependencies via JitPack.
Example for the 1.2.0 release :
repositories {
        maven { url "https://jitpack.io" }
}

dependencies {
        compile 'com.github.Plumillon:ChipView:1.2.0'
}
Cloning
You can also choose to download or clone it to your project and use it as a library.
Why ?
ChipView is a personal need for one of my project, I decided to develop and distribute it because I couldn't find anything which matched what I was seeking.
How does this work
ChipView extends ViewGroup and will contain each Chip as his child view.
His data and Views are driven by his adapter which can be a default one if not specified.
Improve it !
Each suggestion and correction is welcome, do not hesitate !
Licensing
ChipView is published with Apache Licence
How tenacious
You read it to the extra end ! Congratulations, here is a potato :)