Multiscale Object Contrastive Learning-Derived Few-Shot Object Detection in VHR Imagery
The code for “Multiscale Object Contrastive Learning–Derived Few-Shot Object Detection in VHR imagery”
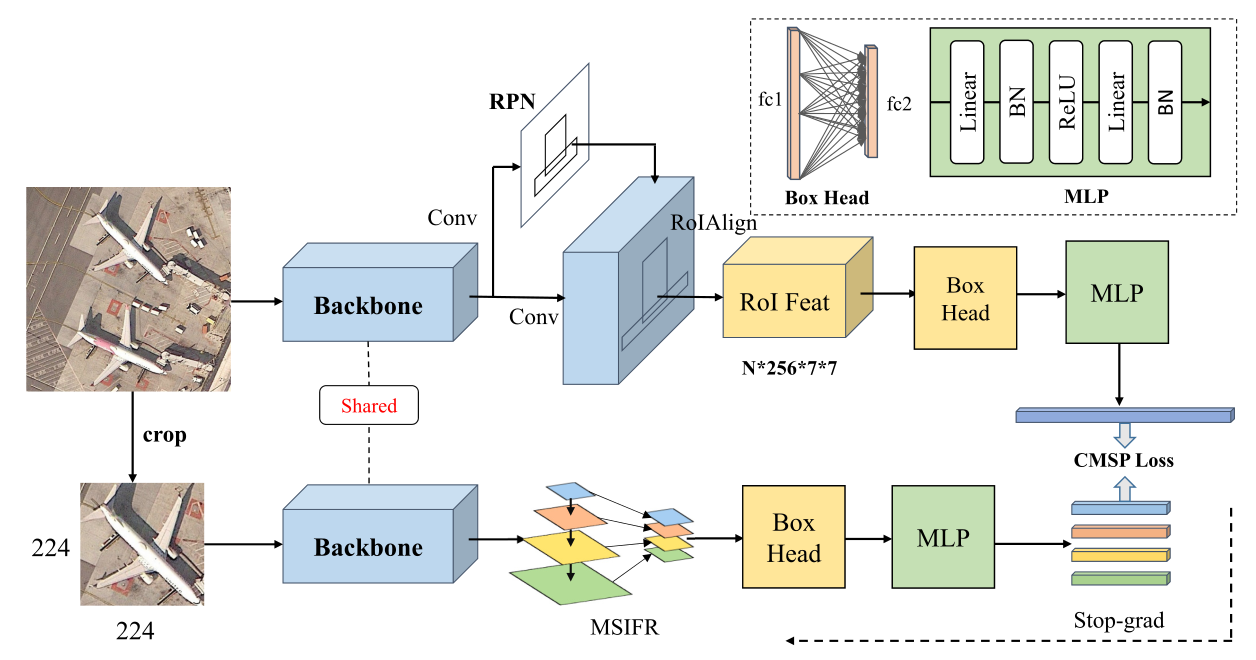
This repo contains the implementation of our fewshot object detector, described in our TGRS 2022 paper, Multiscale Object Contrastive Learning–Derived Few-Shot Object Detection in VHR imagery . MSOCL is built upon the codebase FsDet v0.4, which released by an ICML 2020 paper Frustratingly Simple Few-Shot Object Detection.

If you find this repository useful for your publications, please consider citing our paper.
@ARTICLE{9984671,
  author={Chen, Jie and Qin, Dengda and Hou, Dongyang and Zhang, Jun and Deng, Min and Sun, Geng},
  journal={IEEE Transactions on Geoscience and Remote Sensing},
  title={Multiscale Object Contrastive Learning-Derived Few-Shot Object Detection in VHR Imagery},
  year={2022},
  volume={60},
  number={},
  pages={1-15},
  doi={10.1109/TGRS.2022.3229041}}
Installation
FsDet is built on Detectron2. You need to build detectron2 . You can follow the instructions below to install the dependencies and build FsDet.
Dependencies
- Linux with Python >= 3.6
- PyTorch >= 1.4
- torchvision that matches the PyTorch installation
- CUDA 9.2, 10.0, 10.1, 10.2, 11.0
- GCC >= 4.9
Build FsDet
- You can also use
condato create a new environment.
conda create --n msocl python=3.8
conda activate msocl- Install PyTorch. You can choose the PyTorch and CUDA version according to your machine. Just make sure your PyTorch version matches the prebuilt Detectron2 version (next step). Example for PyTorch v1.7.1:
conda install pytorch==1.7.1 torchvision==0.8.2 torchaudio==0.7.2 cudatoolkit=11.0 -c pytorchCurrently, the codebase is compatible with Detectron2 v0.4. Example for PyTorch v1.7.1 and CUDA v11.0:
- Install Detectron2 v0.4
pip install detectron2==0.4 -f \
https://dl.fbaipublicfiles.com/detectron2/wheels/cu110/torch1.7/index.html- Install other requirements.
pip install -r requirements.txtData preparation
-
We evaluate our models on DIOR datasets:
- DIOR datasets: We use the train/val sets of DIOR datasets for training and the test set of DIOR datasets for evaluation. We randomly split the 20 object classes into 15 base classes and 5 novel classes, and we consider 4 splits like P-CNN. The splits can be found in fsdet/data/builtin_meta.py.
-
Data Structure
├── datasets
│   ├── DIOR
│   │   ├── JPEGImages
│   │   ├── Annotations
│   │   ├── ImageSets
│   │   │   ├── Main
│   ├── diorsplit
If you would like to use your own custom dataset, see CUSTOM.md for instructions. If you would like to contribute your custom dataset to our codebase, feel free to open a PR.
Train & Inference
Training
We follow the eaact training procedure of FsDet and we use random initialization for novel weights. For a full description of training procedure, see here.
1. Stage 1: Training base detector.
python -m tools.train_net \
        --config-file configs/DIOR/base-training/R101_FPN_base_training_split1.yml
2. Random initialize weights for novel classes.
python -m tools.ckpt_surgery \
        --src1 checkpoints/dior/faster_rcnn/faster_rcnn_R_101_FPN_base1/model_final.pth \
        --method randinit \
        --save-dir checkpoints/dior/faster_rcnn/faster_rcnn_R_101_FPN_all1
This step will create a model_surgery.pth frommodel_final.pth.
3. Stage 2: Fine-tune for novel data.
python -m tools.train_net \
        --config-file configs/PASCAL_VOC/split1/10shot_CL_IoU.yaml \
        --opts MODEL.WEIGHTS WEIGHTS_PATH
Where WEIGHTS_PATH points to the model_surgery.pth generated from the previous step. Or you can specify it in the configuration yaml.
Evaluation
To evaluate the trained models, run
python tools.test_net \
        --config-file configs/PASCAL_VOC/split1/10shot_CL_IoU.yml \
        --eval-only
Or you can specify TEST.EVAL_PERIOD in the configuation yml to evaluate during training. We use PASCAL VOC benchmark for evaluation.
