Funix.io
The laziest way to build AI/Data apps in Python
Intro video | Getting started | Gallery | Reference Manual
https://github.com/TexteaInc/funix/assets/438579/86868ab5-ed6e-46e5-8dc5-9e3e4a3cdc3fWhat is Funix?
- Funix automatically turns an ordinary Python function or class definition into a web app, which is accessible in a browser via a shareable link.
- Funix is the frontend/backend/fullstack engineer and the infra/ops engineer for AI/Data/Science solo stars like you.
- Funix is the no-/low-code solution for those who write the most core and innovative code.
- Funix is open-source and can be deployed on-premises.
Use cases
- Startups: quickly build demos, iterate on MVPs, get user feedback and statistics, and pitch to investors or your mom.
- Generative AI: instantly allow people to interact your GenAI model or idea.
- STEM research: let people run your model and/or algorithm effortlessly.
- Data browser: an interface to page through your data.
- A/B test and data labeling: collect human labeling or preference.
Key advantages
- Minimalist and out-of-box: Make no or little addition to your existing code.
- CSS for Python: Widgets are generated automatically based on variable types according to a theme, rather than per-variable manually, for centralized, reusable, and consistent UI across apps.
- Non-intrusive and declarative: As JSON strings, UI configurations are separated from the core logic. Your code can still be run, imported, and called as usual.
- Seamlessly Pythonic: Map Python's native keywords to web app features, such as
globalfor sessions,yieldfor streaming, andprintfor anything you wanna display in your app. - Apps, not demos: Out of the box support for access control, user tracking and Do-Not-Track options, multipage apps with data passing, session management, reactiveness, backend telemetry, etc.
Love Funix? Give us a star

Hello, world!
-
Install Funix (advanced installation options):
pip install funix -
Save the code below to a file called
hello.py:def hello(your_name: str) -> str: return f"Hello, {your_name}." -
Running this command
$ funix hello.py -
The app will pop in a browser on
http://localhost:3000:
Getting started with Funix
The Zen of Funix is to generate widgets for function I/Os based on their types, instead of manually picking and customizing the widget for each I/O. Funix to Python is like CSS to HTML or style class to LaTeX. UI stuff is not intermingled with the core logic but defined separately. The type-to-widget mapping is controlled by a theme and new types can be defined on top of existing types.
The example below shows how common UI compoents are generated from four Python-native data types: str, bool, Literal and range, as well as types in popular packages such as ipywidgets.Password. The example below further maps default values to placeholders in the UI widgets. From this example, we can see that developers need to learn nothing about Funix or do nothing to their existing code before they can get an app.
import typing # Python native
import ipywidgets # popular UI library
def input_widgets_basic(
prompt: str = "Who is Oppenheimer?",
advanced_features: bool = True,
model: typing.Literal['GPT-3.5', 'GPT-4.0', 'Falcon-7B'] = 'GPT-4.0',
max_token: range(100, 200, 20) = 140,
openai_key: ipywidgets.Password = "1234556",
) -> str:
pass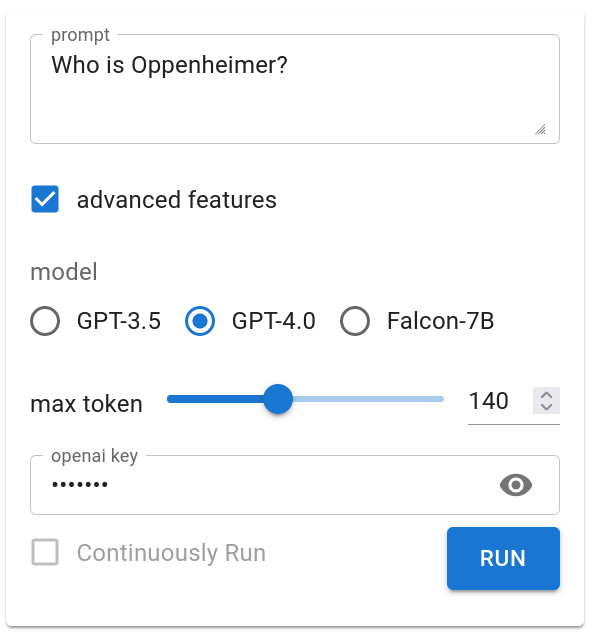
The example below shows how pandas.DataFrame and matplotlib.figure.Figure that AI/data developers cannot be more familiar with are mapped to tables and charts in an app.
import pandas, matplotlib.pyplot
from numpy import arange, log
from numpy.random import random
def table_and_plot(
df: pandas.DataFrame = pandas.DataFrame({
"a": arange(500) + random(500)/5,
"b": random(500)-0.5 + log(arange(500)+1),
"c": log(arange(500)+1) })
) -> matplotlib.figure.Figure:
fig = matplotlib.pyplot.figure()
matplotlib.pyplot.plot(df["a"], df["b"], 'b')
matplotlib.pyplot.plot(df["a"], df["c"], 'r')
return fig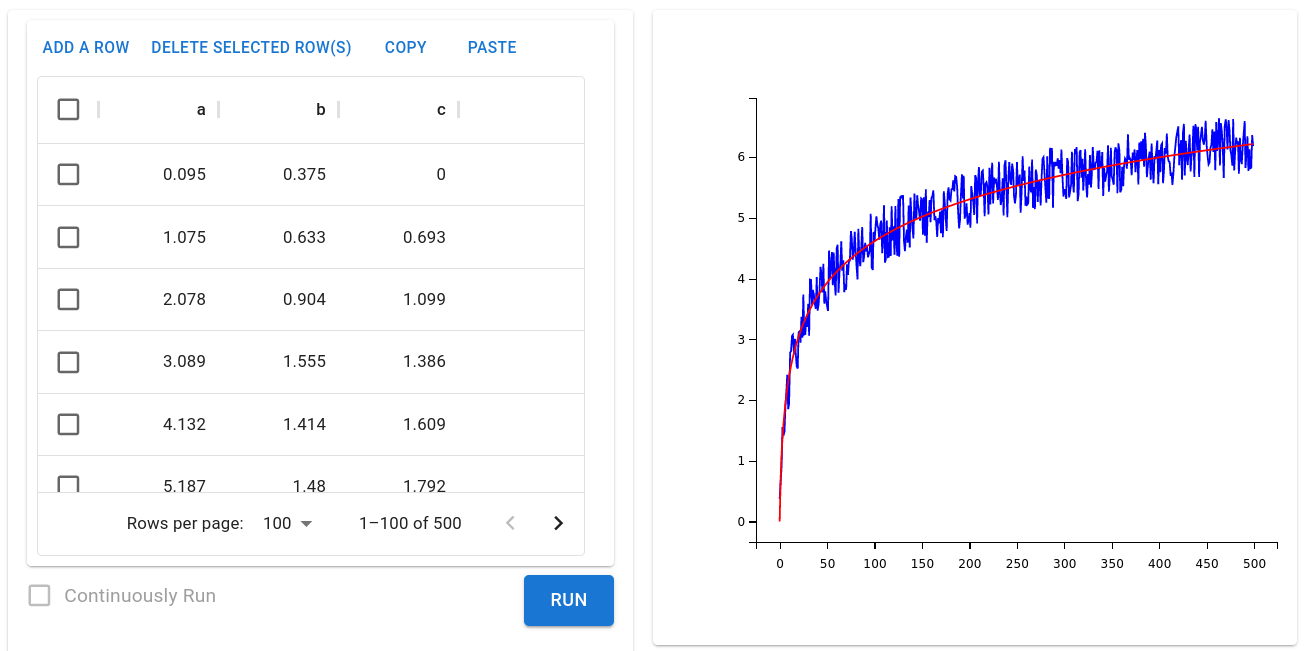
You can even continuously update a plot based on user input.
import funix
import matplotlib.pyplot, matplotlib.figure
import numpy
@funix.funix(
autorun=True,
)
def sine(omega: funix.hint.FloatSlider(0, 4, 0.1)) -> matplotlib.figure.Figure:
fig = matplotlib.pyplot.figure()
x = numpy.linspace(0, 20, 200)
y = numpy.sin(x*omega)
matplotlib.pyplot.plot(x, y, linewidth=5)
return fig
Out-of-box support for classes and OOP
Funix can turn each member method of a class into a page of an app. In two additional lines, the example below turn a class definition into a multi-page app with the OOP experience where the instantiation of an object of the class is done in a page corresponding to the constructor of the class and the member values of the object can be viewed and updated in other pages. No need to manually expose the member methods of the class.
from funix import funix_class
@funix_class()
class A:
def __init__(self, a: int):
self.a = a
return f"`self.a` has been initialized to {self.a}"
def set(self, b: int) -> str:
self.a = b
return f"`self.a` has been updated to {self.a}"
def get(self) -> str:
return f"The value of `self.a` is {self.a}"
A more advanced example of class is the wordle game. You can find the source code in examples/wordle.py. In less than 100 lines, you can build Wordle! The screenshot is as follows:

The quickest way to build GenAI apps
You can wrap any Python function into a web app in Funix. For example, you can take the ChatGPT demo code from OpenAI's APi reference and wrap it into a str-to-str function:
from openai import OpenAI
def ChatGPT(prompt: str) -> str:
client = OpenAI()
completion = client.chat.completions.create(
model="gpt-3.5-turbo",
messages=[
{"role": "user", "content": prompt}
]
)
return completion.choices[0].message.contentwhich is turned into an app by Funix like below:

Themes: the CSS for Python
Funix to Python is like CSS to HTML or macros to LaTeX. It separates the core logic and the UI. All UI stuff is centrally defined in a JSON-based theme to avoid the repetitiveness of individually configuring widgets and keep a consistent look across apps. Consequently, a data scientist or a machine learning engineer does not need to think about anything UI. Just leave it to the UI team and Funix.
Below is an example of a theme file. It defines the widget choices based on variable types and tweaks the props of UI components (currently only MUI ones are supported). Funix exposes frontend components and their props to developers, requiring them to know nothing about frontend. To know more about how to define and apply a theme, please refer to the Themes section in the reference manual.
{
"name": "test_theme",
"widgets": { // dict, map types to widgets
"str": "inputbox", // using Funix' widget shorthand
"int": "slider[0,100,2]", // using Funix' widget shorthand
"float": {
"widget": "@mui/material/Slider", // using MUI's widget
// https://mui.com/material-ui/api/slider
"props": {
"min": 0,
"max": 100,
"step": 0.1
}
},
"Literal": "radio"
},
}To introduce a new data type, just declare a new Python class, and use a decorator to let Funix know. You can associate the type with a widget either on-the-fly (below) or via a theme file.
from funix import funix, new_funix_type
@new_funix_type(
widget = {
"widget": "@mui/material/TextField",
"props": {
"type": "password",
"placeholder": "Enter a secret here."
}
}
)
class blackout(str):
def print(self):
return self + " is the message."
@funix()
def hoho(x: blackout = "Funix Rocks!") -> str:
return x.print()
if __name__ == "__main__":
print (hoho(blackout('Fun'))) Python-native to web-native
Funix repurposes some Python-native features to web features.
First, Funix won't let your docstring or print() function calls go to waste. They will appear in the input and output panels of the web app.
from funix import funix
@funix(
print_to_web=True
)
def foo() -> None:
"""
## What a great app in Funix!
Funix won't let your docstring go to waste.
"""
print("It supports **Markdown**.")
print ("And <b>HTML</b>.")
return None
To stream text to the web, simply use yield:
import time
def stream() -> str:
"""
This function is used to test the stream feature of Funix.
"""
message = "We the People of the United States, in Order to form a more perfect Union, establish Justice, insure domestic Tranquility, provide for the common defence, promote the general Welfare, and secure the Blessings of Liberty to ourselves and our Posterity, do ordain and establish this Constitution for the United States of America."
for i in range(len(message)):
time.sleep(0.01)
yield message[0:i]
Advanced features
History: Keep your call logs
Click to expand
A feature request that we hear from many users is that they do not use a Funix-converted app as a demo that they will use only a couple of time but as a real app that they will use again and again. In this case, they want to keep the call history of the app. Funix supports this feature by default. You can access the history of your app by clicking the history button on the top right corner of the app. Multipage data passing and session/state management
Click to expand
A real app usually comes with multiple page, e.g., setting OpenAI token key in one page and then use the token in other GenAI pages. Functions in the same `.py` script will become different pages of one app. Any global variable can be used to pass data between functions. When you start Funix with the flag `-t`, it will further sessionize the global variables so that different users can have their own sessions. Below is a simple example and the corresponding GIF animation. In the GIF animation you can see that the value `y` differs in two browser sessions. ```python import funix y = "The default value of y." @funix.funix() def set_y(x: str="123") -> str: global y y = x return "Y has been changed. Now check it in the get_y() page." @funix.funix() def get_y() -> str: return y ``` Prefill
Click to expand
A special case of passing data between functions is to use the return value of one function as the value in the widget of an argument of another function. This is called prefill. Funix support prefill by using a decorator attribute `pre_fill`. Below is an example and the corresponding GIF animation. ```python import funix @funix.funix() def first_action(x: int) -> int: return x - 1 @funix.funix() def second_action(message: str) -> list[str]: return message.split(" ") @funix.funix() def third_action(x: int, y: int) -> dict: return {"x": x, "y": y} @funix.funix( pre_fill={ "a": first_action, "b": (second_action, -1), "c": (third_action, "x") } ) def final_action(a: int, b: str, c: int) -> str: return f"{a} {b} {c}" ```Secret: Access control
Click to expand
> Note: This is not a strong way to protect your app. To protect your code (e.g., OpenAI-related functions, which may result in some financial loss), you can use the `secret` option. ```bash funix my_app.py --secret my_secret_token # use a token provided by you # or funix my_app.py --secret True # randomly generate a token ``` The token will be printed on the Terminal. For example, ```bash $ funix hello.py --secret True Secrets: --------------- Name: hello Secret: 8c9f55d0eb74adbb3c87a445ea0ae92f Link: http://127.0.0.1:3000/hello?secret=8c9f55d0eb74adbb3c87a445ea0ae92f ``` The token needs to be included in the URL or manually entered in order to execute the app. Gallery
More examples in Reference Manual or the ./examples folder.
- ChatPaper (It's like the popular ChatPDF. But in Funix, only 70 lines of code needed.)
- mFlux (synthetic biology)
ChatGPT, multi-turn
examples/AI/chatGPT_multi_turn.py 👈 Toggle me to show source code
```python
import os
import IPython
from openai import OpenAI
import funix
client = OpenAI(api_key=os.environ.get("OPENAI_KEY"))
messages = [] # list of dicts, dict keys: role, content, system
@funix.funix(
disable=True,
)
def print_messages_html(messages):
printout = ""
for message in messages:
if message["role"] == "user":
align, name = "left", "You"
elif message["role"] == "assistant":
align, name = "right", "ChatGPT"
printout += f'
Shortest Dall-E web app in Python
from funix import funix # add line one
from IPython.display import Image
from openai import OpenAI # pip install openai
import os
client = OpenAI(api_key=os.environ.get("OPENAI_KEY"))
@funix() # add line two
def dalle(prompt: str = "a cat") -> Image:
response = client.images.generate(prompt=prompt)
return response.data[0].url
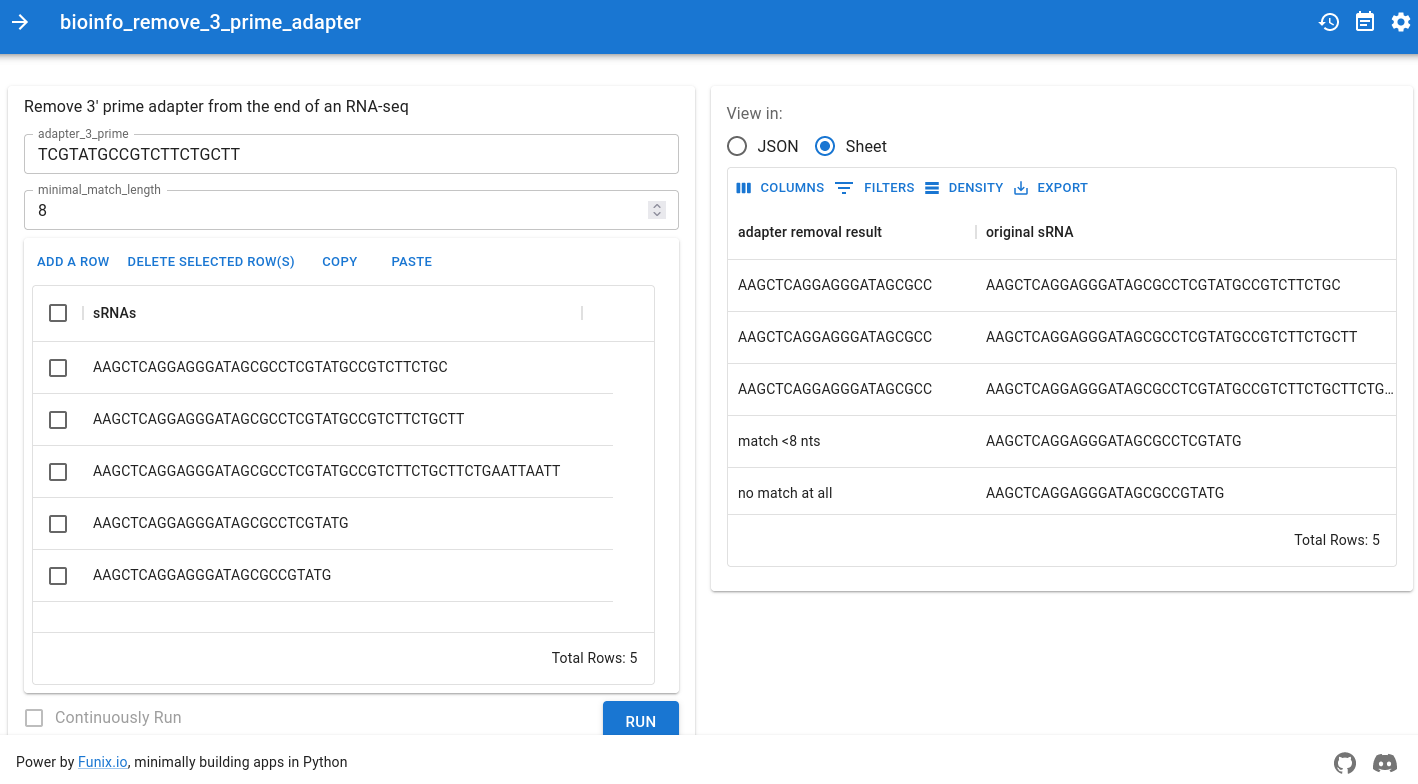
Bioinformatics: vector stripping
examples/bioinformatics/vector_strip.py 👈 Click to see source code
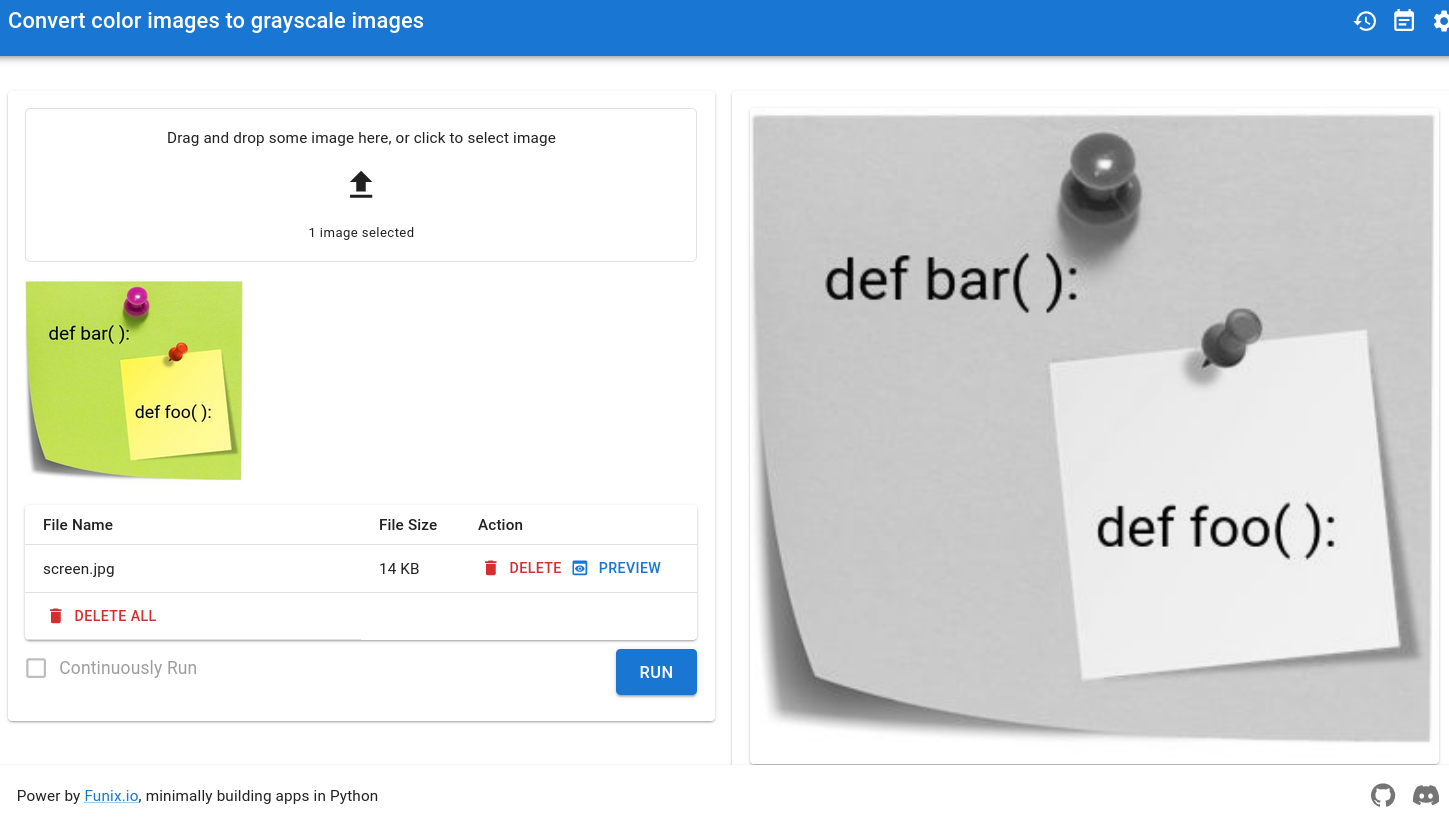
Multimedia inputs and outputs
examples/multimedia/rgb2gray.py 👈 Toggle me to show source code
```python
import io # Python's native
import PIL # the Python Image Library
import IPython
import funix
@funix.funix(
title="Convert color images to grayscale images",
)
def gray_it(image: funix.hint.BytesImage) -> IPython.display.Image:
img = PIL.Image.open(io.BytesIO(image))
gray = PIL.ImageOps.grayscale(img)
output = io.BytesIO()
gray.save(output, format="PNG")
return output.getvalue()
```
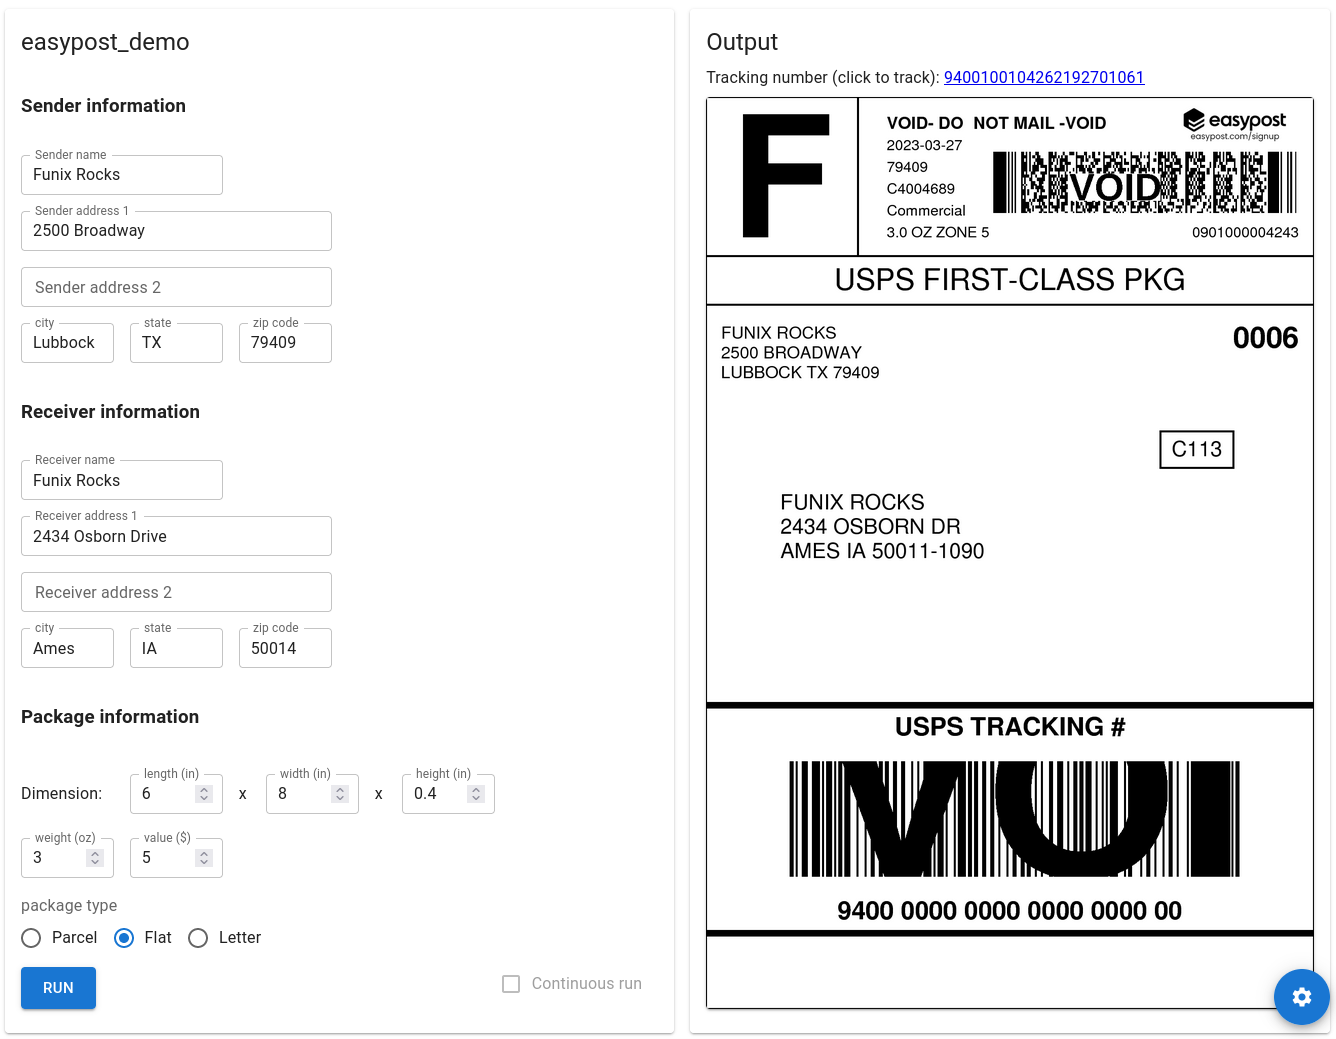
Layout and EasyPost shipping
examples/layout_easypost_shipping.py 👈 Click me to see source code
Usage
Installation
- From PyPI (stable, lacking the latest feature)
pip install funix -
From GitHub (latest)
pip install "git+https://github.com/TexteaInc/funix.git@develop" # Develop version pip install "git+https://github.com/TexteaInc/funix.git" # Stable version -
Local development
git clone -b develop https://github.com/TexteaInc/funix cd funix pip install -e .Add
--prefix=~/.localif pip insists to install to system paths. See #24 and #23
Additional type support
-
If you want to use
gitrelated features (use project from GitHub), install funix by:pip install funix[git] -
If you want to use
ipythonfeatures, install funix by:pip install funix[ipython] -
If you need to have more than one feature, you can try installing them together:
pip install funix[all]
Building the frontend
In the last two cases above, you will need to compile the frontend by yourself. Suppose you are in the funix folder. Then run the following commands:
cd frontendyarn install(you need install Node.JS and Yarn)yarn funix:build
For debugging:
yarn funix:test(Start development mode)funix xxx -p 8080 -F(Use 8080 port and no frontend mode)
Building the frontend with MUI Pro
Our table widget uses advanced features in MUI Pro. If you have a MUI Pro license, you can build the frontend with MUI Pro by following the steps below:
- Install Node.js and Yarn;
- Run
export MUI_PRO_LICENSE_KEY=[MUI_KEY]; - Run
yarn install && yarn funix:buildto build the frontend; - Done!
Command line options
Run the command below to see the command line options:
funix -h Call funix in Python
Besides starting Funix from the command line, you can also use a self-contained .py script:
import funix
@funix.funix()
def hello(your_name: str) -> str:
    return f"Hello, {your_name}."
if __name__ == "__main__":
funix.run(__file__)Exposing a Funix-converted app to the public
funix [module] --host [your_server_ip]How to contribute
Funix is open-sourced under the MIT License. Community contribution is not only welcomed but desired. Feel free to fork and make a pull request when you are ready. You can also report bugs, suggest new features via the issue tracker or our Discord server.
Acknowledgment
Funix draws inspiration from FastAPI and Python-Fire: building software interfaces by inferring from function signatures containing type hints. We port this idea from the backend (FastAPI) or the terminal (Python-Fire) to the frontend. We also thank Streamlit, Gradio, PyWebIO, and Pynecone/Reflex. They inspired us. We are just too lazy to manually define widgets imperatively. Funix’s backend is implemented in Flask and the frontend in Material UI.
Contact
Forrest dot Bao @ Gmail