Module: MMM-temp-ds18b20
Display DS18B20 sensor's temperature on your MagicMirror


Module installation
Dependencies
- An installation of MagicMirror2
- ds18x20
- And of course, have DS18B20 sensor(s) !
Useful commands
List DS18B20 sensors IDs:
find /sys/bus/w1/devices/ -name "28-*"Get DS18B20 sensors temperatures:
find /sys/bus/w1/devices/ -name "28-*" -exec cat {}/w1_slave \; | grep "t=" | awk -F "t=" '{print $2/1000}'Installation
Navigate into your MagicMirror's modules folder:
cd ~/MagicMirror/modulesClone this repository:
git clone https://github.com/thlb/MMM-temp-ds18b20Navigate to the new MMM-temp-ds18b20 folder and install the node dependencies.
npm installConfigure the module in your config.js file.
Using the module
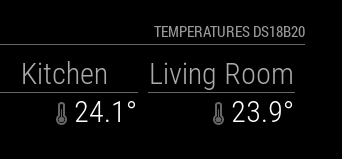
To use this module, add it to the modules array in the config/config.js file:
modules: [
   {
       module: 'MMM-temp-ds18b20',
       position: 'top_right',
       header: 'Temperature sensors',
       config: {
            refreshInterval: 10, // in seconds
            displayMode: 'x-stack',
            sensors:[
                {
                    id: "28-800000xxxxxx",
                    label: "Inside"
                },
                {
                    id: "28-800000xxxxxx",
                    label: "Outside"
                }
            ]
        }
    },
]
Configuration options
The sensors property contains an array with multiple objects (one per sensor connected the Raspberry). These objects have the following properties:
| Option | Description |
|---|---|
id |
Unique ID of a DS18B20 sensor. This ID always beggin with '28-'. To find the sensor value, go to "Useful commands" section. Required Possible values: 28-XXXXXXXXXXXX |
label |
Sensor name. Required Possible values: Inside, Kitchen, or any String you want. |
The following properties can be configured:
| Option | Description |
|---|---|
refreshInterval |
The refresh interval of sensors values (in seconds). Default value: 10 |
displayMode |
Display in horizontal/vertical mode. Required Possible values: x-stack or y-stackDefault value: y-stack |
displayTempIcon |
Display the "termomether" icon. Possible values: true or falseDefault value: true |
iconSize |
Size of thermometer icon. Possible values: xsmall, small, medium, large, xlargeDefault value: small |
labelSize |
Size of sensor name. Possible values: xsmall, small, medium, large, xlargeDefault value: medium |
tempSize |
Display sensor's temperature value. Possible values: xsmall, small, medium, large, xlargeDefault value: medium |
units |
What units to use. Specified by config.js Possible values: config.units = Specified by config.js, default = Kelvin, metric = Celsius, imperial = FahrenheitDefault value: config.units |
DS18B20 Installation
Requirements
- Raspberry
- DS18B20 sensor(s)
- 4.7kΩ resistor (Yellow, Violet, Red, Gold)
- Breadboard (optionnal)
- Jumper wires (optionnal)
Foreword
The DS18B20 communicates with the controlling device via the “One-Wire” communication protocol, a proprietary serial communication protocol that uses only one wire to transmit the temperature reading to the microcontroller. There is differents models :
Technical specifications :
- -55°C to 125°C range
- 3.0V to 5.0V operating voltage
- 750 ms sampling
- 0.5°C (9 bit); 0.25°C (10 bit); 0.125°C (11 bit); 0.0625°C (12 bit) resolution
- 64 bit unique address
- One-Wire communication protocol
DS18B20 Layout
This sensor has three pins :
| PIN | DS18B20+ Genuine | DS18B20 Pre-wired waterproof |
|---|---|---|
| GND | PIN 1 (Cf. diagram below) | Black wire |
| DATA | PIN 2 (Cf. diagram below) | Yellow or Blue wire |
| 3.3V power line | PIN 3 (Cf. diagram below) | Red wire |

Hardware installation
- Power off the Raspberry.
- Follow this diagram :

Using multiples sensors
Plug multiples sensors on the Raspberry is very easy. With multiples sensors, we still only have three connections to the Raspberry (+3.3V, GND & Data). The single data wire will return the temperature readings from all th sensors. This is possible because each DS18B20 sensor has a unique serial number coded into it which the Raspberry Pi can be used to identify them by.

Raspberry configuration
Edit file /boot/config.txt and add the following line :
dtoverlay=w1-gpioLoad the drivers :
sudo modprobe w1-gpio
sudo modprobe w1-therm
Edit file /etc/modules and add the following lines to auto-load drivers on boot :
w1-therm
w1-gpio
Check that sensors are well recognized by the Raspberry :
find /sys/bus/w1/devices/ -name "28-*"You should see as many lines as sensors plugged. Note that the part 28-xxxxxxxxxxxx is the ID of the sensor.
Now, if you want to check the temperatures value af all your sensors :
find /sys/bus/w1/devices/ -name "28-*" -exec cat {}/w1_slave \; | grep "t=" | awk -F "t=" '{print $2/1000}'Finnaly, perform a sudo reboot of your Raspberry to check the proper load of the driver on boot. If the previous command still works, the drivers are correctly loaded.