MERN Enterprise Search ⚡
Quick Overview
Check Out a Sneak Peek
Look below this text for a GIF (a kind of moving image) that's loading. After a short wait, you'll see a quick demo of the application in action. (there will be a new version soon, this one cuts of at a certain point, I'm sorry about that)

🚀 Hey there! 🌟
Guess what? I'm currently working on a super cool FullStack JavaScript application, and I'm on the lookout for fellow tech enthusiasts who share my passion for learning and building awesome stuff!
This project started as a fun educational journey for me, but now I'm throwing the doors wide open. Whether you're a self-taught wizard or just getting started, I'm all ears and totally cool if you don't have a treasure trove of certificates. 🧙♂️✨
Picture this: we're delving deep into the MERN stack, leveraging React (yup, we've got Redux for the ultimate state management party) on the client side. Our ExpressJS backend is the backstage maestro, serving up API endpoints on Node.js and ensuring our data seamlessly moves between the client and MongoDB database. And hey, we've got the NPM Mongoose package – our secret sauce for authenticated data transfer magic! 🎩🐍
But here's the exciting part! This application isn't just any project; it's a vision. We're dreaming big – envisioning a globally recognized platform that not only elevates lives with killer functionalities but also delivers an experience that's as social and enjoyable as your favorite Friday night plans. 🌍🚀
Let me spill the beans on a game-changer feature: our app is a search engine for registered companies. Companies can register for free! The search results are revolutionary; we sort companies by their ratings and relevance. It's way better than sifting through Google to find services or products—our approach ensures you always discover the best-rated, most relevant companies.
Sure, the road ahead might be a bit of a rollercoaster, but guess what? I'm psyched about every twist and turn. And I want you to be a part of it!
If you're itching to dive headfirst into this tech wonderland, explore, and make your mark on a project tailor-made for budding developers, I'm sending you a VIP invite. Drop a pull request, toss in your thoughts in the designated tab – heck, even just shoot me a message with your wildest ideas. Your genius is not only welcomed but cherished! 💡
This project is more than just a learning pathway; it's an adventure where we collectively sculpt the path, giving you the freedom to bring your ideas to life with all the support and none of the stress. Oh, and did I mention? No deadlines! We're in this for skill development, not racing against the clock.
So, if you're a tech wizard with big dreams, looking to ride this rollercoaster of growth and collaboration, consider this your golden ticket.
Jump on board now and become a star player in our tech-tastic team! 🚀✨
Shoot me an email at thompoppins@gmail.com.
Cheers to the adventure ahead! 🌟🚀
:zap: Table of Contents
- :zap: MERN Enterprise Search :rocket:
- :zap: Description
- :zap: Table of Contents
- :zap: Screen Recording:
- 📹 Simple Guide to Screen Recording:
- 🏠 Homepage Exploration:
- 🧑💼 Profile Page Magic:
- 🌐 Uploading Your Profile Pic:
- 🖼️ Preview Before You Commit:
- 🎨 Decoding BLOB: What's the Binary Large Object?
- Quick Overview
- 1. Search Functionality
- Simplified Explanation:
- Professions in Company Schema
- Storybook Integration
- Testing
- Animations
- Co-Ownership Invites
- User profile page and data structure
- Companies
- Quick Start
- Version v0.0.3 Release Notes
- New Features
- Version v0.0.2 Release Notes
- Version v0.0.1 Release Notes
- Technical description:
- Frontend
- Backend
- MongoDB and Mongoose
- ES Lint and Prettier
- Prettier code formatter
- Project management
- Jira
- Project Issue Progression
- Production checklist
- Issues to be created in Jira
- Prerequisites
- Steps
- DocsGPT
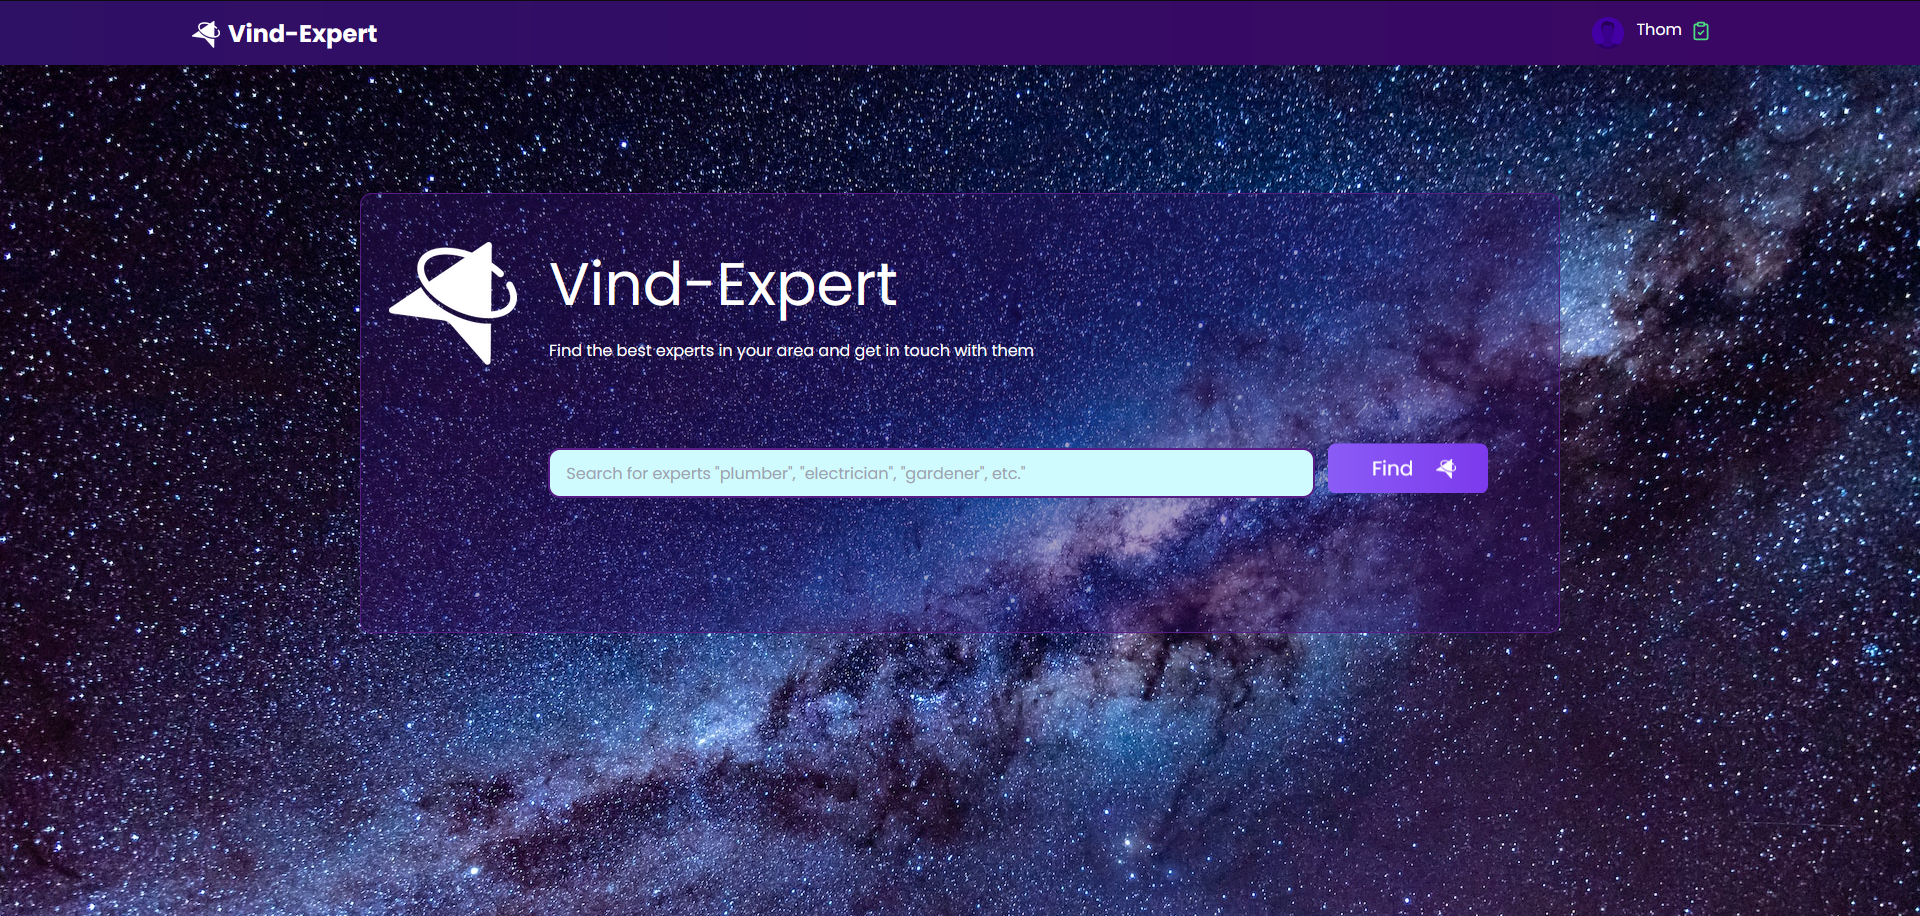
🏠 Homepage Exploration:
When you're logged in, the homepage transforms into a powerful search engine for finding professionals with expertise. It's like a search superpower for users seeking skilled individuals.
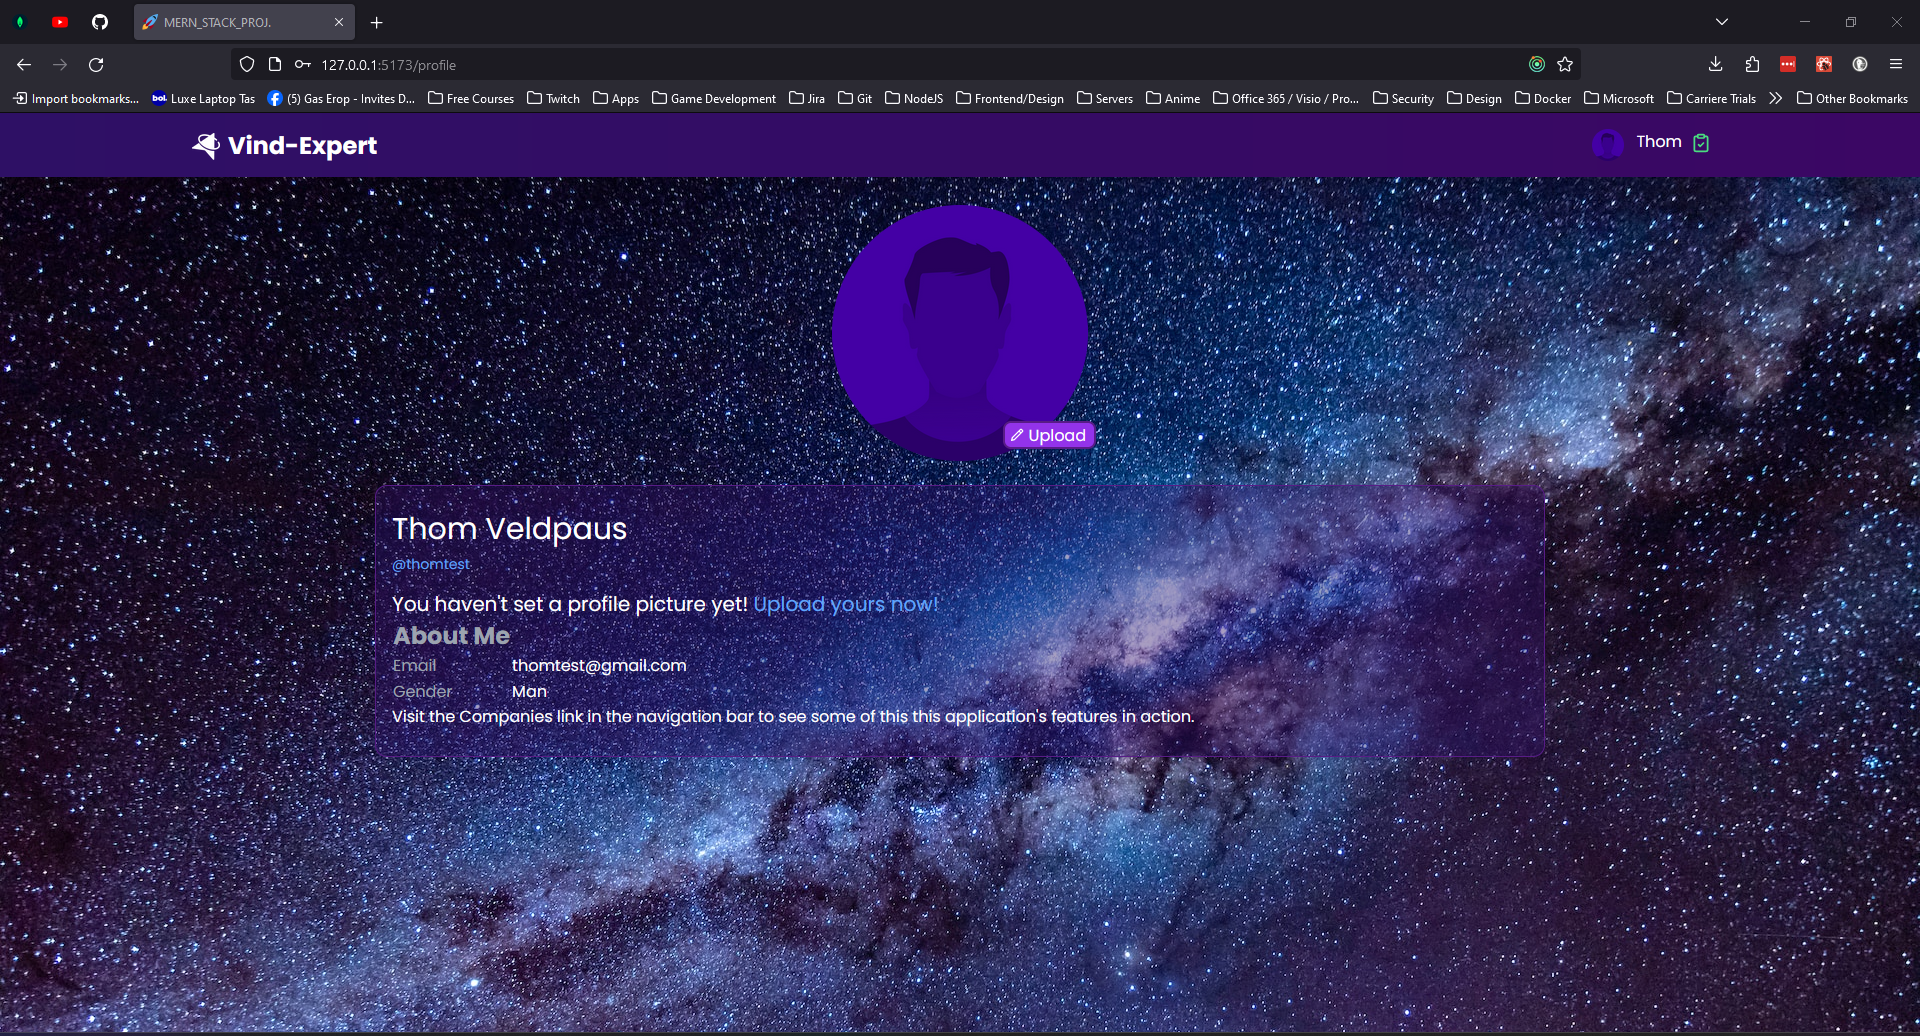
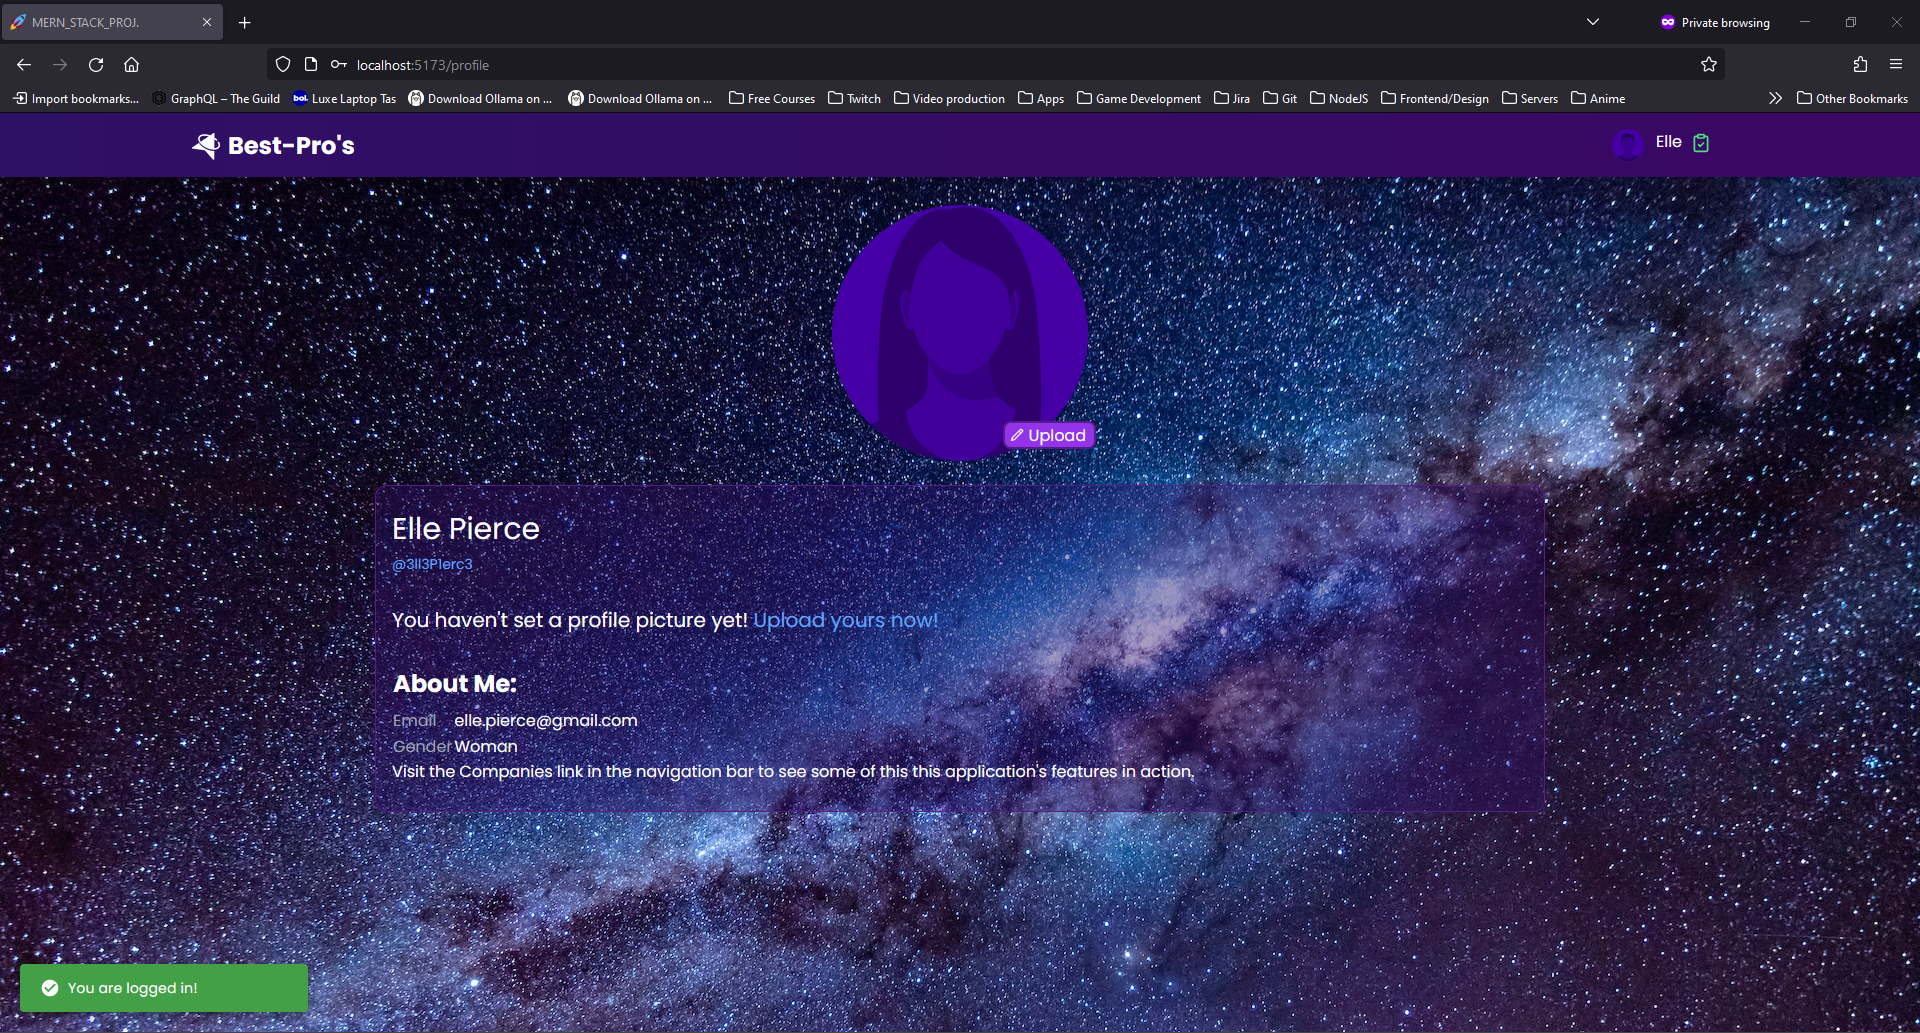
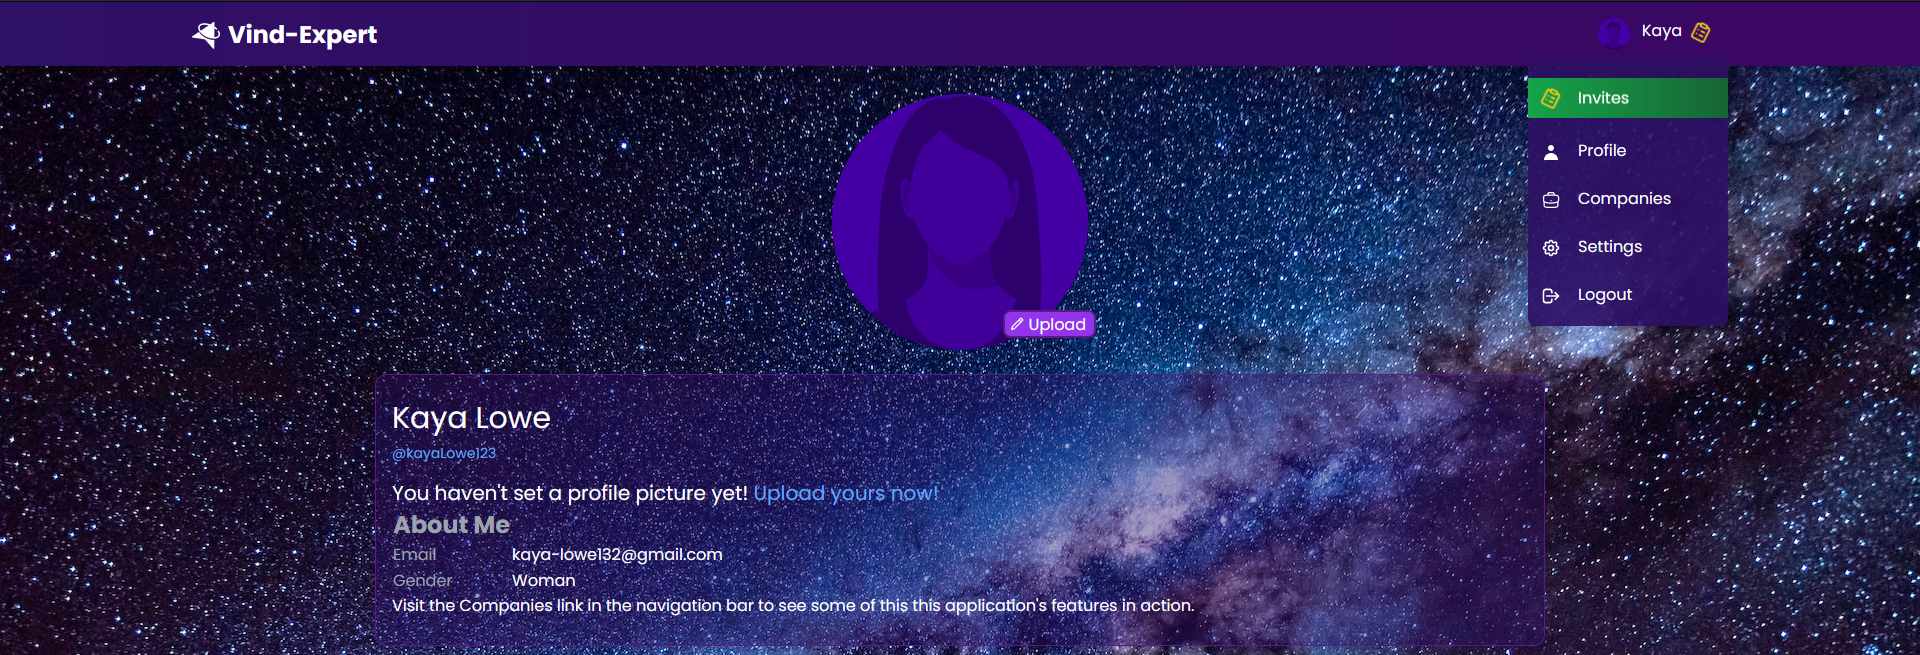
🧑💼 Profile Page Magic:
Right after you sign up, your profile is pretty empty, and your profile picture is a stand-in - a male image for guys and a female image for gals.
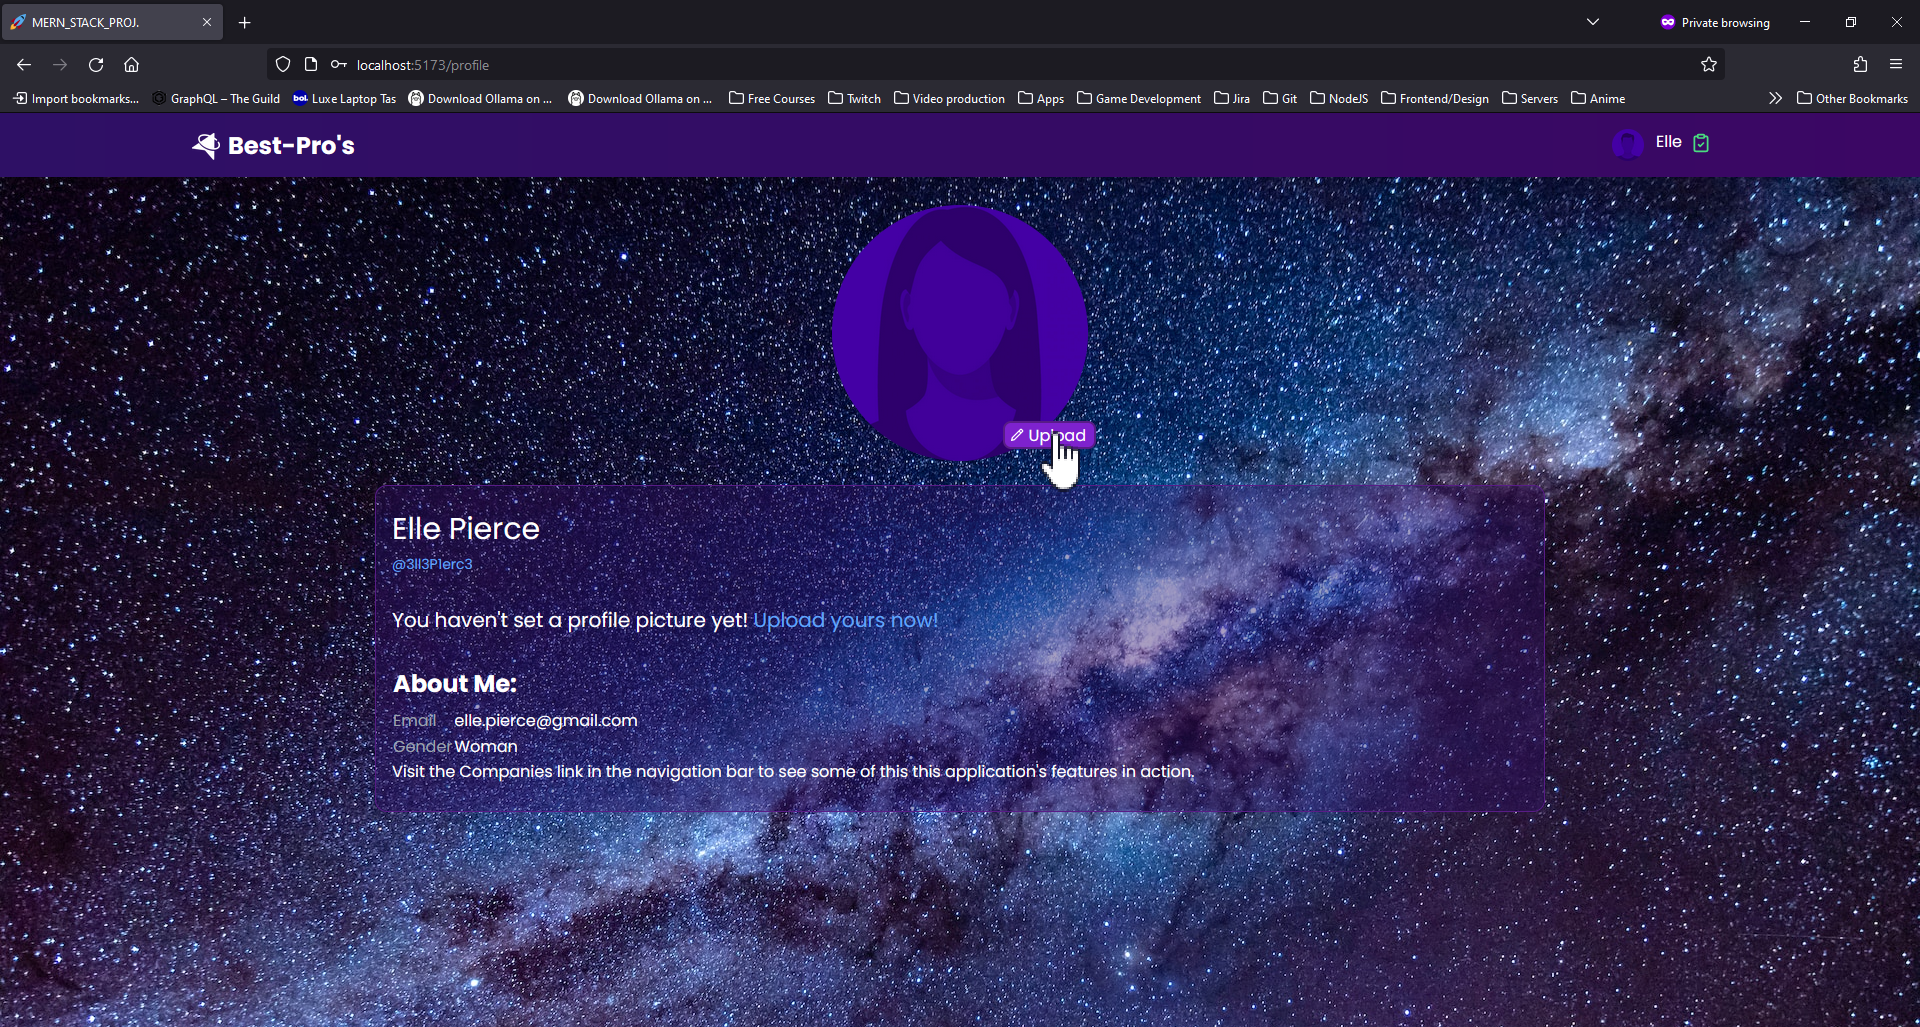
🌐 Uploading Your Profile Pic:
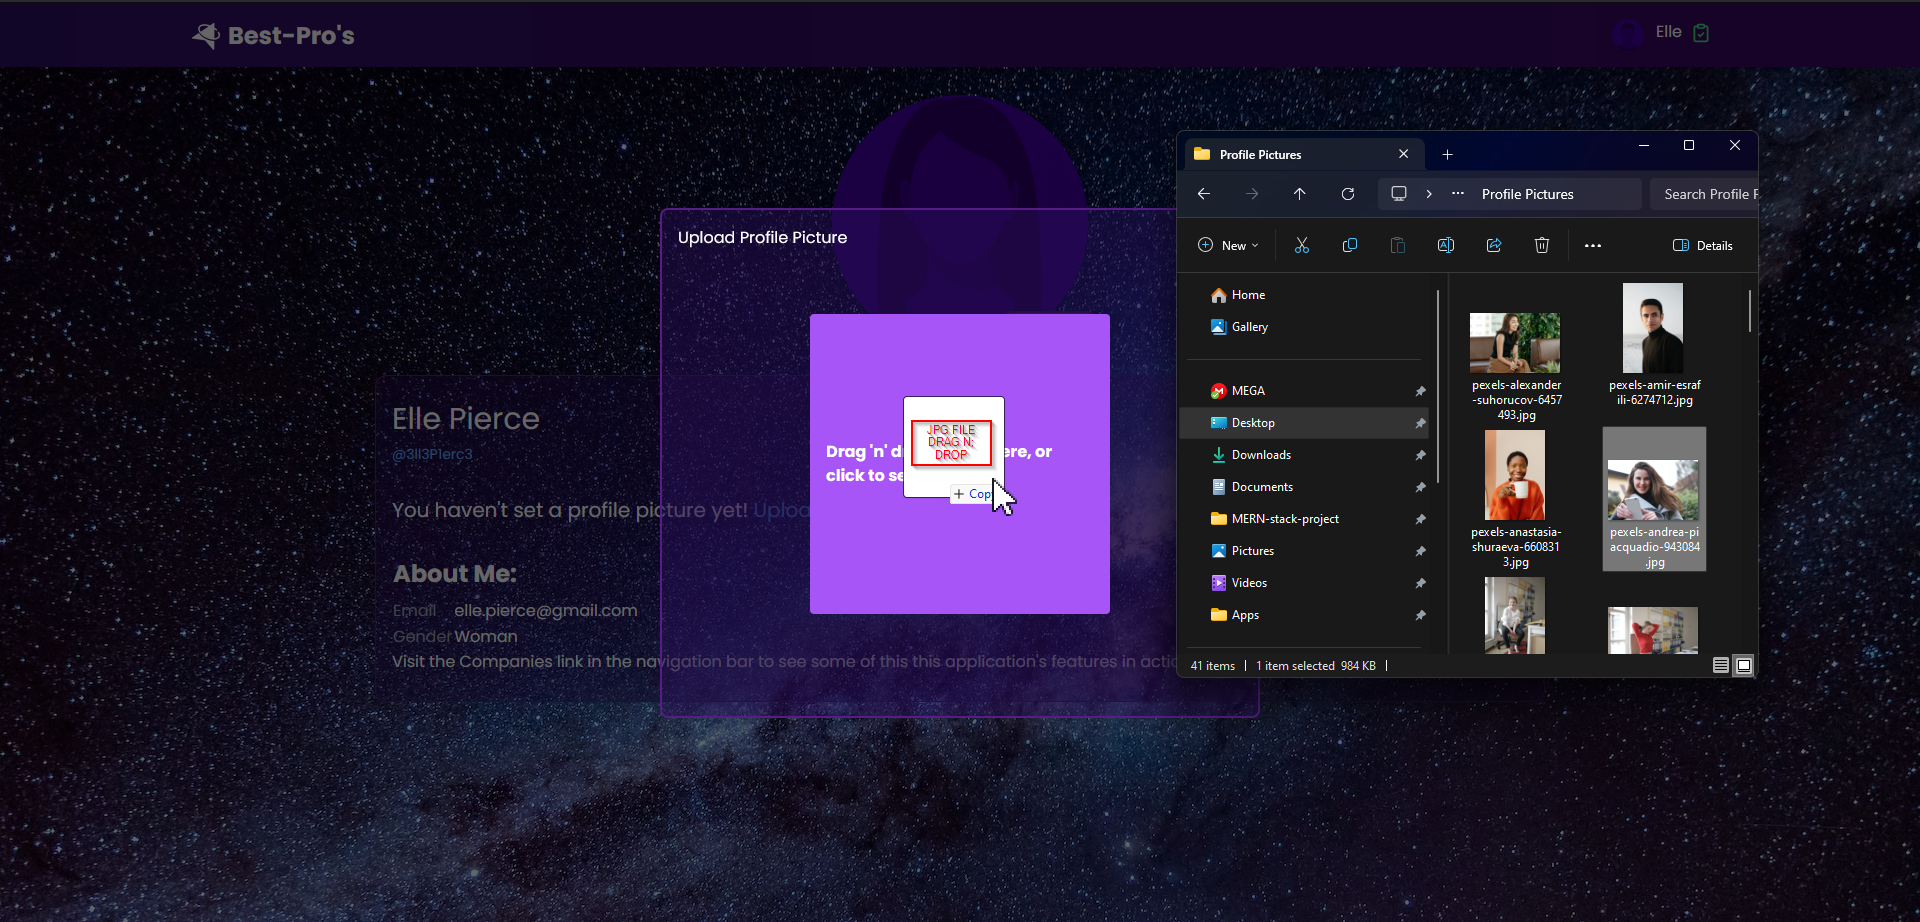
Once you log in for the first time, just hit the upload button on the placeholder profile picture. A window will pop up, letting you pick an image from your device. Click on browse..., and voila! Your picture is ready to roll.
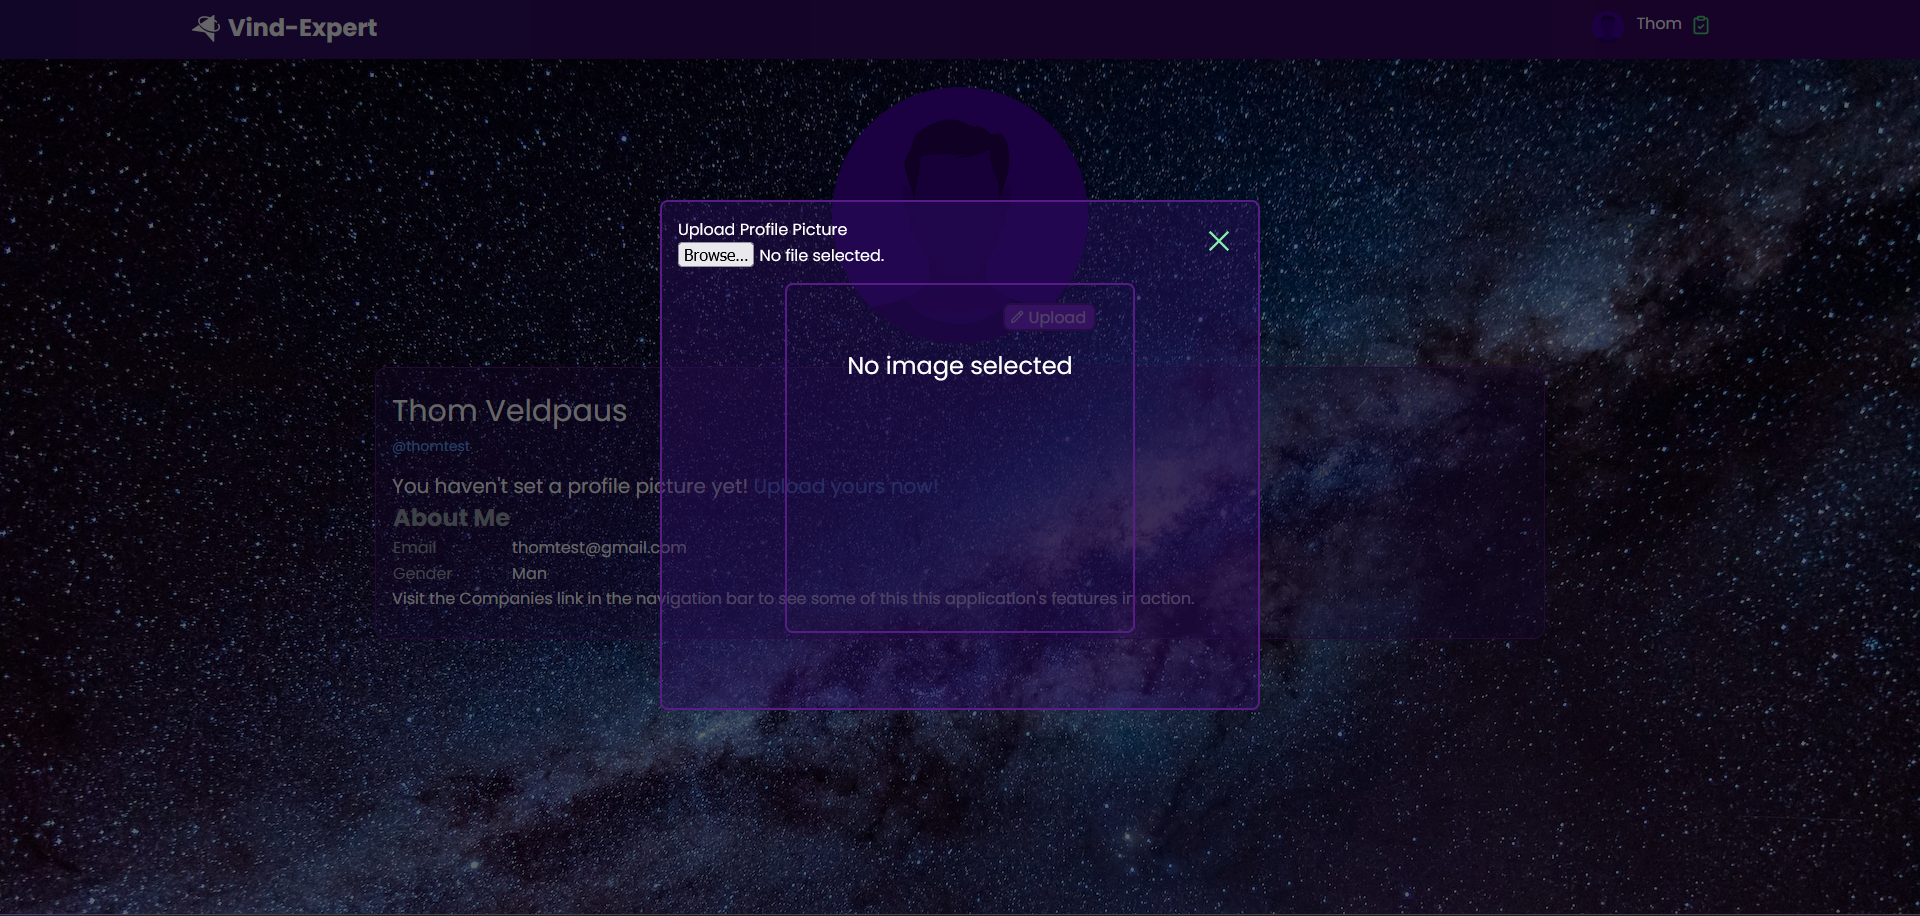
🖼️ Preview Before You Commit:
After you choose an image from your device, you get a sneak peek. You can change your mind or cancel the upload if the image isn't quite what you had in mind.

And hey, if you want, you can still swap it out or hit the cancel button before the image is uploaded. Oh, and that preview? It's like a secret code, but for images.
🎨 Decoding BLOB: What's the Binary Large Object?
Here's the lowdown: a BLOB is a fancy term for a collection of binary data stored as one unit. Usually, it's images, audio, or other cool stuff. Sometimes, even secret binary codes chill out in a BLOB.
<img src={blobValueString} />Source: /client/src/components/users/EditProfilePicture.jsx
In case you're curious about the code behind the scenes, there's a script called EditProfilePictureModal that handles all the picture-editing magic. It's like the conductor of the image orchestra.
Explore New Features
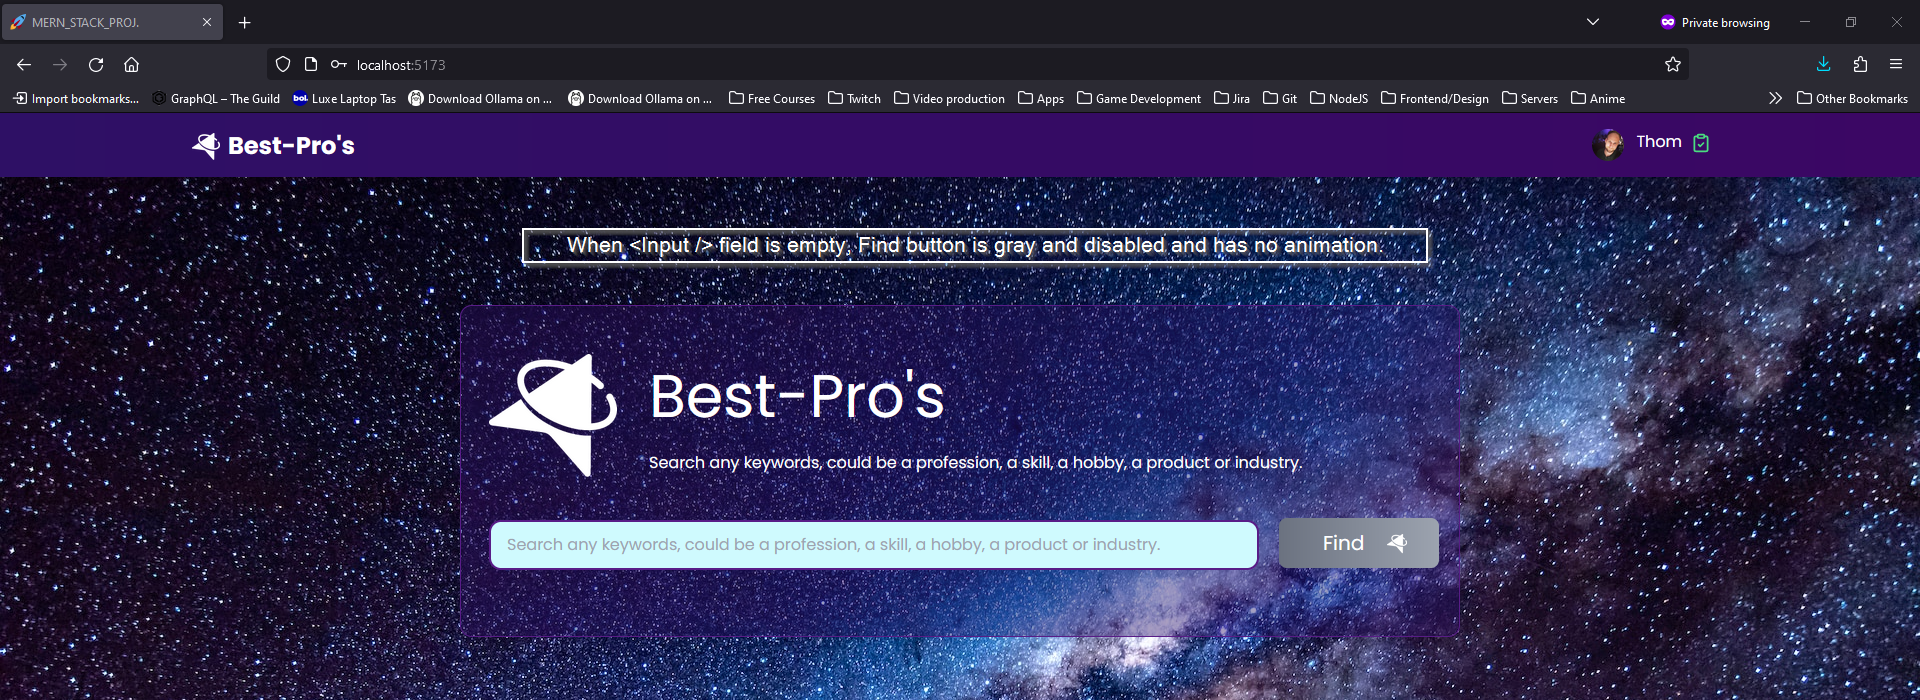
1. Search Functionality
- Find Companies: Users can search for companies by their names.
- Organized Results: Search results are neatly displayed in a grid format with company images.
- Easy Navigation: Clicking on a company takes you to a detailed page about that company (Company Profile).
- Privacy Control: If you're a member of the company (owner, employee, admin), you'll see private details on the company profile page.
Note: The search button is only clickable when there's a search input value. Check out the image below for reference:
Ready to Find Pros!

CSS Grid for Structure


Member Access:
- Private Details Revealed: If you're a member (owner), you'll see private details.

Non-Member Access:
- Private Details Hidden: If you're not a member of the company, private details are hidden.
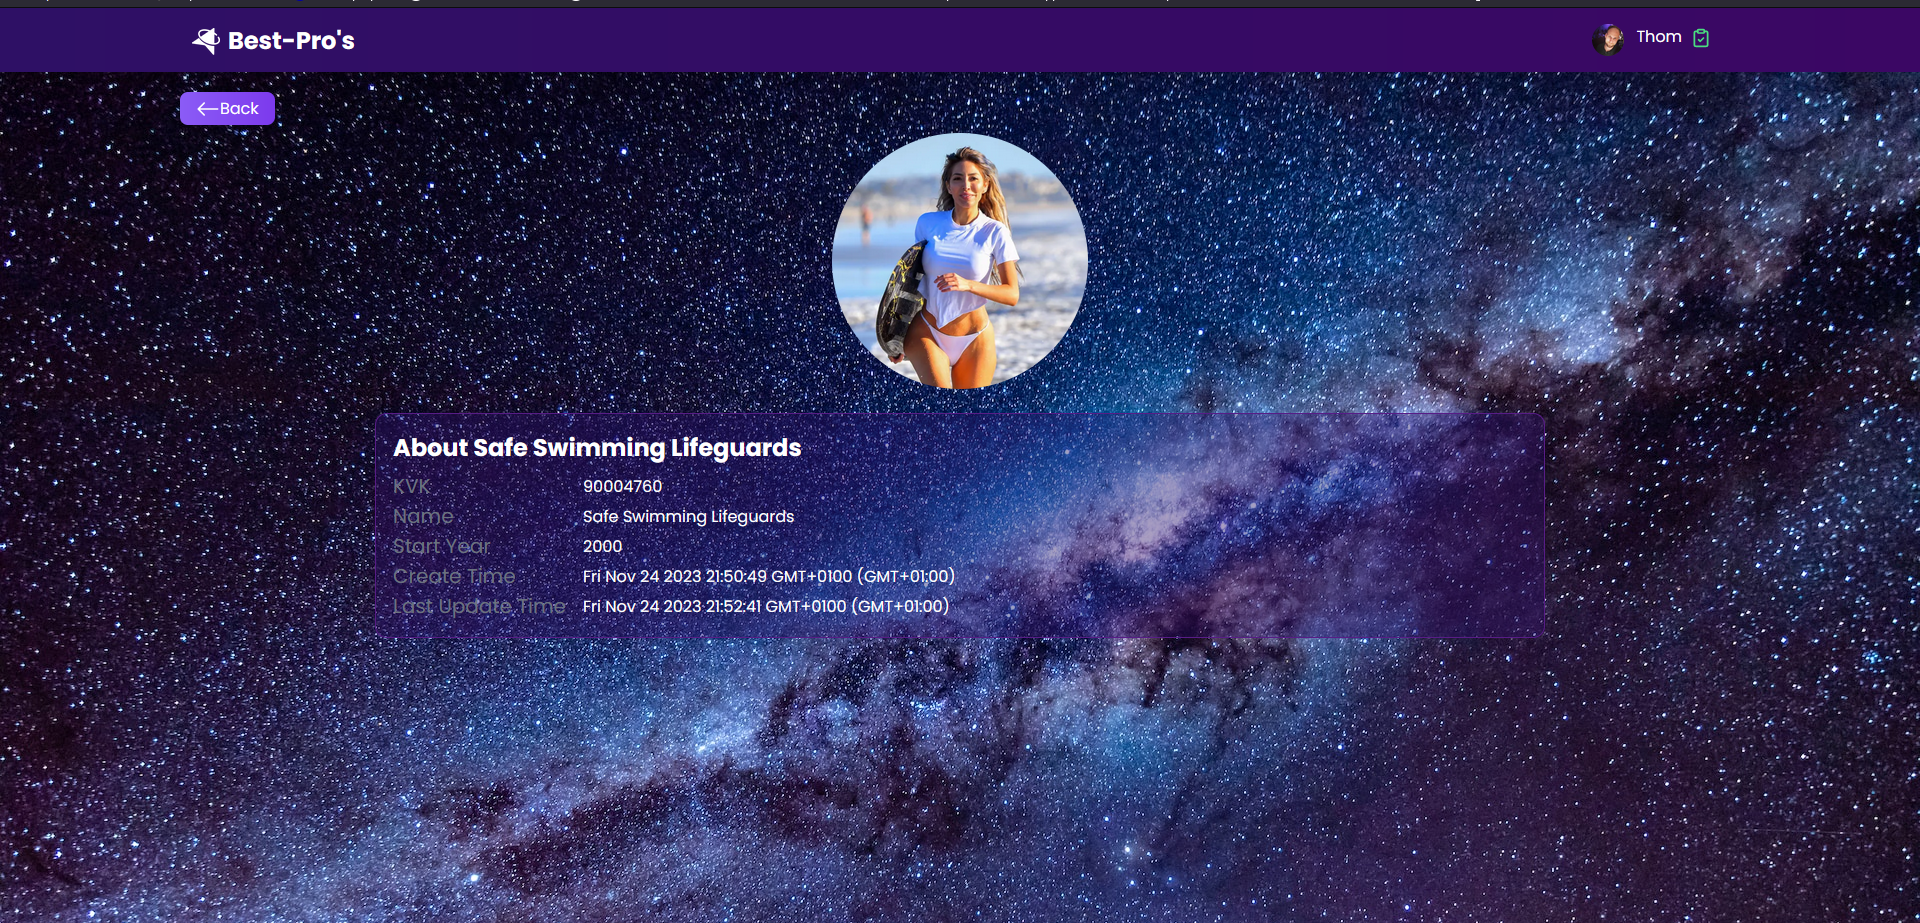
Image Cropping Made Easy
- Upload and Crop:
- Users can upload an image and easily crop it by dragging or selecting a file.
- The preview shows how the crop will look in a circular shape.
- Set as Profile Picture:
- The cropped image becomes the default profile picture.
- Download Option:
- After cropping, users can download the cropped image file.
- Technical Details:
- Cropped images are transformed into a special format (BLOB) and sent to the server (Express.js).
- The server then serves these images as static files for the frontend.
Example Scenario:
- A new user's profile page without a picture.
- Clicking the 'Upload' button to add a picture.
- Dragging and dropping an image into the provided area.
- The cropped image is previewed, and the user can adjust the crop.
- Choosing the desired crop and generating a downloadable PNG file.


Creating and Downloading a Cropped Image:
- After clicking 'Download Cropped Image':
- A special file (Blob) is created from the previewed canvas using the canvas API.
- This Blob file is a raw data representation of the cropped image.
// JavaScript function to create a blob from the canvas and download it as a PNG file
function generateDownload(canvas, crop) {
  if (!crop || !canvas) {
    return
  }

  canvas.toBlob(
    (blob) => {
      const previewUrl = window.URL.createObjectURL(blob)
      const anchor = document.createElement('a')

      anchor.download = 'cropPreview.png'
      anchor.href = URL.createObjectURL(blob)
      anchor.click()

      window.URL.revokeObjectURL(previewUrl)
    },
    'image/png',
    1,
  )
}- Result after Download:
- A PNG file is downloaded with the cropped image.

- Uploading the Cropped Image:
- When the user clicks 'Upload' after cropping, a Blob binary object is generated.
- This Blob object is then written to an image file in PNG format.
- The image file is uploaded to the Express.js server.
// JavaScript function to save the cropped image to the server
const saveProfileImage = (canvas, completedCrop) => {
  if (!completedCrop || !canvas) {
    return
  }

  canvas.toBlob(
    (blob) => {
      const formData = new FormData()
      const file = new File([blob], 'profile-picture.png')
      formData.append('image', file)

      axios
        .post(`${BACKEND_URL}/upload/image`, formData, {
          headers: {
            'Content-Type': 'multipart/form-data',
          },
        })
        .then((response) => {
          // Update user profile picture information in the database
          // and refresh the user's data on the frontend.
        })
        .catch((error) => {
          // Handle any errors that may occur during the upload process.
        })
    },
    'image/png',
    1,
  )
}- Backend Processing:
- On the server side (Express.js), the uploaded image is handled using Multer.
- The file is named, given a destination, and stored in the "/public/uploads/images" folder.
- The server responds with details about the uploaded image.
// Express.js route for handling image uploads
router.post(
  '/image',
  apiLimiter,
  upload.single('image'),
  async (request, response) => {
    // If the file upload was successful, the file will be stored in the "uploads/images" folder.
    // A response is sent back to the client with image path, URL, and database Image._id.
  },
)- Result after Uploading:
- The user's profile picture is updated and utilized.

Simplified Explanation:
Improvements in the System:
Professions in Company Schema
- New Company Information:
- Added a spot for "professions" in the company details.
- Companies can now list their professions during sign-up.
- This enhances search results, making them more relevant and dynamic.
Storybook Integration
- Developer-Friendly Environment:
- Set up Storybook for creating and testing components.
- Introduced initial components to Storybook for development and testing.
Testing
- Ensuring Quality:
- Installed Jest and React-Testing-Library for thorough component testing.
- Work is ongoing to create tests for almost every component.
Animations
- Enhanced User Experience:
- Introduced subtle animations for a more engaging interface.
- Notifications now have attention-grabbing animations:
- When an invite is pending, the user's name in the navigation bar wiggles.
- Dropdown menu has a lively "Invites" item that jumps, directing the user to pending invites.
Tailwind CSS Animation Tweaks:
- More Joyful Animations:
- Tweaked preinstalled Tailwind animations for a livelier and more joyful feel.
- Examples include waving, bouncing, spinning, and ping animations.
Co-Ownership Invites
- Interactive Invitations:
- Notification icon wiggles for co-ownership invites.
- Dynamically added "Invites" to the dropdown menu.
- Attention-grabbing jump animation for pending co-ownership invites.
- Users can accept or decline invites.
- After responding to all invites, users are redirected to a page listing the companies they now co-own.
- Implemented safety measures to avoid duplicate invitations and ensure unique co-ownership status.

User profile page and data structure
Profile page:
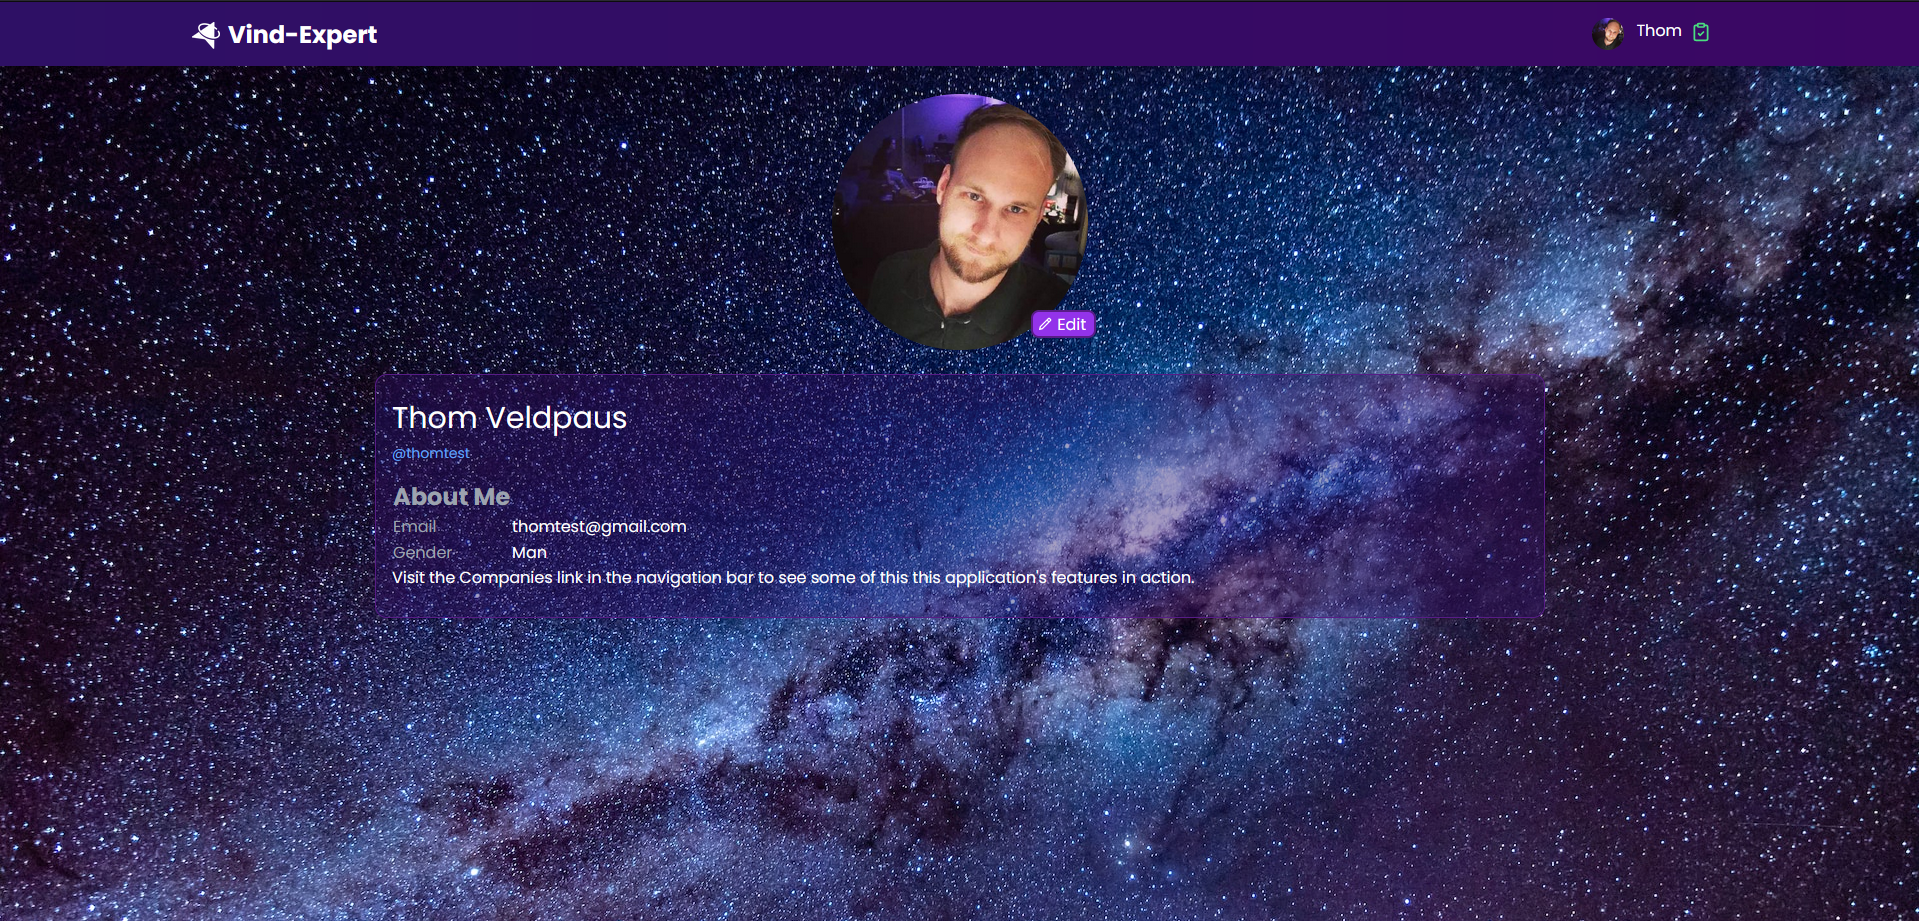
At this point there are only a few details a user can set when registering a new account. Of course this will be expend (largely) in the future. For now in this stage of the development process of the application, it's useful to keep minimalistic, clean and keep everything simple now there is not any dependency on yet and over complicate everything. Dependencies for users details could be a detailed profile pages, location/address information, media, posts on a timeline (or feed) or many other things users would want to save personally to their account eventually.
User schema
Schema fields:
-
username
- Type: String
- Required: true
- Unique: true
- Default: ''
-
email
- Type: String
- Required: true
- Unique: true
- Default: ''
-
hashedPassword
- Type: String
- Required: true
- Default: ''
-
firstName
- Type: String
- Required: true
- Default: ''
-
lastName
- Type: String
- Required: true
- Default: ''
-
gender
- Type: String
- Required: true
- Description: Represents the gender of the user. Can be "Man," "Woman," or "Other."
-
profilePicture
- Type: mongoose.Schema.Types.ObjectId
- Ref: 'Image'
- Description: This field is an ID reference to the image document in the database image collection, containing the file path local to the CDN (ExpressJS backend) server from which image file is being served. This allows for the image to be retrieved from the CDN (ExpressJS backend server) and displayed on the client-side application page based on a URL relative to the CDN server that can logically be generated from the image document's file path. This way no hard coded URLs are needed to be saved in MongoDB database and the image documents will be served independent of the backend server domain address making the image documents portable and reusable in different production and development environments and allowing easy migration of the image files to a different storage and host with a different URL/domain.
Additional fields:
- timestamps
- Type: Object
- Description: Automatically adds
createdAtandupdatedAtfields to the user doc
Mongoose:
- The Mongoose schema establishes the data structure for the user information within the database.
- It enforces uniqueness for each user's username and email to prevent double sign-ups and ensuring secure storage of their hashed password.
User details like
firstName,lastName,genderand a reference field to the profile picture image document calledprofilePicture. - The
Userschema describing the data structure of the MongoDBUserdocuments in theuserscollection is defined in the backend server. - The
Userschema is described and defined using Mongoose, a popular Object Data Modeling (ODM) library for MongoDB and Node.js. - The
Userschema is expected to extends with many fields when continued development will many more dependencies on user data when the application grows and complexity increases.
Source: /backend/models/userModel.js
// Instantiate User schema
const userSchema = new mongoose.Schema(
  {
    username: {
      type: String,
      required: true,
      unique: true,
      default: '',
    },
    email: {
      type: String,
      required: true,
      unique: true,
      default: '',
    },
    hashedPassword: {
      type: String,
      required: true,
      default: '',
    },
    firstName: {
      type: String,
      required: true,
      default: '',
    },
    lastName: {
      type: String,
      required: true,
      default: '',
    },
    gender: {
      type: String,
      required: true,
    },
    profilePicture: {
      type: mongoose.Schema.Types.ObjectId,
      ref: 'Image',
    },
  },
  { timestamps: true },
)
Mongoose User model:
- The User model is created using the mongoose.model function, which takes the name 'User' and the user schema as arguments.
- This model (
User) serves as an interface to interact with the MongoDB database based on the defined schema. - The model (
User) is directly tied to the schema (userSchema). - When you use methods like User.create(), User.find(), or others, Mongoose ensures that the data aligns with the structure defined in the schema.
// Instantiate User model
const User = mongoose.model('User', userSchema)
Companies
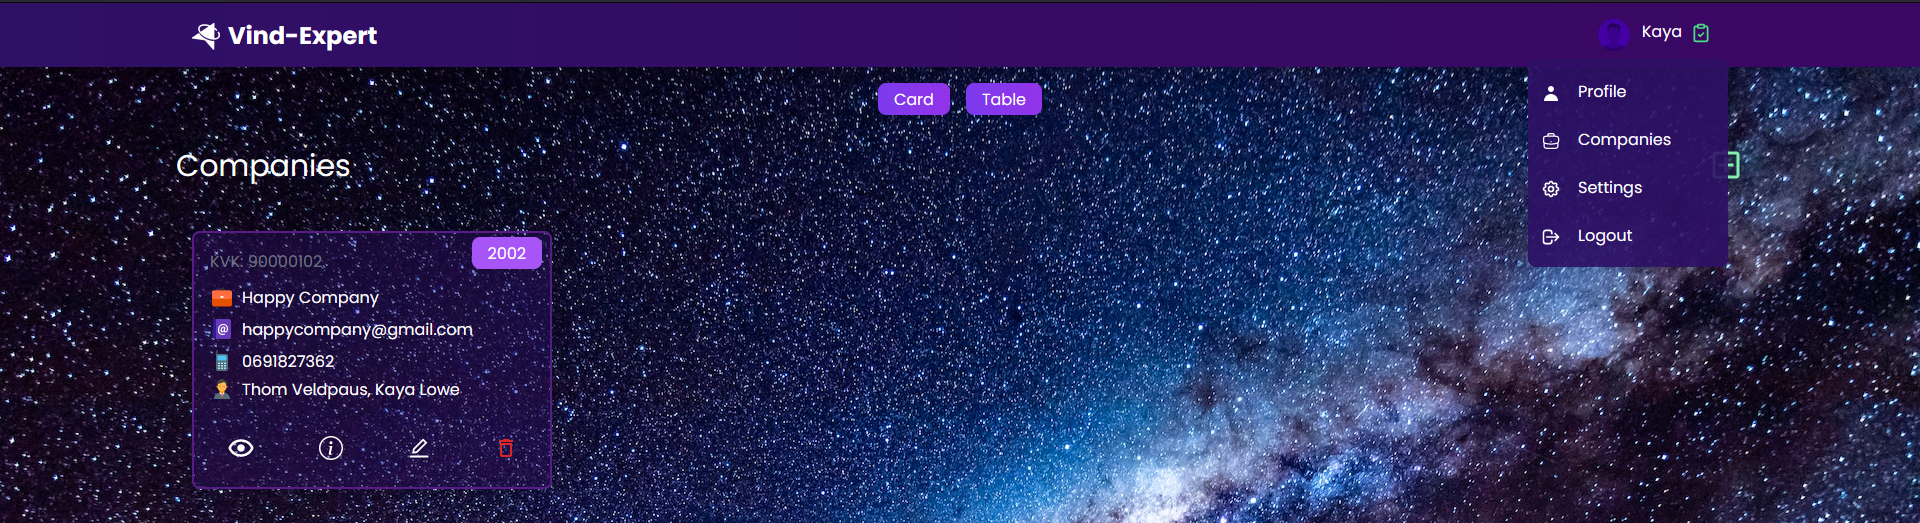
Listing page
On the /companies page the user can see all companies that he owns and has the choice between listing the companies in card view or in table view. The view of choice will be saved as a Redux state so the user preference will be kept as long as they are logged in. I am planning to save this configuration to the database so the user preference will never be lost and can be dispatched to the Redux state every time they log in to their account.
Note: I opened the dropdown menu.
Card view:
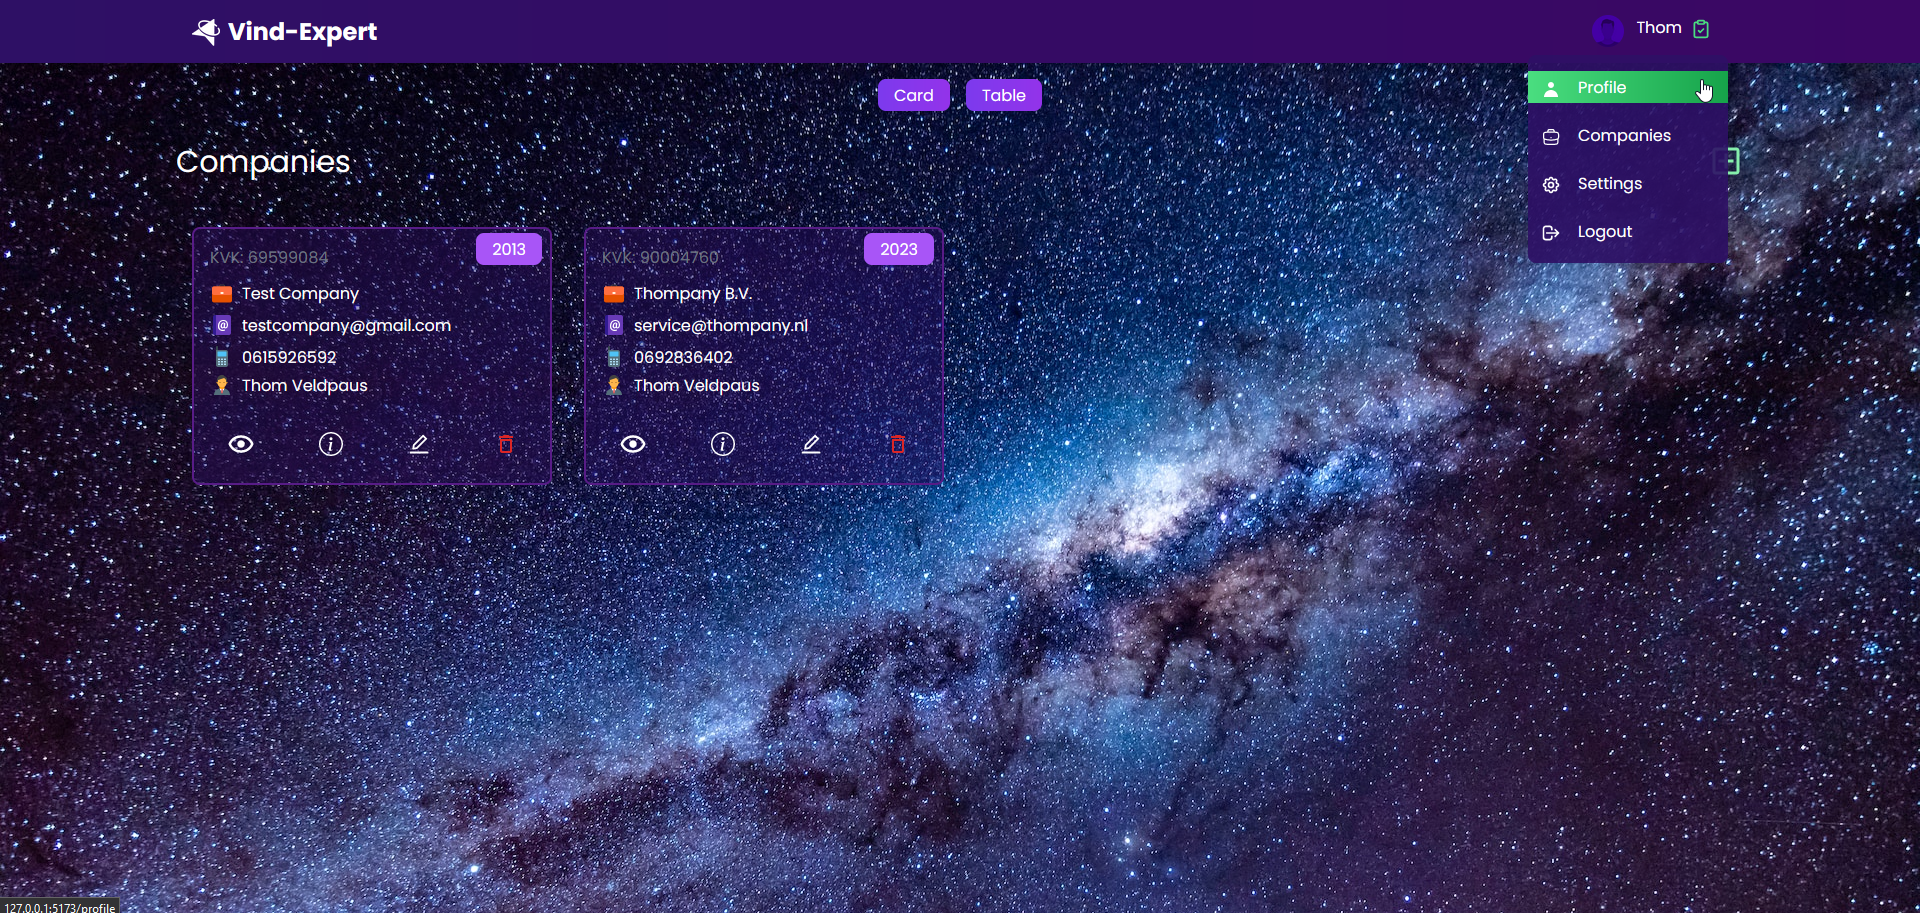
Table view:
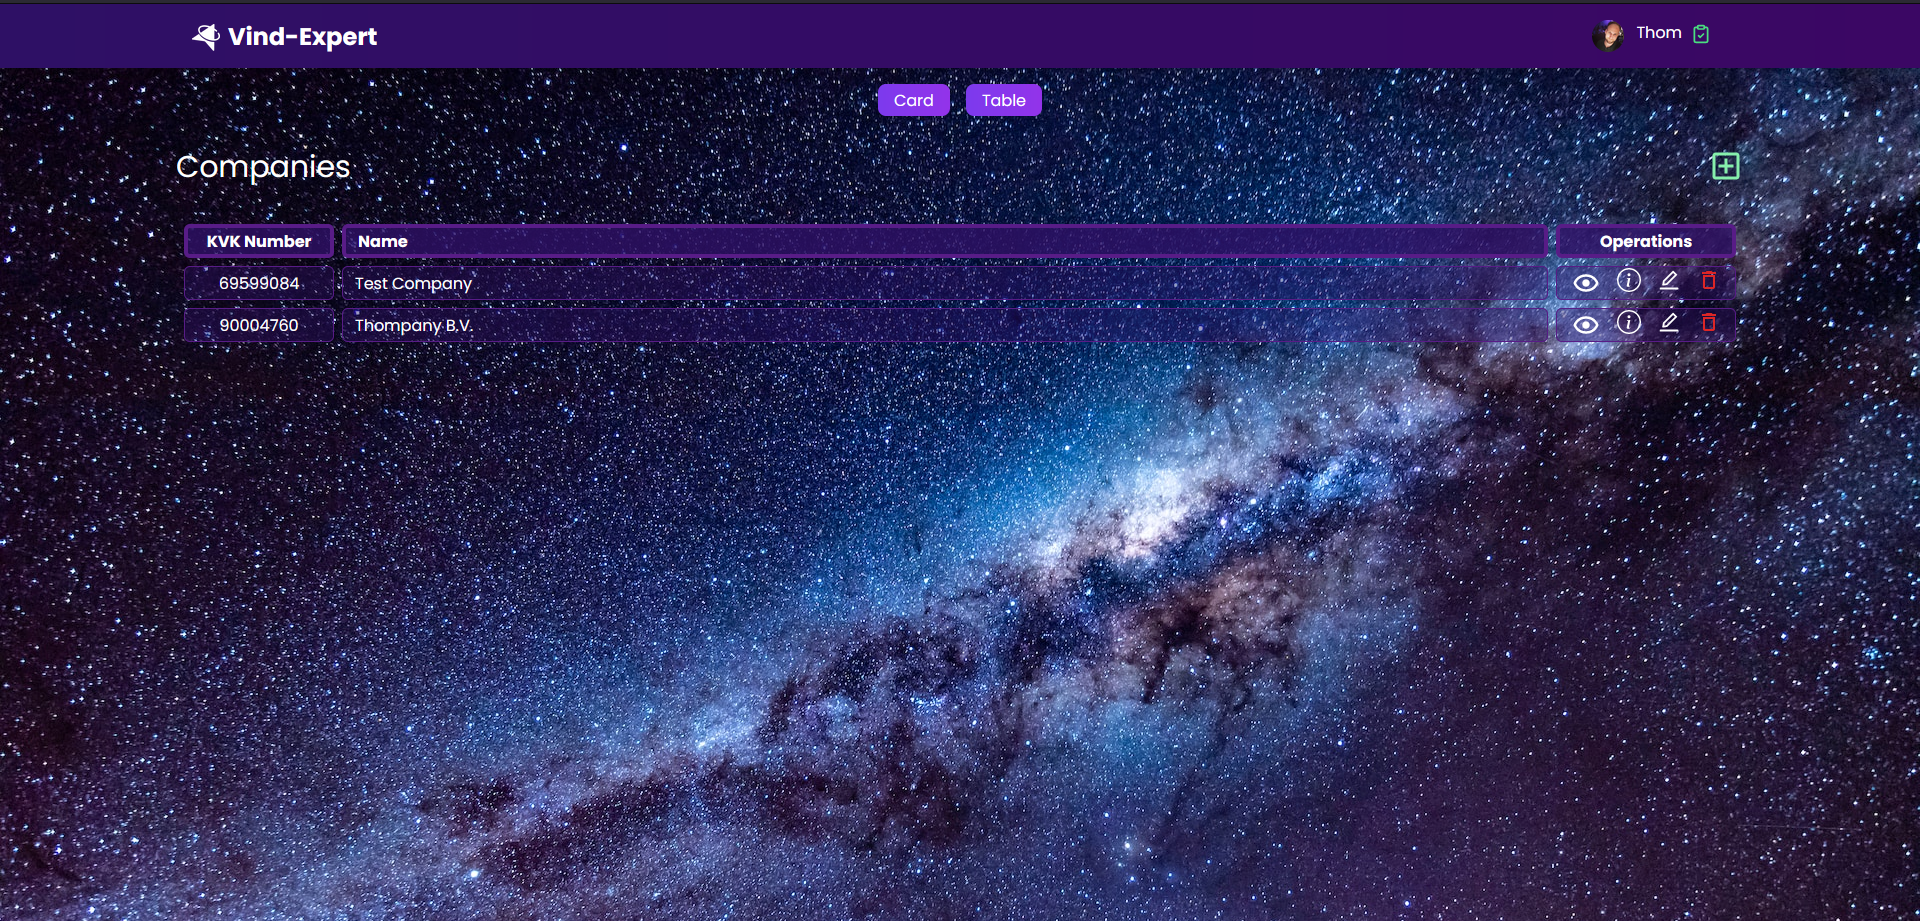
When the user clicks on the eye icon on a listed company, a modal will pop up that will display the main and most important public company information so the owner of the company can check the company current state quickly at a glance without having to navigate to another company specific details page and lose track of what they were doing or planning to do from the companies listing page.
Note: At this stage in development, companies do not have that many details yet to show. There will be a lot of work to these pages yet and they do not reflect a final version.

Registration
An owner of a company can register his company in my application. On this companies listing page you see a green + icon in the top right corner. When a user clicks on that, he will navigate to the company register page where the user can register a new company that hasn't registered yet by filling in a company registration form.
Company registration form:
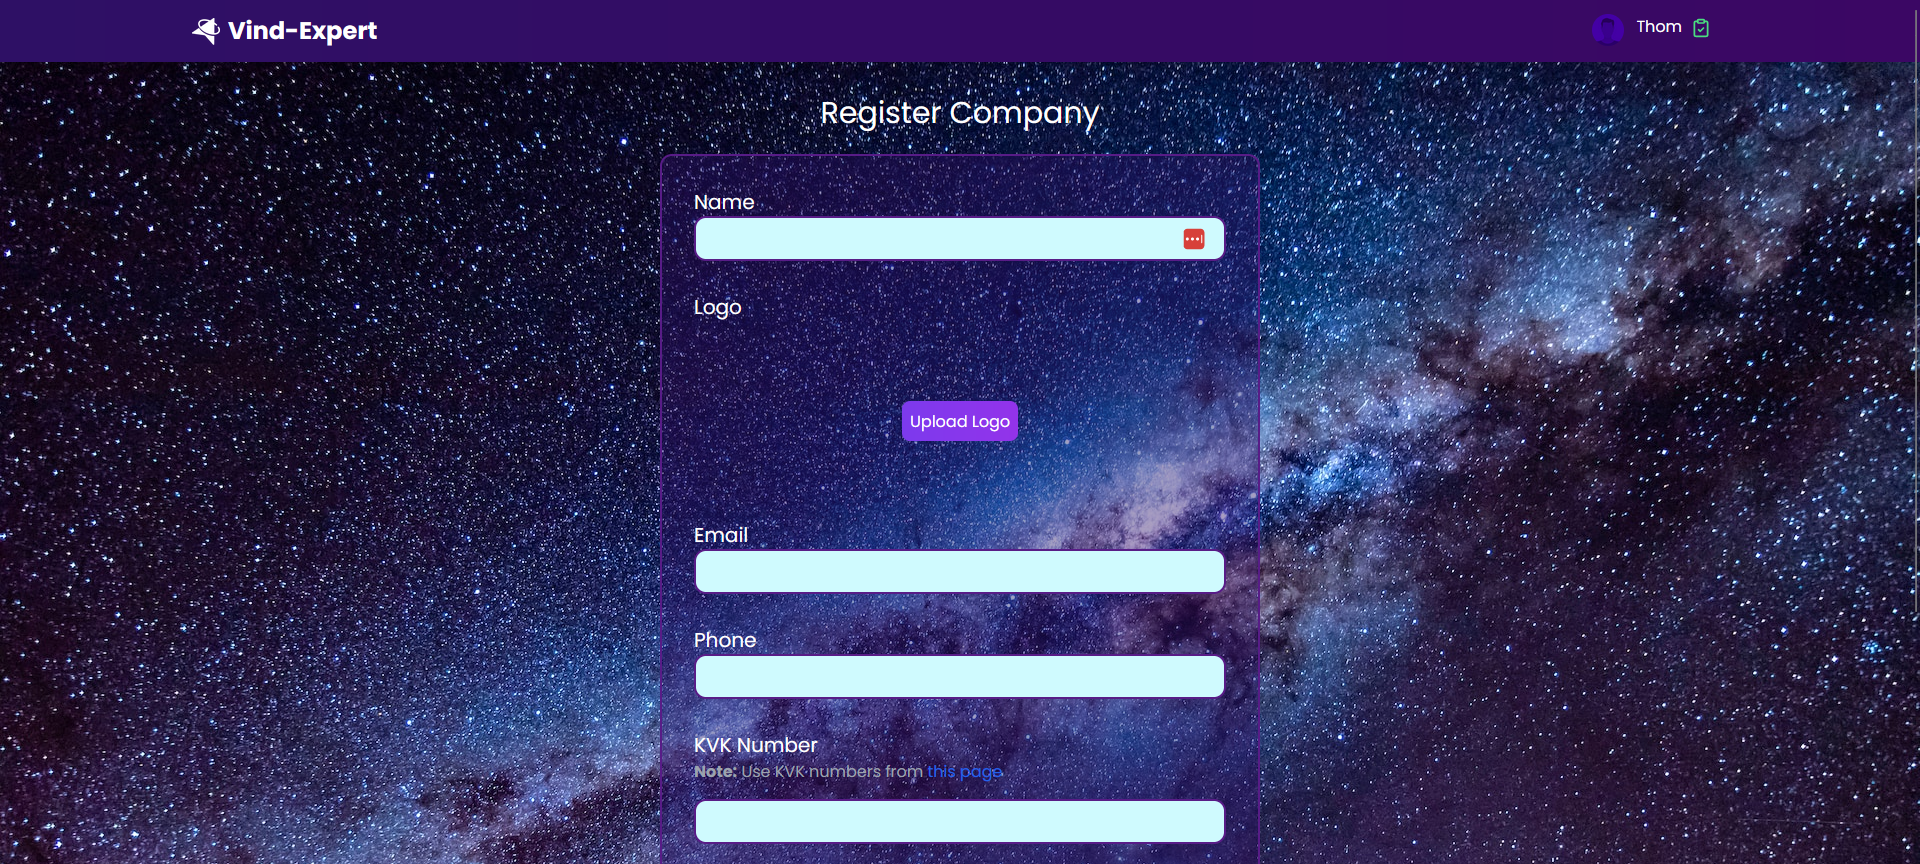

Form field validation
All form input fields in my application have to be validated. I've written my own validators for all fields. I've used regular expressions to make sure it is correct data as I expect to receive from the user input.
Example validator:
Source: /client/utils/validation/emailValidator.js
const emailValidator = (email) => {
  const regex = /^[^\s@]+@[^\s@]+\.[^\s@]+$/u
  return regex.test(email)
}

export default emailValidator
Invalid value notifications:
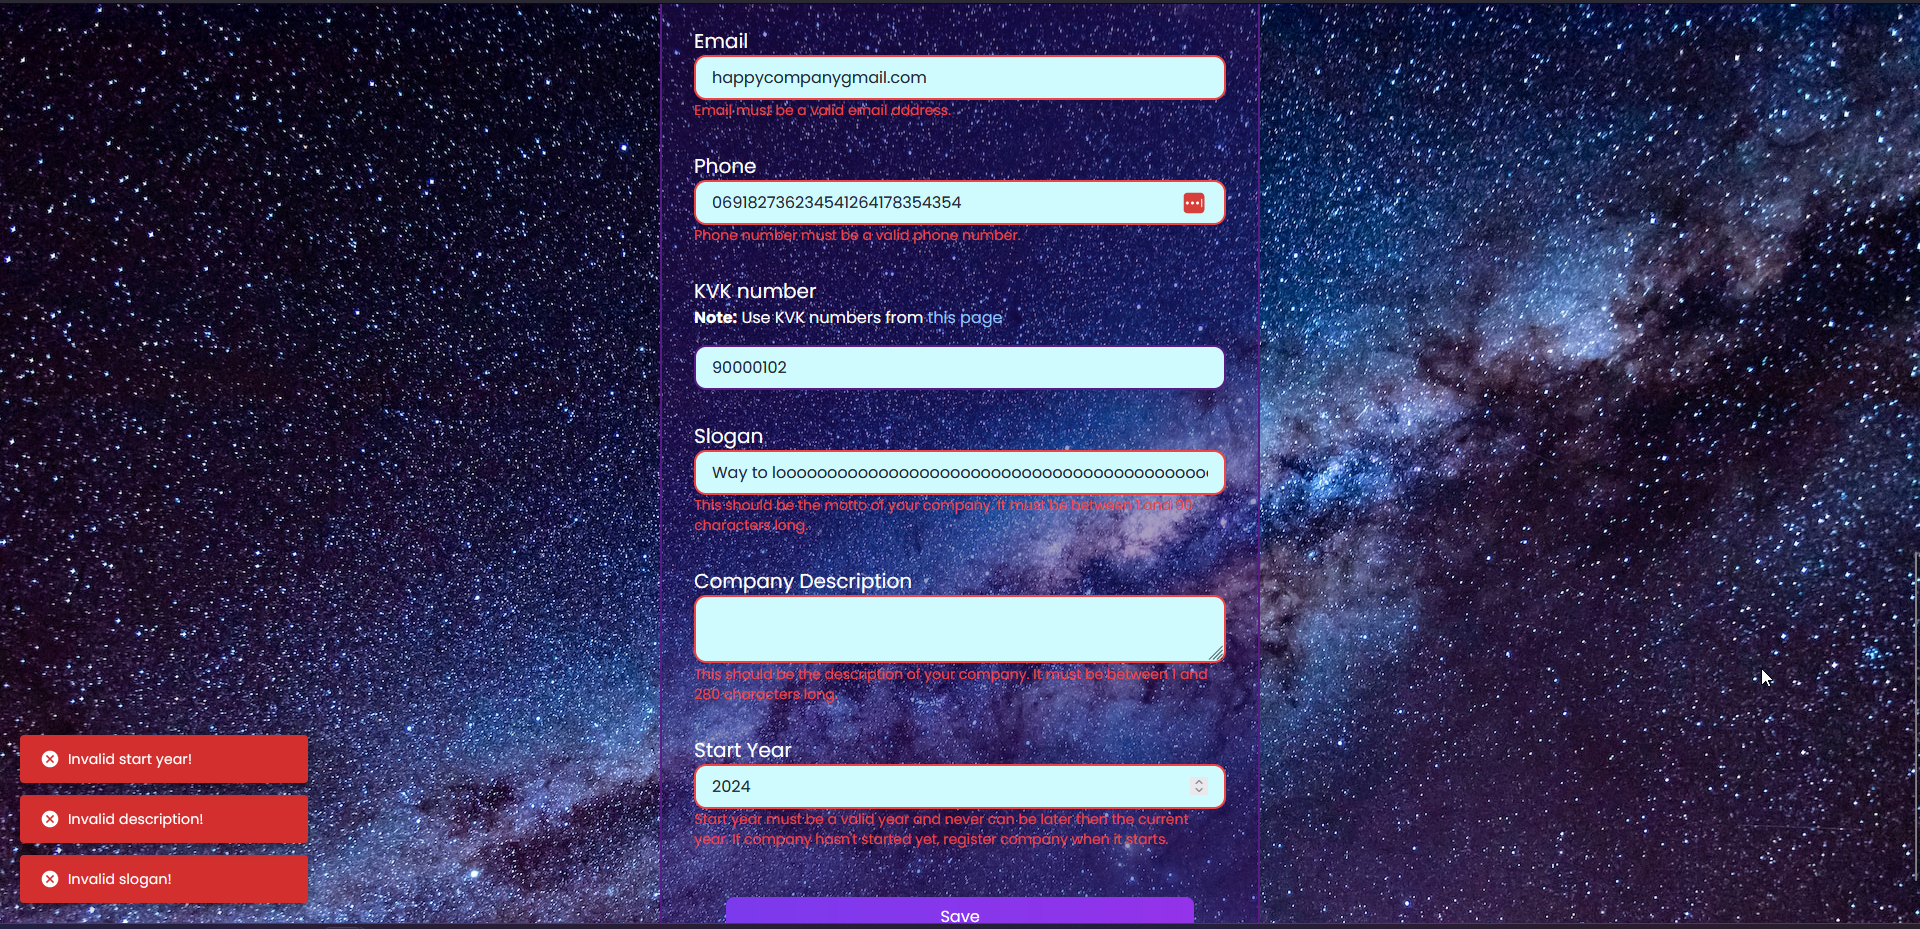
Code example communicating invalid values in the UI of company registration page:
Source: /client/src/pages/companies/RegisterCompany.jsx
import React, { useEffect, useState } from 'react'
import axios from 'axios'
import { useSnackbar } from 'notistack'
import emailValidator from '../../utils/validation/emailValidator'
// ... (and a lot of other imports and validator imports here)
const RegisterCompany = () => {
const [name, setName] = useState(''),
// email form field input value
[email, setEmail] = useState(''),
// ... (states for all other form field values)
// If value is invalid, emailError would become true
[nameError, setNameError] = useState(false),
[emailError, setEmailError] = useState(false),
// ... (errors states for all form fields here)
// useSnackbar is a hook that allows us to show a notification that pops up in the left bottom corder (see image above)
{ enqueueSnackbar } = useSnackbar()
// Functions that will call the name and email validators and sets the error state dependent on the return value from the validators.
// This function is called directly by the onBlur event listener on the name and email input fields, so it is called when the input
// field loses focus.
const validateCompanyName = () => {
if (companyNameValidator(name)) {
setNameError(false)
} else {
setNameError(true)
}
},
validateEmail = () => {
if (emailValidator(email)) {
setEmailError(false)
} else {
setEmailError(true)
}
},
// ... (a lot of other validateFormField() functions here)
// Handle onChange events for all input fields
const handleNameChange = (event) => {
setName(event.target.value)
if (nameError) {
validateCompanyName()
}
},
handleEmailChange = (event) => {
setEmail(event.target.value)
if (emailError) {
validateEmail()
}
},
// ... (a lot of input field change handlers here)
// Handle onChange events for all input fields
const handleNameChange = (event) => {
// Set the name state to the current name input field value
setName(event.target.value)
if (nameError) {
// Only IF the name error state is ALREADY true, then validate name always onChange. This prevents a notification when the user
// hasn't completed his input and would otherwise already show after typing the first character in to the field. onBlur()
//calls the validateName function initially after losing focus the first time.
validateCompanyName()
}
},
handleEmailChange = (event) => {
// Set the email state to the current email input field value
setEmail(event.target.value)
if (emailError) {
// Only IF the email error state is ALREADY true, then validate email always onChange. Initially called by onBlur like the name field.
validateEmail()
}
},
// ... (here all other onChange handler for the other input fields)
// Display error messages if the user enters invalid input with useSnackbar
useEffect(() => {
if (nameError) {
// Trigger snackbar notification
enqueueSnackbar('Company name is invalid!', {
variant: 'error', // Display notification in a red box
preventDuplicate: true, // Prevents notification spamming
})
}
// Trigger snackbar notification
if (emailError) {
enqueueSnackbar('Email is invalid!', {
variant: 'error', // Display notification in a red box
preventDuplicate: true, // Prevents notification spamming
})
}
// ... (rest of the input field if statement whether to display a invalid value error notification)
}, [
// This dependency array is set to the error states of the input fields. Every time a state value from this array changes,
// this useEffect hook function will trigger.
nameError,
emailError,
phoneError,
kvkNumberError,
sloganError,
descriptionError,
startYearError,
])
// Function that is being called when the user presses the Save button.
const handleSaveCompany = async () => {
// Validate all fields before sending the request to the backend, otherwise return
validateCompanyName()
validateEmail()
// ... (validate other fields here)
// If there are any invalid form fields left, notify the active user and return without saving and without redirect.
if (
nameError ||
emailError ||
phoneError ||
kvkNumberError ||
sloganError ||
startYearError ||
!name ||
!email ||
!phone ||
!kvkNumber ||
!slogan ||
!startYear
) {
enqueueSnackbar(
'Please fill in all fields correctly before saving this company!',
{
variant: 'error',
preventDuplicate: true,
},
)
return
}
// If all values are correct, prepare object for company save request
const data = {
name,
logo,
email,
phone,
kvkNumber,
slogan,
startYear,
description,
owners: [{ userId }],
}
// Render loading animation for as long as the request takes
setLoading(true)
axios
.post(`${BACKEND_URL}/companies`, data)
.then(() => {
// Saving company success
// Stop loading animation
setLoading(false)
// Notify the user about success
enqueueSnackbar('Company registered successfully!', {
variant: 'success',
preventDuplicate: true,
})
// Redirect back to companies listing page
navigate('/companies')
})
.catch((error) => {
// If request failed notify active user accordingly to the problem that occurred.
// Company with the KvK number already existed, is not unique
if (error.response.status === 409) {
enqueueSnackbar('Company with this KVK number already exists!', {
variant: 'error',
preventDuplicate: true,
})
// Set KvK error to true
setKvkNumberError(true)
// Display a more fitting message below the input field.
setKvkNumberErrorMessage(
'Company with this KVK number already exists!',
)
}
// Disable animation
setLoading(false)
// Always notify user saving company failed
enqueueSnackbar('Error registering company!', {
variant: 'error',
preventDuplicate: true,
})
})
}
return (
// ... (Top of the register page)
<div className='my-4'>
<label className='text-xl mr-4' htmlFor='company-name-input'>
Name
</label>
<input
className={`border-2 border-purple-900 bg-cyan-100 focus:bg-white rounded-xl text-gray-800 px-4 py-2 w-full ${
nameError ? 'border-red-500' : ''
}`}
data-test-id='company-name-input'
id='company-name-input'
onBlur={validateCompanyName} // onBlur event validate name field function call
onChange={handleNameChange} // onChange event name field change handler function call
type='text'
value={name}
/>
{ /* Conditionally render the error notification text below the input field: */}
{nameError ? (
<p className='text-red-500 text-sm'>
Company name must be between 1 and 60 characters long and can
only contain letters, numbers, spaces, and the following
characters: -, ', and .
</p>
) : (
''
)}
</div>
<div className='my-4'>
<label className='text-xl mr-4' htmlFor='company-email-input'>
Email
</label>
<input
className={`border-2 border-purple-900 bg-cyan-100 focus:bg-white rounded-xl text-gray-800 px-4 py-2 w-full ${
emailError ? 'border-red-500' : ''
}`}
data-test-id='company-email-input'
id='company-email-input'
onBlur={validateEmail} // onBlur event validate email field function call
onChange={handleEmailChange} // onChange event email field change handler function call
type='text'
value={email}
/>
{ /* Conditionally render the error notification text below the input field: */}
{emailError ? (
<p className='text-red-500 text-sm'>
Email must be a valid email address.
</p>
) : (
''
)}
</div>
)KVK number validation
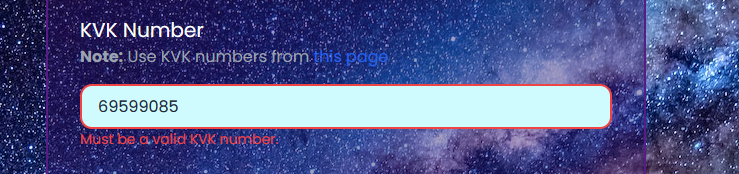
Companies in the Netherlands (my home country) are always registered to the "Kamer van Koophandel" which is the Chamber of Commerce in the Netherlands. It is a government agency that plays a crucial role in the registration and documentation of businesses operating in my country.
I've connected the backend application to the KvK test API for validation of company KvK numbers. When a user registers a company to my application and fills in the KvK number, when the input field loses focus (onBlur()), automatically there will be a request to the KvK (test) API for KvK number validation.
GET route to get KvK data:
Source: /backend/routes/kvkRoute.js
import { getKvkData } from '../controllers/kvkController.js'
import express from 'express'
import cors from 'cors'

const router = express.Router()

// GET route to get KvK data from the KvK API by KvK number
router.get('/', cors(), getKvkData)

export default router
KvK controller for handling request:
Source: /backend/controllers/kvkController.js
import axios from 'axios'
import fs from 'fs'
import https from 'https'
import { KVK_TEST_API_KEY } from '../config.js'

const PATH_TO_KVK_API_CERTIFICATE_CHAIN_RELATIVE_TO_INDEX_APP =
  './certs/kvkApi/Private_G1_chain.pem'

// Function to get data from the KVK API
export const getKvkData = async (request, response) => {
  try {
    // Get the query from the request query parameters
    const { kvkNumber } = request.query,
      // Get the certificate chain from the file system
      certificateChain = fs.readFileSync(
        PATH_TO_KVK_API_CERTIFICATE_CHAIN_RELATIVE_TO_INDEX_APP,
        'utf8',
      ),
      // Create an https agent with the certificate chain
      // https://nodejs.org/api/https.html#https_https_request_options_callback
      agent = new https.Agent({
        ca: certificateChain,
      }),
      // Get the data from the KVK API GET request
      { data } = await axios.get(
        `https://api.kvk.nl/test/api/v1/naamgevingen/kvknummer/${kvkNumber}`,
        {
          headers: {
            apikey: KVK_TEST_API_KEY,
          },
          httpsAgent: agent,
        },
      )

    // Send status 200 response and the data to the client
    return response.status(200).json(data)
  } catch (error) {
    console.log('Error in GET /kvk: ', error)
    // If the error is a 400 error, send a 400 response with the error message
    if (error.response.status === 400) {
      return response.status(400).send({ message: error.message })
    }
    // Else, send a 500 response with the error message
    return response.status(500).send({ message: error.message })
  }
}
For now, only number validation is enough, but in the future also the company name, owners and other company details will be verified against this API to rule out the need for human verification as much as possible to safe costs and make the user experience a much faster because users can get started with their company in the application right away without having to wait for a manual verification of their business.
Subsidiary companies:: KvK numbers have to be unique so companies can't get registered more then once, in the future this uniqueness has to be combination between Kvk number and company name (and also maybe other company details) because companies can have subsidiary companies with the same number and these subsidiary companies should be able to be registered as valid companies to the application because for a regular user using the app to find a company they need, it is not important to know that a company has a parent company. If companies find it necessary to inform the regular user (and potential customer) about their subsidiarity of a parent company, then they should be able to inform users about that on their company profile page (in very early development).
Company document data structure
When I first got the business idea for building this application I decided to make companies the main central starting point to focus on, find out what is necessary to get companies on board with my application and want to register and pay for premium features. Almost the first thing I started building was a company model that has all required fields where companies would be dependent on realizing the ideas I have in mind for my application, resulting in a Company model with many fields. At this stage of development only a few of there defined fields are actually used and populated with data at the moment, but because it is not a requirement to populate every field with data before saving and editing Company documents in the database, I feel no need to simplify the model for the time being at all.
Company schema
Schema fields:
-
Name:
- Type: String
- Required: true
- Description: The name of the company.
-
Logo:
- Type: String (Base64 format)
- Required: false
- Default: ""
- Description: The company's logo (still) in Base64 format.
-
Email:
- Type: String
- Required: true
- Default: ""
- Description: The company's email address for correspondence.
-
Phone:
- Type: String
- Required: true
- Default: ""
- Description: The company's contact phone number.
-
KVK Number:
- Type: String
- Required: true
- Unique: true
- Default: ""
- Description: Kamer van Koophandel (KVK) number of the company.
-
KVK Validated:
- Type: Boolean
- Required: true
- Default: false
- Description: Indicates whether the KVK number is validated using the already fully functional and authenticated KVK test API end point connection.
-
Slogan:
- Type: String
- Required: true
- Default: ""
- Description: The company's slogan.
-
Description:
- Type: String
- Required: true
- Default: ""
- Description: A short description of the company.
-
Address:
- Type: Object
- Required: false
- Default: {}
- Description: The registered address of the company.
-
Billing Address:
- Type: Object
- Required: false
- Default: {}
- Description: The address to send invoices to.
-
Address Format:
- Type: ObjectId (Reference to Address Format model)
- Required: false
- Default: null
- Description: The country specific address format of the country the registered company is in.
-
Country:
- Type: String
- Required: false
- Default: "NL"
- Description: The country of the company's billing address.
-
Region:
- Type: String
- Required: false
- Default: ""
- Description: The region of the company's billing address.
-
Owners:
- Type: Array
- Required: false
- Default: []
- Description: An array of objects containing owner their
UserObjectId's corresponding with their documents' ID in the of theuserscollection. Owners will always have the right to admin level access to company configuration and can disable admin level access to these configurations any time for safety, they can also enable these admin rights whenever is necessary and will be prompted regularly to disable the elevated admin access to prevent any unintended possible disasters (like deleting the company by accident and losing all reviews, score and status).
-
Company Admins:
- Type: Array
- Required: false
- Default: []
- Description: An array of
ObjectId's containing company adminsUserID's who have elevated access to Company configuration. Admins have elevated access to company configurations and can disable admin level accessibility to these configurations any time for safety, they can also enable these admin rights whenever is necessary and will be prompted regularly to disable the elevated admin access to prevent any unintended possible disasters just like owners. Admins have the right to add other admins to a company when they have elevated access enabled, but initially a company owner with elevated access had to add the first admin (who is not company owner).
-
Locations:
- Type: Array
- Required: false
- Default: []
- Description: An array of objects representing company locations. This will be
ObjectIds corresponding toAddressdocuments in theaddresscollection.
-
Departments:
- Type: Array
- Required: false
- Default: []
- Description: An array of objects representing company departments. To be decided the format this will be in.
-
Business Config:
- Type: Object
- Required: false
- Default: {}
- Description: Configurable settings for company owners and admins with elevated access enabled.
-
Payment Details:
- Type: Object
- Required: false
- Default: {}
- Description: Payment details for the company. Think about anything solely necessary for financial transactions in any direction.
-
Start Year:
- Type: Number
- Required: false
- Default: 0
- Description: The year the company was started.
-
Active:
- Type: Boolean
- Required: false
- Default: true
- Description: Indicates if the company is currently active. (Open for business)
-
Industries:
- Type: Array
- Required: false
- Default: []
- Description: An array of industries associated with the company for grouping companies and search result improvement.
-
Public:
- Type: Boolean
- Required: false
- Default: true
- Description: Indicates if the company is public or private.
-
Reviews:
- Type: Array
- Required: false
- Default: []
- Description: An array of
ObjectIds ofReviewdocuments in thereviewcollection in the database representing this companies' reviews.
-
Rating:
- Type: Number
- Required: false
- Min: 0
- Max: 5
- Default: 0
- Description: The overall rating of the company. Every
Usercan vote on this only a single time but might be able to edit their rating of the company. In what format ratings should be tracked and saved is to be decided.
-
Customers:
- Type: Array
- Required: false
- Default: []
- Description: An array of customers
UserObjectIds in from theuserscollection in database.
-
Premium:
- Type: ObjectId (Reference to Premium Type model)
- Required: false
- Default: null
- Description: The premium type associated with the company. Like "none" "bronze", "silver", "gold" or "platinum". What every premium subscription level has to cost and what advantages or features these provide for subscribed companies is to be decided, think about company profile cosmetic changes or being able to have actions, discounts or events, BUT companies will never be able to pay for a higher place in the search result because that defeats the purpose of this application completely.
-
Vendor:
- Type: ObjectId (Reference to Vendor model)
- Required: false
- Default: null
- Description: Can this company sell to other companies? If so, this company will be marked as vendor and probably have a corresponding
Vendordocument in the (yet un-existing)vendorscollection where all to vendors specific data will be saved.
-
Employees:
- Type: Array
- Required: false
- Default: []
- Description: An array of
UserObjectId's of users who accepted theInviteto become employee of this company and will be able to have some functionalities within this company like writingStoryposts under their own name and communicate with (potential) customers (users of this application).
-
Stories:
- Type: Array
- Required: false
- Default: []
- Description:
ObjectId's ofStorydocuments in thestoriescollection. Stories are posts placed on a timeline where you can see what the company has been active in lately and in the past. Stories can differ a lot from one another, companies have to be able to have a large spectrum of possibilities adding stories that fit their wishes.
-
Products:
- Type: Array
- Required: false
- Default: []
- Description: Products a company can offer and users can buy. Probably will be an array of
ObjectId's, but have to decide how to structure product data. Maybe product selling functionality would require a compete new platform to be with a realtime connection synchronizing with this application.
-
Services:
- Type: Array
- Required: false
- Default: []
- Description: A company can offer and sell services to users. The exact format this will be build in is to be decided.
-
Agenda:
- Type: Array
- Required: false
- Default: []
- Description: An array of agenda objects associated with the company. Format is to be decided.
-
Appointments:
- Type: Array
- Required: false
- Default: []
- Description: An array of appointments with users and other companies, format is to be decided.
-
Messages:
- Type: Array
- Required: false
- Default: []
- Description: Corresponds with messages in the
messagescollectionObjectId's ofMessagedocuments. Still need to decide on the messages' format and data structure.
-
Notifications:
- Type: Array
- Required: false
- Default: []
- Description: An array of corresponding
Notificationdocuments'
-
Events:
- Type: Array
- Required: false
- Default: []
- Description:
ObjectId's corresponding toEventdocuments in theeventscollection. Events could be anything that is organized and it is still to decide in which many ways and configurations events could be created by users of the application.
-
Tasks:
- Type: Array
- Required: false
- Default: []
- Description: Array of
ObjectId's ofTaskdocuments in thetaskscollection. Could be anything a user or company could have to do and I will decide later on all the functionalities and data structure of tasks later on.
-
Invoices:
- Type: Array
- Required: false
- Default: []
- Description: Array of
InvoicedocumentObjectId's in theinvoicescollection.Invoicedata structure has to be decided on yet.
-
Orders:
- Type: Array
- Required: false
- Default: []
- Description: Array of
OrderdocumentObjectId's in theorderscollection which will contain all kind of orders users and companies could make and contains information of all order specific data like order status and much more.
-
Payments:
- Type: Array
- Required: false
- Unique: true
- Default: []
- Description: Array of
PaymentdocumentObjectId's in thepaymentscollection which keeps track of all financial transactions between everybody.
-
Main Image ID:
- Type: String
- Required: false
- Default: ""
- Description: The main image should be the first thing people see when searching for a company and should be the eye catcher of the company to attract people to look into them. This is meant to be a different image then the company logo, the logo is also displayed in the first glance of a user searching for a company but smaller in a corner (something like that).
-
Images:
- Type: Array
- Required: false
- Description: An array of image objects associated with the company.
-
Timestamps:
- Type: Object
- Description: Automatically adds
createdAtandupdatedAtfields to the user doc
Mongoose:
- The Mongoose schema establishes the data structure for the company information within the database.
- It enforces uniqueness for each companies' KVK number to prevent double registrations.
- The
Companymodel has a lot of fields not being populated with data yet, but the size of this model tells very clearly about what size of the application would become.
Schema:
// Instantiate `Company` schema
const companySchema = new mongoose.Schema(
  {
    // ... (all schema fields are defined here)
  },
  { timestamps: true },
)
Note: To see the complete code of the
Companyschema instantiation with all fields here.
Model:
// Instantiate `Company` model
const Company = mongoose.model('Company', companySchema)
Edit company
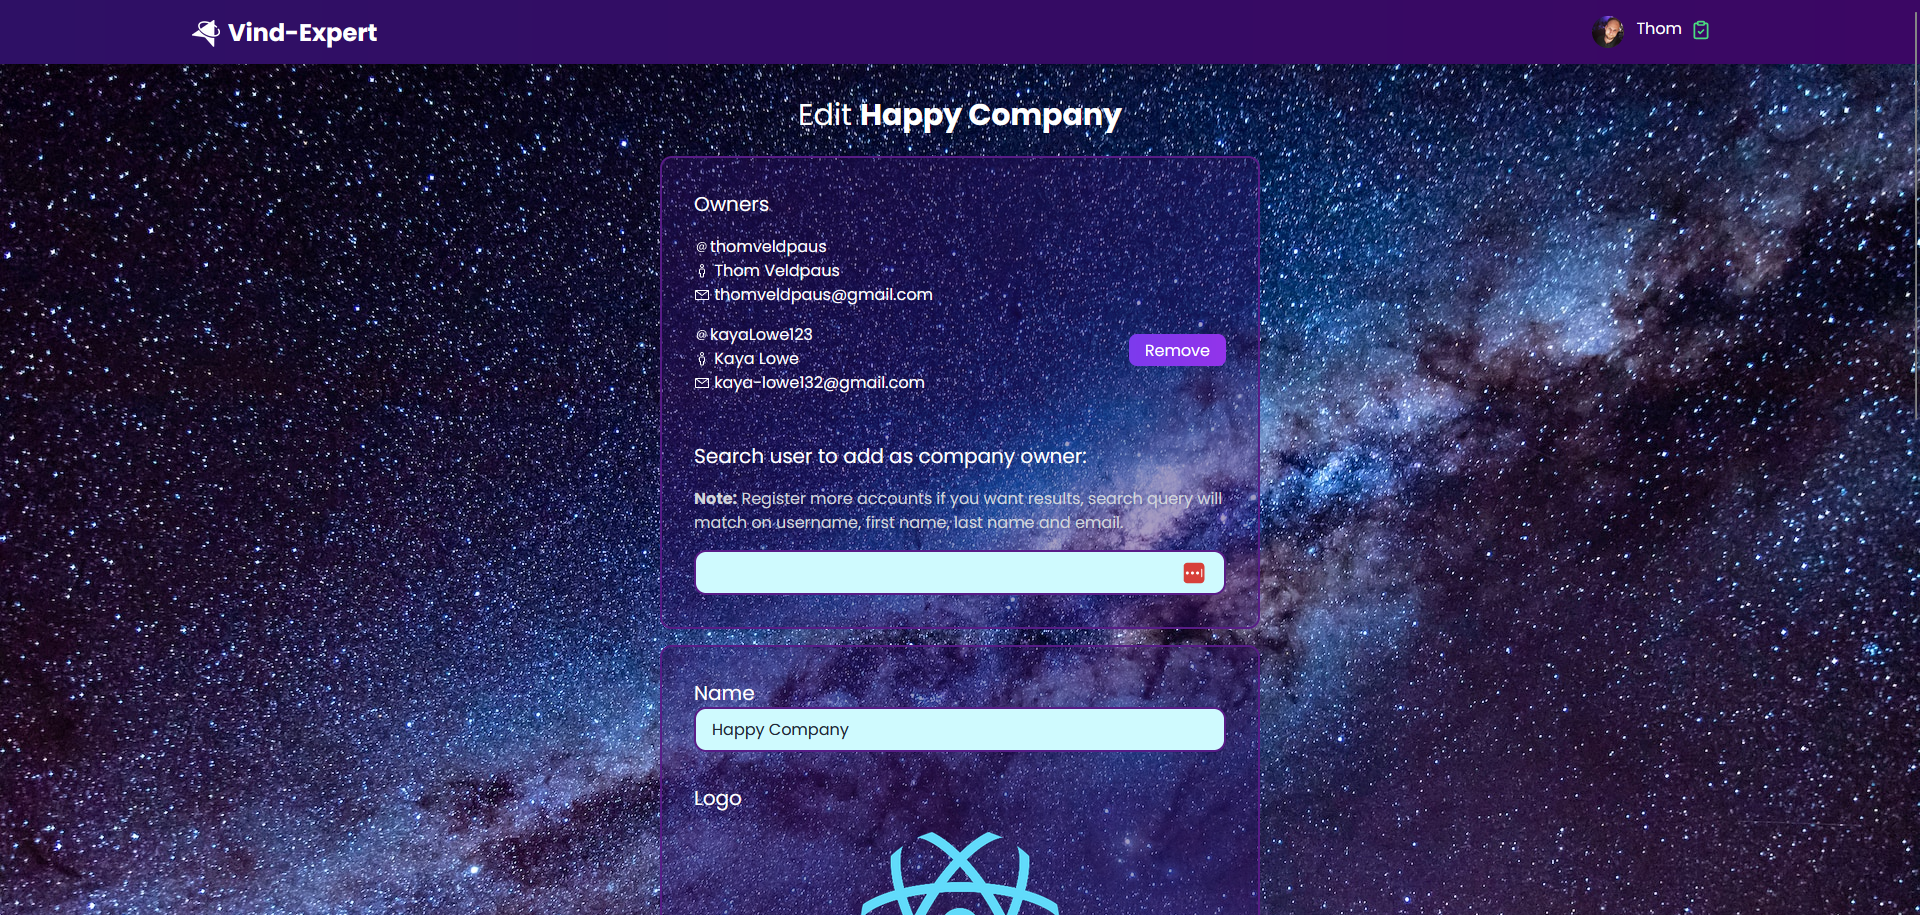
When a company owner clicks on the pencil icon on the companies listing page the owner is able to edit the company.
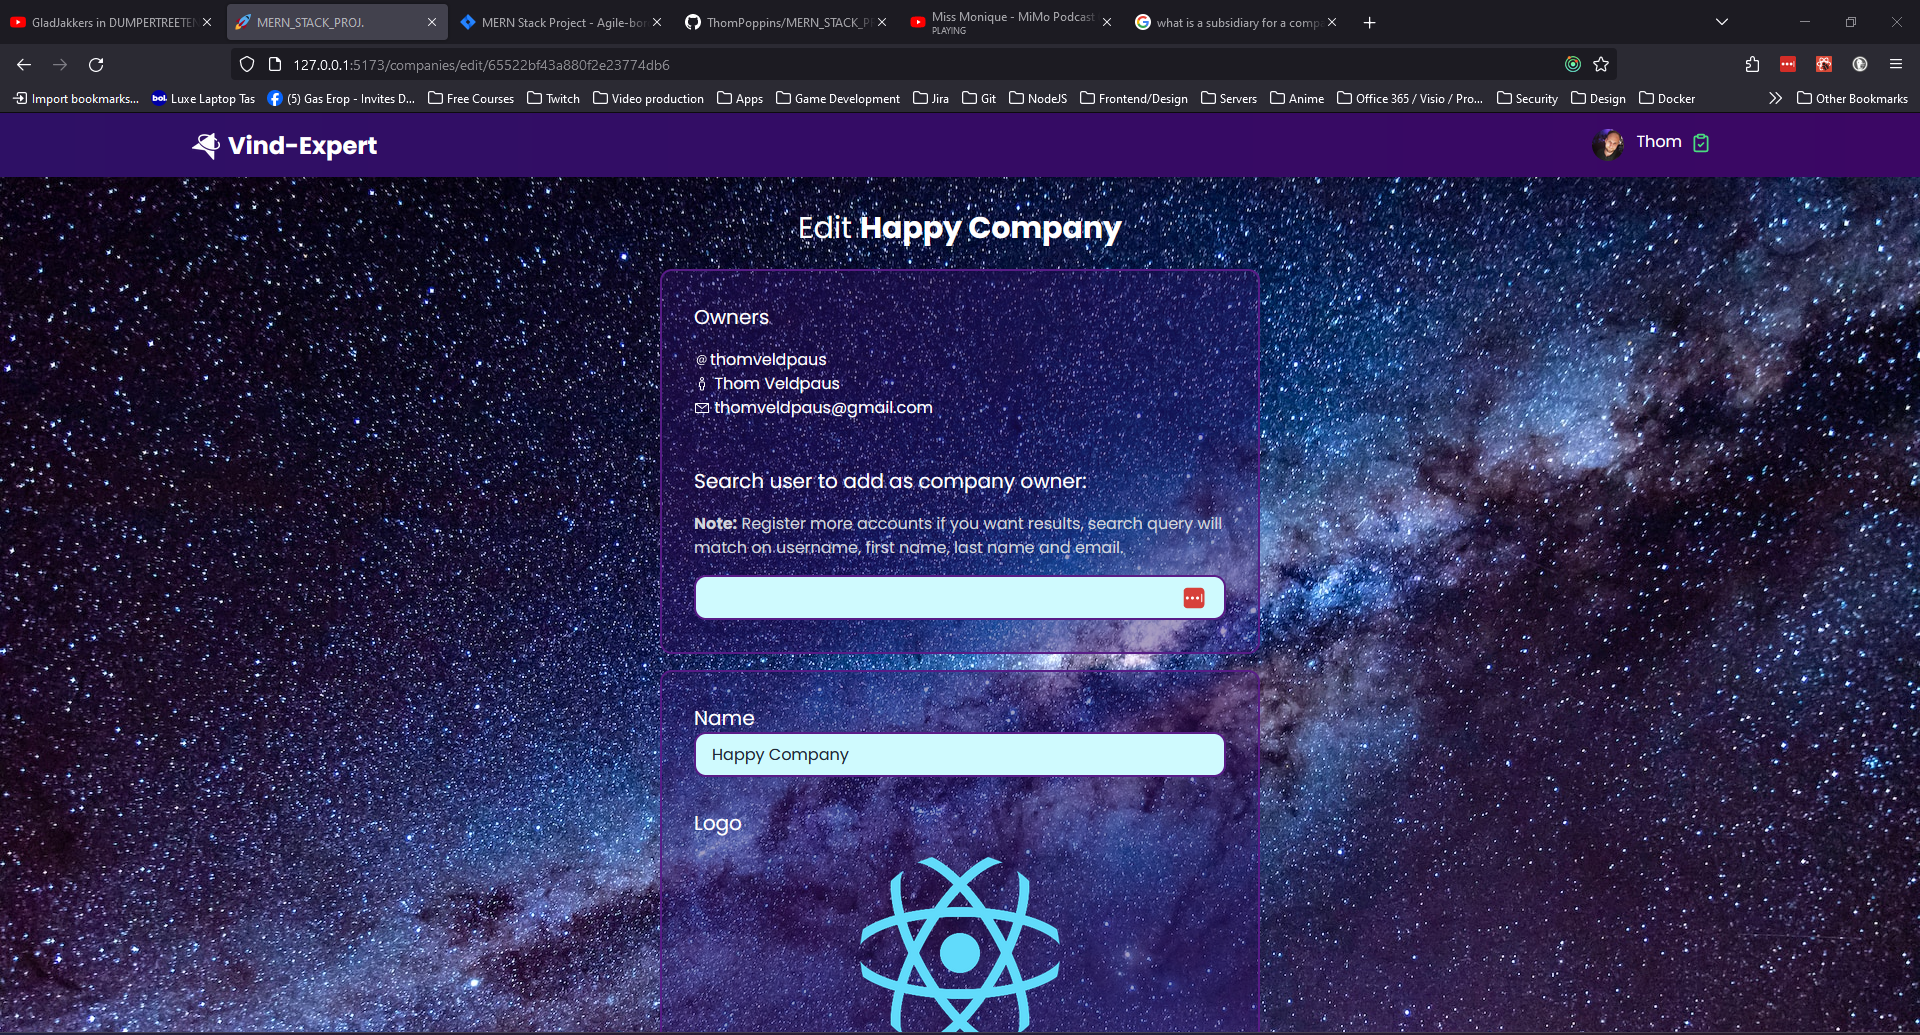

Company ownership
Companies are automatically owned by the User that registers the company to the application.
If a company has more than one owner, the company owners is able to invite other users for company ownership, giving the other co-owners the same admin level elevated access to the configuration of their company.
Find other users and invite them for co-ownership:

A company owner can find users of the application with the search box on the "edit company" page and send them a invite by clicking the invite button.
When a user is invited by the owner for co-ownership the user "result" will be removed from the search results list and a "Pending invites" section will appear with the invited user. I invited the user Kaya Lowe in this example.
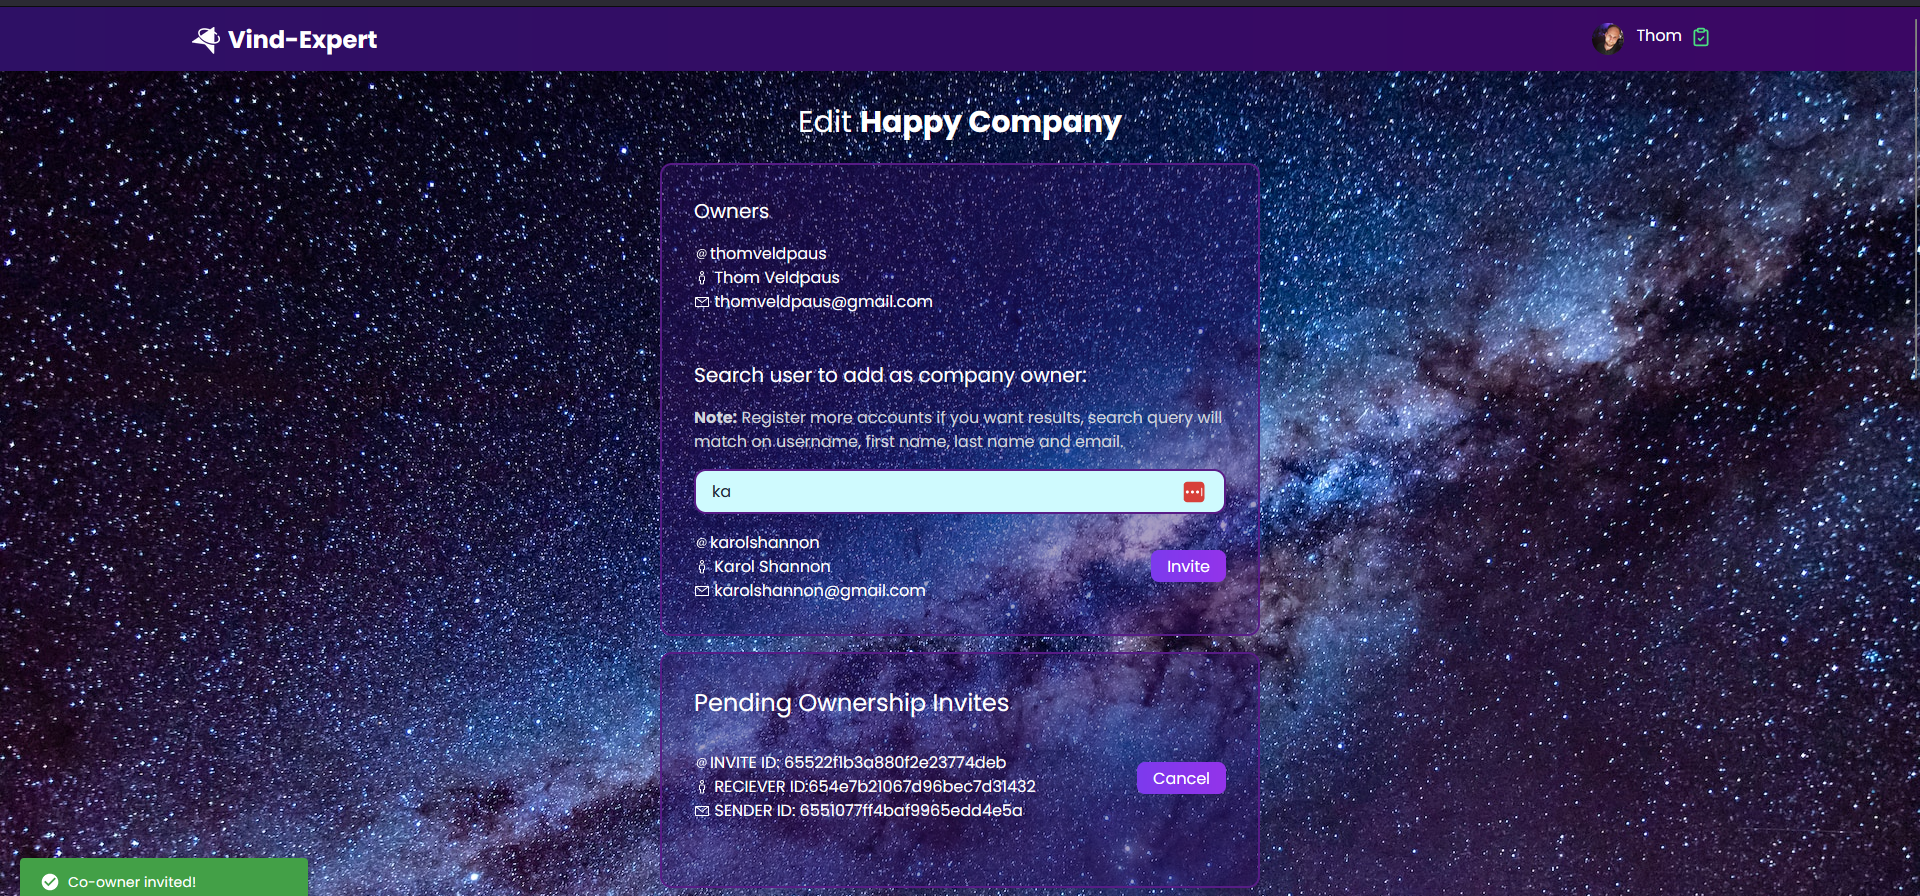
Note: In the future this
Inviteinformation will be the user details, but I have to make a future decision about where I want this data to be served from the backend to the client application, that's why it is only containingObjectIdinformation of theInvitedocument. See theInviteschema data structure further down below.
When the User is invited to become co-owner of the company, that user will receive a invite notification in the navigation bar.
Clicking on the Invites dropdown menu item, the user will navigate to the invites page and be able to Accept or Decline the invite by clicking the buttons in the Operations section in the Invites table listing the pending invites.

After clicking Accept or Decline and there is no pending invite left, the user will navigate to the companies listing page and the companies they accepted will be listed there with their name added as co-owner.
Note: The invite notification has disappeared, the Invites dropdown menu item isn't listing anymore.
After accepting the invite, the Owners section of the edit company page is updated with the new owner and the Pending invites Section disappeared since there are no pending invites left.
Note: In React I use conditional rendering and state management to easily always keep the UI up-to-date with the current state of the application when the state (current data) has been changed.
Invite schema
Schema fields:
-
Sender ID:
- Type: mongoose.Schema.Types.ObjectId
- Reference: "User"
- Description: The ID of the user sending the invitation.
-
Receiver ID:
- Type: mongoose.Schema.Types.ObjectId
- Reference: "User"
- Description: The ID of the user receiving the invitation.
-
Kind:
- Type: String
- Description: Specifies the type of invitation, with possible values: "company_ownership", "friend", "other". Default value is "other".
-
Company ID:
- Type: mongoose.Schema.Types.ObjectId
- Reference: "Company"
- Description: If the invitation is related to company ownership, this field contains the ID of the associated company.
-
Kind:
- Type: String
- Default: "pending"
- Description: Represents the status of the invitation. Only four possible values: "pending", "accepted", "declined", and "canceled".
-
Timestamps:
- Type: Automatically generated timestamps for document creation and modification.
Mongoose:
- The Mongoose schema establishes the data structure for the invite information within the database.
Schema:
// Instantiate `Invite` schema
const inviteSchema = new mongoose.Schema(
  {
    senderId: {
      type: mongoose.Schema.Types.ObjectId,
      ref: 'User',
      required: true,
    },
    receiverId: {
      type: mongoose.Schema.Types.ObjectId,
      ref: 'User',
      required: true,
    },
    kind: {
      type: String,
      required: true,
      default: 'other',
    },
    companyId: {
      type: mongoose.Schema.Types.ObjectId,
      ref: 'Company',
    },
    status: {
      type: String,
      required: true,
      default: 'pending',
    },
  },
  { timestamps: true },
)
Model:
// Create `Invite` model from `inviteSchema`
const Invite = mongoose.model('Invite', inviteSchema)
This was the visual demo for now, I will update this later on, so come back in a while to check it out!
Quick Start
To run this application locally, follow these steps:
-
Create a free MongoDB database to connect with and obtain a MongoDB authentication URL.
-
Clone the Repository:
git clone git@github.com:ThomPoppins/MERN_STACK_PROJ..git MERN_STACK_PROJ && cd MERN_STACK_PROJ -
Set Up Backend Configuration:
- Navigate to the
/backendfolder in your file explorer. - Create a
config.jsfile. -
Add the following constants and update them to your personal values:
// backend/config.js
// port for the server to listen on
export const PORT = 5555

// YOUR MongoDB database connection URL (if you want to test this application without creating your own database,
// contact me at thompoppins@gmail.com, I'll provide you with a database URL)
export const mongoDBURL =
'mongodb+srv://exampleuser:examplepasswork@example-mern-stack-project.xhvmidl.mongodb.net/?retryWrites=true&w=majority'

// Secret key for JWT signing and encryption (just generate a random string or keep it like it is for testing purposes)
export const JWT_SECRET = 'yoursecretkey'

// TEST API key for KVK API (also required)
export const KVK_TEST_API_KEY = 'l7xx1f2691f2520d487b902f4e0b57a0b197'

// PROD API key for KVK API (also required)
export const KVK_PROD_API_KEY = ''
- Navigate to the
-
Set Up Frontend Configuration:
- Navigate to the
/frontendfolder. - Create a
config.jsfile if it doesn't exist. -
Add the following constant and export it:
// frotend/config.js
export const BACKEND_URL = 'http://localhost:5555'
// Disable company validation by KVK API (If you want to test the KVK company validation, mail me at thompoppins@gmail.com for
// instructions how to set this up.)
export const TEST_KVK_API = false
- Navigate to the
-
Install Dependencies:
-
Inside the
/backendfolder, run:npm install -
Inside the
/frontendfolder, run:npm install
-
-
Start the Servers:
-
Inside the
/backendfolder, run:npm run dev -
In a separate terminal, inside the
/frontendfolder, run:npm run dev
-
-
Access the Application:
- Visit the web application in your browser using the link printed by the Vite.js server after starting the frontend server.
Now you have the application up and running locally!
Version v0.0.3 Release Notes
New Features
Basic Search Functionality
- Users can now search for companies by name.
- Search results are listed in a grid with company images.
- Clicking on a company navigates the user to the company details page (Company Profile).
Image Crop
- Users can upload an image and crop it via drag-n-drop or file selection.
- Preview canvas shows the user how the crop will be in a round circled shape.
- The cropped image is displayed as the default profile picture.
- After cropping, users can download the cropped file.
- Cropped base64 binary images are converted into BLOB and uploaded to the Express.js server as
pngfile. - Images are served as static files by /backend Express.js server and it acts as a images/files CDN for the frontend application.
Company Logo Cropping
- Implemented image crop functionality for company logos in the register and edit company pages.
- Company logos are displayed in a circle-shaped
frame throughout the application, when cropping the logo image, companies can see how the logo will look within the circle shaped border.
Professions in Company Profile
- Added a new field to the company model for professions.
- Companies can add professions to their profiles during registration.
Storybook Integration
- Installed Storybook for component development.
- Added a few initial components to Storybook.
Testing
- Jest and React-Testing-Library installed and functional.
Animations
- Added subtle animations for a more interactive user experience. Notification animations, when user has a pending 'Invite' the icon in the navigation bar right to their name turns yellow and starts wiggeling, asking the user for attention. Dropdown has a
Invitesmenu item on top with jumping letters to get the user attention to theInvitespage after clickingInvitesin the dropdown menu.
Co-Ownership Invites
- Notification icon wiggles when a user is invited for co-ownership of a company.
- "Invites" menu item is dynamically added to the dropdown menu.
- The menu item jumps to draw attention to pending co-ownership invites.
- Users can accept or decline co-ownership invites.
- After accepting or declining all pending invites (so no pending invites are left), user gets redirected to /companies page where all companies are listed that the user now (co-)owns.
- Safety measures implemented that prevents users from being invited twice, ensuring a unique co-owner status and no duplicate ownership registrations.
ES Lint and Prettier configuration
- Configured ES Lint and Prettier now optimal for my wished code style wise.
Upcoming features
- Edit company professions feature is still pending.
- More components need to be added to Storybook.
- Ongoing work on writing tests for components.
- Work in progress on writing tests with Jest and react-test-library
- Editing company professions is still pending.
- After implementing professions in Edit company page, main search functionality will use professions as second value to match on.
Version v0.0.2 Release Notes
Backend server CDN for static files
The backend server is now a CDN for static files like images. This means that the backend server will serve the static files from the /backend/public folder. This way, the frontend application can access the images from the backend server without having to store the images in the frontend application. This also makes it possible to use the backend server as a CDN for other applications that need to access the images.
File upload
Users can now upload a profile picture. The profile picture will be saved in the /backend/public/uploads/images folder and the path to the image will be saved in the database. The backend server will serve the image from the /backend/public folder. This way, the frontend application can access the image from the backend server and the image path is stored in the database.
Version v0.0.1 Release Notes
Registering an Account
Users can easily create an account by visiting the homepage of my application. The registration process is straightforward and requires users to provide basic information such as their email address, a secure password, and any additional required details. Once registered, users gain access to the full suite of functionalities offered by the application.
Logging In
Registered users can log in to their accounts using their previously provided credentials. This allows them to access and utilize all features and services provided by the application. The login process is secure and ensures that only authorized users can access their accounts.
When you log in a JWT token is generated and stored in the browser's local storage. This token is used to authenticate the user and to make sure that the user is authorized to access the application. The token is also used to make sure that the user is authorized to access certain resources in the application. For example, the user can only access his own company resources and not the company resources of other users.
Company Registration and Ownership
Upon logging in to their account, users have the capability to register a company that they own. This action automatically designates the user as the owner of the registered company, granting them administrative privileges within the application.
- Ownership Privileges: The user, upon registering a company, assumes the role of owner with full administrative control over the company's operations.
How to Register a Company
- Log in to your account.
- Navigate to Companies
- Click the plus icon to add a new company.
- Fill in company details with KVK-number and submit the registration form.
Upon successful registration and validation from the KVK API, the user will be recognized as the owner of the company and will have access to all administrative functionalities associated with it.
How to add a co-owner to a company
- Log in to your account.
- Navigate to Companies
- Click the pencil icon to edit a company.
- Search for a user by name, username or email.
- Click the add button to add the user as a owner to the company.
Technical description:
Frontend
On the frontend, I've chosen to install React with Vite (Next Generation Frontend Tooling) for building user interfaces and Redux for state management.
Vite
The React frontend application was installed using Vite.js, a modern build tool that provides fast development server and efficient build process.
-
Faster development: Vite.js provides a fast development server that supports near-instantaneous hot module replacement (HMR) for React components. This means that changes to your code are reflected in the browser almost immediately, without requiring a full page reload. This can speed up the development process and make it easier to iterate on code.
-
Efficient builds: Vite.js uses a highly optimized build process that leverages the native ES modules support in modern browsers. This can result in faster build times and smaller bundle sizes compared to other build tools.
-
Modern web technologies: Vite.js supports modern web technologies out of the box, including ES modules, TypeScript, and CSS modules. This makes it easy to build modern, high-performance web applications.
-
Plugin ecosystem: Vite.js has a growing ecosystem of plugins that can be used to extend its functionality. This includes plugins for things like CSS preprocessing, image optimization, and more.
React
React is a popular JavaScript library for building user interfaces. It provides a declarative syntax for defining UI components, and uses a virtual DOM to efficiently update the UI in response to changes in state. Some of the main advantages of React include:
-
Declarative syntax: React provides a simple and intuitive syntax for defining UI components, making it easy to reason about the structure and behavior of your application.
-
Efficient updates: React uses a virtual DOM to efficiently update the UI in response to changes in state, minimizing the number of DOM manipulations required.
-
Component reusability: React components are modular and reusable, making it easy to build complex UIs from simple building blocks.
-
Large ecosystem: React has a large and active ecosystem of libraries and tools, making it easy to find solutions to common problems and integrate with other technologies.
Redux
Redux is a state management library that is often used in conjunction with React. It provides a centralized store for managing application state, and uses a unidirectional data flow to ensure that state changes are predictable and easy to reason about. Some of the main advantages of using Redux with React include:
-
Centralized state management: Redux provides a centralized store for managing application state, making it easy to manage and reason about complex state interactions.
-
Predictable state changes: Redux uses a unidirectional data flow to ensure that state changes are predictable and easy to reason about, making it easier to debug and maintain your application.
-
Time-travel debugging: Redux provides a powerful debugging tool called "time-travel debugging", which allows you to step through state changes and see how your application state evolves over time.
-
Ecosystem integration: React and Redux have large and active ecosystems of libraries and tools, making it easy to integrate with other technologies and solve common problems.
Backend
In the backend, I've set up RESTful API endpoints to create, read, update, and delete documents from collections. These collections are defined and configured in the /backend/models folder, ensuring a structured and organized approach to data management.
Express.js
Efficient Routing: Express.js provides a robust routing system, making it seamless to define endpoints for handling various HTTP methods like GET, POST, PUT, and DELETE. This helps in organizing the backend logic effectively, ensuring clean and maintainable code.
Middleware Support:
Express.js offers a wide range of middleware options that can be easily integrated into the application's request-response cycle. This enables functionalities like request parsing, authentication, logging, and error handling, enhancing the security and performance of the backend.
Streamlined Database Interactions: When combined with database libraries like Mongoose (for MongoDB), Express.js simplifies the process of interacting with the database. This allows for smooth retrieval, creation, updating, and deletion of data, which is essential for building a robust API.
Asynchronous Request Handling: Express.js supports asynchronous programming paradigms, allowing for non-blocking I/O operations. This is crucial for handling multiple concurrent requests efficiently, ensuring optimal performance even under heavy loads.
Cross-Origin Resource Sharing (CORS) Cross-Origin Resource Sharing (CORS) is a critical security feature that safeguards my application from unwanted sources attempting to access your resources. Express.js provides built-in support for CORS, making it easy to configure and enforce CORS policies. This helps in preventing malicious attacks like cross-site scripting (XSS) and cross-site request forgery (CSRF). It also helps in preventing unauthorized access to sensitive data.
Static files server (functioning kind of like a CDN): Overall, Express.js provides a robust and secure foundation for building RESTful APIs.
MongoDB and Mongoose
MongoDB is a popular NoSQL database that provides a flexible and scalable solution for storing and retrieving data. It uses a document-based data model, which means that data is stored in JSON-like documents instead of tables and rows. This makes it easy to store and retrieve complex data structures, and allows for more flexible data modeling compared to traditional relational databases.
Mongoose is a popular Node.js library that provides a convenient and flexible way to interact with MongoDB. It provides a schema-based approach to defining and creating models, which makes it easier to validate and enforce data consistency. It also provides a wide range of data types and validators, making it easy to ensure that my data is stored correctly and consistently.
Mongoose also provides a built-in query builder that allows you to construct complex queries using a fluent API. This makes it easy to build queries that are easy to read and understand, and can be easily modified and reused.
Mongoose also provides a middleware system that allows you to add custom behavior to your models. This includes things like pre- and post-save hooks, virtual properties, and more. This makes it easy to add custom behavior to your models without having to modify the underlying schema.
Overall, Mongoose provides a convenient and flexible way to interact with MongoDB, and it is widely used in the Node.js community for this purpose.
Secure User Authentication with JWT: In this repository, I implement secure user authentication using JSON Web Tokens (JWT). This approach offers several advantages over traditional session-based authentication methods. Below are key reasons why JWT-based authentication is a safe and effective choice:
Stateless Nature: JWTs are stateless, meaning they do not require server-side storage of session data. This eliminates the need for server-side sessions or database queries to validate user authenticity. Instead, the server can validate the token by checking its signature and expiration date, resulting in improved scalability and reduced server load.
Data Integrity and Confidentiality: JWTs are digitally signed using a secret key known only to the server. This signature ensures that the token's content has not been tampered with during transmission. Additionally, sensitive information can be encrypted within the token, providing an extra layer of security.
JWTs can include custom claims, allowing for fine-grained control over user permissions. This means you can specify which resources or actions a user is allowed to access, providing a robust authorization mechanism.
Cross-Origin Resource Sharing (CORS) Support: JWTs can be easily integrated with Cross-Origin Resource Sharing (CORS) policies. This allows for secure communication between the client and server even when they reside on different domains, without compromising security.
Easy Integration with Frontend Frameworks: JWTs can be conveniently stored on the client side, typically in browser cookies or local storage. This facilitates seamless integration with frontend frameworks and libraries (like React), enabling a smooth user experience.
Expiration and Refresh Tokens: JWTs can be configured with expiration times, reducing the window of opportunity for potential attackers. Additionally, you can implement refresh tokens to obtain new JWTs without requiring users to re-enter their credentials.
Conclusion: By implementing user authentication with JWTs, this repository ensures a robust and secure authentication mechanism. The stateless nature, data integrity, and ease of integration make JWTs an excellent choice for validating user authenticity. With careful implementation and adherence to best practices, this approach provides a reliable foundation for secure user authentication in my application.
ES Lint and Prettier
ES Lint: I'm using ES Lint to get my code up-to-date with strict code standards as much as is tolerable and logical (most strict setting is not a logical configuration). The VS Code ES Lint extension has some cool features like auto-fixing a lot of errors like the rule to enforce sorting props alphabetically so props will always be in the same order as parameter of a components as the place where the components is used in the JSX.

ES Lint config:
Frontend (Vite application with React):
Source: /frontend/.eslint.cjs
  extends: [
    'eslint:all',
    'plugin:react/all',
    'plugin:react/jsx-runtime',
    'plugin:react-hooks/recommended',
    'plugin:jsx-a11y/strict',
    'prettier',
  ],
  overrides: [
    {
      env: {
        node: true,
      },
      files: ['.eslintrc.{js,cjs}'],
      parserOptions: {
        sourceType: 'script',
      },
    },
  ],
  parserOptions: {
    ecmaFeatures: {
      jsx: true,
    },
    ecmaVersion: 'latest',
    sourceType: 'module',
  },
  plugins: ['react', 'react-hooks', 'jsx-a11y'],
  rules: {
    'consistent-return': 'off',
    'max-lines-per-function': 'off',
    'no-magic-numbers': 'off',
    'no-nested-ternary': 'off',
    'no-ternary': 'off',
    'no-warning-comments': 'off',
    'one-var': 'off',
    'react-hooks/exhaustive-deps': 'warn',
    'react-hooks/rules-of-hooks': 'error',
    'react/display-name': 'error',
    'react/forbid-component-props': [
      'error',
      { allow: ['className'], forbid: [] },
    ],
    'react/function-component-definition': [
      'error',
      {
        namedComponents: 'arrow-function',
        unnamedComponents: 'arrow-function',
      },
    ],
    'react/jsx-key': 'error',
    'react/jsx-max-depth': ['error', { max: 5 }],
    // Allow arrow functions in JSX props (Remove this rule when performance becomes an issue)
    'react/jsx-no-bind': ['error', { allowArrowFunctions: true }],
    'react/jsx-no-comment-textnodes': 'error',
    'react/jsx-no-literals': 'off',
    'react/jsx-no-target-blank': 'error',
    'react/jsx-no-undef': 'error',
    'react/jsx-uses-react': 'error',
    'react/jsx-uses-vars': 'error',
    'react/no-children-prop': 'error',
    'react/no-danger-with-children': 'error',
    'react/no-deprecated': 'error',
    'react/no-direct-mutation-state': 'error',
    'react/no-find-dom-node': 'error',
    'react/no-is-mounted': 'error',
    'react/no-render-return-value': 'error',
    'react/no-string-refs': 'error',
    'react/no-unescaped-entities': 'error',
    'react/no-unknown-property': 'error',
    'react/prop-types': 'error',
    'react/react-in-jsx-scope': 'error',
    'react/require-render-return': 'error',
    'sort-imports': 'off',
    'sort-vars': 'off',
    'sort-keys': 'off',
    // TODO: Set the no-console rule to error when going in to production
    'no-console': 'warn',
  },
  settings: {
    react: {
      linkComponents: [
        // Components used as alternatives to <a> for linking, eg. <Link to={ url } />
        'Hyperlink',
        { linkAttribute: 'to', name: 'Link' },
      ],
      version: 'detect',
    },
  },
}
Backend config
Source: /backend/.eslint.cjs
'use strict'

module.exports = {
  env: {
    browser: true,
    es2021: true,
  },
  extends: 'eslint:all',
  overrides: [
    {
      env: {
        node: true,
      },
      files: ['.eslintrc.{js,cjs}'],
      parserOptions: {
        sourceType: 'script',
      },
    },
  ],
  parserOptions: {
    ecmaVersion: 'latest',
    sourceType: 'module',
  },
  rules: {
    'new-cap': 'off',
    'no-magic-numbers': 'off',
    'one-var': 'off',
    'sort-imports': 'off',
    'sort-vars': 'off',
    'sort-keys': 'off',
    'no-console': 'off',
    'multiline-comment-style': 'off',
  },
}
Prettier code formatter
I use Prettier code formatter to format my code in a way I find most readable.
Source: /frontend/.prettierrc and /backend/.prettierrc
{
  "semi": false,
  "tabWidth": 2,
  "singleQuote": true,
  "trailingComma": "all",
  "jsxSingleQuote": true,
  "bracketSpacing": true,
  "endOfLine": "lf"
}
Project management
Jira
Im using a Jira board with 4 swim lanes: TODO, IN PROGRESS, BUSY and DONE to sort my project issues.
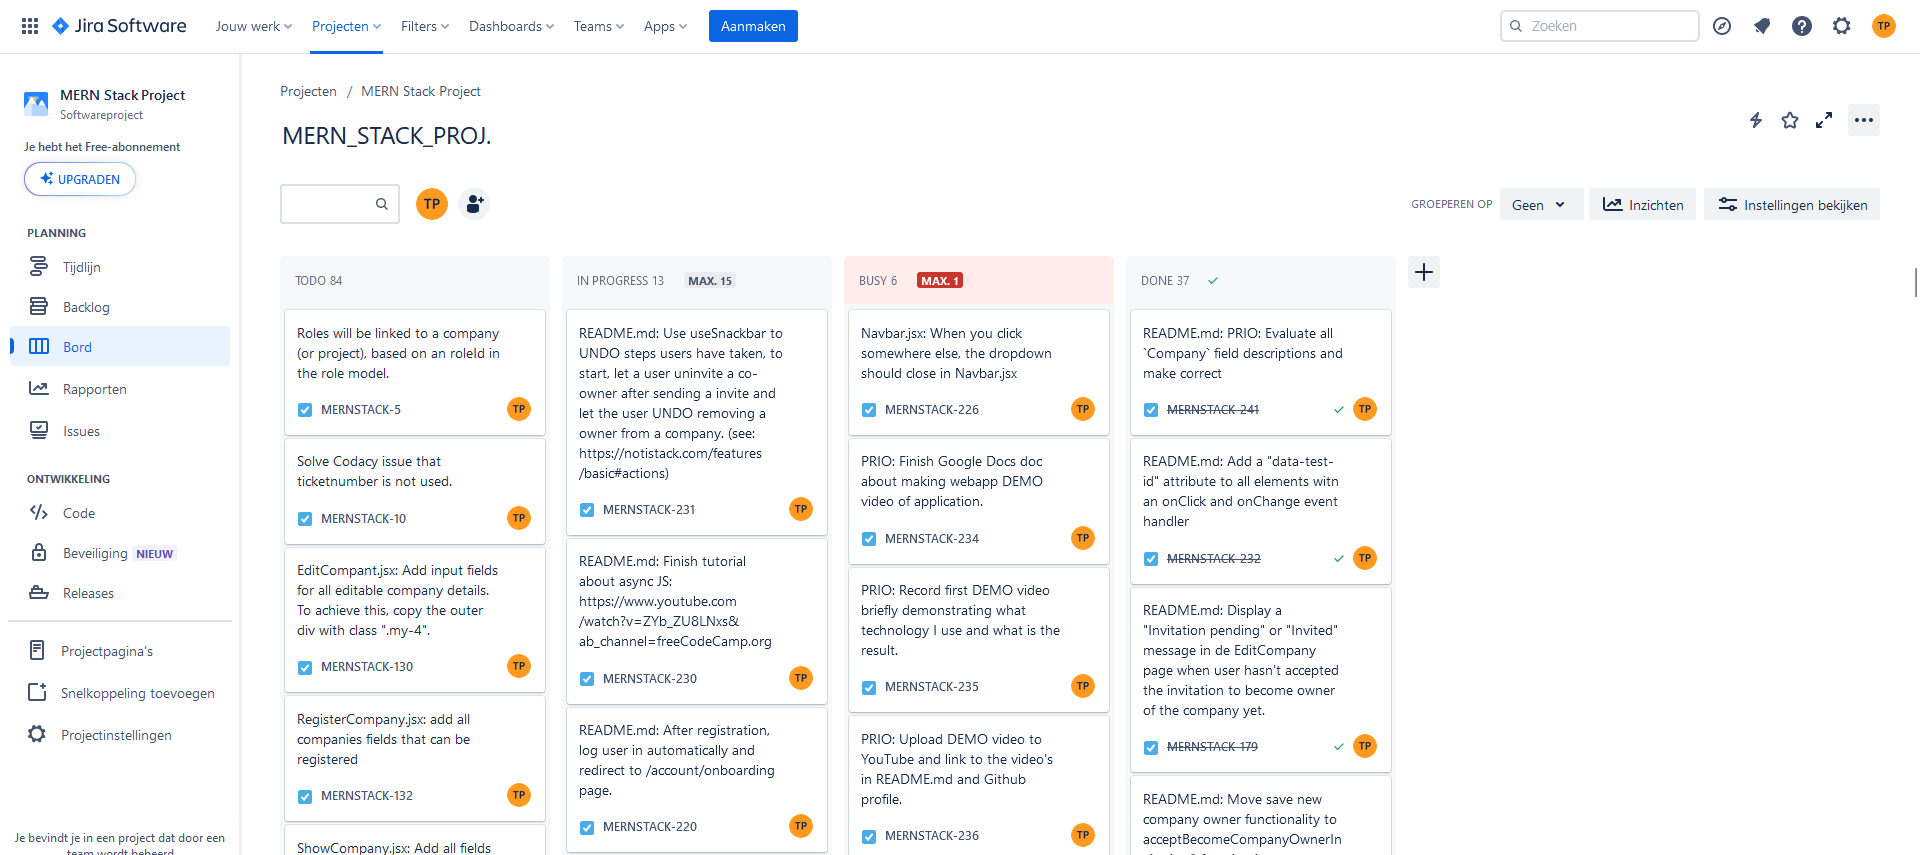
TODO issues I haven't started working on yet.
IN PROGRESS issues are in progress.
BUSY issues are the issues I am working on and have higher priority to finish. A lot of the times other issues are dependent on the BUSY issues, that's the main reason I chose to add this swim lane.
DONE issues are finished.
Project Issue Progression
Production checklist
-
[ ] [MERNSTACK-261] Production: Remove all console logs in the frontend.
-
[ ] [MERNSTACK-262] Production: Evaluate and tighten ES Lint coding standard rules for complexity. Address and resolve any complexity issues currently disabled or configured less strict.
-
[ ] [MERNSTACK-263] Production: Review each file to adhere to coding standards, ensuring resolution of all ES Lint errors.
-
[ ] [MERNSTACK-264] Production: Implement (unit) tests for comprehensive application stability monitoring. Ensure that updates meet specified security standards before going live.
-
[ ] [MERNSTACK-265] Production: Develop a secure financial plan, accounting for potential unforeseen circumstances.
-
[ ] [MERNSTACK-270] Production: Optimize and ensure optimal performance. Develop a scalable plan to handle unexpected increases in traffic, aiming for a user experience as fast, stable, and reliable as leading platforms like Google and Facebook.
-
[ ] [MERNSTACK-268] Production: Create a mobile version compatible with Android and iPhone platforms.
-
[ ] [MERNSTACK-272] Production: Review error messages in routes and controllers to be user-friendly. Eliminate debug data to enhance security and prevent data leaks.
-
[ ] [MERNSTACK-274] Production: Establish environment configuration for development, staging, and production phases. Ensure that environments are operational for a significant duration during development to thoroughly test and stabilize the setup, preventing unforeseen issues upon production deployment.
-
[ ] [MERNSTACK-275] Production: Optimize assets by compressing images for faster loading on various devices. Additionally, consider minifying JS and CSS, exploring the applicability of these practices within the MERN stack.
-
[ ] [MERNSTACK-276] Production: Conduct a security audit to identify and address potential security vulnerabilities, fortifying the application's security pre-deployment. For insights, refer to external resources such as: 1. Asper Brothers - Website Security Audit, 2. Hostinger - Website Security Audit, 3. Webscoot - Website Security Audit.
-
[ ] [MERNSTACK-277] Production: Implement Continuous Integration and Continuous Deployment (CI/CD). 1. Continuous Integration (CI): Automate build and unit testing for every committed revision. Utilize tools like Jenkins, GitLab CI, or GitHub Actions. 2. Continuous Deployment (CD): Automate code release to the production environment upon passing predefined tests. Ensure the system pushes updates to users once tests are successful. 3. Testing Automation: Set up automated testing, including unit tests, integration tests, and end-to-end tests, to guarantee application stability and functionality before deployment.
-
[ ] [MERNSTACK-278] Production: Establish monitoring and error tracking pre-production using tools like Prometheus, Grafana, and Sentry for enhanced visibility and issue resolution.
-
[ ] [MERNSTACK-269] Production: Address confidential issue, refer to Jira for details if you are involved.
-
[ ] [MERNSTACK-273] Production: Address confidential issue, refer to Jira for details if you are involved.
-
[ ] [MERNSTACK-302] Production: Remove data-testid attributes with babel plugin before going into production.Babel plugin.
-
[ ] [MERNSTACK-]
-
[ ] [MERNSTACK-]
-
[ ] [MERNSTACK-57] Create Owner model. Owner schema should set up a one-to-one relationship with the User schema by using a
userIdfield in the Owner schema that references the_idfield of the User schema. This will allow to associate each Owner document with a single User document. -
[ ] [MERNSTACK-62] Create
junctiontable betweenCompanyandProject. This table will be used because of the many-to-many relationship and additional properties that are needed to link a company to a project. (see backend devdocs folder) -
[ ] [MERNSTACK-63] Create
junctiontable betweenUserandCompany. (also a many-to-many relationship, user would be customer of companies and companies would have move then one customers) CONSIDER: Saving users as customers tocompanymodel instead of creating ajunctiontable. This will allow to associate each Company document with multiple User documents. No need for ajunctiontable that will make it more complex without any use for it. -
[x] [MERNSTACK-142] Update README.md with explanation about the validators I created in the frontend application. Explain the regex of every validator used to validate and the test method that returns true or false.
-
[x] [MERNSTACK-14] Create a new schema and model for user.
-
[x] [MERNSTACK-16] Owners will be linked to a company, based on an ownerId in the owner model. CANCELLED: Now the owner will be linked to a company, based on an userId corresponding to the user
_idin the user model. -
[x] [MERNSTACK-17] "owners" array should contain owner objects with an userId.
-
[x] [MERNSTACK-51] Create Jira tickets for all TODOs.
-
[x] [MERNSTACK-53] Create GET, POST, PUT and DELETE Company server routes.
-
[x] [MERNSTACK-55] Create User model.
-
[x] [MERNSTACK-56] Create login and register functionality. Hash user password on register and compare hashed password on login. (see backend devdocs folder)
-
[x] [MERNSTACK-58] When user is logged in, create a form to register a company and make user owner. Owner has admin rights at first when creating his account and registering his company.
-
[x] [MERNSTACK-59] Create one-to-many relationship between Owner and Company in the Owner schema. This will allow to associate each Owner document with multiple Company documents. UPDATE: This is not needed because the Company schema will have an
ownersfield that will be an array of owner objects withuserIdfield. -
[x] [MERNSTACK-60] Create
userauthentication and authorization functionality using JSON Web Token authorization. (see backend devdocs folder) -
[x] [MERNSTACK-61] Create
junctiontable for many-to-many relationship betweenownersandcompanies. (see backend devdocs folder) CANCELLED: For now it is easier to just add anownerfield to theCompanyschema and model. This will allow to associate each Company document with company owners. No need for ajunctiontable that will make it more complex without any use for it. -
[x] [MERNSTACK-64] In the frontend, create a route to
/my-companieswhereusercompanies will be listed. UPDATE: Route will be /companies for now. -
[x] [MERNSTACK-65] Create a route to save a new Company document in the database.
-
[x] [MERNSTACK-66] Create a route to get all Company documents from the database.
-
[x] [MERNSTACK-67] Create a route to get a single Company document from the database.
-
[x] [MERNSTACK-68] Create a route to update a single Company document in the database.
-
[x] [MERNSTACK-69] Create a route to delete a single Company document from the database.
-
[x] [MERNSTACK-70] Set up GET, POST, PUT and DELETE Book server routes.
-
[x] [MERNSTACK-74] Set up
Companymodel. -
[x] [MERNSTACK-95] Test companyRouter POST route
/for saving a new company with Postman. -
[x] [MERNSTACK-96] Test companyRouter GET route
/for getting all companies with Postman. -
[x] [MERNSTACK-97] Test companyRouter GET route
/:idfor getting a single company with Postman. -
[x] [MERNSTACK-98] Test companyRouter PUT route
/:idfor updating a single company with Postman. -
[x] [MERNSTACK-99] Test companyRouter DELETE route
/:idfor deleting a single company with Postman. -
[x] [MERNSTACK-102] Check for the word
propertywhen it should befieldin the documentation of schemas and models. Check for the wordfieldwhen it should bepropertyin the documentation when talking about databasedocument's -
[x] [MERNSTACK-103] Start using testing frameworks Mocha and Chai to write automated tests for the endpoints and ensure that the code is working correctly.
-
[x] [MERNSTACK-109] Populate the company document with the properties from the request body if they exist in companiesRoute.js.
-
[x] [MERNSTACK-110] Check if the company already exists in the database based on kvkNumber in companiesRoute.jsx. Hint: Use the findOne method and consider using
unique: truein the company schema. -
[x] [MERNSTACK-111] If the company already exists, send status 409 response and a (error) message to inform the client in companiesRoute.jsx.
-
[x] [MERNSTACK-114] Use time-travel debugging with Redux DevTools.
-
[x] [MERNSTACK-115] Decide the default destination after clicking the BackButton, something like the previous page or the home page.
-
[x] [MERNSTACK-116] Create table on the frontend to display all companies.
-
[x] [MERNSTACK-117] Create ShowCompany component to display a single company's details
-
[x] [MERNSTACK-118] Create EditCompany component to edit a single company's details.
-
[x] [MERNSTACK-119] Create DeleteCompany component to delete a single company.
-
[x] [MERNSTACK-120] Create CreateCompany component to create a new company.
-
[x] [MERNSTACK-121] Implement a button on the ShowCompany component that allows the user to navigate to the corresponding EditCompany page.
-
[x] [MERNSTACK-122] Create CompaniesList page (where all companies for a user will be shown in
tableorcardview.) and safe thistable/cardsetting to Redux store state so user will return to listing page with preferred setting. -
[x] [MERNSTACK-123] Create a CompanyModal component that will show up on the CompaniesList page when the user clicks on the
eyeicon. -
[x] [MERNSTACK-124] Use useSnackbar() for displaying error or success messages to the user in the Company components.
-
[x] [MERNSTACK-125] Inform myself better about using useEffect() to prevent infinite loop situations when my application get more complex. Speech about using useEffect effectively
-
[x] [MERNSTACK-126] Use react-redux in frontend to
dispatchactions toreducersandstoretogetandsetstateandpropsin the frontend and combine at least 2reducers. (see frontend devdocs folder) -
[x] [MERNSTACK-127] Add state for all companies fields that can be registered in RegisterCompany.jsx
-
[x] [MERNSTACK-128] In RegisterCompany.jsx: Add form inputs of all fields that the owner should fill in to register a company. Copy paste the following outer div with .my-4 class to achieve this
-
[x] [MERNSTACK-129] Add state for all companies fields that can be edited in EditCompany.jsx
-
[x] [MERNSTACK-131] Set state for all companies fields that can be edited in EditCompany.jsx
-
[x] [MERNSTACK-133] ShowCompany.jsx: Add all fields of the company model here. Copy paste outer div with ".my-4" class below to achieve this.
-
[x] [MERNSTACK-138] Create user register page and functionality, save with bcrypt hashed password in database.
-
[x] [MERNSTACK-139] Create a user login page and functionality, validate user password has with bcrypt and compare hashed password on login.
-
[x] [MERNSTACK-140] Make it possible for a user to register a company and automatically become first company owner.
-
[x] [MERNSTACK-141] Find fitting icons for company
namephone numberandemailfor the ListCompaniescardview and CompaniesModal component. Find them in the react-icons library. DO THIS BEFORE CREATING ANY OTHER LIST COMPONENTS! -
[x] [MERNSTACK-143] Add explanation about the main advantages of using MongoDB and Mongoose in the README.md file in the Backend section.
-
[x] [MERNSTACK-144] After user login, display link that will
navigate(?withuseNavigate()?) user tomy-companieswhere companies will be listed and with a company register form. (see frontend devdocs folder) -
[x] [MERNSTACK-146] Decide if the default values should be set in the model or in the route. Hint: Consider using the
defaultproperty in the company schema. CONCLUSION: Set default values in the model. -
[x] [MERNSTACK-153] Check if the user already exists in the database in usersRoute.jsx when registering a new user. Hint: Use the findOne method and consider using
unique: truein the user schema. -
[x] [MERNSTACK-154] If the user already exists, send status 409 response and a (error) message to inform the client.
-
[x] [MERNSTACK-155] Populate the user document with the properties from the request body if they exist when registering account.
-
[x] [MERNSTACK-157] Give input field of the form a red border if the input is invalid in LoginUser, RegisterUser, RegisterCompany and EditCompany components.
-
[x] [MERNSTACK-158] Display error message under the input field if the input is invalid explaining the right format in LoginUser, RegisterUser, RegisterCompany and EditCompany components.
-
[x] [MERNSTACK-159] Give input field of the form a red border if the input is invalid on all forms
-
[x] [MERNSTACK-160] Display error message under the input field if the input is invalid explaining the right format on all forms
-
[x] [MERNSTACK-161] Fix CORS policy error when registering user
-
[x] [MERNSTACK-162] Save userId as state in Redux store after verification of JWT token, make only /, /login and /register routes accessible for users that are not logged in.
-
[x] [MERNSTACK-165] Create a schema and model for images.
-
[x] [MERNSTACK-166] Validate validity and uniqueness of company KVK number
-
[x] [MERNSTACK-167] Add KVK number to the form in RegisterCompany and EditCompany components.
-
[x] [MERNSTACK-168] Make possible for user (owner) to add other owners to the company by finding other users and adding them to the company
-
[x] [MERNSTACK-169] On all forms, validate user input when losing focus and display error message if input is not valid and the right format and color the input field border red.
-
[x] [MERNSTACK-170] Make API call to backend to find users by query on username, name or email, use useEffect to call this function when query changes
-
[x] [MERNSTACK-171] Display results in a list displaying the username, name and email
-
[x] [MERNSTACK-173] Finish EditCompany component, integrated with search functionality so users can be found by name, username or email and added to company as owner.
-
[x] [MERNSTACK-174] When the user selects a user to add as an owner to the company, update the owners state variable in the
<EditCompany />component to include the selected user. You can use the setOwners() function to update the owners state variable. -
[x] [MERNSTACK-175] Solve the problem of the owner being undefined
-
[x] [MERNSTACK-176] Display owners first name and last name on
<ShowCompany /><CompanySingleCard />and<CompanyModal />. -
[x] [MERNSTACK-177] Only find owners that are not already owners of the company in the EditCompany and UserSearch component.
-
[x] [MERNSTACK-178] Send invitation to user to become owner of company.
-
[x] [MERNSTACK-179] Display a "Invitation pending" or "Invited" message in de EditCompany page when user hasn't accepted the invitation to become owner of the company yet.
-
[x] [MERNSTACK-180] Move save new company owner functionality to acceptBecomeCompanyOwnerInvitation() function in some new component.
-
[x] [MERNSTACK-181] Add remove button to remove owner from company in EditCompany component.
-
[x] [MERNSTACK-182] Save new owners of company after pressing save button in EditCompany component. CANCELLED: Now the owner can add owners in a different
formin the EditCompany component without a save button so it is clear that a owner has been added without submitting the form. -
[x] [MERNSTACK-183] Remove "Remove" button from EditCompany component of the current logged in user.
-
[x] [MERNSTACK-184] Remove item from search results when added
-
[x] [MERNSTACK-186] Check MongoDB discord server and Twitter for the BUG that users aren't filtered using the $nin operator
-
[x] [MERNSTACK-188] Remove
Nofield and add KVK number field in CompaniesTable component -
[x] [MERNSTACK-189] Add real kvk number validation with API call in kvkNumberValidator
-
[x] [MERNSTACK-190] Make call to backend API to validate kvk number in kvkNumberValidator
-
[x] [MERNSTACK-191] Export working getKvkData function returning the KVK data in kvkController.js
-
[x] [MERNSTACK-193] Fix BUG that you can save a company without kvk number validation in RegisterCompany.jsx and EditCompany.jsx SOLUTION: Throw an error in the kvkNumberValidator if the kvk number is not valid. Catch the error in the RegisterCompany and EditCompany components and display an error message to the user. If the KVK number is not valid, return from handleEditCompany() and handleSaveCompany() functions and don't save the company.
-
[x] [MERNSTACK-195] Define the invite model
-
[x] [MERNSTACK-202] FIX backend error: "PayloadTooLargeError: request entity too large" for images too large ExpressJS. Multer link SOLVED using Multer for large image file uploads.
-
[x] [MERNSTACK-203] Make file upload possible as user profile image
-
[x] [MERNSTACK-206] Set up a profile picture upload for the user
-
[x] [MERNSTACK-207] Save the profile picture Base64 string to the database
-
[x] [MERNSTACK-208] Create default page layout that all pages will become children of
-
[x] [MERNSTACK-210] Change text color to white when background image is set
-
[x] [MERNSTACK-211] Add background color with opacity to all places where text is displayed on top of the background image.
-
[x] [MERNSTACK-213] Complete styling on RegisterCompany page.
-
[x] [MERNSTACK-214] Style all form input fields
-
[x] [MERNSTACK-216] Use Multer for large image file upload.
-
[x] [MERNSTACK-217] Create a new routes file for file uploads. When the profile picture is uploaded, save the link/URL with the filepath in the database. ALSO return the path/fileId of the image as response to the client, so when the user registers the correct fileId/filepath will be saved to the new/edited user/company.
-
[x] [MERNSTACK-218] Make /backend server a CDN for static files like images.
-
[x] [MERNSTACK-219] Make first name and last name required on user registration. In the model, route, validator and frontend page form.
-
[x] [MERNSTACK-221] Log in when user has filled in his/her password and pressed enter.
-
[x] [MERNSTACK-222] Use a placeholder image for the profile picture, specifically a man for male users and a woman for female users.
-
[x] [MERNSTACK-223] Spin animation on Find button on homepage when the button is clicked.
-
[x] [MERNSTACK-224] Update "Invite" status when user Accepts or Declines a Invite.
-
[x] [MERNSTACK-225] If there is 1 or more pending invites, notify the user in the Navbar by making the "Invites" item bounce and give it a bright background color.
-
[x] [MERNSTACK-226] When you click somewhere else besides the dropdown menu, the dropdown should close in Navbar.jsx
-
[x] [MERNSTACK-227] Dropdown menu items have to become clickable over the full width of the menu instead only the text and icon
-
[x] [MERNSTACK-230] README.md: Finish tutorial about asynchronous JavaScript: https://www.youtube.com/watch?v=ZYb_ZU8LNxs&ab_channel=freeCodeCamp.org
-
[x] [MERNSTACK-232] Add a "data-test-id" attribute to all elements with an onClick and onChange event handler.
-
[x] [MERNSTACK-233] Find a pretty loading spinner animation to replace the ugly
<Spinner /> -
[x] [MERNSTACK-241] Evaluate all
Companyfield descriptions and make them correct. -
[x] [MERNSTACK-244] Clean up everything
Bookrelated. -
[x] [MERNSTACK-246] Add useSnackbar notification after successful profile image upload.
-
[x] [MERNSTACK-248] Get search results if companies match.
-
[x] [MERNSTACK-251] Create a find route in the backend for finding results when using the search input on the homepage
-
[x] [MERNSTACK-253] Remove
hashedPasswordfrom the user object before sending it to the frontend. -
[x] [MERNSTACK-256] BUG: Related to MERNSTACK-257. Sometimes it is possible to accept a invite twice an you become owner of the company twice. Saving a new company owner should check that the owner not already is owner.
-
[x] [MERNSTACK-257] BUG: Related to MERNSTACK-256. After becoming owner you can still get an invite for a company you already own, so the "received pending invites" have to check if the receiver isn't already owner and otherwise the invite should cancel.
-
[x] [MERNSTACK-258] BUG: Related to [MERNSTACK-256&257]. When a company owner invites a user for ownership, if they empty the search input and search again, they can send multiple pending invites to 1 user. Limit this to one by filtering out the search results in EditCompany
-
[x] [MERNSTACK-284] Add little profile picture of invited user next to their details in the "pending invites" section.
-
[x] [MERNSTACK-285] Add picture to search results searching for co-owners.
-
[x] [MERNSTACK-286] Add picture to the list of owners in EditCompany
-
[x] [MERNSTACK-209] Make file upload possible as company logo
-
[ ] [MERNSTACK-212] Create account edit page for account settings/configurations.
-
[ ] [MERNSTACK-220] After registration, log user in automatically and redirect to /account/onboarding page.
-
[ ] [MERNSTACK-228] The "Find" on the homepage has to transition between color using "color transitions" from TailwindCSS.
-
[ ] [MERNSTACK-231] Use useSnackbar to UNDO steps users have taken, to start, let a user un-invite a co-owner after sending a invite and let the user UNDO removing a owner from a company. See here
-
[ ] [MERNSTACK-234] Finish Google Docs doc about making webapp DEMO video of application.
-
[ ] [MERNSTACK-235] Record first DEMO video briefly demonstrating what technology I use and what is the result.
-
[ ] [MERNSTACK-236] Upload DEMO video to YouTube and link to the video's in README.md and Github profile.
-
[ ] [MERNSTACK-237] Add DEMO links to new LinkedIn profile. Explain on LinkedIn profile that I also have another account and that I can't access it anymore.
-
[ ] [MERNSTACK-238] Edit first DEMO video, make sure to add an explanation of the functionalities of the application and what kind of technologies were used. START OF with demonstrating the client side app and LATER technical explanation.
-
[ ] [MERNSTACK-239] Implement ERROR logging to error log files everywhere console.log is used.
-
[ ] [MERNSTACK-240] Remove all debug data printing console.logs and keep useful error logs. Clean up the debug data flow.
-
[ ] [MERNSTACK-242] Fade dropdown menu in and out with quickly with customized animation defined in tailwind.config.js.
-
[ ] [MERNSTACK-243] Implement localization library for multi-language support
-
[ ] [MERNSTACK-250] Add
IndustrytoCompanyregistration form and edit form. -
[ ] [MERNSTACK-252] Filter search results from users that already are in a pending invite
-
[ ] [MERNSTACK-254] Add phone number to
Usermodel routes and registration form. -
[ ] [MERNSTACK-255] When user clicks logout, there should be a "Go back" or "Stay logged in" option available on the /logout page.
-
[ ] [MERNSTACK-259] Finish basic structure and design for Result.jsx page. (Search results page)
-
[ ] [MERNSTACK-279] Read article about performance and optimization of MERN stack here.
-
[ ] [MERNSTACK-280] Read article about Node.js.
-
[ ] [MERNSTACK-281] Read article about MongoDB.
-
[ ] [MERNSTACK-282] Read article about MERN stack Security
-
[ ] [MERNSTACK-283] Read MERN stack CI/CD & deployment article
-
[x] [MERNSTACK-298] Add image crop to application so everybody can crop their image till it fits the frame. Almost perfect example, predefined aspect ratio, After getting the first example done, this one might be interesting to investigate react-image-crop MANY examples page, NPM Page react-image-crop.
-
[ ] [MERNSTACK-288] Upgrade ShowCompany to a nice profile page where companies can upload multiple images with titles. This is the start of the timeline or storyline that's it going to become.
-
[x] [MERNSTACK-289] Use React Dropzone for easy image file select or drag and drop when user uploads profile image.
-
[x] [MERNSTACK-290] First make possible for the user to crop their profile image within a 1 / 1 aspect ratio so I can use this everywhere in the website UI.
-
[x] [MERNSTACK-291] After cropping the image all left is a Base64 coded binary string, convert that string back to an image file and upload that image file to the backend server. (+ CDN) Read this info page about how to work with file conversion in JavaScript with clear examples.
-
[ ] [MERNSTACK-293] Get started with the
react-testing-library. React Testing Library Documentation Repository README -
[ ] [MERNSTACK-294] Read about testing with
jest-domtesting library has additional value. Jest-DOM Repository README -
[ ] [MERNSTACK-295] Let Jest automatically import tests. import '@testing-library/jest-dom' Configure Jest to import test imports for you automatically. Learn more in the setup docs! Source
-
[x] [MERNSTACK-292] Correct the README.md file everywhere I talk about Base64 strings and Blob images. My understanding was wrong and that's why it needs to be corrected to actual information. Base64 is a binary-to-text encoding scheme. Blob stands for Binary Large Object and is used for storing binary data, my understanding was that those two were the same thing, but they are not, Blob is raw binary data and Base64 is a representation of binary data in an ASCII string format.
-
[ ] [MERNSTACK-296] Practice working with breakpoints in VS Code for 30 minutes.
-
[ ] [MERNSTACK-297] Read into Mock Service Worker to optimize testing to declaratively mock API communication in your tests instead of stubbing window.fetch, or relying on third-party adapters. https://github.com/mswjs/msw
-
[x] [MERNSTACK-303] Try vite-jest to get started with testing npm page Read on npm page how to use es-module-lexer with vite-jest.
-
[x] [MERNSTACK-304] Try to implement testing inside of the Vite app. THE Guide to set up Jest on Vite 2023
-
[ ] [MERNSTACK-305] Implement Jest Snapshot After gaining basic skills and knowledge of working and testing with Jest and react-testing-framework. With Jest snapshot testing you can keep track of all unexpected or any intended UI changes because Jest snapshot makes a snapshot of the rendered components in pretty-format which is a conversion of all JavaScript to most readable format.
-
[ ] [MERNSTACK-306] Read into pretty-format and use it on console.log statements to make them more readable.
-
[ ] [MERNSTACK-307] Read about how to utilize Istanbul code coverage best. Best basic introduction, https://istanbul.js.org/, Jesy, Istanbul and React
-
[ ] [MERNSTACK-308] Write a Jest/react-testing-library test for the user login form, as good possible. ARTICLE ABOUT REACT-TEST-LIBRARY LOGIN FORM TESTING
-
[ ] [MERNSTACK-309] After [MERNSTACK-308], implement Mock Service Worker functionality in the login form test.
-
[ ] [MERNSTACK-310] Read into core-js, see if that is something useful for me or not.
-
[ ] [MERNSTACK-314] Read about Vite about Vite has to offer and add to documentation. Get a more general understanding about the advantages of Vite are in comparison to the much more supported create-react-app and make a desicion about a possible migration. Look through the interesting subsectionds of the Viteconf video
-
[ ] [MERNSTACK-315] Set up Jest in the /backend.
-
[ ] [MERNSTACK-316] Read into Vite Storybook and see if it is useful. Also finish the ViteConf Storybook video presentation. Storybook claims to be useful for developers for documentation, development and testing. Introduction video to Storybook
-
[ ] [MERNSTACK-317] Transform all comments to JSDoc format.
-
[ ] [MERNSTACK-318] Read about the Storybook ES Lint plugin and start using it in Storybook.
-
[ ] [MERNSTACK-319] Learn about Storybook tools from this page and about how to configure global values.
-
[ ] [MERNSTACK-320] Learn about how to use MDX and Doc blocks
-
[ ] [MERNSTACK-321] Integrate Figma into Storybook and if it does not take too many time, get started with Figma in the community section and design some component to use Figma in Storybook and after doing that write a piece of documentation for the project README file.
-
[ ] [MERNSTACK-322] Learn about testing using Storybook.
-
[ ] [MERNSTACK-323] Break down search engine functionality of my MERN_STACK_PROJ. documentation. Read Nextra documentation for this.
-
[ ] [MERNSTACK-324] Move all information of this project README file to the documentation website hosted by Vercel. Nextra documentation here.
-
[ ] [MERNSTACK-325] Add Storybook section to [documentation]((https://mern-stack-proj.vercel.app/).
-
[x] [MERNSTACK-329] Apply rate limit to all API end points.
-
[ ] [MERNSTACK-330] Implement this GraohQL interactive playground component on to a page of my website.
-
[ ] [MERNSTACK-331] Implement dotenv for deployment on Netlify REPLACE config.js.
-
[ ] [MERNSTACK-332] Update Quick Start guide using dotenv .env instead of config.js.
-
[x] [MERNSTACK-333] README.md: Add
Professions toCompanyregistration form -
[ ] [MERNSTACK-334] README.md: Add
Professions toCompanyedit form -
[ ] [MERNSTACK-335] On the GraphQLConf 2023 sessions page Continue from: "Streamlining Access to NASA Earth Science Data with GraphQL - Ryan Abbott, Element 84" to add the rest of the interesting sounding / useful topics to the bookmarks folder.
-
[ ] [MERNSTACK-336] Add contact form to [documentation]((https://mern-stack-proj.vercel.app/) that will send a email. Documentation here.
-
[ ] [MERNSTACK-337] Set up Dependabot in repository and write about it in the [documentation]((https://mern-stack-proj.vercel.app/).
-
[ ] [MERNSTACK-338] Get started with Ollama AI, try to install on Linux subsystem Ubuntu.
-
[ ] [MERNSTACK-339] AFTER INSTALL: 1. Run Code Llama locally
-
[ ] [MERNSTACK-340] (NOTE BEFORE START: READ ALL FORM PAGES FIRST BEFORE STARTING TO EDIT THE FORMS IN CODE! IF NECESSARY CREATE JIRA ISSUES FOR EVERYTHING THAT NEEDS TO BE DONE!) PRIO: Improve all forms based on the information in 1. The Valley of Code: Forms: Forms 101 2. The Valley of Code: Forms: Form Fields 3. Forms and JavaScript
-
[ ] [MERNSTACK-341] (NOTE BEFORE START: READ ALL FORM PAGES FIRST BEFORE STARTING TO EDIT THE FORMS IN CODE! IF NECESSARY CREATE JIRA ISSUES FOR EVERYTHING THAT NEEDS TO BE DONE!) PRIO: Make Jira Issues for everything I need to improve to get my code up to The Standards of Flavio Copes in The Valley of Code: UI libraries: React + Vite
-
[ ] [MERNSTACK-342] Read The Valley of Code: Frameworks: Astro
-
[ ] [MERNSTACK-] Implement The Interaction Code flow authentication from Okta Implement OAuth 2.0 and OpenID Connect for user authentication. Use embedded deployment model for authentication process instead of redirect. Use Okta Customer Identity Cloud
-
[ ] [MERNSTACK-] Read into Indexing Strategies In MongoDB Database for redicing query calls optimization. Best to get started with is implementing The ESR (Equality, Sort, Range) Rule
-
[ ] [MERNSTACK-]
-
[ ] [MERNSTACK-]
-
[ ] [MERNSTACK-]
-
[ ] [MERNSTACK-]
-
[ ] [MERNSTACK-]
Issues to be created in Jira
- [ ] [MERNSTACK-] Read into Voy and see if that can improve a search esperience.
- [ ] [MERNSTACK-] Implement Ollama into frontend application like this example.
- [ ] [MERNSTACK-] Generate GIF files from screen records, follow these instructions: START INSTRUCTIONS: ****Creating a high-quality GIF within the constraints of a 100MB file size for GitHub involves a balance between duration, quality, and compression. Here's a guide using FFmpeg and Gifski:
Prerequisites
Steps
Step 1: Record Your Screen
Use a screen recording tool to capture the content you want. OBS Studio, ShareX, or QuickTime (on macOS) are good options.
Step 2: Edit the Recording (if needed)
Trim unnecessary portions from your recording using video editing software.
Step 3: Convert Video to GIF with FFmpeg
Open a command prompt or terminal and use FFmpeg to convert your video to GIF. Adjust the parameters to achieve the desired quality and file size:
ffmpeg -i input.mp4 -vf "fps=15,scale=640:-1:flags=lanczos" -c:v gif output.giffps: Adjust the frame rate (e.g., 15 frames per second).scale: Set the width to 640 pixels (adjust as needed).
Step 4: Optimize GIF with Gifski
Use Gifski to optimize and compress the GIF:
gifski -o output.gif input.mp4This command will compress the GIF while maintaining high quality.
Step 5: Check File Size
Ensure the resulting GIF is smaller than 100MB. If it's still too large, consider adjusting parameters or shortening the duration.
Step 6: Repeat if Necessary
If the GIF is still too large, you may need to compromise on quality, reduce resolution, or shorten the duration further.
Step 7: Upload to GitHub
Once satisfied with the quality and size, upload the GIF to your GitHub repository.
Remember to test the GIF on GitHub to ensure it meets the platform's requirements. If necessary, further optimization may be needed. END INSTRUCTIONS
- [ ] [MERNSTACK-] Find out if it is possible to run ONNX Runtime in the browser as AI model server. Read 0. Get Started Steps, 0.5 Install ONNX runtime and read Get Started section 1. Build a web application with ONNX Runtime, 2. How to add machine learning to your web application with ONNX Runtime [3. ](info url), [4. ](info url)
- [ ] [MERNSTACK-]
- [ ] [MERNSTACK-]
- [ ] [MERNSTACK-]
- [ ] [MERNSTACK-]
- [ ] [MERNSTACK-]
- [ ] [MERNSTACK-]
- [ ] [MERNSTACK-]
- [ ] [MERNSTACK-] Add useful Storybook tutorials as Jira issues.
- [ ] [MERNSTACK-] Finish Intro to Storybook tutorial Continue here
- [ ] [MERNSTACK-] Read about Mock Service Worker integration into Storybook for handling mock data.
- [ ] [MERNSTACK-] Select integrations (addons) for Storybook that are useful without losing productivity.
- [ ] [MERNSTACK-]
- [ ] [MERNSTACK-] Write a section about Component-Driven Development in [documentation]((https://mern-stack-proj.vercel.app/).
- [ ] [MERNSTACK-] Destructure all component object type parameters to define all keys used in the component like the first parameter of this example:
function Task = ({ task: { id, title, state }, onArchiveTask, onPinTask }) => {} - [ ] [MERNSTACK-] Write a piece Component Story Format 3 in the Storybook section of the [documentation]((https://mern-stack-proj.vercel.app/).
- [ ] [MERNSTACK-] Write about Component Driven Development in the [documentation]((https://mern-stack-proj.vercel.app/) [(Storybook source)] in a "Design practice" or "Strategies" kinda section.
- [ ] [MERNSTACK-326] Add Rocket Icon to documentation website title.
- [ ] [MERNSTACK-327] IMPORTANT: Implement Formidable Inline Executable codeblocks examples in the documentation.
- [ ] [MERNSTACK-] In the Interactive demo section, make as interactive as possible using components of the application.
- [ ] [MERNSTACK-] Replace all codeblocks on documentation website with the codeblock like in /examples/codeblock.mdx
- [ ] [MERNSTACK-] Redecorate all code blocks on the new documentation website.
- [ ] [MERNSTACK-] Read flexsearch documentation, maybe this is a good search package. See this list for more optional search packages
- [ ] [MERNSTACK-] Build search component on the homepage in Storybook.
- [ ] [MERNSTACK-] Learn about JavaScript design patters
- [ ] [MERNSTACK-] Configuration of META data on Next.js documentation site.
- [ ] [MERNSTACK-] See if react-live is compatible with Nextra.
- [ ] [MERNSTACK-] See if I can use mermaid.js on Nextra. docs
- [ ] [MERNSTACK-] OPTONAL SEARCH ENGINE: Algolia Docsearch
- [ ] [MERNSTACK-] Watch freeCodeCamp TypeScript React Video tutorial about how to use TypeScript in React.
- [ ] [MERNSTACK-] Watch this video if you want to get inspired by someone with a interesting view on how data and UI design are intertwined and designers need to realize that.
- [ ] [MERNSTACK-] Make all buttons on the /quick-start page of documentation seem like a light turns on like the
DownloadandGet Gitbutton. - [ ] [MERNSTACK-] Checkout this awesome-vite repository full of options to try out any project scaffolding you want.
- [ ] [MERNSTACK-] Nextra uses Prismjs for code highlighting, Find out how to use it because highlighting can make an example much more understandable and the reader has his attention drawn to the important lines.
- [ ] [MERNSTACK-] Capitalize all titles using The Chicago Manual of Style. (First find out where titles are and change them all)
- [ ] [MERNSTACK-] Use Code Highlighting in the code examples in the documentation.
- [ ] [MERNSTACK-] Write a piece about Storybook once you've worked with it enough to tell about it, and tell about the ES Lint rule that forbids to use prop spreading. Tell about how much I agree with this rule, waiting for errors once you start changing around related components and am convinced that is this context I can not see any benefit on the long term.
- [ ] [MERNSTACK-] Transforming documentation website to "Thom Veldpaus" instead of "MERN_STACK_PROJ." primarily to blog about progress and document technology that excites me.
- [ ] [MERNSTACK-] Test this scaffolding repository for a potential upgrade! Read into Charkra UI and find out if there are costs.
- [ ] [MERNSTACK-] Follow THIS on installing Nextra Install Nextra with JSX after install of Next.js
- [ ] [MERNSTACK-] Try Nextra 2.0.0 beta. MDX v2 Nextra Blog Post About Update
- [ ] [MERNSTACK-] Nextra site generator also tool for theming!
- [ ] [MERNSTACK-] Very nice code example blocks by Nextra. See more over here.
- [ ] [MERNSTACK-] AFMAKEN RESPONSE VANUIT SERVER NAAR CLIENT/BROWSER packages\nextra-theme-docs\server.ts
- [ ] [MERNSTACK-] Get the Apollo VSCode extension up and running, simply follow the steps in the extension description.
- [ ] [MERNSTACK-] Start NOW with project management of your ALREADY EXISTING PROJECT on GraphQL Hive.
- [ ] [MERNSTACK-] Introduction to Hive Start now and only when you are completely set up for basic project management, only then start the next task.
- [ ] Get started with introduction tutorial and implement the interactive component on my documentation website.
- [ ] Get GraphQL certified
- [ ] Start building schema's by the MERN_STACK_PROJ. application For routes and models, pages data transfer, everything.\
- [ ] [MERNSTACK-] Have a better life from now on and discover the most useful things (https://the-guild.dev/ has to offer.
- [ ] [MERNSTACK-] Add explanation about MongoDB query for finding other users in EditCompany page to documentation website.
- [ ] [MERNSTACK-] Render search result components when main search results.
- [ ] [MERNSTACK-] PRIO: Read The Valley of Code Asynchronous
- [ ] [MERNSTACK-] Read The Valley of Code VS Code
- [ ] [MERNSTACK-] Read The Valley of Code Github
- [ ] [MERNSTACK-] Read The Valley of Code The Internet From Here
- [ ] [MERNSTACK-] Read The Valley of Code HTTP Protocol
- [ ] [MERNSTACK-] Read The Valley of Code Netlify
- [ ] [MERNSTACK-] Read The Valley of Code TypeScript
- [ ] [MERNSTACK-] Read The Valley of Code CSS Grid
- [ ] [MERNSTACK-] Read The Valley of Code Flexbox
- [ ] [MERNSTACK-] Read The Valley of Code TailwindCSS
- [ ] [MERNSTACK-] Read The Valley of Code JavaScript from: 5. Arrays + functions: find() and findIndex()
- [ ] [MERNSTACK-] Read The Valley of Code OOP in JS
- [ ] [MERNSTACK-] Read The Valley of Code JavaScript The event loop
- [ ] [MERNSTACK-] Read The Valley of Code ES Modules
- [ ] [MERNSTACK-] Read The Valley of Code Errors and exceptions
- [ ] [MERNSTACK-] Read The Valley of Code JavaScript Built-in objects
- [ ] [MERNSTACK-] Read The Valley of Code JavaScript More operators
- [ ] [MERNSTACK-] Read The Valley of Code The DOM
- [ ] [MERNSTACK-] Read The Valley of Code Browser Events
- [ ] [MERNSTACK-] Read The Valley of Code: Networking: HTTP
- [ ] [MERNSTACK-] Read The Valley of Code: Networking: Fetch
- [ ] [MERNSTACK-] Read The Valley of Code: Server Runtimes: Node.js
- [ ] [MERNSTACK-] Read The Valley of Code: Server Runtimes: Bun
- [ ] [MERNSTACK-] Read The Valley of Code: HTTP Servers: Express
- [ ] [MERNSTACK-] Read The Valley of Code: HTTP Servers: Hono
- [ ] [MERNSTACK-] LOW PRIO: Read The Valley of Code: Databases: Kysely
- [ ] [MERNSTACK-] Investigate Git Large File Storage (LFS) and figure out if it needs to be enabled in the Vercel deployment settings.
- [ ] [MERNSTACK-] DOCS here. Check out Meticulous and try to get it running when login is possible with useraccount on documentation website. MAYBE if possible to frontend only login in MERN_STACK_PROJ. then deploy and test that one with Meticulous.
- [ ] [MERNSTACK-] Investigate JS Deliver which claims to be a free CDN for open-source projects, is it useful for me?
- [ ] [MERNSTACK-] Read The Open Collective Website
- [ ] [MERNSTACK-] Read this and improve the projectg README.md
- [ ] [MERNSTACK-]
- [ ] [MERNSTACK-]
- [ ] [MERNSTACK-]
- [ ] [MERNSTACK-]
- [ ] [MERNSTACK-]
- [ ] [MERNSTACK-]
- [ ] [MERNSTACK-] Break down the following advice from DocsGPT into separate issues:
DocsGPT
Absolutely! Nextra is a great choice for building an informational website. To provide an interactive experience and keep your readers entertained, here are some suggestions:
-
Embed Interactive Widgets: You can embed interactive widgets such as maps, charts, sliders, or calculators to make the content more engaging. Tools like Google Maps API, Chart.js, and React Slider can be helpful for this purpose.
-
Add Animations: Animations can add visual interest to your website. Use libraries like React Spring or Framer Motion to easily incorporate animations into different elements such as text, images, or buttons.
-
Include Interactive Quizzes or Surveys: Integrate interactive quizzes or surveys within your website to make it more interactive. Tools like Typeform or Google Forms can help you create and embed interactive forms.
-
Implement Interactive Code Examples: If you are writing about code or programming concepts, consider using code playgrounds like CodePen or CodeSandbox to provide interactive code examples that users can modify and execute directly on your website.
-
Integrate Social Media Feeds: Display social media feeds related to your application or topic to provide real-time updates and encourage user engagement. You can use APIs provided by popular social media platforms like Twitter, Instagram, or Facebook to fetch and display the feeds.
-
Include Interactive Infographics: Infographics can present complex information in a visually appealing way. Use tools like Infogram or Canva to create interactive infographics and embed them into your website.
-
Incorporate Gamification Elements: Gamify your website by adding interactive features like badges, points, or progress bars. Users can earn rewards for completing certain actions or reaching milestones on your website.
Remember to consider your target audience and the purpose of your website while incorporating interactive elements. Too many or overly complex interactive features may distract users from the main content. Strive for a balance between interactivity and readability to enhance the overall user experience.