TOCropViewController

![]()

![]()
![]()

TOCropViewController is an open-source UIViewController subclass to crop out sections of UIImage objects, as well as perform basic rotations. It is excellent for things like editing profile pictures, or sharing parts of a photo online. It has been designed with the iOS Photos app editor in mind, and as such, behaves in a way that should already feel familiar to users of iOS.
For Swift developers, CropViewController is a Swift wrapper that completely encapsulates TOCropViewController and provides a much more native, Swiftier interface.
Proudly powering apps by

Looking for something more? If TOCropViewController doesn't meet your exact requirements, please consider IMG.LY with video editing and photo filter capabilities instead! (Disclaimer: Affiliate Link)
Features
- Crop images by dragging the edges of a grid overlay.
- Optionally, crop circular copies of images.
- Rotate images in 90-degree segments.
- Clamp the crop box to a specific aspect ratio.
- A reset button to completely undo all changes.
- iOS 7/8 translucency to make it easier to view the cropped region.
- The choice of having the controller return the cropped image to a delegate, or immediately pass it to a
UIActivityViewController. - A custom animation and layout when the device is rotated to landscape mode.
- Custom 'opening' and 'dismissal' animations.
- Localized in 28 languages.
System Requirements
iOS 11.0 or above
Installation
CocoaPods
Objective-C
Add the following to your Podfile: ``` ruby pod 'TOCropViewController' ```Swift
Add the following to your Podfile: ``` ruby pod 'CropViewController' ```Swift Package Manager
Add the following to your `Package.swift`: ``` swift dependencies: [ // ... .package(url: "https://github.com/TimOliver/TOCropViewController.git"), ], ```Carthage
1. Add the following to your Cartfile: ``` github "TimOliver/TOCropViewController" ``` 2. Run `carthage update` 3. From the `Carthage/Build` folder, import one of the two frameworks into your Xcode project. For Objective-C projects, import just `TOCropViewController.framework` and for Swift, import `CropViewController.framework` instead. Each framework is separate; you do not need to import both. 4. Follow the remaining steps on [Getting Started with Carthage](https://github.com/Carthage/Carthage#getting-started) to finish integrating the framework.Manual Installation
All of the necessary source and resource files for `TOCropViewController` are in `Objective-C/TOCropViewController`, and all of the necessary Swift files are in `Swift/CropViewController`. For Objective-C projects, copy just the `TOCropViewController` directory to your Xcode project. For Swift projects, copy both `TOCropViewController` and `CropViewController` to your project.Examples
Using TOCropViewController is very straightforward. Simply create a new instance passing the UIImage object you wish to crop, and then present it modally on the screen.
While TOCropViewController prefers to be presented modally, it can also be pushed to a UINavigationController stack.
For a complete working example, check out the sample apps included in this repo.
Basic Implementation
#### Swift ```swift func presentCropViewController() { let image: UIImage = ... //Load an image let cropViewController = CropViewController(image: image) cropViewController.delegate = self present(cropViewController, animated: true, completion: nil) } func cropViewController(_ cropViewController: CropViewController, didCropToImage image: UIImage, withRect cropRect: CGRect, angle: Int) { // 'image' is the newly cropped version of the original image } ``` #### Objective-C ```objc - (void)presentCropViewController { UIImage *image = ...; // Load an image TOCropViewController *cropViewController = [[TOCropViewController alloc] initWithImage:image]; cropViewController.delegate = self; [self presentViewController:cropViewController animated:YES completion:nil]; } - (void)cropViewController:(TOCropViewController *)cropViewController didCropToImage:(UIImage *)image withRect:(CGRect)cropRect angle:(NSInteger)angle { // 'image' is the newly cropped version of the original image } ``` Similar to many `UIKit` `UIViewController` subclasses, like `MFMailComposeViewController`, the class responsible for presenting view controller should also take care of dismissing it upon cancellation. To dismiss `TOCropViewController`, implement the `cropViewController:didFinishCancelled:` delegate method, and call `dismissViewController:animated:` from there.Making a Circular Cropped Image
#### Swift ```swift func presentCropViewController() { var image: UIImage? // Load an image let cropViewController = CropViewController(croppingStyle: .circular, image: image) cropViewController.delegate = self self.present(cropViewController, animated: true, completion: nil) } func cropViewController(_ cropViewController: TOCropViewController?, didCropToCircularImage image: UIImage?, with cropRect: CGRect, angle: Int) { // 'image' is the newly cropped, circular version of the original image } ``` #### Objective-C ```objc - (void)presentCropViewController { UIImage *image = ...; // Load an image TOCropViewController *cropViewController = [[TOCropViewController alloc] initWithCroppingStyle:TOCropViewCroppingStyleCircular image:image]; cropViewController.delegate = self; [self presentViewController:cropViewController animated:YES completion:nil]; } - (void)cropViewController:(TOCropViewController *)cropViewController didCropToCircularImage:(UIImage *)image withRect:(CGRect)cropRect angle:(NSInteger)angle { // 'image' is the newly cropped, circular version of the original image } ```Sharing Cropped Images Via a Share Sheet
#### Swift ```swift func presentCropViewController() { var image: UIImage? // Load an image let cropViewController = CropViewController(image: image) cropViewController.showActivitySheetOnDone = true self.present(cropViewController, animated: true, completion: nil) } ``` #### Objective-C ```objc - (void)presentCropViewController { UIImage *image = ...; // Load an image TOCropViewController *cropViewController = [[TOCropViewController alloc] initWithImage:image]; cropViewController.showActivitySheetOnDone = YES; [self presentViewController:cropViewController animated:YES completion:nil]; } ```Presenting With a Custom Animation
Optionally, `TOCropViewController` also supports a custom presentation animation where an already-visible copy of the image will zoom in to fill the screen. #### Swift ```swift func presentCropViewController() { var image: UIImage? // Load an image var imageView = UIImageView(image: image) var frame: CGRect = view.convert(imageView.frame, to: view) let cropViewController = CropViewController(image: image) cropViewController.delegate = self self.present(cropViewController, animated: true, completion: nil) cropViewController.presentAnimated(fromParentViewController: self, fromFrame: frame, completion: nil) } ``` #### Objective-C ```objc - (void)presentCropViewController { UIImage *image = ...; UIImageView *imageView = [[UIImageView alloc] initWithImage:image]; CGRect frame = [self.view convertRect:imageView.frame toView:self.view]; TOCropViewController *cropViewController = [[TOCropViewController alloc] initWithImage:image]; cropViewController.delegate = self; [self presentViewController:cropViewController animated:YES completion:nil]; [cropViewController presentAnimatedFromParentViewController:self fromFrame:frame completion:nil]; } ```Architecture of TOCropViewController
While traditional cropping UI implementations will usually just have a dimming view with a square hole cut out of the middle, TOCropViewController goes about its implementation a little differently.
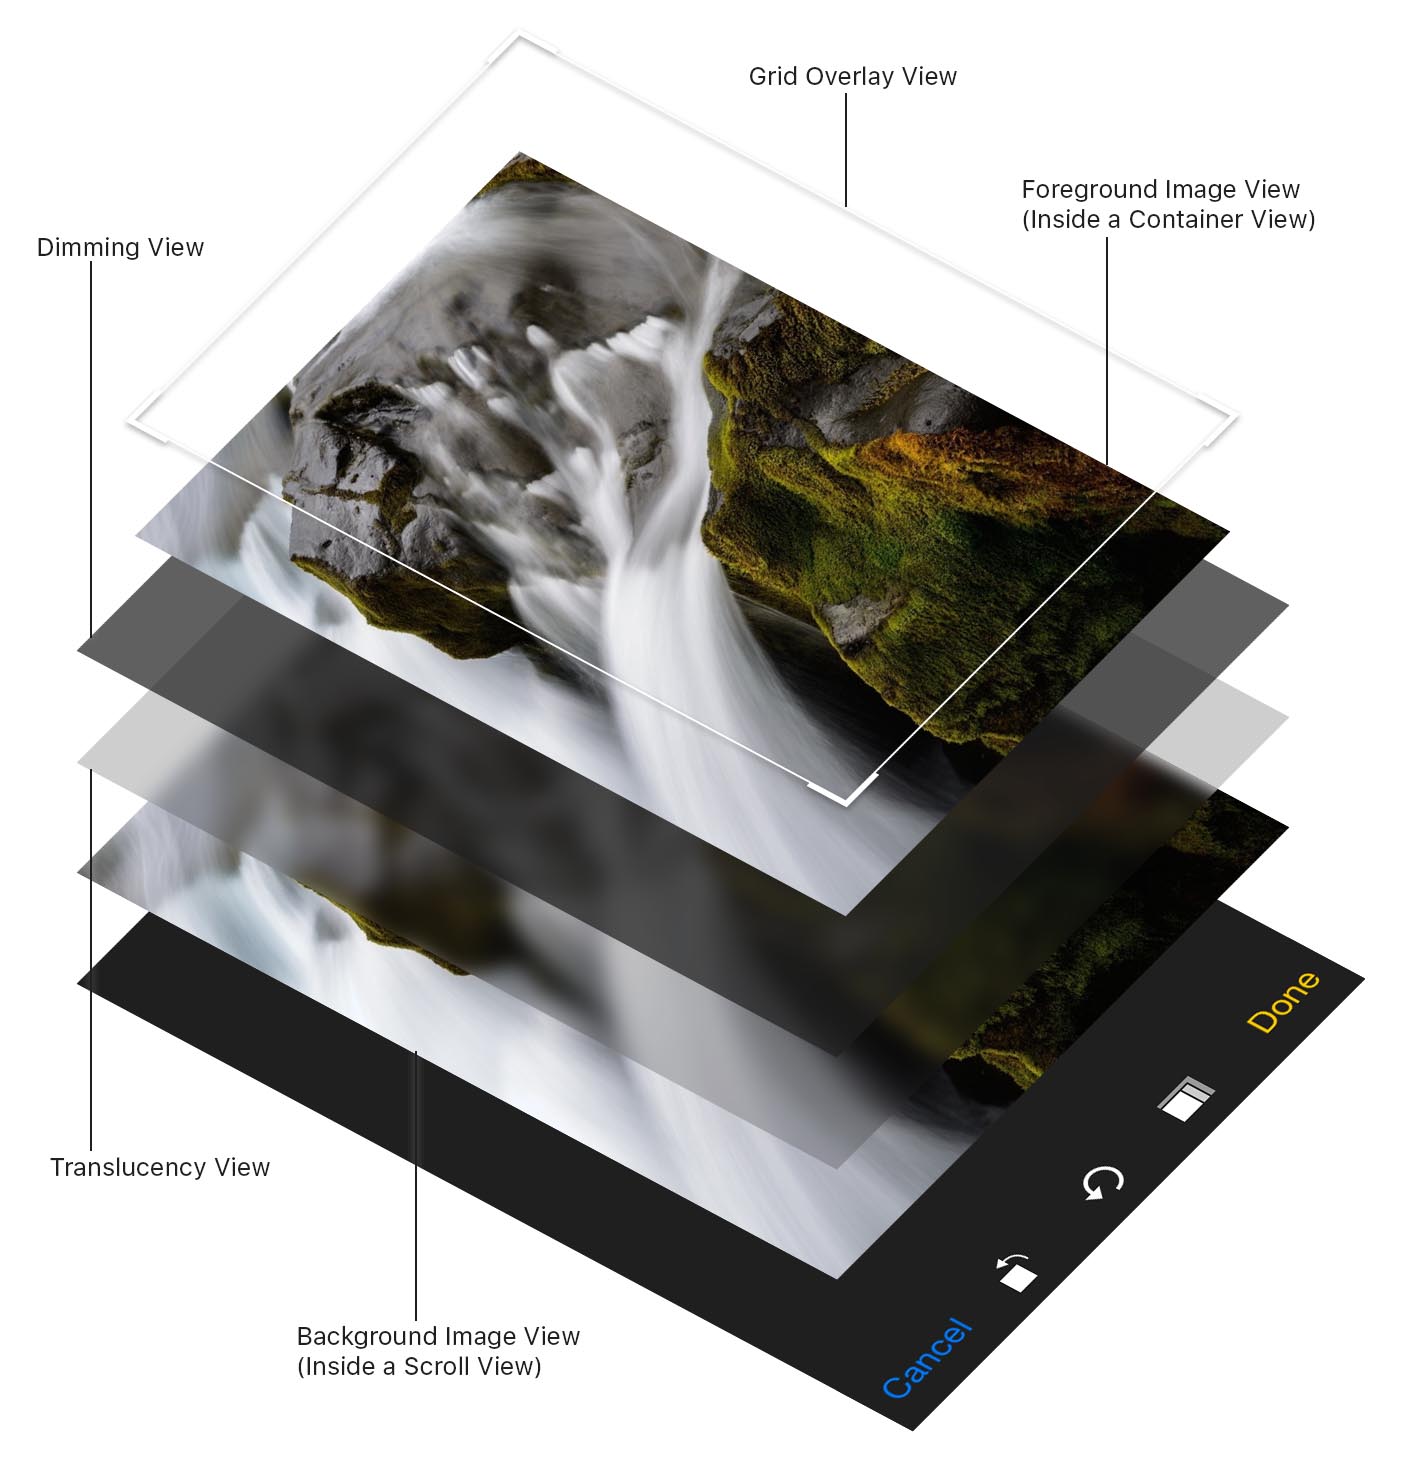
Since there are two views that are overlaid over the image (A dimming view and a translucency view), trying to cut a hole open in both of them would be rather complex. Instead, an image view is placed in a scroll view in the background, and a copy of the image view is placed on top, inside a container view that is clipped to the designated cropping size. The size and position of the foreground image is then made to match the background view, creating the illusion that there is a hole in the dimming views, and minimising the number of views onscreen.
Credits
TOCropViewController was originally created by Tim Oliver as a component for iComics, a comic reader app for iOS.
Thanks also goes to TOCropViewController's growing list of contributors!
iOS Device mockups used in the screenshot created by Pixeden.
License
TOCropViewController is licensed under the MIT License, please see the LICENSE file.