SailPoint IdentityIQ Dockerized v2
Migrating From v1 to v2
If you were previously on v1, v2 has breaking changes. The src folder has been removed, along with the bootstrapping code that is used to move the binaries to the appropriate locations. Use the SailPoint Binaries instructions below to know where these files should be placed. If you are having trouble with the migration, you can backup the ssb/envconfig and ssb/components folders and place those folders in a fresh copy of this repository.
Prerequisites
SailPoint Binaries
Please note that IdentityIQ is closed source so you first need to get a license for IdentityIQ. To do this, go to https://community.sailpoint.com/ to download the software (identityiq-8.1.zip & identityiq-8.1p3.jar & ssb-v7.zip).
The file identityiq-8.1.zip can currently be found at: https://community.sailpoint.com/t5/IdentityIQ-Server-Software/IdentityIQ-8-1/ta-p/158175
The file identityiq-8.1p3.jar can currently be found at: https://community.sailpoint.com/t5/IdentityIQ-Server-Software/IdentityIQ-8-1p3/ta-p/190689
The file ssb-v7.zip can currently be found at: https://community.sailpoint.com/t5/Professional-Services/Services-Standard-Build-SSB-v7/ta-p/190496
Once you clone the repository, you will put the downloaded files into the proper ssb folders within components to get started.
The file locations should be as follows:
identityiq-8.1.zip: ssb => components => iiq8.1 => base => gaidentityiq-8.1p3.jar: ssb => components => iiq8.1 => base => patchssb-v7.zip: ssb => components => ssb-v7
This does not include ANY SailPoint proprietary code and can only be used if you get these binaries from Compass.
Docker
Install the Docker Engine. For Mac OS and Windows, Docker Desktop should be sufficient. For Linux, Docker and Docker Compose needs to be installed.
We recommend to change your Docker settings to have 4gb memory and 2 cores.
Java
Java JDK is required for the build process. We recommend using OpenJDK 8 or higher.
Git Large File Storage
The ant-contrib-1.0b3.jar file provided is a git lfs file. This means git lfs needs to be installed and must be pulled in the repo.
After cloning the repository and installing git lfs, navigate to the cloned directory and use git lfs pull.
Host File
Add an entry to your hosts file.
- Linux -
/etc/hosts - Mac OS -
/private/etc/hosts - Windows -
C:\Windows\System32\drivers\etc\hosts
Add the following 127.0.0.1 dev.icam.local
Description
This installation will provide you a working instance of SailPoint IdentityIQ 8.1p3 running with OpenJDK and Tomcat 9 in a Docker container.
An additional container is built utilizing MySQL to host the IdentityIQ database and an Apache HTTP Server proxying the connections back to Tomcat.
This project was heavily inspired by ssperling/sailpoint-iiq.
Containers will run in background under stack defined in uedocker/.env, IIQ will be run from mounted volume.
Volumes
- ./uedocker/volumes/app-logs => Contains the /ue/logs/tomcat directory with all the tomcat logs for troubleshooting.
- ./uedocker/volumes/app-scripts => Contains scripts to bootstrap the database and also IIQ with the basic xml files.
- ./uedocker/volumes/app-ue => Contains the /ue/iiq/tomcat/webapps/ue directory in a read-write capacity so you can make updates directly for testing.
- ./uedocker/volumes/web-logs => Contains the /ue/logs/https directory with all the Apache logs for troubleshooting.
Ports
Seven ports are exposed:
- 80: Apache port.
- 443: Apache SSL port.
- 3306: MySQL port.
- 8080: Tomcat port.
- 8009: Tomcat debug port.
- 1025: MailHog SMTP Server.
- 8025: MailHog Web UI.
How to build SailPoint IdentityIQ and run the docker containers
First things first, please return to the top of this article and validate that you have placed the IdentityIQ binaries in the correct locations.
Components
We are huge proponents of SailPoint's Standard Services Build process. In fact, it's the first thing we setup when we go into a customer environment because it saves everyone so much time. It can be used to very quickly package up your SailPoint code and environment specific configuration files as part of a continuous integration and continuous delivery pipeline. Normally, one would set up SSB once per environment but we have included some of the files we use to be able to service multiple environments (and customers) out of a single build process.
More on SSB and it's benefits can be found at: https://community.sailpoint.com/docs/DOC-4125
We utilize the SSB process to stage all of the code for our SailPoint IdentityIQ deployments. To integrate your own existing code into the build process create a folder under ./ssb/components/<your folder name> and then edit ./ssb/envconfig/local-dev/components.txt to include the name of your folder. This is probably the quickest way to get your code into the builds and have your customized version of SailPoint IdentityIQ up and running in the container.
For each environment, you must provide a components.txt file which includes the groups of code for the environment, but we also commonly include:
- build.properties
- {environment-name}.ignorefiles.properties
- {environment-name}.iiq.properties
- {environment-name}.target.properties
Environment specific objects can be put into the envconfig specific environment, while components are used commonly across all environments. After making the changes to the above files, adding to the components directory, and configuring the environment's components.txt file, you should be ready to build a .war and deploy the container.
Building the Baseline War File
First we want to validate your war can actually build before we build the docker containers. To do this, go to ./ssb and execute the ./build.sh script. To build a a specific environment (other than the local-dev default) use ./build.sh -Due.env={environment-name}.
This should copy and extract the SSB and IdentityIQ files into the appropriate places and take you through the SSB build process for the local dev environment. If successful, you should see a message that says BUILD SUCCESSFUL at the end of the run. This is a great sign.
Building the Containers and Deploying SailPoint IdentityIQ
Now that we've proven that IIQ can build, it's time to actually build the containers.
Change directory into ./uedocker and execute the ./bootstrap.sh build script. To bootstrap a specific environment (other than the local-dev default) use ./boostrap.sh build {environment-name}.
This script will build the application war file again, download the baseline docker containers to your machine, create the IIQ database, deploy the application and start the containers with our custom configuration.
In about 5 minutes you'll have an entire running set of docker containers with IIQ deployed in it ready to run.
Usage
To make your life easier, you can import the certificate from ./uedocker/ICAM-HTTPD/local-dev.cer into your browser as a trusted certificate.
Login
IdentityIQ
Go to http://dev.icam.local/ue/login.jsf using an Internet browser.
- Username: spadmin
- Password: admin
By default we have given Tomcat limited resources to keep the memory sizes down, so it may take a few minutes for the container to warm up and no longer throw a 500 error.
MailHog
A docker container for MailHog is also deployed and automatically configured in IdentityIQ.
Go to http://dev.icam.local:8025 using an Internet browser.
Database
You can use MySQL Workbench to view the database: https://dev.mysql.com/downloads/workbench/
Host: dev.icam.local
Port: 3306
Database: identityiq
- Username: identityiq
- Password: identityiq
Database: identityiqPlugin
- Username: identityiqPlugin
- Password: identityiqPlugin
Additional Info
This is a great way to get developers up and running with IdentityIQ very quickly. These same principles can be extended to your integrated development, test and production environments. If you're looking to apply continuous integration, continuous delivery and docker or kubernetes based containers in your environment please reach out to us at hello@uberether.com and we'd love to help you and your team be more efficient in your SailPoint development process.
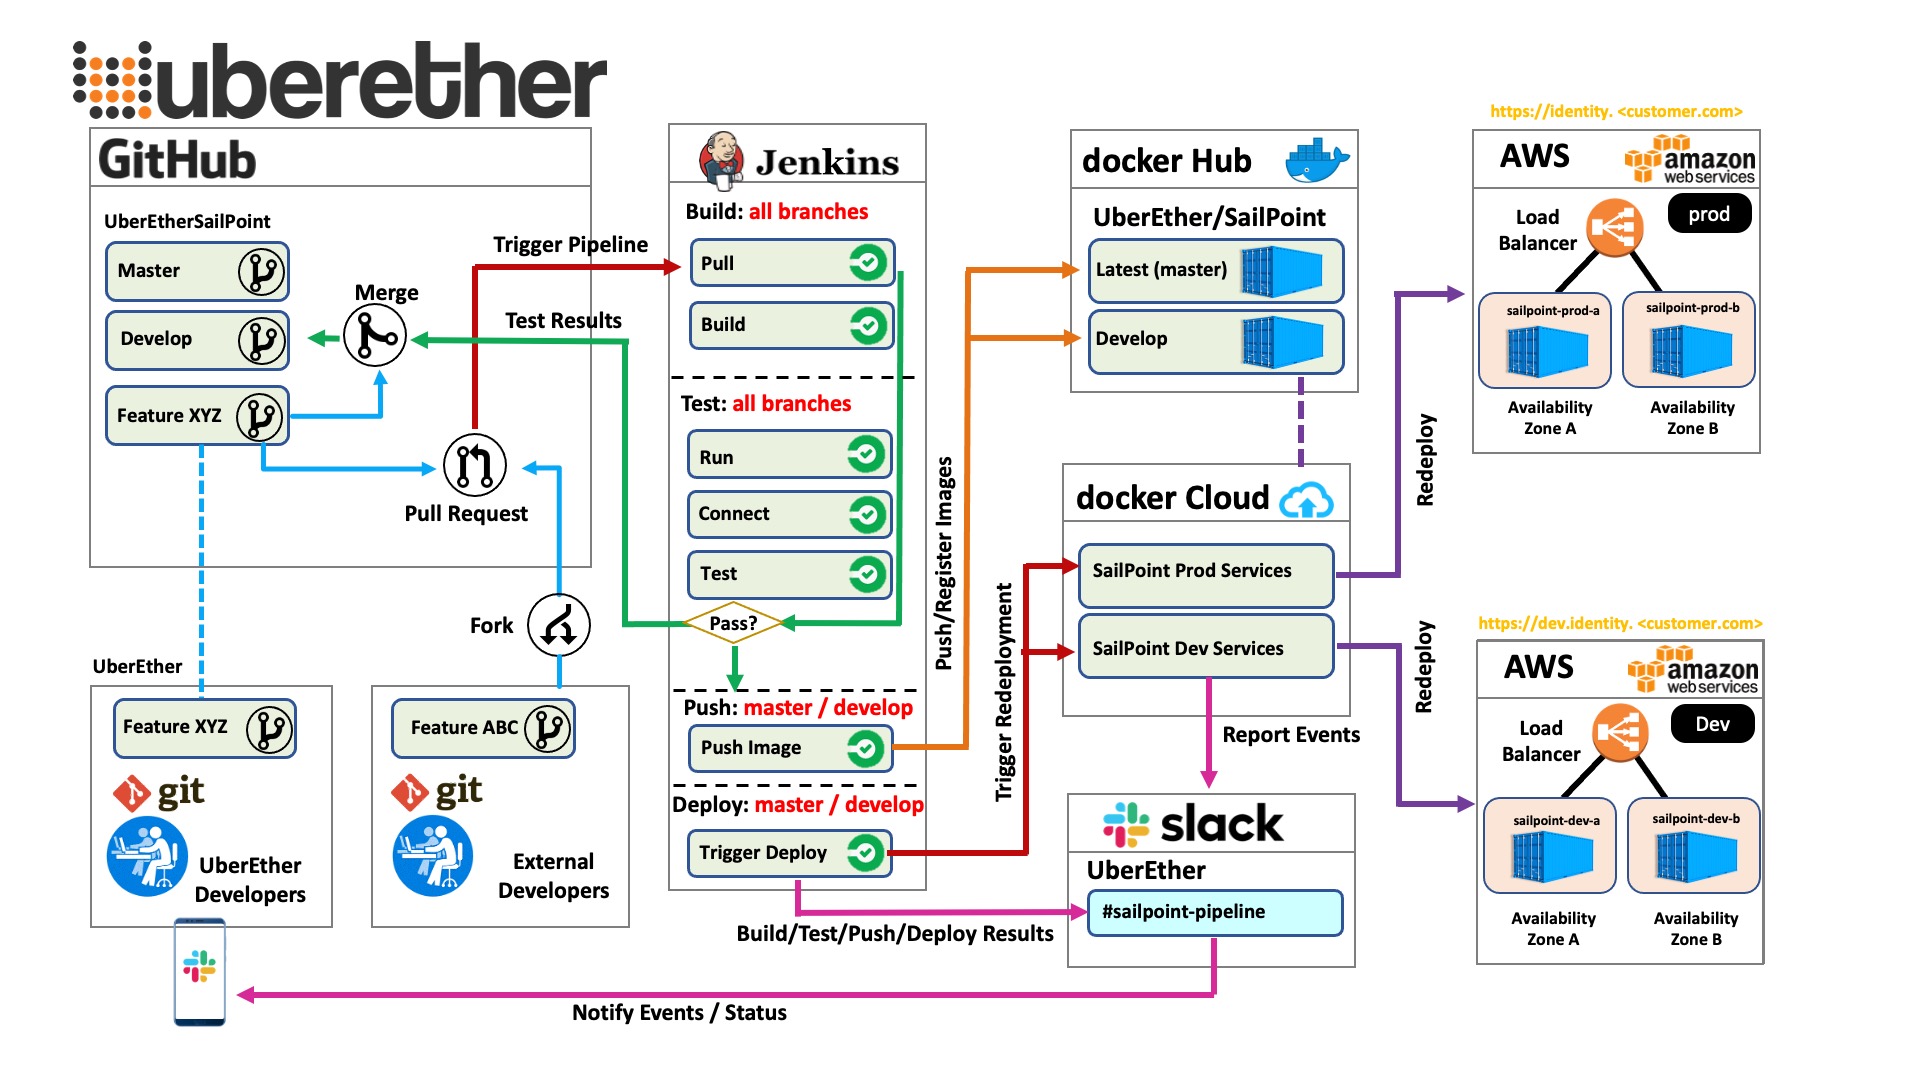
To get an idea of what this might look like, here is what a typical CI/CD docker based deployment looks like for our customers: