V2G Liberty
Full automatic and optimised control over bidirectional charging of your electric vehicle, saving the average user over € 1000 on charging cost in 2023.
Use your electric vehicle (EV) as you would normally do, drive where you want go.
In addition, the EV's battery is used to:
- store cheap & green (own solar) electricity
- when prices are high, deliver this energy to the house or the grid, alas the name: Vehicle-to-Grid (V2G).
Liberty in the name refers to:
-
V2G Liberty strives for you to be independent of the make/type of charger & car.
The truth now is that only the Wallbox Quasar charger offers (affordable) bidirectional charging. As it is equipped with a CHAdeMo connector, so currently only cars with this connector are supported, see prerequisites.
-
V2G Liberty strives for you to be independent of power company.
You can choose any contract but V2G is only relevant for contracts with dynamic (e.g. hourly changing) electricity prices.
V2G Liberty is a practical local app that works in the browser and on your phone.
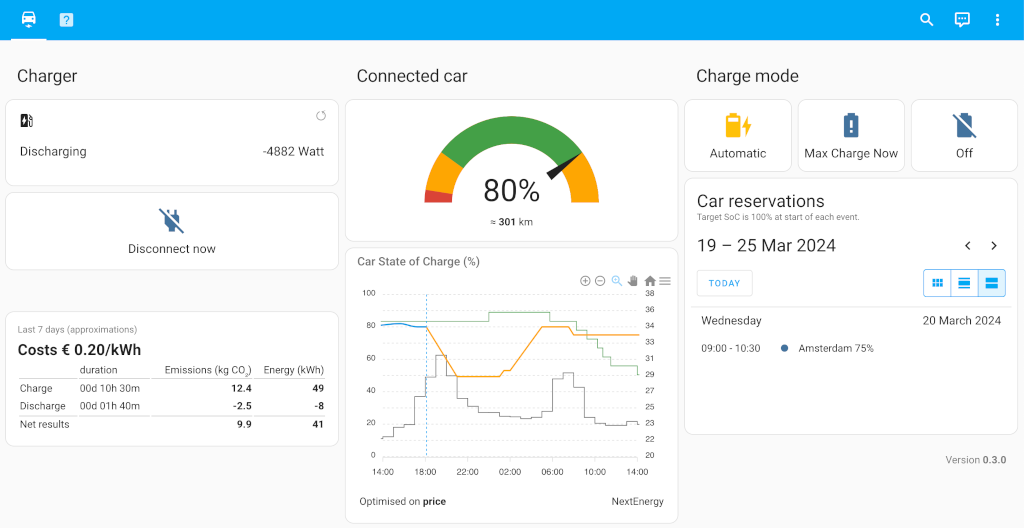
The schedules are optimised to maximise revenues ór minimising emissions. The optimised schedules are produced by FlexMeasures, our smart backend by Seita. While the price optimisation already decreases emissions significantly, you can also choose to take sustainability a step further and optimise for minimising emissions (and still do quite well on savings on charge costs).
Most Dutch energy suppliers are listed and all European energy prices (EPEX) are available for optimisation. For none European markets (e.g. Australia) there is an option to (automatically) upload price data to FlexMeasures.
Read more about V2G Liberty on v2g-liberty.eu or github.com.
Read more about FlexMeasures on flexMeasures.io, seita.nl or github.com.
Prerequisites
As said, at the time of writing, 2024-04, only the Wallbox Quasar 1 charger is supported. This is a CHAdeMO compatible charger.
Compatible cars that can do V2G with this protocol are the Nissan Leaf (also earlier models) and Nissan Evalia.
When the Wallbox Quasar 2 is available we expect V2G Liberty to be compatible with this hardware "out of the box". Then also CCS V2G capable cars can be managed with V2G Liberty.
We expect to add new chargers to V2G Liberty soon
Preparation
Quasar charger
Before installing or activation of V2G Liberty, please make sure that charging and discharging with the EV and Quasar charger works properly. Test this with the app supplied with the charger.
FlexMeasures
You can run your own instance of FlexMeasures, but you can also make use of an instance run by V2G Liberty. If you prefer this option, please contact us.
An electricity contract with dynamic prices
As said, the software optimizes dynamic prices, so a contract of this type is the best option. There is no rush, though. You can try out V2G Liberty first and later on get the dynamic contract. In the Netherlands there are several suppliers, o.a. Eneco, Vattenfall, ANWB, Tibber, Zonneplan, Energy Zero, etc.
A dynamic contract changes the way your electricity is priced and billed, so it is wise to find information and make sure you really understand what this means for your situation before making this change.
Get an online calendar
For the situations where you would like the car to be fully charged, e.g. for a longer trip, V2G Liberty optimizes on a dedicated online calendar.This is mandatory, without it V2G Liberty cannot work.
It is of course most useful if the calendar is integrated with your normal calendar and if you can easily edit the calendar items on your smartphone (outside HA / V2G Liberty). Options are, for example:
- A CalDav compatible calendar. E.g. NextCloud or OwnCloud if you’d like an open-source solution
- iCloud calendar
This can be reached through CalDav. See the instructions on tasks.org. - Google calendar
This -from early 2024- should also be reachable via CalDav but has not been successfully tested yet with V2G Liberty. If you've got experience with this, please let us know! See developers.google.com.
The Google calendar is confirmed to work with the HA Google Calendar integration in Home Assistant (not to be confused with Google Assistant). - Office 365. Via non-official O365-HomeAssistant integration.
- ICS Calendar (or iCalendar) integration, also non-official. It can be found on HACS.
We recommend a separate calendar for your car reservations. The result must be that in Home Assistant only the events meant for the car are present.
Preferably name the calendar (car_reservation). If you name(d) it otherwise, update the calendar name in the configuration of V2G Liberty secrets.yaml and in the v2g_liberty_dashboard.yaml
Installation
The installation of this add-on is pretty straightforward.
- Copy this URL:
https://github.com/V2G-liberty/addon-v2g-liberty.git - In home assistant got to
settings > add-ons. - Hit the big blue button in the bottom right
add-on shop. - Open the menu in the top right with the ⋮-icon and select the option
repostitories. - Paste the URL of step 1 and click
ADD, wait a little and clickClose. - Scroll down to the bottom of the page, the V2G Liberty add-on should be visible there. If not, refresh the page. Click the add-on.
- The add-on page opens, click the
Installbutton to install the add-on. This might take quite a while as several some files. - Consider activating
Watch dogandAutomatic update.
Further steps in the proces of installation and configuration are explained in the installed add-on itself.
Configuration
Charging is fully automatic an optimised, so you can just connect your EV and forget about it. You can tweak the charging process by setting min- and max-limits, min- and max-charge power etc.
Happy 🚘 ← ⚡ → 🏡 charging!
Changelog & Releases
This repository keeps a change log using GitHub's releases functionality. In Home Assistant a notification is shown when a new version is available. We advise you to keep the software up to date.
Releases are based on Semantic Versioning, and use the format
of MAJOR.MINOR.PATCH. In a nutshell, the version will be incremented
based on the following:
MAJOR: Incompatible or major changes.MINOR: Backwards-compatible new features and enhancements.PATCH: Backwards-compatible bugfixes and package updates.
Got questions?
You have several options to get them answered:
- The Home Assistant Community Add-ons Discord chat server for add-on support and feature requests.
- The Home Assistant Discord chat server for general Home Assistant discussions and questions.
You could also open an issue on GitHub.
Authors & contributors
The original setup of this repository is by Ard Jonker, Seita B.V. and Ronald Pijnacker.
License
Apache 2.0
Copyright (c) 2021 - 2024 Ard Jonker
Licensed under the Apache License, Version 2.0 (the "License"); you may not use this file except in compliance with the License. You may obtain a copy of the License at
http://www.apache.org/licenses/LICENSE-2.0
Unless required by applicable law or agreed to in writing, software distributed under the License is distributed on an "AS IS" BASIS, WITHOUT WARRANTIES OR CONDITIONS OF ANY KIND, either express or implied. See the License for the specific language governing permissions and limitations under the License.