Enemy Skin Kit
This mod provides tools for creating vanilla enemy skins for lethal company from within the unity editor. Most end users will see this as a dependency for other skin mods.
Features
- Code generation for a codeless workflow
- Easy, drag-and-drop replacement of materials, meshes and some sounds.
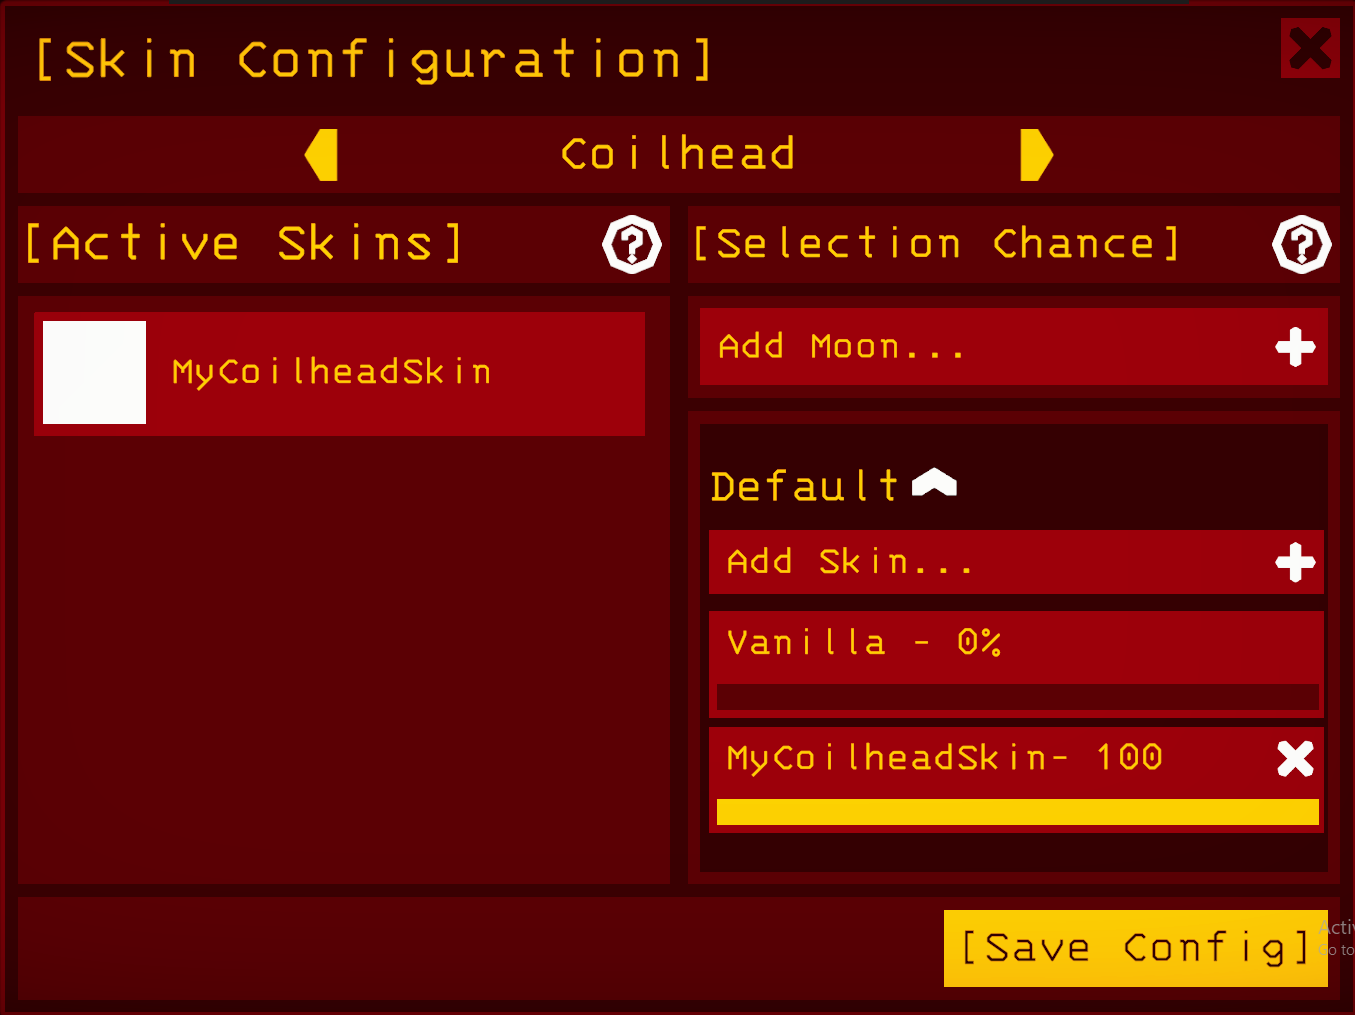
- Built in support for the EnemySkinRegistry
- Included example FBX files for all vanilla skinned meshes as of Lethal Company v49
- Extendable Skin and Skinner implementations that allow developers to make tweaks or add features to their skins
Prerequisites
- Lethal Company
- Installation of Unity 2022.3.9f1
- Enemy Skin Kit and its dependencies
- Quite a bit of patience so that unity may chug as it is want to do
It's recommended that you also use Evaisa's starter project which can be found here: https://github.com/EvaisaDev/LethalCompanyUnityTemplate
Use of Thunderkit is also an optional recommendation: https://github.com/PassivePicasso/ThunderKit
Setup with Thunderkit
1.Create up a new 3D (HDRP) project in Unity (or get a project template like this one https://github.com/EvaisaDev/LethalCompanyUnityTemplate). If your project still has HDRP starter assets, you should delete them. This will be the the "TutorialInfo" folder, the "ReadMe" asset, and the "Outdoor Scene." The "TutorialInfo" folder is the most important, as this contains scripts that will conflict with what we're going to try and import from the game data later.
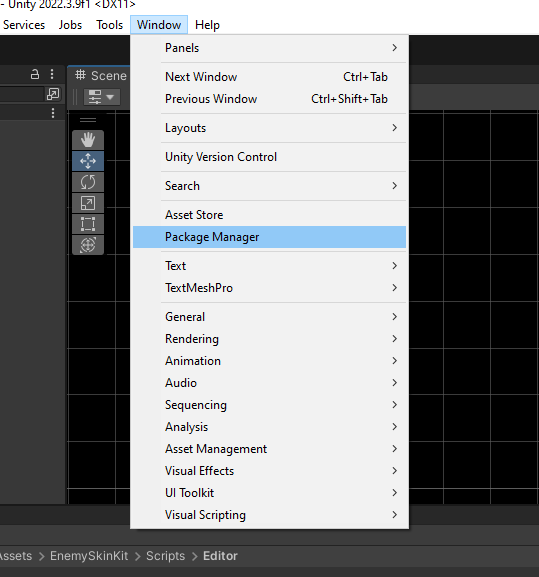
2.Now, we're going to get ThunderKit. ThunderKit is a package manager for making mods in the unity editor. Go to Window > Package Manager to open up the package manager window.
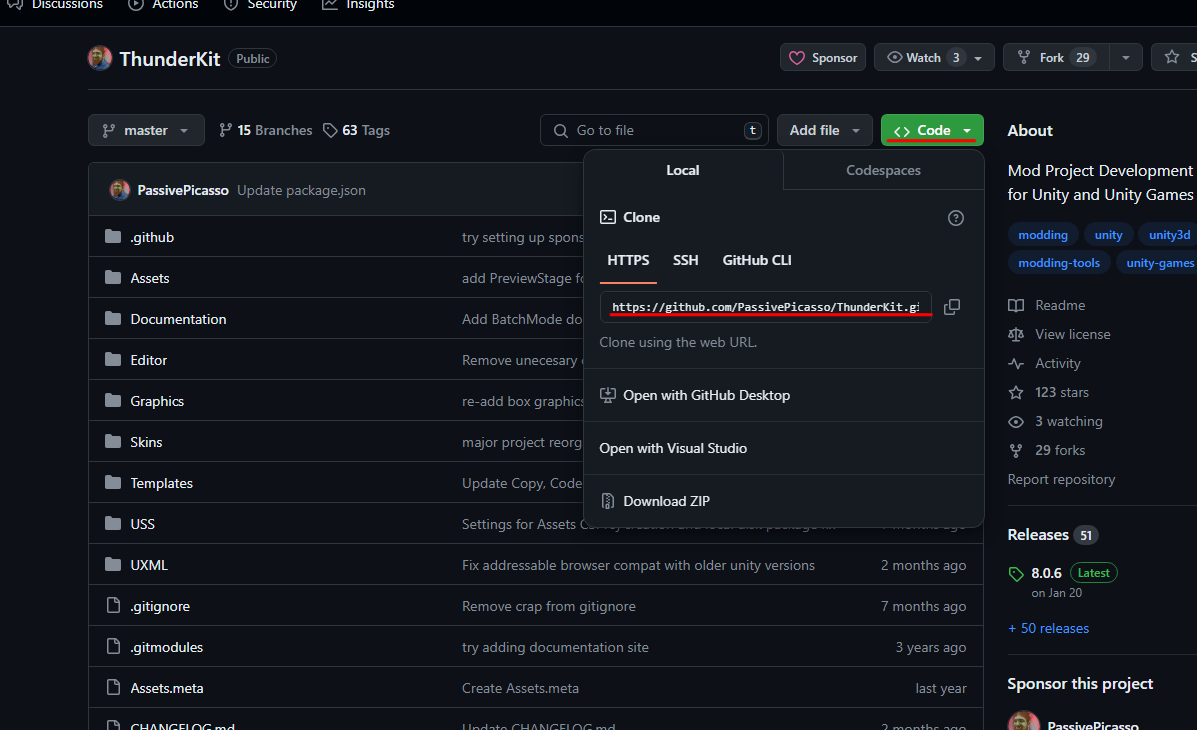
3.From the ThunderKit github page, click the "code " in the input field and click the "add" button.
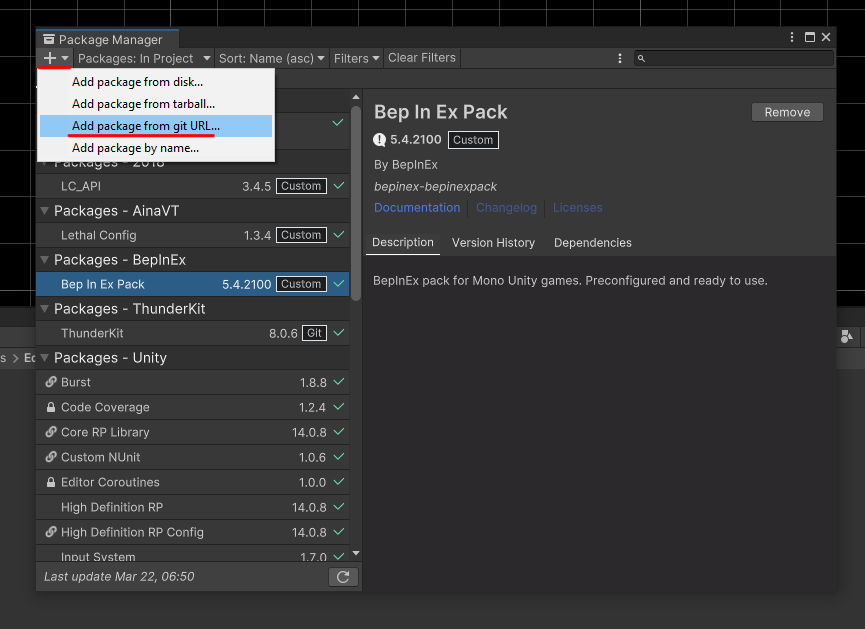
4.Click the plus dropdown in the upper left hand corner, and from that menu select "Add package from git url" and paste the url you copied into the input field that appears.

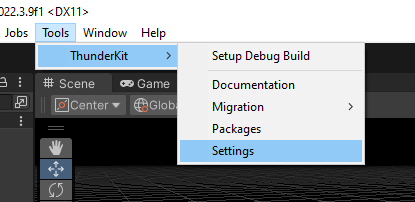
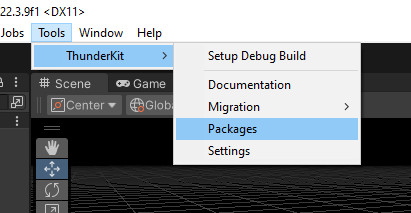
5.Unity will take a minute to download and install ThunderKit. Once the the ThunderKit package is installed, a new option will be added to the menu bar. Navigate to Tools > Thunderkit > Settings to open the Thunderkit settings menu.
6.We're going to use this menu to make a package out of Lethal Company's code. Go to "ThunderKit Settings" and in the "Locate and Load game files for project" section, click browse and navigate to your Lethal Company.exe (probably in your steamapps folder).
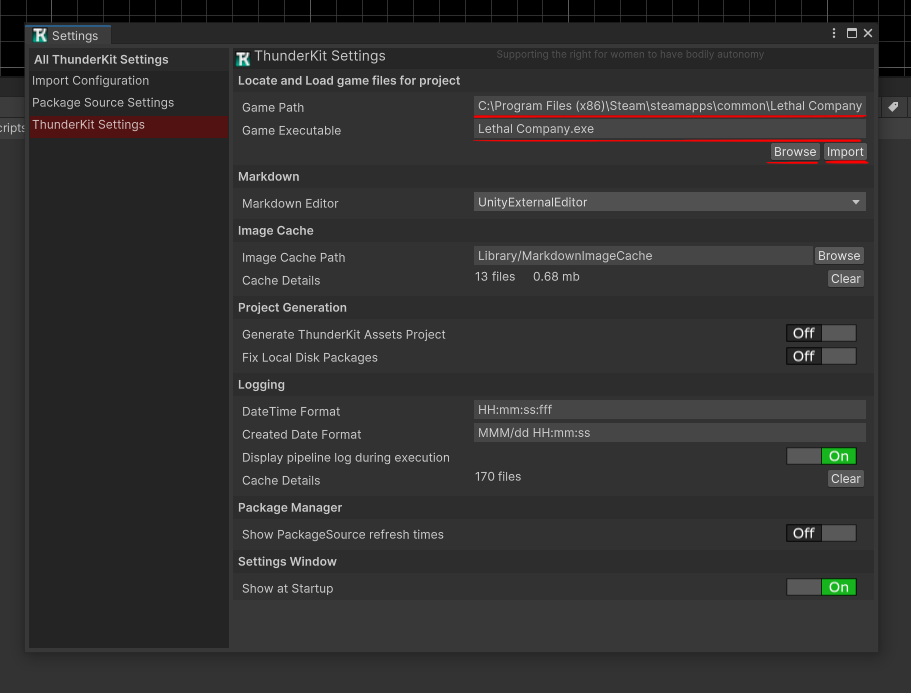
7.Click "import" and let Thunderkit do its thing. It'll ask you to restart your project a couple of times. After it's done, you'll have the necessary game code that this and other mods depend on.
ThunderKit will not import the Assembly-CSharp.dll from Lethal Company if you didn't properly dispose of the unneeded HDRP starter files. If this is the case, navigate to the same folder you found your Lethal Company.exe in, go to "Lethal Company_Data"/Managed and copy (DO NOT MOVE) Assembly-CSharp.dll to
8.At this point we're nearly done with the setup. Now we're gonna get this mod's code, along with its dependencies. Go back to the Thunderstore Settings menu and navigate to "Package Source Settings." Click "Add" and from the dropdown select "Thunderstore Source." This will add a new entry to the package source list called "ThunderStoreSource."
9.Select the new entry and name it to whatever pleases you in the "Package Source" field. I just call it "Lethal Company Mods." In the url field, paste this url:
https://thunderstore.io/c/lethal-company
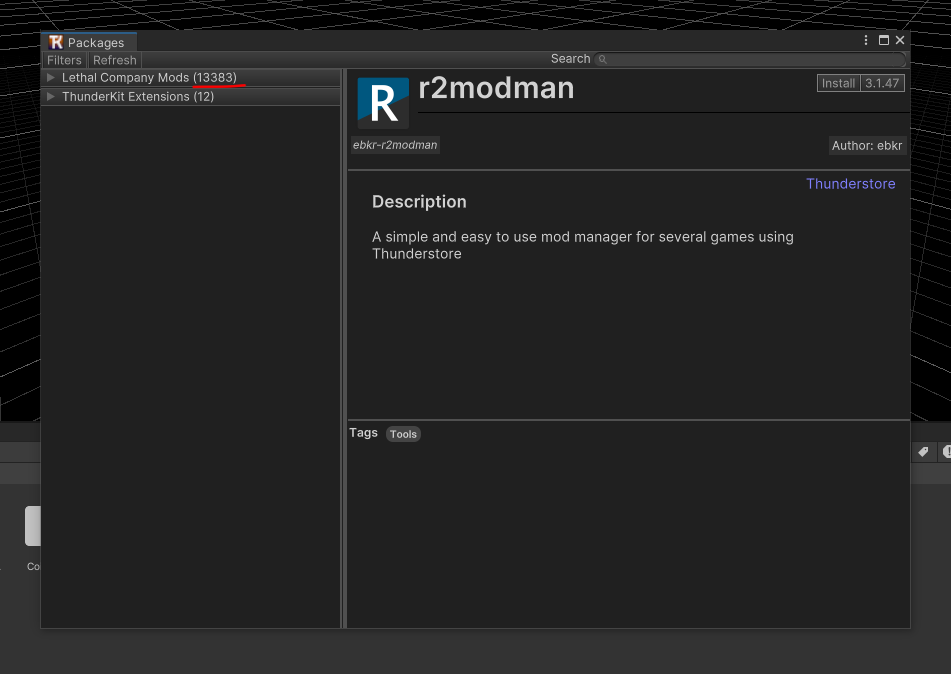
10.Give unity a minute to connect to ThunderStore. Once it's done, navigate to Tools > ThunderKit > Packages. If the package source you named has a silly number next to it**, you've successfully connected to Thunderstore and can now download mods.
** If you make modpacks and post them to ThunderStore when you could've just shared a ThunderStore profile code, I really don't care for you.
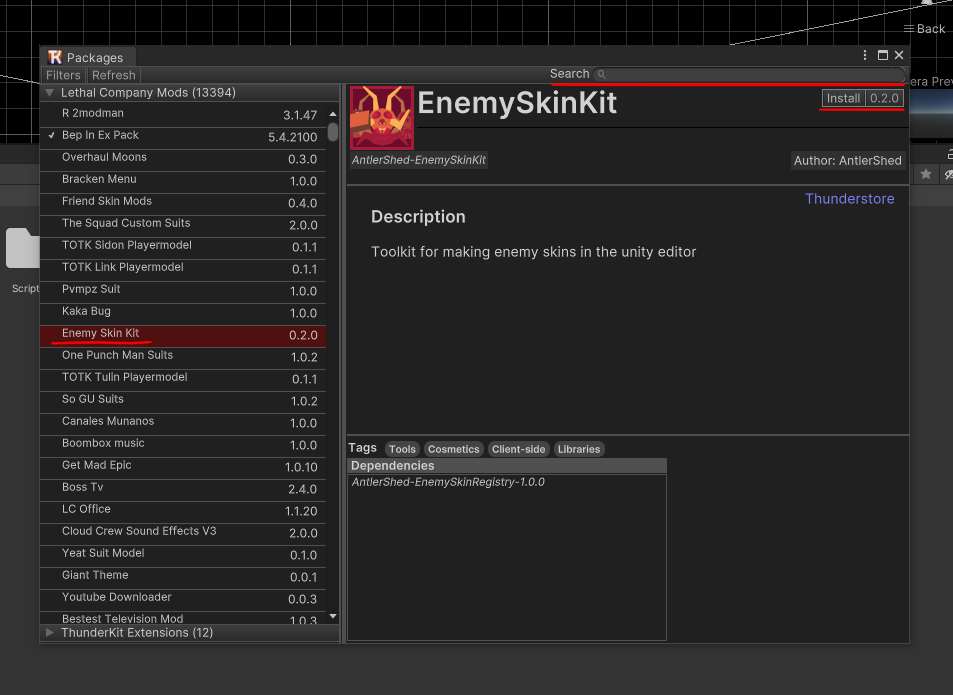
11.In the search bar in the top right, type in "EnemySkinKit" and look for this mod. Once you've found it, click "install" in the top right.
12.An annoying extra step we need to take is getting rid of some BepInEx libraries that I guess Unity doesn't agree with. Navigate to
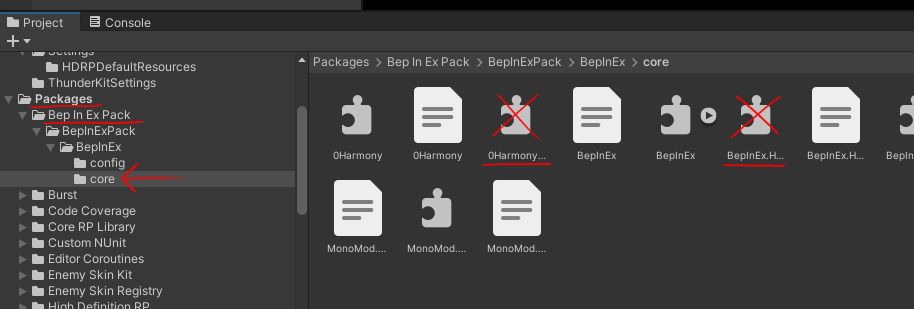
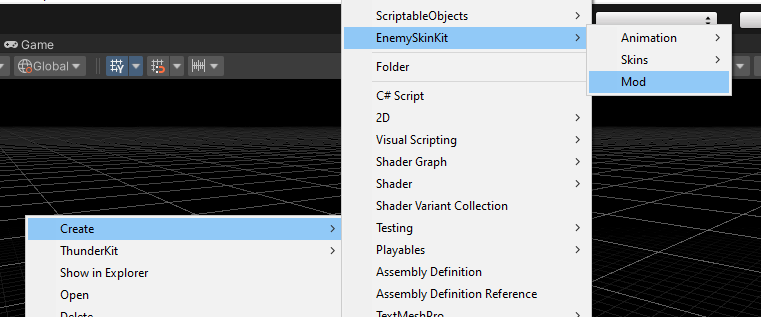
13.Verify that the mod has been installed by right clicking anywhere in the project window (the little file explorer at the bottom of unity's default layout) and go to Create. If you find options for "EnemySkinKit" it's installed and you should be good to go.
Code-Free Method
Now you should have all the stuff you need to start making skins.
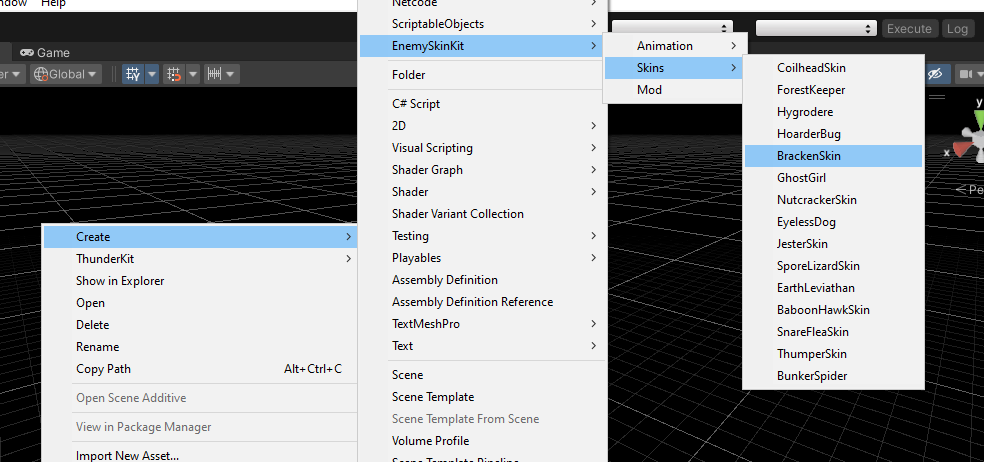
1.Right click anywhere in the assets window and select Create > Enemy Skin Kit > Skins > Enemy-You-Want-To-Skin
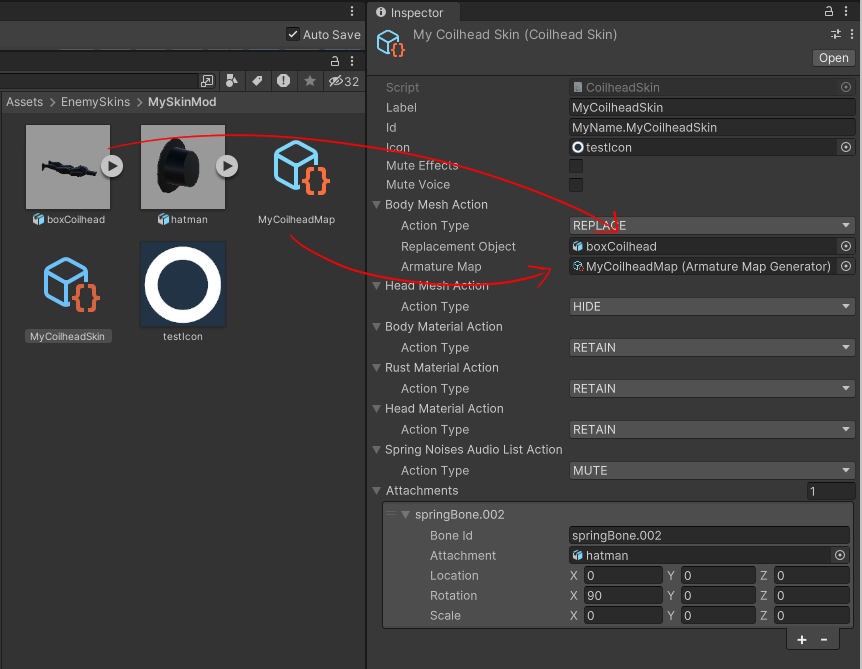
2.Name your skin file, then set the label, guid, and icon fields in the inspector. This is what a completed skin object might look like
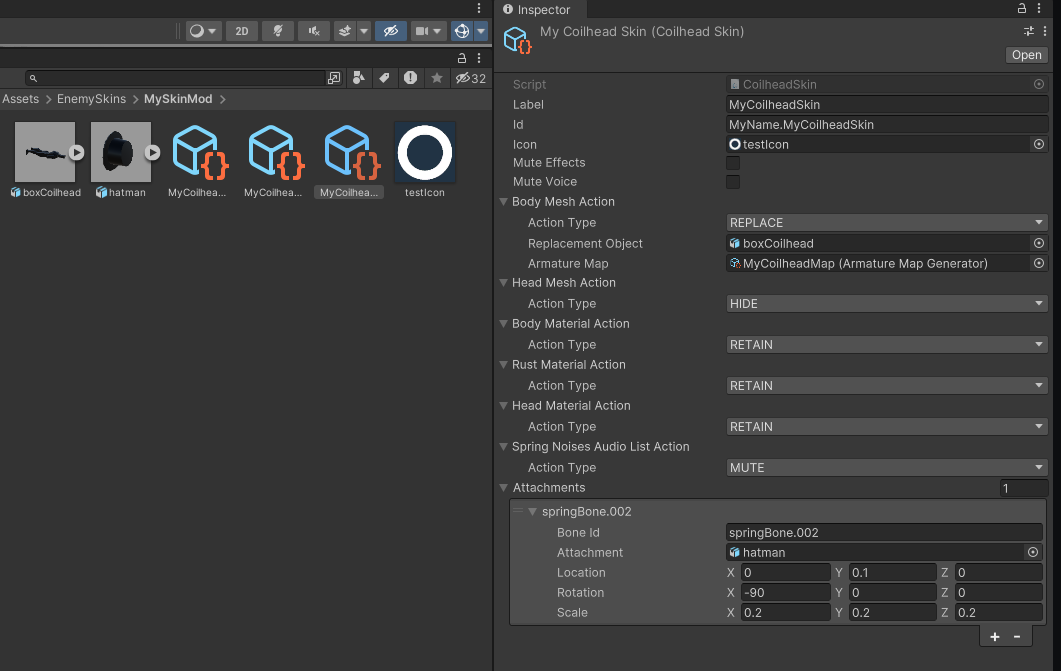
3.In the inspector, fill out the remaining fields for your skin. These fields come in the form of several "Action" types that will let you replace, hide, or keep sound effects, materials, and meshes.
Material Action - Operates on a material
- ActionType - determines what the action does when the skin is applied
- Retain - Keeps the material as is
- Replace - Replaces the material with "ReplacementMaterial"
- ReplacementMaterial - the material that will replace the vanilla material when ActionType is set to Replace
Static Mesh Action - Operates on one of the enemy's static meshes (like the spider's fangs or the jester's skull)
- ActionType - determines what the action does when the skin is applied
- Retain - Leaves the mesh as is.
- Hide - Disables the mesh's renderer, effectively hiding it.
- Replace - Replaces the static mesh with "ReplacementMesh"
- ReplacementMesh - the static mesh that will replace the vanilla mesh when ActionType is set to Replace
Skinned Mesh Action - Operates on one of the enemy's skinned meshes (normally the one "body" mesh)
- ActionType - determines what the action does when the skin is applied
- Retain - Leaves the mesh as is.
- Hide - Disables the mesh's renderer, effectively hiding it.
- Replace - Hides the vanilla skeletal mesh and puts a prefab in place to copy its animation.
- ArmatureMap - A data structure mapping the bones from your modded mesh to the vanilla mesh.*
- ReplacementObject - the prefab that will be instantiated, placed into the enemy's hierarchy, and made to copy its animations when ActionType is set to Replace. This prefab must contain a skeletal mesh component in its hierarchy, along with the skeleton. Really it should just be whatever prefab importing your .fbx or .dae or whatever spits out.
Audio Action - Operates on one of the enemy's sounds
- ActionType - determines what the action does when the skin is applied
- Retain - Leaves the sound as is.
- Mute - Replaces the sound with nothing.
- Replace - Replaces the sound with ReplacementClip
- ReplacementClip - the clip that will play instead of the vanilla audio clip when ActionType is set to Replace
Audio List Action - Operates on a set of sounds the enemy picks from
- ActionType - determines what the action does when the skin is applied
- Retain - Leaves the sound list as is.
- Mute - Replaces the vanilla list of audio clips with an empty list
- Replace - Replaces the list of clips with ReplacementClips
- ReplacementClips - the list of audio clips that the enemy will pick from when ActionType is set to Replace
Attachments
You can also specify "Attachments" that will let you attach a prefab as a child of a bone in the vanilla enemy's armature. So you could attach a watch to a wrist or a mask to a face without having to replace anything. You have to match the name of the bone exactly for it to attach.
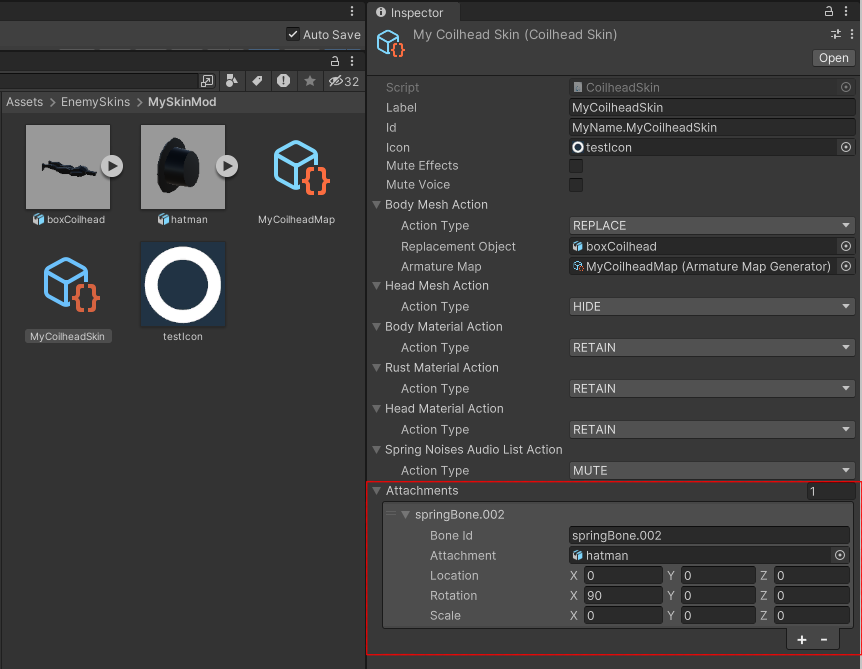
The location, rotation, and scale describe the transform of your prefab relative to the bone you're attaching it to. You can figure out what you want the values to be by attaching your prefab in the scene to the same desired bone on one of the example FBX files provided. Get it positioned correctly, then copy the values of your prefab's transform in the inspector. You could also use the Unity Explorer mod to do something similar in the game's runtime.
Just don't be a dope like me and leave the scale at zero in your example image.
4.Right click anywhere in the assets window and select Create > Enemy Skin Kit > Mod
5.Fill out the different fields of your mod. The only optional one is the mod GUID. The others are required.
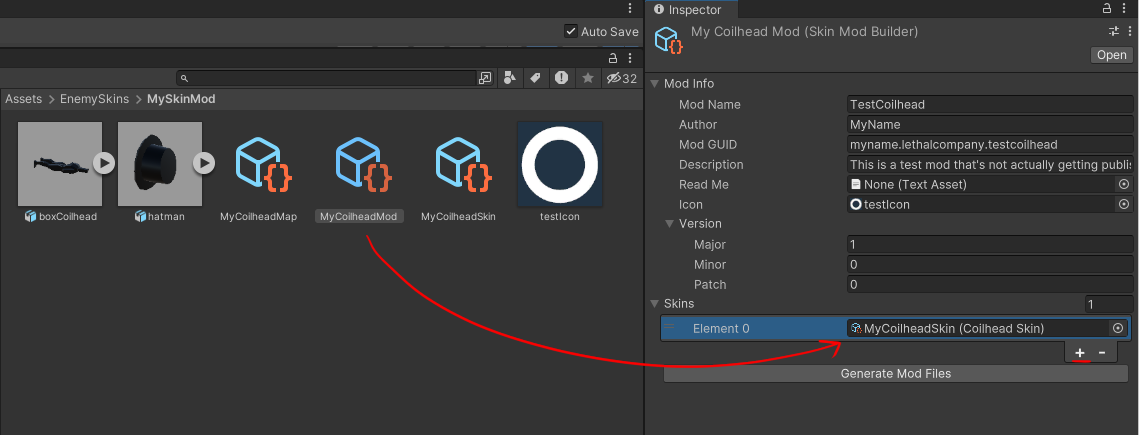
- Mod Name - The name of your mod as it will appear in ThunderStore. Needs at least one alphabetical character. Try to keep it short, but distinct.
- Mod GUID - The unique identifier for your mod. If not specified, it will be
. - Description - A short, one-to-two-sentence description of your mod. It's the one that appears next to ThunderStore thumbnails, so keep it brief.
- ReadMe - Your readme markdown file. This site's pretty good for making readme files.
- Icon - a 256 x 256 png file that will be your mod's thumbnail.
- Version - Your mod's version, separated by major, minor, and patch. Check the tooltips or use good ol' google to find out when you should increment these numbers.
- Skins - the skin scriptable objects to include in your mod. Just hit the plus button or set the amount of skins by entering a number in the skins size field. Drag and drop any skins you've created using the previous steps into this list.
5.Click the "Create Mod" button.
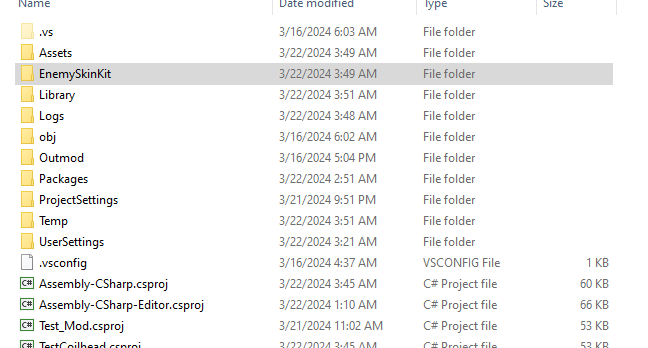
6.If successful, your mod files and the generated code will be saved to a zip file located in a folder called "EnemySkinKit" in the unity project folder (the same level as the assets folder).

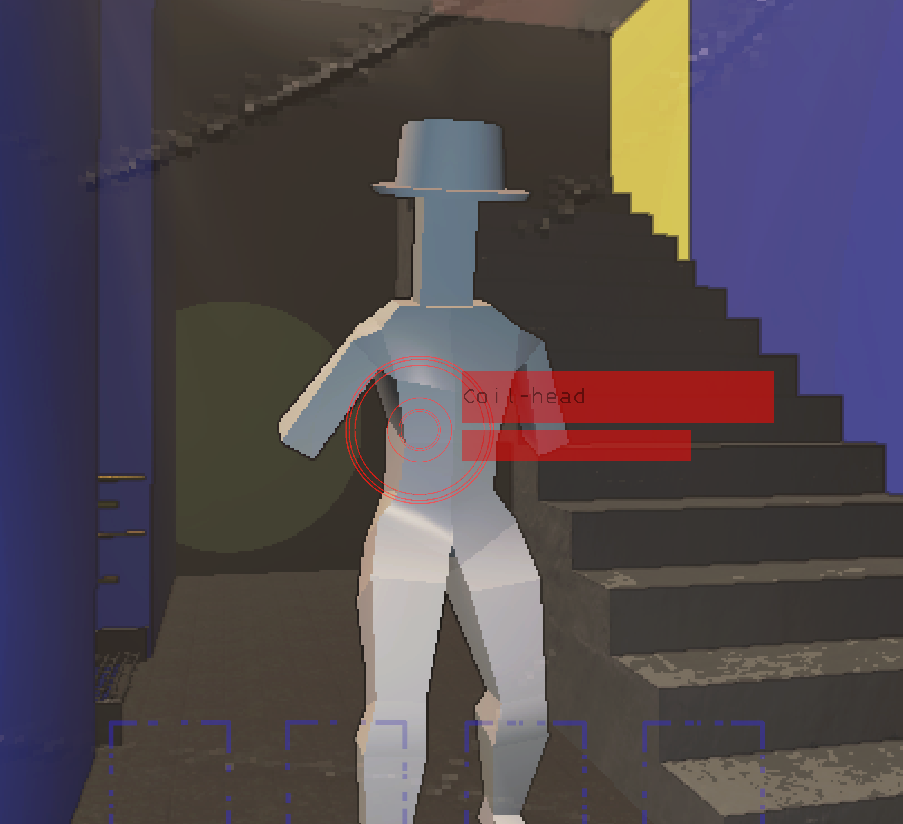
7.Install your mod in whatever way that pleases you and verify that it works as intended. You can pretty easily test your mod with the ThunderStore mod manager by using its "Import Local Mod" feature. Just search for it in the settings menu.
8.Once you've verified and tested your mod, you can go to Thunderstore and upload your zip file.
Additional Logic Method
If you want to take advantage of the ease of using the scriptable objects, but want to use them in a larger mod, then all you have to do is load your skin scriptable object from an asset bundle and register it with the EnemySkinRegistry.
//whatever you're doing to retrieve your skin scriptable object from your asset bundle
EnemySkinRegistry.RegisterSkin(mySkin);
The BaseSkin and BaseSkinner classes implement the necessary interfaces to register with the EnemySkinRegistry.
You're also free to add child classes to the existing Skin and Skinner types to extend them with whatever is to your liking. Permissions for these classes are pretty lax. If a member isn't public in one of these classes, it's protected. Don't you do nothing crazy though.
If you'd prefer something leaner or want something more custom, consider looking at the developer section of the EnemySkinRegistry mod page.
*So About Those Armature Maps...
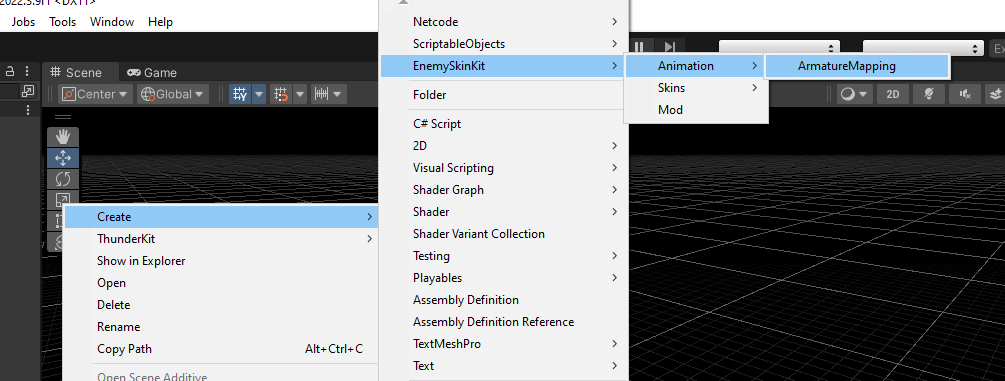
Lethal Company skinned meshes have proven difficult to work with, at least for me. Reskinning a mesh in the usual way is probably possible, but it seems no matter what I try, when I go to replace a skinned mesh in a skinned mesh component, it ends up a scrambled mess. Get in touch with me if you've got this figured out. Until then, my solution is "Armature Maps," which copy the animation from the vanilla mesh over to your modded mesh at runtime. These were a planned feature anyway, because they have the benefit of allowing you to adjust the proportions of your model. They're just more expensive computationally. To get an armature map set up, right click in the Project Window, and select Create > EnemySkinKit > Animation > Armature Mapping.
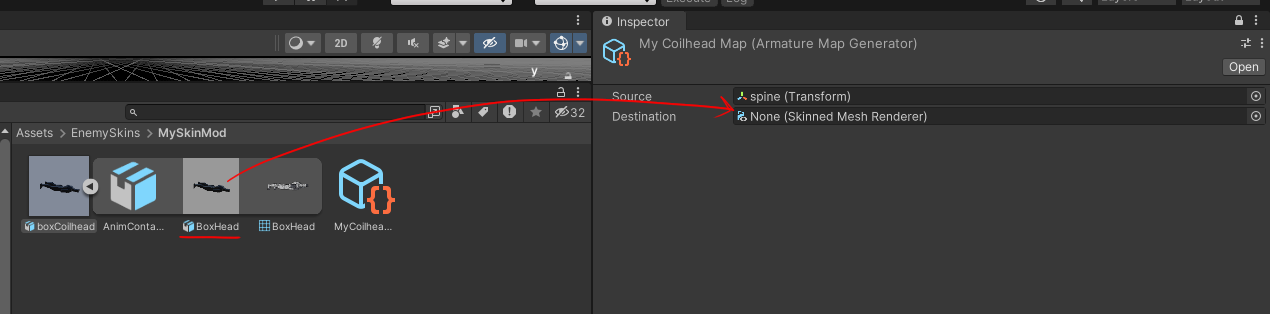
This Scriptable Object will first display two fields: a "source" hierarchy and a "destination" hierarchy. "Source" is the hierarchy of the vanilla enemy armature. I've included a prefab for each one of these in the mods package. You should be able to find the prefab you need in
You'll probably want to lock the inspector so you don't accitdentally take focus off of it while browsing to enemy armature prefab. Just click the little lock at the top.

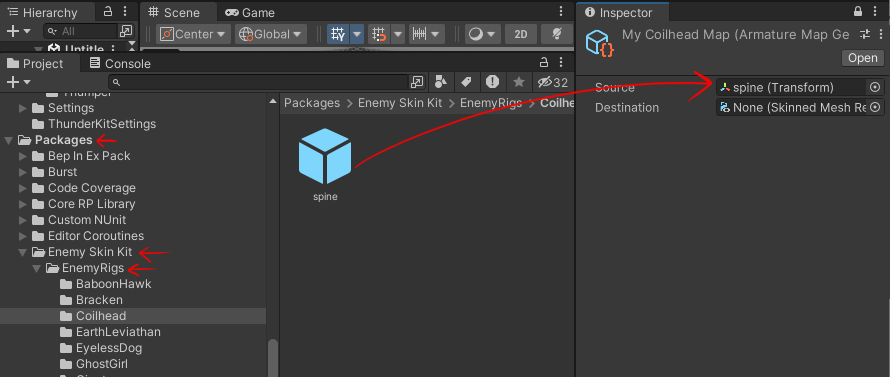
For destination, drag in the part of your prefab object that has the skinned mesh component.
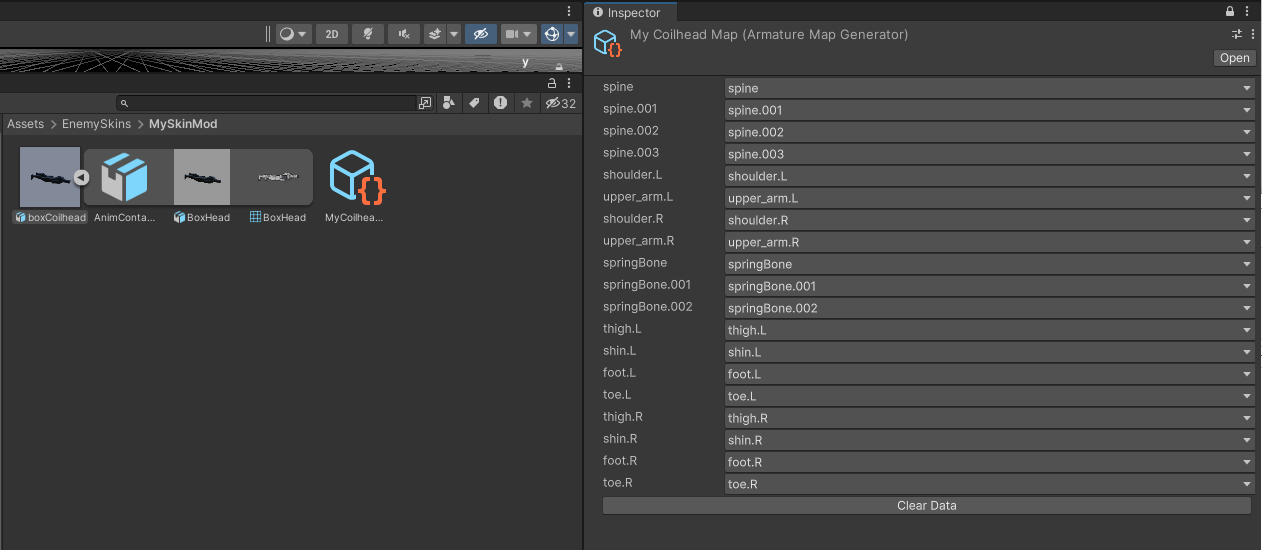
Once both of those fields have been added, the ArmatureMap in the inspector should expand and show the mapping of source bones to destination bones. If a source bone name matches a destination bone name, the ArmatureMap will automatically map them. At runtime, a source bone will have its animation copied by whatever destination bone has been mapped to it. Once your ArmatureMap is set up in this way, you can add it to the SkinnedMeshAction.
Don't forget to unlock the inspector if you locked it.
That's about as hairy as it gets. For actually creating the Skinned Meshes, I'd recommend getting one of the FBX files that come packaged with this mod. The folder for that is in the same folder as the EnemyRigs folder. You can get a rigged model in the correct position and import it to blender or your poison of choice and work from there. Teaching how to create and rig a skeletal mesh is a little beyond the scope of this little ReadMe. But there are plenty of resources out there for you to get started if you're new. Good luck!
Tips
- Use a developer mod like Hamunii's "Dev Tools" to enable cheats and debug options while testing.
"To Do"s
- Testing to ensure these skins are client-side only.
- Currently, not all sound effects can be replaced. This is because some are stored in scriptable objects, but these skins work at an instance level. So full sound replacement will have to wait on the EnemySkinRegistry finishing all of the enemy dispatchers. Until then, most sounds can at least be muted via the "mute creature effects" and "mute creature voice" toggles on each enemy skin object.