Size Limit 
<img src="https://ai.github.io/size-limit/logo.svg" align="right" alt="Size Limit logo by Anton Lovchikov" width="120" height="178">
Size Limit is a performance budget tool for JavaScript. It checks every commit on CI, calculates the real cost of your JS for end-users and throws an error if the cost exceeds the limit.
- ES modules and tree-shaking support.
- Add Size Limit to GitHub Actions, Circle CI or another CI system to know if a pull request adds a massive dependency.
- Modular to fit different use cases: big JS applications that use their own bundler or small npm libraries with many files.
- Can calculate the time it would take a browser to download and execute your JS. Time is a much more accurate and understandable metric compared to the size in bytes.
- Calculations include all dependencies and polyfills used in your JS.

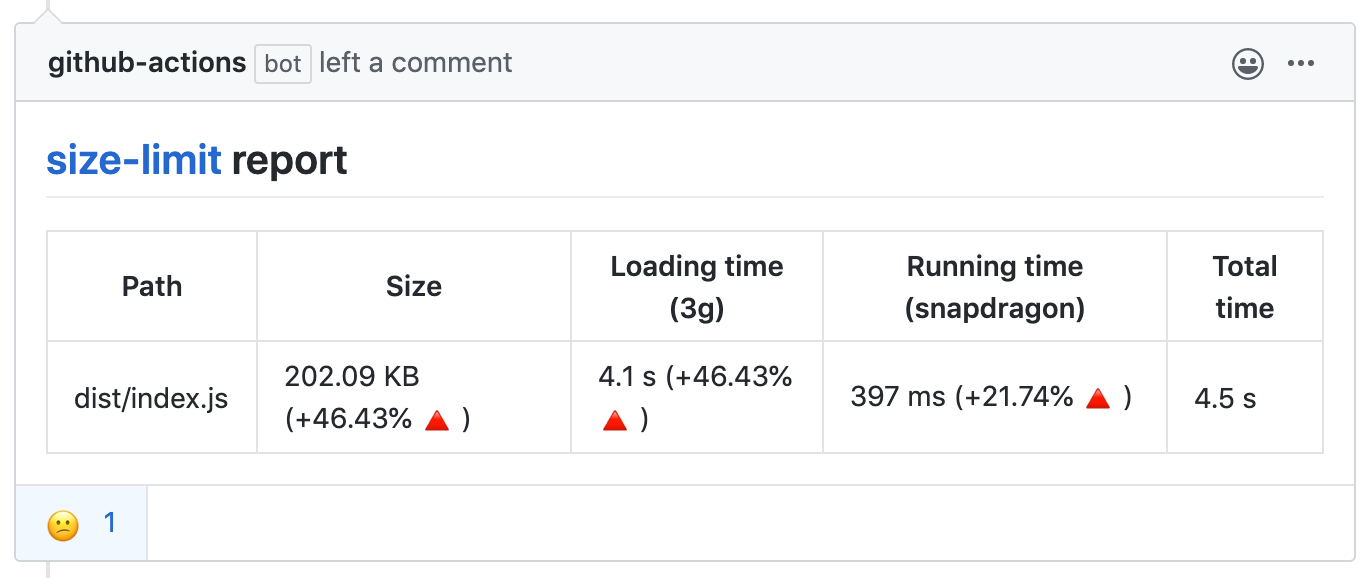
With GitHub action Size Limit will post bundle size changes as a comment in pull request discussion.
With --why, Size Limit can tell you why your library is of this size
and show the real cost of all your internal dependencies.
We are using Statoscope for this analysis.


Who Uses Size Limit
- MobX
- Material-UI
- Ant Design
- Autoprefixer
- PostCSS reduced 25% of the size.
- Browserslist reduced 25% of the size.
- EmojiMart reduced 20% of the size
- nanoid reduced 33% of the size.
- React Focus Lock reduced 32% of the size.
- Logux reduced 90% of the size.
How It Works
- Size Limit contains a CLI tool, 3 plugins (
file,webpack,time) and 3 plugin presets for popular use cases (app,big-lib,small-lib). A CLI tool finds plugins inpackage.jsonand loads the config. - If you use the
webpackplugin, Size Limit will bundle your JS files into a single file. It is important to track dependencies and webpack polyfills. It is also useful for small libraries with many small files and without a bundler. - The
webpackplugin creates an empty webpack project, adds your library and looks for the bundle size difference. - The
timeplugin compares the current machine performance with that of a low-priced Android devices to calculate the CPU throttling rate. - Then the
timeplugin runs headless Chrome (or desktop Chrome if it’s available) to track the time a browser takes to compile and execute your JS. Note that these measurements depend on available resources and might be unstable. See here for more details.
Usage
JS Applications
Suitable for applications that have their own bundler and send the JS bundle directly to a client (without publishing it to npm). Think of a user-facing app or website, like an email client, a CRM, a landing page or a blog with interactive elements, using React/Vue/Svelte lib or vanilla JS.
Show instructions
1. Install the preset: ```sh npm install --save-dev size-limit @size-limit/file ``` 2. Add the `size-limit` section and the `size` script to your `package.json`: ```diff + "size-limit": [ + { + "path": "dist/app-*.js" + } + ], "scripts": { "build": "webpack ./webpack.config.js", + "size": "npm run build && size-limit", "test": "vitest && eslint ." } ``` 3. Here’s how you can get the size for your current project: ```sh $ npm run size Package size: 30.08 kB with all dependencies, minified and brotlied ``` 4. Now, let’s set the limit. Add 25% to the current total size and use that as the limit in your `package.json`: ```diff "size-limit": [ { + "limit": "35 kB", "path": "dist/app-*.js" } ], ``` 5. Add the `size` script to your test suite: ```diff "scripts": { "build": "webpack ./webpack.config.js", "size": "npm run build && size-limit", - "test": "vitest && eslint ." + "test": "vitest && eslint . && npm run size" } ``` 6. If you don’t have a continuous integration service running, don’t forget to add one — start with Github Actions.JS Application and Time-based Limit
File size limit (in kB) is not the best way to describe your JS application cost for developers. Developers will compare the size of the JS bundle with the size of images. But browsers need much more time to parse 100 kB of JS than 100 kB of an image since JS compilers are very complex.
This is why Size Limit support time-based limit. It runs headless Chrome to track the time a browser takes to compile and execute your JS.
Show instructions
1. Install the preset: ```sh npm install --save-dev size-limit @size-limit/preset-app ``` 2. Add the `size-limit` section and the `size` script to your `package.json`: ```diff + "size-limit": [ + { + "path": "dist/app-*.js" + } + ], "scripts": { "build": "webpack ./webpack.config.js", + "size": "npm run build && size-limit", "test": "vitest && eslint ." } ``` 3. Here’s how you can get the size for your current project: ```sh $ npm run size Package size: 30.08 kB with all dependencies, minified and brotlied Loading time: 602 ms on slow 3G Running time: 214 ms on Snapdragon 410 Total time: 815 ms ``` 4. Now, let’s set the limit. Add 25% to the current total time and use that as the limit in your `package.json`: ```diff "size-limit": [ { + "limit": "1 s", "path": "dist/app-*.js" } ], ``` 5. Add the `size` script to your test suite: ```diff "scripts": { "build": "webpack ./webpack.config.js", "size": "npm run build && size-limit", - "test": "vitest && eslint ." + "test": "vitest && eslint . && npm run size" } ``` 6. If you don’t have a continuous integration service running, don’t forget to add one — start with Github Actions.Big Libraries
JS libraries > 10 kB in size.
This preset includes headless Chrome, and will measure your lib’s execution time. You likely don’t need this overhead for a small 2 kB lib, but for larger ones the execution time is a more accurate and understandable metric that the size in bytes. Libraries like React are good examples for this preset.
Show instructions
1. Install preset: ```sh npm install --save-dev size-limit @size-limit/preset-big-lib ``` 2. Add the `size-limit` section and the `size` script to your `package.json`: ```diff + "size-limit": [ + { + "path": "dist/react.production-*.js" + } + ], "scripts": { "build": "webpack ./scripts/rollup/build.js", + "size": "npm run build && size-limit", "test": "vitest && eslint ." } ``` 3. If you use ES modules you can test the size after tree-shaking with `import` option: ```diff "size-limit": [ { "path": "dist/react.production-*.js", + "import": "{ createComponent }" } ], ``` 4. Here’s how you can get the size for your current project: ```sh $ npm run size Package size: 30.08 kB with all dependencies, minified and brotlied Loading time: 602 ms on slow 3G Running time: 214 ms on Snapdragon 410 Total time: 815 ms ``` 5. Now, let’s set the limit. Add 25% to the current total time and use that as the limit in your `package.json`: ```diff "size-limit": [ { + "limit": "1 s", "path": "dist/react.production-*.js" } ], ``` 6. Add a `size` script to your test suite: ```diff "scripts": { "build": "rollup ./scripts/rollup/build.js", "size": "npm run build && size-limit", - "test": "vitest && eslint ." + "test": "vitest && eslint . && npm run size" } ``` 7. If you don’t have a continuous integration service running, don’t forget to add one — start with Github Actions. 8. Add the library size to docs, it will help users to choose your project: ```diff # Project Name Short project description * **Fast.** 10% faster than competitor. + * **Small.** 15 kB (minified and brotlied). + [Size Limit](https://github.com/ai/size-limit) controls the size. ```Small Libraries
JS libraries < 10 kB in size.
This preset will only measure the size, without the execution time, so it’s suitable for small libraries. If your library is larger, you likely want the Big Libraries preset above. Nano ID or Storeon are good examples for this preset.
Show instructions
1. First, install `size-limit`: ```sh npm install --save-dev size-limit @size-limit/preset-small-lib ``` 2. Add the `size-limit` section and the `size` script to your `package.json`: ```diff + "size-limit": [ + { + "path": "index.js" + } + ], "scripts": { + "size": "size-limit", "test": "vitest && eslint ." } ``` 3. Here’s how you can get the size for your current project: ```sh $ npm run size Package size: 177 B with all dependencies, minified and brotlied ``` 4. If your project size starts to look bloated, run `--why` for analysis: ```sh npm run size -- --why ``` > We use [Statoscope](https://github.com/statoscope/statoscope) as bundle analyzer. 5. Now, let’s set the limit. Determine the current size of your library, add just a little bit (a kilobyte, maybe) and use that as the limit in your `package.json`: ```diff "size-limit": [ { + "limit": "9 kB", "path": "index.js" } ], ``` 6. Add the `size` script to your test suite: ```diff "scripts": { "size": "size-limit", - "test": "vitest && eslint ." + "test": "vitest && eslint . && npm run size" } ``` 7. If you don’t have a continuous integration service running, don’t forget to add one — start with Github Actions. 8. Add the library size to docs, it will help users to choose your project: ```diff # Project Name Short project description * **Fast.** 10% faster than competitor. + * **Small.** 500 bytes (minified and brotlied). No dependencies. + [Size Limit](https://github.com/ai/size-limit) controls the size. ```Reports
Size Limit has a GitHub action that comments and rejects pull requests based on Size Limit output.
- Install and configure Size Limit as shown above.
- Add the following action inside
.github/workflows/size-limit.yml
name: "size"
on:
  pull_request:
    branches:
      - master
jobs:
  size:
    runs-on: ubuntu-latest
    env:
      CI_JOB_NUMBER: 1
    steps:
      - uses: actions/checkout@v1
      - uses: andresz1/size-limit-action@v1
        with:
          github_token: ${{ secrets.GITHUB_TOKEN }}
Config
Plugins and Presets
Plugins or plugin presets will be loaded automatically from package.json.
For example, if you want to use @size-limit/webpack, you can just use
npm install --save-dev @size-limit/webpack, or you can use our preset
@size-limit/preset-big-lib.
Plugins:
@size-limit/filechecks the size of files with Brotli (default), Gzip or without compression.@size-limit/webpackadds your library to empty webpack project and prepares bundle file forfileplugin.@size-limit/webpack-whyadds reports forwebpackplugin about your library is of this size to show the cost of all your dependencies.@size-limit/webpack-cssadds css support forwebpackplugin.@size-limit/esbuildis likewebpackplugin, but usesesbuildto be faster and use less space innode_modules.@size-limit/esbuild-whyadd reports foresbuildplugin about your library is of this size to show the cost of all your dependencies.@size-limit/timeuses headless Chrome to track time to execute JS.
Plugin presets:
@size-limit/preset-appcontainsfileandtimeplugins.@size-limit/preset-big-libcontainswebpack,file, andtimeplugins.@size-limit/preset-small-libcontainsesbuildandfileplugins.
Third-Party Plugins
Third-party plugins and presets named starting with size-limit- are also supported.
For example:
size-limit-node-esbuildis like@size-limit/esbuildbut for Node libraries.size-limit-preset-node-libis like@size-limit/preset-small-libbut for Node libraries which contains abovenode-esbuildand corefileplugins.nx-size-limitis an NX build system community plugin.
Limits Config
Size Limits supports three ways to define limits config.
-
size-limitsection inpackage.json:"size-limit": [ { "path": "index.js", "import": "{ createStore }", "limit": "500 ms" } ] -
or a separate
.size-limit.jsonconfig file:[ { "path": "index.js", "import": "{ createStore }", "limit": "500 ms" } ] -
or a more flexible
.size-limit.jsor.size-limit.cjsconfig file:module.exports = [ { path: "index.js", import: "{ createStore }", limit: "500 ms" } ] -
or types
.size-limit.ts:import type { SizeLimitConfig } from '../../packages/size-limit' module.exports = [ { path: "index.js", import: "{ createStore }", limit: "500 ms" } ] satisfies SizeLimitConfig
Each section in the config can have these options:
- path: relative paths to files. The only mandatory option.
It could be a path
"index.js", a pattern"dist/app-*.js"or an array["index.js", "dist/app-*.js", "!dist/app-exclude.js"]. - import: partial import to test tree-shaking. It could be
"{ lib }"to testimport { lib } from 'lib',*to test all exports, or{ "a.js": "{ a }", "b.js": "{ b }" }to test multiple files. - limit: size or time limit for files from the
pathoption. It should be a string with a number and unit, separated by a space. Format:100 B,10 kB,500 ms,1 s. - name: the name of the current section. It will only be useful if you have multiple sections.
- entry: when using a custom webpack config, a webpack entry could be given. It could be a string or an array of strings. By default, the total size of all entry points will be checked.
- webpack: with
falseit will disable webpack. - running: with
falseit will disable calculating running time. - gzip: with
trueit will use Gzip compression and disable Brotli compression. - brotli: with
falseit will disable any compression. - config: a path to a custom webpack config.
- ignore: an array of files and dependencies to exclude from the project size calculation.
- modifyWebpackConfig: (.size-limit.js only) function that can be used to do last-minute changes to the webpack config, like adding a plugin.
- compareWith: path to
stats.jsonfrom another build to compare (when--whyis using). - uiReports: custom UI reports list (see Statoscope docs).
If you use Size Limit to track the size of CSS files, make sure to set
webpack: false. Otherwise, you will get wrong numbers, because webpack
inserts style-loader runtime (≈2 kB) into the bundle.
Analyze with --why
You can run size-limit --why to analyze the bundle.
You will need to install @size-limit/esbuild-why or @size-limit/webpack-why
depends on which bundler you are using (default is esbuild).
For @size-limit/esbuild-why,
it will generate a esbuild-why.html at the current directory & open it in the browser.
If you also specify --save-bundle <DIR>,
the report will be generated inside <DIR>.
If you have multiple sections in your config,
the files will be named esbuild-why-{n}.html,
or you can give it a custom name:
[
  {
    "name": "cjs",
    /* snap */
  },
  {
    "name": "esm",
    /* snap */
  }
]
This will produce esbuild-why-cjs.html and esbuild-why-esm.html respectively.
For @size-limit/webpack-why,
it will generate the report and open it in the browser automatically.
JS API
const sizeLimit = require('size-limit')
const filePlugin = require('@size-limit/file')
const webpackPlugin = require('@size-limit/webpack')

sizeLimit([filePlugin, webpackPlugin], [filePath]).then(result => {
  result //=> { size: 12480 }
})