
CacheCow
An implementation of HTTP Caching in .NET Core and 4.52+ for HttpClient, ASP.NET Web API, ASP.NET MVC Core and Carter.
This document covers topics below:
- Breaking changes in Version 2.0.0
- Concepts and definitions
- Getting started:
- CacheCow Header
- Running Samples
- CacheCow.Server Advanced Options
- Dependency Injection scenarios in ASP.NET MVC Core
- Configuration options with ASP.NET Core
- Dependency Injection scenarios in ASP.NET Web API
- Migrating projects using older CacheCow.Server
NOTE: Breaking changes in Version 2.0.0
There are quite a few changes in the server-side implementation of CacheCow due to shortcomings of previous approach while the client-side mostly remained the same. Hence if you have used CacheCow.Server in the past and you would like to migrate, read the guide on migration further down. CacheCow.Client has some changes which may or may not break your code (depending whether you had used .NET 4.5 packages) which includes:
- All interfaces are fully async now
- Many cache storages no longer maintained and available including: MongoDb, Memcached, File and Elasticsearch. Currently only Redis, SQL and InMemory are supported although I accept PR if you would like to add your storage.
- ICacheStore implementations optionally supported a cache quota management interface which is no longer supported.
- Renaming CacheCow client header from "x-cachecow" to "x-cachecow-client"
- CacheCow.Client now copies any headers starting with x-cachecow it receives from the server to the response it delivers to your HttpClient.
Concepts and definitions
It is useful to start with concepts but feel free to use it as a reference. If you get bored reading this 😀, jump straight to Getting Started sections or simply browse and run a couple of samples.
- CacheCow.Client: Client constructs for HTTP Caching when making HTTP calls with .NET's
HttpClient. - CacheCow.Server: Server constructs for HTTP Caching when serving HTTP APIs in ASP.NET Web API or MVC Core.
- Resource: A RESTful resource - generally identified by its URI.
- Representation: A particular embodiment of a resource according to its format, language, etc. For example
/api/car/1is a resource and it might have two representations as JSON or XML. Also the same resource could have two representations in Chinese or Spanish. Headers by which representations will vary is defined by theVaryheader from the server. - HTTP Caching: Caching as described in HTTP 1.1 Specification (RFC 7230 or 2616). Despite the common notion, the representations get cached on the client (not server) and the server is responsible for providing cache directives and validate conditional requests on resources.
- ICacheStore: CacheCow interface responsible for storing cacheable representation on the client. There are choice of storages, at this point InMemory and Redis are available. CacheCow itself is responsible for storing representations separately.
- Cache directives: These are various cache-related headers that the server provides to guide the client on how best cache and validate the resources. These headers include
Cache-Control,Vary,ETagand in HTTP 1.0 would includeExpires,Last-ModifiedandPragma(for the purpose of this article, we includeETagandLast-Modifiedas part of directives although purely speaking they are not). CacheCow hasICacheDirectiveProviderinterface responsible for controlling these headers. Expiresheader: Defines expiry of a resource in absolute time.Cache-Controlheader provides richer semantic and supersedes it. CacheCow sets both to support both HTTP 1.0 and 1.1.- Expiry: Expiry of a cached representation on the client is defined by the directives sent by the server. It is crucial to note that the client normally does not eject the cached representation right after the expiry - the client can carry on using the cached representation provided it checks with the server if the representation is still valid (see Consistency below).
Last-Modifiedheader: Since its precision is at seconds, its use is not recommended for valiation and instead, it is recommended to useETag.ETagheader: ETag or EntityTag is an opaque string that identifies a version of resource (not representation). If you have a high-precision Last-Modified date, it is better to turn it to ETag by binarising the date (example).- TimedETag: A CacheCow construct that combines Last-Modifed and ETag (can have either of them but not both) and represents a version of the resource and implemented as
TimedEntityTagHeaderValue. It is recommended to construct it with an ETag (due to low precision of DateTime in HTTP Spec'sLast-Modifiedheader). ITimedETagExtractor: A CacheCow interface responsible for extracting TimedETag from view models sent back by the API. By default, it checks to see if the ViewModel has implemented ICacheResource, if so it enquires the TimedETag directly. If not, it will resort to serialising the ViewModel to JSON and use its hash as ETag. This can be expensive hence it is suggested to either your ViewModels implementingICacheResourceinterface or implementITimedETagExtractor- plenty of examples in the samples.- Consistency: Resources underlying the cached representationa could change without any notice making them invalid - this problem has been half-joking known as one of the two most difficult problems in computer science, the other being naming. For many resources this could be acceptable while for some simply not tolerable. HTTP solves this problem with a single round-trip call that would either approve the use of the version client has cached (by returing status 304) or return the latest version of the resource in the representation requested. This is known as conditional GET. HTTP also provides means for optimistic concurrency and only update (or delete) of the resource if it matches the ETag or has not changed since the
Last-Modifieddate supplied. This is known as conditional PUT/PATCH/DELETE. CacheCow supports these scenarios OOB. - Zero-Expiry resources (consistent resources): These resources require a high consistency and the clients are allowed to cache the representations and re-use only if they make a conditional GET to confirm the version they have is valid. Essentially, the representation is expired as soon as it leaves the server but can be safely re-used if the client makes a conditional GET. It might seem that caching in these scenarios is not really beneficial, but in fact it helps to reduce network traffic, client and server resource usage and even can protect back-end systems. The trick on the server is to just find out whether a resource has changed without loading it all the way from back-end systems. For example, to know whether a record has been changed, we can check whether its LastModifiedDate (or Timestamp) has been modified against the ETag or a date. Or for a list of records, the most recent LastModifiedDate of all records along with the count can be used which can be executed in a single query (For example in SQL you would use
SELECT COUNT(1), MAX(LastModifiedDate) FROM MyTable). Such queries will be fast and cheap. CacheCow providesITimedETagQueryProviderinterface to preemptively query the backend stores for conditional HTTP calls without load the resources. ITimedETagQueryProvider: This interface allows server implementations to query their back-end and carry out validation against it. This is the best way to have APIs support consistency and the most efficient level of caching.
Getting started - Client
Client scenario is perhaps the most common use case of CacheCow. Most of the concepts discussed above relate to the server-side. Client-side CacheCow has been implemented as a DelegatingHandler and has very few concept counts - most of the complexity of HTTP Caching has been hidden away from you. For the purpose of this guide, we choose an In-Memory storage which is the default.
1) Install the nuget package
> install-package CacheCow.Client2) Use ClientExtensions to create an HttpClient (piped to a CachingHandler fronted by HttpClientHandler):
var client = ClientExtensions.CreateClient();This is simply a helper and you saves you writing a couple of lines of code.
3) Make two calls to a cacheable resource
JQuery CDN is a handy little cacheable resource. We make a call twice and check CacheCow header:
const string CacheableResource = "https://code.jquery.com/jquery-3.3.1.slim.min.js";
var response = client.GetAsync(CacheableResource).
      ConfigureAwait(false).GetAwaiter().GetResult();
var responseFromCache = client.GetAsync(CacheableResource).
      ConfigureAwait(false).GetAwaiter().GetResult();
Console.WriteLine(response.Headers.GetCacheCowHeader().ToString()); // outputs "2.0.0.0;did-not-exist=true"
Console.WriteLine(responseFromCache.Headers.GetCacheCowHeader().ToString()); // outputs "2.0.0.0;did-not-exist=false;retrieved-from-cache=true"
As you can see, second time round the resource came from the cache and the request did not even hit the network.
NOTE: In-Memory storage is OK for test scenarios or cases where the load is limited. In many cases you would choose to use Redis storage or you can implement your own if you need to. If you would need an alternative storage not yet supported, feel free to discuss by opening an issue before sending a PR.
Getting started - ASP.NET MVC Core
From CacheCow 2.0, ASP.NET MVC Core scenarios are supported. Server-side CacheCow has been implemented as a Resource Filter.
1) Add the nuget package:
> install-package CacheCow.Server.Core.Mvc2) Add HTTP Caching dependencies:
public virtual void ConfigureServices(IServiceCollection services)
{
    ... // usual startup code
    services.AddHttpCachingMvc(); // add HTTP Caching for Core MVC
}
3) Decorate your Controller's actions with HttpCacheFactory attribute
Provide the expiry as the first parameter (number of seconds):
public class MyController : Controller
{
    [HttpGet]
    [HttpCacheFactory(300)]
    public IActionResult Get(int id)
    {
        ... // implementation
    }
}
Here we have set the expiry to 5 minutes. This covers the basic scenario, browse the samples for the advanced and efficient use cases.
Getting started - ASP.NET Web API
Web API has always been supported by CacheCow but the server-side has been radically changed. There is no more a DelegatingHandler and all you need is to decorate your actions with the HttpCache filter.
1) Add the nuget package:
> install-package CacheCow.Server.WebApi2) Decorate your Controller's actions with HttpCache attribute
Provide the expiry as a parameter (number of seconds):
public class MyController : ApiController
{
    [HttpGet]
    [HttpCache(DefaultExpirySeconds = 300)]
    public IHttpActionResult Get(int id)
    {
        ...
    }
}
Here we have set the expiry to 5 minutes. This covers the basic scenario, browse the samples for the advanced and efficient use cases.
CacheCow Header
CacheCow.Client and CacheCow.Server variants include diagnostic headers (x-cachecow-client and x-cachecow-server) to inform you of the actions taken and their results. They are useful in debugging and in case you would like to log them to understand cache hit ratios.
CacheCow.Client Header
The header name is x-cachecow-client and can optionally contain extensions below (values separated by semicolon) depending on the scenario:
- Version of the CacheCow.Client
was-stale: whether the stored representation was staledid-not-exist: the requested representation did not exist in the cachenot-cacheable: the request or response were not cacheable (due to status, various headers and directives)cache-validation-applied: CacheCow attempted the HTTP call (GET, PUT, PATCH or DELETE) with cache validationretrieved-from-cache: whether the representation ultimately came from the cache or the one sent by the server
CacheCow.Server Header
The header name is x-cachecow-server and contains extensions below (values separated by semicolon):
validation-applied: whether validation was attemptedvalidation-matched: validation attempted and the conditions met (resulting in 304 for GET and 2xx for PUT/PATCH/DELETE)short-circuited: the request was short-circuited and did not hit deeper API layers (with status 304 or 412)query-made:ITimedETagQueryProvidermade a query to the back-end stores
Running Samples
CacheCow project contains 3 sample projects that demonstrate how to use both client and server libraries. The samples are exactly similar in functionality, shared by CacheCow.Samples.Common project. Server is an API hosting functionality for adding, modifying and querying cars. it a command-line interface with 6 options to choose from:
- A. To return all cars
- L. To return the last car (default is JSON)
- X. To return the last car in XML
- C. To create a new car
- U. To update the last car
- O. To update the last car - outside the API by modifying underlying data so the API does not get to see it
- D. To delete the last car
- F. To delete the first car
- V. To toggle on/off verbose output of headers
- Q. to quit
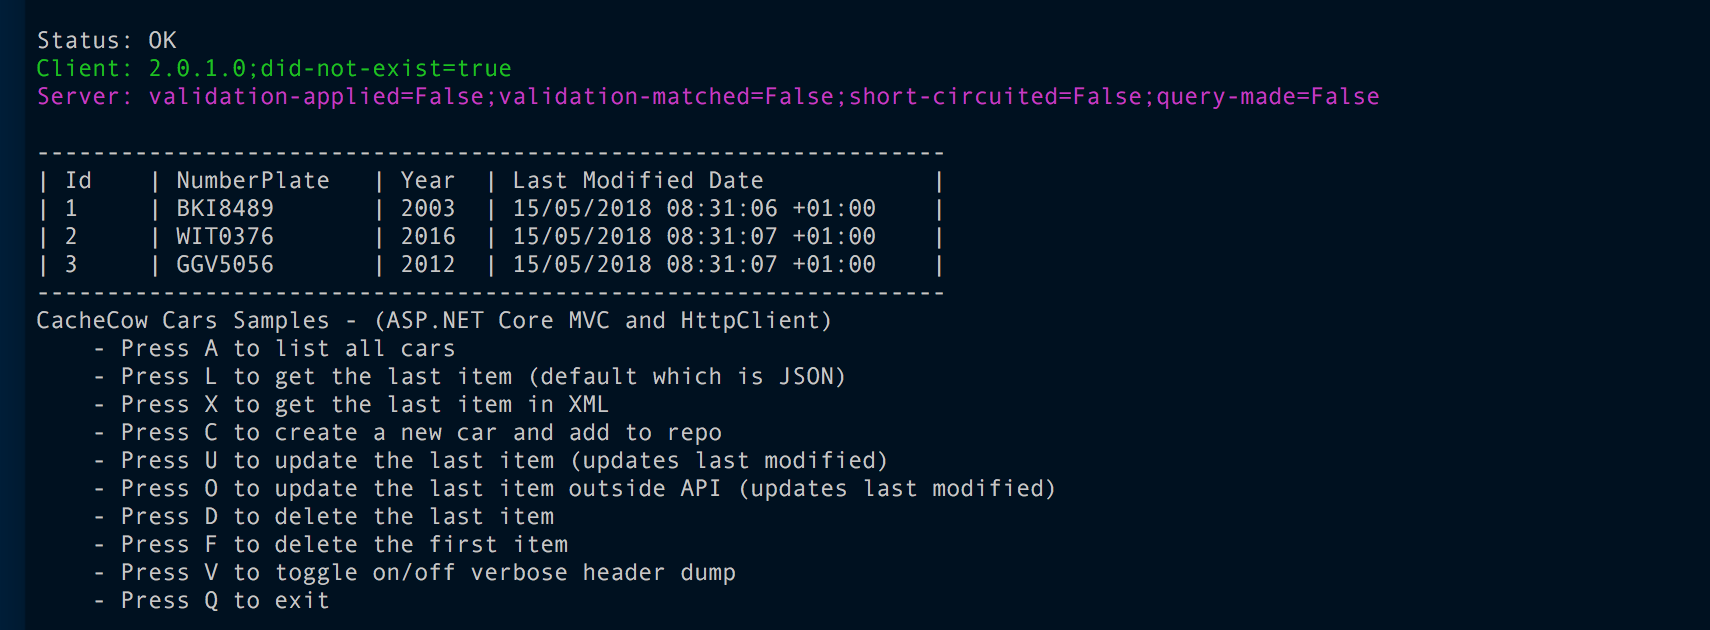
After choosing options A, L or X application prints the value of the CacheCow header from both client and the server. These values will denote the caching actions taken and their result.
You can test and try different scenarios. For example:
- A, C, A, A to test the impact of creating a new car on the car collection's GET
- C, C, A, A, F, A to test the impact of deleting a car on on the car collection's GET
- C, C, L, L, U, L to test the caching header changes on subsequent requests and after updating an item
- C, L, L, X, U, L, X to see that the representations of the same resource (in JSON and XML) get cached separately but invalidated together (after the update)
- C, C, C to add a few cars and then L, O, U to see an unsuccessful HTTP PUT/PATCH/DELETE validation resulting in status 412
CacheCow.Samples.MvcCore
You can run this sample on Windows, Mac and Linux and requires .NET Core +2.0. Essentially in your shell of your choice cd to the CacheCow.Samples.MvcCore folder and type:
dotnet runCacheCow.Samples.WebApi
This is a simple Web API example that displays out-of-the-box features for Web API. This sample is in .NET 4.52 and you can build and run as a console app on Windows.
CacheCow.Samples.WebApi.WithQueryAndIoc
This is an advanced Web API example that displays advanced features of server-side CacheCow, especially IoC. This sample is in .NET 4.52 and you can build and run as a console app on Windows.
CacheCow.Samples.Carter
This sample is for a typical Carter implementation. You can run this sample on Windows, Mac and Linux and requires .NET Core +2.0. Essentially in your shell of your choice cd to the CacheCow.Samples.Carter folder and type:
dotnet runCacheCow.Server advanced options
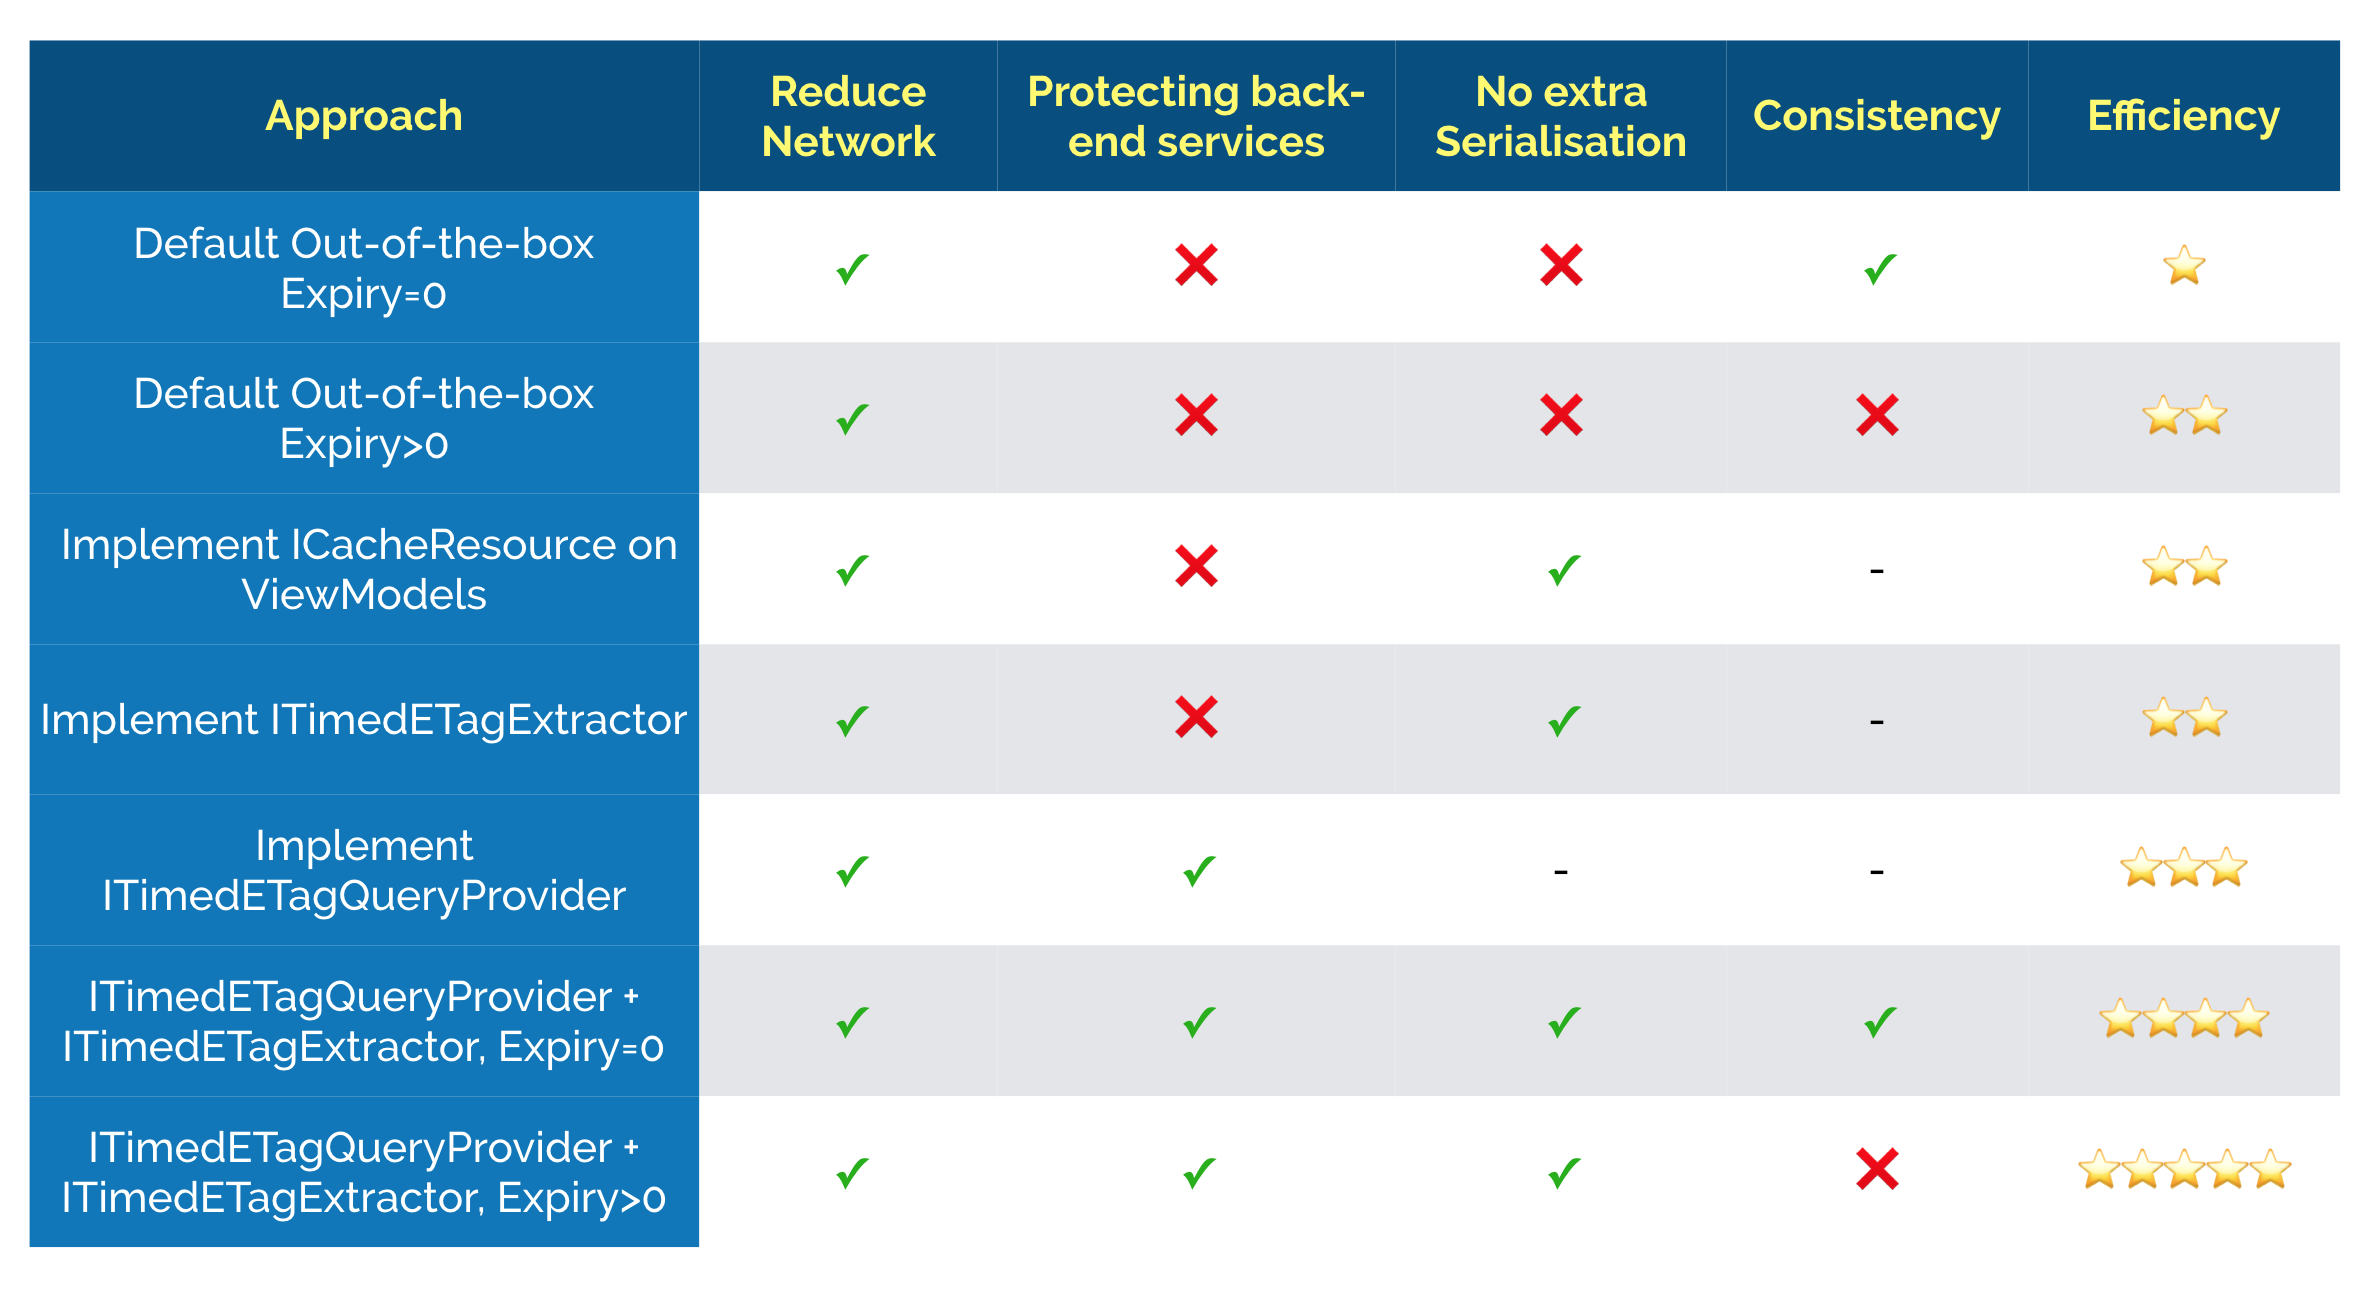
Scenarios in the Getting-Started sections above choose simple out-of-the-box options to get you started. Depending on the load on your server, these are not necessarily the optimal. To get the best out of your API's caching, you would have to do a little more work and help CacheCow optimise HTTP Caching. By default, CacheCow server relies on Serialising your payloads/viewmodels to generate ETag. While for low-mid traffic scenarios this could be sufficient, it would be detrimental for high-load APIs or cases where your payload is big. That is why, instead of leaving CacheCow to generate ETag (rather TimedETag) by serialisation, you could supply it yourself.
There are two times when a TimedETag is needed:
- when serving the viewmodel
- when carrying out validation (conditional GET/PUT/PATCH/DELETE)
TimedETag when serving the ViewModel
TimedETag needs to be included in the response headers (in the form of ETag or Last-Modified headers). If your view models implement ICacheResource, CacheCow will attempt to get TimedETag by calling interface's only method. Otherwise it will use serialisation unless you provide an alternative ITimedETagExtractor implementation that extracts the TimedETag. And example would be an implementation that uses LastModifiedDate field and turns it into an ETag by binarisation (example here).
TimedETag when carrying out validation
This is the preemotive validation of the resource in response to conditional GET (or PUT/PATCH/DELETE). In case of a conditional GET, client requests for a later version of the resource unless it has changed since it has had its version, providing its last modified date or ETag(s). In this case, by default, CacheCow allows the call to controller to load the view model and then generates its TimedETag (by querying ICacheResource or serialisation). If the version the client has is still the most recent, it will send back status 304 or NotModified. While this reduces network traffic and reduces server (and client) resource usage, it does not relieve pressure from your back-end services. That is where ITimedETagQueryProvider interface comes into play: by implementing this interface you could go back to your back-end store and check whether the condition is met without loading the whole view model from the back-end services. For example, you could go back to the record requested and check if the LastModifiedDate matches.
This table highlights different options in CacheCow.Server and value associated with each.
Dependency Injection scenarios on ASP.NET Core
ASP.NET Core can already integrate with Dependency Injection frameworks and supports resolving its own dependencies through such abstractions. One of the challenges with server-side CacheCow is that there interfaces such as ITimedETagExtractor or ITimedETagQueryProvider would have implementations that would be different for different resources (rather view models). For example, if an API serves 3 entities as Customer, Product and Order you would need 6 different implementations, one for each entity and one for each collection (e.g. IEnumerable<Customer>). It would be certainly cleaner to have one implementation per each and somehow know the view model type of each action. Looking at the return type is an option but quite commonly actions return IActionResult.
So the solution is to let the filter on the action define the type of the view model. Hence, for example, on a CarController's Get action, you would define ViewModelType in the attribute as below:
public class CarController : Controller
{
    [HttpGet]
    [HttpCacheFactory(300, ViewModelType = typeof(Car))]
    public IActionResult Get(int id)
    {
        ... // implementation
    }
}
This will help CacheCow to know that it should look for ITimedETagExtractor<Car> and you would create an implementation for ITimedETagExtractor<Car> and register it on your DI container.
The same applies to ITimedETagQueryProvider<T>, essentially: 1) define ViewModelType on filter 2) implement generic interfaces 3) register them in your container
Configuration options with ASP.NET Core
CacheCow uses Options Pattern to allow consumers to configure a few options at the time of using AddHttpCachingMvc. Currently you can control whether to emit CacheCow diagnostic header (for now default is true) and also whether respect configuration:
services.AddHttpCachingMvc(options =>
{
    options.EnableConfiguration = true; // default is false
    options.DoNotEmitCacheCowHeader = false; // default is true
});
If you enable configuration (using EnableConfiguration = true), CacheCow will try to read expiry values from .NET Core's IConfiguration. For example using the appsettings.json below, you can override the settings defined in the attribute:
{
    "CacheCow":
    {
      "Test":
      {
        "Get":
        {
          "Expiry": "00:00:10"
        }
      }
    }
}
Example below assumes a controller of "Test" and action of "Get" and it sets the cache expiry to 10 seconds. The value of controller and action are picked up from the route data and the keys need to be defined under "CacheCow" entry.
As per .NET Core configuration, you can override file configuration values with environment variables or command line arguments.
At this point, there is also "Enabled" property that can be set to false to disable CacheCow for a particular controller/action - something that might be handy during development. For example, setting environment variable "CacheCowTestGet__Enabled" to "false" will turn off CacheCow functionality on action Get of controller Test.
Dependency Injection scenarios on ASP.NET Web API
You should first register default types in your Web API Dependency Resolver:
// registering in a Windsor Castle container
CachingRuntime.RegisterDefaultTypes((
    (t1, t2, isTransient) =>
    {
        if (isTransient)
            container.Register(Component.For(t1).ImplementedBy(t2).LifestyleTransient());
        else
            container.Register(Component.For(t1).ImplementedBy(t2).LifestyleSingleton());
    }));
The rest to use ITimedETagExtractor<T> and ITimedETagQueryProvider<T> is similar to ASP.NET Core: simply define ViewModelType and register your dependencies.
Migrating older CacheCow.Server projects to the new CacheCow.Server.Core.Mvc or CacheCow.Server.WebApi
Almost all projects using CacheCow.Client would carry on working in version 2.0. But servider-side implementation has been radically changed and in many ways simplified. In order to migrate: