Vehicle Detection, Tracking and Counting
Last page update: 12/04/2017 (Added Python API & OpenCV 3.x support)
Last version: 1.0.0 (see Release Notes for more info)
Hi everyone,
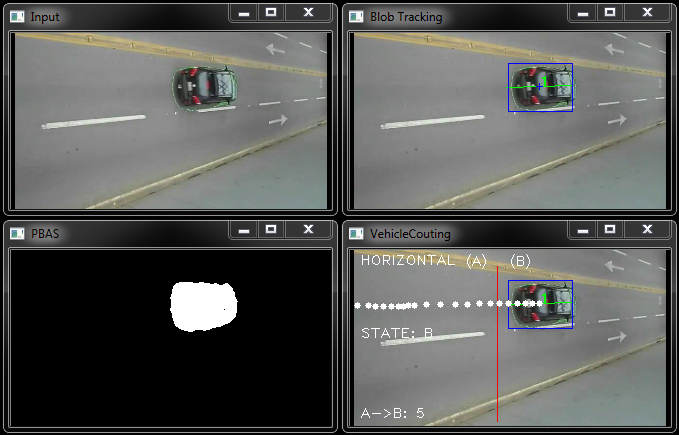
There are several ways to perform vehicle detection, tracking and counting. Here is a step-by-step of a simplest way to do this:
- First, you will need to detect the moving objects. An easy way to do vehicle detection is by using a Background Subtraction (BS) algorithm. You can try to use a background subtraction library like BGSLibrary.
- For vehicle tracking, you will need to use a tracking algorithm. A simplest way to do this is by using a blob tracker algorithm (see cvBlob or OpenCVBlobsLib). So, send the foreground mask to cvBlob or OpenCVBlobsLib. For example, the cvBlob library provide some methods to get the centroid, the track and the ID of the moving objects. You can also set to draw a bounding box, the centroid and the angle of the tracked object.
- And then, check if the centroid of the moving object has crossed a region of interest (i.e. virtual line) in your video.
- Voilà! enjoy it :)

Citation
If you use this code for your publications, please cite it as:
@ONLINE{vdtc,
    author = "Andrews Sobral",
    title  = "Vehicle Detection, Tracking and Counting",
    year   = "2014",
    url    = "https://github.com/andrewssobral/simple_vehicle_counting"
}
For Windows users
- There is no Visual Studio 2013 template project anymore. Please, use CMAKE instead.
Compiling with OpenCV 3.x and Visual Studio 2015 from CMAKE
Dependencies:
- OpenCV 3.x (tested with OpenCV 3.2.0)
- GIT (tested with git version 2.7.2.windows.1).
- CMAKE for Windows (tested with cmake version 3.1.1).
- Microsoft Visual Studio (tested with VS2015).
Note: the procedure is similar for OpenCV 2.4.x and Visual Studio 2013.
Please follow the instructions below:
1) Go to Windows console.
2) Clone git repository:
git clone --recursive https://github.com/andrewssobral/simple_vehicle_counting.git3) Go to simple_vehicle_counting/build folder.
4) Set your OpenCV PATH:
set OpenCV_DIR=C:\OpenCV3.2.0\build5) Launch CMAKE:
cmake -DOpenCV_DIR=%OpenCV_DIR% -G "Visual Studio 14 Win64" ..6) Include OpenCV binaries in the system path:
set PATH=%PATH%;%OpenCV_DIR%\x64\vc14\bin7) Open the bgs.sln file in your Visual Studio and switch to 'RELEASE' mode
8) Click on 'ALL_BUILD' project and build!
9) If everything goes well, copy simple_vehicle_counting.exe to simple_vehicle_counting/ and run!
For Linux users
-
For Linux and Mac users, a CMakefile is provided to compile the source code.
-
- Check out the latest project source code and compile it:
~/git clone --recursive https://github.com/andrewssobral/simple_vehicle_counting.git
~/cd simple_vehicle_counting
~/simple_vehicle_counting/cd build
~/simple_vehicle_counting/build/ cmake ..
~/simple_vehicle_counting/build/ make
- Check out the latest project source code and compile it:
-
- Run demo:
~/simple_vehicle_counting/run_simple_vehicle_counting.sh
- Run demo:
Docker image
- Docker image is available at:
-
- Ubuntu 16.04 + VNC + OpenCV 2.4.13 + Python 2.7 + Vehicle Detection, Tracking and Counting https://hub.docker.com/r/andrewssobral/vehicle_detection_tracking_counting/
Example code
#include <iostream>
#include <opencv2/opencv.hpp>

#include "package_bgs/PBAS/PixelBasedAdaptiveSegmenter.h"
#include "package_tracking/BlobTracking.h"
#include "package_analysis/VehicleCouting.h"

int main(int argc, char **argv)
{
  /* Open video file */
  CvCapture *capture = 0;
  capture = cvCaptureFromAVI("dataset/video.avi");
  if(!capture){
    std::cerr << "Cannot open video!" << std::endl;
    return 1;
  }

  /* Background Subtraction Algorithm */
  IBGS *bgs;
  bgs = new PixelBasedAdaptiveSegmenter;

  /* Blob Tracking Algorithm */
  cv::Mat img_blob;
  BlobTracking* blobTracking;
  blobTracking = new BlobTracking;

  /* Vehicle Counting Algorithm */
  VehicleCouting* vehicleCouting;
  vehicleCouting = new VehicleCouting;

  std::cout << "Press 'q' to quit..." << std::endl;
  int key = 0;
  IplImage *frame;
  while(key != 'q')
  {
    frame = cvQueryFrame(capture);
    if(!frame) break;

    cv::Mat img_input = cv::cvarrToMat(frame);
    cv::imshow("Input", img_input);

    // bgs->process(...) internally process and show the foreground mask image
    cv::Mat img_mask;
    bgs->process(img_input, img_mask);

    if(!img_mask.empty())
    {
      // Perform blob tracking
      blobTracking->process(img_input, img_mask, img_blob);

      // Perform vehicle counting
      vehicleCouting->setInput(img_blob);
      vehicleCouting->setTracks(blobTracking->getTracks());
      vehicleCouting->process();
    }

    key = cvWaitKey(1);
  }

  delete vehicleCouting;
  delete blobTracking;
  delete bgs;

  cvDestroyAllWindows();
  cvReleaseCapture(&capture);

  return 0;
}
Python API
A python demo shows how to call the Python API. It is similar as the C++ demo.
To use the Python API, you should copy "python" directory to overwrite the generated one.
~/simple_vehicle_counting/cd build
~/simple_vehicle_counting/build/cmake ..
~/simple_vehicle_counting/build/make -j 8
~/simple_vehicle_counting/build/cp -r ../python/* python/
~/simple_vehicle_counting/build/../run_python_demo.sh
If you have previously built the project at the project root,
make sure there are no previously generated libraries in the "python" directory by make clean.
Release Notes:
-
12/04/2017: Added OpenCV 3.x support. Removed vs2013 template project (use CMAKE instead).
-
07/04/2017: Added Python API, thanks to @kyu-sz.
-
Version 1.0.0: First version.