Coinbase.Commerce for .NET and C#
Project Description
:moneybag: A C# API library and HTTP client implementation for the Coinbase Commerce API.
:loudspeaker: HEY! Be sure to checkout these other Coinbase API integrations:
- Coinbase - For Coinbase wallet account integration.
- Coinbase.Pro - For retail trading on Coinbase Pro. Integration with orders, market data, and real-time WebSocket feeds.
Minimum Requirements
- .NET Standard 2.0 or later
- .NET Framework 4.6.1 or later
- TLS 1.2 or later
Note: If you are using .NET Framework 4.6.1 you will need to ensure your application is using TLS 1.2 or later. This can be configured via the registry (link 1, link 2) or configured at application startup by setting the following value in ServicePointManager:
ServicePointManager.SecurityProtocol = SecurityProtocolType.Tls12;Crypto Tip Jar
Download & Install
Nuget Package Coinbase.Commerce
Install-Package Coinbase.CommerceUsage
Getting Started
You'll need to create Coinbase Commerce account. You can sign up here!
Receiving A Simple Crypto Payment
Suppose you want to charge a customer 1.00 USD for a candy bar and you'd like to receive payment in cryptocurrency like Bitcoin, Ethereum or Litecoin. The following C# creates a checkout page hosted at Coinbase Commerce:
var commerceApi = new CommerceApi(apiKey);

// Create a unique identifier to associate
// the customer in your system with the
// crypto payment they are about to make.
// Normally, this is a unique ID for your
// customer inside your database.
var customerId = Guid.NewGuid();

var charge = new CreateCharge
   {
      Name = "Candy Bar",
      Description = "Sweet Tasting Chocolate",
      PricingType = PricingType.FixedPrice,
      LocalPrice = new Money {Amount = 1.00m, Currency = "USD"},
      Metadata = // Here we associate the customer ID in our DB with the charge.
         {       // You can put any custom info here but keep it minimal.
            {"customerId", customerId}
         },
   };

var response = await commerceApi.CreateChargeAsync(charge);

// Check for any errors
if( response.HasError() )
{
   // Coinbase says something is wrong. Log the error
   // and report back to the user an error has occurred.
   Console.WriteLine(response.Error.Message);
   Server.Render("Error creating checkout page.", 500);
   return;
}

// else, send the user to the hosted checkout page at Coinbase.
Server.Redirect(response.Data.HostedUrl);
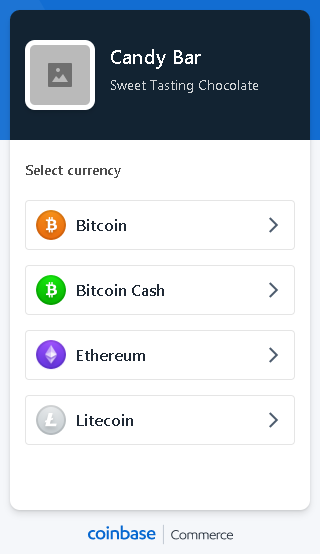
When the customer is redirected to the HostedUrl checkout page on Coinbase the customer can pick their preference of cryptocurrency to pay with as shown below:

It's important to keep in mind that the customer has 15 minutes to complete the payment; otherwise the payment will fail.
Look Ma! No Redirects!
It's totally possible to perform a checkout without any redirects. "Whaaaat?!" I hear you say... That's right, you just need to roll your own custom UI.
In the previous example, if the charge creation was successful, you'll get back a Charge object in response.Data that looks like the object shown below:
{
  "data": {
    "code": "SOMECODE",
    "name": "Candy Bar",
    "description": "Sweet Tasting Chocolate",
    "logo_url": null,
    "hosted_url": "https://commerce.coinbase.com/charges/SOMECODE",
    "created_at": "2018-04-04T19:45:34+00:00",
    "expires_at": "2018-04-04T20:00:34+00:00",
    "confirmed_at": "0001-01-01T00:00:00+00:00",
    "checkout": null,
    "timeline": [
      {
        "time": "2018-04-04T19:45:34+00:00",
        "status": "NEW",
        "context": null
      }
    ],
    "metadata": {
      "customerId": "30025397-adff-4d80-8e9f-c231b582be85"
    },
    "pricing_type": "fixed_price",
    "pricing": {...},
    "payments": [],
    "addresses": {
      "ethereum": "0xeb294D2BCb1Cf25cBEBd0bF55160aA655F82D8c0",
      "bitcoin": "1KgpR5rQmFpfvxQKdPsL9jU8FPf35xmjvn",
      "bitcoincash": "DGVC2drEMt41sEzEHSsiE3VTrgsQxGn5qe",
      "litecoin": "LXWELKEw124ryu3hbwzBJPUy81odeLthkv"
    }
  },
  "error": null,
  "warnings": null
}
Wonderful! Notice the data.addresses dictionary of bitcoin, ethereum and litecoin addresses above. So, instead of sending a redirect like the last example, you can use these crypto addresses to generate QR codes in your custom UI. The same timelimit and rules apply, the customer has 15 minutes to complete the payment.
Webhooks: 'Don't call us, we'll call you...'
If you want to receive notifications on your server when Charges are created, confirmed (aka completed), or failed you'll need to listen for events from Coinbase on your server. You can do this using Webhooks.
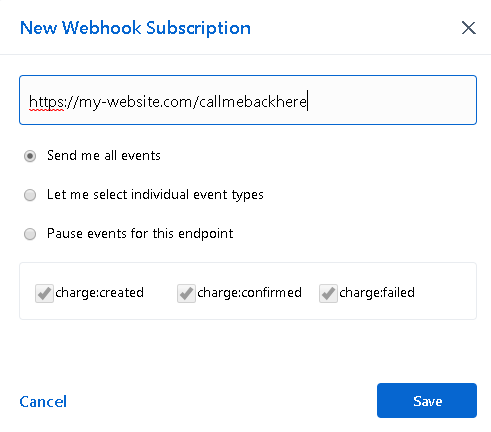
Go to the Settings tab in your Coinbase Commerce account and create a Webhook Subscription as shown below:

:bulb: Protip: Consider using smee.io or ngrok to help you debug webhook callbacks while in development.
When a charge:created, charge:confirmed, or charge:failed event occurs, Coinbase will POST JSON to your /callmebackhere endpoint. The HTTP POST looks something like:
POST /callmebackhere HTTP/1.1
User-Agent: weipay-webhooks
Content-Type: application/json
X-Cc-Webhook-Signature: cb22789c9d5c344a10e0474f134db39e25eb3bbf5a1b1a5e89b507f15ea9519c
Accept-Encoding: gzip;q=1.0,deflate;q=0.6,identity;q=0.3
Accept: */*
Connection: close
Content-Length: 1122

{"attempt_number":1,"event":{"api_version":"2018-03-22","created_at":"2018-04-04T23:49:00Z","data":{"code":"8EKMDPVQ","name":"Candy Bar",...."description":"Sweet Tasting Chocolate","pricing_type":"fixed_price"},"id":"f6972c57-c100-4e64-b47c-193adecfadc6","type":"charge:created"}}
The two important pieces of information you need to extract from this HTTP POST callback are:
- The
X-Cc-Webhook-Signatureheader value. - The raw HTTP body JSON payload.
The value of the X-Cc-Webhook-Signature header is a HMACSHA256 signature of the raw HTTP JSON computed using your Webhook Shared Secret as a key.
The WebhookHelper static class included with this library does all the heavy lifting for you. All you need to do is call Webhookhelper.IsValid() supplying your Webhook Shared Secret key, the X-Cc-Webhook-Signature header value in the HTTP POST above, and finally the raw JSON body in the HTTP POST above.
The following C# code shows how to use the WebhookHelper to validate callbacks from Coinbase:
if( WebhookHelper.IsValid("sharedSecretKey", webhookHeaderValue, Request.Body.Json) ){
   // The request is legit and an authentic message from Coinbase.
   // It's safe to deserialize the JSON body.
   var webhook = JsonConvert.DeserializeObject<Webhook>(Request.Body.Json);

   var chargeInfo = webhook.Event.DataAs<Charge>();

   // Remember that customer ID we created back in the first example?
   // Here's were we can extract that information from the callback.
   var customerId = chargeInfo.Metadata["customerId"].ToObject<string>();

   if (webhook.Event.IsChargeFailed)
   {
      // The payment failed. Log something.
      Database.MarkPaymentFailed(customerId);
   }
   else if (webhook.Event.IsChargeCreated)
   {
      // The charge was created just now.
      // Do something with the newly created
      // event.
      Database.MarkPaymentPending(customerId)
   }
   else if( webhook.Event.IsChargeConfirmed )
   {
      // The payment was confirmed.
      // Fulfill the order!
      Database.ShipCandyBar(customerId)
   }

   return Response.Ok();
}
else {
   // Some hackery going on. The Webhook message validation failed.
   // Someone is trying to spoof payment events!
   // Log the requesting IP address and HTTP body.
}
Sample callback processing code for ASP.NET can be found here. Easy peasy! Happy crypto shopping! :tada:
Building
- Download the source code.
- Run
build.cmd.
Upon successful build, the results will be in the \__compile directory. If you want to build NuGet packages, run build.cmd pack and the NuGet packages will be in __package.
Note: This application/third-party library is not directly supported by Coinbase Inc. Coinbase Inc. makes no claims about this application/third-party library. This application/third-party library is not endorsed or certified by Coinbase Inc.


