Netflix Built their Own Application Generator to Boost Dev Productivity. Here's How You Can, Too.
If you watch Taylor Wicksell of Netflix's SpringOne Platform keynote on YouTube you can’t help but be blown away by the sheer productivity of their engineering team. Last year, over 300 Spring-based apps went into production – an incredible achievement.
What Can Your Enterprise Learn From Netflix?
At Netflix, Taylor and his Java Platform team own the Java developer experience (DevEx). Taylor’s team has one mission: to help Netflix's engineers stay productive – delivering great code at great velocity. It’s a mission that is clearly proving successful.
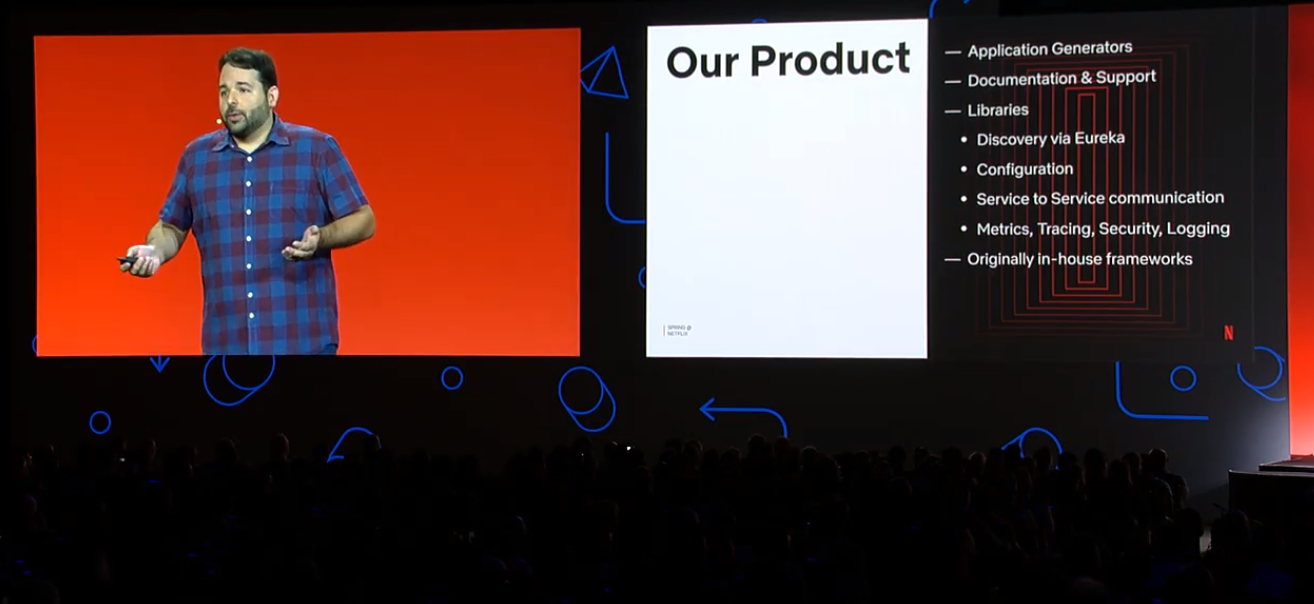
Top of Taylor’s list of productivity secrets is Application Generators. Netflix found that developers adopt platforms far quicker when everything they need to get started is right there, at their fingertips. Application generators help developers to get started quickly by providing useful guide rails that reduce toil and ease their burden. Application generators also encourage common approaches to common problems – particularly useful if you have lots of teams creating microservices at the same time.
Also high on Taylor's list is easing access to important libraries. Every enterprise has libraries - tools they rely on to simplify tasks or take care of the plumbing. These libraries are quite important and often including proprietary business logic that’s both private and unique. Application generators can help developers to get easy access to these libraries without having to delve into docs, wade through wiki’s, or search in maven repositories.
Are Application Generators Popular?
Yes. You probably use an application generator already. The best example I can think of is start.spring.io, also known as the “Spring Initializr” (although others exist, such as this one for .Net applications).
Spring Initializr makes generating Spring Boot apps a cinch.
The proof? Spring Initializr generated over 15 million Spring Boot projects in the last 12 months - up 63% on the year before. It’s phenomenally successful. It’s also living proof that a great developer experience can lead to greater reuse and wider adoption as this data from JetBrains illustrates.
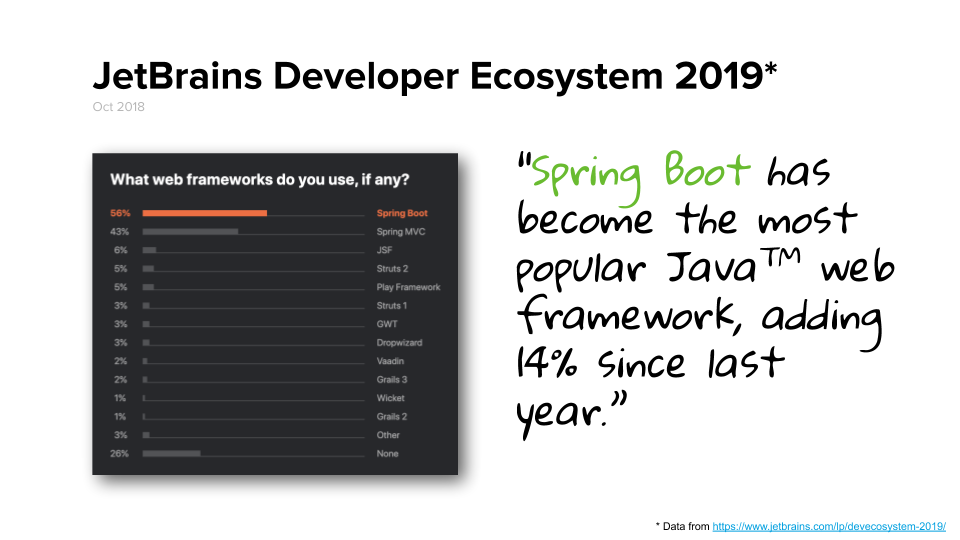
The secret to its success is no secret at all: it’s superbly easy to use. You can use it in your browser, or directly from inside your IDE. You can even use it from the command line via cURL or HTTPie or from the Spring Boot CLI.
Build Your Own Application Generator
How? With Spring of course! There’s even a library for it. The library is also called Spring Initializr. It’s the core library that powers start.spring.io, and it's super easy to customize. In the rest of this article, we’ll walk through the steps required to create your own customized initializr.
To imitate what you would do inside your enterprise, in this tutorial we’ll narrow some of the application generation options and include some libraries that the regular Spring Initializr doesn’t offer, namely the Axon CQRS and Event Sourcing Framework. We’ll call our project the “Axon Initializr”.
Follow these steps, and before you know it you’ll have easier access to custom libraries, greater adoption of preferred patterns, and a vastly improved developer experience!
NOTE: The full code from this tutorial can be found here on GitHub.
On to the tutorial!
Step One - Create a Spring “Web” Project
At the risk of getting recursive, we can use the start.spring.io website to start building our Axon Initializr!
Using the website, create a project with the settings in the screenshot below (or use this link which uses the handy new “Share” feature). Make sure you include the “web” dependency. We’re building a RESTful web service, so we need those libraries present.
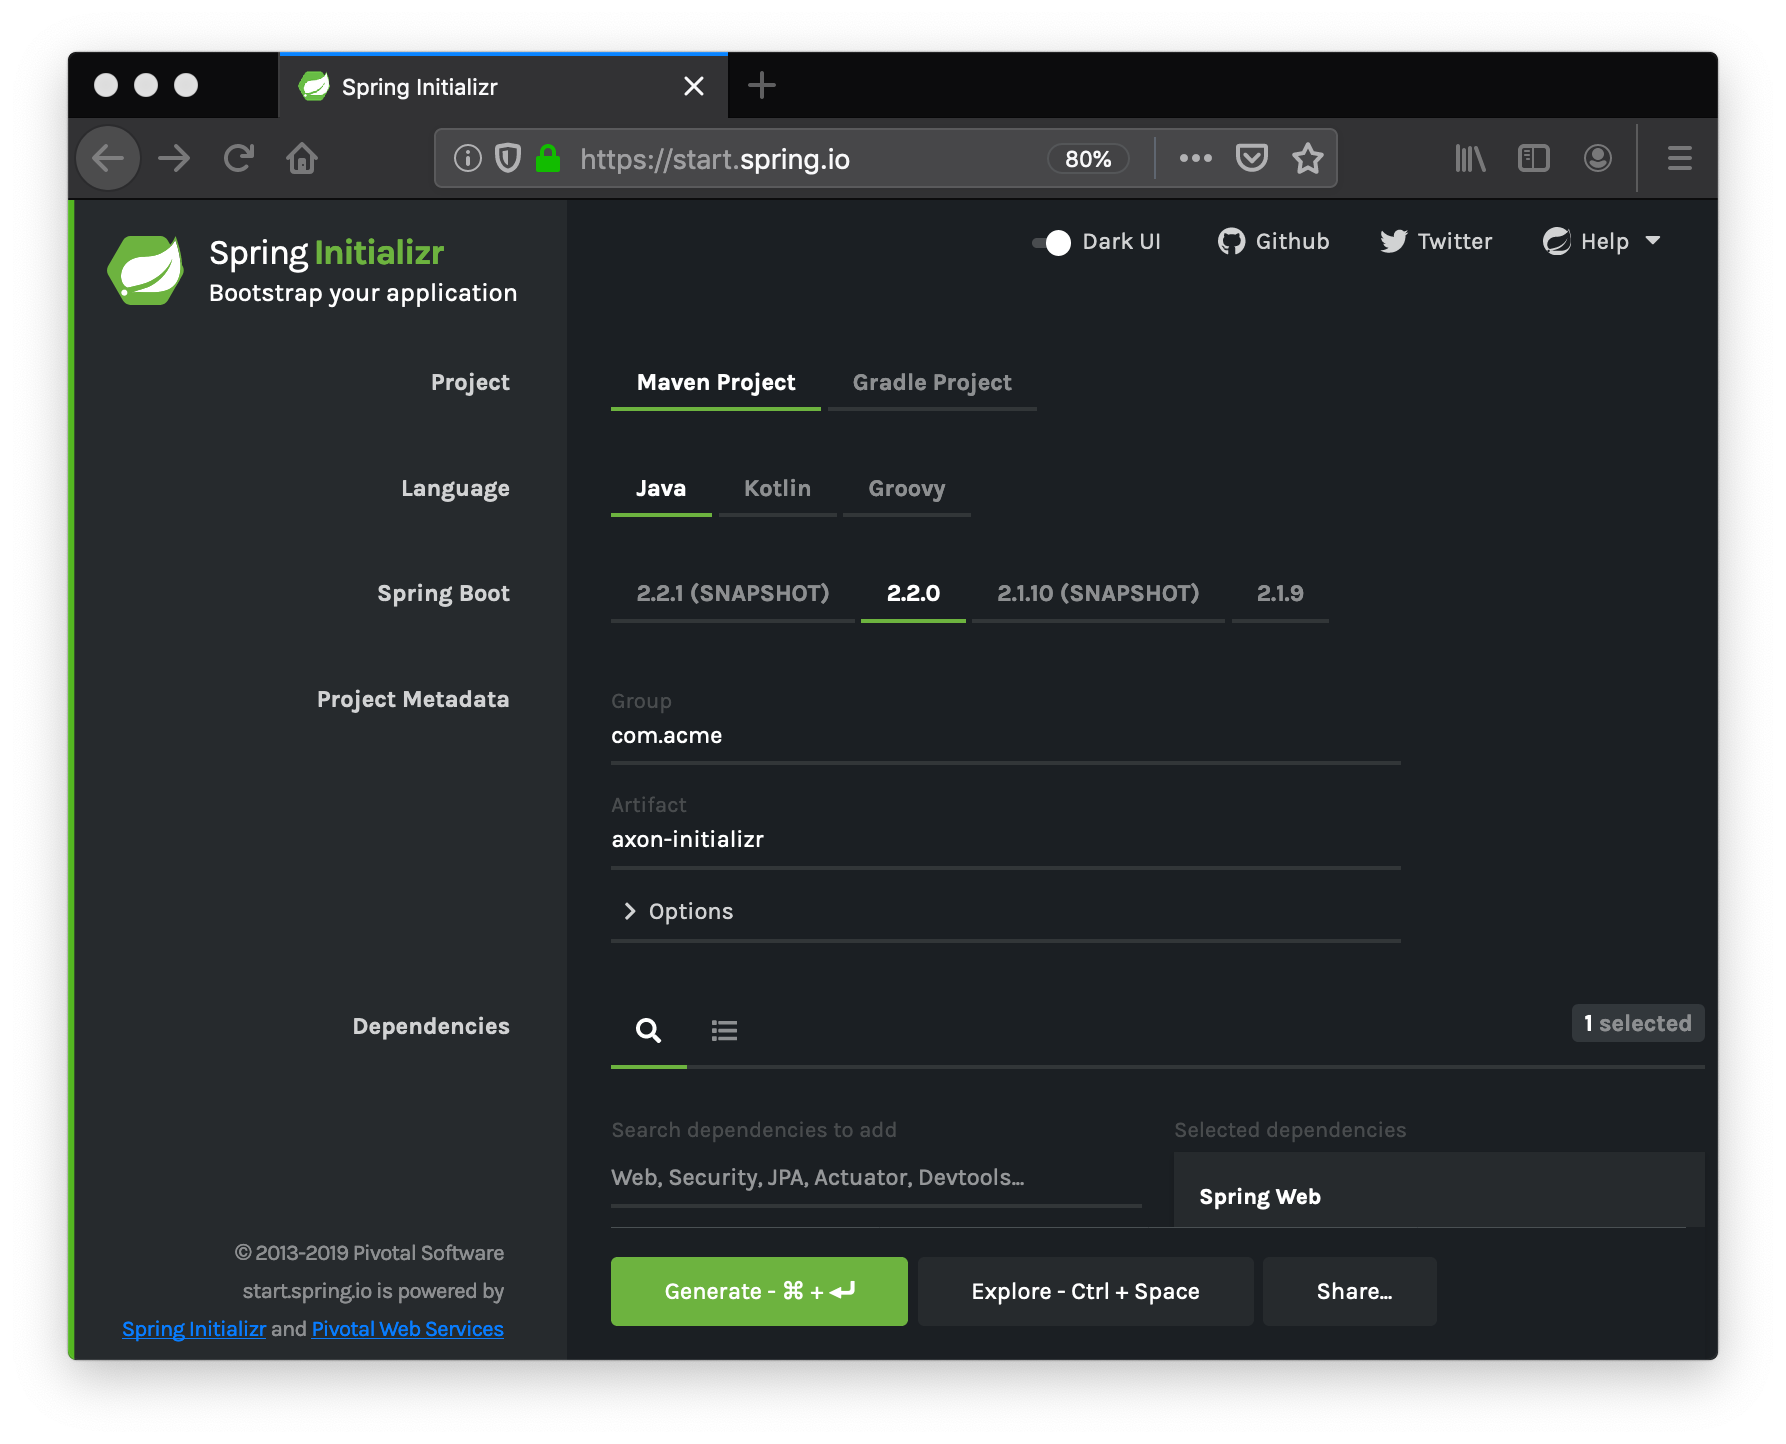
Hit the green “Generate” button to download the project as a Zip file. Unpack the zip and open the generated project folder in your IDE or text editor. Now, we can begin to build our custom axon-initializr project.
Step Two - Add Spring Initializr As A Dependency
We need to add a few entries to our Maven pom.xml in order to include in our project the Spring Initializr libraries. In the POM, add a dependencyManagement entry for the Spring Initializr as shown below:
    <dependencyManagement>
       <dependencies>
           <dependency>
               <groupId>io.spring.initializr</groupId>
               <artifactId>initializr-bom</artifactId>
               <version>0.8.0.RELEASE</version>
               <type>pom</type>
               <scope>import</scope>
           </dependency>
       </dependencies>
   </dependencyManagement>
Next, add a couple of extra Spring Initializr dependencies into our POM’s existing
<dependencies> section:
    <!-- Existing dependencies omitted here -->
    <dependency>
        <groupId>io.spring.initializr</groupId>
        <artifactId>initializr-web</artifactId>
    </dependency>
    <dependency>
        <groupId>io.spring.initializr</groupId>
        <artifactId>initializr-generator-spring</artifactId>
    </dependency>
The initializr-web dependency is bringing in predetermined application generation endpoints which IDEs can talk to, and the initializr-generator-spring brings in preset opinions about how to build Spring Boot projects (which we want). Now we’re ready to customize the axon-initializr.
Step Three - Configure The Basic Generator Options
The Spring Initializr library can generate application projects based on a host of different choices (language, build tool, etc.). However, in your enterprise, it may be prudent to limit these choices. This way, you can encourage certain approaches. (These are the aforementioned guide rails.) For example, your enterprise may have a preferred database or a preferred messaging platform, so it would complicate things if you offered any others.
We configure our Axon Initializr using an application.yaml file. In our axon-initializr project, rename the src/main/resources/application.properties file to application.yaml. Then, start customizing by adding the following YAML configuration:
initializr:
 name:
   value: axon
 description:
   value: 'An Axon Framework Sample Application'
 group-id:
   value: com.benwilcock
  artifact-id:
   value: axon-app
 javaVersions:
   - id: 11
     default: false
   - id: 1.8
     default: true
 languages:
   - name: Java
     id: java
     default: true
   - name: Kotlin
     id: kotlin
     default: false
 packagings:
   - name: Jar
     id: jar
     default: true
 types:
   - name: Maven Project
     id: maven-project
     description: Generate a Maven-based project archive
     tags:
       build: maven
       format: project
     default: true
     action: /starter.zip
These “initializr:” parameters configure our application generator by specifying the available choices for:
- Java Versions (just 8 & 11 for now)
- Languages (Java and Kotlin, but not Groovy)
- Build and packaging (Maven and JAR, respectively).
You’ll notice default: true, on some items. This setting automatically promotes our preferred options when no choice has been made.
Let’s run a simple test, to make sure we’re on track. First, build and run the new initializr project with the command:
./mvnw package spring-boot:runThen, in a separate terminal, use cURL to access the initializr help:
curl http://localhost:8080The output in your terminal window should look similar to the screenshot below:

This confirms the axon-initializr started up as expected and incorporated the desired Spring Initializr libraries. But it’s not yet ready to start generating Spring or Axon applications. Use Ctrl-C in the first terminal window to stop the axon-initializr, and we’ll continue with our customization.
Step 4 - Add Spring Libraries
Adding regular Spring libraries is easy. We simply create an entry for each library in our YAML configuration’s dependencies: list. The downside: YAML is quite verbose. I’ll just show one entry here for the Spring Web project to get you started. (The rest are in GitHub.)
Dependency entries start with a name followed by a list of content items. In the example below, you’ll see the Web dependencies group, and then an entry for Spring Web:
initializr:
 #...(omitted the previous stuff here to save space)
 dependencies:
   - name: Web
     content:
       - name: Spring Web
         id: web
         description: Build web, including RESTful, applications using Spring MVC. Uses Apache Tomcat as the default embedded container.
          facets:
            - web
            - json
         links:
           - rel: guide
             href: https://spring.io/guides/gs/rest-service/
             description: Building a RESTful Web Service
           - rel: reference
             href: https://docs.spring.io/spring-boot/docs/{bootVersion}/reference/htmlsingle/#boot-features-developing-web-applications
           - rel: guide
             href: https://spring.io/guides/gs/serving-web-content/
             description: Serving Web Content with Spring MVC
           - rel: guide
             href: https://spring.io/guides/tutorials/bookmarks/
             description: Building REST services with Spring
NOTE: You can copy any other Spring related entries you like from this example YAML file taken from the start.spring.io configuration.
Step Five - Add Your Custom Libraries
This is the last configuration step! For our Axon Initializr, we need to add our custom Axon libraries. For brevity, I’ll just add a single Axon library here as an example. But when customizing your initializr you can add as many entries as you need.
initializr:
 dependencies:
   #...(omitted the existing libraries here to save space)
   - name: Axon Tools
     content:
       - name: Axon Framework
         id: axon-starter
         groupId: org.axonframework
         artifactId: axon-spring-boot-starter
         version: 4.2
         description: Provides Axon Framework - first class support for CQRS and Event Sourcing in SpringBoot. Including Commands, Queries, Aggregates, Events, Event Handlers, etc.
          links:
           - rel: axon
             href: https://github.com/AxonFramework
              description: The open-source code repository on GitHub
           - rel: docs
             href: https://docs.axoniq.io/reference-guide/
             description: The reference guide on how to use Axon
           - rel: video-guide
             href: https://www.youtube.com/watch?v=tqn9p8Duy54&list=PL4O1nDpoa5KQkkApGXjKi3rzUW3II5pjm
             description: A full getting started tutorial for Axon in small simple steps (YouTube).
You might notice that this configuration looks different from the configuration in step 4. That’s because we’re explicitly calling out the maven coordinates of each library (the groupId, artifactId, and version). We do this because the Axon Framework libraries are outside Spring, so we need to be specific.
NOTE: The examples here are just snippets. You can see the complete axon-initializr YAML configuration here in GitHub.
Try The Axon Initializr From Your IDE
Now we’ve added our desired configurations and customizations to the axon-initializr project it’s time to use it to generate an Axon application in our IDE.
NOTE: I’ll use IntelliJ IDEA Ultimate Edition as my IDE, but the same smooth developer workflow can also be accomplished easily with Eclipse, Spring Tools, NetBeans, or Visual Studio Code in much the same way.
First, start the axon-initializr service in your terminal:
./mvnw clean package spring-boot:runThen, start IntelliJ IDEA and choose File → New → Project... and on the next screen, choose Spring Initializr as your new project type in the panel on the left. Then, in the center panel switch the service endpoint URL to http://localhost:8080 like this:
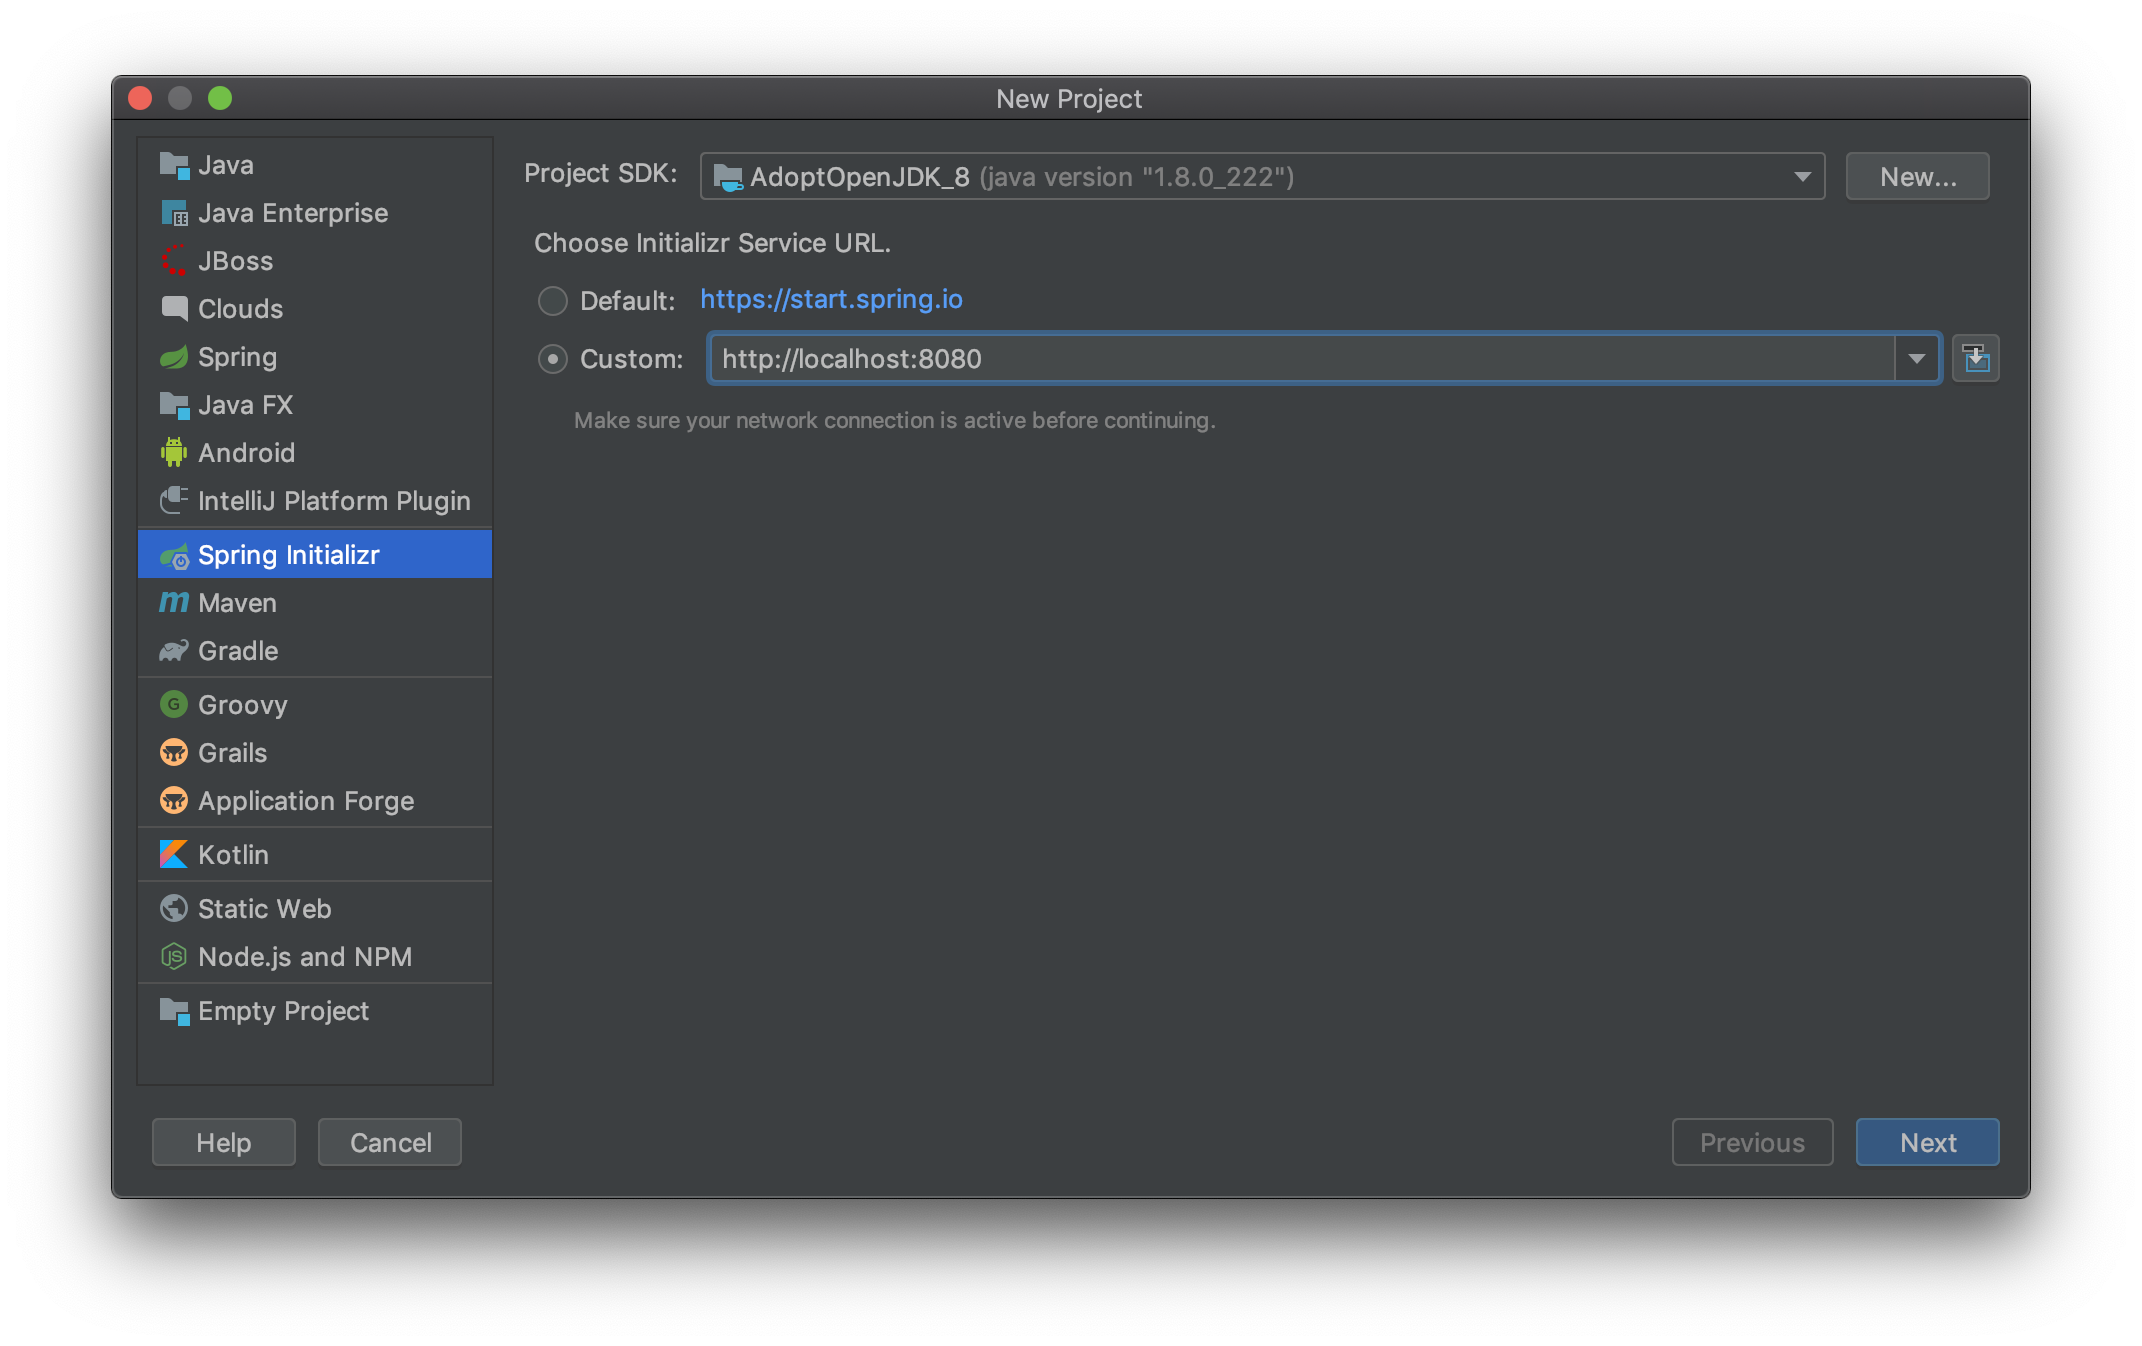
When you click “Next,” you can begin to customize your new Axon based application. Our efforts to standardize are already paying off; the default project name, group id, artifact id, package, packaging, language, java version, and description all come from our default settings in the application.yaml within the Axon Initializr.
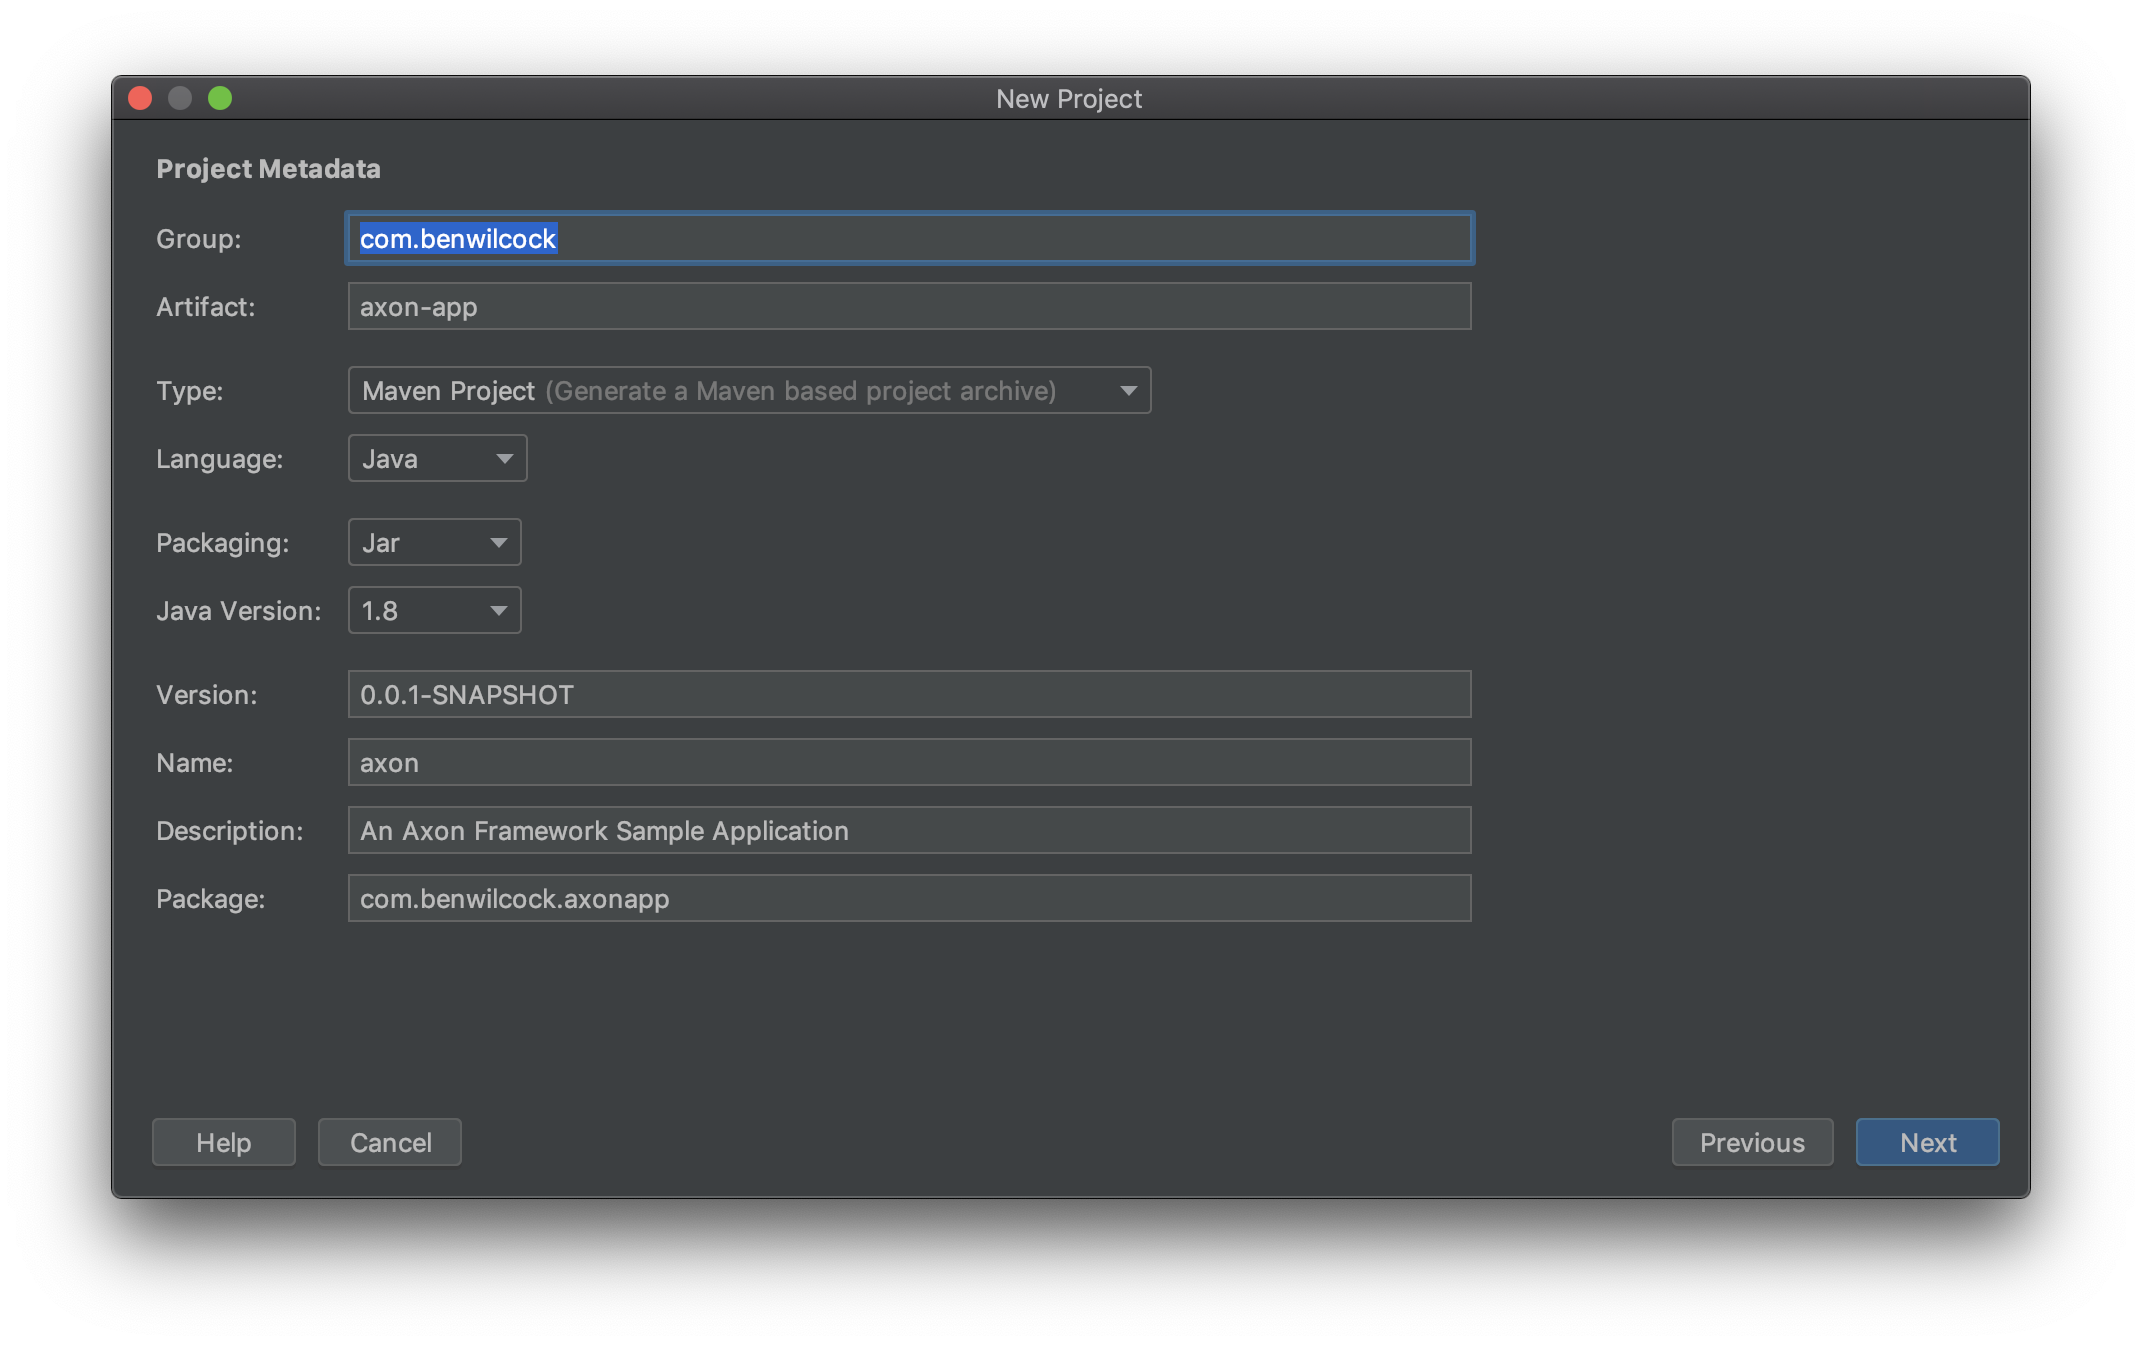
Finally, after clicking “Next” again, we can configure our (still yet to be generated) Axon application project.
We start by adding our desired dependencies from our Axon Initializr's curated list. In the screenshot below, you can see that alongside the various standard Spring libraries like Spring Data JPA and Spring for RabbitMQ (if you added them), we can also select our custom libraries like Axon Framework. It all works seamlessly, mixing our preferred Spring libraries with our custom Axon libraries.
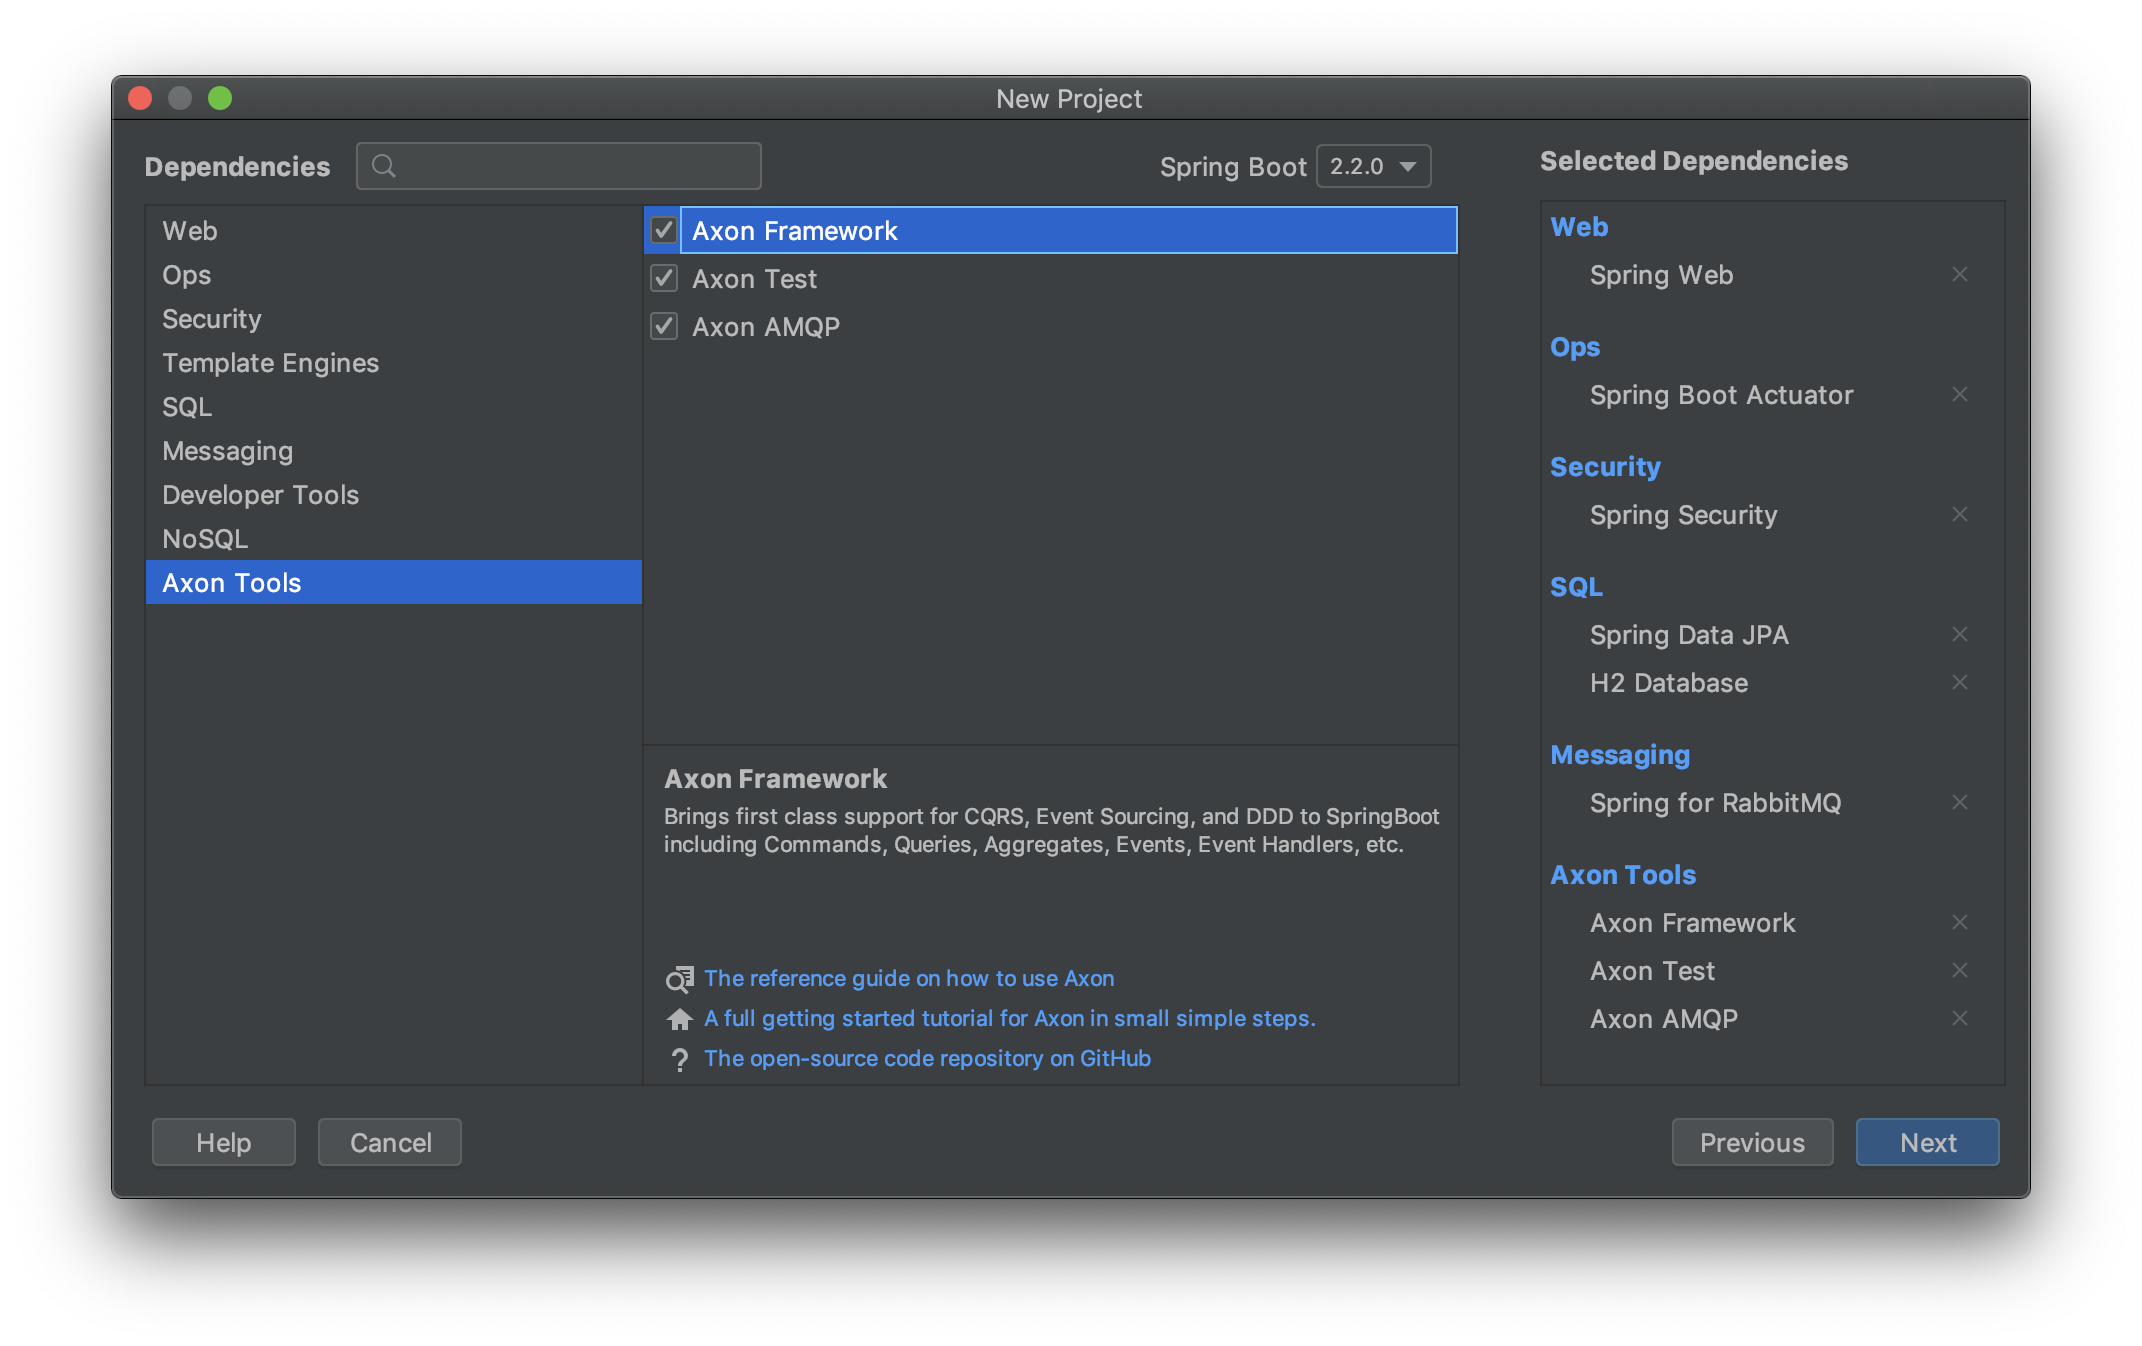
And we’re done. After setting a few more items in IntelliJ IDEA (such as the folder to generate the application into) clicking the “Next” button for the final time will create our new Axon application project and take us straight into the IDE. From there we can get to work on our CQRS application, adding Commands, Queries, Events, and Aggregates.
Wrapping Up
As you’ve seen, creating a custom application generator using the Spring Initializr as a base is really easy, and it greatly improves our developer experience. By adding your preferred libraries and other customizations, you make it easy for developers to “do the right thing” and give them something that everybody wants - more time to work on the things that really matter!
I’ve only scratched the surface of what’s possible with Spring Initializr customization. To find out more about the many other customization options, take a look at the official documentation. And finally, don’t forget that the code that accompanies this tutorial can be found here on GitHub.
