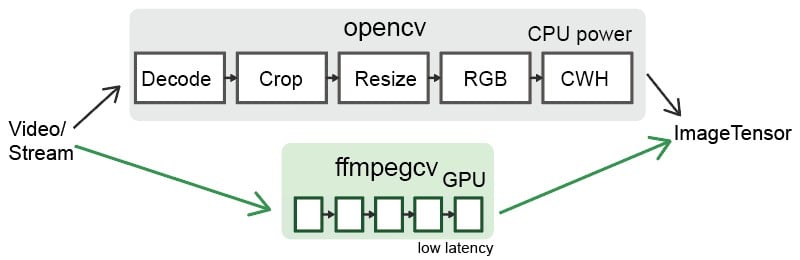
FFMPEGCV is an alternative to OPENCV for video read and write.
![]()


English Version | 中文版本 | Resume 开发者简历 陈昕枫
The ffmpegcv provide Video Reader and Video Witer with ffmpeg backbone, which are faster and powerful than cv2. Integrating ffmpegcv into your deeplearning pipeline is very smooth.
- The ffmpegcv is api compatible to open-cv.
- The ffmpegcv can use GPU accelerate encoding and decoding*.
- The ffmpegcv supports much more video codecs v.s. open-cv.
- The ffmpegcv supports RGB & BGR & GRAY format as you like.
- The ffmpegcv supports fp32 CHW & HWC format shortcut to CUDA memory.
- The ffmpegcv supports Stream reading (IP Camera) in low latency.
- The ffmpegcv supports ROI operations.You can crop, resize and pad the ROI.
In all, ffmpegcv is just similar to opencv api. But it has more codecs and does't require opencv installed at all. It's great for deeplearning pipeline.
Functions:
VideoWriter: Write a video file.VideoCapture: Read a video file.VideoCaptureNV: Read a video file by NVIDIA GPU.VideoCaptureQSV: Read a video file by Intel QuickSync Video.VideoCaptureCAM: Read a camera.VideoCaptureStream: Read a RTP/RTSP/RTMP/HTTP stream.VideoCaptureStreamRT: Read a RTSP stream (IP Camera) in real time low latency as possible.noblock: Read/Write a video file in background using mulitprocssing.toCUDA: Translate a video/stream as CHW/HWC-float32 format into CUDA device, >2x faster.
Install
You need to download ffmpeg before you can use ffmpegcv.
 #1A. LINUX: sudo apt install ffmpeg
 #1B. MAC (No NVIDIA GPU): brew install ffmpeg
 #1C. WINDOWS: download ffmpeg and add to the path
 #1D. CONDA: conda install ffmpeg=6.0.0     #don't use the default 4.x.x version

 #2. python
 pip install ffmpegcv                                      #stable verison
 pip install git+https://github.com/chenxinfeng4/ffmpegcv  #latest verison

 #3. recommand when using cuda
 pip install ffmpegcv[cuda]
When should choose ffmpegcv other than opencv:
- The
opencvis hard to install. The ffmpegcv only requiresnumpyandFFmpeg, works across Mac/Windows/Linux platforms. - The
opencvpackages too much image processing toolbox. You just want a simple video/camero IO with GPU accessible. - The
opencvdidn't supporth264/h265and other video writers. - You want to crop, resize and pad the video/camero ROI.
- You are interested in deeplearning pipeline.
Basic example
Read a video by CPU, and rewrite it by GPU.
vidin = ffmpegcv.VideoCapture(vfile_in)
vidout = ffmpegcv.VideoWriterNV(vfile_out, 'h264', vidin.fps)  #NVIDIA-GPU
with vidin, vidout: for frame in vidin: cv2.imshow('image', frame) vidout.write(frame)
Read the camera.
```python
# by device ID
cap = ffmpegcv.VideoCaptureCAM(0)
# by device name
cap = ffmpegcv.VideoCaptureCAM("Integrated Camera")
Deeplearning pipeline.
"""
          ——————————  NVIDIA GPU accelerating ⤴⤴ ———————
          |                                              |
          V                                              V
video -> decode -> crop -> resize -> RGB -> CUDA:CHW float32 -> model
"""
cap = ffmpegcv.toCUDA(
    ffmpegcv.VideoCaptureNV(file, pix_fmt='nv12', resize=(W,H)),
    tensor_format='chw')

for frame_CHW_cuda in cap:
    frame_CHW_cuda = (frame_CHW_cuda - mean) / std
    result = model(frame_CHW_cuda)
Cross platform
The ffmpegcv is based on Python+FFmpeg, it can cross platform among Windows, Linux, Mac, X86, Armsystems.
GPU Acceleration
- Support NVIDIA card only, test in x86_64 only.
- Works in Windows, Linux and Anaconda.
- Works in the Google Colab notebook.
- Infeasible in the MacOS. That ffmpeg didn't supports NVIDIA at all.
* The ffmegcv GPU reader is a bit slower than CPU reader, but much faster when use ROI operations (crop, resize, pad).
Codecs
| Codecs | OpenCV-reader | ffmpegcv-cpu-r | gpu-r | OpenCV-writer | ffmpegcv-cpu-w | gpu-w |
|---|---|---|---|---|---|---|
| h264 | √ | √ | √ | × | √ | √ |
| h265 (hevc) | not sure | √ | √ | × | √ | √ |
| mjpeg | √ | √ | × | √ | √ | × |
| mpeg | √ | √ | × | √ | √ | × |
| others | not sure | ffmpeg -decoders | × | not sure | ffmpeg -encoders | × |
Benchmark
On the way...(maybe never)
Video Reader
The ffmpegcv is just similar to opencv in api.
# open cv
import cv2
cap = cv2.VideoCapture(file)
while True:
    ret, frame = cap.read()
    if not ret:
        break
    pass

# ffmpegcv
import ffmpegcv
cap = ffmpegcv.VideoCapture(file)
while True:
    ret, frame = cap.read()
    if not ret:
        break
    pass
cap.release()

# alternative
cap = ffmpegcv.VideoCapture(file)
nframe = len(cap)
for frame in cap:
    pass
cap.release()

# more pythonic, recommand
with ffmpegcv.VideoCapture(file) as cap:
    nframe = len(cap)
    for iframe, frame in enumerate(cap):
        if iframe>100: break
        pass
Use GPU to accelerate decoding. It depends on the video codes. h264_nvcuvid, hevc_nvcuvid ....
cap_cpu = ffmpegcv.VideoCapture(file)
cap_gpu = ffmpegcv.VideoCapture(file, codec='h264_cuvid') #NVIDIA GPU0
cap_gpu0 = ffmpegcv.VideoCaptureNV(file)         #NVIDIA GPU0
cap_gpu1 = ffmpegcv.VideoCaptureNV(file, gpu=1)  #NVIDIA GPU1
cap_qsv = ffmpegcv.VideoCaptureQSV(file)         #Intel QSV, experimental
Use rgb24 instead of bgr24. The gray version would be more efficient.
cap = ffmpegcv.VideoCapture(file, pix_fmt='rgb24') #rgb24, bgr24, gray
ret, frame = cap.read()
plt.imshow(frame)
ROI Operations
You can crop, resize and pad the video. These ROI operation is ffmpegcv-GPU > ffmpegcv-CPU >> opencv.
Crop video, which will be much faster than read the whole canvas.
cap = ffmpegcv.VideoCapture(file, crop_xywh=(0, 0, 640, 480))Resize the video to the given size.
cap = ffmpegcv.VideoCapture(file, resize=(640, 480))Resize and keep the aspect ratio with black border padding.
cap = ffmpegcv.VideoCapture(file, resize=(640, 480), resize_keepratio=True)Crop and then resize the video.
cap = ffmpegcv.VideoCapture(file, crop_xywh=(0, 0, 640, 480), resize=(512, 512))toCUDA device
The ffmpegcv can translate the video/stream from HWC-uint8 cpu to CHW-float32 in CUDA device. It significantly reduce your cpu load, and get >2x faster than your manually convertion.
Prepare your environment. The cuda environment is required. The pycuda package is required. The pytorch package is non-essential.
nvcc --version # check you've installed NVIDIA CUDA Compiler. Already installed if you've installed Tensorflow-gpu or Pytorch-gpu
pip install ffmpegcv[cuda] #auto install pycuda
# Read a video file to CUDA device, original
cap = ffmpegcv.VideoCaptureNV(file, pix_fmt='rgb24')
ret, frame_HWC_CPU = cap.read()
frame_CHW_CUDA = torch.from_numpy(frame_HWC_CPU).permute(2, 0, 1).cuda().contiguous().float()    # 120fps, 1200% CPU load

# speed up
cap = toCUDA(ffmpegcv.VideoCapture(file, pix_fmt='yuv420p')) #pix_fmt: 'yuv420p' or 'nv12' only
cap = toCUDA(ffmpegcv.VideoCaptureNV(file, pix_fmt='nv12'))  #'nv12' is better for gpu
cap = toCUDA(vid, tensor_format='chw') #tensor format:'chw'(default) or 'hwc', fp32 precision
cap = toCUDA(vid, gpu=1) #choose gpu

# read to the cuda device
ret, frame_CHW_pycuda = cap.read()     #380fps, 200% CPU load, dtype is [pycuda array]
ret, frame_CHW_pycudamem = cap.read_cudamem()  #dtype is  [pycuda mem_alloc]
ret, frame_CHW_CUDA = cap.read_torch()  #dtype is  [pytorch tensor]
ret, _ = cap.read_torch(frame_CHW_CUDA)  #no copy, but need to specify the output memory

frame_CHW_pycuda[:] = (frame_CHW_pycuda - mean) / std  #normalize
How can toCUDA make it faster in your deeplearning pipeline than opencv or ffmpeg?
- The opencv/ffmpeg uses the cpu to convert video pix_fmt from original YUV to RGB24, which is slow. The ffmpegcv use the cuda to accelerate pix_fmt convertion.
- Use
yuv420pornv12can save the cpu load and reduce the memory copy from CPU to GPU.- The ffmpeg stores the image as HWC format. The ffmpegcv can use HWC & CHW format to accelerate the video reading.
Video Writer
# cv2
out = cv2.VideoWriter('outpy.avi',
                       cv2.VideoWriter_fourcc('M','J','P','G'),
                       10,
                       (w, h))
out.write(frame1)
out.write(frame2)
out.release()

# ffmpegcv, default codec is 'h264' in cpu 'h265' in gpu.
# frameSize is decided by the size of the first frame
out = ffmpegcv.VideoWriter('outpy.mp4', None, 10)
out.write(frame1)
out.write(frame2)
out.release()

# more pythonic
with ffmpegcv.VideoWriter('outpy.mp4', None, 10) as out:
    out.write(frame1)
    out.write(frame2)
Use GPU to accelerate encoding. Such as h264_nvenc, hevc_nvenc.
out_cpu = ffmpegcv.VideoWriter('outpy.mp4', None, 10)
out_gpu0 = ffmpegcv.VideoWriterNV('outpy.mp4', 'h264', 10)        #NVIDIA GPU0
out_gpu1 = ffmpegcv.VideoWriterNV('outpy.mp4', 'hevc', 10, gpu=1) #NVIDIA GPU1
out_qsv  = ffmpegcv.VideoWriterQSV('outpy.mp4', 'h264', 10)        #Intel QSV, experimental
Input image is rgb24 instead of bgr24
out = ffmpegcv.VideoWriter('outpy.mp4', None, 10, pix_fmt='rgb24')Resize the video
out_resz = ffmpegcv.VideoWriter('outpy.mp4', None, 10, resize=(640, 480)) #ResizeVideo Reader and Writer
import ffmpegcv
vfile_in = 'A.mp4'
vfile_out = 'A_h264.mp4'
vidin = ffmpegcv.VideoCapture(vfile_in)
vidout = ffmpegcv.VideoWriter(vfile_out, None, vidin.fps)

with vidin, vidout:
    for frame in vidin:
        vidout.write(frame)
Camera Reader
Experimental feature. The ffmpegcv offers Camera reader. Which is consistent with VideoFiler reader.
- The
VideoCaptureCAMaims to support ROI operations. The Opencv will be general fascinating than ffmpegcv in camera read. I recommand the opencv in most camera reading case. - The ffmpegcv can use name to retrieve the camera device. Use
ffmpegcv.VideoCaptureCAM("Integrated Camera")is readable thancv2.VideoCaptureCAM(0). - The
VideoCaptureCAMwill be laggy and dropping frames if your post-process takes long time. The VideoCaptureCAM will buffer the recent frames. - The
VideoCaptureCAMis continously working on background even if you didn't read it. Please release it in time. - Works perfect in Windows, not-perfect in Linux and macOS.
import cv2
cap = cv2.VideoCapture(0)
while True:
    ret, frame = cap.read()
    cv2.imshow('frame', frame)
    if cv2.waitKey(1) & 0xFF == ord('q'):
        break
cap.release()

# ffmpegcv, in Windows&Linux
import ffmpegcv
cap = ffmpegcv.VideoCaptureCAM(0)
while True:
    ret, frame = cap.read()
    cv2.imshow('frame', frame)
    if cv2.waitKey(1) & 0xFF == ord('q'):
        break
cap.release()

# ffmpegcv use by camera name, in Windows&Linux
cap = ffmpegcv.VideoCaptureCAM("Integrated Camera")

# ffmpegcv use camera path if multiple cameras conflict
cap = ffmpegcv.VideoCaptureCAM('@device_pnp_\\\\?\\usb#vid_2304&'
    'pid_oot#media#0001#{65e8773d-8f56-11d0-a3b9-00a0c9223196}'
    '\\global')

# ffmpegcv use camera with ROI operations
cap = ffmpegcv.VideoCaptureCAM("Integrated Camera", crop_xywh=(0, 0, 640, 480), resize=(512, 512), resize_keepratio=True)
List all camera devices
from ffmpegcv.ffmpeg_reader_camera import query_camera_devices

devices = query_camera_devices()
print(devices)
{0: ('Integrated Camera', '@devicepnp\\?\usb#vid_2304&pid_oot#media#0001#{65e8773d-8f56-11d0-a3b9-00a0c9223196}\global'),
1: ('OBS Virtual Camera', '@devicesw{860BB310-5D01-11D0-BD3B-00A0C911CE86}\{A3FCE0F5-3493-419F-958A-ABA1250EC20B}')}
Set the camera resolution, fps, vcodec/pixel-format
from ffmpegcv.ffmpeg_reader_camera import query_camera_options

options = query_camera_options(0)  # or query_camera_options("Integrated Camera")
print(options)
cap = ffmpegcv.VideoCaptureCAM(0, **options[-1])
[{'camcodec': 'mjpeg', 'campix_fmt': None, 'camsize_wh': (1280, 720), 'camfps': 60.0002}, {'camcodec': 'mjpeg', 'campix_fmt': None, 'camsize_wh': (640, 480), 'camfps': 60.0002}, {'camcodec': 'mjpeg', 'campix_fmt': None, 'camsize_wh': (1920, 1080), 'camfps': 60.0002}, {'camcodec': None, 'campix_fmt': 'yuyv422', 'camsize_wh': (1280, 720), 'camfps': 10}, {'camcodec': None, 'campix_fmt': 'yuyv422', 'camsize_wh': (640, 480), 'camfps': 30}, {'camcodec': None, 'campix_fmt': 'yuyv422', 'camsize_wh': (1920, 1080), 'camfps': 5}]
Known issues
-
The VideoCaptureCAM didn't give a smooth experience in macOS. You must specify all the camera parameters. And the query_camera_options woun't give any suggestion. That's because the
ffmpegcannot list device options using mac nativeavfoundation.# The macOS requires full argument. cap = ffmpegcv.VideoCaptureCAM('FaceTime HD Camera', camsize_wh=(1280,720), camfps=30, campix_fmt='nv12') -
The VideoCaptureCAM cann't list the FPS in linux. Because the
ffmpegcound't query the device's FPS using linux nativev4l2module. However, it's just OK to let the FPS empty.
Stream Reader (Live streaming, RTSP IP cameras)
Experimental feature. The ffmpegcv offers Stream reader. Which is consistent with VideoFiler reader, and more similiar to the camera. Becareful when using it.
- Support
RTSP,RTP,RTMP,HTTP,HTTPSstreams. - The
VideoCaptureStreamwill be laggy and dropping frames if your post-process takes long time. The VideoCaptureCAM will buffer the recent frames. - The
VideoCaptureStreamis continously working on background even if you didn't read it. Please release it in time. - Low latency RTSP IP camera reader. Batter than opencv.
- It's still experimental. Recommand you to use opencv.
# opencv
import cv2
stream_url = 'http://devimages.apple.com.edgekey.net/streaming/examples/bipbop_4x3/gear2/prog_index.m3u8'
cap = cv2.VideoCapture(stream_url, cv2.CAP_FFMPEG)

if not cap.isOpened():
    print('Cannot open the stream')
    exit(-1)

while True:
    ret, frame = cap.read()
    if not ret:
        break
    pass

# ffmpegcv
import ffmpegcv
cap = ffmpegcv.VideoCaptureStream(stream_url)
while True:
    ret, frame = cap.read()
    if not ret:
        break
    pass

# ffmpegcv, IP Camera Low-latency
# e.g. HIK Vision IP Camera, `101` Main camera stream, `102` the second
stream_url = 'rtsp://admin:PASSWD@192.168.1.xxx:8554/Streaming/Channels/102'
cap = ffmpegcv.VideoCaptureStreamRT(stream_url)  # Low latency & recent buffered
cap = ffmpegcv.ReadLiveLast(ffmpegcv.VideoCaptureStreamRT, stream_url) #no buffer
while True:
    ret, frame = cap.read()
    if not ret:
        break
    pass
Noblock
A proxy to automatic prepare frames in backgroud, which does not block when reading&writing current frame (multiprocessing). This make your python program more efficient in CPU usage. Up to 2x boost.
ffmpegcv.VideoCapture(args) -> ffmpegcv.noblock(ffmpegcv.VideoCapture, args)
ffmpegcv.VideoWriter(args) -> ffmpegcv.noblock(ffmpegcv.VideoWriter, args)
#Proxy any VideoCapture&VideoWriter args and kargs
vid_noblock = ffmpegcv.noblock(ffmpegcv.VideoCapture, vfile, pix_fmt='rbg24')
this is fast
def cputense(): time.sleep(0.01) for in tqdm.trange(1000): ret, img = vid_noblock.read() #current img is already buffered, take no time cpu_tense() #meanwhile, the next img is buffering in background
this is slow
vid = ffmpegcv.VideoCapture(vfile, pixfmt='rbg24') for in tqdm.trange(1000): ret, img = vid.read() #this read will block cpu, take time cpu_tense()