OpcUaHelper
一个通用的二次封装的opc ua客户端类库,基于.net 4.6.1创建,基于官方opc ua基金会跨平台库创建,方便的实现和OPC Server进行数据交互。本类库每个几个月就同步官方的类库。
免责声明
OpcUa相关的组件版权归OPC UA基金会所有,使用本库时请遵循OPC UA基金会的授权规则。
- 非商用情况,如果你的项目仅仅是自己公司使用的,那么需要注册为OPC基金会的成员,否则,必须开源。
- 商用都是需要额外授权的,请联系OPC基金会。
FormBrowseServer
在开发客户端之前,需要使用本窗口来进行查看服务器的节点状态,因为在请求服务器的节点数据之前,必须知道节点的名称,而节点的名称可以通过这个窗口获取。以下演示实例化操作
OpcUaHelper.Forms.FormBrowseServer formBrowseServer = new Forms.FormBrowseServer( );
formBrowseServer.ShowDialog( );
当然你可以固定住这个地址,传入地址即可,此处为示例:
OpcUaHelper.Forms.FormBrowseServer formBrowseServer = new Forms.FormBrowseServer( "opc.tcp://127.0.0.1:62541/SharpNodeSettings/OpcUaServer" );
formBrowseServer.ShowDialog( );
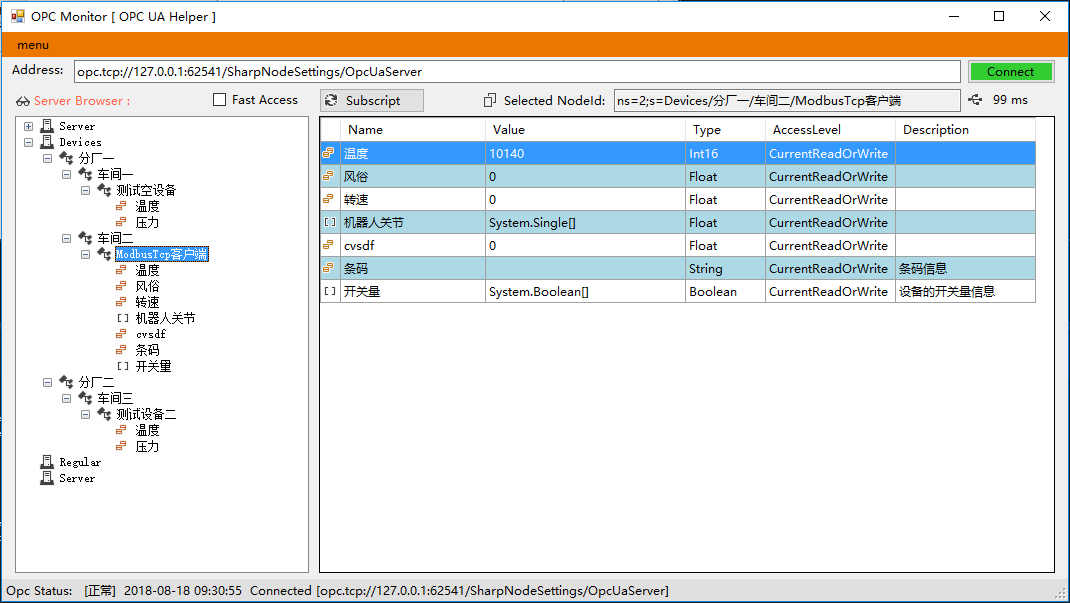
界面效果如下,包含了节点的查看,订阅操作,双击值表格,还可以修改服务器的值(如果这个节点支持修改的话),查看节点的信息:

Server Prepare
如果你没有opc ua的服务器的话,可以参照本示例的服务器,本示例的服务器是项目 SharpNodeSettings 的示例。可以直接下载这个项目运行服务器软件。
或者选择在线的客户端测试: opc.tcp://118.24.36.220:62547/DataAccessServer
OpcUaClient
实例化操作
OpcUaClient m_OpcUaClient = new OpcUaClient();设置匿名连接
m_OpcUaClient.UserIdentity = new UserIdentity( new AnonymousIdentityToken( ) );设置用户名连接
m_OpcUaClient.UserIdentity = new UserIdentity( "user", "password" );使用证书连接
X509Certificate2 certificate = new X509Certificate2( "[证书的路径]", "[密钥]", X509KeyStorageFlags.MachineKeySet | X509KeyStorageFlags.Exportable );
m_OpcUaClient.UserIdentity = new UserIdentity( certificate );
设置完连接的权限之后,就可以真正的启动连接操作了,连接的操作必须要放到try...catch...之前,必须使用async标记方法
private async void button1_Click( object sender, EventArgs e )
{
    // connect to server, this is a sample
    try
    {
        await m_OpcUaClient.ConnectServer( "opc.tcp://127.0.0.1:62541/SharpNodeSettings/OpcUaServer" );
    }
    catch (Exception ex)
    {
        ClientUtils.HandleException( "Connected Failed", ex );
    }
}
Read/Write Node
如果我们想要读取上图节点浏览器的温度数据,节点字符串为
ns=2;s=Devices/分厂一/车间二/ModbusTcp客户端/温度类型为Int16, 所以我们使用下面的方法读取
try
{
    short value = m_OpcUaClient.ReadNode<short>( "ns=2;s=Devices/分厂一/车间二/ModbusTcp客户端/温度" );
}
catch(Exception ex)
{
    ClientUtils.HandleException( this.Text, ex );
}
你也可以使用异步读取,只是外面的方法上需要使用async标记
try
{
    short value = await m_OpcUaClient.ReadNodeAsync<short>( "ns=2;s=Devices/分厂一/车间二/ModbusTcp客户端/温度" );
}
catch (Exception ex)
{
    ClientUtils.HandleException( this.Text, ex );
}
接下来写入节点操作,如果该节点的权限不支持写的话,就会触发异常
try
{
    m_OpcUaClient.WriteNode( "ns=2;s=Devices/分厂一/车间二/ModbusTcp客户端/温度", (short)123 );
}
catch (Exception ex)
{
    ClientUtils.HandleException( this.Text, ex );
}
批量读取的操作,分为类型不一致和类型一致两种操作,下面都做个示例
try
{
    // 添加所有的读取的节点,此处的示例是类型不一致的情况
    List<NodeId> nodeIds = new List<NodeId>( );
    nodeIds.Add( new NodeId( "ns=2;s=Devices/分厂一/车间二/ModbusTcp客户端/温度" ) );
    nodeIds.Add( new NodeId( "ns=2;s=Devices/分厂一/车间二/ModbusTcp客户端/风俗" ) );
    nodeIds.Add( new NodeId( "ns=2;s=Devices/分厂一/车间二/ModbusTcp客户端/转速" ) );
    nodeIds.Add( new NodeId( "ns=2;s=Devices/分厂一/车间二/ModbusTcp客户端/机器人关节" ) );
    nodeIds.Add( new NodeId( "ns=2;s=Devices/分厂一/车间二/ModbusTcp客户端/cvsdf" ) );
    nodeIds.Add( new NodeId( "ns=2;s=Devices/分厂一/车间二/ModbusTcp客户端/条码" ) );
    nodeIds.Add( new NodeId( "ns=2;s=Devices/分厂一/车间二/ModbusTcp客户端/开关量" ) );

    // dataValues按顺序定义的值,每个值里面需要重新判断类型
    List<DataValue> dataValues = m_OpcUaClient.ReadNodes( nodeIds.ToArray() );

    // 如果你批量读取的值的类型都是一样的,比如float,那么有简便的方式
    List<string> tags = new List<string>( );
    tags.Add( "ns=2;s=Devices/分厂一/车间二/ModbusTcp客户端/风俗" );
    tags.Add( "ns=2;s=Devices/分厂一/车间二/ModbusTcp客户端/转速" );

    // 按照顺序定义的值
    List<float> values = m_OpcUaClient.ReadNodes<float>( tags.ToArray() );

}
catch (Exception ex)
{
    ClientUtils.HandleException( this.Text, ex );
}
批量写入的操作如下:
try
{
    // 此处演示写入一个short,2个float类型的数据批量写入操作
    bool success = m_OpcUaClient.WriteNodes( new string[] {
        "ns=2;s=Devices/分厂一/车间二/ModbusTcp客户端/温度",
        "ns=2;s=Devices/分厂一/车间二/ModbusTcp客户端/风俗",
        "ns=2;s=Devices/分厂一/车间二/ModbusTcp客户端/转速"},
        new object[] {
            (short)1234,
            123.456f,
            123f
        } );
    if (success)
    {
        // 写入成功
    }
    else
    {
        // 写入失败,一个失败即为失败
    }
}
catch (Exception ex)
{
    ClientUtils.HandleException( this.Text, ex );
}
Read History
try
{
    // 此处演示读取历史数据的操作,读取8月18日12点到13点的数据,如果想要读取成功,该节点是支持历史记录的
    List<float> values = m_OpcUaClient.ReadHistoryRawDataValues<float>( "ns=2;s=Devices/分厂一/车间二/ModbusTcp客户端/转速",
        new DateTime( 2018, 8, 18, 12, 0, 0 ), new DateTime( 2018, 8, 18, 13, 0, 0 ) ).ToList( );
    // 列表数据可用于显示曲线之类的操作

}
catch (Exception ex)
{
    ClientUtils.HandleException( this.Text, ex );
}
Read Attribute
本类库支持读取一个节点的相关的所有的属性,主要包含了值,描述,名称,权限等级,等等操作
try
{
    OpcNodeAttribute[] nodeAttributes = m_OpcUaClient.ReadNoteAttributes( "ns=2;s=Devices/分厂一/车间二/ModbusTcp客户端/温度" );
    foreach (var item in nodeAttributes)
    {
        Console.Write( string.Format( "{0,-30}", item.Name ) );
        Console.Write( string.Format( "{0,-20}", item.Type ) );
        Console.Write( string.Format( "{0,-20}", item.StatusCode ) );
        Console.WriteLine( string.Format( "{0,20}", item.Value ) );
    }

    // 输出如下
    //  Name                          Type                StatusCode                         Vlaue

    //  NodeClass                     Int32               Good                                   2
    //  BrowseName                    QualifiedName       Good                              2:温度
    //  DisplayName                   LocalizedText       Good                                温度
    //  Description                   LocalizedText       Good
    //  WriteMask                     UInt32              Good                                  96
    //  UserWriteMask                 UInt32              Good                                  96
    //  Value                         Int16               Good                              -11980
    //  DataType                      NodeId              Good                                 i=4
    //  ValueRank                     Int32               Good                                  -1
    //  ArrayDimensions               Null                Good
    //  AccessLevel                   Byte                Good                                   3
    //  UserAccessLevel               Byte                Good                                   3
    //  MinimumSamplingInterval       Double              Good                                   0
    //  Historizing                   Boolean             Good                               False
}
catch (Exception ex)
{
    ClientUtils.HandleException( this.Text, ex );
}
Read Reference
本类库支持读取一个节点的关联节点,包含了几个简单的基本信息
try
{
    ReferenceDescription[] references = m_OpcUaClient.BrowseNodeReference( "ns=2;s=Devices/分厂一/车间二/ModbusTcp客户端" );
    foreach (var item in references)
    {
        Console.Write( string.Format( "{0,-30}", item.NodeClass ) );
        Console.Write( string.Format( "{0,-30}", item.BrowseName ) );
        Console.Write( string.Format( "{0,-20}", item.DisplayName ) );
        Console.WriteLine( string.Format( "{0,-20}", item.NodeId.ToString( ) ) );
    }

    ;
    // 输出如下
    //  NodeClass                     BrowseName                      DisplayName           NodeId

    //  Variable                      2:温度                          温度                  ns=2;s=Devices/分厂一/车间二/ModbusTcp客户端/温度
    //  Variable                      2:风俗                          风俗                  ns=2;s=Devices/分厂一/车间二/ModbusTcp客户端/风俗
    //  Variable                      2:转速                          转速                  ns=2;s=Devices/分厂一/车间二/ModbusTcp客户端/转速
    //  Variable                      2:机器人关节                    机器人关节            ns=2;s=Devices/分厂一/车间二/ModbusTcp客户端/机器人关节
    //  Variable                      2:cvsdf                         cvsdf                 ns=2;s=Devices/分厂一/车间二/ModbusTcp客户端/cvsdf
    //  Variable                      2:条码                          条码                  ns=2;s=Devices/分厂一/车间二/ModbusTcp客户端/条码
    //  Variable                      2:开关量                        开关量                ns=2;s=Devices/分厂一/车间二/ModbusTcp客户端/开关量
}
catch (Exception ex)
{
    ClientUtils.HandleException( this.Text, ex );
}
Subscript
订阅数据分为订阅单个节点和批量订阅操作,下面分别演示,本订阅的机制基于官方库进行了二次设计,方便扩展实现
-
举例说明,有个节点,ns=2;s=Devices/分厂一/车间二/ModbusTcp客户端/温度 的数据需要订阅,订阅后再界面上的 textBox3 上显示出来
m_OpcUaClient.AddSubscription( "A", "ns=2;s=Devices/分厂一/车间二/ModbusTcp客户端/温度", SubCallback );这个关键字 A 是自己定义的,方便回调判断或是取消订阅用的,方法 SubCallback 是一个回调方法,代码如下:
private void SubCallback(string key, MonitoredItem monitoredItem, MonitoredItemNotificationEventArgs args )
{
if (InvokeRequired)
{
    Invoke( new Action<string, MonitoredItem, MonitoredItemNotificationEventArgs>( SubCallback ), key, monitoredItem, args );
    return;
}

if (key == "A")
{
    // 如果有多个的订阅值都关联了当前的方法,可以通过key和monitoredItem来区分
    MonitoredItemNotification notification = args.NotificationValue as MonitoredItemNotification;
    if (notification != null)
    {
        textBox3.Text = notification.Value.WrappedValue.Value.ToString( );
    }
}
}
当服务器的值变化之后,文本框的值也会变化。如果想要取消订阅
m_OpcUaClient.RemoveSubscription( "A" ); -
举例说明批量订阅,此处举例批量订阅3个点节点,按顺序在 textBox5 , textBox9 , textBox10 文本框按照顺序进行显示,此处比上面的操作需要麻烦一点, 需要缓存下批量订阅的节点信息
// 缓存的批量订阅的节点
private string[] MonitorNodeTags = null;
private void button5_Click( object sender, EventArgs e ) { // 多个节点的订阅 MonitorNodeTags = new string[] { textBox6.Text, textBox7.Text, textBox8.Text, }; m_OpcUaClient.AddSubscription( "B", MonitorNodeTags, SubCallback ); }
然后修改下回调函数private void SubCallback(string key, MonitoredItem monitoredItem, MonitoredItemNotificationEventArgs args ) { if (InvokeRequired) { Invoke( new Action<string, MonitoredItem, MonitoredItemNotificationEventArgs>( SubCallback ), key, monitoredItem, args ); return; }
if (key == "A")
{
    // 如果有多个的订阅值都关联了当前的方法,可以通过key和monitoredItem来区分
    MonitoredItemNotification notification = args.NotificationValue as MonitoredItemNotification;
    if (notification != null)
    {
        textBox3.Text = notification.Value.WrappedValue.Value.ToString( );
    }
}
else if(key == "B")
{
    // 需要区分出来每个不同的节点信息
    MonitoredItemNotification notification = args.NotificationValue as MonitoredItemNotification;
    if (monitoredItem.StartNodeId.ToString( ) == MonitorNodeTags[0])
    {
        textBox5.Text = notification.Value.WrappedValue.Value.ToString( );
    }
    else if (monitoredItem.StartNodeId.ToString( ) == MonitorNodeTags[1])
    {
        textBox9.Text = notification.Value.WrappedValue.Value.ToString( );
    }
    else if (monitoredItem.StartNodeId.ToString( ) == MonitorNodeTags[2])
    {
        textBox10.Text = notification.Value.WrappedValue.Value.ToString( );
    }
}
}
## Thanks
感谢使用本库,如何有任何的疑问,可以联系作者,也可以加群讨论:592132877
## 创作不易,感谢打赏


