Writing notes
Writing posts
To write articles, you have to use Markdown language. Here you can find the main basics of Markdown syntax.
Please note, there are many different versions of Markdown and some of them are not supported by Hugo.
Front-matter settings
Tranquilpeak introduces new variables to give you a lot of possibilities.
Example :
disqusIdentifier: fdsF34ff34
keywords:
- javascript
- hexo
clearReading: true
thumbnailImage: image-1.png
thumbnailImagePosition: bottom
autoThumbnailImage: yes
metaAlignment: center
coverImage: image-2.png
coverCaption: "A beautiful sunrise"
coverMeta: out
coverSize: full
coverImage: image-2.png
gallery:
    - image-3.jpg "New York"
    - image-4.png "Paris"
    - http://i.imgur.com/o9r19kD.jpg "Dubai"
    - https://example.com/orignal.jpg https://example.com/thumbnail.jpg "Sidney"
comments: false
showTags: true
showPagination: true
showSocial: true
showDate: true| Variable | Description |
|---|---|
| disqusIdentifier | Define a unique string which is used to look up a page's thread in the Disqus system. |
| keywords | Define keywords for search engines. you can also define global keywords in Hugo configuration file. |
| clearReading | Hide sidebar on all article page to let article take full width to improve reading, and enjoy wide images and cover images. Useless if params.sidebarBehavior is equal to 3 or 4. (true: enable, false: disable). Default behavior : params.clearReading value in theme configuration file. |
| autoThumbnailImage | Automatically select the cover image or the first photo from the gallery of a post if there is no thumbnail image as the thumbnail image. autoThumbnailImage overwrite the setting autoThumbnailImage in the theme configuration file |
| thumbnailImage | Image displayed in index view. |
| thumbnailImagePosition | Display thumbnail image at the right of title in index pages (right, left or bottom). thumbnailImagePosition overwrite the setting thumbnailImagePosition in the theme configuration file |
| metaAlignment | Meta (title, date and categories) alignment (right, left or center). Default behavior : left |
| coverImage | Image displayed in full size at the top of your post in post view. If thumbnail image is not configured, cover image is also used as thumbnail image. Check the beautiful demo here : Cover image demo |
| coverSize | partial: cover image take a part of the screen height (60%), full: cover image take the entire screen height. |
| coverCaption | Add a caption under the cover image : Cover caption demo |
| coverMeta | in: display post meta (title, date and categories) on cover image, out: display meta (title, date and categories) under cover image as usual. Default behavior : in |
| gallery | Images displayed in an image gallery (with fancybox) at the end of the post. If thumbnail image is not configured and cover image too, the first photo is used as thumbnail image. format: original url [thumbnail url] [caption], E.g : https://example.com/original.jpg https://example.com/thumbnail.jpg "New York" |
| comments | true: Show the comment of the post. |
| showDate | true: Show the date when true (default) |
| showTags | true: show tags of this page. |
| showPagination | true: show pagination. |
| showSocial | true: show social button such as share on Twitter, Facebook... |
| showMeta | true: Show post meta (date, categories). |
| showActions | true: Show post actions (navigation, share links). |
Example:
A post on index page will look like this with :thumbnailImagePosition set to bottom:
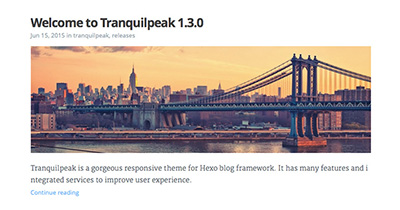
The same with : thumbnailImagePosition set to right:

The same with : thumbnailImagePosition set to left:

Define post excerpt
Use:
<!--more-->to define post excerpt and keep the post excerpt in the post content
Display table of contents
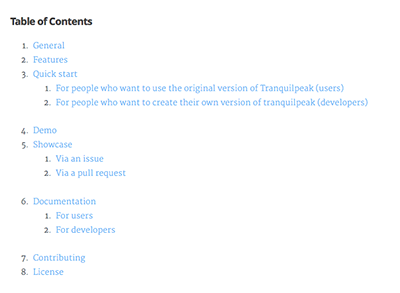
As post excerpt feature enable with <!--more--> comment, you can display the table of contents of a post with <!-- toc -->. Place this comment where you want to display the table of content.
Here is what looks like the table of contents generated:
Tags
Tranquilpeak introduce new tags to display alert messages, images in full width and create beautiful galleries.
Alert
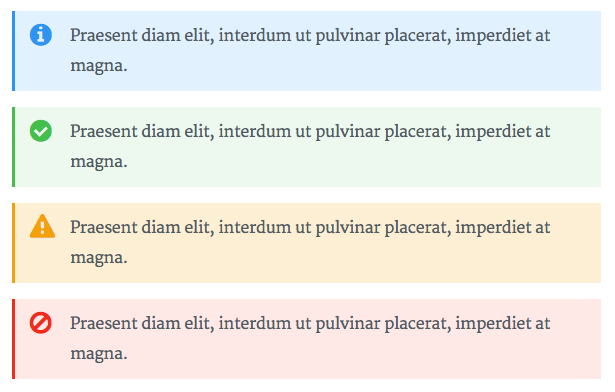
Alert tag is useful to highlight a content like a tips or a warning. Check it live here : Alert tag demo
Syntax:
{{< alert [classes] >}}
content
{{< /alert >}}
E.g:
{{< alert danger no-icon >}}
Here is a danger alert without icon
{{< /alert >}}| Argument | Description |
|---|---|
| Classes |
|
Highlight Text
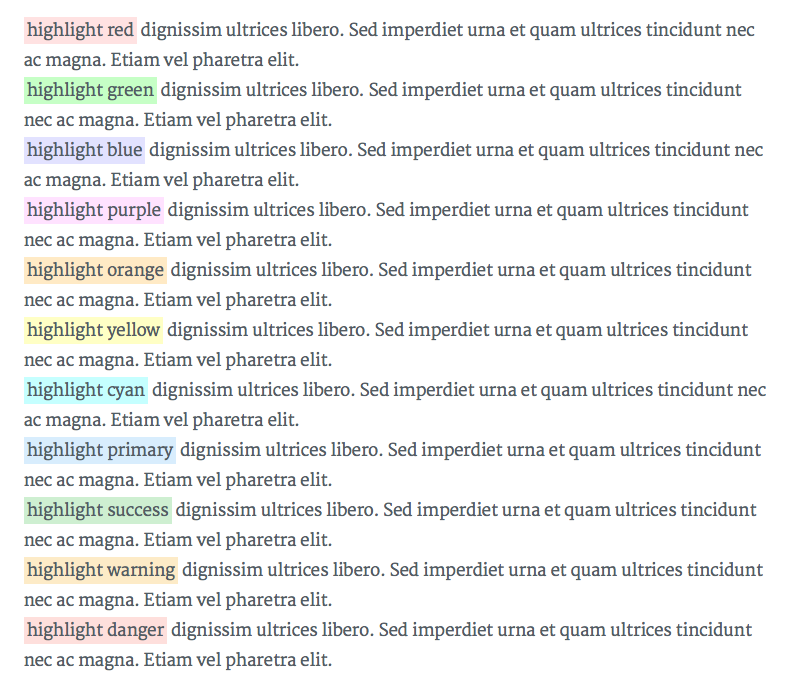
Highlight text tag is useful to highlight an interesting part in a text. Check it live here : Highlight text tag demo
Syntax:
{{< hl-text [classes] >}}
content
{{< /hl-text >}}
E.g:
{{< hl-text danger >}}
your highlighted text
{{< /hl-text >}}| Argument | Description |
|---|---|
| Classes | classes :
|
It's important to put the paragraph that contains highlight text tag inside <p>...</p>
otherwise the following content may not be rendered.
Image
Image tag is useful to add images and create beautiful galleries. Check what are the possibilities here : Image tag demo
Syntax:
{{< image classes="[classes]" src="https://github.com/dominhhai/dominhhai.github.io/raw/dev/[/path/to/image]" thumbnail="[/path/to/thumbnail]" group="[group-name]" thumbnail-width="[width of thumbnail]" thumbnail-height="[height of thumbnail]" title="[title text]" >}}E.g:
{{< image classes="fancybox right clear" src="https://github.com/dominhhai/dominhhai.github.io/raw/dev/image2.png" thumbnail="http://google.fr/images/image125.png" group="group:travel" thumbnail-width="150px" thumbnail-height="300px" title="A beautiful sunrise" >}}| Argument | Description |
|---|---|
| classes (optional) | You can add css classes to stylize the image. Separate class with whitespace. Tranquilpeak integrate many css class to create nice effects :
|
| group (optional) | Name of a group, used to create a gallery. Only for image with fancybox css class |
| src | Path to the original image. |
| thumbnail (optional) | Path to the thumbnail image. If empty, the orignal image will be displayed. |
| thumbnail-width (optional) | Width to the thumbnail image. If the thumbnail image is empty, width will be attached to thumbnail image created from original image. E.g : 150px or 85%. |
| thumbnail-height (optional) | Height to the thumbnail image. If the thumbnail image is empty, height will be attached to thumbnail image created from original image. E.g : 300px or 20%. |
| title (optional) | Title of image displayed in a caption under image. Alt HTML attribute will use this title. E.g : "A beautiful sunrise". |
Tabbed code block
Tabbed code blocks are useful to group multiple code blocks related. For example, the source code of a web component (html, css and js). Or compare a source code in different languages.
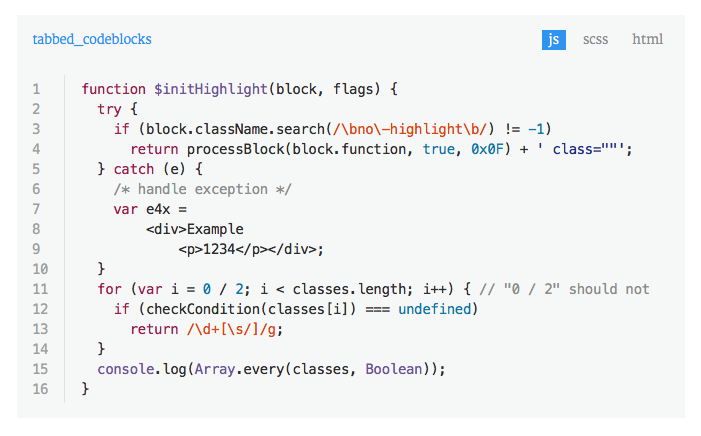
Check it live : tabbed code block demo
Syntax:
{{< tabbed-codeblock [name] [link] >}}
    <!-- tab [lang] -->
        source code
    <!-- endtab -->
{{< /tabbed-codeblock >}}
E.g:
{{< tabbed-codeblock example http://example.com >}}
    <!-- tab js -->
        var test = 'test';
    <!-- endtab -->
    <!-- tab css -->
        .btn {
            color: red;
        }
    <!-- endtab -->
{{< /tabbed-codeblock >}}| Argument | Description |
|---|---|
| Name (optional) | Name of the code block, or of the file |
| Link (optional) | Link to a demo, or a file |
| Lang (optional) | Programming language use for the current tab |
Wide image
Wide image tag is useful to display wide images in full width. It take the entire window width. Check the the result : Wide image tag demo
Syntax:
{{< wide-image src="https://github.com/dominhhai/dominhhai.github.io/raw/dev/[/path/to/image]" title="[title text]" >}}E.g:
{{< wide-image src="http://google.fr/images/image125.png" title="A beautiful sunrise" >}}| Argument | Description |
|---|---|
| src | Path to the original image. |
| title (optional) | Title of image displayed in a caption under image. Alt HTML attribute will use this title. E.g : "A beautiful sunrise". |
Writing pages
Sometimes you need to create a page that is not a regular blog post, where you want to hide the date, social sharing buttons, tags, categories and pagination. This is the case for the blog pages About or Contact for instance which do not need to be timestamped (nor tagged or categorized) nor provide pagination and are not intended to be shared on social networks.
In order to create such a page you can proceed like so:
hugo new page/contact.mdThis creates the file contact.md in the directory content/page
pre-populated with the following front matter.
---
title: "New Page"
categories:
- category
- subcategory
tags:
- tag1
- tag2
keywords:
- tech
comments:       false
showMeta:       false
showActions:    false
#thumbnailImage: //example.com/image.jpg
---
The rest is basically the same as for a regular post.
Math with KaTex
More in this Hugo HP.
1. _{ problem
Replace _{ by \_{ to disable Markdown transform.
Such as:
s_t = f(U x_t + W s\_{t-1} )2. \ problem
Replace \ by \\ to disable Markdown transform.
Such as:
\\{ A\_{i,i} \\}3. Aligned layout with empty before =
Prepend \ before &=.
Such as:
\begin{aligned}
E_t(y_t, \hat{h_y}) &= -y_t log{\hat{y_t}} \\cr
E(y, \hat{y})       &= \sum_t{E_t(y_t, \hat{h_y})} \\cr
                  \ &= -\sum_t{y_t log{h_y})}
\end{aligned}