This is the repository for APCSP materials. This was taken from the original Boostrap repository (https://github.com/bootstrapworld/curr) and copied into this new repository to adapt to APCSP in December 2016.
This codebase is maintained by: Sarah Guthals Beth Simon And undergrads
Installation:
Clone the Project
-
Open a terminal and go to the directory where you want this project to live on your machine.
-
Download git and Sign in to GitHub on your terminal:
Mac: http://burnedpixel.com/blog/setting-up-git-and-github-on-your-mac/
Ubuntu: https://www.howtoforge.com/tutorial/install-git-and-github-on-ubuntu-14.04/
-
git clone git@github.com:drguthals/APCSP.git(Can take a few minutes)Note: You may need to run it with sudo
-
Mac Only: You may need to agree to XCode.
Download and Install Racket
-
Download from here: http://download.racket-lang.org/ (Can take a few minutes)
-
Open the installer, click through, drag the folder into applications. (Mac)
-
Add Racket to your PATH variable:
$ vim ~/.bash_profileAdd this line to the .bash_profile file:
export PATH="/Applications/Racket v6.8/bin:$PATH"Then re-load the .bash_profile:
$ source ~/.bash_profileMake sure you fill in your actual path to Racket
-
Test racket and make sure it works:
$ racket
Welcome to Racket v6.8.
>
CTRL-d to exit Racket
-
Go to the parent of the APCSP project folder and type:
$ raco link APCSP
Download and Install pdftex
For Macs:
-
Go to: https://www.tug.org/mactex/
-
Download the Smaller Download
-
Open the installer and follow the steps
For Ubuntu or Windows
-
Follow the instructions for Ubuntu or Windows, depending on which you're using
Download and Install wkhtmltopdf
-
Choose your OS and download the package
-
Open the installer and follow the steps
Download and Install pdftk
For Mac 10.11:
-
Go here to download the pdftk package: https://www.pdflabs.com/tools/pdftk-the-pdf-toolkit/pdftk_server-2.02-mac_osx-10.11-setup.pkg
-
Open the installer and follow the steps
NOTE: On https://www.pdflabs.com/tools/pdftk-server/ there is a version for Mac, but it is old and does not work, so make sure you use the one in the steps above
For Ubuntu:
-
Scroll down to the very bottom and follow these instructions: (pasted here, but go to the link because there are links)
Build PDFtk Server
You can compile PDFtk Server from its source code. PDFtk Server is known to compile and run on Debian, Ubuntu Linux,   FreeBSD, Slackware Linux, SuSE, Solaris and HP-UX.

Download and unpack: pdftk-2.02-src.zip (~2MB)
Review the pdftk license information in: license_gpl_pdftk/readme.txt.
Review the Makefile provided for your platform and confim that TOOLPATH and VERSUFF suit your installation of gcc/gcj/libgcj. If you run apropos gcc and it returns something like gcc-4.5, then set VERSUFF to -4.5. The TOOLPATH probably doesn’t need set.
Change into the pdftk sub-directory,
run make -f Makefile.Debian (substitute your platform’s Makefile filename)
We have built pdftk using gcc/gcj/libgcj versions 3.4.5, 4.4.1, 4.5.0 and 4.6.3. Pdftk 1.4x fails to build on gcc 3.3.5 due to missing libgcj features. If you are using gcc 3.3 or older, try building pdftk 1.12 instead.
Build the Project
When you build the project for the first time, you need to build the workbook first:
$ racket build-workbook.rkt
$ racket build.rkt
From then on, if you are not making edits to the workbook, you shouldn't have to build the workbook.
Making Changes
Branch First!
Before making changes you should make your own branch from the development branch.
$ git checkout development
$ git checkout -b yourBranchName
Changing a Unit to Have Different Text
One of the easiest changes to make is to change a unit from Algebra to CS content. If you want to update the text to Unit 1, you have to change the the-unit.scrbl file found here:
$ cd courses/bs1/units/unit1
$ ls
bootstraplesson.js  codemirror.css      exercise-list.rkt   images          pretty-printing.css scheme2.js
box.gif         codemirror.js       homeworks       logo.png        runmode.js      the-unit.scrbl
Then, head back to the home APCSP directory and re-build the projet:
$ racket build.rktThen, you can find the HTML file here:
$ cd distribution/courses/bs1/units/unit1
$ ls
backlogo.png        easyXDM.min.js      pict_11.png     pict_18.png     pict_7.png      scribble-common.js
bootstrap-helpers.js    exercises       pict_12.png     pict_19.png     pict_8.png      scribble.css
bootstrap.css       index.html      pict_13.png     pict_2.png      pict_9.png      scribble_2.css
bootstraplesson.js  json2.min.js        pict_14.png     pict_3.png      pretty-printing.css textbook.css
box.gif         logo.png        pict_15.png     pict_4.png      pyret-mode.js       wescheme-embedded.js
codemirror.css      pict.png        pict_16.png     pict_5.png      runmode.js
codemirror.js       pict_10.png     pict_17.png     pict_6.png      scheme2.js
From there, you can open index.html and you will see the changes you made!
Pushing Your Changes to your Branch
After you have made some changes, you should push to your branch:
$ git add .
$ git commit -m "The changes you've made"
$ git pull origin development
$ git push origin yourBranchName
*Note: You should pull from development before pushing to your branch to make sure there are no conflicts.
Merging Your CHanges to Development
After you have made substantial changes (or every Monday at 4pm) you should do a Pull Request into development. First, make sure you have pushed all of your changes to your branch. Follow steps above and double check by running:
$ git status
On branch development
nothing to commit, working tree clean
$
Then you should go onto GitHub, and go to the Repostory and click "Create New Pull Request":

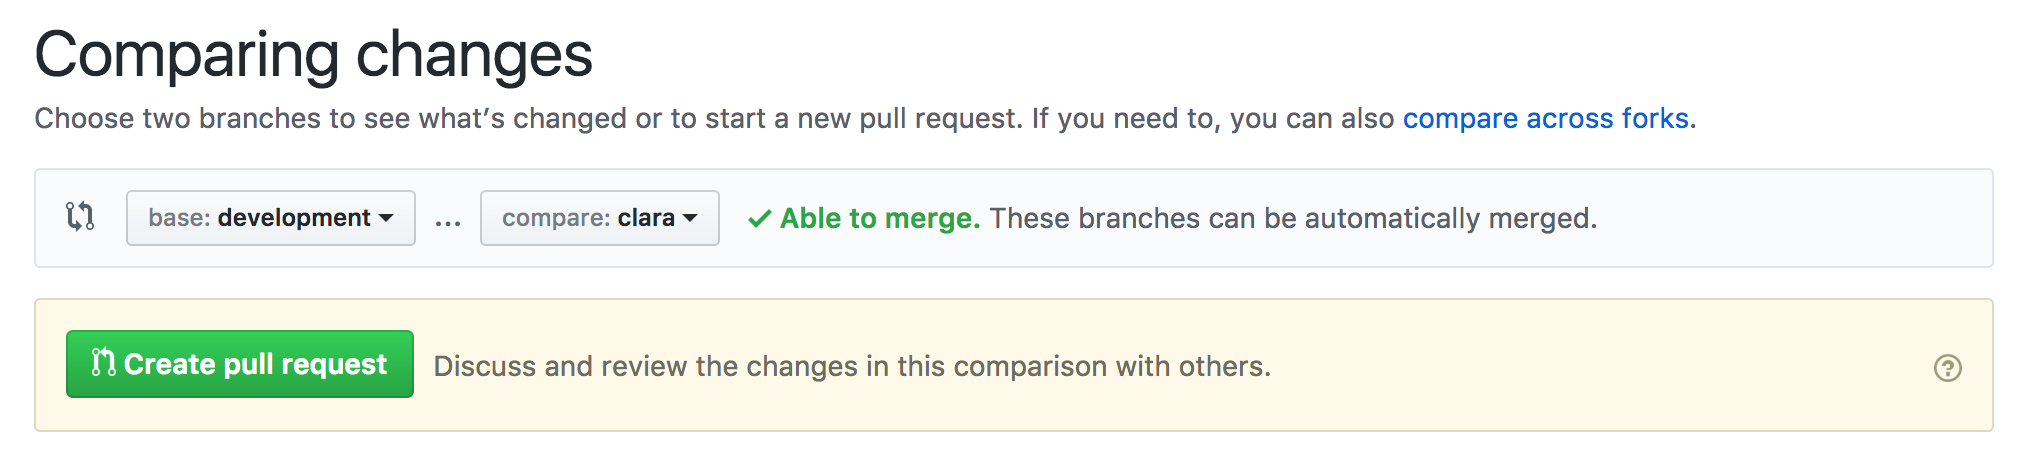
Make sure that the base is development and the compare is your branch (clara in this example):
Do this by Mondays at 5pm. Then Sarah will accept your merge, and you will have until Wednesdays at 11am to test all of the changes on the development branch. (Hosting TBA).
Pushing Your Changes to the Master
If needed, Sarah approves merge from Development into Master on Wednesdays at 11am and testing of the master branch should be complete by Thursdays at 11am.
From the original Bootstrap README
The following contributors worked on converting the original Bootstrap material in the summer of 2012 at Brown University:
Daniel Kocoj Mike Rowland Winnie Wang Kathi Fisler Jonah Stanley Miles Eldon Andrew Tian Katherine Ng
After the summer, the original Bootstrap codebase has been maintained by:
Emmanuel Schanzer Kathi Fisler Vicki Crosson Emma Youndtsmith
Building the Project
To generate the curriculum under a different tagging context, provide additional arguments to the build.rkt program. e.g:
$ racket build.rkt pedagogy groupUnder DrRacket, you can change your Language settings to include the tags as custom command line arguments.
Installing Octokit
For Windows
- Go to: https://www.visualstudio.com/downloads/
- Download and install Microsoft Visual Studio. Follow the installation steps.
- Once installed, in the package selection window, select .NET extension packages. Ignore the Mobile and Gaming extensions since there is no need for them.
- Create your project using .NETFramework, Version 4.5 or .NETCore, Version 4.5.1. Octokit is only compatible with these versions.
- Got to Tools and select NuGet Package Manager -> Package Manager Console
- In the console type the command "Install-Package Octokit".
*Note: Run tests using Ctrl+F5 to keep the output window from instantly closing.