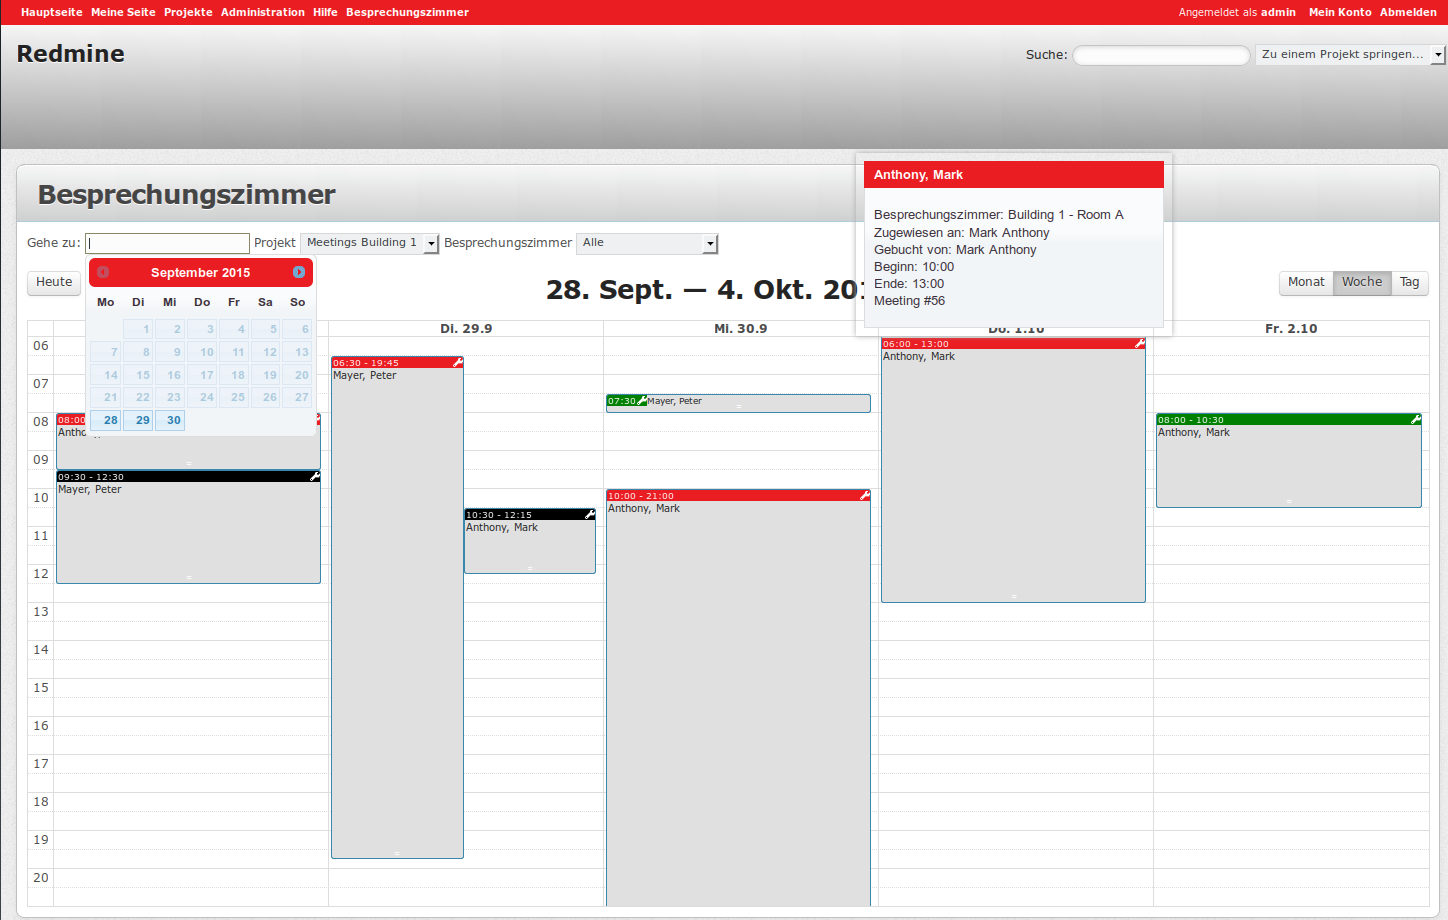
Meeting Calendar for Redmine
=============================
This Redmine plugin allows you to book and thence display meetings on a calendar interface
Requirements
- Redmine 2.x or 3.x (does not work with Redmine 1.x)
Install
Clone the plugin source code into your Redmines plugin directory:
git clone https://github.com/dro123/redmine_meeting_room_calendar.git
(original code: git clone https://github.com/QBurst/qbmeetingroomplugin.git)
!NOTICE! Make sure the plugin directory is named redmine_meeting_room_calendar.
Run the following command from a command line:
rake redmine:plugins:migrate Setup
Login with your administrator account and go to the admin menu.
1. Create Project
Create new projects that hold the bookings for the rooms and add all the groups and users that should be allowed to book meetings.
It is possible to create multiple projects with different users and groups assignes to the.
For example a project for each building.
2. Create Tracker
Create a new tracker, name it something like 'Meeting' and make sure that the standard fields 'Assignee', 'Start date' and 'Due date' are selected and copy the workflow from a already existing tracker (e.g. 'Bug')
Name: Something like 'Meeting' (the name does not matter).
Default status: Does not matter, will be overwritten.
Issues displayed in roadmap: No
Standard fields: Assignee, Category (optional), Start date, Due date
Copy workflow: Bug
Projects: The projects you want to use for booking meetings
![]()
3. Create CustomFields
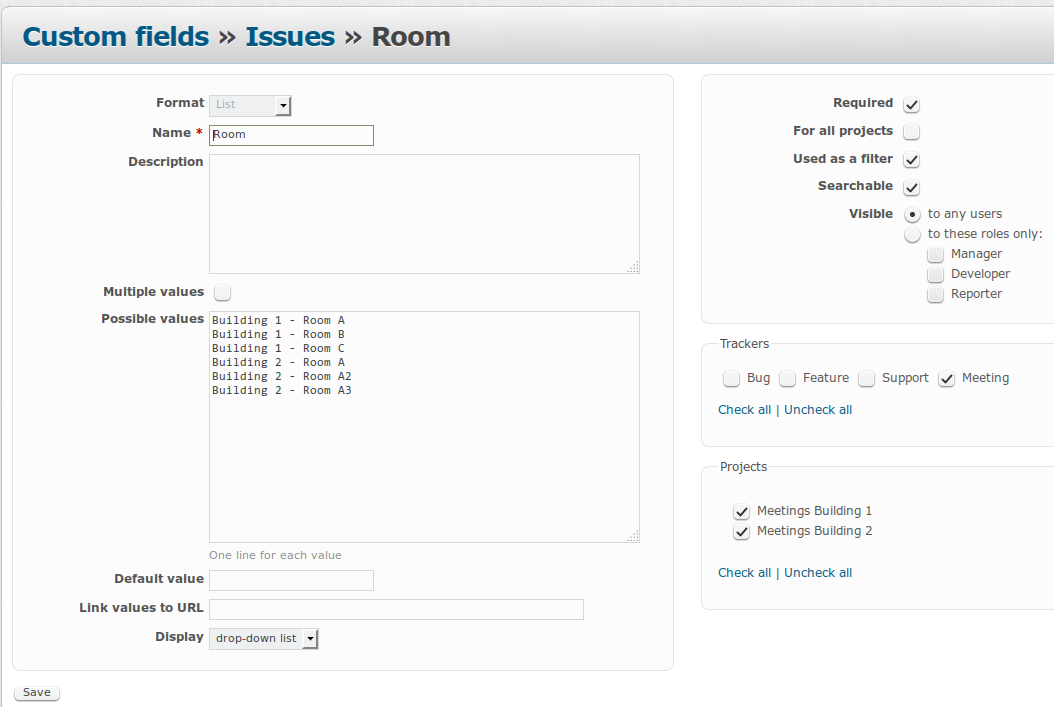
Create 3 new custom fields for Issues: Room, Start time, End time.
!NOTICE! It is important to use the ISO format for the start and end time custom fields (so 13:00 instead of 1:00pm)! The localization will happen in the calendar view. If you want to be able to book meetings earlier than 06:00 just add the times in front of the list. The same applies to times after 21:00.
Room
Format: List
Name: Something like 'Room' (the name does not matter).
Description: Does not matter.
Multiple values: No
Possible values: A list of rooms you want to be able to book meetings for. This must include all possible rooms!
Default value: none
Link values to URL: none
Display: drop-down list
Required: Yes
For all projects: No
Used as a filter: Yes
Searchable: Yes
Visible: to any users
Trackers: 'Meeting' or whatever you called the tracker you created.
Projects: The projects you want to use for booking meetings.
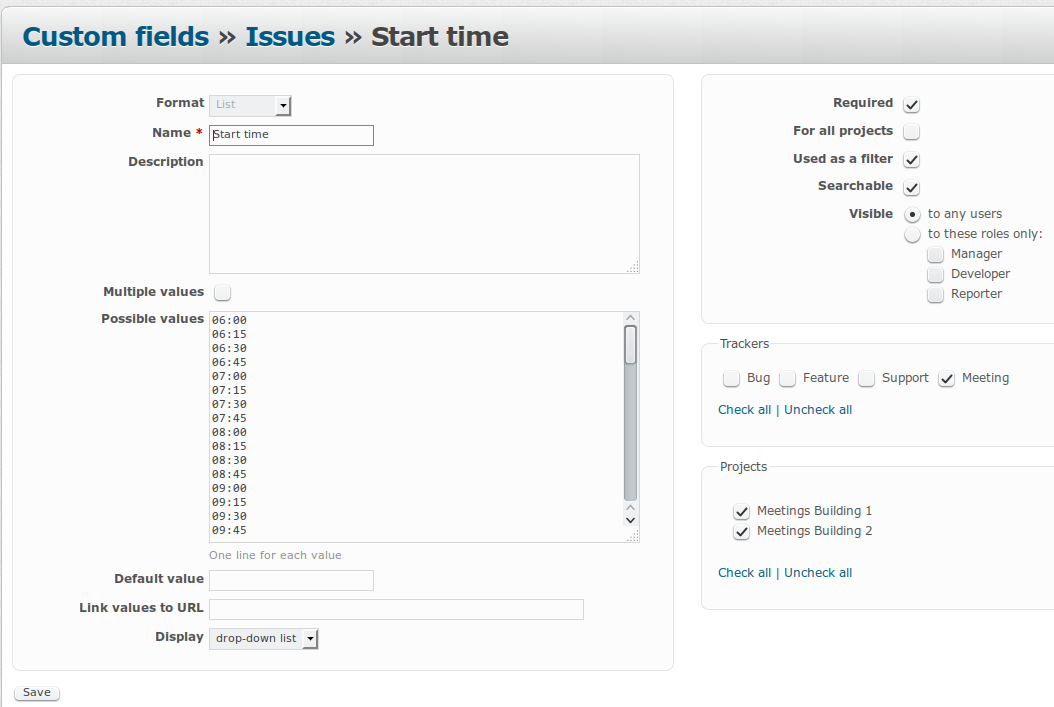
Start time
Format: List
Name: Something like 'Start time' (the name does not matter).
Description: Does not matter.
Multiple values: No
Possible values:
06:00
06:15
06:30
06:45
07:00
07:15
07:30
07:45
08:00
08:15
08:30
08:45
09:00
09:15
09:30
09:45
10:00
10:15
10:30
10:45
11:00
11:15
11:30
11:45
12:00
12:15
12:30
12:45
13:00
13:15
13:30
13:45
14:00
14:15
14:30
14:45
15:00
15:15
15:30
15:45
16:00
16:15
16:30
16:45
17:00
17:15
17:30
17:45
18:00
18:15
18:30
18:45
19:00
19:15
19:30
19:45
20:00
20:15
20:30
20:45
21:00
Default value: none
Link values to URL: none
Display: drop-down list
Required: Yes
For all projects: No
Used as a filter: Yes
Searchable: Yes
Visible: to any users
Trackers: 'Meeting' or whatever you called the tracker you created.
Projects: The projects you want to use for booking meetings.
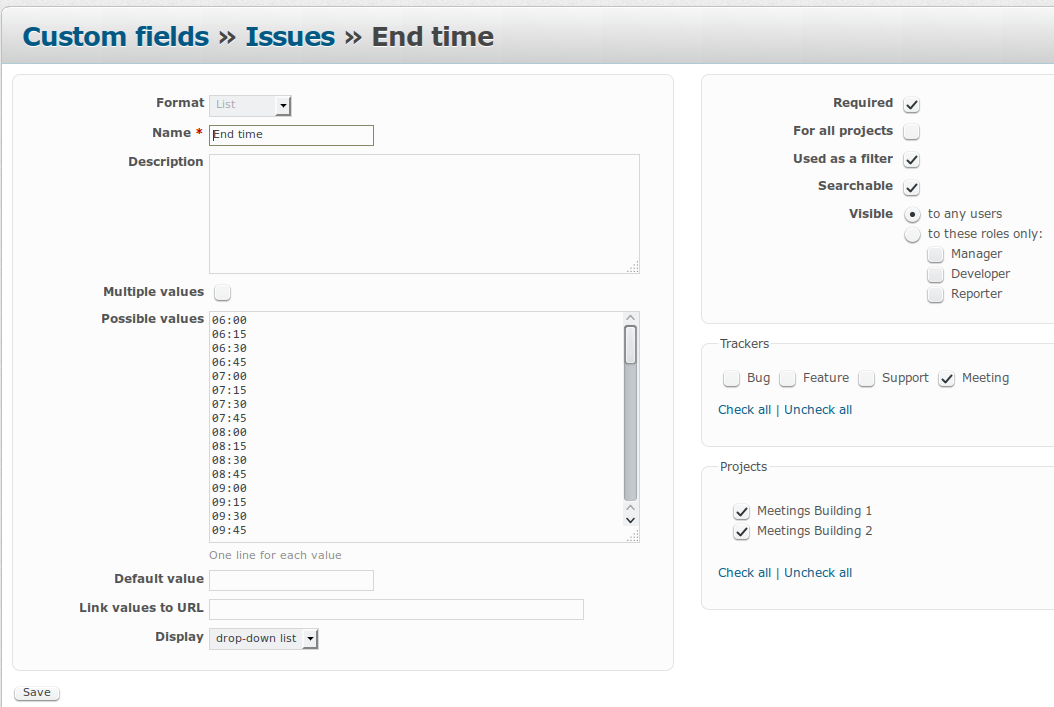
End time
Format: List
Name: Something like 'End time' (the name does not matter).
Description: Does not matter.
Multiple values: No
Possible values: same as 'Start time'
Default value: none
Link values to URL: none
Display: drop-down list
Required: Yes
For all projects: No
Used as a filter: Yes
Searchable: Yes
Visible: to any users
Trackers: 'Meeting' or whatever you called the tracker you created.
Projects: The projects you want to use for booking meetings.
4. Setup project
Go to the project settings of the projects you created.
In the 'Information' panel check and set:
Trackers: 'Meeting' (or whatever you called the tracker you created).
Custom fields: 'Room', 'Start time', 'End time' (or whatever you called the custom fields you created).
Meeting rooms (comma seperated list): If empty it will show all rooms from the custom field 'Room'. If non-empty it will only show the rooms in that project that are listed here. For example 'Room 1,Room 2' will only show 2 rooms for that project, even if the custom field has more rooms available.
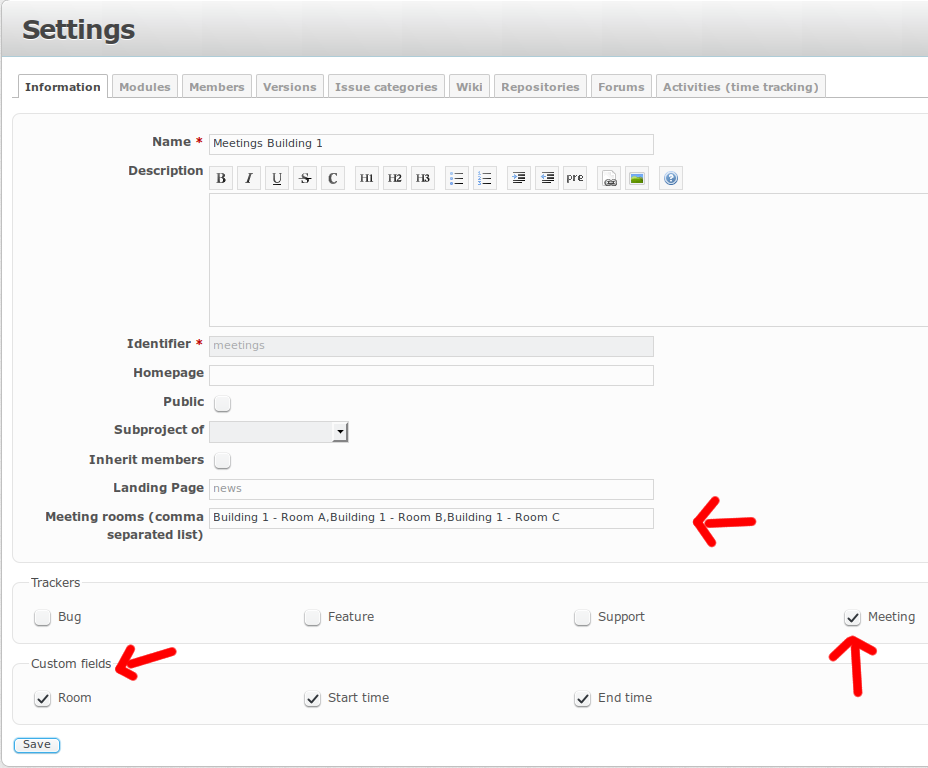
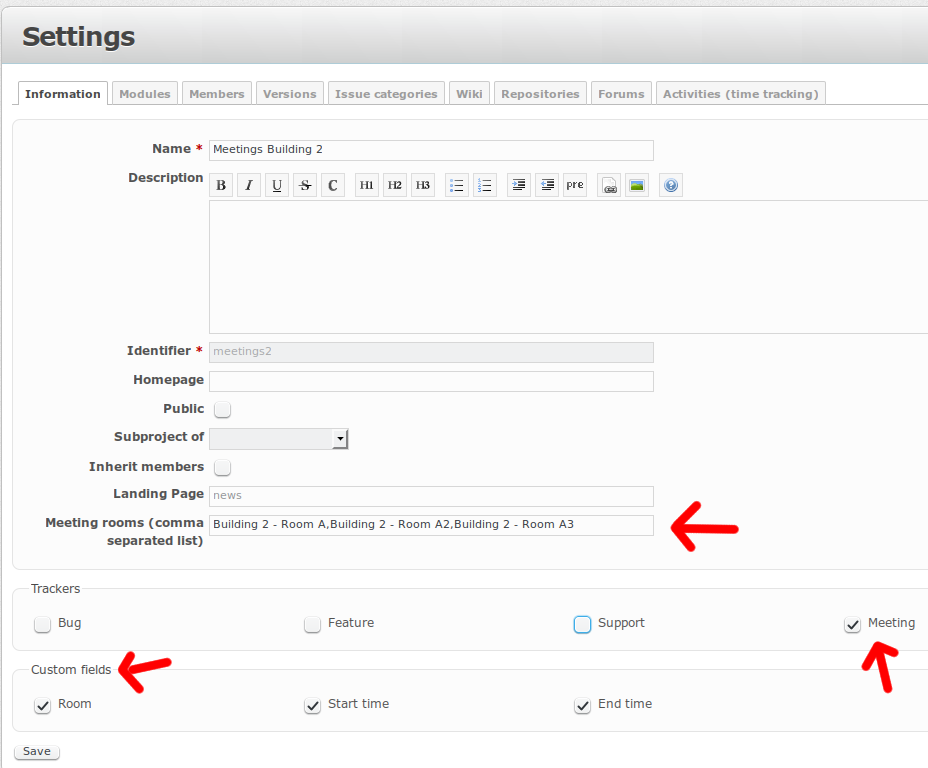
!NOTICE! Make sure there are no spaces before or after the comma in the meeting rooms list. Rooms that are not defined as possible values in the custom field 'Room' will be ignored!
5. Configure Plugin
Go to the plugin settings in Admin -> Plugins and click on 'Configure' for the plugin 'Redmine Meeting Room Calendar plugin'.
- Select the project(s) you created. (multi select possible)
- Select the tracker you created
- Select the custom fields you created
- Select the issue status the tickets should get
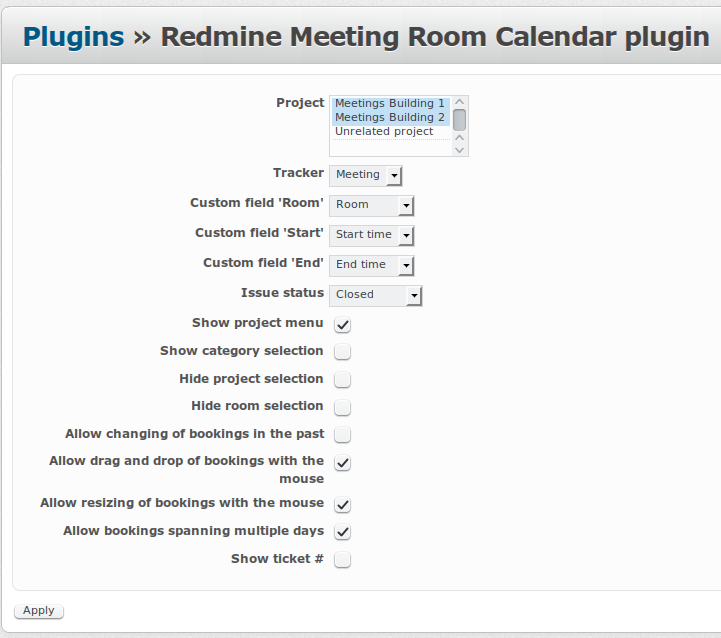
!NOTICE! The other options will be described later and are all optional.
6. Configure Redmine
Go to the authentication settings in Admin -> Settings -> Authentication
If 'Authentication required' is activated or the project you created is not public you have to enable the REST web service authentication with 'Enable REST web service'.
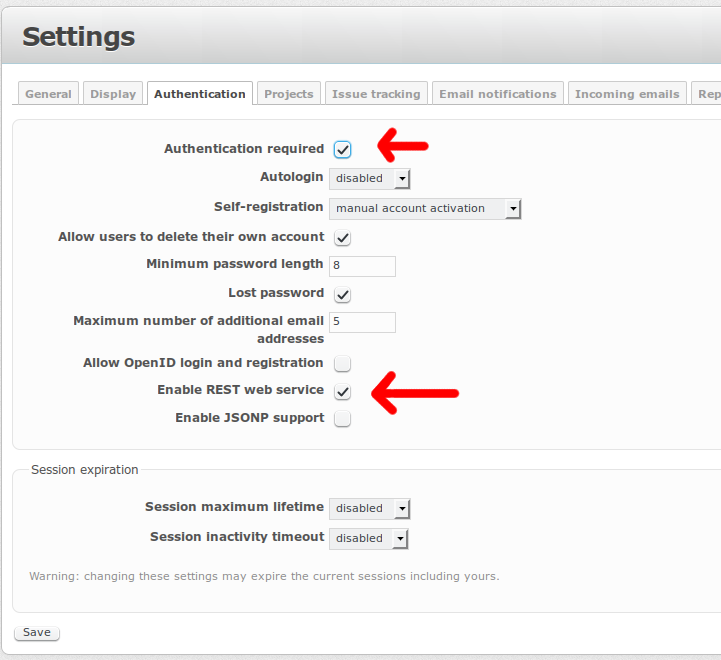
Go to role settings of developer in Admin -> Roles and permissions
Make sure the permissions 'View issues', 'Add issues', 'Edit issues' and 'Delete issues' are set. If you don't want to change the developer role, you can add a new one with these permissions set. 'Issues can be assigned to this role' has to be checked to.
All users that should be able to book meetings have to have this role.

If you want members to have read only access to the calendar, you can create a 'View only' role.
Go to role settings of developer in Admin -> Roles and permissions
Add a new role with only the 'View issues' permission set and 'Issues can be assigned to this role' unchecked.
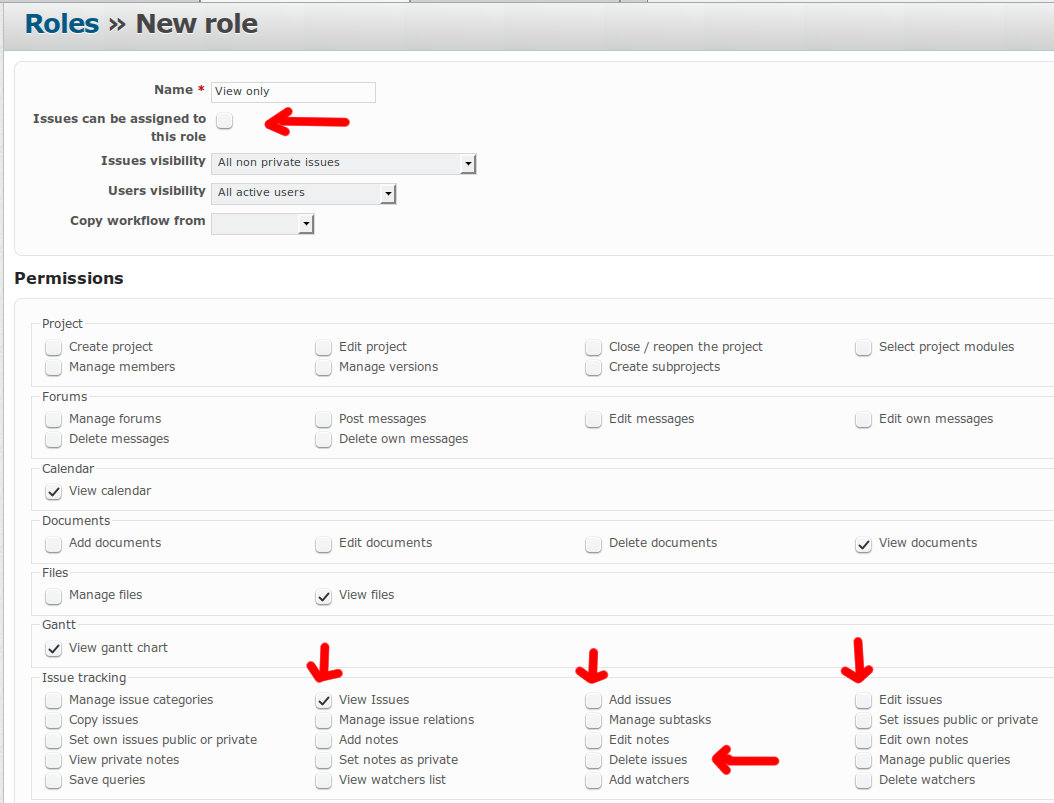
!NOTICE! You can define your own roles. The calendar will respect the 'View issues', 'Add issues', 'Edit issues' and 'Delete issues' permissions. If only 'View issues' is selected, the user cannot change anything. If additionally 'Add issues' is selected, the user can only add new bookings, but cannot change or delete them. If 'Edit issues' or 'Delete issues' are added, the user can change the booking or delete it. If either 'View issues' is not set for the users roll or the project is not visible to the user (e.g. non-public project where the user is not a member of the project), it will not show up in the calendar. If the role contains the 'Edit project' permission, the user can also change and delete bookings from other users.
How it Works
- The plug-in uses a Fullcalendar jQuery plug-in which uses ajax calls to fetch the events,which are the booked meeting rooms in Redmine by various employees.
- The calendar has a toggleable Moth view, Week view and Day view on the top right corner; of which the Week view is the default.
- The Week view has the span of the week written as the title along with the year.
- There is also a Go to date picker to take the user to a future date he/she wants to take a quick view.
- This also helps in reducing the clicks required to book a meeting room in some far future.
- There is also a drop down, populated with all the projects and meeting rooms available at the time, to select whichever room a user wants to book a room.
- There is a quick jump Today button to take the user to the present day so that the status of a particular room for such a day could be viewed.
- Both the Week view and Day view exhibit a time line with the aid of which a meeting room can be booked at various time slots, avoiding an overlap.
- Events could be booked also on a recurring basis. The available options are daily, weekly and bi-weekly, in which case the meeting room goes occupied for the specified time range.
- On the event of an overlap about to occur the calendar itself alerts the scheduler about the issue and in no case will it be possible to book an event ignoring the alert.
- The meeting rooms are booked with the currently logged in users authorship but can be assigned to another user.
- The main feature of the suggested plug-in is that knowing the Project Id and Issue tracker Id of the Book Meeting Project, the plug-in is stand alone in that no other files need to be edited in the actual project.
- For easy realization of the situation, the title bars of rooms booked by the presently logged in user is made different in color while displaying along with the others and marked with a wrench.
- Besides booking, a meeting room can also be edited; only by the author, the assigned person of the booking or an admin.
- The plug-in requires some details like project_id and tracker_id to be defined in the plugin configuration.
Workflow examples
Initial condition
Redmine is configured as describe in the previous chapters with the described changes to the role 'Developer' and optional role 'View only' created.
The 2 projects have 4 users assigned:
User 1 (mark):

User 'mark' can book meetings in both projects. Both projects will be visible for him.
User 2 (peter):

User 'peter' can only see project 'Meetings Building 1' and will not see the other project. He can book meetings in 'Meetings Building 1'.
User 3 (tim):

User 'tim' can only see project 'Meetings Building 2' and will not see the other project. He can book meetings in 'Meetings Building 2'.
User 4 (bill):

User 'bill' cannot book meetings in either project, but both projects will be visible for him.
Calendar
User 1 (mark)
The follow screenshots will show the different views the user 1 (mark) has.
Project 1, all rooms:

Project 1, room 1 (Building 1 - Room A):

Project 1, room 2 (Building 1 - Room B):

Project 1, room 3 (Building 1 - Room C):

Events with the wrench in the title are events that can be changed by the user.
This user can switch between different projects:

and rooms:

User 2 (peter)
This user can only see and select one project (project 1):

User 3 (tim)
This user can only see one project (project 2), all rooms:

User 4 (bill)
User 4 (bill) has the same view as user 1 (mark) but can not change anything.
Changing date/week/month
The date/week/month display can either be changed by the navigation buttons in the top left corner:
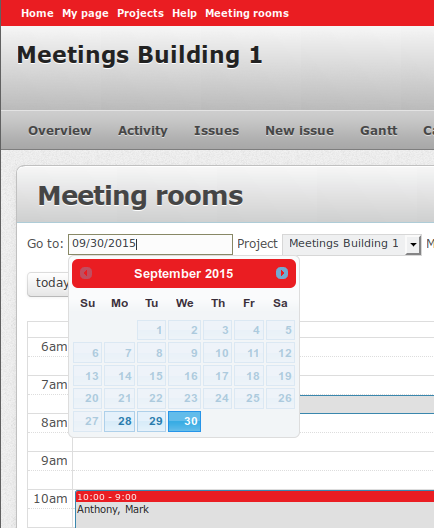
or with the 'Go to' box:
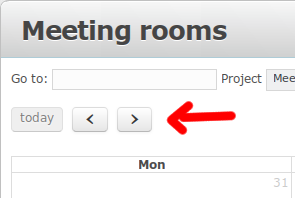
Changing views
The view style day/week/month can be changed with the view buttons in the top right corner:
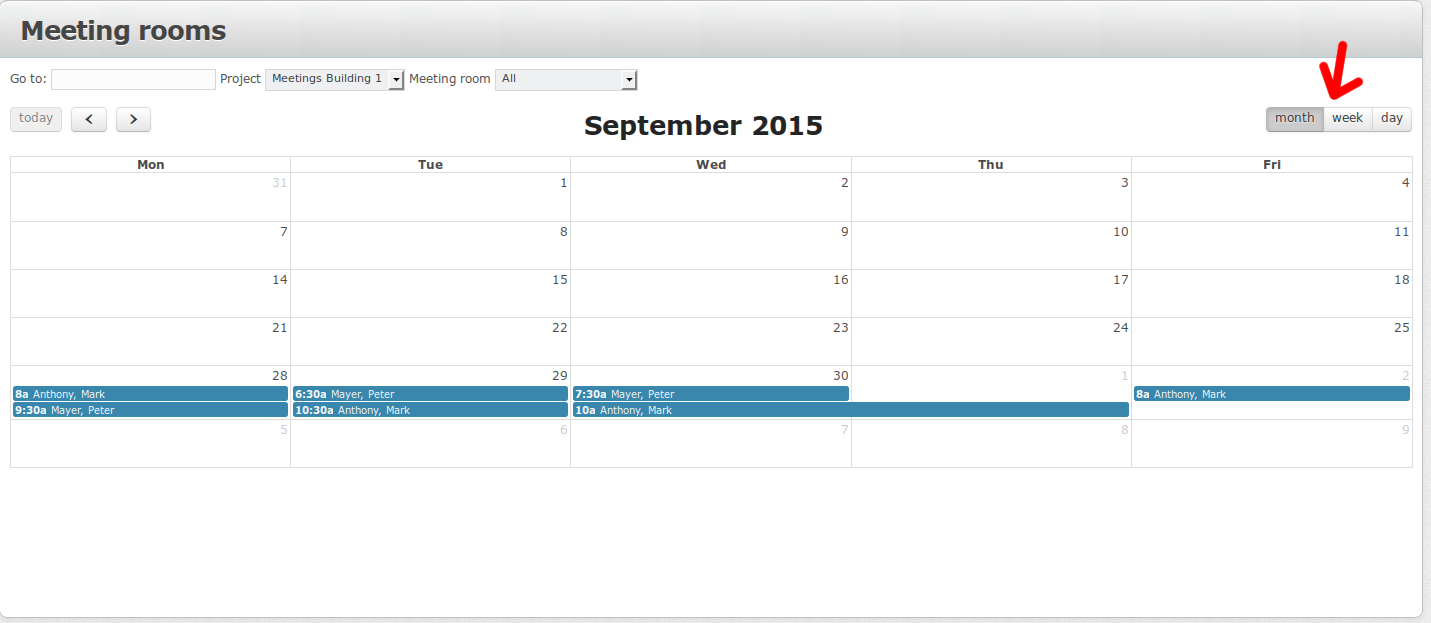
Create booking
In order to create a new booking, a user with the needed rights just has to click in an empty space of the calendar.
A popup where the details can be added will be shown.
Depending on wether only a single room or all rooms of the projects are display, the user gets one of those popups:
Only one rooms display:

All rooms display:

Change or delete booking
In order to change or delete an exisiting booking, a user with the needed rights has to either click on the exisiting event in the calendar or use the mouse to manipulate the booking.
If the user clicks on the event a popup where the details can be changed will be shown. This is also the only way to delete a booking.
Depending on wether only a single room or all rooms of the projects are display, the user gets one of those popups:
Only one rooms display:

All rooms display:

Optional plugin settings
Show project menu
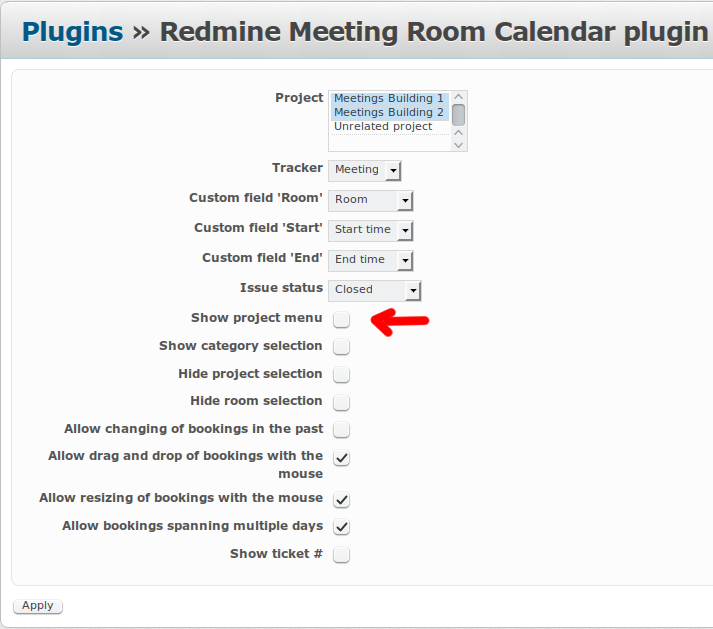
With this setting the project menu bar for the selected project in the calendar is either removed:
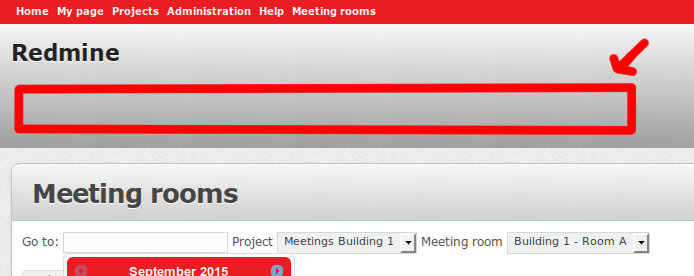
or shown:
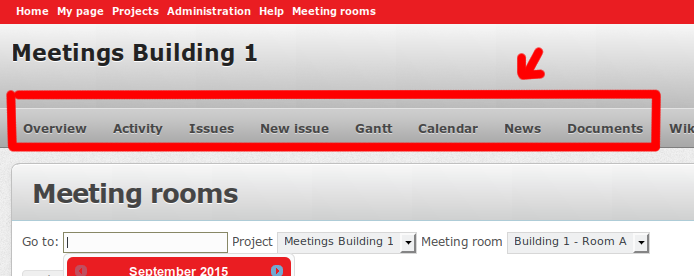
Show category selection

With this setting enabled the category of the issue is assignable and displayed in the calendar:


Additionally an CSS class is added to the events in the calendar of the form .category_<cid> (<cid>=category id). This way the events can be displayed differently via CSS. See https://github.com/dro123/redmine_meeting_room_calendar/blob/master/assets/stylesheets/meeting_calendar.css#L103 for more details and examples.
Hide project selection
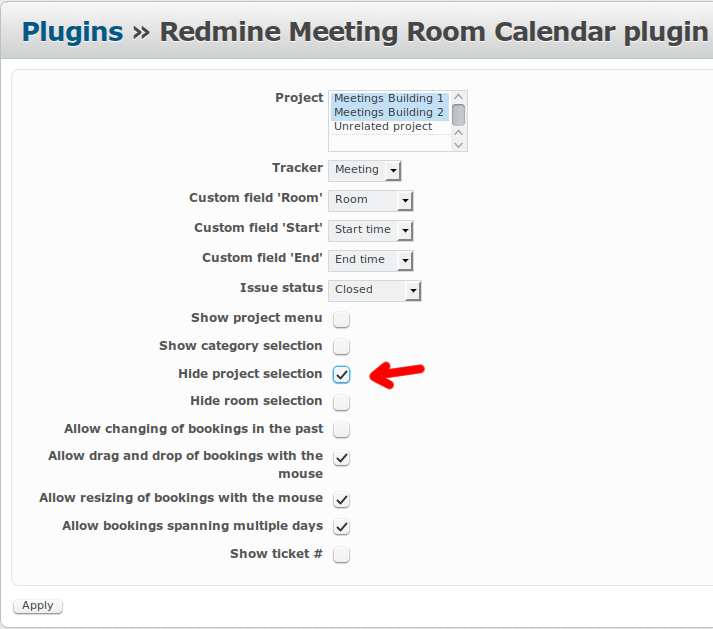
With this setting enabled the project drop-down list will not be displayed and the first selected project in the plugin settings will be shown:
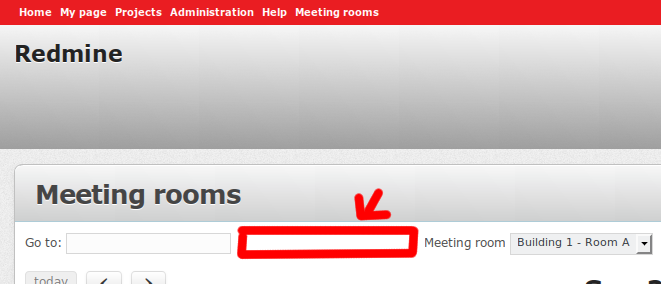
This is usefull if there's only one project for bookings.
Hide room selection
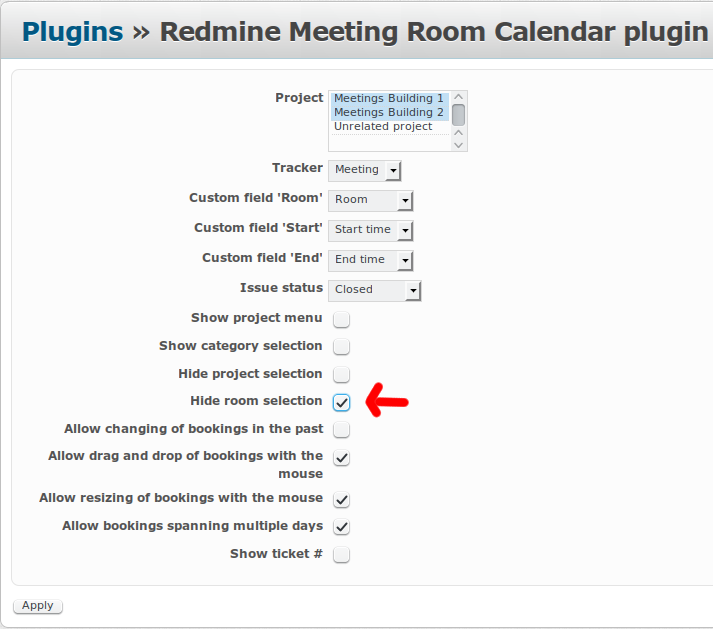
With this setting enabled the room drop-down list will not be displayed and the first room of the 'Room' custom fields possible values will be show:
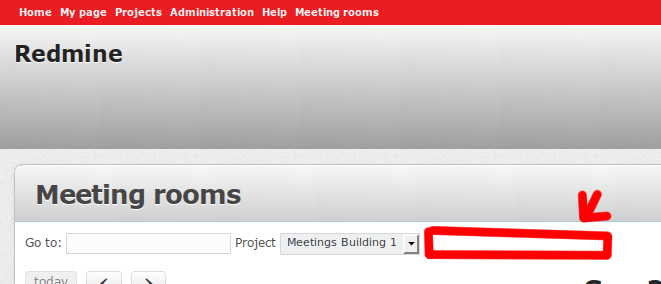
This is usefull if there's only one room for bookings.
Allow changing of bookings in the past
The default setting is to disallow chaning of bookings in the past. With this setting enabled bookings in the past can be changed as well.
Allow drag and drop of bookings with the mouse
This setting allows to drag and drop the events to different time slots in the calendar with the mouse.
Allow resizing of bookings with the mouse
This setting allows to change the end date/time of an event with the mouse.
Allow bookings spanning multiple days
This seetting allows events to end on a different date than the date they start. When this setting is disabled an event can only start and end on the same date.
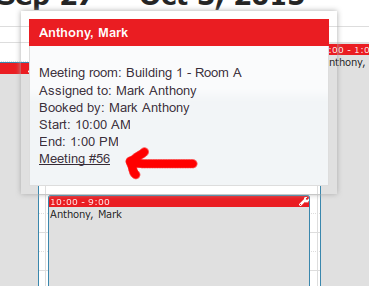
Show ticket number + Link to ticket
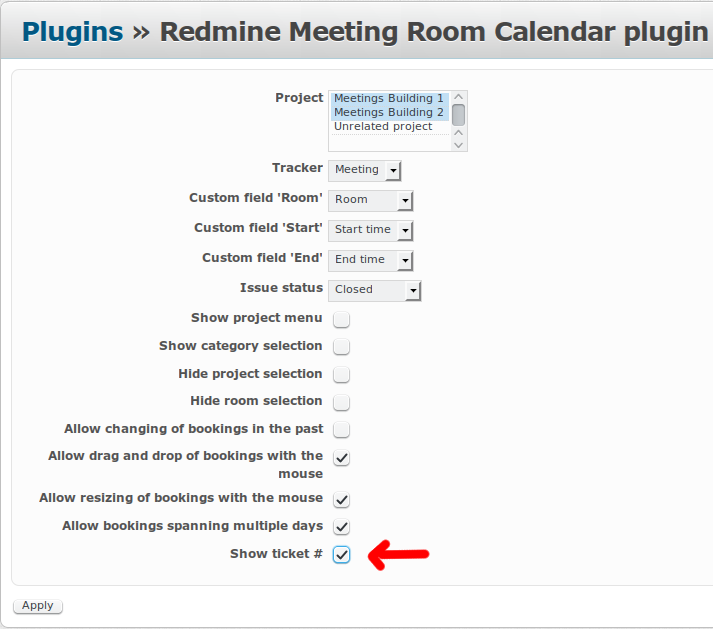
With this setting enabled an additional link to the ticket is display in the calendar:
Different CSS styles for different rooms
For each event in the calendar a CSS class is added of the form .meetingroom<roomnr> (<roomnr>=index of the room in the drop-down select box). This way the events can be displayed differently via CSS. See https://github.com/dro123/redmine_meeting_room_calendar/blob/master/assets/stylesheets/meeting_calendar.css#L125 for more details and examples.
Localization
The calendar and the plugin will use the current locale of the user. This includes display style of dates and times.
If there is something missing it can be added to the following files/folders:
Plugin localization:
https://github.com/dro123/redmine_meeting_room_calendar/tree/master/config/locales
for example: https://github.com/dro123/redmine_meeting_room_calendar/tree/master/config/locales/de.yml
Calendar and date/times:
https://github.com/dro123/redmine_meeting_room_calendar/blob/master/assets/javascripts/fullcalendar/lang-all.js
see also: http://fullcalendar.io/docs/text/lang/
Example with German localization:
