Liferay DDM Tool
Command Line Tool for authoring, uploading, downloading and synchronizing Liferay DDM related stuff (Structures and Templates) across environments. All transactions are done over JSON Web Services.
Demonstration recorded at Liferay DevCon 2014
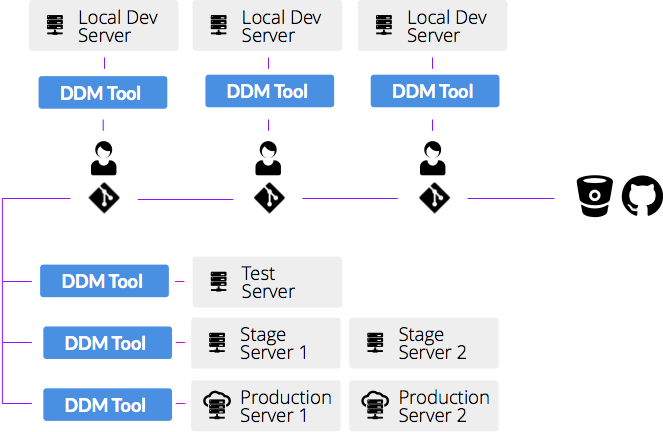
Flowchart
Abilities
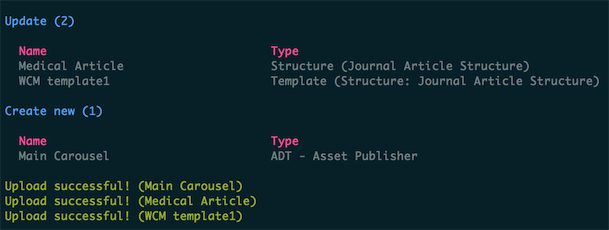
- Upload ddm stuff - structures and templates - from local (version controlled!) repositories to server (localhost, live, dev and whatnot).
- Download ddm stuff from server to local repositories.
- Watch local folder for changes and when changed immediately upload the file to server.
- Show diffs between server and local repositories (files only available locally/on server)
What is "DDM related stuff"?
- Journal Article Structures and Templates
- Application Display Templates (ADTs), including but not limited to all built-in portlets supporting ADTs, such as Asset Publisher, Blogs, Categories Navigation, Document and Media, Sitemap, Tags Navigation and Wiki.
- Dynamic Data List Definitions
- Document & Media; Metadata Set Definitions and Document Type Definitions
- All structures and templates for portlets you build yourself.
Installation
Requires Node.js (if unsure if you have node install, run node -v in a console.)
Install with npm:
sudo npm install -g liferay-ddmtooland then run:
ddmIf this is the first time you use this App. You most probably want to download all structures and templates to a local folder.
- Create a new project by following the wizard in the App.
- Select the just created project and choose "Download All"
- A folder containing all structures and templates has now been created in the path you selected when you created the project. Maybe you want to make this into a git repository?
Common use cases
Version contol
The DDM tool will upload (and download) files from a folder on your local machine to a Liferay server of your choice. If you put that local folder under version control you may check in and out your structures and templates just as any other source code.
Live template development in the editor/IDE of your choice
 When developing templates, set the Liferay DDM Tool in "watch mode" and as soon as you save a template in your favorite editor, it'll upload to the Liferay server and is used immediately.
Usually you want to upload files to your localhost development environment.
Pro tip:
Run DDM Tool with the -w/--watch flag to go straight into watch mode:
ddm -w --project <awesomeproject> --server <servername>Setting up a new environment, such as a new live/dev server
Checkout all structures and templates from your resposity, run the DDM Tool and select "Upload all"
Pro tip:
Run DDM Tool with the -u/--upload flag to upload all files without any menu selections.
ddm -u --project <awesomeproject> --server <servername>Deploying all to the live server as a part of the release process
Just as if you were setting up a new environment, just checkout all ddm stuff and run "Upload all" to deploy all structures and templates.
If you just want to deploy some of the files, go into "Find Diffs" > "Select and upload files which differs", and pick the files you want to deploy.
Making sure that each environment have the same structures and templates
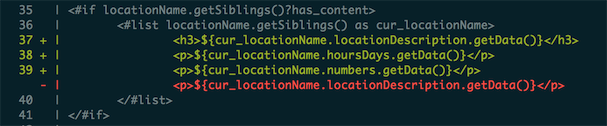
Start up the DDM Tool and go into "Find Diffs". From there you may show all diffs straight from the command line, open an external diff tool (see Project settings below) or upload/download diffing files.
Pro tip:
Run DDM Tool with the -i/--diffs flag to go straight into diffs mode:
ddm -i --project <awesomeproject> --server <servername>Download all DDM Stuff
Want to save all structures and templates from a server to your local disk? Just run the app and select "Download All"
Pro tip:
Run DDM Tool with the -d/--download flag to go straight into download mode:
ddm -d --project <awesomeproject> --server <servername>Command line arguments
You may also start the App with some command line arguments. One common way to start the app is ddm --project <project-name> --server <server-name> to skip the project and server selection menues. Run with --help to get all available arguments.
Limitations
- Currently there's no way of syncing removal of files. If you remove a file on server, you must remove it locally and vice versa.
- Every Template must be assigned to a Structure. Don't create any templates on the Liferay server which does not have a structure connected to it.
- Much of the magic comes form matching names. If there's a journal template on the server named 'My Template' the app will try to match it to the file project/journal/templates/My Template.ftl (or .vm). Therefor, if you rename a structure or template, it'll be seen as a new file.
- There may be no exotic characters in the structure/template names (nothing which is not valid filename on an old Windows machine, so no slash, no comma, etc).
- As we at Monator are all running Macs, the DDM Tool hasn't been tested on Windows.
Settings
All config files are saved as JSON in $USERHOME/.ddmtool.
Project Configuration Files
For each project, there's a project configuration in $USERHOME/.ddmtool/config/projects/project-name.json.
Sample Project Setting File
{
  "projectName": "myproject",
  "filesPath": "/code/ddm-repo",
  "defaultLocale": "en_US",
  "externalDiff": "/usr/bin/opendiff %1 %2",
  "allowSelfSignedCerts": true,
  "watchIgnorePattern": "^(\\#.*|.*\\~)$",
  "hosts": [
    {
      "name": "local",
      "host": "http://localhost:8080",
      "username": "test@liferay.com",
      "password": "test",
      "email": "test@liferay.com"
    },
    {
      "name": "prod1",
      "host": "http://123.123.123.123",
      "username": "admin",
      "password": "superstrongpassword",
      "email": "admin@company.com"
    }
  ],
  "ignoreDDMs": [
    "EVENTS",
    "INVENTORY",
    "ISSUES TRACKING"
  ]
}
Project Settings
projectName. Your project name. App may be called with command line argument--project myprojectto skip the project selection menu.filesPath. Full path to where your DDMs are. This is typically the folder you want to have under version control.defaultLocale. New DDMs will be uploaded with the name/description in this locale.allowSelfSignedCerts. By default, Node.js (and this tool) does not allow connections to hosts with self signed certificates. Set this totrueto bypass this check and allow the connection. Added in version 0.8.6.watchIgnorePattern. Some editors create temporary files. To make sure that the watch function doesn't try to upload those to the server you may specify a regex of files to ignore. Default settings ignore files starting with#and/or ending with~. Added in version 0.8.5. You need to add thewatchIgnorePatternline to any previous projects you have, if you want to add the functionality.
Host(s)
- Array of Liferay servers, e.g your local development server, your test server, your production server etc.
name. Your name of the server. App may be called with command line argument--server localto skip the server selection menu. If--serveris supplied, so must--project.host. Host and port to the Liferay server.username&password. The username and password with which you will log in to Liferay.email. Often email is the same as username. However, if you're not using email to log in, change this to the email adress connected to your Liferay account. Email is only used to lookup your user id (For some reason, we can't ask Liferay for the user id for the current logged in user).
Optional
externalDiff. Path to external diff tool. If externalDiff is supplied, you'll get a new choice to "open external diff tool" in the diff menu. Must have variables%1and%2. Like/usr/bin/opendiff %1 %2.%1will be replaced with "left" folder (local DDM repository) and%2will be replaced with "right" folder (server DDMs).ignoreDDMs. Array of structure/template ID:s to be ignored by the App. Typically Liferay default structures/templates (if you don't remove them from server).
Custom Class Names Configuraiton
By default, the App will look for Liferay standard DDM entities (such as structures and templates for journal articles, ADTs, dynamic data lists, etc).
If you want the App to be able to handle custom structures and templates for custom DDM entities you may create a customClassNameConfig.json file in $USERHOME/.ddmtool/config/.
- Figure out the className of the new structure/template by querying the database for
select value from classname_ where classNameId = 12345. If the App finds a structure/template it does not recognize, it will tell you. It'll also tell you the server classNameId of that structure/template which you'll use in the query. - Create/update the
customClassNameConfig.jsonfile, like below:
Sample Custom Class Name Configuration
[
    {
        "filesPath": "generic_record_set",
        "friendlyName": "Generic Record Set",
        "clazz": "com.monator.moh.genericddm.model.GenericRecordSet",
        "getTemplate": false,
        "mayHaveTemplates": true,
        "mayHaveStructures": true,
        "isNativeDDM": true
    }
]filesPath[string]. Subfolder (inside the folder you defined as filesPath for the project) the files will be saved in. No slashes anywhere please; no leading, no trailing and none inside.friendlyName[string]. Name as it will be displayed in the user interfaceclazz[string]. Class Name you got from your database query.getTemplate[boolean]. Whether or not theclazzshould be used when asking Liferay for all Templates. If unsure, set this tofalse, run the App and download the structures/templates and check if you get the templates you want.mayHaveTemplates[boolean]. Within the folder defined infilesPath, may there be Templates? Typically this is true.mayHaveStructures[boolean]. Within the folder defined infilesPath, may there be Structures? Typically this is trueisNativeDDM[optional boolean]. True if template's class name should be DDMStructure instead of the entity given by clazz. Typically this is false.