node-red-contrib-tellstick
This is a full featured Node-RED module to communicate with a Tellstick or Tellstick Duo.
- Send data to a Tellstick, e.g. turning a lamp on (Available on both Tellstick and Tellstick Duo).
- Recieve data from a (Tellstick compatible) transmitter, e.g a remote control or a temperature sensor (Only available on Tellstick Duo).
- Manage devices, e.g. add and "teach" a new wall plug
Table of contents
- Status
- Issues
- Looking for older module?
- Example flow
- Installation
- Usage, In node
- Usage, Out node
- Tips and tricks
- Advanced
- About the Tellstick
- Developing
Status
| What? | Status | What? | Status |
|---|---|---|---|
| Codacy | Licence |  |
|
| Issues |  |
Tag |  |
| GitHub Version | GitHub Forks |  |
|
| NPM Version | GitHub Followers |  |
|
| Dependencies |
Issues
This is still getting developed. Feel free to add issues, questions or feature requests.
Looking for older module?
The NPM namespace node-red-contrib-tellstick previously (up until 13 april 2015) held a completely different, simple, module which supported receiving data from Tellstick Duo.
@japikas gracefully transferred ownership of the namespace to this module (which also supports receiving data, plus much more). Are you looking for the old module? Please find it at https://github.com/japikas/node-red-contrib-tellstick.
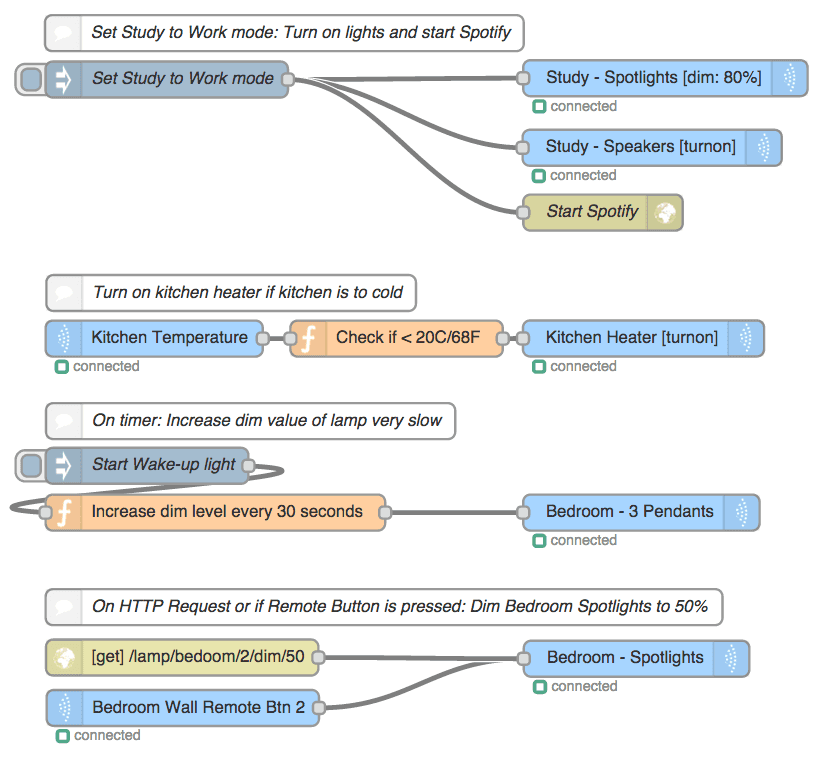
Example flow
Light blue nodes are tellstick nodes.
Installation
0. Node version
Find out if you're running Node 0.10/0.11 or a newer version. Get your current Node version by running:
node -v1. Install telldus-core and development libraries
Windows and Mac OS X
Make sure you have Telldus Center installed. If you own a Telldus, you probably have this already. If not, download and install from the Telldus webpage. That's it, go to step 2 below.
Ubuntu/Debian/Raspbian (Raspberry Pi)
Note: If you previously have installed drivers for the Tellstick, there's a possibility that you've installed telldus-core but are missing the libtelldus-core-dev which is needed for this module to work on Ubuntu/Debian/Raspbian.
#
# Make Telldus available to the distribution
#
sudo nano /etc/apt/sources.list
# add the following line (without the #):
# deb http://download.telldus.com/debian/ stable main

#
# Download and install Telldus repository key
#
wget -q http://download.telldus.se/debian/telldus-public.key -O- | sudo apt-key add -

#
# Update the repository
#
sudo apt-get update

#
# Install telldus-core AND libtelldus-core-dev
#
sudo apt-get install telldus-core libtelldus-core-dev
Other Linux
Install from source by following this excellent guide from Lasse.
2. Install module(s)
For some reason, the underlying telldus library does not have node-gyp as a dependency (even though it actually needs it). Therefor install by cd-ing to your Node-RED directory ($HOME/.node-red) and run these 3 commands in sequence.
1)
npm install node-gyp2)
Run one of these commands:
If you're running Node 0.12 or above, run:
npm install telldusor, if you're running a legacy version of Node (0.10/0.11), run:
npm install telldus-legacy3)
npm install node-red-contrib-tellstickUsage
This module consist of 2 nodes, one for listening to incoming data (remotes and sensors) and one for transmitting data (e.g telling a lamp to turn off).
Usage, In node
This module will listen to all incoming data and if that data matches the rule set in the in node, the node will be triggered and pass the complete incoming message object forward.
E.g. you can set an input node to listen to all remote which sends house=15414550 and group=0. This will fire the node on all button press' on that remote control. If you want to qualify it you may adda a unit=10 to the rule which will make it only fire on button 10. Or qualify it even more by adding the rule method=turnoff to only make it trigger on the off button (and not the on button).
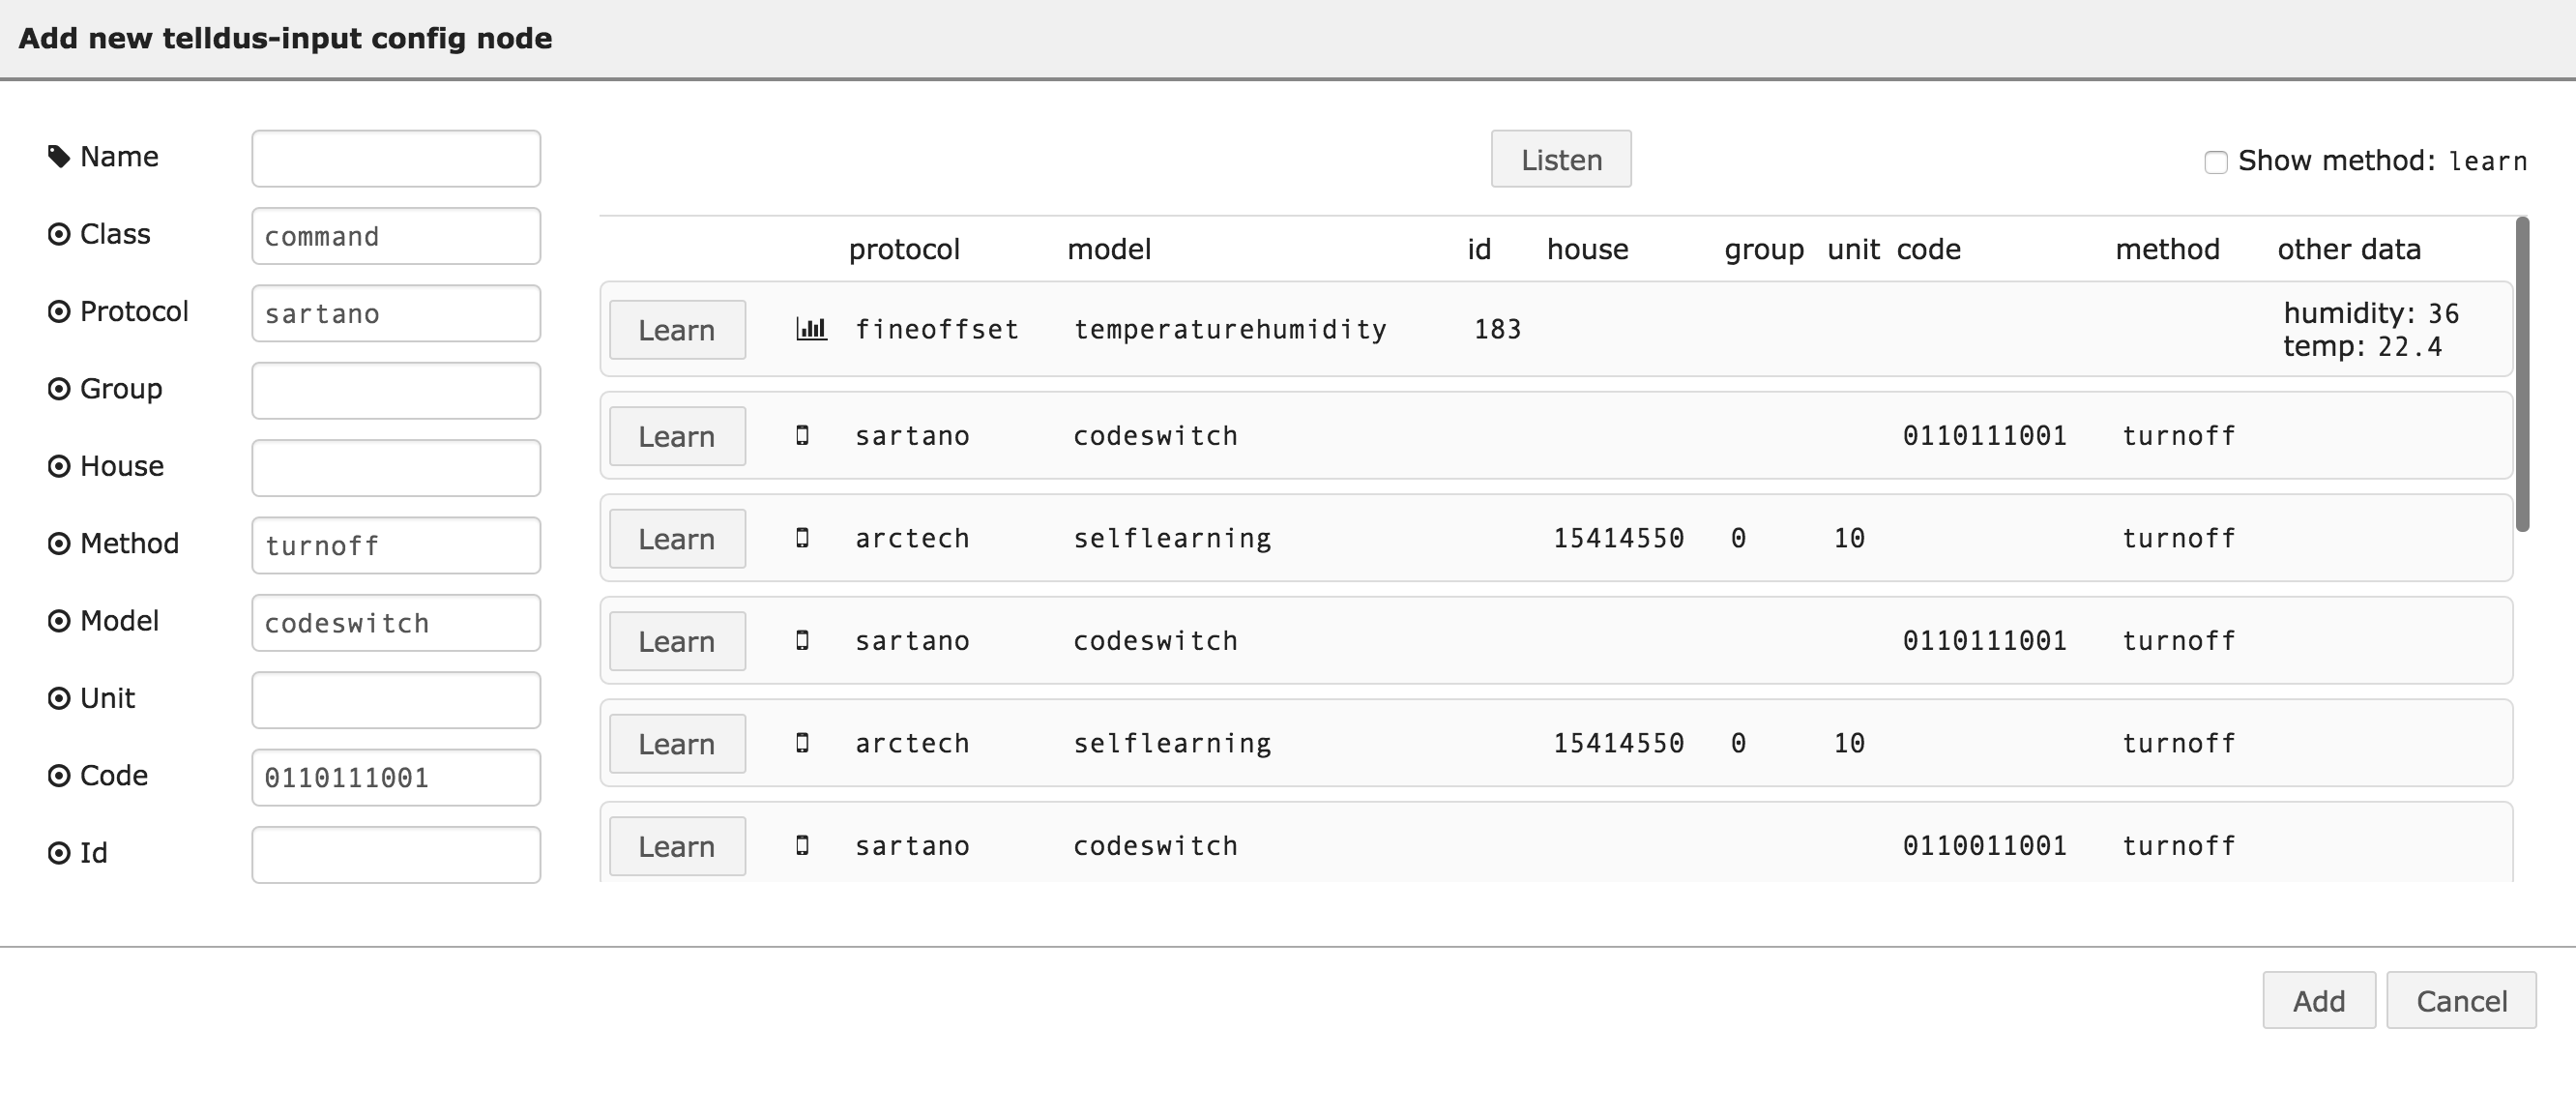
You can easily make your rules by placing a Tellstick in node on your Sheet, clicking it and select "Add new tellstick-input". A dialog will open which will show all incoming data. Just press a button on the remote (or wait for your sensor to transmit a signal) and it will show up on the dialog. From there you may can the learn button which will populate the rule fields.
If you want to create an In node which passes on all incoming data, just create a config with all fields left blank (meaning: no rules).
If a in node is triggered, it will output the complete data message from the transmitter. Check the message out by wiring the input node to a debug node (set to display full message).
Example of outputted data. However, note that no transmitter sends all fields. All transmitters have fields like class and protocol but e.g. codeswitch type transmitters only transmit code and not house or unit where for a selflearning transmitter it's the opposite.
{
    "class": "command",
        // Could be 'command' for remote or 'sensor' for sensor
    "protocol": "sartano",
    "group": 0,
    "house": 12345678,
    "method": "turnon",
        // Remotes usually send "turnon" for "on" and "turnoff" for "off" button
    "model": "codeswitch",
    "unit": 1,
    "code": 1011011011,
    "id": 123,
    "additionalDataFields": 22.1
        // A sensor could send "temp: 22.1" for temperature reading,
        // or "humidity: 57" for humidity

}
Example, pressing the first off button on a Nexa handheld remote:
{
    class: 'command',
    protocol: 'everflourish',
    model: 'selflearning',
    house: 34937,
        // Built in identifyer for this particular remote
    unit: 1,
        // Number 1 button (this remote have 4 pairs of on/off buttons)
    method: 'turnoff'
        // Pressed the "off" button. On button would give "turnon"
}
Example Proove TSS320 Temperature/Hygrometer sensor. Sends a signal every minute.
{
    class: 'sensor',
    protocol: 'fineoffset',
    id: 183,
    model: 'temperaturehumidity',
    humidity: 37,
    temp: 22
 }
Usage, Out node
The out node will send a signal telling your heater to turn off or your lamp to dim to 45%.
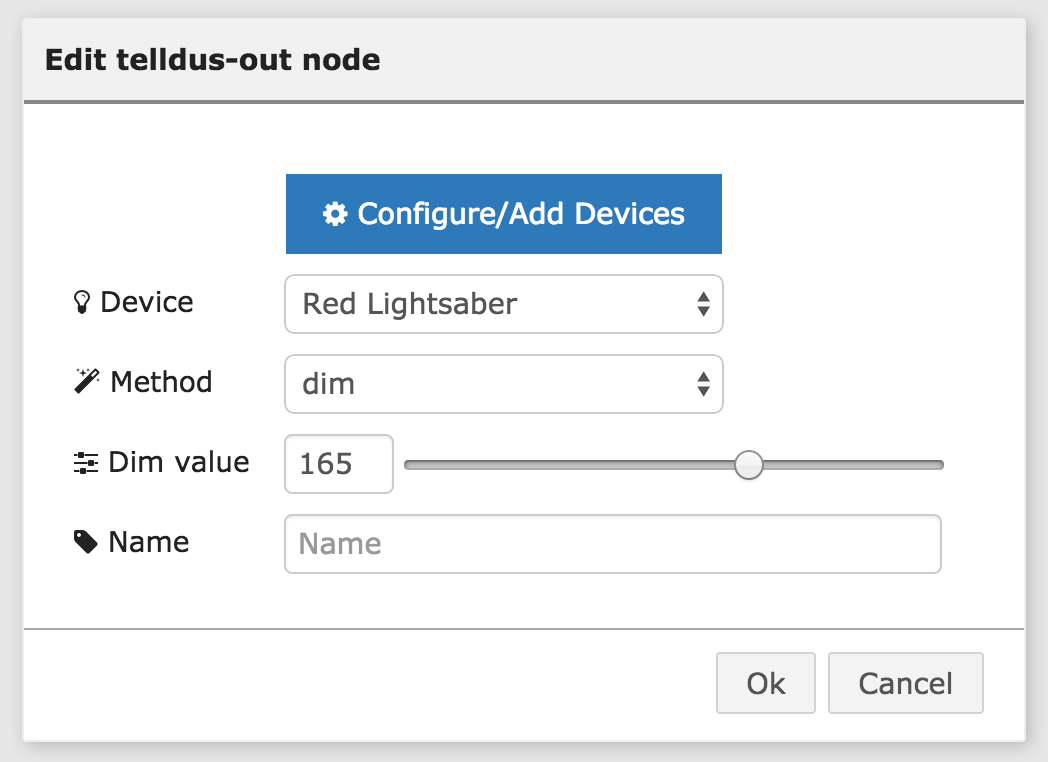
Example of an out node, dimming the device "Red lightsaber" to 165 (65%):
Passing data to the out node.
There are 3 ways of passing data to an out node:
- Configure the
device,method(turn on/turn off/dim) anddimlevel(0-255) if a dim capable device on the output node itself (as done in the screenshot above) - Send the data in the
msgsent to the out node. - A combination of above. E.g set the device to Red lightsaber in the configuration dialog but send
method: turnonormethod: turnoffin themsgto the out node. Whatever is sent in the msg will always override the settings set in the node.
msg: {
    device: 1,
        // Integer, device ID.
        // The Device IDs are displayed in the "Configure devices"
        // dialog (se further down in this README).
    method: 'turnon',
        // Valid methods: turnoff, turnon, dim, bell, learn
        // if dim is supplied so must dimlevel be.
        // method may also be an integer:
        //      0 (for turnoff)
        //      1 (for turnon)
        //      2 (for dim)
        //      3 (for bell)
        //      4 (for learn)
    dimlevel: 100
        // Only taken into account if method is "dim".
        // Valid input: 0-255, where 255 is 100% and 0 is off.
}
Configure devices
The way the Tellstick works you have to configure your devices. On Windows and Mac OS X you do this in Telldus Center, on Linux you do this in /etc/tellstick.conf. However, this is a full featured module to handle Tellstick devices and you may add/update/delete devices straight from Node-RED with this module. Any changes you do from Node-RED will be saved (e.g. written to /etc/tellstick.conf).
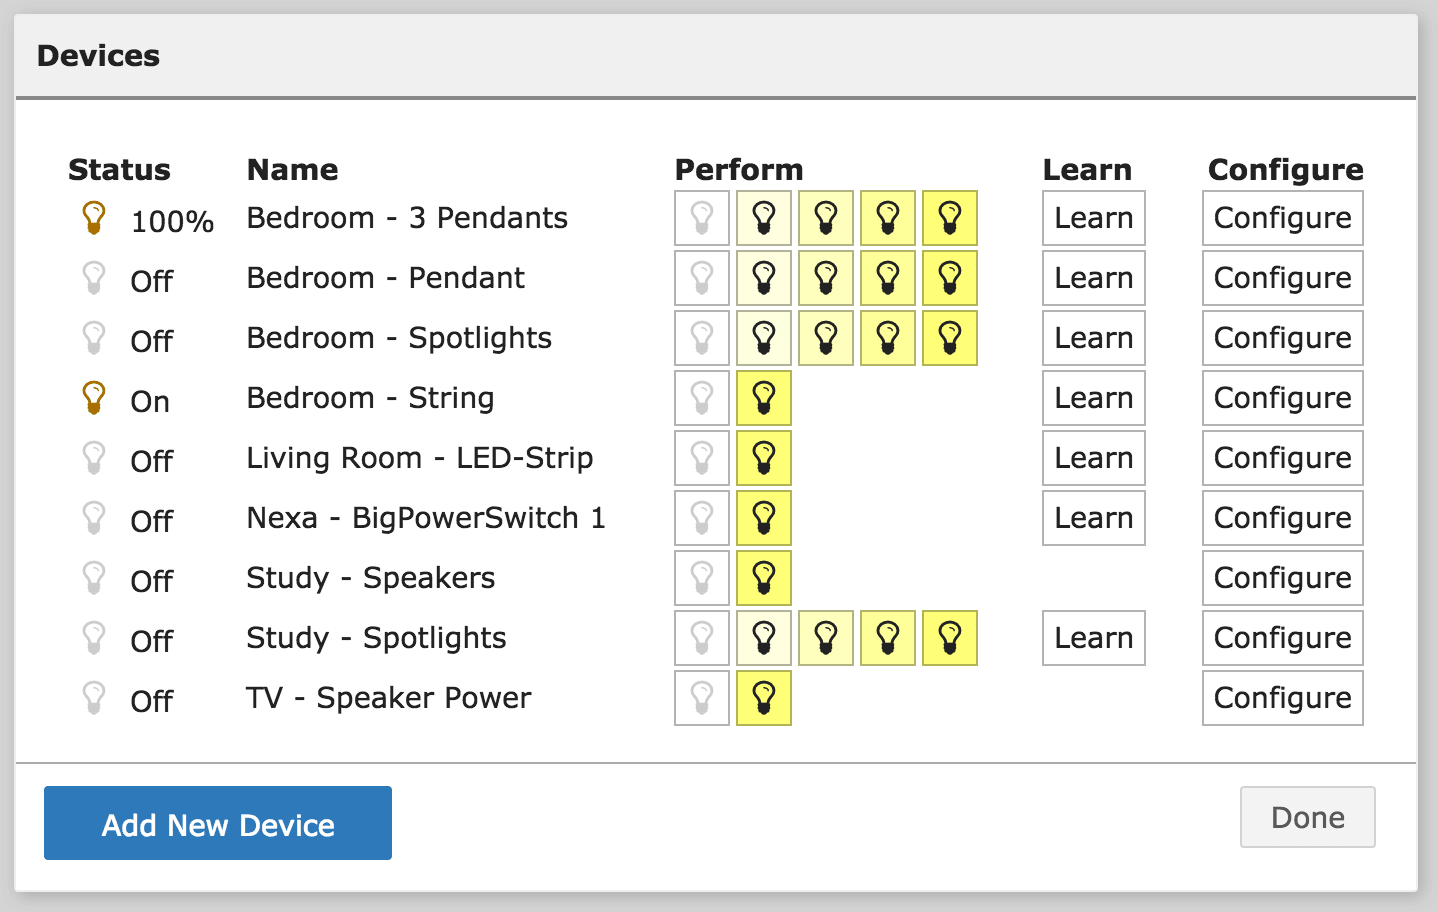
To configure devices. Place an Out node on a Sheet, click it and click the big blue "Configure/Add devices". A new dialog will open showing all configured devices. From here you can also test your devices but turning them on/off or dimming them. Or you may send the "learn" command to them.
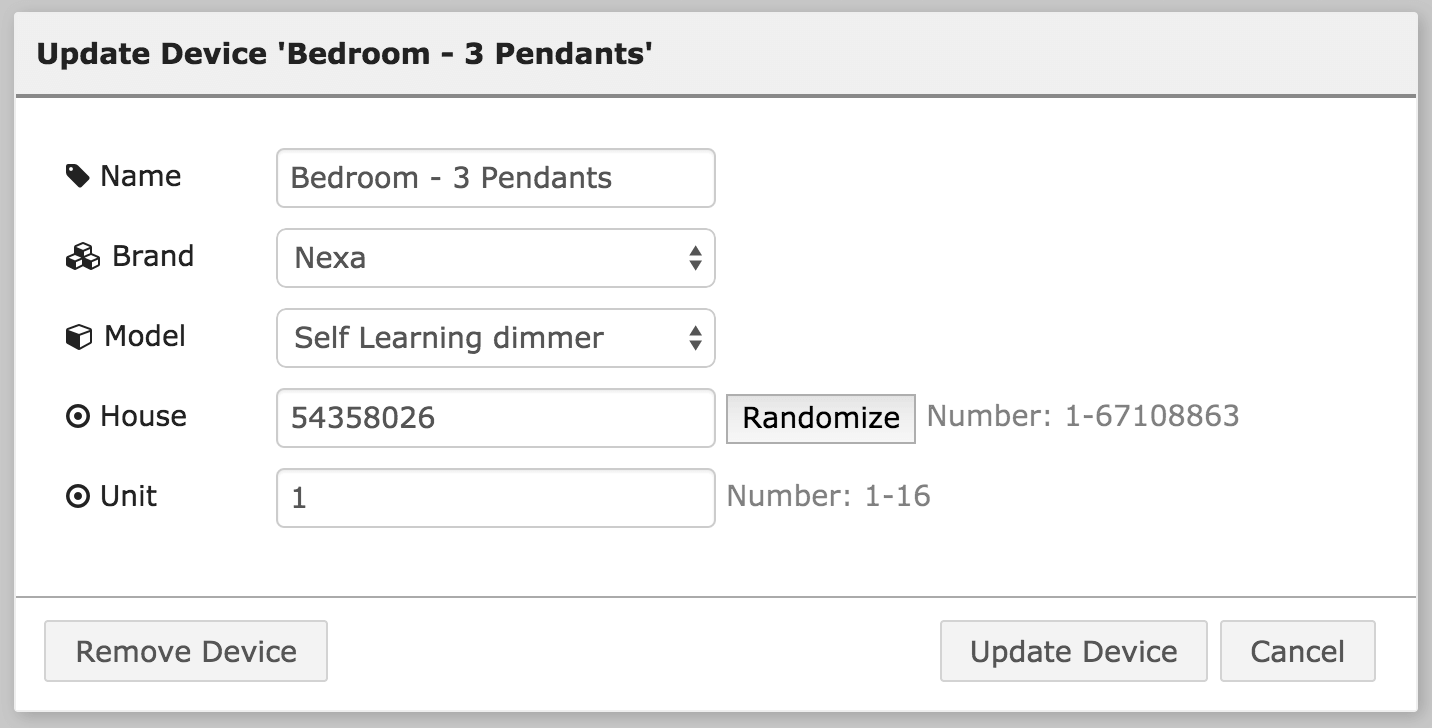
Clicking "Configure" or "Add new device" will give you a dialog to add/configure/remove a device.
Tips and tricks
Converting "on" to "dim to n"
Sending the "turnon" command to a dim capable device will turn it on to the same dim level as you last set it to. If you have a regular on/off remote and want to convert a "turnon" command to a "dim to maximum" you can easily drop a function node between your Tellstick In node and your Tellstick Out node converting the message:
if (msg.method === 'turnon') {
    msg.dimlevel = 255;
    msg.method = 'dim'
}

return msg;
dimlevel goes from 0 to 255, so 255 will dim the device to 100%.
Advanced
Sending same command multiple times
The tellstick-out node sends the same command multiple times to ensure that at least one of them reaches the receiver.
As the Tellstick just sends radio signals without any way of knowing if the transmission reched its goal, sometimes signals gets lost in space.
To mitigate this. The tellstick-out sends the same command multiple times.
By default, it sends the same command 5 times with an interval of 500 milliseconds (0.5 seconds) between each command. You can tweak these settings but editing the settings.js file in your Node-RED directory (the path to the settings file is printed in the console when you're starting Node-RED).
The new settings are:
functionGlobalContext: {
    repeatSendTimes: 5,
    repeatSendInterval: 500
}
Possible caveat
Imagine that you have a flow that will turn on a lamp (command A) and directly thereafter turn off that lamp (command B).
Then the command A will turn the lamp on, then command B will turn the lamp off. Then the command A will emit it's second signal, turning the lamp on again. Command B will emit it's second signal, turning the lamp on - and so on.
If you have a flow as such, then set repeatSendTimes to 1. However, this should really be a corner case.
Debounce/Throttle Data
A radio transmitter will often send the same command multiple times in a short rapid burst to ensure that at least one of them is received. Most 433 Mhz transmitters send the same command 5-6 times.
To make sure it only gets picked up once (even if all 6 of those transmissions makes it through to the Tellstick) we need "debounce" the data. If the same command gets received within a certain time frame, we treat it as one (1) command. By default this time is 500ms.
When transmitting data, the Tellstick behaves in the same way, it will send the same command about 6 times. However, this means that if we're sending two different commands, the Tellstick might start sending the second command before it's done with the first command. This makes only the first receiver pick up a clean signal and do what it's supposed to do (like turn on a lamp). The second receiver will get scrambled data and probably just ignore it.
To solve this we've to make sure the Tellstick is only sending one command at a time. The default time between 2 commands is 900ms (discovered by the nobel art of trial and error).
Unlikely but if your input nodes are getting fired twice or if a second receiver aren't getting the signal (e.g. aren't turning on) you may tweak these times but editing the settings.js file in your Node-RED directory.
Add the tellstickInputThrottle and/or tellstickOutputThrottle property to the functionGlobalContext object like this:
functionGlobalContext: {
    tellstickInputThrottle: 500,
    tellstickOutputThrottle: 900
}
About the Tellstick
The Telldus Tellstick is a small USB connected radio tranciever which plays well on Windows/Mac/Linux (Raspberry) and is used to control a wide range of 433 MHz based plugged in and built in electric switches and dimmers. Further, this module can also listen to incoming Tellstick data (or in other words: it can pick up signals from remote controls).
There are 3 different types of Tellsticks:
- Tellstick - The simplest device. This device can only transmit radio (meaning you may turn on a lamp from Node-RED)
- Tellstick Duo - Transmitter and receiver. This is most probably the one you want. With this you can transmit radio as well as receive (meaning Node-RED may listen and act on incoming radio, e.g. from a sensor or remote control)
- Tellstick Net - This node does not support this device. Ethernet device. It's more or less an all-in-one solution with its own software.
Commonly used Tellstick transmitters/receivers
- HomeEasy
- Nexa Swedish | English (Resellers include Clas Ohlson in United Kingdom, Sweden, Norway, Finland and UAE
- Proove (Swedish)
- X10
- Kjell & Company (Swedish)
Other supported Tellstick transmitters/receivers
Anslut, Brennestuhl, Bye Bye Standby, Chacon, CoCo Technologies, Conrad, Ecosavers, Elro, GAO, Goobay, HQ, IKEA, Intertechno, Kappa, KlikAanKlikUit, Otio, Rusta, Sartano, UPM, Waveman.
See complete list of supported devices on Telldus webpage.
Developing
This modules is quite big and to make it easier to handle, the source code is is broken down into smaller files.
As per Node-RED standard, each module consist of 1 html file and 1 js file. These files lives in the /tellstick folder and gets built from the /lib folder. This is, somewhat incorrectly, named lib because it's a reserved word in the Node-RED world and Node-RED will not try to discover nodes in folders named lib. The more correct folder name would be source.
A Gulp build script is included. Run gulp build to build the html/js files. Run gulp to start gulp in developer mode and auto-build the files when the source files (in /lib) are changed.
