Misinfo Dashboard
![]()
![]()
![]()
Getting Started | Firebase Emulator | Firebase | Push to Netlify
This project project bootstrapped with create-next-app of the Next.js framework. To learn more about Next.js features and API, take a look at Next.js Documentation.
See Technical Documentation for Project Structure, Firebase, Components and Git Usage docs.
Getting Started
1. Clone repo
First step! Clone this repo into a local directory (ex. ~/username/sites/) on your machine.
-
From the command line in your project root run:
git clone https://github.com/engagingnewsproject/misinfo-dashboard.git
2. Install Packages
Node Version
At this time of writing (April 26, 2024) the latest working update is at Node v20.12.2. Ensure this is the version by running node -v. If you are not on that Node version check out this article to set the correct Node version: Easily switch between multiple Node versions without using nvm.
Yarn
Install/update yarn package manager on your machine (installation docs)
-
Enable Corepack, if it isn't already; this will add the
yarnbinary to your PATH:corepack enable -
Set the yarn version by running:
yarn set version 1.22.1-
From the root of the project install dependencies by running:
yarn installWhy not
npm install? Glad you asked! Netlify, the service that hosts the dashboard, will not allow us to upload updates becausenpm installcreates apackage-lock.jsonfile. Netlify doesn't likepackage-lock.jsonfiles.
3. Add Firebase configuration
In order to be authenticated with the Firebase Project you must have the .env file (which contains the Firebase credentials) at the root of your project. To get the contents of the .env file reach out to the project lead (currently Luke).
4. Install Firebase Emulator
Install Firebase Tools by running:
curl -sL firebase.tools | bash5. Start dev server
To boot up the development server and Firebase Emulator run:
yarn devThis command will boot up the Firebase Emulator UI and the NextJS server. Look over your terminal output and click the Emulator links (Emulator UI) and localhost link.
Emulator Users
The emulator has 3 user accounts already set up. You can log in with any of them. Each login has different permissions so the layout will change based on who you are logged in with.
User:
- email: user@user.com
- pass: devPassword
Agency user:
- email: agency@user.com
- pass: devPassword
Admin user:
- email: admin@user.com
- pass: devPassword
You can also sign up with totally different info (email, name, city, state ect.). When you sign up a authorization link will print out in your terminal. You will need to click that link to verify. After you click the link you can close the window that open's (its only for verification) and return to your localhost window to log in.
Emulator Tips:
If you get
command not foundyou might have to be added as a user for the Firebase project. Contact the lead developer to do this for you. Or contact mediaengagement@austin.utexas.edu
The Firebase Emulator should boot up and provide you an emulator link (look for View Emulator UI at in your command line output).
Open that link to view the Emulator UI:
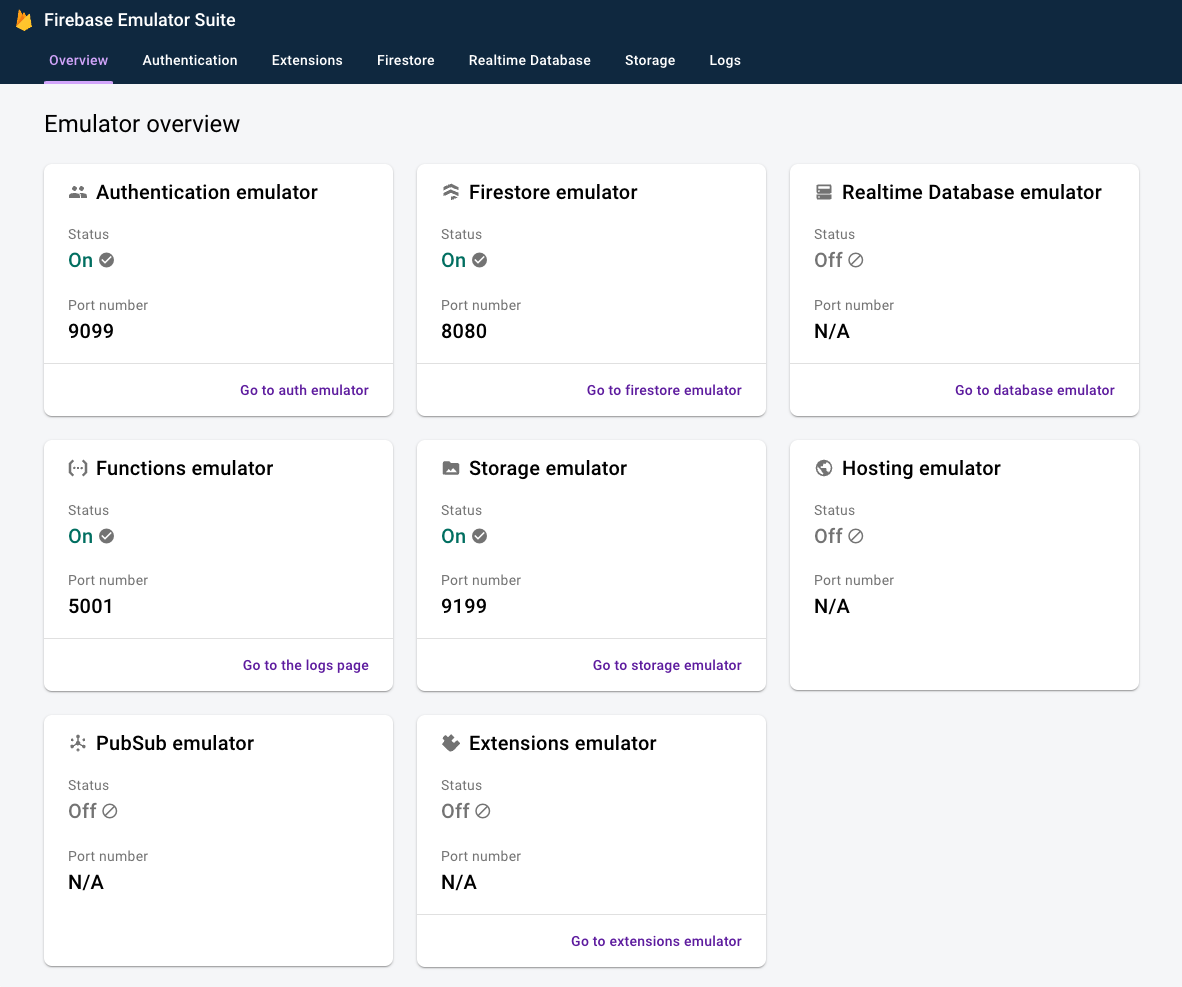
See Emulator Tips for more info.
Add yourself as a user via the "Emulator Authentication" tab.
Two options:
-
Option one: Manually add yourself
From the Firebase Emulator UI select the "Emulator Authentication" tab and click "Add user". Only required fields are:
name,emailandpassword. Change your role? see Available user roles below. -
Option two: Sign up.
You can also signup like a normal user at the Login/Signup page. Once you have signed up:
- Open the link printed out in your Emulator terminal window.
- **all you need to do is open the link. Once you've opened the link close the tab and...
- Return to your initial Signup tab and login with the credentials you signed up with. Change your role? see Available user roles below.
- Open the link printed out in your Emulator terminal window.
Available user roles:
-
General User:
No additional configuration required.
-
Agency User:
In the "Custom Claims" input enter
{"agency":true}& save. -
Admin User:
In the "Custom Claims" input enter
{"admin":true}& save.
Emulator UI
- Database: find the imported database under the Emulator UI / Firestore tab.
- Users: view, add, edit & delete users under the Authentication tab.
- Files & Uploads: Storage tab in the Emulator UI.
Users
Your user UID that you created will not be associated with any reports or agencies so you can either add reports via the Misinfo Dashboard in your localhost:3000 window or go into the Emulator UI and manually change the userID to your own for some reports. Same idea with assigning your user to an agency: go into the Emulator UI and add your email to an agency's agencyUsers field.
Emulator log files
Emulator creates log files (firebase-debug.log & ui-debug.log) when you boot up the emulator. No need to push those with git.
Export your local emulator data
The Firebase emulator allows you to export data from your running emulator instance. If you want to stash a baseline set of data, auth profiles you have set up in your running emulator instance.
firebase emulators:export ./emulator-data
This command will export the running emulator instance's auth profiles, firestore data and storage files to the /emulator-data folder. Recommended to not commit the /emulator-data changed files as to not alter the baseline Emulator data.
Firebase Functions
To deploy Firebase functions:
firebase deploy --only functionsFirebase Creds
With proper permissions access Firebase Console or Firebase Cloud Console.
- Firebase project name: Misinfo
- Firebase project ID: misinfo-5d004
- Firebase project #: 2581605663
Firebase Storage
- Firebase storage name: misinfo-5d004.appspot.com
Links: Chrome React Developer Tools || VS Code React-Native snippets || VS Code Tailwind CSS IntelliSense
Deploy to Netlify
Deploy to dev
Link: https://dev-misinfo-dashboard.netlify.app/
To push all changes to the dev site on Netlify using the Engaging News Project's misinfo-dashboard repo's dev branch.
The dev branch is the branch that contains the dev live site code.
-
Checkout the
devbranchgit checkout dev -
Merge changes from
maintodevgit marge main -
Push the merge into
devgit push origin dev -
Open the Netlify UI for the dev site and monitor the progress. Make sure the top bar has
dev-misinfo-dashboardactive. On the left sidebar navigate to the "Deploys" link. Your latest push will be listed at the top.
Deploy to prod
Link: https://misinfo-dashboard.netlify.app/
To push all changes to the live site on Netlify using the Engaging News Project's misinfo-dashboard repo's dev branch.
The prod branch is the branch that contains the live site code.
-
Checkout the
mainbranchgit checkout main -
Merge changes from
devintomaingit marge dev -
Push the merge into
maingit push origin main -
Checkout the
prodbranchgit checkout prod -
Merge
mainintoprodgit merge main -
Push the merge into
prodgit push origin prod -
Open the Netlify UI for the prod site and monitor the progress. Make sure the top bar has
misinfo-dashboardactive. On the left sidebar navigate to the "Deploys" link. Your latest push will be listed at the top.
Deploy issues
If you get the below error you will need to install Git Large File Storage.
remote: error: File firestore-debug.log is 102.65 MB; this exceeds GitHub's file size limit of 100.00 MBTo install:
git lfs install - make sure git large file storage is installed
git lfs track "firestore-debug.log" - to track the large file
git lfs migrate import --include="firestore-debug.log" --everything - convert the file types to LFS
git lfs ls-files - to list files
git lfs checkout - files can be repopulated with their full expected contents lfs docs
Project Lead Links: Firebase CLI Tools || Firebase Console || Firebase Cloud Console || Syncing a fork || Netlify dashboard || ENP Prod Repo
Links
Netlify Dashboard
React Dev Docs
Firebase Firestore Docs
Material Tailwind
- (all components in the left sidebar)
TailwindCSS Docs
Deprecated: Misinfo Dashboard Documentation GitBook
Markdown Badges
Docs
Integration of AuthContext and Firebase Functions
The AuthContext.jsx file in your React application interacts with the Firebase functions defined in functions/index.js through HTTPS callable functions. This setup allows your front-end application to communicate with the backend Firebase environment in a structured and secure manner.
How It Works:
-
Firebase Functions (
functions/index.js): This file defines various cloud functions that you deploy to Firebase. These functions can perform operations such as user authentication management (e.g., adding roles, fetching user data), interacting with Firebase Firestore, and other tasks that require server-side execution. -
React Context (
context/AuthContext.jsx): This file creates a React context that holds the user's authentication state and provides various authentication-related functions across your React application. It utilizes the functions defined infunctions/index.jsthrough HTTPS callable methods, such asaddAdminRole,addAgencyRole, andfetchUserRecord.- HTTPS Callable Functions: These are Firebase functions that are exposed via an HTTPS endpoint. In your React app, you use
httpsCallablefrom Firebase to invoke these functions. This method sends a POST request to the corresponding function's URL and gets the response.
- HTTPS Callable Functions: These are Firebase functions that are exposed via an HTTPS endpoint. In your React app, you use
Example Flow:
-
Add Role: When you want to add a role to a user, your React component calls
addAdminRoleoraddAgencyRolethrough the context. This context function then calls the respective HTTPS callable function, which in turn invokes the cloud function in Firebase. The cloud function performs the necessary operations (like setting custom claims) and returns the result. -
Fetch User Record: When you need to fetch details about a user, your component accesses
fetchUserRecordfrom the context. This function usesgetUserRecord(defined as an HTTPS callable function) to retrieve user details from Firebase Authentication.
Connecting the Dots:
-
AuthContext Integration: In your React components, you use the context to perform operations that involve authentication or user management. For instance, upon user login, you might call
loginfrom the context, which handles the sign-in process using Firebase Authentication. -
Security and Accessibility: By managing these operations through cloud functions and context, you ensure that sensitive operations are securely handled on the server side, minimizing exposure to the client side, and you maintain a clean separation of concerns.