yt_clipper
yt_clipper is a relatively simple way to clip videos from popular platforms (for now YouTube, WeVerse, Naver TV, and AfreecaTV).
It provides a graphical UI for video editing that creates instructions in json format for clipping the video.
These instruction files are small and in plain text so they can be easily read, modified, and shared with others.
The clipper script component provides a way to process these instructions and generate the clips you want.
Video Quick Start
For a video quickstart check out this video: https://imgur.com/a/gQ4KItt
Quick Start Guide
Visit this quickstart guide to get up and running with yt_clipper.
The contents of the quickstart guide are included here for convenience:
1) First install a user script extension (preferably Tampermonkey) for your browser (preferably chrome).
- See this article for more information.
2) Next install the
markup scriptcomponent ofyt_clipperby clicking here. 3) Install the standaloneclipper scriptcomponent ofyt_clipperby visiting Clipper Script Installation. - Alternatively download the python source here and see this section for usage instructions.
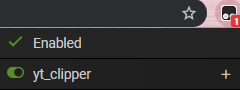
4) Visit a YouTube video page. Check that the
markup scriptis active on the page. Refresh the page if it is not active. 5) Press Alt+Shift+A to activate themarkup scriptand its hotkeys. You should see a flash message below the video. - Use the various hotkeys to add marker pairs and edit settings to specify how to clip the video.
- A to add markers, Z to undo markers, Shift+Mouseover a yellow end marker to open its settings editor.
- W to open global settings editor, Shift+W to toggle additional settings.
- Click the shortcuts reference toggle in the video player bar for an overview of all shortcuts.
- Hover over an option in a settings editor to see a tooltip describing the option.
6) Use the S key to save markers data in
.jsonformat. 7) Generate webms using the saved markers data and theclipper script. - Windows: Drag and drop the saved markers data onto the
yt_clipper_auto.bat. - Mac: Launch the
yt_clipper_auto.shprogram, drag and drop the saved markers data onto the terminal, and hit Enter. - Find generated webms in
yt_clipper/webms/title-suffixfolder wheretitle-suffixis the file name stem of the markers data file. - See this section for details on the other helper scripts available.
8) See the full instructions for more detail and advanced usage as well as changelogs.
9) Check the changelogs for updates as there is not yet an automated mechanism.
10) Join the
yt_clipperdiscord server if you want further help or want to contribute.
Notices
- Windows users getting ffmpeg crashes may want to try the following:
- Update visual c++ redistributables:
- For 64-bit Windows: https://aka.ms/vs/16/release/vc_redist.x64.exe
- For other Windows versions and older redistributables check this page: https://support.microsoft.com/help/2977003/the-latest-supported-visual-c-downloads.
- Switch to static ffmpeg build: https://github.com/BtbN/FFmpeg-Builds/releases and find the latest release titled something like
ffmpeg-N-101776-gd4575982f4-win64-gpl.zip. - Replace contents of
yt_clipper_win_*/binwith the contents of thebinfolder in the ffmpeg zip.
Browser Support
- Works best on Chrome with the Tampermonkey extension and YouTube video in theater mode.
- You may need to refresh the video page and ensure this user script is active.
- FireFox, Opera, and most Chromium-based browsers not fully tested, but reportedly work as intended.
- FireFox audio slowdown stutters and in mainline FireFox has a min speed of 0.5.
- Other browsers may or may not work as intended.
Video Platform Support
YouTube is the primary video platform supported by yt_clipper. Other supported platforms are listed below.
- YouTube
- Weverse (at least Weverse Lives)
- Naver TV
- AfreecaTV (at least VODs)
AfreecaTV Support Notes
- AfreecaTV clips use the hls (http live streaming) protocol which is not as reliable as other protocols.
- Short AfreecaTV clips (about 1 second or shorter) may produce empty video files when.
- AfreecaTV VODs come in multiple video file parts and clips that span multiple parts are not currently supported.
Related Scripts
- Check out the companion script with tools for making some tasks on
gfycat.comeasier (e.g., quickly tagging multiple gfys, copying gfy links in various formats) at https://openuserjs.org/scripts/elwm/gfy-tools.
Table of Contents
- yt_clipper
- Video Quick Start
- Quick Start Guide
- Notices
- Browser Support
- Video Platform Support
- Related Scripts
- Table of Contents
- Terminology and Installation
- Markup Script Shortcuts
- Marker Shortcuts
- Cropping Shortcuts
- Video Playback and Preview Shortcuts
- Frame Capturing Shortcuts
- Save and Load Shortcuts
- Miscellaneous Shortcuts
- Dynamic Speed and Crop Shortcuts
- Common Dynamic Chart Shortcuts
- Dynamic Speed Chart Shortcuts
- Dynamic Crop Chart Shortcuts
- ZoompPan Mode
- Dynamic Crop Tips
- Useful YouTube Controls
- Tips
- Encoding Settings Guide
- Clipper Script Source
- Clipper Script Usage
- Clipper Script Preview Shortcuts
- Clipper Script Installation
- All Releases
- Clipper Script Dependencies
- Changelog
Terminology and Installation
Markup scriptrefers to the user script installed in your browser through a user script extension. It is used to mark up videos (e.g. on YouTube) before creating webm clips.- The required user script extension, for exampleTampermonkey, can be installed from the appropriate add-on store from your browser.
- See https://openuserjs.org/about/Userscript-Beginners-HOWTO for more information on user scripts.
Clipper scriptrefers to the python script (.py)or the installation that consumes marker data injsonformat to generate webm clips.- See Clipper Script Usage for usage instructions.
- See Clipper Script Installation for installation instructions.
Markup Script Shortcuts
First ensure the script is active on the page by checking your user script extension.
Alt+Shift+A: Toggle hotkeys on/off. A green message will flash below the video indicating hotkeys are enabled.
A shortcuts reference can be toggled by clicking the scissor icon in the video controls bar.
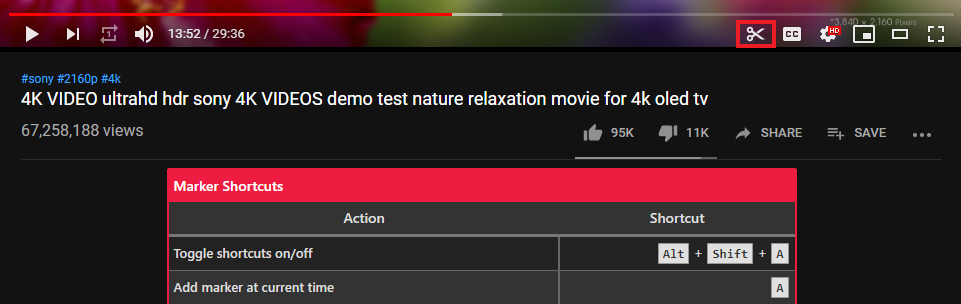
Marker Shortcuts
A: Add marker at current time (start = green, end = yellow, selected = black center). Multiple marker pairs can be added simultaneously.
Z: Undo last marker.
Shift+Z: Redo last undone marker.
Ctrl+Shift+Alt+Z: Delete currently selected marker pair. Does nothing if no pair selected.
Shift+Mouseover End Marker (Yellow) or Left-Click Any Marker Numbering: Toggle marker pair editor. Selected marker pairs have a black center.

- Modified marker pair settings are accented orange while settings redundant with a global setting are accented red.
- Reorder marker pairs using the input box in the title of the marker pair settings panel.
- Edit pair crop or speed multiplier.
- Edit
Title Prefixthat will be prepended to theTitle Suffixand used in the webm name for the marker pair.
Ctrl+Up: Select/deselect the most recently selected marker pair or else the first available pair.
Ctrl+Down: Toggle auto-hiding of unselected marker pairs. Hidden marker pairs cannot be selected with the mouse.
Adjusting marker position/time:
-
While a pair is selected use Shift+Q/Shift+A to move the start/end marker to current time.
- Adjust marker position more precisely by first using the < and > keys to seek videos frame by frame.
-
Use Alt+Shift+Mousewheel and scroll up/down to move marker one frame forward/backward.
- When performed on the left half of the window moves the start marker and on the right half the end marker.
-
Alt+Click+Drag a marker numbering to quickly make rough adjustments to the marker's time.
-
Use Alt+Z/Alt+Shift+Z to undo/redo marker moves as well as speed and crop changes.
- Undo/redo history is kept separately for each marker pair. Navigating marker pairs without the mouse:
-
Jumping to and selecting marker pairs without the mouse
- Ctrl+Left/Right: Jumps to the nearest previous/next marker.
- Alt+Left/Right: Select the next/previous marker pair relative to the currently or previously selected pair.
- Ctrl+Alt+Left/Right: Select the next/previous marker pair and jump to its start marker.
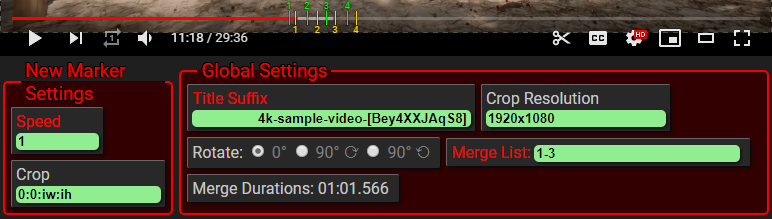
W: Global settings editor:
- Modified global settings are accented red.
- Change default new marker speed or crop.
- Any new markers added will use these defaults, but this will not update existing markers.
- To update existing markers to the default new marker speed/crop use Alt+Shift+Q/Alt+Shift+X.
- Specify crop resolution (automatically scales any existing crops on change).
- This resolution must match the downloaded video's resolution.
- By default the max available video resolution is downloaded by the
clipper scriptand the crop resolution auto-scaled if a mismatch is detected.
- Specify any webms you want to merge from the clipped webms.
- Very fast as it does not require re-encoding webms.
- The format is similar to that for printer page ranges:
- Each merge is a comma separated list of marker pair numbers or ranges (e.g., '1-3,5,9' = '1,2,3,5,9').
- Multiple merges are separated with semicolons (e.g., '1-3,5,9;4-6,8' will create two merged webms).
- Specify
Title Suffixappended to each marker pairTitle Prefixto produce itsFull Title.- By default the
Title Suffixis the YouTube video ID in square brackets (e.g., [Bey4XXJAqS8]). - The
Title Suffixis used for the name of the folder containing all generated webms.
- By default the
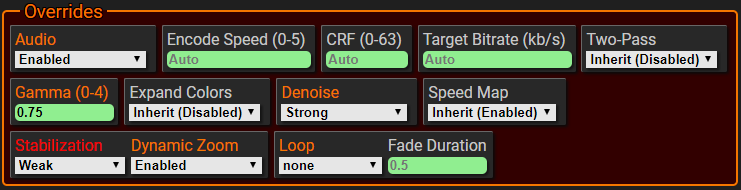
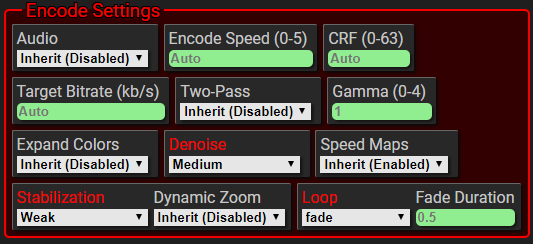
Shift+W: Open additional settings when the global settings editor or a marker pair editor is open.
- Settings left blank with a placeholder of
Autowill be automatically calculated based on the input video bitrate and other video properties. This is the recommended default. - Marker pair settings are overrides that if set will override the global value for that marker pair only.
- Marker pair settings set to
Inheritwill get their value from the global settings. - Global settings set to
Inheritwill get their value from the command line options or theyt_clipper_optionshelper script prompt. - See Encoding Settings Guide for more information and tips about the possible settings.
- Marker Pair Overrides:
- Global Encode Settings:
Alt+Shift+Q/alt+Shift+X: Update all existing markers to default new marker speed (Q) or crop (X).
- Set the default new marker speed or crop using W.
Cropping Shortcuts
X: When marker or defaults editor is open, begin drawing crop.
-
Click+Drag on the video to set draw a rectangular crop.
-
While drawing crop, pressing X again will cancel drawing.
-
Crop is given as
x-offset:y-offset:width:height. Each value is a positive integer in pixels.Widthandheightcan also beiwandihrespectively for input width and input height.
Ctrl+X: Cycle crop dim opacity by 25% plus one stop point at 90%. Ctrl+Shift+X: Toggle crop crosshair.
Mouse-Based crop Adjustment:
- Ctrl+Hover: Indicate potential drag action when hovering over crop.
- Ctrl+Click+Drag: Drag and move crop or resize crop in the indicated directions.
- Can release Ctrl after dragging begins. Dragging ends when mouse is released.
- Ctrl+Alt+Drag: Approximately aspect-ratio-locked mouse resizing of crop.
- Ctrl+Shift+Drag: Center-out resize/draw of crop.
- Ctrl+Shift+Drag: Horizontally-fixed (Y-only) drag of crop.
-
Ctrl+Alt+Drag: Vertically-fixed (X-only) drag of crop.
Arrow Key Crop Adjustment:
- When a crop input box has focus:
- UpArrow/DownArrow: Increment/decrement the value indicated by the current cursor position by
10.
- UpArrow/DownArrow: Increment/decrement the value indicated by the current cursor position by
- When a crop input box does not have focus:
- Alt+X: Toggle crop adjustment with arrow keys.
- UpArrow/DownArrow: Increment/decrement the
y offsetby10. - LeftArrow/RightArrow: Increment/decrement the
x offsetby10. - Ctrl modifier key changes target from
y offsettoheightor fromx offsettowidth.
- The Alt and Shift modifier keys alter the increment/decrement amount.
- Alt sets the amount to
1, Shift to50, Alt+Shift to100.
- Alt sets the amount to
- The resulting crop values are clamped to valid values.
Video Playback and Preview Shortcuts
Shift+Mouse-Wheel: Scroll the mouse wheel up/down over the video to skip forward/backward one frame per tick.
Alt+Click+Drag: Scrub/seek video time backward or forward by dragging left or right respectively.
C: Toggle previewing marker pair speed.
- Video playback speed is automatically set to the speed of the current marker pair.
- When outside of a marker pair the playback speed is force set to 1. Toggle off the speed preview to change the player speed manually.
Shift+C: Toggle auto looping of currently selected marker pair.
Ctrl+Shift+C: Toggle auto crop chart section looping. This setting takes precedence over auto marker pair looping.
Alt+C: Toggle auto previewing gamma correction setting when between a marker pair.
Alt+Shift+C: Toggle fade loop previewing.
- Note that fade duration defaults to 0.7 seconds and is clamped to a minimum of 0.1 seconds and a maximum of 40% of the output clip duration.
Ctrl+Alt+Shift+C: Toggle all previews.
-
If any preview feature is disabled, turns it on. If all preview features are enabled, disables all of them.
-
Works only when in fullscreen mode or theater mode.
-
Note that this does not yet work with drawing and previewing crops and should be disabled when doing so.
-
This feature is only for watching or previewing the video, and does not affect webm output.
Shift+R: Toggle big video previews on video progress bar hover.
Q: Toggle auto force setting of video playback speed. Takes precedence over any marker pair speed. This can be useful to try out different playback speeds without modifying settings.
Alt+Q: Cycle the force-set video speed down by 0.25. Use Q to toggle force settings video speed.
R/Alt+R: Toggle between a 90 degree clockwise/counter-clockwise rotation and no rotation.
- Note that this is only a preview and you must set the rotation in the global settings editor opened with W to rotate the output video.
Frame Capturing Shortcuts
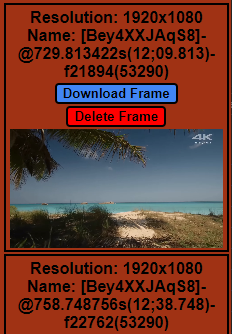
E: Capture frame at current time of video at currently selected video quality/resolution.
- Frame must be buffered and loaded.
-
Opens a pop-up window where captured frames are saved.
- Download and Delete buttons are provided above each captured frame.
- You may need to allow pop-ups from
https://www.youtube.comin your browser settings.
Alt+E Trigger zipping of all captured frames for download.
Save and Load Shortcuts
S: Save markers info to a .json file.
- Can be dropped onto the clipper script installation's helper scrips like
yt_clipper_autoon Windows. On Mac, run the helper script and try dragging and dropping in the window that opens up when prompted. - When using the python source of the
clipper scriptuse--json/-jand pass the path of the markers data file.
Alt+S: Copy markers json data to clipboard. Useful if saving breaks.
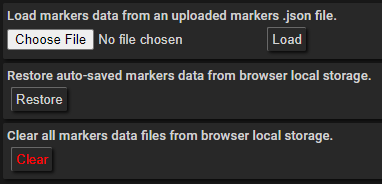
G: Toggle markers data commands UI. Allows for uploading and loading markers data files in .json format and for restoring markers data auto-saved in browser local storage.
- To upload and reload markers data, click
Choose File, pick your markersjsonfile, then clickLoad.
Miscellaneous Shortcuts
Shift+F: Flatten a VR video to make it easier to crop.
Dynamic Speed and Crop Shortcuts
Common Dynamic Chart Shortcuts
D: Toggle dynamic speed chart.
Alt+D: Toggle dynamic crop chart.
Shift+Click: Add a point at the clicked location.
Alt+A: Add a point at the current time.
Alt+Shift+Click: Delete a point.
Right-Click: Seek to time on bottom time-axis when clicking anywhere in chart area.
Alt+Right-Click/Ctrl+Alt+Right-Click: Set chart looping start/end marker.
Shift+D: Toggle chart loop markers
- Note that chart loop markers only work when speed previewing is on with C.
Ctrl+Mousewheel: Zoom in and out of chart.
Ctrl+Click: Reset zoom.
Click+Drag: Drag a point to move it or drag chart area to pan when zoomed in.
Alt+Z/Alt+Shift+Z: Undo/redo marker moves as well as speed and crop changes.
- Undo/redo history is kept separately for each marker pair.
Dynamic Speed Chart Shortcuts
See Common Dynamic Chart Shortcuts for shortcuts shared between dynamic charts like adding and removing points.
D: Toggle dynamic speed chart.
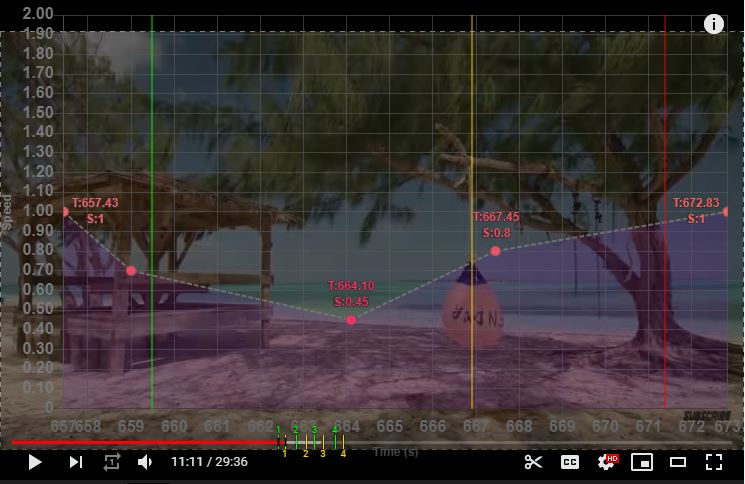
Notes:
- Points are auto-sorted based on their time value on adding or removing points or on drag-end when moving points.
- YouTube playback speed can only be set to a multiple of
0.05and greater than or equal to0.25. - Audio is not compatible with dynamic speed.
Dynamic Crop Chart Shortcuts
See Common Dynamic Chart Shortcuts for shortcuts shared between dynamic charts like adding and removing points.
Dynamic crop allows for panning a crop in the default pan-only mode.
In pan-only mode the crops of all crop chart points are maintained equal.
For zooming and panning, enable zoompan mode from the marker pair settings extended options (Shift+W).
In zoompan mode crops can change size for a zooming effect, but their aspect ratios are maintained equal.
Alt+D: Toggle dynamic crop chart.
Left-Click: Left-click a crop chart point to seek to it's time.
Left-Click+Drag: Left-click and drag a crop chart point to change it's time and seek/scrub the video.
Ctrl+Shift+C: Toggle auto crop chart section looping.
- A crop chart section is any two points on the chart.
- The current section is between a green start point and yellow end point. All other points are red.
- As the video time changes, the current crop chart section is automatically updated.
- Takes precedence over marker pair looping.
Ctrl/Alt+Mouseover: Select point as start/end of crop section.
- When the currently selected point is green then you are in start mode, and if it is yellow you are in end mode.
- The selected point's crop is editable and it's crop appears more brightly in a matching color (green or yellow).
- As the video time changes, the currently selected point is automatically updated to the start or end point of the new section maintaining the current mode where possible.
- Selected points have a black border and are square. Unselected points are circular.
Alt+Mousewheel-Up/Down: Intelligently toggle modes or select points. More specifically:
- Alt+Mousewheel-Up: If in end mode, toggle to start mode. If already in start mode, select next point and toggle to end mode.
- Alt+Mousewheel-Down: If in start mode, toggle to end mode. If already in end mode, select previous point and toggle to start mode.
Ctrl+Alt+Shift+Mousewheel-Up/Down: Set current crop point's crop to that of the next/previous point's crop.
Ctrl+Shift+Click: Toggle crop point easing between auto and instant.
- Points with instant easing enabled are darkened.
- Instant easing means that any pan or zoom from a previous point will happen instantly, causing the crop to jump. This is useful if there is a scene change in the video or very fast movement.
A/Shift+A: Set target crop component of all points following/preceding the currently selected point. Select crop components by placing your cursor in the crop input field in the marker pair settings.
- For example, let's say you want to align the X-position of all points following the currently selected point. Place your cursor by clicking in the crop input field in the first value. For example
10|0:100:920:1080where the|represents your cursor. Now hit the A key and all following crop points will have an X-Position of100.
ZoompPan Mode
In zoompan mode crops can change size for a zooming effect, but their aspect ratios are maintained equal.
The usual crop shortcuts have different effects than usual in this mode as described here.
Ctrl+Drag: Resize crop while maintaining aspect ratio.
Ctrl+Alt+Drag: Freely resize the crop, updating the aspect ratio of all other crop points to match automatically.
X: Draw crop.
- Click+Drag: Draw crop while maintaining aspect ratio.
- Alt+Click+Drag: Freely draw crop, updating the aspect ratio of all other crop points to match automatically.
Dynamic Crop Tips
- Use as few points as possible for smoother motion (each point with a crop different from its neighbors causes the crop motion to stop and then start again).
- Try enabling video stabilization to smooth out the motion, especially if many points are used.
- Pause the video and Right-Click+Drag to seek/scrub through the video. Use this to preview the crop movement with precise control.
Useful YouTube Controls
- Use [space_bar] or K to pause/play the video.
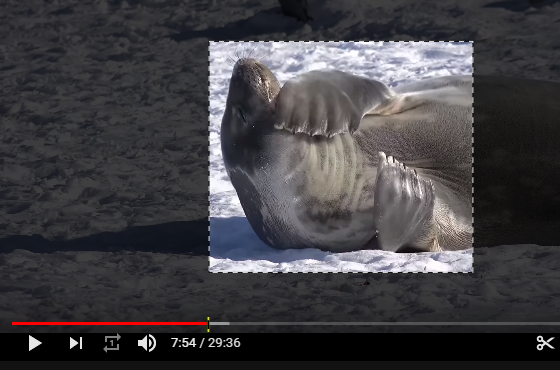
- Use < and > to view a video frame by frame.
- Use Left-Arrow and Right-Arrow to jump backwards or forwards by 5 seconds.
Tips
User Script Tips
- If you're new to userscripts check out https://openuserjs.org/about/Userscript-Beginners-HOWTO for instructions.
- Check out the companion script for copying gfy links from gfycat as reddit markdown at https://openuserjs.org/scripts/elwm/gfy2md.
- Refresh the page if the script doesn't load and to clear markers when switching videos in the same window.
- Videos can be marked up and the markers json or clipper script can be saved before higher quality levels are available, but the final generated webm quality depends on the quality formats available.
Clipper Script Tips
- The
clipper scriptskips regenerating any existing webms.- This makes it easy to delete webms you want regenerated and by rerunning the script.
- Use this to work incrementally, saving markers data, starting a batch encode, continuing to mark up, overwriting the markers data, and then rerunning the encoding.
Encoding Settings Guide
Articles on CRF and vp9 Encoding
Tips and Settings
Markup Script Tips
- Move between input fields with Tab and Shift+Tab.
- Numeric input fields can be set using the Up/Down arrow keys or the Mousewheel.
- Access additional settings, including various encoding settings using the Shift+W additional settings editors.
- Hover over settings in the
markup scriptto view tooltips describing each setting.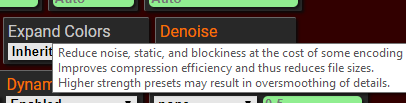
Clipper Script Tips
- The
clipper scriptis set to use the vp9 encoder by default (encoding used for webm videos on YouTube). - Use
--help,-h, or theyt_clipper_optionshelper script for additional options that can be enabled on the command line. - Encoding settings will be automatically selected, unless overridden, based on the detected bitrate and other properties of the input video.
Gamma Correction
- Play around with the
gammasetting to bring back shadow or highlight detail. - Use Alt+C to preview
gamma valueswith themarkup script. - A value of 1 does nothing. Use a value between 0 and 1 to bring back shadow detail and a value greater than 1 to bring back highlight detail.
- Refer to this gamma correction guide for more details.
Clipper Script Source
- You can find the latest mainline clipper script python source file here: https://github.com/exwm/yt_clipper/blob/master/src/clipper/yt_clipper.py
Clipper Script Usage
python ./yt_clipper.py -h # Prints help. Details all options and arguments.

python ./yt_clipper.py --markers-json markers.json # automatically generate webms using markers json

python ./yt_clipper.py -j markers.json --input-video ./clip.webm  # provide a local input video

python ./yt_clipper.py -j markers.json --preview  # preview marker pairs using ffplay

python ./yt_clipper.py -j markers.json --format bestvideo[width<=1080] # specify download format used by youtube-dl
Clipper Default Arguments Files
Default arguments for the clipper script may be set using a simple file format.
A default_args.txt file with comments explaining the usage is provided with the clipper script installation.
The file contents are copied below for convenience:
# By default, this args file will be read by yt_clipper to set default arguments.
# To see all arguments use the `yt_clipper_options` helper script or the `-h` argument.
# Lines that begin with a `#` in this file are comments and are ignored.
# To use other arg files use the `--arg-files` argument outside of an arg file.

# The following commented lines provide an example of how to use this file.
# The lines can be uncommented (by removing the `#`) to test their effects.

# --audio
# --two-pass
# -di -dn 2
# --youtube-dl-alternative yt_dlp
Clipper Script Preview Shortcuts
See https://ffmpeg.org/ffplay.html#While-playing.
Clipper Script Installation
There is an installation that does not require the dependencies below.
- Extract the appropriate zip file anywhere:
- Go to https://github.com/exwm/yt_clipper/releases and pick a release. In the assets, find the appropriate file for your platform.
- Simply drag and drop the markers .json file onto the
yt_clipper_auto.batfile on Windows or at the terminal prompt after executingyt_clipper_autoon Mac. - Use
Ctrl+Cif you need to cancel the process. - All generated webm clips will be placed in
./webms/<markers-json-filename>. - Windows users may require Microsoft Visual C++ 2010 Redistributable Package (x86).
Manual and Beta/Alpha Version Installation
Markup script (js): (1) Find the yt_clipper*.js file in the github release assets, (2) right-click > copy address, (3) open user script extension dashboard, (4) find and use option to add a script via url (in tampermonkey, utilities tab > install from url; in violentmonkey, + button at top > install from url).
Alternatively, (1) Download the yt_clipper*.js file from the github release assets, (2) open user script extension dashboard, (3) open yt_clipper for editing, (4) click inside the editor and select everything with Ctrl+A, (5) delete everything with say backspace, (6) drag and drop the markup script js file into the editor, (7) Ctrl+S to save.
Clipper script (platform-specific zip): Install as usual by extracting the zip file to a convenient location.
Additional Helper Scripts
There are some alternative helper scripts for more options:
- Use
yt_clipper_optionsto print all the available options and to be prompted for a string with additional options before running the script. This allows you to combine options (e.g., include audio and rotate and denoise).- The other helper scripts provide preconfigured subsets of these options.
- Use
yt_clipper_previewto locally preview markersjsondata withffplay.- Cannot preview audio, video stabilization, or expanded color range.
- Use
yt_clipper_auto_downloadto download video before processing markers. - Use
yt_clipper_auto_input_videoto specify both markersjsondata and an input video for processing.- On Windows simply drag and drop both the
jsonand the input video ontoyt_clipper_auto_input_video. - On Mac,
yt_clipper_auto_input_videowill prompt for thejsonthen the input video.
- On Windows simply drag and drop both the
The helper scripts have a simple format. Copy and edit yt_clipper_auto in a text editor to create custom automated versions. For example you could add --deinterlace to enable deinterlacing or use --only 2,5 to process only marker pairs 2 and 5.
-
On Windows:
@echo off chcp 65001 cd /D "%~dp0" FOR %%A IN (%*) DO ( REM you can add options after %%A of the next line as shown .\yt_clipper.exe --markers-json %%A ) pause -
On Mac
#!/bin/bash
cd "$(dirname "$0")" || exit

read -rp "First enter the paths of 1 or more markers json data files (you may be able to drag and drop files at the prompt): " JSONPROMPT

IFS=$'\n' JSONS=( $(xargs -n1 <<< "$JSONPROMPT") )

for JSON in "${JSONS[@]}"
do
if [ -f "$JSON" ]; then
  # you can add options after $JSON of the next line as shown
  ./yt_clipper --markers-json "$JSON"
else
  echo "$JSON does not exist"
fi
done
Utility Scripts
There several utility scripts provided as well that wrap ffmpeg or other tools either for convenience or additional functionality.
- The
fast_trimutility script takes a single video file as input and trims it quickly BUT approximately. The script prompts for a start time and an end time to trim the input video file. The output file name will be suffixed with-trim. - The
vid2gifutility script converts an input video file to agifwith a small file size and resolution. The script will prompt for the output gif fps and scale/resolution. - The
preprocess_hevcutility script preprocesses an input video file (likelymp4) with anhevcvideo stream to ensure compatibility with ffmpeg. You may need to use this script if you see errors likeInvalid data found when processing inputfrom ffmpeg when usinghevcwith the--input-video/-ioption or theyt_clipper_auto_input_videohelper script. The preprocessed output file name will be suffixed with-preproc.
Merge Utility Script
The merge utility script can be used to merge any webm files in any order:
- On mac, follow the prompts after running the utility script, providing the paths of 2 or more input files in the other you want them merged.
- On Windows:
- Rename the webm files so they sort in desired lexicographic order.
- Select/highlight all webms to be merged in your file explorer and drag and drop them onto the
merge.batscript. - The output file name will be
-mergedappended to the first input file name. - Check the
merge.txtfile to confirm the correct videos were merged in the correct order.
All Releases
Since clipper script v3.6.1, releases can be tracked here: https://github.com/exwm/yt_clipper/releases.
Clipper Script Dependencies
These dependencies must be manually installed when not using the clipper script installation:
- ffmpeg must be in your path: (https://www.ffmpeg.org/download.html).
- install required python packages as listed in the
requirements.txt:pip install -r ./src/clipper/requirements.txt
Changelog
For a complete changelog, including beta and alpha releases, see https://github.com/exwm/yt_clipper/blob/master/changelog.md.
For pre-version-unification (between markup and clipper scripts) changelogs see https://github.com/exwm/yt_clipper/blob/master/changelog-pre-version-unification.md.