AsyncGraphics
AsyncGraphics is a Swift package for working with images and video with async / await. The core type is simply just called Graphic, it's like an image and is backed by a MTLTexture.
Documentation
Documentation (DocC)
See the Graphic docs for all effects.
Articles
Content
Resources: Image, Video, Camera, Maps, Screen, Text, View
Shapes: Circle, Rectangle, Arc, Polygon, Star, Line
Solid: Color, Gradient, Noise, Metal
Particles: UV Particles, UV Color Particles
Effects
Direct: Blur, Zoom Blur, Angle Blur, Circle Blur, Rainbow Blur, Random Blur, Channel Mix, Chroma Key, Clamp, Color Convert, Hue, Saturation, [Monochrome](https://heestand-xyz.github.io/AsyncGraphics-Docs/documentation/asyncgraphics/graphic/monochrome()), Tint, Corner Pin, Edge, Kaleidoscope, Brightness, Contrast, Gamma, [Inverted](https://heestand-xyz.github.io/AsyncGraphics-Docs/documentation/asyncgraphics/graphic/inverted()), Opacity, Morph, Pixelate, Quantize, Sharpen, Slope, Threshold, Offset, Rotate, Scale, Metal
Dual: Blend, Cross, Displace, Lookup, Luma Blur, Luma Rainbow Blur, Luma Hue, Luma Saturation, Luma Brightness, Luma Contrast, Luma Gamma, Luma Translate, Luma Rotate, Luma Scale, Remap, Metal
Array: HStack, VStack, ZStack, Layers, Metal
Technical: Add, Average, Bits, Color Space, Crop, Inspect, Polar, Reduce, Resize, Coordinate Space, LUT
Install
.package(url: "https://github.com/heestand-xyz/AsyncGraphics", from: "2.0.0")Views
In AsyncGraphics there are a couple ways to present a graphic.
- AGView to declaratively view AGGraphs
- GraphicView to imperatively view Graphics
- AsyncGraphicView to imperatively view Graphics asynchronously.
- Graphic3DView to view Graphic3Ds
import AsyncGraphics

struct ContentView: View {
    var body: some View {
        AsyncGraphicView { resolution in
            try await .circle(resolution: resolution)
        }
    }
}
Examples
Blending

First we create an AGView, this is the container for all AGGraphs. In this example we have a AGZStack with 3 AGHStacks. Each graph has a blend mode (AGBlendMode), in this case .screen.
import SwiftUI
import AsyncGraphics

struct ContentView: View {
    var body: some View {
        AGView {
            AGZStack {
                AGHStack {
                    AGSpacer()
                    AGCircle()
                        .foregroundColor(.red)
                }
                AGHStack {
                    AGSpacer()
                    AGCircle()
                        .foregroundColor(.green)
                    AGSpacer()
                }
                .blendMode(.screen)
                AGHStack {
                    AGCircle()
                        .foregroundColor(.blue)
                    AGSpacer()
                }
                .blendMode(.screen)
            }
        }
    }
}
Layout

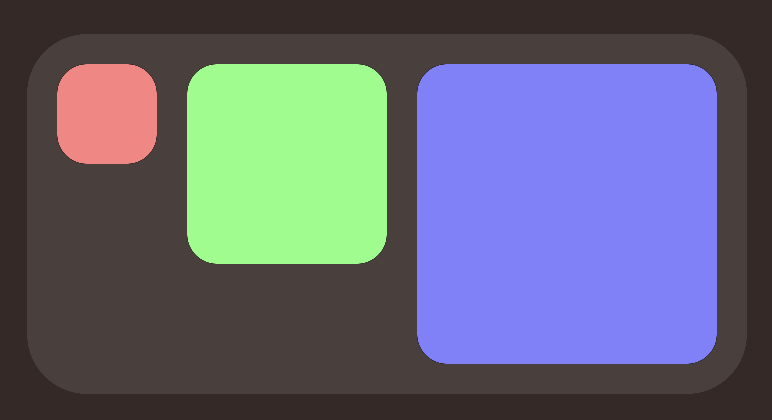
First we create an AGView, this is the container for all AGGraphs. In this example we create an AGHStack to contain out boxes, then we loop 3 times with an AGForEach, calculate the width and create AGRoundedRectangles. After that we set the frame to get a fixed size and apply a color. After the stack we apply some padding and finally add a background.
import SwiftUI
import AsyncGraphics

struct ContentView: View {
    var body: some View {
        AGView {
            AGHStack(alignment: .top, spacing: 15) {
                AGForEach(0..<3) { index in
                    let width = 50 * CGFloat(index + 1)
                    AGRoundedRectangle(cornerRadius: 15)
                        .frame(width: width, height: width)
                        .foregroundColor(Color(hue: Double(index) / 3,
                                               saturation: 0.5,
                                               brightness: 1.0))
                }
            }
            .padding(15)
            .background {
                AGRoundedRectangle(cornerRadius: 30)
                    .opacity(0.1)
            }
        }
    }
}
Camera
import SwiftUI
import AsyncGraphics

struct ContentView: View {

    var body: some View {
        AGView {
            AGZStack {
                AGCamera(.front)
                    .resizable()
                    .aspectRatio(contentMode: .fill)
                AGCircle()
                    .blendMode(.multiply)
            }
        }
    }
}
You can also do the same with Graphics:
import SwiftUI
import AsyncGraphics

struct ContentView: View {

    @State private var graphic: Graphic?

    var body: some View {
        ZStack {
            if let graphic {
                GraphicView(graphic: graphic)
            }
        }
        .task {
            do {
                let resolution = CGSize(width: 1_000, height: 1_000)
                let circleGraphic: Graphic = try await .circle(radius: 500,
                                                               backgroundColor: .clear,
                                                               resolution: resolution)
                for await cameraGraphic in try Graphic.camera(.front) {
                    graphic = try await circleGraphic
                        .blended(with: cameraGraphic,
                                 blendingMode: .multiply,
                                 placement: .fill)
                }
            } catch {
                print(error)
            }
        }
    }
}
Remember to set the Info.plist key
NSCameraUsageDescription"Privacy - Camera Usage Description"
Metal
There is the option to write high level metal code in AsyncGraphics. No need to setup a pipeline.
Colors
Colors are represented with the PixelColor type.
import PixelColor to create custom colors with hex values.
PixelColor on GitHub.