BehaveX Documentation
Table of Contents
- Introduction
- Features
- Installation Instructions
- Execution Instructions
- Constraints
- Supported Behave Arguments
- Specific Arguments from BehaveX
- Parallel Test Executions
- Test Execution Reports
- Attaching Images and Evidence
- Test Logs and Metrics
- Muting Test Scenarios
- Handling Failing Scenarios
- Displaying Progress Bar in Console
- Show Your Support
Introduction
BehaveX is a BDD testing solution designed to enhance your Behave-based testing workflow by providing additional features and performance improvements. It's particularly beneficial in the following scenarios:
- Accelerating test execution: Significantly reduce test run times through parallel execution by feature or scenario.
- Enhancing test reporting: Generate comprehensive and visually appealing HTML and JSON reports for in-depth analysis and integration with other tools.
- Improving test visibility: Provide detailed evidence, such as screenshots and logs, essential for understanding test failures and successes.
- Optimizing test automation: Utilize features like test retries, test muting, and performance metrics for efficient test maintenance and analysis.
- Managing complex test suites: Handle large test suites with advanced features for organization, execution, and reporting.
Features
BehaveX provides the following features:
- Parallel Test Executions: Execute tests using multiple processes, either by feature or by scenario.
- Enhanced Reporting: Generate friendly HTML and JSON reports that can be exported and integrated with third-party tools.
- Evidence Collection: Include images/screenshots and additional evidence in the HTML report.
- Test Logs: Automatically compile logs generated during test execution into individual log reports for each scenario.
- Test Muting: Add the
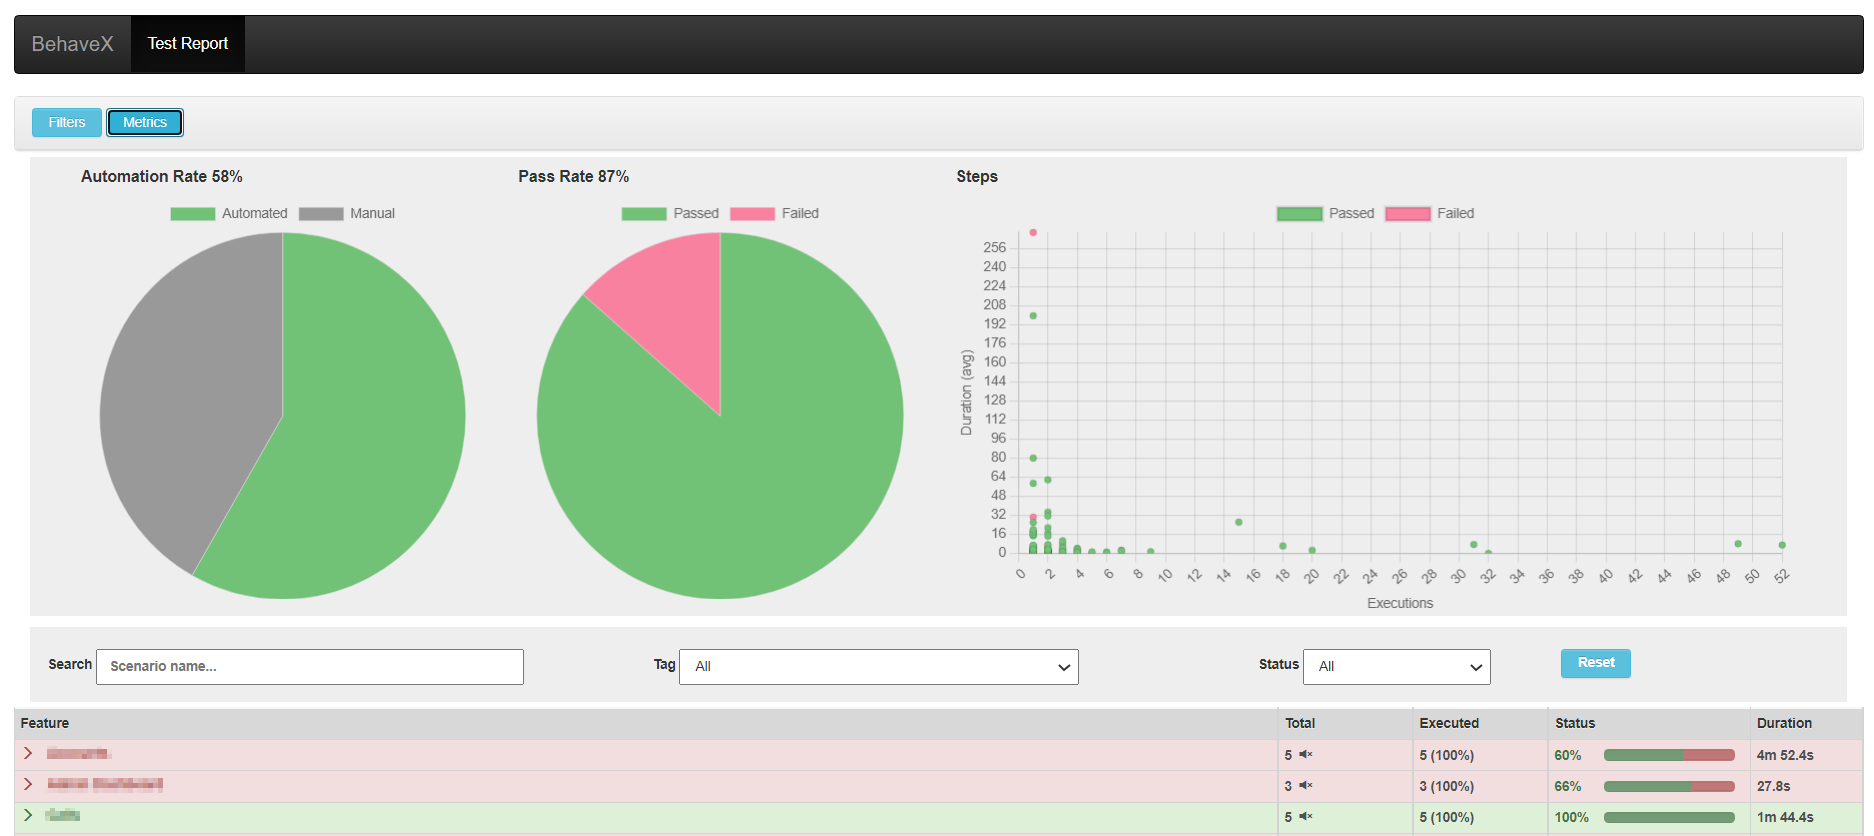
@MUTEtag to test scenarios to execute them without including them in JUnit reports. - Execution Metrics: Generate metrics in the HTML report for the executed test suite, including Automation Rate, Pass Rate, Steps execution counter and average execution time.
- Dry Runs: Perform dry runs to see the full list of scenarios in the HTML report without executing the tests. It overrides the
-dBehave argument. - Auto-Retry for Failing Scenarios: Use the
@AUTORETRYtag to automatically re-execute failing scenarios. Also, you can re-run all failing scenarios using the failing_scenarios.txt file.


Installation Instructions
To install BehaveX, execute the following command:
pip install behavexExecution Instructions
Execute BehaveX in the same way as Behave from the command line, using the behavex command. Here are some examples:
-
Run scenarios tagged as
TAG_1but notTAG_2:behavex -t=@TAG_1 -t=~@TAG_2 -
Run scenarios tagged as
TAG_1orTAG_2:behavex -t=@TAG_1,@TAG_2 -
Run scenarios tagged as
TAG_1using 4 parallel processes:behavex -t=@TAG_1 --parallel-processes=4 --parallel-scheme=scenario -
Run scenarios located at specific folders using 2 parallel processes:
behavex features/features_folder_1 features/features_folder_2 --parallel-processes=2 -
Run scenarios from a specific feature file using 2 parallel processes:
behavex features_folder_1/sample_feature.feature --parallel-processes=2 -
Run scenarios tagged as
TAG_1from a specific feature file using 2 parallel processes:behavex features_folder_1/sample_feature.feature -t=@TAG_1 --parallel-processes=2 -
Run scenarios located at specific folders using 2 parallel processes:
behavex features/feature_1 features/feature_2 --parallel-processes=2 -
Run scenarios tagged as
TAG_1, using 5 parallel processes executing a feature on each process:behavex -t=@TAG_1 --parallel-processes=5 --parallel-scheme=feature -
Perform a dry run of the scenarios tagged as
TAG_1, and generate the HTML report:behavex -t=@TAG_1 --dry-run -
Run scenarios tagged as
TAG_1, generating the execution evidence into a specific folder:behavex -t=@TAG_1 -o=execution_evidence
Constraints
- BehaveX is currently implemented on top of Behave v1.2.6, and not all Behave arguments are yet supported.
- Parallel execution is implemented using concurrent Behave processes. This means that any hooks defined in the
environment.pymodule will run in each parallel process. This includes the before_all and after_all hooks, which will execute in every parallel process. The same is true for the before_feature and after_feature hooks when parallel execution is organized by scenario.
Supported Behave Arguments
- no_color
- color
- define
- exclude
- include
- no_snippets
- no_capture
- name
- capture
- no_capture_stderr
- capture_stderr
- no_logcapture
- logcapture
- logging_level
- summary
- quiet
- stop
- tags
- tags-help
Important: Some arguments do not apply when executing tests with more than one parallel process, such as stop and color.
Specific Arguments from BehaveX
- output-folder (-o or --output-folder): Specifies the output folder for execution reports (JUnit, HTML, JSON).
- dry-run (-d or --dry-run): Performs a dry-run by listing scenarios in the output reports.
- parallel-processes (--parallel-processes): Specifies the number of parallel Behave processes.
- parallel-scheme (--parallel-scheme): Performs parallel test execution by [scenario|feature].
- show-progress-bar (--show-progress-bar): Displays a progress bar in the console during parallel test execution.
Parallel Test Executions
BehaveX manages concurrent executions of Behave instances in multiple processes. You can perform parallel test executions by feature or scenario. When the parallel scheme is by scenario, the examples of a scenario outline are also executed in parallel.
Examples:
behavex --parallel-processes=3
behavex -t=@<TAG> --parallel-processes=3
behavex -t=@<TAG> --parallel-processes=2 --parallel-scheme=scenario
behavex -t=@<TAG> --parallel-processes=5 --parallel-scheme=feature
behavex -t=@<TAG> --parallel-processes=5 --parallel-scheme=feature --show-progress-bar
Identifying Each Parallel Process
BehaveX populates the Behave contexts with the worker_id user-specific data. This variable contains the id of the current behave process.
For example, if BehaveX is started with --parallel-processes 2, the first instance of behave will receive worker_id=0, and the second instance will receive worker_id=1.
This variable can be accessed within the python tests using context.config.userdata['worker_id'].
Test Execution Reports
HTML Report
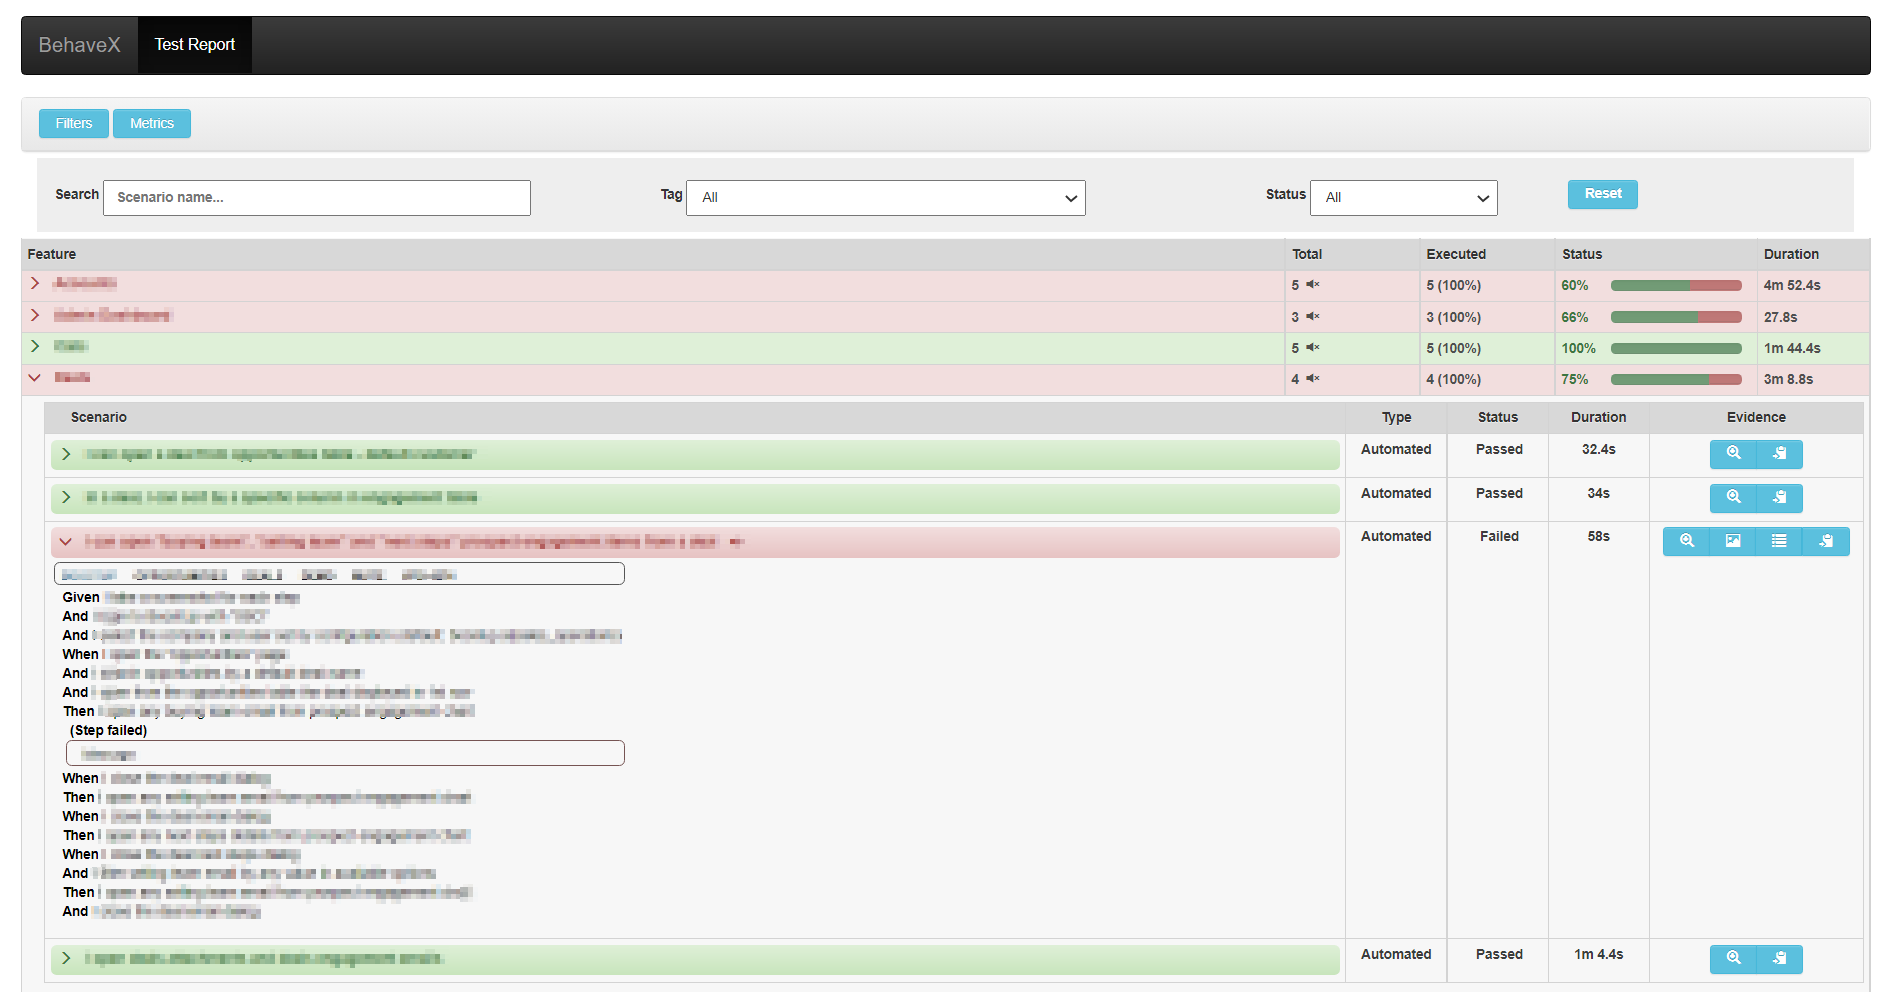
A friendly test execution report containing information related to test scenarios, execution status, evidence, and metrics. Available at:
<output_folder>/report.htmlJSON Report
Contains information about test scenarios and execution status. Available at:
<output_folder>/report.jsonJUnit Report
One JUnit file per feature, available at:
<output_folder>/behave/*.xmlThe JUnit reports have been replaced by the ones generated by the test wrapper, just to support muting tests scenarios on build servers
Attaching Images to the HTML Report
You can attach images or screenshots to the HTML report using your own mechanism to capture screenshots or retrieve images. Utilize the attach_image_file or attach_image_binary methods provided by the wrapper.
These methods can be called from hooks in the environment.py file or directly from step definitions.
Example 1: Attaching an Image File
from behavex_images import image_attachments

@given('I take a screenshot from the current page')
def step_impl(context):
    image_attachments.attach_image_file(context, 'path/to/image.png')
Example 2: Attaching an Image Binary
from behavex_images import image_attachments
from behavex_images.image_attachments import AttachmentsCondition

def before_all(context):
    image_attachments.set_attachments_condition(context, AttachmentsCondition.ONLY_ON_FAILURE)

def after_step(context, step):
    image_attachments.attach_image_binary(context, selenium_driver.get_screenshot_as_png())
By default, images are attached to the HTML report only when the test fails. You can modify this behavior by setting the condition using the set_attachments_condition method.


For more information, check the behavex-images library, which is included with BehaveX 3.3.0 and above.
If you are using BehaveX < 3.3.0, you can still attach images to the HTML report by installing the behavex-images package with the following command:
pip install behavex-images
Attaching Additional Execution Evidence to the HTML Report
Providing ample evidence in test execution reports is crucial for identifying the root cause of issues. Any evidence file generated during a test scenario can be stored in a folder path provided by the wrapper for each scenario.
The evidence folder path is automatically generated and stored in the "context.evidence_path" context variable. This variable is updated by the wrapper before executing each scenario, and all files copied into that path will be accessible from the HTML report linked to the executed scenario.
Test Logs per Scenario
The HTML report includes detailed test execution logs for each scenario. These logs are generated using the logging library and are linked to the specific test scenario. This feature allows for easy debugging and analysis of test failures.
Metrics and Insights
The HTML report provides a range of metrics to help you understand the performance and effectiveness of your test suite. These metrics include:
- Automation Rate: The percentage of scenarios that are automated.
- Pass Rate: The percentage of scenarios that have passed.
- Steps Execution Counter and Average Execution Time: These metrics provide insights into the execution time and frequency of steps within scenarios.
Dry Runs
BehaveX enhances the traditional Behave dry run feature to provide more value. The HTML report generated during a dry run can be shared with stakeholders to discuss scenario specifications and test plans.
To execute a dry run, we recommend using the following command:
behavex -t=@TAG --dry-run
Muting Test Scenarios
In some cases, you may want to mute test scenarios that are failing but are not critical to the build process. This can be achieved by adding the @MUTE tag to the scenario. Muted scenarios will still be executed, but their failures will not be reported in the JUnit reports. However, the execution details will be visible in the HTML report.
Handling Failing Scenarios
@AUTORETRY Tag
For scenarios that are prone to intermittent failures or are affected by infrastructure issues, you can use the @AUTORETRY tag. This tag enables automatic re-execution of the scenario in case of failure.
You can also specify the number of retries by adding the total retries as a suffix in the @AUTORETRY tag. For example, @AUTORETRY_3 will retry the scenario 3 times if the scenario fails.
The re-execution will be performed right after a failing execution arises, and the latest execution is the one that will be reported.
Rerunning Failed Scenarios
After executing tests, if there are failing scenarios, a failing_scenarios.txt file will be generated in the output folder. This file allows you to rerun all failed scenarios using the following command:
behavex -rf=./<OUTPUT_FOLDER>/failing_scenarios.txt
or
behavex --rerun-failures=./<OUTPUT_FOLDER>/failing_scenarios.txt
To avoid overwriting the previous test report, it is recommended to specify a different output folder using the -o or --output-folder argument.
Note that the -o or --output-folder argument does not work with parallel test executions.
Displaying Progress Bar in Console
When running tests in parallel, you can display a progress bar in the console to monitor the test execution progress. To enable the progress bar, use the --show-progress-bar argument:
behavex -t=@TAG --parallel-processes=3 --show-progress-bar
If you are printing logs in the console, you can configure the progress bar to display updates on a new line by adding the following setting to the BehaveX configuration file:
[progress_bar]
print_updates_in_new_lines="true"
Show Your Support
If you find this project helpful or interesting, we would appreciate it if you could give it a star (:star:). It's a simple way to show your support and let us know that you find value in our work.
By starring this repository, you help us gain visibility among other developers and contributors. It also serves as motivation for us to continue improving and maintaining this project.
Thank you in advance for your support! We truly appreciate it.


