HeroesTavern
The live site can be found here: Site
Table of Contents
- [User Experience]
- [Features]
- [Design]
- [Technologies Used]
- [Testing]
- [Deployment]
- [Credits]
Objective
The goal of the Heroes Tavern application is to provide a site where users can create Dungeons and Dragons character sheets and save them. Users can edit their characters indefinitely, delete them when they wish, view a full list of their characters and make unlimited characters.
User Experience
User Stories


Features
Entity Relationship Diagram
General
Navigation Bar
Navbar

The navigation bar is featured across all pages.
For unregistered or logged out users of the site, the navbar displays Home, Login, Signup On large screens, the links are visible on the right hand side of the navbar. The list collapses into a dropdown menu on smaller screens which can be toggled by clicking the bars icon.
For registered users of the site, the navbar displays Home and Logout.
The navbar is a component called "Header" and that includes both the hamburger menu and the full navbar.
Within this Header component is also a Create Character CTA Button that is shown at all points on the site other than when you are in the character creation or character update process.
On the left hand side of the header, there is the logo which acts as a link to the home or index page depending on whether you are logged in (home) or logged out (index).
Footer
In this project I chose not to include a footer as it felt unnecessary and added very little to the project. In the case that there was a design team, or that there were important links to include such as social media links, this would be something worth adding.
Landing Page
Landing Page

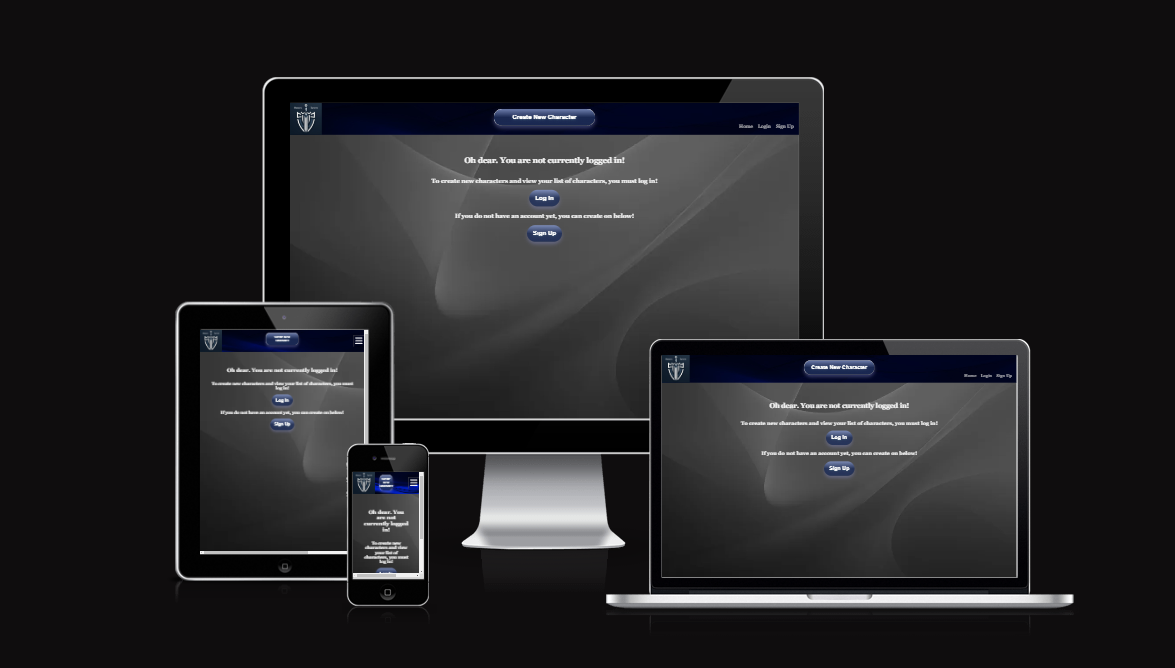
The landing page is for users who are either not logged in, or have not signed up for an account. There is still a call to action to Create a Character, despite the fact this is not possible when you are not logged in, as it displays the intention and simplicity of the site. The page is responsive in that the nav bar will adapt to the screen size, becoming a hamburger menu when viewed on smaller displays.
Home Page
Home Page

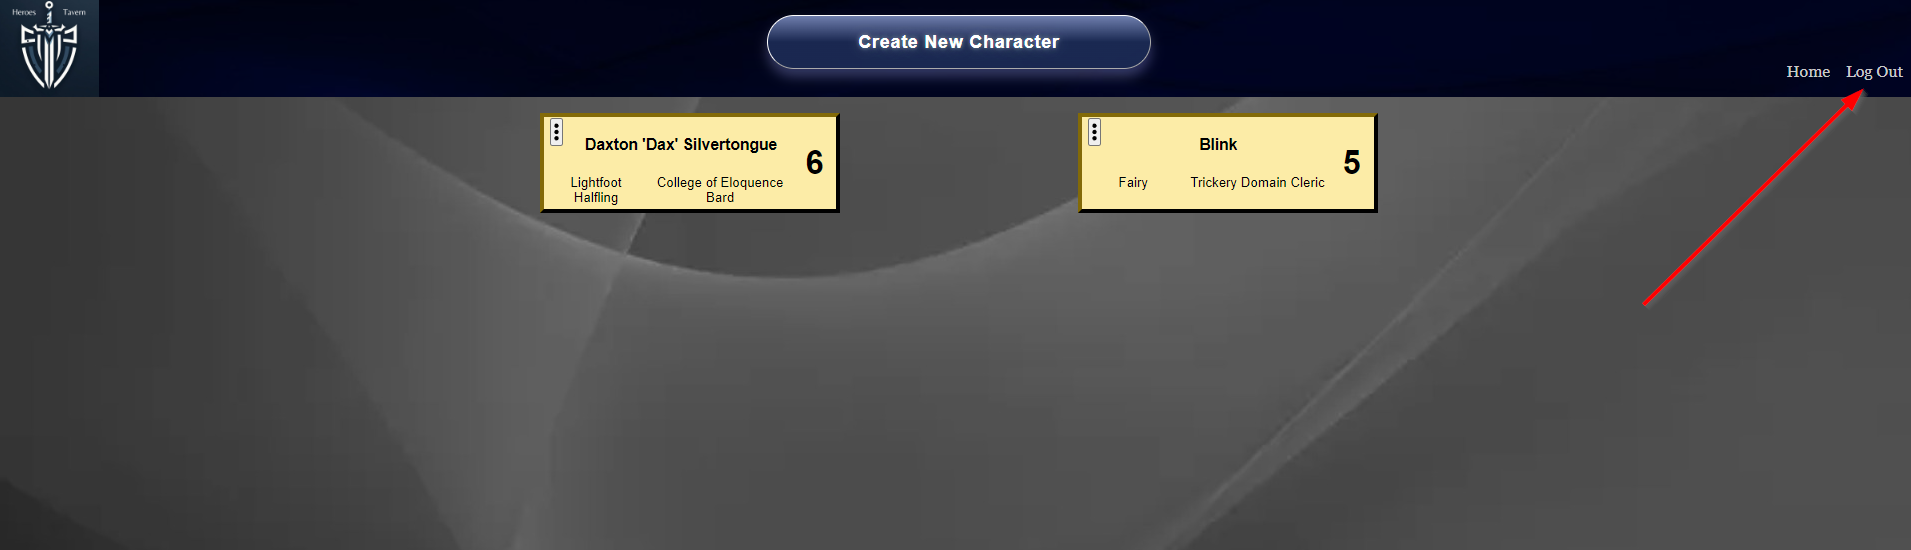
The Home page is for people who are registered and logged in. It displays an automatically generated list of all of the user's characters, kept responsive using flex boxes. On each character tile is a kebab menu for editing or deleting the character, and key information about these characters. We use caching to ensure swift loading, but there is a loading interaction if for some reason it is slow to collect the users' characters. In the situation the user has no characters, they are told they have no characters and are invited to create one. Clicking on a character tile takes you to the character sheet. The Create a Character button in the navbar takes you to character creation.
Character Sheet
Character Sheet

The character sheet is probably the most complex and important page on the site. This is where all of our database information is displayed, and where many things are calculated based on the user's chosen race, class, background, attributes and so on. This page is divided into three panels when viewed in desktop mode, and the third panel allows the user to switch between different tabs to view different part of the character's background. The page will often be larger than the screen and require scrolling down to view the details of certain aspects of the character, but on a standard desktop all important information is presented on the screen at once when viewed in full screen. When viewed on mobile or other smaller devices the site stacks the panels on top of eachother for easy mobile scrolling. This could probably be improved in a later iteration by using a method similiar to the tabs for background, but instead dividing the whole site into tabs.
This should be fairly simple to implement in a later iteration as almost every aspect of the character sheet is divided into components and helper functions for calculations, allowing all aspects of this page to be used elsewhere. If we wanted a simpler character sheet for mobile users, a cut down version for a character tile or for sharing characters later on, or simply wanted to change one aspect of the character sheet, the large use of components here keeps it very modular and reusable.
Character Creation
Character Creation 1

Character Creation 2

Character Creation 3

Character Creation 4

Character creation is divided into four forms. These forms retain information in state as you navigate between them, allowing the user to complete the character creation in any order they wish, but certain information on the first page and third must be filled in to proceed to the next page. This is because it is the information contained in the base Character model, which is built on top of for certain other sections of the character creation that require a character ID.
The character creation process is simple and intuitive, with plenty of defaults in place, and many optional boxes. If you try and proceed without filling out key information, an alert will pop up and prevent continuation until the user fills out the required fields. Drop down boxes are populated based on other parts of the character that have been selected; for example if you choose the "Elf" race, you will only see a list of Elf subraces when you go to the subrace option.
Many aspects of the character creation are modular and can be reused elsewhere (for example, we use the same forms for editing a character).
Accounts
Registration Page
Registration Page

The registration page is accessible through a "Sign Up" link in the navbar or "Register" CTA button on the index page for users who are not logged in. The page features a simple form that requires the users "Username", "Password" and "Repeat Password".
If the user attempts to register while leaving any of the fields blank, they are prompted to fill in the missing field. If the user attempts to register with a username that is already registered, they are given a message that the username is already in use. If the user attempts to register without the passwords matching, they are given a message that the password fields don't match.
When the user registers, they are redirected to the index page where they can then log in.
Login Page
Login Page

The login page is accessible through a "Login" link in the navbar or through the "Log In" call to action button on the landing page. The page features a simple form that requires the user's "Username" and "Password". If the user attempts to submit an empty field, they are prompted to fill in the required field. If the user's credentials are invalid, they are given a message that their login is invalid.
When the user logs in, they are redirected to the home page.
The logout option is accessible through a "Logout" link in the navbar. When the user clicks the logout button they are immediately logged out and redirected to the landing page.
Future Features
- Administration Page. A page for administrators to manage accounts and edit the database in some ways.
- Account Deletion. In future it would be good to allow users to delete their accounts if they no longer want to use the site.
- Password Recovery. A future feature that would be important in another iteration would be the ability for a user to recover forgotten login credentials.
Reusable React Components
During the creation of the site, a large number of React components were created, with the intention that they would be reusable on other parts of the site. Many of these pertain to the character sheet, as mentioned before. This means that if we decide to use a different display, or a different system, on the site the character sheet could be built out of these components. In other areas there are reusable components such as the loading component, the charactertile component and the header tile, that whilst they only serve one purpose could easily be imported into different areas of the site, or modified without affecting any other parts of the site.
Design
The concept for HeroesTavern was a site for the creation and collection of characters for Dungeons and Dragons. As such, the aim of the design was to be aesthetically pleasing, clear and easy to read, and modular, so that when certain parts of the character sheet are repeated on a character tile, or on multiple characters, they are clear and easily identifiable. We used a "dark mode" colour scheme to keep the site easy on the eye with clear call to action buttons and high levels of contrast for accessibility.
Colour
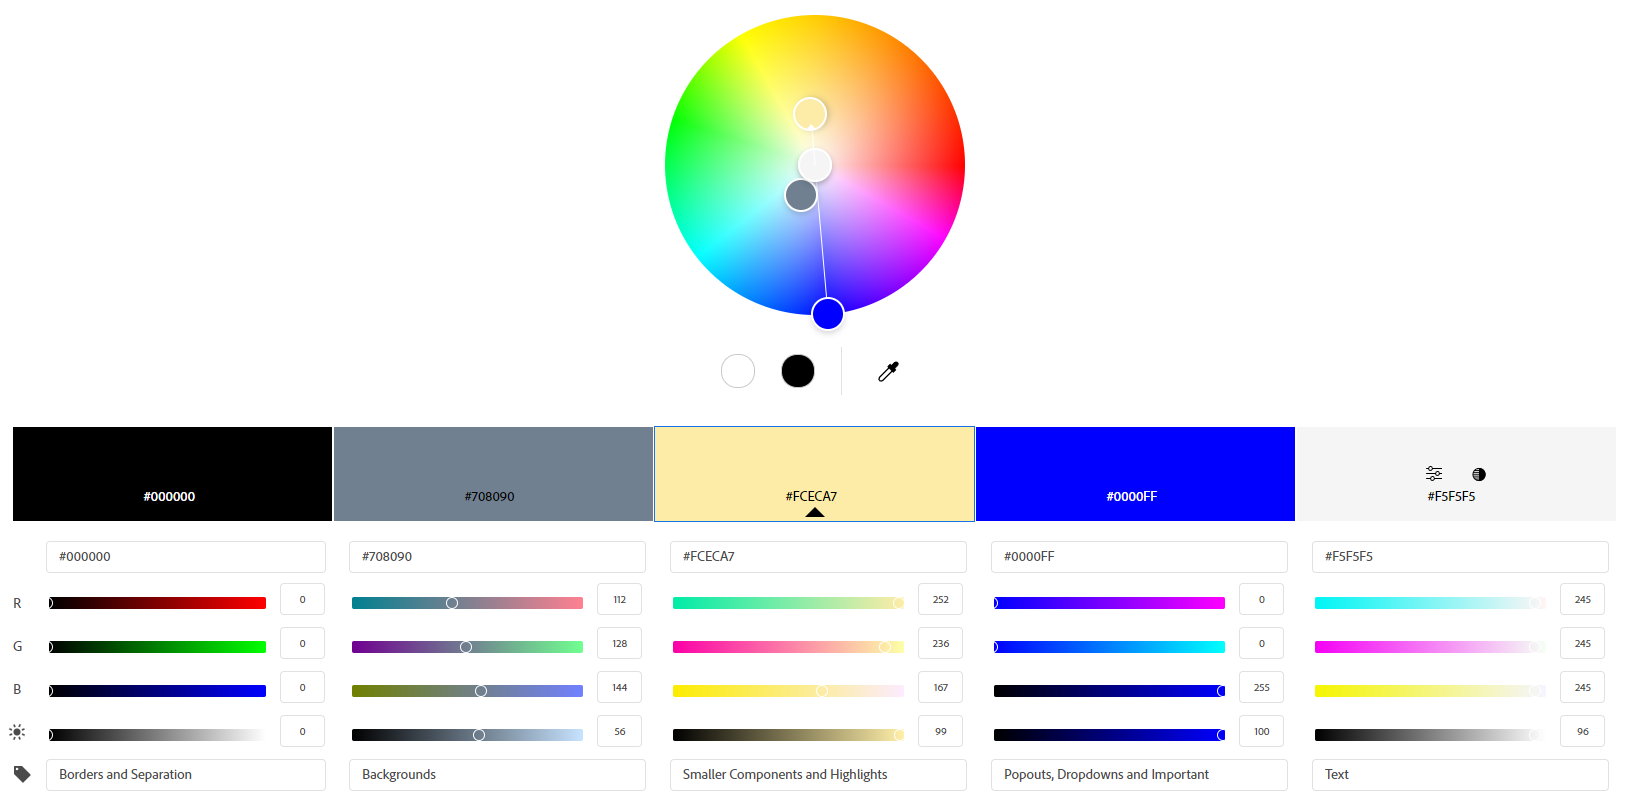
This colour palette was chosen for a "dark mode" feel with clarity and accessibility in mind. Important things pop up in high contrast colours, or in colours that are not present on the screen until that moment, text is in high contrast to background at all times.
Typography
The font of the site is consistent throughout, using the Georgia family primarily, with sans-serif as a fall back.
Wireframes
Wireframes were created in Balsamiq. They were used for initial planning of the character sheet layout. This page was the most complicated and the base from which the character sheets were created for other display sizes. I did not create wireframes for the login page, or the home page, as I felt they were both incredibly simple and modular depending on screen size.
Character Sheet Wireframe (Desktop)

## CRUD Functionality
Users can create a character by clicking the Create a Character button, edit it and update it through the kebab menu on the character tile of the Home page, or via the Edit button on the character sheet, and can delete their character on the Home page using the kebab menu "Delete Character" option.
## Agile Methodology
[GitHub Projects Page](https://github.com/users/jameshart197/projects/4/)
GitHub Projects was used in part for the planning of this website to create and track User Stories as they were implemented and fulfilled. This section documents sprints and implementation of the plan. The project consists of seven sprints in total. When I began creating the project plan, I split the site into separate categories; Backend, API, UI, Authentication, Character Sheets, Character Creation and Stretch Goals.
I then decided that the initial sprint would be the creation of the backend models. During this creation process, we did include a single "should have" or "Extended Functionality" aspect, as it was incredibly easy to include at this stage and would be more complex to include later. These were the Linked Models which allow for a model to link two content models together so things can be implemented automatically, such as the subrace providing a skill proficiency.
My second sprint was almost entirely the API creation for the site. Again a couple of "should haves" and even a "could have" feature were included at this stage as the sprint was ahead of schedule and the implementation of these was easy at the time. The part of these features that truly put them in the "extended functionality" or even "stretch goal" category was the implementation and usage of the APIs on the front end. Whilst creating these APIs was very simple, it was likely we would not use them in the first iteration.
My third sprint was the bare bones of the site; landing page, header, navbar and authentication. Having a login, logout and the functionality to test them before implementing any more complicated features was vital, and creating a skeleton to the site made it simpler to see where we would go from here. This sprint was fairly simple, and was done quickly without much struggle.
The fourth sprint was to be the character sheet. At first we created this using mocking and json sheets, for simplicity and to be able to see how the data would look when implemented. A lot of time was spent on the design element of this page, and styling was perhaps as much a distraction as it was an important step at this time, but this sprint took a fairly long time and began to shine a light on what would be the most time consuming element of the site. Creating the javascript functionality to fetch the data for character sheets on the site took almost the entire project length in time, and was a huge task for a single coder. It was at this point that the scope of the site had to be narrowed slightly, and certain features were removed from the design process.
The fifth sprint was character creation. The actual creation forms were fairly simple to implement, and the design element of this sprint was fairly short. That being said, keeping the information in state, and ensuring that it was the correct data type and data shape for the character sheet was a big learning curve, and this is definitely where I had the most bugs to fix.
The sixth sprint was to finish the UI, make the site responsive and to add Edit, Update and Delete functionality to the site. This felt like a natural progression, and in reality was a far shorter sprint than I had originally believed it would be. The uploading of character art was added to this sprint on the basis that if it was too difficult to implement it would be removed from the site until a later iteration. Fortunately, this proved to be simpler than I originally believed and it was included at this point.
The final sprint was to finish documenting the site, removing any testing code or commented out code, refactoring the code to industry standards and ensuring there are no redundant elements to the site. With a project of this scope, with as many different components and parts, this was a fairly lengthy process and probably wasn't finished to my satisfaction in time. In future I will leave more time for this element of a project, though perhaps it should be noted that more efficient practices and habits in the site creation might lead to this step being shorter in future.
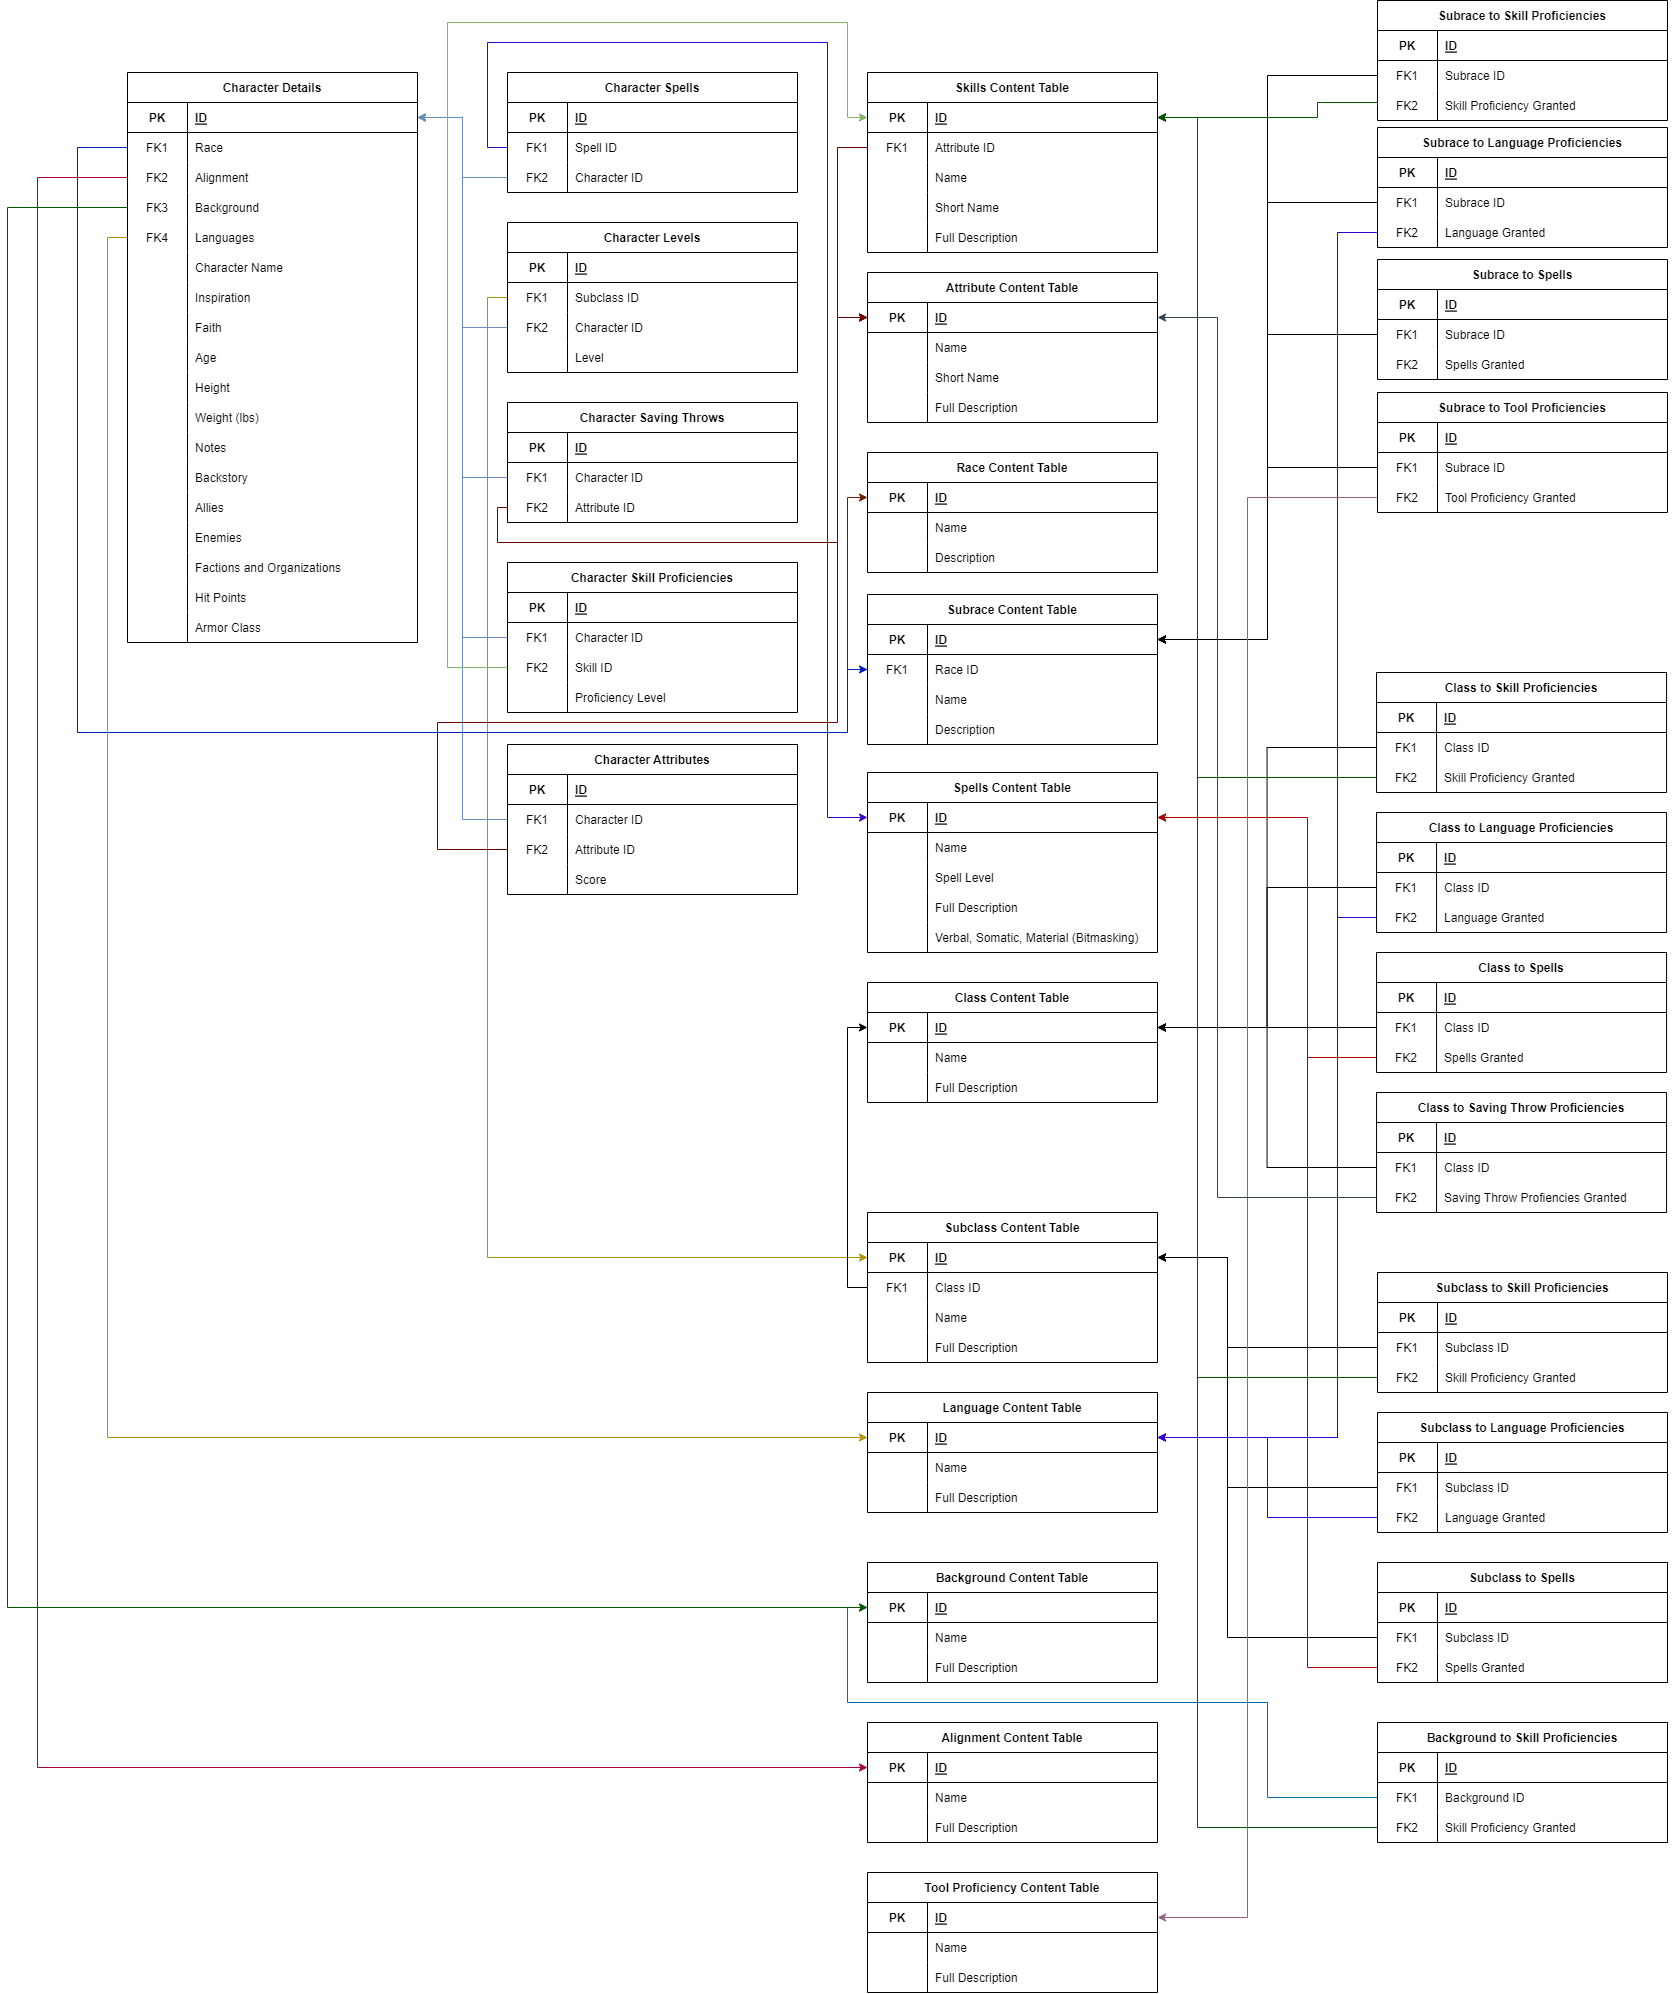
## Entity Relationship Diagram
The below Entity Relationship Diagram was created on [diagrams.net](https://www.diagrams.net/). It illustrates the relationships between the models present in the project:
ERD

# Technologies Used
- [HTML5](https://en.wikipedia.org/wiki/HTML5): mark-up language.
- [CSS3](https://en.wikipedia.org/wiki/CSS): styling.
- [JavaScript](https://www.javascript.com/): programming language.
- [Python 3](https://www.python.org/): programming language.
- [React](https://create-react-app.dev/): front-end application.
- [Heroku](https://www.heroku.com) - deployment.
- [Django REST Framework](https://www.django-rest-framework.org/) - toolkit used to build this web API
- [ElephantSQL](https://www.elephantsql.com/) - serves as the PostgreSQL database for this project
- [Cloudinary](https://cloudinary.com/): store static and media files.
- [GIT](https://git-scm.com/): for version control.
- [GitHub](https://github.com/): for host repository.
- [Gitpod](https://www.gitpod.io/): online IDE.
- [Google Fonts](https://fonts.google.com/): to import fonts.
- [Font Awesome](https://fontawesome.com/): to import icons.
- [Balsamiq](https://balsamiq.com/): to create wireframes.
- [Diagrams.net](https://www.diagrams.net/): for Entity Relationship Diagram.
## Known Bugs
When testing the site using web developer tools (such as Chrome Dev Tools) and changing the home page from a desktop view to mobile view, the menu begins opened and displays a gap on the right hand side of the screen. This is immediately fixed by pressing the menu button twice. As this bug was not replicable using an actual mobile to access the site, I decided this bug was unique to testing and did not spend any more time fixing it.
When using postman, characters can be edited without a full security check. If the site was going to production this would need to be fixed, but as you need a current access token, a character ID and a username to make such an edit, I decided the site was secure enough for the purposes of the project.
If no information is entered in the fourth character creation page, it appears that the tabs at the bottom right of the character sheet do not work. This is not the case, but as each tab is empty, there is no indication switching between them is working. The user should recieve a visual notification of switching between tabs, but unfortunately styling this area was beyond the timeframe of the project. This should be fixed in a later iteration.
# Deployment
## Steps to deploy site using Heroku:
- Assuming gunicorn, dj_database_url, psycopg2 and dj3-cloudinary-storage have been installed
- On the Heroku dashboard, select "New" and click "Create new app"
- Create a unique app name - this will be added to allowed hosts in the project settings
- Select your region
- Click "Create app"
- Go to the Resources tab:
- Search for "postgres" in the add-ons search bar and select "Heroku Postgres"
- Click "Submit Order Form"
- Go to the settings tab:
- Scroll down to the config vars section and select "Reveal Config Vars"
- DATABASE_URL will be set after adding Heroku Postgres - this will be copied to the project
- Add a new config var for SECRET_KEY - create your own or use a django secret key generator
- Add a new config var for CLOUDINARY_URL - copy the "API Environment variable" from your cloudinary dashboard, remove "CLOUDINARY_URL="
- Add a new config var for DISABLE_COLLECTSTATIC, with the value 1 - this will be removed before deployment
- In your project, for your environment variables:
- Create a new env.py file in the top level directory
- In env.py:
- Import os
- Add 'os.environ["DATABASE_URL"] = "Paste the DATABASE_URL from the Heroku app here"'
- Add 'os.environ["SECRET_KEY"] = "Paste your new secret key here"'
- Add 'os.environ["CLOUDINARY_URL"] = "Paste your CLOUDINARY_URL as in the Heroku app here"'
```
import os
os.environ['DATABASE_URL'] = 'postgres://exampledatabaseurl'
os.environ['SECRET_KEY'] = 'examplesecretkey'
os.environ['CLOUDINARY_URL'] = 'cloudinary://examplecloudinaryurl'
```
- If not already present, create a .gitignore file and add env.py to it
- In your project, in settings.py:
- Import os
- Import dj_database_url
- if os.path.isfile('env.py'):
import env
```
import os
import dj_database_url
if os.path.isfile('env.py'):
import env
```
- Replace the insecure secret key with "SECRET_KEY = os.environ.get('SECRET_KEY')"
```
SECRET_KEY = os.environ.get('SECRET_KEY')
```
- Link new database by commenting out old DATABASES section and adding:
DATABASES = {
'default': dj_database_url.parse(os.environ.get('DATABASE_URL'))
}
```
DATABASES = {
'default': dj_database_url.parse(os.environ.get('DATABASE_URL'))
}
```
- Add Heroku to the allowed hosts: "ALLOWED_HOSTS = ['the_app_name_from_heroku.herokuapp.com']
```
ALLOWED_HOSTS = ['example-heroku-app-name.herokuapp.com', 'localhost']
```
- Add 'cloudinary_storage' (above 'django.contrib.staticfiles') and 'cloudinary' (below) to INSTALLED_APPS
```
...
'cloudinary_storage',
'django.contrib.staticfiles',
'cloudinary',
...
```
- Setup Cloudinary to store static and media files
```
STATIC_URL = '/static/'
STATICFILES_STORAGE = 'cloudinary_storage.storage.StaticHashedCloudinaryStorage'
STATICFILES_DIRS = [os.path.join(BASE_DIR, 'static')]
STATIC_ROOT = os.path.join(BASE_DIR, 'staticfiles')
MEDIA_URL = '/media/'
DEFAULT_FILE_STORAGE = 'cloudinary_storage.storage.MediaCloudinaryStorage'
```
- Run 'python3 manage.py collectstatic' to collect static files
- In your project:
- Create a Procfile in the top level directory and add 'web: gunicorn project_name.wsgi' to tell
```
web: gunicorn project_name.wsgi
```
- Create a requirements file with 'pip3 freeze --local > requirements.txt' for Heroku to install required packages
```
pip3 freeze --local > requirements.txt
```
- Make migrations with 'python3 manage.py migrate'
```
python3 manage.py migrate
```
- Commit and push to GitHub
- Prior to final deployment:
- Set DEBUG = False in project settings.py
- Remove DISABLE_COLLECTSTATIC config var from Heroku
- Go to the Deploy tab:
- Select GitHub and confirm connection to GitHub account
- Search for the repository and click "Connect"
- Scroll down to the deploy options
- Select automatic deploys if you would like automatic deployment with each new push to the GitHub repository
- In manual deploy, select which branch to deploy and click "Deploy Branch"
- Heroku will start building the app
- The link to the app can be found at the top of the page by clicking "Open app"
The live site can be found here: [Application]()
## Steps to clone site:
- In the GitHub repository, click the "Code" button.
- Select "HTTPS" and copy the URL.
- Open Git Bash and navigate to the repository where you would like to locate the cloned repository.
- Type "git clone" followed by the copied URL.
- Press enter to create the clone.
- Install required packages with the command "pip3 install -r requirements.txt"
# Credits
## Code
- Buttons taken and modified from [Get Css Scan](https://getcssscan.com/css-buttons-examples)
- Toast implementation from [React Hot Toast](https://react-hot-toast.com/)
- Tab implementation from [Headless UI](https://headlessui.com/react/menu)
- Various elements from the initial Code Institute Moments and DRF-API walkthrough projects
- Authentication from [DJ Rest Auth](https://dj-rest-auth.readthedocs.io/en/latest/installation.html)
- Listboxes from [Headless UI](https://headlessui.com/react/menu)
- Routing from [React Router](https://reactrouter.com/en/main/start/tutorial)
## Media
- Icons are from [Font Awesome](https://fontawesome.com/v5/docs/web/use-with/react)
- The fonts are imported from [Google Fonts](https://fonts.google.com)
## Acknowledgment
This fictional site was created for Portfolio Project #5 (Advanced Front End Specialisation) - Diploma in Full Stack Software Development at the Code Institute. I would like to thank my mentor Daisy McGirr for her support and feedback during the project.