nimqt
Qt6 bindings for nim. It makes use of verdigris, a set of macros to use Qt without moc. The targeted version is Qt6, and might work for Qt5, depending on what modules are used.
Usage
Installation
Install with nimble install https://github.com/jerous86/nimqt@#head.
This will install bindings that have been generated for Qt 6.4.2, but will very likely work with any Qt 6 version.
qmake is used to determine the paths.
The path can be overriden using the environment variable QMAKE_PATH, e.g.
QMAKE_PATH=$HOME/Qt/Qt5.2.1/bin/qmake nim cpp -r examples/calc.nimwill use (if it exists) Qt 5.2.1.
On linux it will link with the Qt major version libraries (i.e. for the example it will link with -lQt5Core etc, while for Qt 6 it will link to -lQt6Core).
Simple example
The following example is based on an old examples/hello.nim
import os
import nimqt
import nimqt/[qpushbutton, qboxlayout]
nimqt.init
let app = newQApplication(commandLineParams())
inheritQObject(GuiHandler, QObject):
slot_decl on_helloWorld_clicked()
let guiHandler: ptr GuiHandler = newGuiHandler()
let win: ptr QWidget = newQWidget()
win.makeLayout:
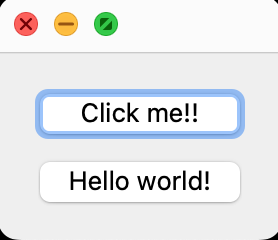
- newQPushButton(Q "Click me!!"):
connect(SIGNAL "clicked()", guiHandler, SLOT "on_helloWorld_clicked()")
- newQPushButton( Q "Click me!!"):
connect(SIGNAL "clicked()", guiHandler, SLOT "on_helloWorld_clicked()")
proc on_helloWorld_clicked(this: ptr GuiHandler) =
let sender = cast[ ptr QPushButton]( this.get_sender())
sender.setText( Q "Hello world!")
win.show()
discard app.exec()When running this code with nim cpp examples/hello.nim, we get
 .
.
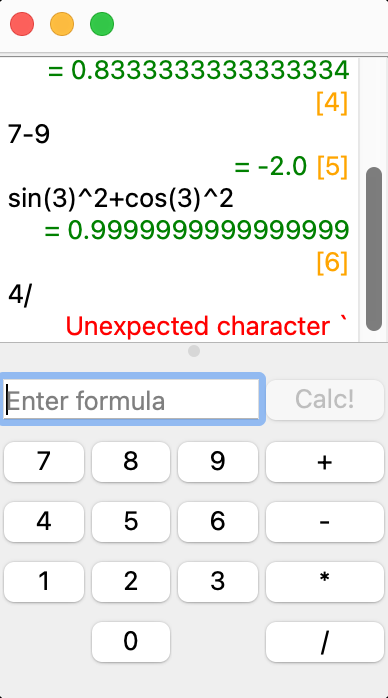
A screenshot of examples/calc.nim:
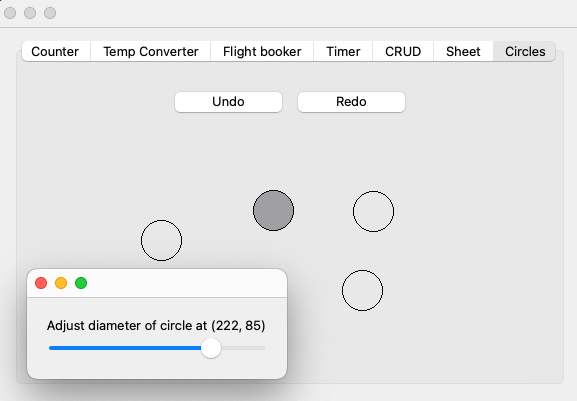
A screenshot of the circle draw example from 7GUIs: A GUI Programming Benchmark, found in examples/seven_tasks.nim, :
Documentation
A more elaborate usage of nimqt can be found in examples/text_view.nim which has a lot of comments on the usage.
Not all methods are available yet due to nim's restriction on recursive module imports. See in the Generating bindings section below. A temporary fix is to write the bindings manually after having imported all necessary modules.
Minimal example
Here we show the minimal code necessary to show a Qt widget.
import os
# First, we import the nimqt.nim module that will allow us to use the Qt system
import nimqt

# nimqt.init() should be called at the start of your program.
# It will initialize verdigris, and import some common modules.
nimqt.init()

let app = newQApplication(commandLineParams()) # Create your application.

import nimqt/qlabel

let w=newQLabel(Q"Hello world!")
w.show()

discard app.exec() # Run Qt's main loop
Creating a new QObject
To create a custom QObject, one can use the inheritQObject(CLASSNAME, BASECLASS) macro.
This will start the creation of a new class named CLASSNAME which derives from BASECLASS.
BASECLASS should be one of the Qt classes (like a QObject or a QWidget etc).
The body of the inheritQObject allows for defining slots and overriding methods (creating new methods cannot be done in the body of the macro, but should be done just as a regular proc/func).
For example,
inheritQObject(MyTextEdit, QTextEdit):
    # In this case, we want to intercept mouse presses inside the QTextEdit,
    # print a message and then let the QTextEdit handle the events.
    # As we are not using any variables that are defined below, we can just
    # use the "override" statement.
    override mousePressEvent(e: ptr QMouseEvent):
        echo "Pressed the mouse! ", e.button
        this.parent_mousePressEvent(e)
The following declaration and definitions are possible inside inheritQObject(Foo, QObject):
- Define/declare a slot
slot SLOT_NAME(ARGUMENTS): BODYslot_defer SLOT_NAME(ARGUMENTS): BODYslot_decl SLOT_NAME(ARGUMENTS)
- Override a method
override METHOD_NAME(ARGUMENTS): BODYoverride_defer METHOD_NAME(ARGUMENTS): BODYoverride_decl METHOD_NAME(ARGUMENTS)
- Override a const method
const_override METHOD_NAME(ARGUMENTS): BODYconst_override_defer METHOD_NAME(ARGUMENTS): BODYconst_override_decl METHOD_NAME(ARGUMENTS)
- Define a signal
signal SIGNAL_NAME(ARGUMENTS)Declares a custom signal. It can be connected to using the regularconnectcall. The signal can be emitted using theemittemplate. An example for creating and using custom signals can be found inexamples/custom_signal.nim.
- Define a member function
member FUNCTION_NAME(ARGUMENTS)Protected functions can not be called from within regular nim code. To solve this problem, a proc can be declared as amember(which results in making it a c++friendfunction, allowing access to the protected functions). An example can be found incustom_widgets/code_viewer.nim.
- Define a member variable
var VAR_NAME: VAR_TYPEthis will create a variable. Due to limitations, this variable is not stored inside the object, but in an unrelated Table. The value can be transparently set and retrieved, but bear in mind that due to this Table there will be a small performance cost. See inexamples/hello.nimfor an example of how to use member variables. The default value for VAR_NAME is VAR_TYPE's default value. There is no way to modify this default value.
- Define a constructor that will call the parent class
constructor(parent: ptr QObject)This code will create a constructor that will call the base class' constructor with parameterparent. A constructor can not have a body. This restriction is to simplify the parsing and processing. To do more initialization, create a member function (e.g. calledinitializeand call that). The constructor method is only useful in case e.g. some parameters are initialized in the constructor. See incustom_widgets/code_viewer.nimfor an example.
We now explain the differences:
slot,overrideandconst_overrideare method definitions, and require a body. The code in the body will be inserted at this place in the code. This means that if you are using variables that are defined later on in the code, this will result in errors. Inside the body,thisis implicitly defined and will refer to the current object.slot_defer,override_deferandconst_override_deferare also method definitions, and also require a body. The difference with the version above is that the body is inserted where the macroqt.insertSlotImplementations(CLASS_NAME)orqt.insertAllSlotImplementations()is called. The call to the function will effectively insert the code at that point in the code. This is useful when you want to use objects that are defined after the definition of this object. Inside the body,thisis implicitly defined and will refer to the current object.-
slot_decl,override_declandconst_override_declare used to declare the methods. The definitions have to be specified manually. E.g.inheritQObject(ObjectFoo, QObject): slot_decl onClick(param1:bool) proc onClick(this:ObjectFoo, param1:bool) = echo param1This version is only useful when you really need fine control over where the procedure is defined.
Some notes
-
In the body of an overriden method, we can call
METHOD_NAMEof the base class usingparent_${METHOD_NAME}. E.g.inheritQObject(MyTextEdit, QTextEdit): override mousePressEvent(e: ptr QMouseEvent): echo "Pressed the mouse! ", e.button this.parent_mousePressEvent(e) -
The body definition does not follow the '=' like in regular nim code, but follows the ':' character.
-
If a parameter must be passed by c++ reference, use a
vartype. If a parameter must be passed by const c++ pointer, useconst_ptr. If a parameter must be passed by const c++ reference, useconst_var. E.g.inheritQObject(MyTextEdit, QTextEdit): slot on_viewer_highlighted(link: const_var QUrl): echo &"highlighted '{link.scheme} :// {link.host} {link.path}" let txt = newMyTextEdit() txt.connect(SIGNAL "highlighted(const QUrl &)", txt, SLOT "on_viewer_highlighted(const QUrl &)")or see the example in
examples/seven_tasks.nim. -
inheritQObject(Foo, QObject)creates a new functionnewFoo()that can be used to create aptr Fooinstance. -
connectcan also connect to a functor. The syntax is very similar:connect(object, SIGNAL "signalName", functor). An example of that can be found inexamples/hello.nim. Additionally,handleSignal<i>i</i>can be used inside themakeLayoutmacro (see next section). -
custom widgets can be placed in separate modules, but need an additional call to also be able to use them. E.g. to import a custom widget
CustomWidgetfrom a modulefoo, you need to doimport foo # this is nothing special foo.import_CustomWidget # So here additional C++ code is generated, required to be able to use the custom widget.There is a restriction that the custom widget must inherit directly from one of the Qt widgets (so importing a custom widget that inherits from a custom widget is not supported). See
examples/custom_widget_main.nimandexamples/custom_widget_widget.nimfor an example.
Layout DSL
The nimqt module provides a macro makeLayout (and makeLayoutH to start with a QHBoxLayout) to easily generate layouts.
Some examples of the DSL follow.
These examples assume we have let rootWidget:ptr QWidget = newQWidget().
This example will generate a widget, containing two unnamed push buttons.
rootWidget.makeLayout:
  - newQPushButton()
  - newQPushButton()
Now, we again add two push buttons to a widget.
But, we name them btn1 and btn2 respectively, and btn2 is an already existing object. This is indicated through the keyword use_object.
let btn2=newQPushButton()
rootWidget.makeLayout:
  - newQPushButton() as btn1
  - use_object btn2
In this example, we extend the previous example, and connect some signals with slots and set some properties from within the DSL.
let btn2=newQPushButton()
rootWidget.makeLayout:
  - newQPushButton() as btn1:
      # All expressions have the object implicitly added. E.g.
      connect(SIGNAL "clicked()", guiHandler, SLOT "clicked()")
      # is converted to
      # btn1.connect(SIGNAL "clicked()", guiHandler, SLOT "clicked()")
      # If you do not want this to happen, use the ```discardThis``` template:
      discardThis: btn1.connect(SIGNAL "clicked()", guiHandler, SLOT "clicked()")
  - use_object btn2:
      connect(SIGNAL "clicked()", guiHandler, SLOT "clicked()")
Grid layouts are also supported in the DSL. After the (obligatory) name, we have the keyword at followed by either
(ROW,COL) or (ROW,COL,ROW_SPAN,COL_SPAN).
rootWidget.makeLayout:
    - newQWidget():
        - newQGridLayout():
            - newQPushButton() as btn00 at (0,0)
            - newQPushButton() as btn01 at (0,1)
            - newQPushButton() as btn10 at (1,0)
            - newQPushButton() as btn11 at (1,1)
Nesting is supported, but care must be taken to alternate widgets and layouts. For example, in the QGridLayout example above, we have a
rootWidget > QVboxLayout (created by the call to makeLayout) > QWidget > QGridLayout > QPushButton.
Doing something like
rootWidget>QVBoxLayout>QGridLayoutorrootWidget>QVboxLayout>QWidget>QWidget
will result in compilation errors, as a QLayout follows a QLayout (in 1.) and a QWidget follows a QWidget (in 2.).
A shorthand to handle simple connections is made available through the handleSignal<i>i</i> templates, where i indicates the number of parameters in the signal.
This will create a functor, and connect the signal to it.
E.g.
rootWidget.makeLayout:
    - newQLineEdit() as txtLine:
        handleSignal1(SIGNAL "textChanged(QString)", s:QString):
            # The variable `this` refers to txtLine
            echo this.text
        handleSignal0(SIGNAL "returnPressed()"):
            echo "Return pressed!"
QMenu DSL
Similar to the layout DSL, there is also a DSL to create menus.
To use it, one should first import nimqt/tools/menu.
When a line starts with
- a
+symbol followed by a stringX, a menu will be created with the titleX. - a
-symbol followed by a stringX, an action will be created with the titleX. - a
*symbol followed by a stringX, an section will be created with the titleX.
As with the layout DSL, children can be added by adding a colon at the end, and indenting. These children can be new QMenus/QActions, or calls to functions.
Signals can also be handled. Some often used shortcuts are introduced in nimqt/tools/menu:
template handleHovered*(m: ptr QMenu, body:untyped) = m.handleSignal1(SIGNAL "hovered(QAction *)", action:ptr QAction, body)
template handleTriggered*(m: ptr QMenu, body:untyped) = m.handleSignal1(SIGNAL "triggered(QAction *)", action:ptr QAction, body)
and nimqt/qtgui/qaction:
template handleChanged*(m: ptr QAction, body:untyped) = m.handleSignal0(SIGNAL "changed()", body)
template handleHovered*(m: ptr QAction, body:untyped) = m.handleSignal0(SIGNAL "hovered()", body)
template handleToggled*(m: ptr QAction, body:untyped) = m.handleSignal1(SIGNAL "toggled(bool)", checked:bool, body)
template handleTriggered*(m: ptr QAction, body:untyped) = m.handleSignal1(SIGNAL "triggered(bool)", checked:bool, body)
template handleVisibleChanged*(m: ptr QAction, body:untyped) = m.handleSignal0(SIGNAL "handleVisibleChanged()", body)
Here is a very simple example of its usage:
import nimqt/tools/menu

let rootMenu=newQMenu(Q"Sample menu")
rootMenu.makeMenu:
    + "Menu1" as menu1:
        + "Menu1.1":
            - "Action1.1.1"
            - "Action1.1.2":
                setCheckable(true)
                handleToggled():
                    echo "Action1.1.2 is now ",checked
        - "Action1.1"
        * "Section1.1"

menu1.setTitle(Q "New title for menu1")
A more elaborate example can be found in examples/menu_toolbar.nim, which also shows an example of creating toolbar items (which is very similar to the macro for the menu).
Loading .ui files
Simple support for loading .ui files is available.
These files can be created using e.g. Qt Creator.
Loading .ui. files requires the QtUiTools module (using apt, it requires libqt6uitools6 and qt6-tools-dev).
This functionality can be found in the macro loadUi from the module nimqt/load_ui.
The macro expects two arguments, a ptr QWidget (might be nil) in which to load the layout, and the (absolute) path to the .ui file.
An example of this can be seen in examples/load_ui.nim:
import os

import nimqt
import nimqt/[load_ui,qboxlayout]

nimqt.init
let app = newQApplication(commandLineParams())

# We use `curFileDir`, defined in nimqt/load_ui to get the directory of *this* file.
# loadUi works best with absolute paths.
var rootWg:ptr QWidget
rootWg.loadUi(curFileDir/"load_ui_example.ui", createConnections=true)
btnUndo.setEnabled(false)
btnRedo.setEnabled(false)

rootWg.show()
discard app.exec()
This macro will generate let statements for all the objects in the .ui file, and also create the connections that are specified in the .ui file.
To disable these connections, set createConnections=false.
To see the code that is generated, set printLetStatements=true in the loadUi call.
Tools
- See in
examples/autosaver.nimandscripts/tools/autosaver.nim. This tool will save a widget's value (e.g. the text for a QLineEdit, or the toggled state for a QRadioButton) to a file, and restore it on startup. To make use of it, importnimqt/tools/autosaverand callautoSave(object)on all the objects you want it enabled for.
Other notes
- To use a type
Tin a parameter of a signal/slot or as a return value, verdigris must know about this type. This can be done through callingregisterArgTypeon that type. E.g.QListWidgetItem.registerArgType() - Static methods of a class, like
QCursor::pos()are written asstatic_QCursor_pos. This naming is done to avoid name clashing with non-static methods and/or member variables. - Like in Qt, we also have to annotate signals and slots in a
connectcall with respectivelySIGNALandSLOT. E.g.connect(btn1, SIGNAL "clicked()", txt, SLOT "clear()").
Generating bindings
Bindings are generated in three steps:
- convert header files to XML files: this parses the header files using libclang, and writes them to a more convenient XML format.
- extract from all the XML files all the available classes and enums, and write them to
typeDb.txt. This allows for quick resolution of what imports need to be done to have access to a class, and also allows for easy filtering of what methods can be supported given a limited set of classes. - find out the classes that should be converted to nim, and then convert them.
These steps are carried out by scripts/generate_distr.sh.
This script accepts 1 parameter, the "distribution", and determines for which classes nim modules should be generated.
Currently, there is only one distribution defined, "gui_widgets", which provides bindings to most of QtWidgets, many classes of QtGui and a very limited set of classes from QtCore.
A larger set of Qt classes should be possible in the future, so one can make use of the extensive Qt libraries.
Generation of these bindings is partly automatic, but there is still some manual intervention required for some parts.
For example, due to recursive module imports not being supported, not all methods are possible, as types inside the method parameter list or return type would result in a loop (e.g. QLayoutItem::widget() is not available, due to the module dependency QLayoutItem -> QWidget -> QLayout -> QLayoutItem).
Additionally, there are some bugs in libclang, which result in inaccuracies.
License
Like Qt, this library is under the dual license LGPLv3 and GPLv2.