Main location for this repo has been moved to https://github.com/chilipeppr/serial-port-json-server
serial-port-json-server
Version 1.87 (See https://github.com/chilipeppr/serial-port-json-server for latest version 1.88+)
A serial port JSON websocket & web server that runs from the command line on Windows, Mac, Linux, Raspberry Pi, or Beagle Bone that lets you communicate with your serial port from a web application. This enables web apps to be written that can communicate with your local serial device such as an Arduino, CNC controller, or any device that communicates over the serial port. Since version 1.82 you can now also program your Arduino by uploading a hex file.
The app is written in Go. It has an embedded web server and websocket server. The server runs on the standard port of localhost:8989. You can connect to it locally with your browser to interact by visiting http://localhost:8989. The websocket is technically running at ws://localhost/ws. You can of course connect to your websocket from any other computer to bind in remotely. For example, just connect to ws://192.168.1.10/ws if you are on a remote host where 192.168.1.10 is your devices actual IP address.
The app is one executable with everything you need and is available ready-to-go for every major platform. It is a multi-threaded app that uses all of the cool techniques available in Go including extensive use of channels (threads) to create a super-responsive app.
If you are a web developer and want to write a web application that connects to somebody's local or remote serial port server, then you simply need to create a websocket connection to the localhost or remote host and you will be directly interacting with that user's serial port.
For example, if you wanted to create a Gcode Sender web app to enable people to send 3D print or milling commands from your site, this would be a perfect use case. Or if you've created an oscilloscope web app that connects to an Arduino, it would be another great use case. Finally you can write web apps that interact with a user's local hardware.
Thanks go to gary.burd.info for the websocket example in Go. Thanks also go to tarm/goserial for the serial port base implementation. Thanks go to Jarret Luft at well for building the Grbl buffer and helping on global code changes to make everything better.
Example Use Case
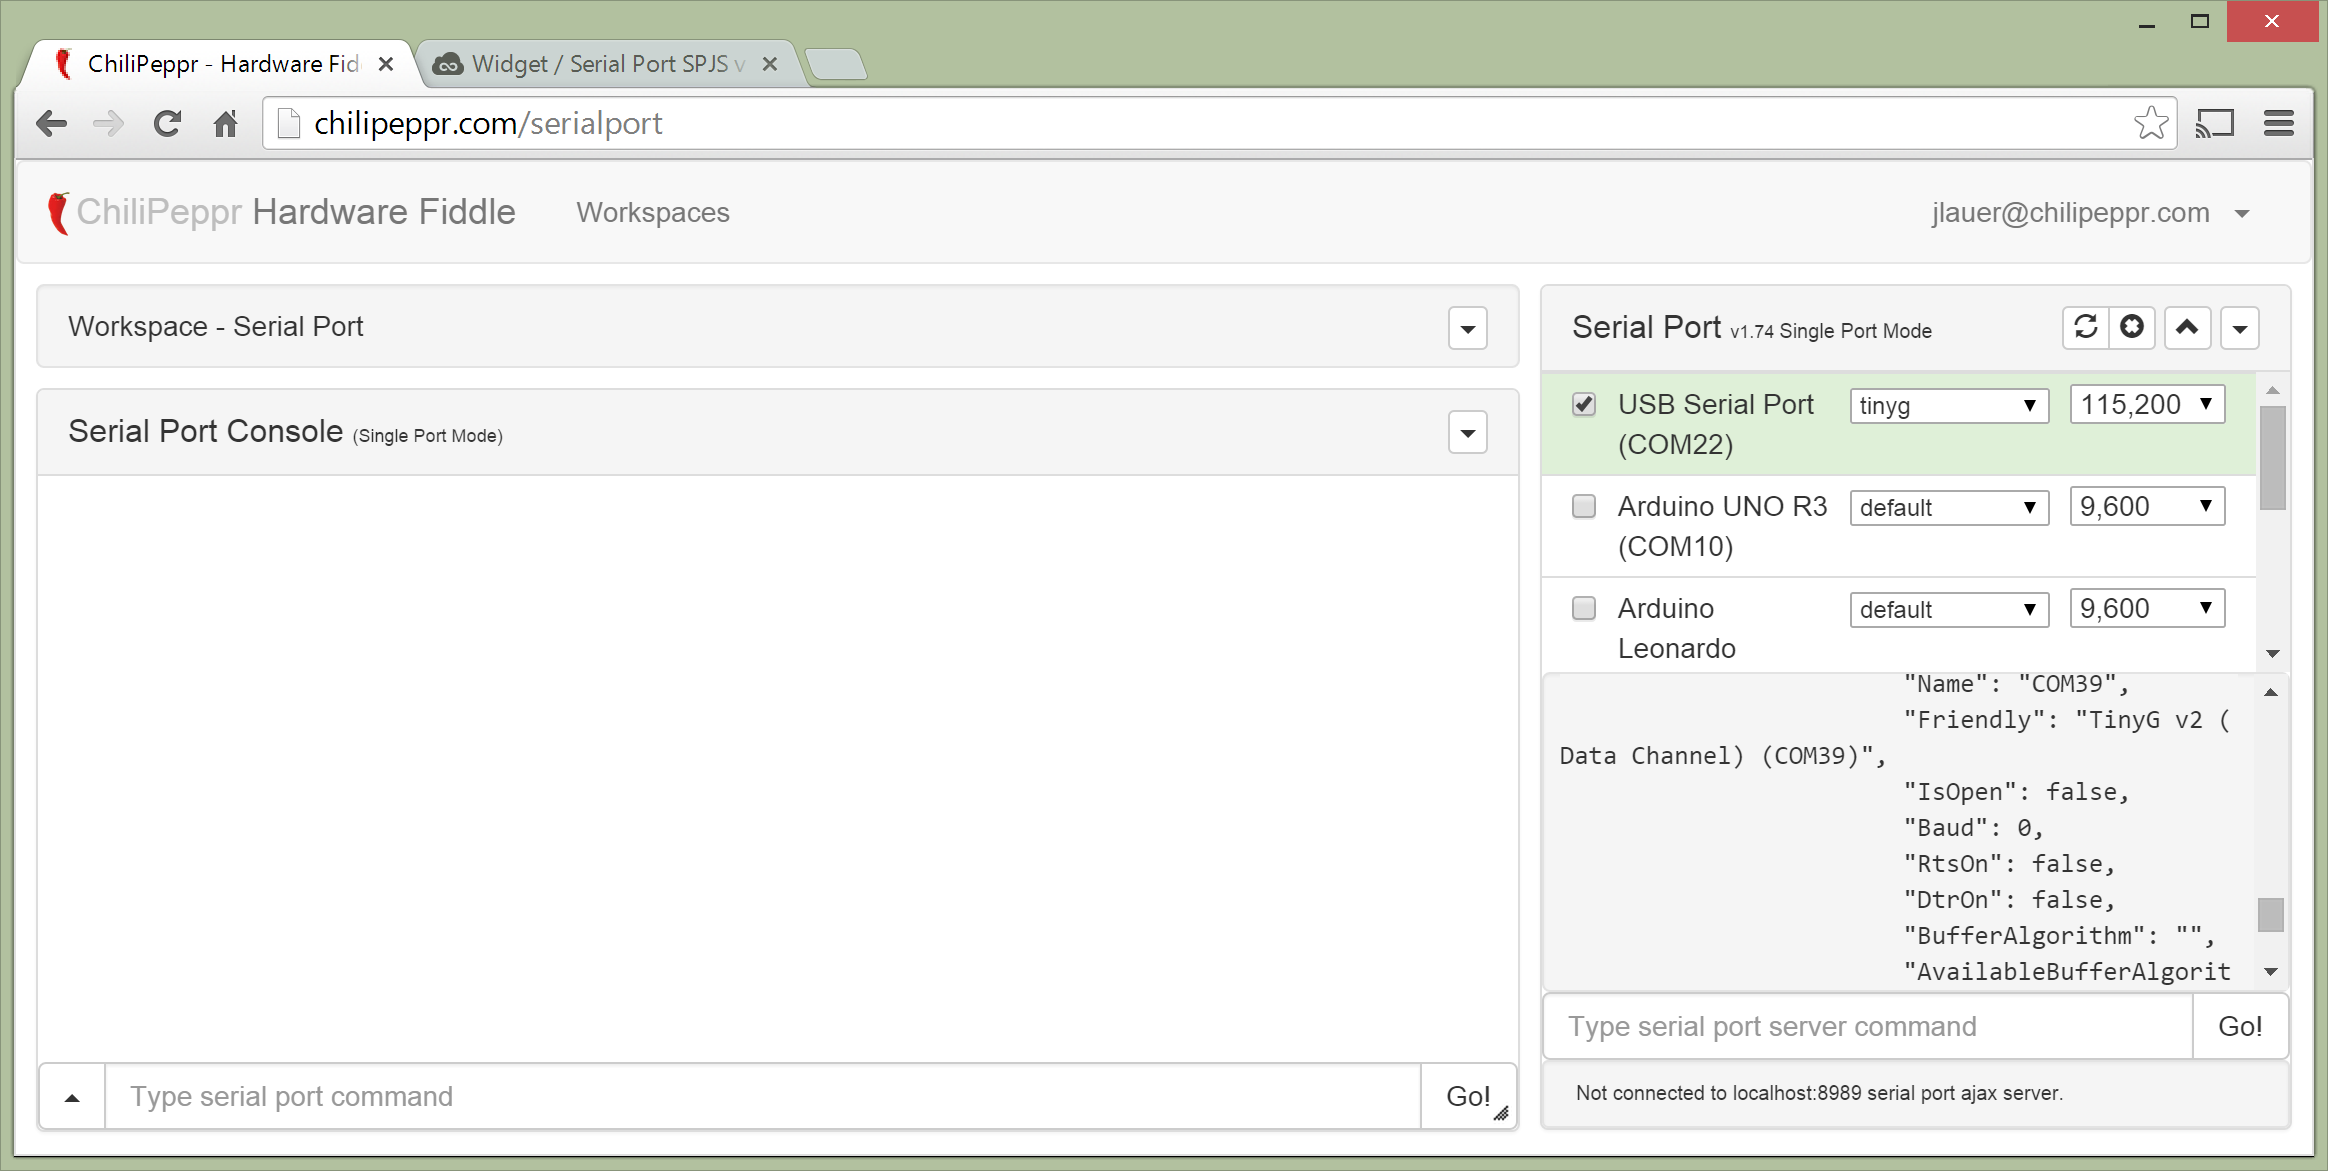
Here is a screenshot of the Serial Port JSON Server being used inside the ChiliPeppr Serial Port web console app. http://chilipeppr.com/serialport
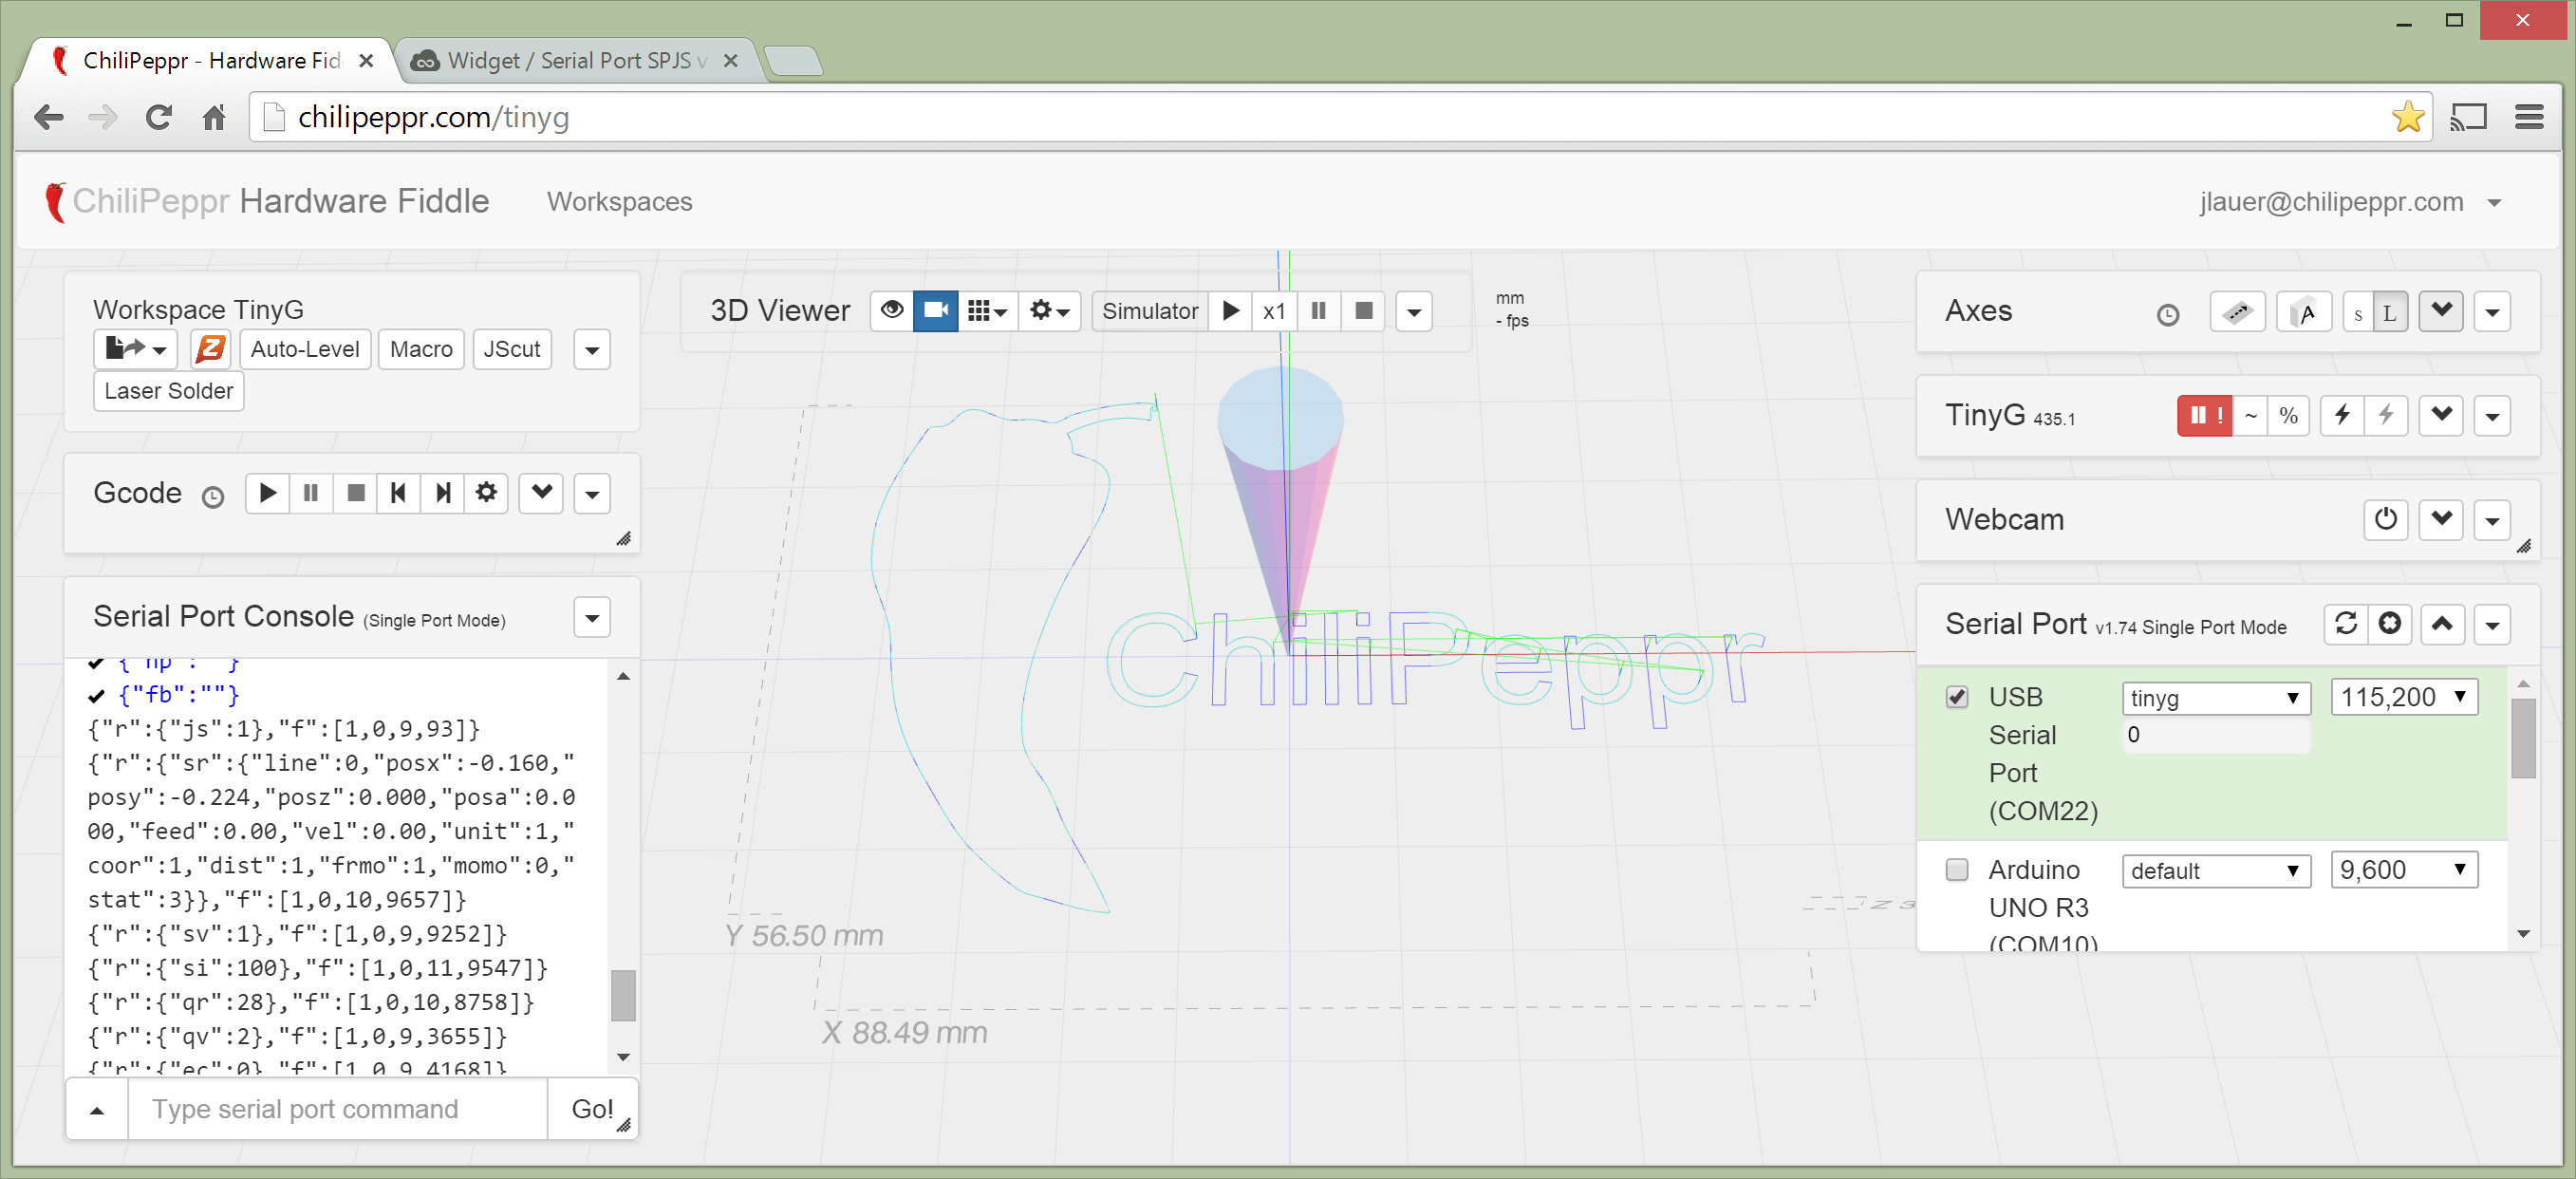
This is the Serial Port JSON Server being used inside the TinyG workspace in ChiliPeppr. http://chilipeppr.com/tinyg
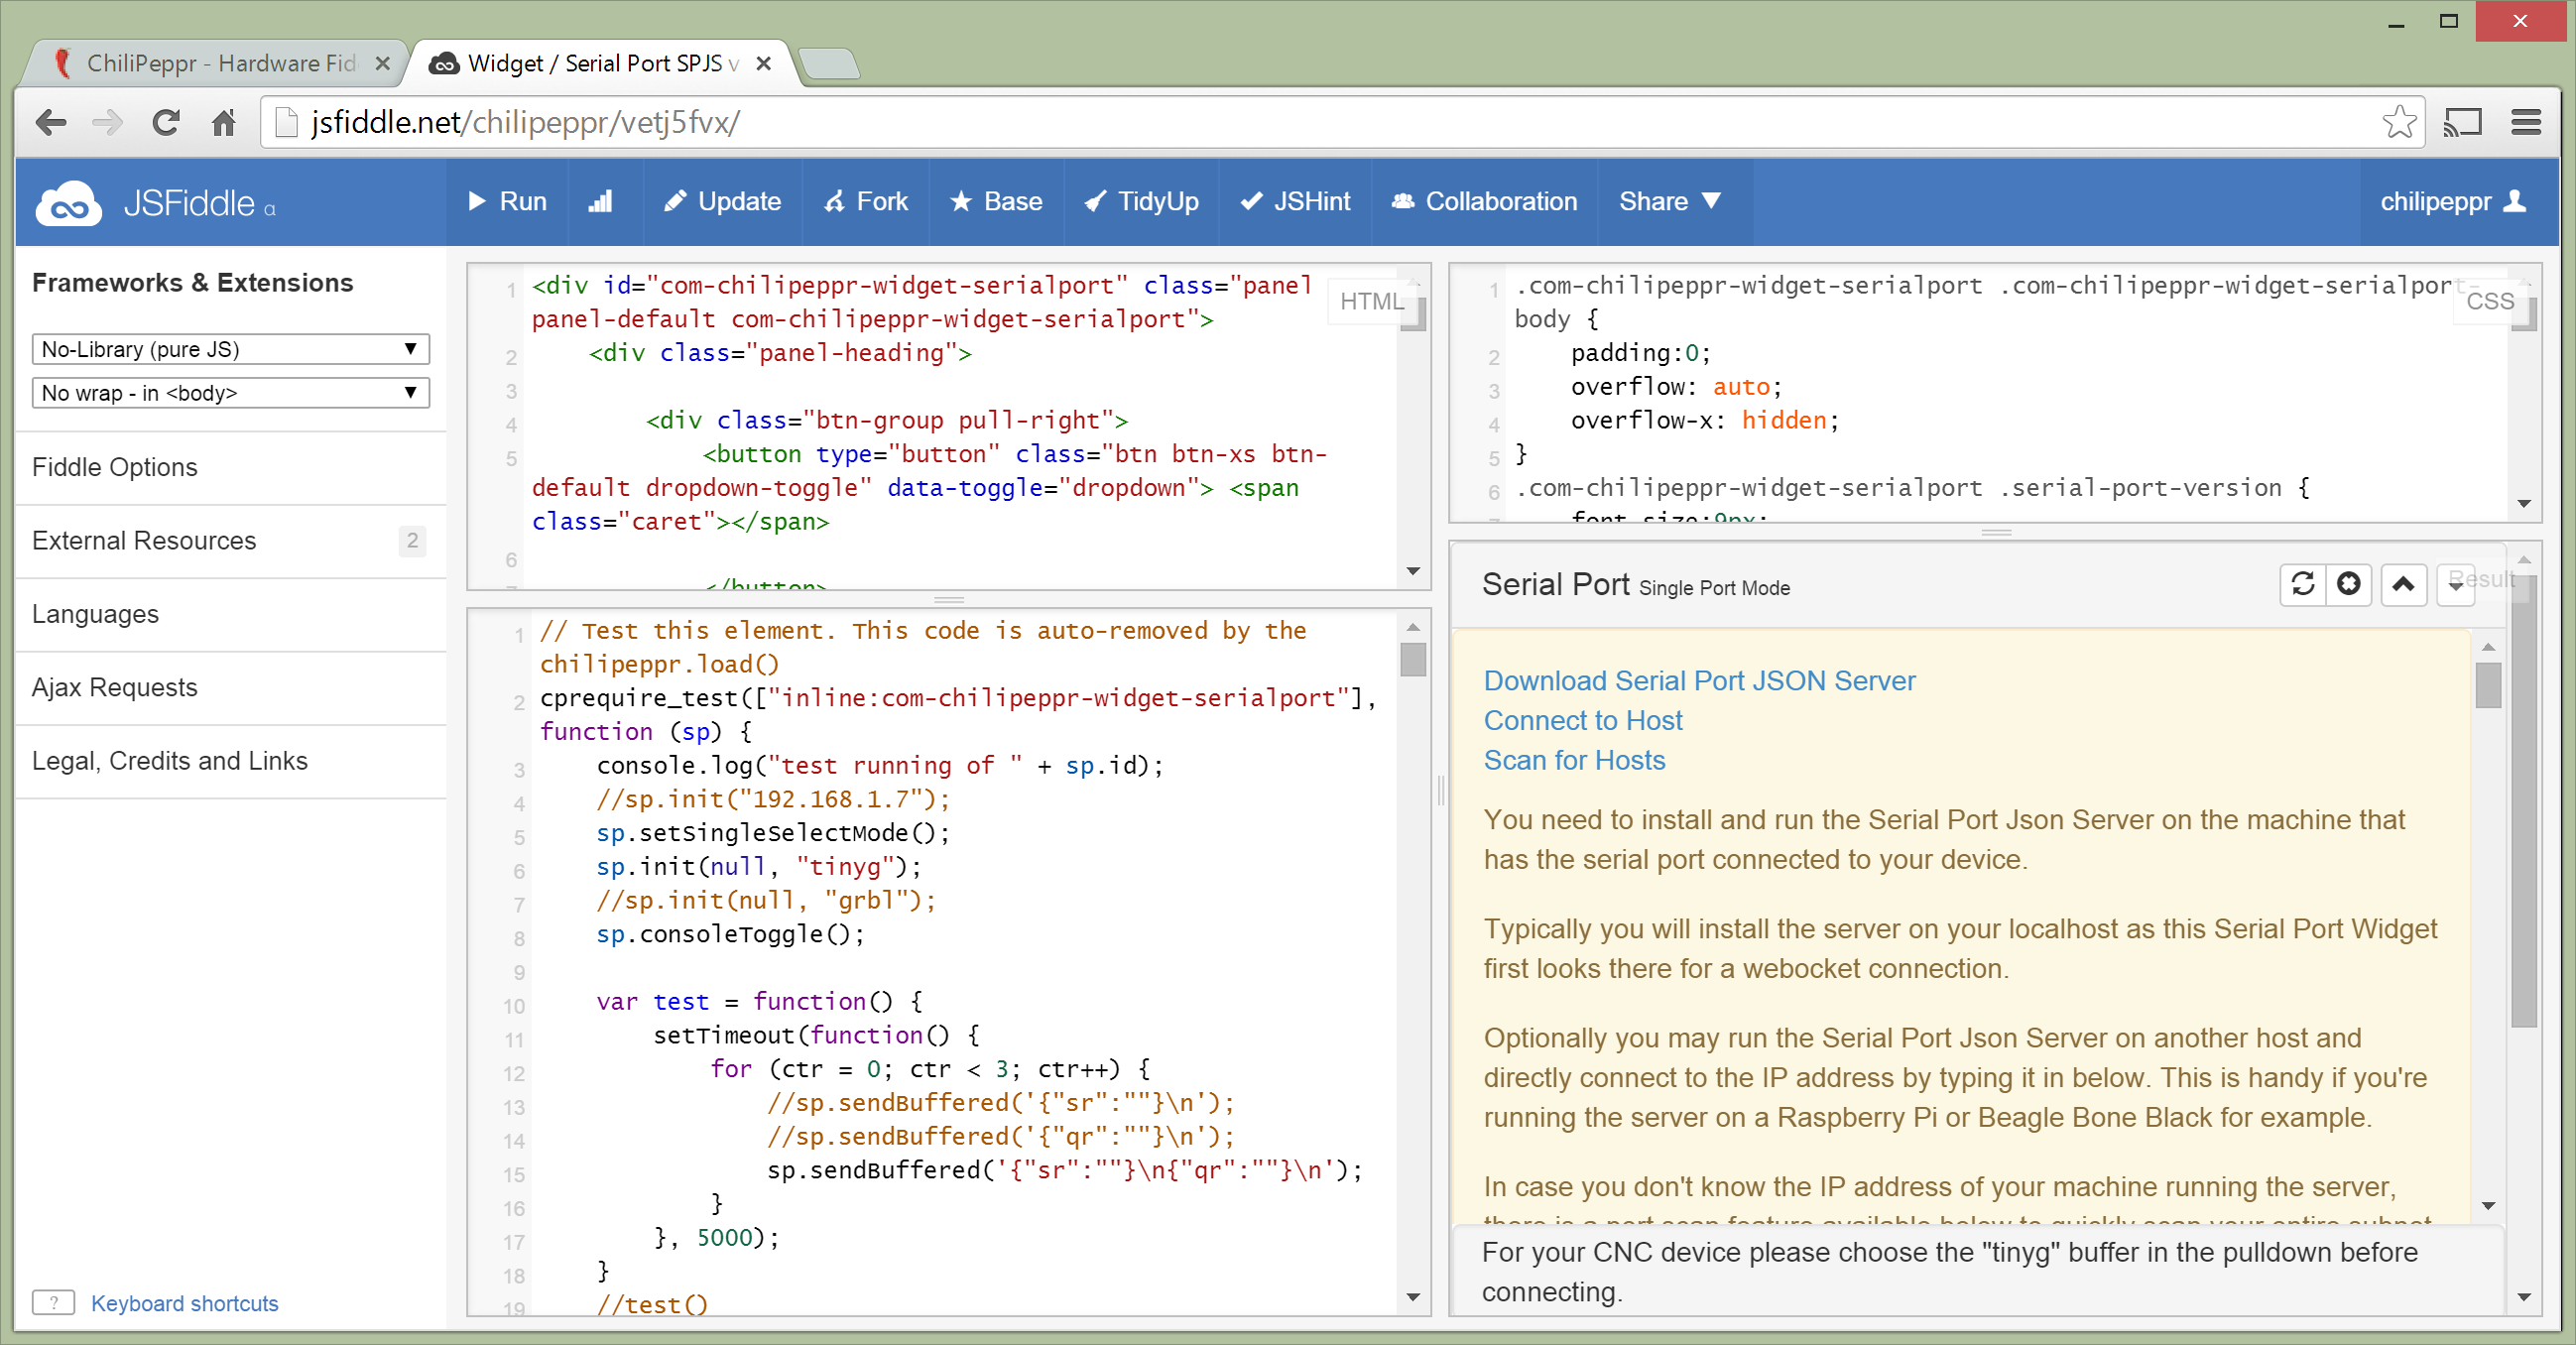
There is also a JSFiddle you can fork to create your own interface to the Serial Port JSON Server for your own project. http://jsfiddle.net/chilipeppr/vetj5fvx/
Running
From the command line issue the following command:
- Mac/Linux
./serial-port-json-server - Windows
serial-port-json-server.exe
Verbose logging mode:
- Mac/Linux
./serial-port-json-server -v - Windows
serial-port-json-server.exe -v
Running on alternate port:
- Mac/Linux
./serial-port-json-server -addr :8000 - Windows
serial-port-json-server.exe -addr :8000
Filter the serial port list so it has relevant ports in the list:
- Mac/Linux
./serial-port-json-server -regex usb|acm - Windows
serial-port-json-server.exe -regex com8|com9|com2[0-5]|tinyg
Garbage collect mode (deprecated):
- Mac/Linux
./serial-port-json-server -gc std - Windows
serial-port-json-server.exe -gc max
Override the default hostname:
- Mac/Linux
./serial-port-json-server -hostname myMacSpjs - Windows
serial-port-json-server.exe -hostname meWindowsBox
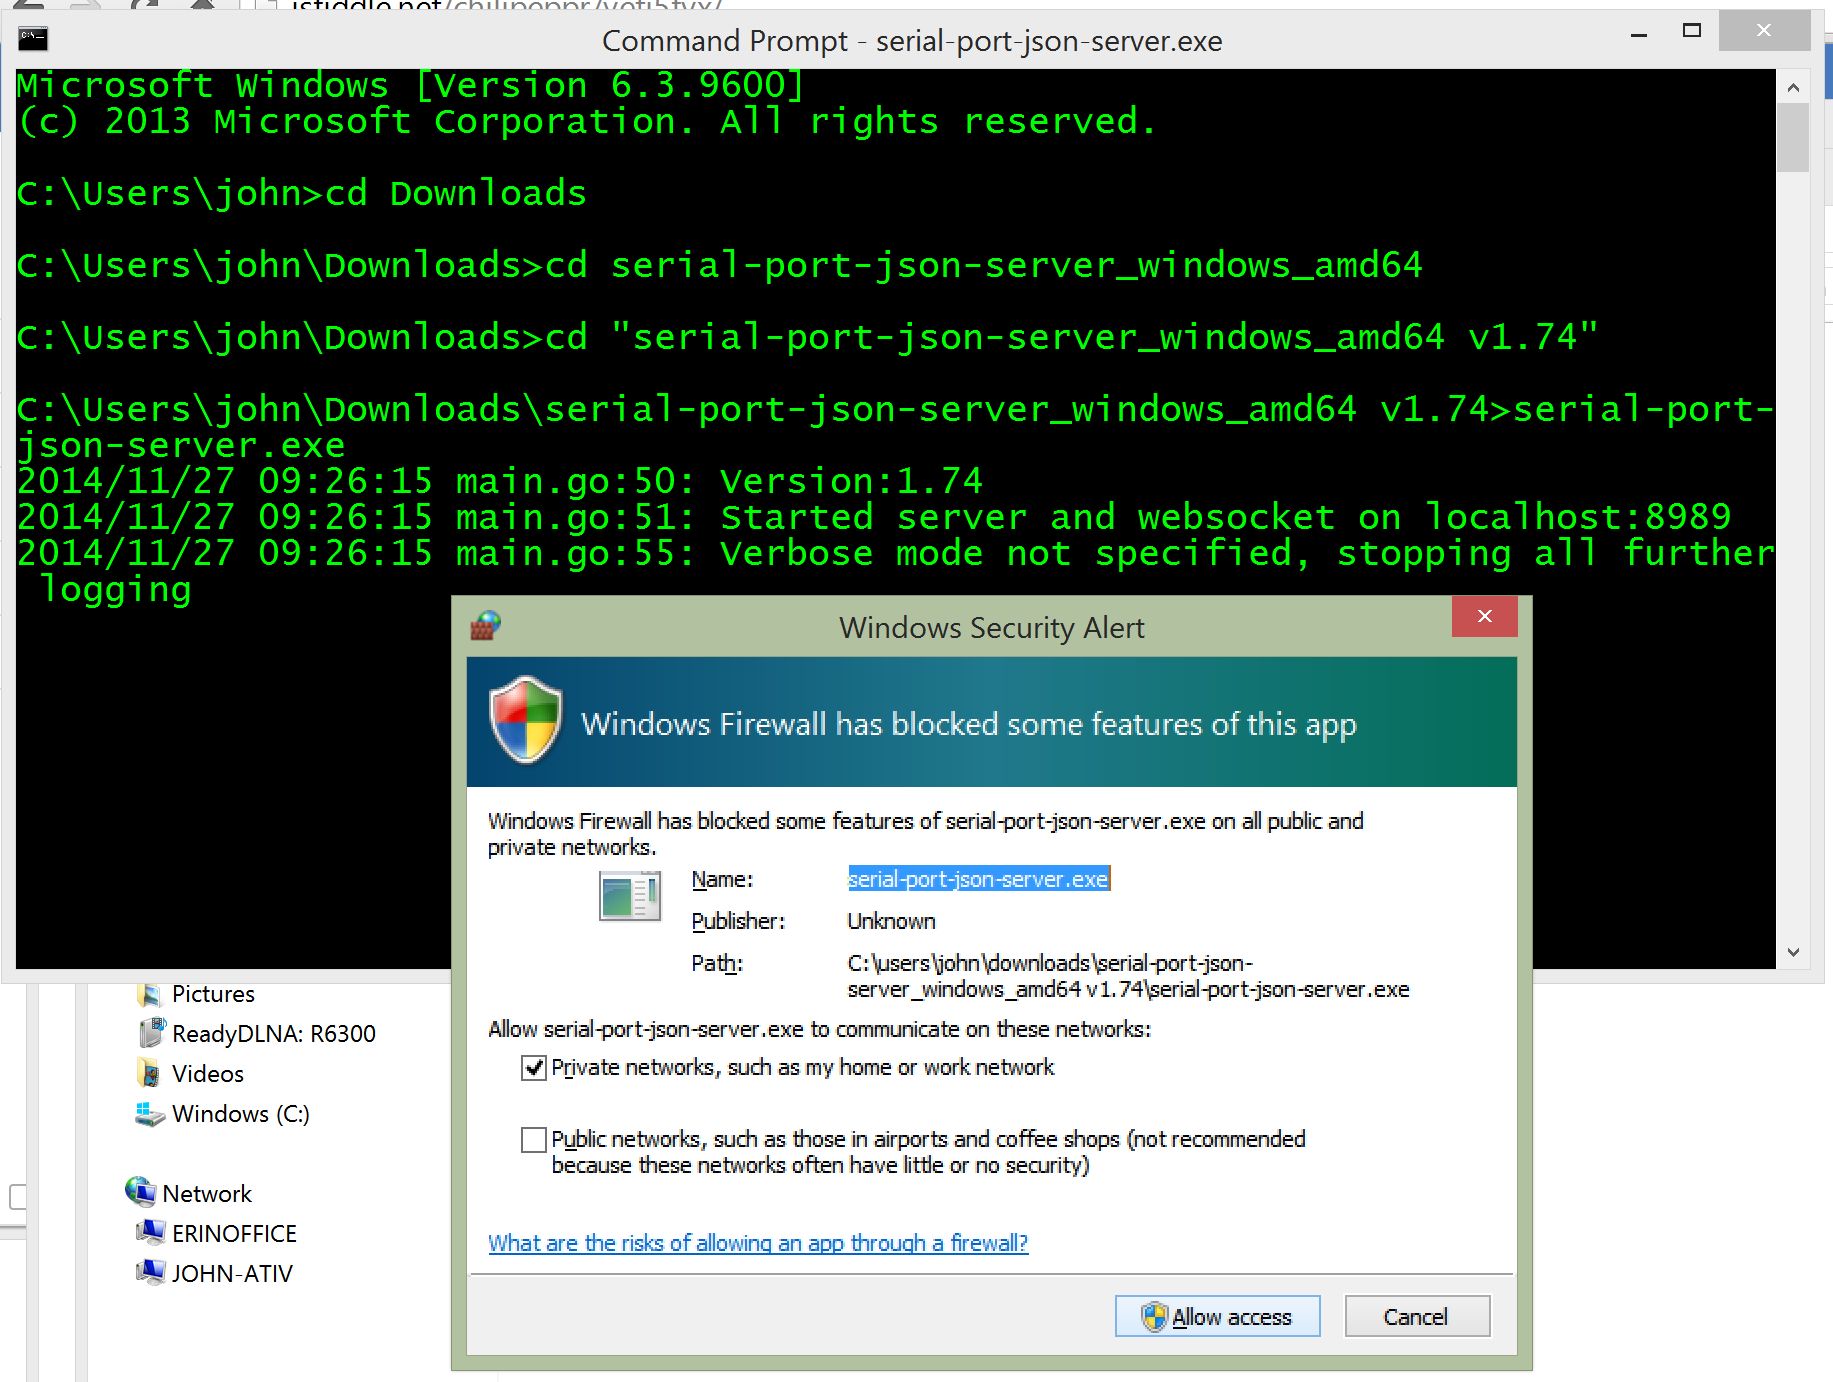
Here's a screenshot of a successful run on Windows x64. Make sure you allow the firewall to give access to Serial Port JSON Server or you'll wonder why it's not working.
Binaries for Download
Version 1.86 Build date: Oct 4, 2015 Latest TinyG buffer and firmware programmer.
- Windows x32
- Windows x64
- Mac OS X x64
- Linux x32
- Linux x64
- Raspberry Pi (Linux ARM)
- Beagle Bone Black (Linux ARMv7)
- Intel Edison (Linux x64)
Version 1.80 Build date: Mar 8, 2015 Build has new garbage collection, "broadcast" tag, and "hostname" tag support.
- Windows x32
- Windows x64
- Mac OS X x64 (Thanks to Riley Porter)
- Linux x32
- Linux x64
- Raspberry Pi 1 (Linux ARMv6)
- Raspberry Pi 2 (Linux ARMv7)
- Beagle Bone Black (Linux ARMv7)
- Linux ARMv8 (AppliedMicro X-Gene)
- Intel Edison (Linux x64)
Feed Rate Override
There is a new feature available as of version 1.83 which is Feed Rate Override. It can be triggered by sending in a command like the following:
fro COM4 0.5
This command asks SPJS to override the existing feed rate and reduce it by half. If you have a feedrate of 200 then the command above would bring it to 100 by multiplying 200 * 0.5 = 100. To turn off the feed rate override set it back to 0 with a command such as:
fro COM4 0.0
How to Build
You do not need to build this. Binaries are available above. However, if you still want to build...
Video tutorial of building SPJS on a Mac: https://www.youtube.com/watch?v=4Hou06bOuHc
- Install Go (http://golang.org/doc/install)
- If you're on a Mac, install Xcode from the Apple Store because you'll need gcc to compile the native code for a Mac. If you're on Windows, Linux, Raspberry Pi, or Beagle Bone you are all set.
- Get go into your path so you can run "go" from any directory: On Linux, Mac, Raspberry Pi, Beagle Bone Black export PATH=$PATH:/usr/local/go/bin On Windows, use the Environment Variables dialog by right-click My Computer
- Define your GOPATH variable and create the folder to match. This is your personal working folder for all yourGo code. This is important because you will be retrieving several projects from Github and Go needs to know where to download all the files and where to build the directory structure. On my Windows computer I created a folder called C:\Users\John\go and set GOPATH=C:\Users\John\go On Mac export GOPATH=/Users/john/go On Linux, Raspberry Pi, Beagle Bone Black, Intel Edison export GOPATH=/home/john/go On Windows, use the Environment Variables dialog by right-click My Computer to create GOPATH
- Change directory into your GOPATH
- Type "go get github.com/johnlauer/serial-port-json-server". This will retrieve this Github project and all dependent projects. It takes some time to run this.
- Then change direcory into src\github.com\johnlauer\serial-port-json-server.
- Type "go build" when you're inside that directory and it will create a binary called serial-port-json-server
- Run it by typing ./serial-port-json-server or on Windows run serial-port-json-server.exe
- If you have a firewall on the computer running the serial-port-json-server you must allow port 8989 in the firewall.
Supported Commands
| Command | Example | Description |
|---|---|---|
| list | Lists all available serial ports on your device | |
| open portName baudRate [bufferAlgorithm] | open /dev/ttyACM0 115200 tinyg | Opens a serial port. The comPort should be the Name of the port inside the list response such as COM2 or /dev/ttyACM0. The baudrate should be a rate from the baudrates command or a typical baudrate such as 9600 or 115200. A bufferAlgorithm can be optionally specified such as "tinyg" (or in the future "grbl" if somebody writes it) or write your own. |
| sendjson {} | {"P":"COM22","Data":[{"D":"!~\n","Id":"234"},{"D":"{\"sr\":\"\"}\n","Id":"235"}]} | See Wiki page at https://github.com/johnlauer/serial-port-json-server/wiki |
| send portName data | send /dev/ttyACM0 G1 X10.5 Y2 F100\n | Send your data to the serial port. Remember to send a newline in your data if your serial port expects it. |
| sendnobuf portName data | send COM22 {"qv":0}\n | Send your data and bypass the bufferFlowAlgorithm if you specified one. |
| close portName | close COM1 | Close out your serial port |
| bufferalgorithms | List the available bufferAlgorithms on the server. You will get a list such as "default, tinyg" | |
| baudrates | List common baudrates such as 2400, 9600, 115200 | |
| restart | Restart the serial port JSON server | |
| exit | Exit the serial port JSON server | |
| fro | fro COM 1.5 | Multiplies the current feed rate by the value passed in for the specific serial port. (This is specific to Gcode, so if using SPJS for non-Gcode work this command won't mean much.) |
| memstats | Send back data on the memory usage and garbage collection performance | |
| broadcast string | broadcast my data | Send in this command and you will get a message reflected back to all connected endpoints. This is useful for communicating with all connected clients, i.e. in a CNC scenario is a pendant wants to ask the main workspace if there are any settings it should know about. For example send in "broadcast this is my custom cmd" and get this reflected back to all connected sockets {"Cmd":"Broadcast","Msg":"this is my custom cmd\n"} |
| version | Get the software version of SPJS that is running | |
| hostname | Get the hostname of the current SPJS instance | |
| program portName core:architecture:name $path/to/filename | program com3 arduino:avr:uno c:\myfiles\grbl_9i.hex | Send a hex file to your Arduino board to program it. |
| programfromurl portName core:architecture:name url | programfromurl /dev/ttyACM0 arduino:sam:arduino_due_x http://synthetos.github.io/g2/binaries/TinyG2_Due-edge-078.03-default.bin | Download a hex/bin file from a URL and then send it to your Arduino board to program it. |
Programming Your Arduino from SPJS
The ability to program your board is now available within Serial Port JSON Server (SPJS). This feature was developed by the folks at Arduino because they are looking to use SPJS inside their upcoming Web IDE project. Therefore you can expect great support for this feature into the future as it will be the main way the IDE programs the boards. For folks using SPJS in other environments like ChiliPeppr, this means you'll be able to do firmware updates on your boards without much effort.
There are two new commands:
program [portName] [core:architecture:name] [$path/to/filename]
programfromurl [portName] [core:architecture:name] [url]
These commands are identical except for one parameter that specifies where the binary hex/bin file is. With the program command you specify a file path. With programfromurl you specify a public URL.
This example command will update your Arduino Due with the latest TinyG G2 firmware for your CNC machine. It will download the bin file from Github and flash it to an Arduino Due running on the ttyACM0 serial port on a Raspberry Pi 2.
programfromurl /dev/ttyACM0 arduino:sam:arduino_due_x http://synthetos.github.io/g2/binaries/TinyG2_Due-edge-078.03-default.binThis example will update your Arduino Uno running on a Windows computer with the latest version of Grbl from a public URL.
programfromurl com12 arduino:avr:uno https://raw.githubusercontent.com/grbl/grbl-builds/master/builds/grbl_v0_9i_atmega328p_16mhz_115200.hexThe 2nd parameter of core:architecture:name specifies which board you're trying to program so that SPJS can figure out what programmer and parameters should be used to send the hex/bin file up to your device. The choices can be seen in the boards.txt file in the distribution, but here is a partial list for quick reference:
- arduino:avr:uno
- arduino:avr:yun
- arduino:avr:diecimila
- arduino:avr:nano
- arduino:avr:mega
- arduino:avr:megaADK
- arduino:avr:leonardo
- arduino:avr:micro
- arduino:avr:esplora
- arduino:avr:mini
- arduino:avr:ethernet
- arduino:avr:fio
- arduino:avr:bt
- arduino:avr:LilyPadUSB
- arduino:avr:lilypad
- arduino:avr:pro
- arduino:avr:atmegang
- arduino:avr:robotControl
- arduino:avr:robotMotor
- arduino:sam:arduino_due_x_dbg
- arduino:sam:arduino_due_x
- arduino:avr:tinyg (TinyG v7/v8. For G2 use due_x_dbg.)
Broadcast Command
There is a growing need for end-clients of SPJS to be able to chat with eachother. Therefore a new command has been added called "broadcast". It's not a very sophisticated feature because it simply regurgitates out whatever is after the broadcast command back to all connected clients. This simplistic approach means any user can implement any command they would like via the broadcast command and create unique solutions via SPJS.
For example, if a pendant controller for your CNC is connected to SPJS and trying to figure out if the ChiliPeppr main workspace has some stored settings for your pendant, it could send out a command like:
broadcast get-settings
And SPJS would regurgitate the command to all connected sockets like:
{"Cmd":"Broadcast","Msg":"get-settings\n"}
And if the ChiliPeppr workspace were listening for all incoming {"Cmd":"Broadcast","Msg":...} signals and specifically the "get-settings" command then it could respond with something like:
broadcast settings x:1, y:10, z:4
Interesting Branches of SPJS
https://github.com/benjamind/gpio-json-server/
This is a very interesting branch on this project where Ben took the basic code layout, websocket, and command structure and created a GPIO server version of this app. It's such an interesting and awesome project, it makes me want to combine his code into SPJS to make a full-blown version of serving up hardware ports via JSON and websockets--whether they're serial ports or GPIO ports. Something about that just feels right. The only downside is that no Windows or Mac machines have GPIO, so it would be a very Raspberry Pi specific feature.
FAQ
-
Q: There are several Node.js serial port servers. Why not write this in Node.js instead of Go?
-
A: Because Go is a better solution for several reasons.
- Easier to install on your computer. Just download and run binary. (Node requires big install)
- It is multi-threaded which is key for a serial port websocket server (Node is single-threaded)
- It has a tiny memory footprint using about 3MB of RAM
- It is one clean compiled executable with no dependencies
- It makes very efficient use of RAM with amazing garbage collection
- It is super fast when running
- It launches super quick
- It is essentially C code without the pain of C code. Go has insanely amazing threading support called Channels. Node.js is single-threaded, so you can't take full advantage of the CPU's threading capabilities. Go lets you do this easily. A serial port server needs several threads. 1) Websocket thread for each connection. 2) Serial port thread for each serial device. Serial Port JSON Server allows you to bind as many serial port devices in parallel as you want. 3) A writer and reader thread for each serial port. 4) A buffering thread for each incoming message from the browser into the websocket 5) A buffering thread for messages back out from the server to the websocket to the browser. To achieve this in Node requires lots of callbacks. You also end up talking natively anyway to the serial port on each specific platform you're on, so you have to deal with the native code glued to Node.
Startup Script for Linux
Here's a really lightweight /etc/init.d startup script for use on Linux like with a Raspberry Pi, Beable Bone Black, Odroid, Intel Edison, etc.
Create a text file inside /etc/init.d called serial-port-json-server, for example:
sudo nano /etc/init.d/serial-port-json-server
Then make sure the file contents contain the following script, but make sure to update the path to your serial-port-json-server binary. This example has the binary in /home/pi but yours may differ.
#! /bin/sh
### BEGIN INIT INFO
# Provides:          serial-port-json-server
# Required-Start:    $all
# Required-Stop:
# Default-Start:     2 3 4 5
# Default-Stop:      0 1 6
# Short-Description: Manage my cool stuff
### END INIT INFO

PATH=/usr/local/sbin:/usr/local/bin:/usr/sbin:/usr/bin:/sbin:/bin:/opt/bin

. /lib/init/vars.sh
. /lib/lsb/init-functions
# If you need to source some other scripts, do it here

case "$1" in
  start)
    log_begin_msg "Starting Serial Port JSON Server service"
# do something
        /home/pi/serial-port-json-server_linux_arm/serial-port-json-server -regex usb|acm &
    log_end_msg $?
    exit 0
    ;;
  stop)
    log_begin_msg "Stopping the Serial Port JSON Server"

    # do something to kill the service or cleanup or nothing
    killall serial-port-json-server
    log_end_msg $?
    exit 0
    ;;
  *)
    echo "Usage: /etc/init.d/serial-port-json-server {start|stop}"
    exit 1
    ;;
esac
Then you need to run the following command to setup your /etc/init.d script so it starts on boot up of your computer...
sudo update-rc.d serial-port-json-server defaults
And of course to manually start/stop the service:
sudo service serial-port-json-server stop
sudo service serial-port-json-server start
Revisions
Changes in 1.87
- Added exec and execruntime commands. The exec command lets you simply execute any command on the host operating system as if you were logged in at the command line. This is similar to the program command which essentially was executing a command on the command line. However, now you can do any command you want. Make sure your host OS is behind a firewall as this method opens up your device to any command being executed on it. Changes in 1.86
- Rewrote "tinyg" buffer to use better locking technique on in/out thread to remove chance that r:{}'s are lost and jobs get paused mysteriously. Now report {"Lbs":xx} which is a LocalBufferSize report that tells the UI how many characters are in the TinyG buffer from SPJS's perspective. This will help users see if in fact there is a mis-sync between what SPJS thinks is in the TinyG buffer and what actually is in that buffer. The {"Lbs":0} value will be reported back after every r:{} received from TinyG.
- Added "Pause" value in sendjson command so you can ask SPJS to pause after sending a serial command. This was needed because on Atmel processors during an EEPROM write all data is dropped that is sent in on the serial lines. To use this value, send in a sendjson command similar to the following:
sendjson {"P":"COM7","Data":[{"D":"{\"ej\":1}\n","Id":"tinygInit-cmd182","Pause":50}]} - Added "tinyg_tidmode" buffer which is the most advanced buffer ever added to SPJS. This buffer uses a primary key for each line sent to TinyG and TinyG sends back the primary key as it processes each line. This means that SPJS will be in 100% perfect sync with TinyG. This will solve the longstanding hard-to-find bug where users would occasionally get random pausing because SPJS thought TinyG's buffer was full, but it really wasn't.
Changes in 1.85
- Moved back to original serial library that was used in 1.80 and away from the new one that the Arduino team added that was used in 1.83. Too many problems were happening with mangled characters in 1.83.
Changes in 1.84
- Added TinyG Line Mode (also referred to as Packet Mode). This sends data to TinyG in a different way to try to make sure no buffers overflow in either direction but there also is no pausing either like some users have reported on longer jobs.
- Added feed rate override. Send in a command like "fro COM7 1.5" to multiply the feed rate by 1.5x.
Changes in 1.83
- Rebased with BFG to remove old binaries that were bloating the Github repo. Repo was 230MB and is now 10MB. Please clone new repos from scratch as of 7/19/15 so you get the new rebased repo if you are going to do any pull requests in the future.
- Added Marlin buffer courtesy of Peter van der Walt
Changes in 1.82
- Thanks go to https://github.com/facchinm from Arduino.cc for the changes in 1.82.
- You can now program your Arduino by using the program command in SPJS.
- Avrdude and Bossac are now included in the binary distributions for each platform.
- The serial library has been replaced with one from https://github.com/cmaglie to solve some long-standing bugs including a connection handshake and ports not closing correctly on all platforms.
Changes in 1.81
- On Linux, SPJS now tries to grab the Manufacturer and Name of the serial port to give you pretty names for your connected devices. Arduinos and TinyGs show up with nicely descriptive names now instead of just ttyUSB0 or ttyACM0.
Changes in 1.80
- "Broadcast" command added which simply regurgitates out to all clients whatever is sent in. Allows for end-client to end-client communication via SPJS.
- "Hostname" was added whereby SPJS now tries to figure out the hostname of the machine running SPJS and pass it back to the end-clients. This helps to differentiate multiple SPJS's on your network. You can set this from the command line as well on launch.
- Garbage collection improvement. Golang 1.4 got some big garbage collection improvements. This is the first time SPJS was built with this new version of golang for the binaries made publicly available.
Changes in 1.77
- Completely fixed stalled jobs. This was due to garbage collection doing a "stop the world" so the fix was to force garbage collection on key events.
Changes in 1.76
- Somewhat fixed stalled jobs (they're not perfect yet, but you can simply hit the ~ in ChiliPeppr to resume the job if it stalls) whereby the serial buffer from the serial device to Serial Port JSON Server could overflow because SPJS was handling blocking websocket send operations. The sending back of data to the client is now de-coupled from the incoming serial stream via a buffered golang channel. Prior to this change it was an unbuffered channel, so it was a different thread, but it could block on write across the boundary.
- Added restart and exit commands
- Added serial port list readout on startup
- Added ability to filter list based on regular expression by adding -regexp myfilter to the command line
Changes in 1.75
- Tweaked the order of operations for pausing/unpausing the buffer in Grbl and TinyG to account for rare cases where a deadlock could occur. This should guarantee no dead-locking.
- Jarret Luft added an artificial % buffer wipe to Grbl buffer to mimic to some degree the buffer wiping available on TinyG.
Changes in 1.7
- sendjson now supported. Will give back onQueue, onWrite, onComplete
- Moved TinyG buffer to serial byte counting.
Changes in 1.6
- Logging is now off by default so Raspberry Pi runs cleaner. The immense amount of logging was dragging the Raspi down. Should help on BeagleBone Black as well. Makes SPJS run more efficient on powerful systems too like Windows, Mac, and Linux. You can turn on logging by issuing a -v on the command line. This fix by Jarret Luft.
- Added EOF extra checking for Linux serial ports that seem to return an EOF on a new connect and thus the port was prematurely closing. Thanks to Yiannis Mandravellos for finding the bug and fixing it.
- Added a really nice Grbl bufferAlgorithm which was written by Jarret Luft who is the creator of the Grbl workspace in ChiliPeppr.
- The buffer counts each line of gcode being sent to Grbl up to 127 bytes and then doesn't send anymore data to Grbl until it sees an OK or ERROR response from Grbl indicating the command was processed. For each OK|ERROR the buffer decrements the counter to see how much more room is avaialble. If the next Gcode command can fit it is sent immediately in.
- This new Grbl buffer should mirror the stream.py example code from Sonny Jeon who maintains Grbl. This Serial Port JSON Server should now be able to execute the commands faster than anything out there since it's written in Go (which is C) and is compiled and super-fast.
- Position requests occur inside this buffer where a ? is sent every 250ms to Grbl such that you should see a position just come back on demand non-stop from Grbl. It could be possible in a future version to only queue these position reports up during actual Gcode commands being sent so that when idle there are not a ton of position updates being sent back that aren't necessary.
- Soft resets (Ctrl-x) now wipe the buffer.
- !~? will skip ahead of all other commands now. This is important for jogging or using ! as a quick stop of your controller since you can have 25,000 lines of gcode queued to SPJS now and of course you would want these commands to skip in front of that queue.
- Feedhold pauses the buffer inside SPJS now.
- Cycle resume ~ unpauses the buffer inside SPJS now.
- When using this buffer data is sent back in a per line mode rather than as characters are received so there is more efficiency on the websocket.
- Checks for the grbl init line indicating the arduino is ready to accept commands
Changes in 1.5
- For TinyG buffer, moved to slot counter approach. The buffer planner approach was causing G2/G3 commands to overflow the buffer because the round-trip time was too off with reading QR responses. So, moved to a 4 slot buffer approach. Jogging is still a bit rough in this approach, but that can get tweaked. The new slot approach is more like counting serial buffer queue items. SPJS sends up to 4 commands and then waits for a r:{} json response. It has intelligence to know if certain commands won't get a response like !~% or newlines, so it doesn't look for slot responses and just blindly sends. The only danger is if there are 4 really long lines of Gcode that surpass the 254 bytes in the serial buffer then we could overflow. Could add trapping for that.
Changes in 1.4
- Added reporting on Queuing so you know what the state of the Serial Port JSON Server Queue is doing. The reason for this is to ensure your serial port commands don't get out of order you will want to make sure you write to the websocket and then wait for the {"Cmd":"Queued"} response. Then write your next command. This is necessary because when sending different frames across a websocket over the Internet, you can get packet retransmissions, and although you'll never lose your data, your serial commands could arrive at the server out of order. By watching that your command is queued, you are safe to send the next command. However, this can also slow things down, so now you can simply gang up multiple commands into one send and the Serial Port JSON Server will split them into separate sub-commands and tell you that it did in the queue and write reports.
- For example, a typical queue report looks like {"Cmd":"Queued","QCnt":61,"Type":["Buf"],"D":["{\"sr\":\"\"}\n"],"Port":"COM22"}.
- If you send something like: send COM22 {"sr":""}\n{"qr":""}\n{"sr":""}\n{"qr":""}\n. You will get back a queue report like {"Cmd":"Queued","QCnt":4,"Type":["Buf","Buf","Buf","Buf"],"D":["{\"sr\":\"\"}\n","{\"qr\":\"\"}\n","{\"sr\":\"\"}\n","{\"qr\":\"\"}\n"],"Port":"COM22"}
- When two queue items are written to the serial port you will get back something like {"Cmd":"Write","QCnt":1,"D":"{\"qr\":\"\"}\n","Port":"COM22"}{"Cmd":"Write","QCnt":0,"D":"{\"sr\":\"\"}\n","Port":"COM22"}
- Fixed analysis of incoming serial data due to some serial ports sending fragmented data.
- Added bufferalgorithms and baudrates commands
- A new command called sendnobuf was added so you can bypass the bufferflow algorithm. This command only is worth using if you specified a bufflerFlowAlgorithm when you opened the serial port. You use it by sending "sendnobuf com4 G0 X0 Y0" and it will jump ahead of the queue and go diretly to the serial port without hesitation.
- TinyG Bufferflow algorithm.
- Looks for qr responses and if they are too low on the planner buffer will trigger a pause on send.
- Looks for qr responses and if they are high enough to send again the bufferflow is unblocked.
- If you pause with ! then the bufferflow also pauses.
- If you resume with ~ then the bufferflow also resumes.
- If you wipe the buffer with % then the bufferflow also wipes.
- When you send !~% it automatically is sent to TinyG without buffering so it essentially skips ahead of all other buffered commands. This mimics what TinyG does internally.
- If you ask qr reports to be turned off with a $qv=0 or {"qv":0} then bypassmode is entered whereby no blocking occurs on sending serial port commands.
- If you ask qr reports to be turned back on with $qv=1 (or 2 or 3) or {"qv":1} (or 2 or 3) then bypassmode is turned off.
- If a qr reponse is seen from TinyG then BypassMode is turned off automatically.
Changes in 1.3
- Added ability for buffer flow plugins. There is a new buffer flow plugin for TinyG that watches the {"qr":NN} response. When it sees the qr value go below 12 it pauses its own sending and queues up whatever is still coming in on the Websocket. This is fine because we've got plenty of RAM on the websocket server. The {"qr":NN} value is still sent back on the websocket as soon as it was before, so the host application should see no real difference as to how it worked before. The difference now though is that the serial sending knows to check if sending is paused to the serial port and queue. This makes sure no buffer overflows ever occur. The reason this was becoming important is that the lag time between the qr response and the sending of Gcode was too distant and this buffer flow needs resolution around 5ms. Normal latency on the Internet is like 20ms to 200ms, so it just wasn't fast enough. If the Javascript hosting the websocket was busy processing other events, then this lag time became even worse. So, now the Serial Port JSON Server simply helps out by lots of extra buffering. Go ahead and pound it even harder with more serial commands and see it fly.
Changes in 1.2
- Added better error handling
- Removed forcibly adding a newline to the serial data being sent to the port. This means apps must send in a newline if the serial port expects it.
- Embedded the home.html file inside the binary so there is no longer a dependency on an external file.
- TODO: Closing a port on Beagle Bone seems to hang. Only solution now is to kill the process and restart.
- TODO: Mac implementation seems to have trouble on writing data after a while. Mac gray screen of death can appear. Mac version uses CGO, so it is in unsafe mode. May have to rework Mac serial port to use pure golang code.